
Bricked Your Vivo V30 Pro? Heres A Full Solution | Dr.fone
Bricked Your Vivo V30 Pro? Here’s A Full Solution
A bricked phone is a device that won’t turn on no matter what you do and everything you try to do to fix it doesn’t work. Most people will tell you that there is really nothing you can do to fix a bricked device. But with the right information, the right buttons to push and useful additional software you can actually try to fix a bricked device.
In this article we are going to look at how you can fix your device if you are sure it is bricked, how to rescue the data on your bricked device and even how you can avoid this situation in the future.

Part 1: Rescue the data on your Bricked Android Phone
Before we can learn how to fix a bricked device, it is important that you are able to save the data that is on the Vivo V30 Pro device. Having the data saved somewhere else will be the added insurance you need in case anything goes wrong during the process. There are very few software solutions in the market to help you get back data from a bricked device. One of these and the most reliable is Wondershare Dr.Fone - Data Recovery (Android) .
Dr.Fone - Data Recovery (Android)
World’s 1st Android smartphone and tablet recovery software.
- Recover data from broken Android in different situations.
- Scan and preview files before starting the retrieval process.
- SD card recovery on any Android devices.
- Recover contacts, messages, photos, call logs, etc.
- It works great with any Android devices.
- 100% safe to use.
4,771,974 people have downloaded it
How to Use Dr.Fone - Data Recovery (Android) to Rescue Data from a Bricked Android
If your device is completely unresponsive, don’t worry Dr.Fone can help you get all the data back. Simply follow these steps to gain access to the Vivo V30 Pro device and recover all your data.
Step 1: Download and install Wondershare Dr.Fone to your PC. Launch the program and then click on Data Recovery. Select the data types you would like to recover and then click on Next.

Step 2. Select the issue type for your phone. Choose from “Touch screen not responsive or cannot access the phone” or “Black/broken screen”.
 ZoneAlarm Pro Antivirus + Firewall NextGen

Step 3: In the next step, you need to select your device model. If you don’t know the model of your device click on “How to check the Vivo V30 Pro device model” to get help.


Step 4: The next screen will provide instructions on how to enter “Download mode.” Connect the Vivo V30 Pro device to your PC once it is in “Download Mode”


Step 5: The program will begin an analysis of your device and then download the recovery package.

Step 6: Then Dr.Fone will display all the recoverable file types. You can click on the files to preview them. Select the ones you need and click on “Recover to Computer” to save them to your computer.


Part 2: How to Fix Your Bricked Android Phone
Android devices are usually very flexible in allowing users to flash ROM but sometimes an incorrect process can result in a bricked device. While there are few solutions to this problem, here are a few things you can do;
When the Vivo V30 Pro device Boots Straight into Recovery
If the Vivo V30 Pro device can boot to the recovery screen, you can find an alternative ROM to install and copy it your device. Installation can then be done in the recovery menu. If the Vivo V30 Pro device is booting to recovery mode there is a chance that it can be fixed.
Step 1: Load up Clockworkmod or any other recovery tool that you have been using.
Step 2: Once you are in, navigate to the “Reboot system now.” If you are using Clockworkmod, this should be your first option. Hopefully everything will work just right if you do this, If it doesn’t you may need to download and re-flash the ROM again.

Key features:
• Import from any devices and cams, including GoPro and drones. All formats supported. Сurrently the only free video editor that allows users to export in a new H265/HEVC codec, something essential for those working with 4K and HD.
• Everything for hassle-free basic editing: cut, crop and merge files, add titles and favorite music
• Visual effects, advanced color correction and trendy Instagram-like filters
• All multimedia processing done from one app: video editing capabilities reinforced by a video converter, a screen capture, a video capture, a disc burner and a YouTube uploader
• Non-linear editing: edit several files with simultaneously
• Easy export to social networks: special profiles for YouTube, Facebook, Vimeo, Twitter and Instagram
• High quality export – no conversion quality loss, double export speed even of HD files due to hardware acceleration
• Stabilization tool will turn shaky or jittery footage into a more stable video automatically.
• Essential toolset for professional video editing: blending modes, Mask tool, advanced multiple-color Chroma Key

When the Vivo V30 Pro device won’t stop rebooting
Here’s what to do if the Vivo V30 Pro device wont stop rebooting.
Step 1: Turn off the Vivo V30 Pro device and then reboot in recovery mode.
Step 2: Go to “Advanced” which will bring up a number of options to choose from.
Step 3: One of the options should be “Wipe Dalvik cache” select this option and then follow the instructions. When finished select “Go Back” to return to the main menu.

Step 4: Go to the “Wipe Cache Partition” and select it.
Step 5: Go to “Wipe data/ factory reset.”

Step 6: Finally reboot the Vivo V30 Pro device by selecting “Reboot system now.” This should fix the problem. You may also want to flash the same ROM or try a new one.
If the above methods don’t work, try one of the following options.
You can return to resource where you found the flash tools and search or ask for advice
Sometimes these errors can be caused if the ROM installation was performed via SD card. In this case reformatting the SD card might help.
If all else fails, it is time to returning the Vivo V30 Pro device to the vendor if your warranty is still applicable.

Part 3: Useful Tips to avoid Bricking your Android Phone
If you are planning on installing custom ROM you need to install Custom Recovery. This will enable you restore the Vivo V30 Pro device to its original settings should anything go wrong and hopefully help you avoid bricking your device.
- Ensure that you are familiar with the Fastboot or ADB commands before doing anything. You should know how to recover your device by flashing a command line and also manually transfer important files to your device.
- Make a backup of your device. This is obvious but most people fail to adhere to it. At the very least you can get back all your files and settings to transfer to a new phone.
- Keep a full Nandroid backup on your phone
- Keep another backup on your PC which you can access should anything go wrong with the Custom ROM installation
- Know how to hard reset your device. It may come in handy when your device freezes on you.
- You should also consider enabling USB debugging. This is because many solutions for a Bricked device rely on USB debugging.
- Ensure the Custom ROM you choose can actually be used on your device model.
While installing Custom ROM can actually be a great way to customize your device, it is also the leading reason for bricked devices. Therefore ensure that you understand what you are doing when you decide to customize your device. Learn as much as you can about the process before attempting everything.
Vivo V30 Pro Not Connecting to Wi-Fi? 12 Quick Ways to Fix
Nowadays, it’s pretty much essential to have your Vivo V30 Pro or smartphone connected to the internet. Whether you’re watching videos, looking something up, or using any kind of app, you need the internet for these applications to function correctly.
This is why it can so annoying when it gets to a point where the internet connection isn’t working. However, the problem of a web page not loading correctly is just the tip of the iceberg.
There are plenty of problems you could experience, whether it’s the Wi-Fi network keeps disconnecting on its own without any warning, perhaps a security issue where the passcode or IP address isn’t being registered properly, or even if the connection is just being super slow, even if there’s no reason too.
Luckily, despite there being so many problems out there, there are also many solutions. Today, we’re going to share with you the complete definitive guide to help you get your Vivo V30 Pro connected and free from problems and issues.
Part 1: Restart your Vivo V30 Pro
Begin by powering off your Vivo V30 Pro and unplugging your router. Wait for about a minute before plugging in the router and turning on your device. This simple reset can often restore stable connections and fix Android wifi not working.


Part 2: Turn on Airplane mode and turn off
Turn on Airplane Mode for a few seconds, then turn it off. This maneuver refreshes your device’s network connections and might rectify the Android not connecting to wifi issue.

Part 3. Check Wi-Fi Router settings
The third step you’ll want to take is making sure the internet router in your house is working properly and is actually sending internet data to your Vivo V30 Pro. Of course, if you have other internet-enabled devices connected to the same router and they’re working fine, you know this isn’t the problem.
However, if you’ve got a problem with Wi-Fi not working on your Android and other devices in your home or office, you know you’ve got a router problem. Here’s how to solve it.
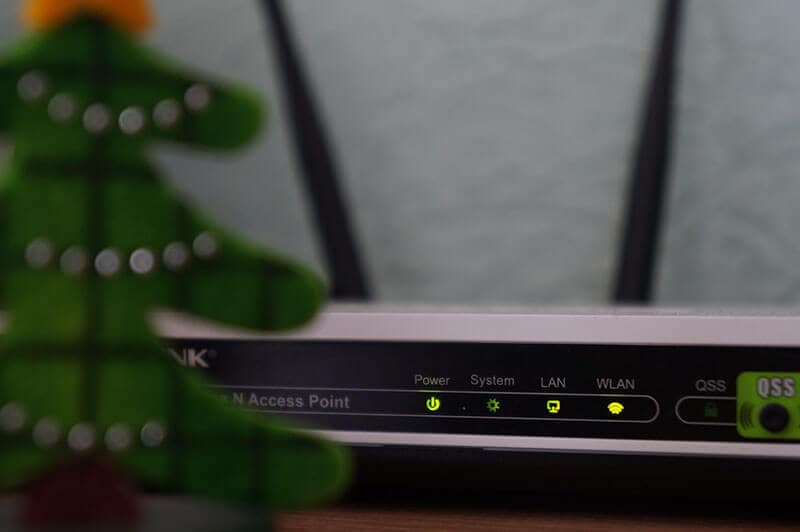
- Go to your internet router and check the indicator lights
- While this depends on your device, a green or blue light will mean the connection is good, whereas a red light indicates a problem
- Press the Restart button on your router and wait ten minutes before reconnecting your device and connecting again
- Call up your internet provider to see if there’s an internet connection issue in your area
- Open your web browser and log into your router settings to ensure your Vivo V30 Pro is connected to the Wi-Fi network and is allowed to send and receive data
 LYRX is an easy-to-use karaoke software with the professional features karaoke hosts need to perform with precision. LYRX is karaoke show hosting software that supports all standard karaoke file types as well as HD video formats, and it’s truly fun to use.
Part 4. Boot your Android in safe mode

If you’re unable to connect to the internet, but other devices have no issues, you may find the issues is coming from within your Vivo V30 Pro itself. Fortunately, there are ways you can see whether this is the problem.
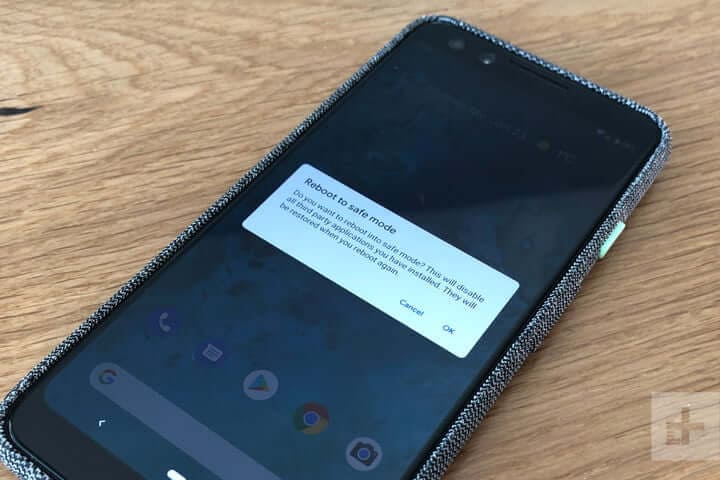
The best way to do this is to boot your device in Safe Mode. The process for doing this will depend on the make and model of your Vivo V30 Pro, but the basic process goes as follows;
- Turn off your Vivo V30 Pro by holding down the Power button and tapping Power Off. Wait a few minutes to ensure the Vivo V30 Pro device is completely off
- Press and hold the Power button to turn your phone on, but the press and hold both the volume up and volume down buttons at the same time
- You will see the words ‘Safe Mode’ appear on your screen as the Vivo V30 Pro device loads
- Now you will be booted in Safe Mode. Try connecting to the internet again to see if it works
If your device connects to the internet while in Safe Mode, you’ll know you have a problem with an app or service that’s running on your device. If this is the case, you’ll need to go through your apps and delete them and then reinstall them one at a time until you find the app or service that is causing your internet problems.
Part 5. Check the Android Wi-Fi adapter
If you’re using a Wi-Fi adapter on your device to connect to the internet, you’ll need to make sure this is working. This could be an adapter on your Vivo V30 Pro itself, especially if you’re using an older device, or if you’re using an adapter to boost the ranger of your router network.
You need to check both of these to make sure your connection is working properly.
- If using an Android Wi-Fi adapter, make sure all the Vivo V30 Pro device drivers are up to date, and if you’re using an app, make sure the app is updated, and all the settings allow an internet connection
- If you’re using a router adapter, make sure it’s set up properly, and your Vivo V30 Pro is connected to the adapter using the correct passwords. Try connecting another device to see if the internet connection is working on there
- Whichever method you’re using, try disconnecting your Vivo V30 Pro and forgetting the network, and then reconnecting and entering the right password to refresh the connection
 OtsAV TV Webcaster
Part 6. Check SSID and IP address on Android
To make a Wi-Fi connection work, your Vivo V30 Pro needs to match two codes that connect and relate to your router to establish the connection and work correctly. These are known as the SSID and the IP address.
Every wireless device will have its own codes and making sure they’re matched to the network you’re connecting to is crucial to ensuring the internet is working on your Vivo V30 Pro. Here’s how to check on your Vivo V30 Pro to make sure everything is correct.
- Tap the Settings menu option, followed by Wi-Fi on your Vivo V30 Pro
- Turn on your Wi-Fi network and connect it to your router
- Find the router name (SSID) and make sure it’s exactly the same as the SSID written on your router
- Once connected, tap the Wi-Fi network and you will see the IP address. Check both your phone and the router codes to make sure this number matches
When these numbers are matching, if your Android is still not connecting to wifi, you’ll know this wasn’t the problem.
Part 7. Fix Android system issues in one click
If none of the solutions above are working, this could indicate a real problem with the firmware and operating system of your Vivo V30 Pro. Fortunately, a fast solution to get everything working again is to completely repair the software of your phone.
You can do this easily using powerful Android recovery software known as Dr.Fone - System Repair (Android) . This is the leading repair tool on the market and is designed to fix and repair any firmware and software problems you may be having.
Dr.Fone - System Repair (Android)
A one-click tool to fix Wi-Fi not working on Android
- Can repair Android from any problem including the black screen of death
- A trusted software application used by 50+ million people around the world
- The most user-friendly mobile repair application available right now
- Supports over 1,000+ Android models and devices
- A world-class customer support team to help you whenever you need them
3,483,527 people have downloaded it
To help you have the best and the most accurate experience when using the Dr.Fone - System Repair (Android) application, here’s a complete step-by-step guide on how to use it.
Step One Make your way over to the Wondershare website and download the Dr.Fone - System Repair (Android) software. Install it onto your computer by following the on-screen instructions.
Once installed, connect your Vivo V30 Pro to your computer using a USB cable, and open the software, click “System Repair”.
![]() FX PRO (Gold Robot + Silver Robot(Basic Package))
FX PRO (Gold Robot + Silver Robot(Basic Package))

Step Two Click the “Android” option in the menu and then click “Start” to begin the Repair process.

Step Three On the next screen, go through the options and use the drop-down menus to make sure the information is correct for your individual device. Accept the terms and conditions of the software, and then click the “Next” button.

Step Four Confirm you want the software to carry out the repair process by typing the ‘000000’ code into the pop-up box and pressing Confirm. Make sure you read everything displayed in this box beforehand to know what’s happening.

Step Five Now put your phone into Download Mode by following the on-screen instructions, so your device is ready for the repair process. The method for getting your phone into Download Mode will vary depending on your device, so make sure you’re following the right instructions.

Step Six Once the software has detected your device in Download Mode, it will automatically begin the repair process. You need to make sure your device stays connected throughout this time, and your computer stays on.

The whole process is automatic, so you won’t need to do anything until it’s finished. Once completed, you can disconnect your phone and start connecting it to the internet as normal!

 safe & secure
Part 8. Check the Wi-Fi connectivity on another phone


When experiencing problems with your Wi-Fi network, it’s worth noting the problem might not be with your phone, but rather the Wi-Fi network itself. This is why it’s important to make sure you check the connection on another device.
Of course, if you’re already using another phone on your Wi-Fi network, you know this isn’t the case. However, if you’re not sure, here’s what you need to do;
- Get another Android or iOS phone or tablet
- Open the Settings menu and connect to the Wi-Fi network you’re having problems with
- Enter the password and connect to the network
- Open a web browser on the phone and try loading a web page
- If the page loads, you know the Wi-Fi network isn’t the problem
- If the page doesn’t load, you know you’ve got a problem with your Wi-Fi network
Part 9. Change the password of the Wi-Fi

Each Wi-Fi network router will give the opportunity to choose and change the password you have to let devices connect to your network. It’s important you try changing this because you never know if someone else has accessed your network and could be blocking your device. Here’s how it works;
- Log onto your computer and open your Wi-Fi settings
- Depending on the brand and method of your individual router, navigate to the Wi-Fi password settings menu
- Change the password to something complicated using all available digits and characters
- Save the password and restart the router to disconnect all devices
- Now connect your Vivo V30 Pro to the router using the new password
Part 10. Reset network settings on Android
Just like the method above where you’ll be effectively resetting the network settings on your router, if this hasn’t worked, you’ll be able to reset the network settings on your Vivo V30 Pro, hopefully removing the bugs and allowing you to connect.
Here’s how you can do this easily on your Vivo V30 Pro;
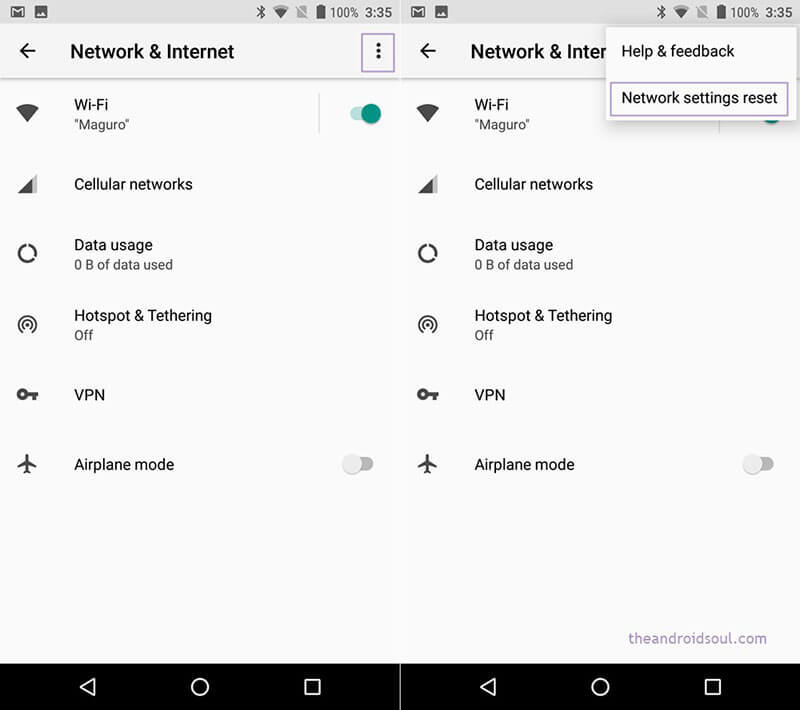
- From the home screen of your Vivo V30 Pro, open the Settings menu
- Tap the Backup & Reset option
- Tap the Reset Network Settings option
- Tap the Reset Network option
- If you need to, enter the PIN number or passcode for the Android device, and the Vivo V30 Pro device will confirm the reset has taken place
- Reconnect your Vivo V30 Pro to your Wi-Fi network for the changes to take effect
Part 11. Clear partition cache in recovery mode
As you continue to use your Vivo V30 Pro, the partition cache will fill up with data your device needs and doesn’t need. However, by clearing your device’s partition cache, you can make clear up some space which should help your device have enough memory to connect to the internet.
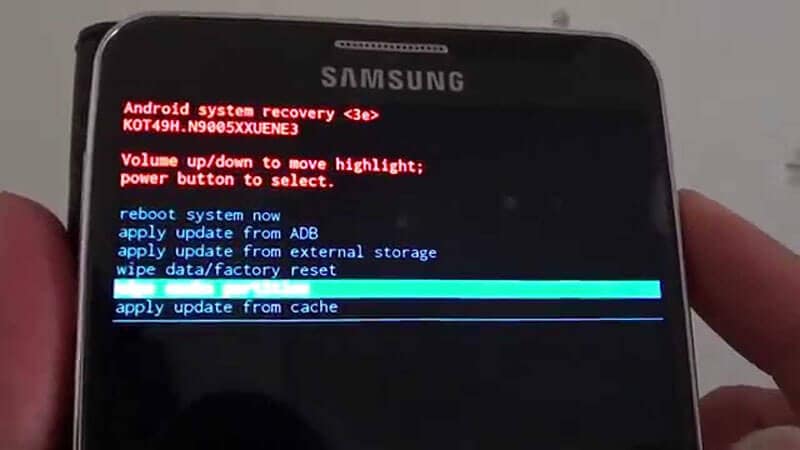
- Turn off your Vivo V30 Pro
- Turn it on by holding down the power button, volume button, and home button
- When your phone vibrates, let go of the Power button, but continue to hold the volume button
- When a menu is displayed, use the volume buttons to navigate the menu
- Select the Android System Recovery option, followed by Wipe Cache Partition
- Restart your device and connect to the internet
Part 12. Reset factory settings

If worse comes to worst, another option you have is to factory reset your Vivo V30 Pro. As we’ve spoken about above, while using your phone from the day you started using it, your device will fill up with files and data which can become messy and causes bugs.
However, by factory resetting your device, you can start again from the factory default from which you first received it, ultimately clearing the bugs. Make sure you back up your device before proceeding because it will erase your personal files.
- Open the Settings menu on your Vivo V30 Pro
- Navigate to System > Advanced > Reset Options
- Tap the Reset phone option, and enter your PIN code if required
- Tap Erase Everything
- Wait for your phone to complete the process
- Restart your device and connect to the internet
 vMix 4K - Software based live production. vMix 4K includes everything in vMix HD plus 4K support, PTZ control, External/Fullscreen output, 4 Virtual Outputs, 1 Replay, 4 vMix Call, and 2 Recorders.
safe & secure
Want to Uninstall Google Play Service from Vivo V30 Pro? Here is How
In this article, you will learn the pros and cons of uninstalling Google Play services, as well as a free root tool to help you do this.
Acts as a one-stop destination to download various kinds of apps from the Play Store. The Play service also provides a way to manage these apps without much hassle. From uninstalling to updating an app, all of this can be done with Google Play service. Nevertheless, there are times when users wish to uninstall Google Play services. To start with, it takes a lot of storage and makes it pretty tough for users to manage their devices. To help you, we will let you know how to uninstall Google Play Store in this informative post.
Part 1: Reason you might want to get rid of Google Play Service
Before we proceed and discuss different ways on how to update Play Store after uninstalling updates, it is important to cover the basics. We have heard plenty of users who wish to uninstall Google Play services, but are not sure of the repercussions. One of the main reasons is that it consumes a lot of space on phone’s storage. Not just that, it only consumes plenty of battery as well.
If your device is giving the insufficient storage warning, then you need to start by clearing your phone’s data. It is observed that the Google Play Service accumulates most of the data in a device. This leads to users looking for different ways to how to uninstall Google Play Store.
Part 2: What will it affect to uninstall Google Play Service?
If you think that Google Play Service only provides a platform to download new apps, then you are wrong. It provides several other functions that might alter the way you use your smartphone. It is linked with other essential Google services as well, like Google Maps, Gmail, Google Music, etc. After uninstalling the Google Play Service, you might face trouble using various essential apps.
Furthermore, it might tamper with the overall functionality of your device as well. For instance, you could encounter network issues, messaging problems, app crashing, and more. Since the Play Service is closely associated with Android system, it might have a prominent effect on your phone. If you have a rooted device, then you can easily install custom ROM and resolve these issues. Though, for a non-rooted device, overcoming these problems could be a big hurdle.
Part 3: How to disable Google Play Service?
By now, you already know all the repercussions of getting rid of Google Play Services permanently. Before you learn how to update Play Store after uninstalling updates, be sure whether you wish to uninstall Google Play Services or not. You can also choose to simply disable the services as well. If you face any severe issue afterward, then you can always enable the services manually.
To disable the Google Play Services, just go to your phone’s Settings > Applications > All and open Google Play Services. You will get to know about the app’s detail and a few other options here. Just tap on the “Disable” button. It will generate another pop-up message. Confirm it by tapping on the “Ok” button. This will disable Google Play Services on your device. Later, you can follow the same drill to enable it as well.

Now when you know how to uninstall Google Play Store on your device, you can easily customize it. Get rid of any kind of problem you are facing due to lack of storage or battery issues related to Google Play services after following these instructions. Feel free to drop a comment below if you face any setback while following this tutorial.
- Title: Bricked Your Vivo V30 Pro? Heres A Full Solution | Dr.fone
- Author: Ariadne
- Created at : 2024-07-30 09:49:31
- Updated at : 2024-07-31 09:49:31
- Link: https://howto.techidaily.com/bricked-your-vivo-v30-pro-heres-a-full-solution-drfone-by-drfone-fix-android-problems-fix-android-problems/
- License: This work is licensed under CC BY-NC-SA 4.0.