
Calls on Lava Yuva 2 Pro Go Straight to Voicemail? 12 Fixes | Dr.fone
Calls on Lava Yuva 2 Pro Go Straight to Voicemail? 12 Fixes
Have you ever experienced incoming calls to your phone go straight to voicemail without ringing? It can be frustrating, especially if you’re expecting an important call. It could be due to simple things like turning down the volume or forgetting to turn off the Do Not Disturb mode. In other cases, it might be because you accidentally blocked the caller’s number.
In most cases, incoming calls going to voicemail without ringing are common. However, if it’s happening frequently or for all calls, your phone may have a problem.
This article will discuss why incoming phone calls go straight to voicemail and how to fix the problem. We’ll also show you how to use Wondershare Dr.Fone, a powerful Android System Repair tool, to solve such issues. So, if you’re uncertain why that last call went straight to voicemail, keep reading, and we’ll cover everything you need to know.


Part 1: Not Ringing? Here’s Why Calls on Your Phone Go Straight to Voicemail
If an incoming call to your cell phone goes straight to voicemail without ringing, there could be a few reasons. Here’s what to look for and what you should do to fix it:
- Turn Off Do Not Disturb (DND) Mode
DND mode is a feature that silences all incoming calls, notifications, and alerts. If DND mode is enabled, your cell phone goes straight to voicemail when someone calls. To turn off DND mode, swipe down from the top of the screen to open the notification settings panel, then tap the Do not disturb icon.

Here’s an alternative way:
- Step 1: Open the Settings app and go to Notifications.
- Step 2: Tap Do not disturb.

- Step 3: Toggle Do Not Disturb offto disable the mode.
- Turn Off Call Forwarding
One reason calls go straight to voicemail without ringing is if you enabled call forwarding. Call forwarding is a feature that redirects incoming calls to another number. To turn off call forwarding:
- Step 1: Open the Phone Dialer app on your device, then tap the menu icon and select Settings.

- Step 2: Navigate to Supplementary services > Call forwarding.


- Disable Call Barring
If a phone call went straight to voicemail, another possible explanation is the call barring. It is a feature that restricts calls from being made or received on your phone. If activated, it can cause incoming calls to a phone to go straight to voicemail. To turn off call barring on Lava Yuva 2 Pro devices:
- Step 1: Open the Phone Dialer app, then tap the menu icon in the top right corner.
- Step 2: Go to Settings > Supplementary services > Call barring, then tap OK.
- Step 3: Select Voice call, then turn off your preferred outgoing and incoming calls. When prompted, enter 0000 as a password.

- Update Your Phone’s Software
Sometimes, software bugs can cause problems with incoming calls, which may be why your last incoming call went straight to voicemail. If your phone runs outdated software, try updating it to the latest version.
To check for updates, open the Settings app and go to Software update or System update. For a seamless update experience, follow the step-by-step instructions on your mobile screen.

- Reset Network Settings
If the incoming calls on your phone go straight to voicemail, consider resetting your phone’s network settings. Network settings control how your phone connects to the cellular network. If these settings are not set up correctly, incoming calls may not be able to reach your device.
Note: Resetting your network settings will erase any saved Wi-Fi networks and Bluetooth pairings, requiring you to re-enter them after the reset is complete.
To reset your network settings on most Android devices:
- Step 1: Open the Settings app on your smartphone, then tap System or General Management.
- Step 2: Go to Reset > Reset Network Settings and confirm the action.
 Forex Robotron Gold Package
- Turn Off Bluetooth
When Bluetooth is on, it can interfere with your device’s ability to receive calls, causing them to go straight to voicemail without ringing. To turn off Bluetooth on an Android device, you can do one of the following:
- Swipe down from the top of the screen to open the Quick Settingspanel, then tap the Bluetooth icon to turn it off.

- Go to Settings> Connections > Bluetooth and toggle the switch off.

It should help ensure that calls come through to your phone instead of going to voicemail.
- Check Airplane Mode
If turning off Bluetooth didn’t solve the issue, another possible cause could be that your phone is in Airplane Mode. Airplane Mode turns off all wireless connections on your phone, including cellular service, which can cause calls to dial straight to voicemail. There are two ways to turn off Airplane mode on Android:
Using the Settings app:
- Step 1: Open the Settings app.
- Step 2: Tap Network & internet.
- Step 3: Toggle off Airplane mode or Flight mode.
Using the Quick Settings panel:
- Step 1: Swipe down from the top of the phone screen to access the Quick Settings panel.
- Step 2: Look for the Airplane mode or Flight mode icon, then tap it to turn it off.

- Check Blocked Numbers
“My boyfriend’s phone goes straight to voicemail when someone is calling. Any idea why that might be?”
Do you also find yourself asking what does it mean? It could be that he has blocked that phone number. To check this:
- Step 1: Open the Phone dialer app.
- Step 2: Tap the menu icon in the top right corner and select Settings.
- Step 3: Tap Block numbers. If you find the number in the blocked list, remove it to ensure that their calls come through to the phone.

If you still have trouble reaching your boyfriend, try calling him from a different number. If your call didn’t go through, you know that he hasn’t blocked your number and that there may be another issue with his phone.
- Turn Off Google One VPN
If you’re using Google One VPN, try turning it off to see if that fixes the problem. Some users have reported that Google One VPN can cause incoming calls to a phone to go straight to voicemail. To turn off Google One VPN:
- Step 1: Open the Google One app on your Lava Yuva 2 Pro.
- Step 2: At the bottom, go to the Benefits tab, then tap View Details below the Online protection with a VPN section.

- Step 3: Toggle off Enable VPN.

- Contact Your Carrier
If your phone calls go straight to voicemail after trying all the above, contact your carrier for help. They may be able to troubleshoot the problem or determine if there is a service outage in your area.
And if your carrier confirms that there is no service outage or billing-related block, the problem may be with your phone itself. You may need to try resetting your phone to factory settings or taking it to a repair shop.
- The Caller Used Ringless Voicemail
Ringless voicemail is a service that allows businesses to bypass your phone’s ringtone and send you pre-recorded messages directly to voicemail. Ringless voicemail is often used for marketing purposes. If you think you’re receiving ringless voicemail calls, you can contact the company calling you and ask them to remove you from their list.
## Part 2: Not Clear About the Root Cause? Troubleshoot Directly by Wondershare Dr.FoneIf you’re unsure what’s causing your calls to go straight to voicemail, you can try using the Dr.Fone System Repair tool. This software can scan and repair your phone for any underlying problems, which may fix the issue and get your calls ringing again.
Dr.Fone supports over 1000 Android models, including unlocked Lava Yuva 2 Pro models and models from carriers like AT&T and Vodafone. It has an intuitive interface and is easy to use, even for beginners. Learn below the steps on how to use Dr.Fone System Repair to fix incoming calls that dial straight to voicemail:
- Step 1: Download Dr.Fone on your computer, then launch it once installed.
 PCDJ DEX 3 for Windows & MAC is the total entertainment DJ software solution, offering audio, video, and karaoke mixing ability. Automatic beat-sync, smart looping, 4 decks, DJ MIDI controller support, Karaoke Streaming and much more.
 safe & secure
4,118,635 people have downloaded it
- Step 2: Connect your smartphone to your desktop or computer using a USB cable. Next, from the Toolbox homepage, select System Repair.

- Step 3: Select Android as the Lava Yuva 2 Pro device type.

- Step 4: Click Start to begin repairing your smartphone.

- Step 5: Select the Lava Yuva 2 Pro device details on the Name, Model, Country, and Carrier drop-down lists. Next, select the agreement checkbox, then click Next to proceed.
 Forex Robotron Basic Package
- Step 6: Follow the in-app instructions to enter Download mode on your Lava Yuva 2 Pro, then click Next.

- Step 7: Wait while the app downloads the firmware; once done, click Fix Now.

- Step 8: Enter the code in the input box to verify the Lava Yuva 2 Pro device information in the dialogue box, then click Confirm.

- Step 9: The app will start repairing the system issue on your Lava Yuva 2 Pro. Once completed, your app should restart, then click Done to close the app.

You May Also Like:
Top 5 Best Android System Repair Apps
How to Fix It: Android Stuck on Boot Screen?
How to Flash Dead Android Phone Safely
Conclusion
When your phone calls go straight to voicemail without ringing, it can be a frustrating and disruptive experience. Not only do you miss important calls from work, friends, or family, but it also leaves you feeling disconnected and out of the loop. As a temporary measure to avoid missing important calls, check your voicemail regularly.
For a prompt solution, consider using Dr.Fone if incoming calls on your phone go straight to voicemail. It is a powerful mobile solution that can also address other system problems, including stuck boot loops, app crashes, black screens, and bricked devices. If you consistently experience this issue, it’s advisable to reach out to a professional for assistance.
safe & secure
4,215,287 people have downloaded it
 WinUtilities Pro
How To Fix Unresponsive Touch Screen on Lava Yuva 2 Pro
With the increase in our reliance on smartphones, having touchscreen problems on your device can be annoying. Sometimes, it’s even more frustrating than a physically broken screen because you don’t know where the issue is coming from.
If your touchscreen is malfunctioning or doesn’t work correctly, you cannot interact with your device. On this page, you’ll learn general phone touch problems on Android and how to get rid of them. Now explore the article to learn more.


 Glarysoft File Recovery Pro Annually - Helps to recover your lost file/data, even permanently deleted data.
Part 1: Why Is My Android Experiencing Touch Screen Problems
Below are some of the most common reasons you’re experiencing touch problems on your Android smartphone.
- The touchscreen problemfreezes your phone, lags, or hangs.
- Some parts of the screen work fine, but some don’t.
- Your screen responds inaccurately (typing “a” gets you “q” or “z”).
- The touchscreen is automatically operating itself, resulting in ghost touch.
- It doesn’t respond to any taps, and the phone’s screen has stopped working.
- The device is physically damaged, or the screen is cracked or broken.
- Outdated devices are prone to the black/white/blue screen of death.
 PCDJ Karaoki is the complete professional karaoke software designed for KJs and karaoke venues. Karaoki includes an advanced automatic singer rotation list with singer history, key control, news ticker, next singers screen, a song book exporter and printer, a jukebox background music player and many other features designed so you can host karaoke shows faster and easier!
Part 2: Tips, Fixes, and Workarounds To Fix Your Lava Yuva 2 Pro Touch Problems
If any of the outlined reasons above are the cause of your touch screen malfunctioning, here are some solutions to fix it.
Method 1: Remove the Screen Protector and Phone Case
Some phone cases and screen protectors cause touch problems on your Android screen. This issue is prevalent if you recently changed your phone case or screen protector. It may be due to incompatibility, but you should remove them to see if your phone starts responding again.
 PDF application, powered by AI-based OCR, for unified workflows with both digital and scanned documents.
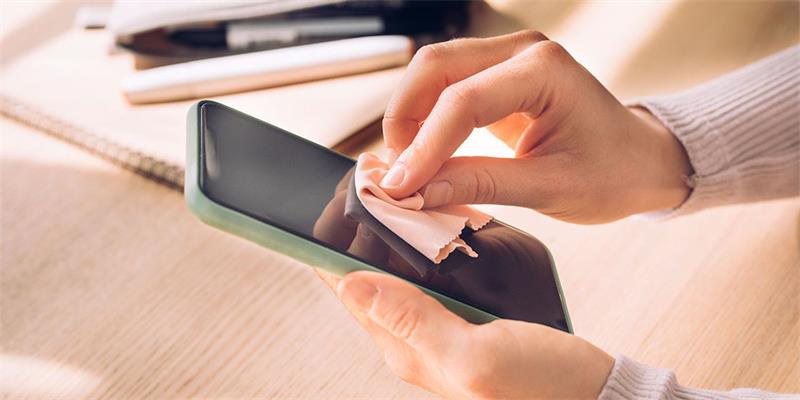
Method 2: Clean Your Android Smartphone
A touchscreen malfunctioning can also be a sign of a dirty display. Since the screen relies on contact between your fingers and the touchpad to perform actions, this also applies to foreign particles such as dirt, debris, smudges, oil, and more. Clean your touchscreen with wipes or a soft cloth by gently wiping over the screen.

Method 3: Stop Using Your Android Device for a While
Touch problems also arise due to abnormal temperature changes. Your phone might experience ghost touch if it’s too cold or hot. For your screen to function correctly, it needs to be in a temperate environment. Remember to take breaks between phone usage, especially when the phone gets too hot. Avoid using your device under hot conditions, direct sunlight, or anything affecting your phone’s normal temperature.
Method 4: Restart Your Android
Performing a reboot sounds trivial with such a complicated issue. But sometimes, it’s often the most successful way to fix a touchscreen problem on an Android device. Restarting your Android shuts down and resets all background services, which may have led to your issue.
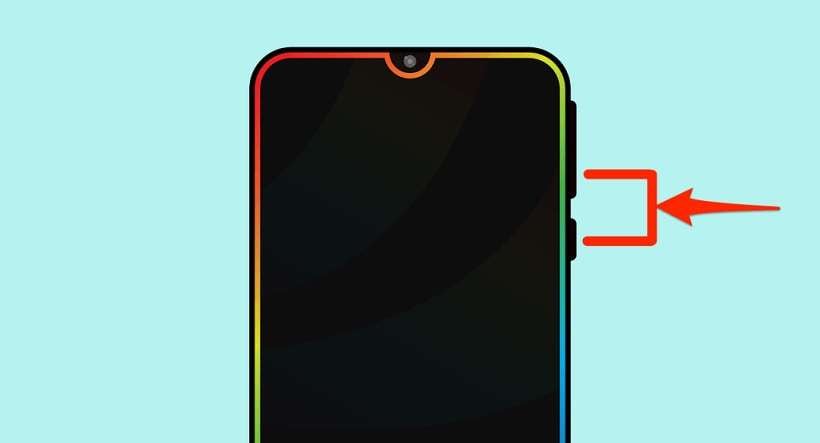
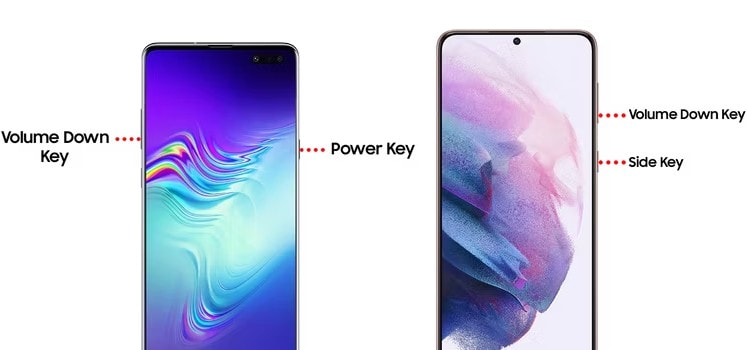
To restart your Android, press and hold the Power button for several seconds to switch off your phone. In other smartphones, you may need to hold down the Power button as well as the Volume Down button at the same time.
Method 5: Factory Data Reset Your Android
Before attempting to have your device checked for any hardware defects, you should try completing a Factory Reset. To do this, go to Settings > Backup and Reset. Next, tap on Factory data reset > Delete all.
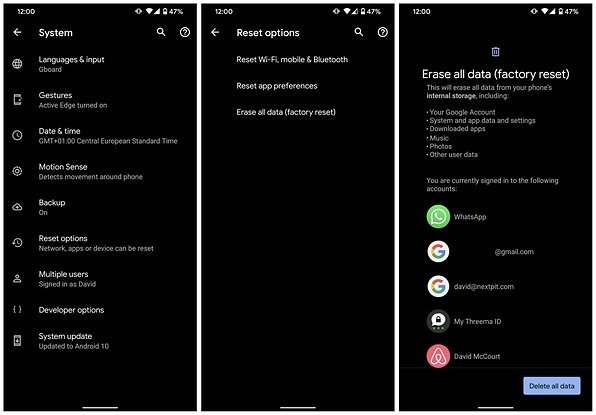
Performing a Factory Data Reset will erase all your data and restore your device to its factory default settings. Creating a backup before doing this step is recommended, as you will lose all your personal data once the process starts.
 Any DRM Removal for Win:Remove DRM from Adobe, Kindle, Sony eReader, Kobo, etc, read your ebooks anywhere.
Method 6: Put Your Android into Recovery Mode
If all else fails, placing your Android into Recovery Mode should be a last resort. Doing this method works similarly to the method above. You should perform this method if the screen is unresponsive and only the buttons on your Android are functional. Here’s how.
Note
Placing your Android into Recovery Mode is different depending on your Android smartphone. Refer to your owner’s manual to see which method is right for your Lava Yuva 2 Pro.
Step 1A: Press and hold the Power button and Volume Down buttons at the same time. Continue holding both buttons until the screen starts.
Step 1B: If your Lava Yuva 2 Pro still has a Home button, press and hold the Home button and the Power button at the same time. Continue holding them until the screen starts.
Step 1C: If step 1A did not put your Android into Recovery Mode, press and hold the Power and Volume Up and Down buttons simultaneously. Continue pressing all three until the screen starts.
Step 2: Use the Volume buttons to navigate the choices, select Wipe data/factory reset, and confirm your choice with the Power button.
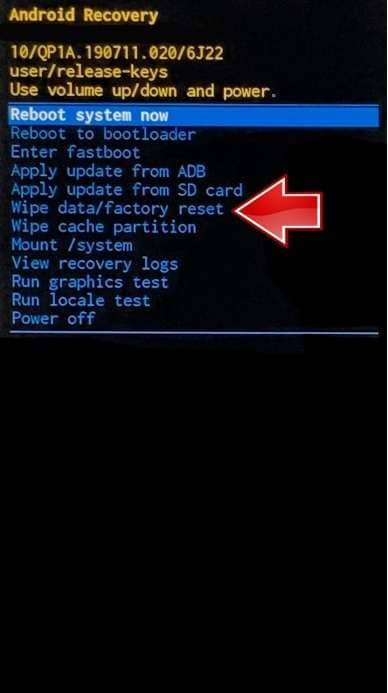
Step 3: Wait for the process to complete and for your Lava Yuva 2 Pro to restart automatically.
Method 7: Replace Your Android Touchscreen
If doing all the earlier workarounds and fixes couldn’t resolve the touchscreen problem, it could be the screen itself. While replacing the touchscreen yourself is possible if you have the technical know-how, it’s still best to bring it to a professional to prevent further damage. You should have your Lava Yuva 2 Pro checked by a technician if the screen is getting weak, has water damage, or has failing screen components.
 “
“
Method 8: Bring it to an Authorized Service Center
Your phone touch problem might not be caused by the screen, even when you had it replaced. If your Android is still unresponsive, it’s best to bring your smartphone to an authorized service center or directly to the phone manufacturer, especially when all efforts are exhausted.
Part 3: How To Fix Android Touch Problem With an Alternative
If all the general phone touch problems on your Lava Yuva 2 Pro persist, you should strongly consider Wondershare Dr.Fone to do the job. The program can fix all Android system issues without any required skills. Problems caused by the operating system or software, such as the black screen of death, boot loop, ghost touch, and more, are done within less than 10 minutes with the program.

Key Features
Dr.Fone – System Repair (Android) has many features you can immediately take advantage of. Here are some of them below.
- Fix All Android Problems In Minutes
Wondershare Dr.Fone allows you to fix all touchscreen problems on your smartphone within less than 10 minutes. Moreover, it has a high success rate making it one of the most reliable tools available today.
- Supports up to 1000+ Android Models
The program supports almost all Lava Yuva 2 Pro models and other Android devices, whether unlocked or from a carrier. Dr.Fone is equipped with all the proper firmware to flash your Lava Yuva 2 Pro with just a few clicks. In addition, it has handy on-screen instructions to help you complete the whole process with ease.
Pros and Cons
Here are the pros and cons of using Dr.Fone – System Repair (Android) to know if you’re still undecided.
Pros
- The user interface is clutter-free, making it highly beginner-friendly.
- The fast processing time to fix your Lava Yuva 2 Pro means you can do more in less time.
Cons
- The free version only works until you see if your Lava Yuva 2 Pro is compatible with the app. You will be required to enter a valid license once you initiate the repair process.
- If you own an iOS device, you’ll have to get the iOS version.
How To Fix Black Phone Screen With Wondershare Dr.Fone
Follow the step-by-step guide below to start fixing general phone screen problems on Android using Wondershare Dr.Fone.
Step 1: Download and install Wondershare Dr.Fone on your computer. Next, launch the program and connect your Lava Yuva 2 Pro to your computer.
 Epubor Audible Converter for Win: Download and convert Audible AAXC/AA/AAX to MP3 with 100% original quality preserved.
Step 2: Click Start to initiate the setup on a new window. From there, select the Brand, Name, Model, Country, and Carrier of your Lava Yuva 2 Pro and click Next.
Step 3: Follow the on-screen instructions on the main program window to initiate the repair process. After that, wait for your Android smartphone to return to its original state.
Part 4: FAQs
Here are some FAQs you should remember when experiencing phone touch problems.
1. Does a Cracked Screen Affect Touch on an Android?
If you continue using a smartphone with a cracked screen, there are several implications. Your device will be vulnerable to further damage and might develop touchscreen problems,and your sensors will gradually begin to malfunction. The capabilities of your device are also compromised the longer you delay repairing it. Moreover, a cracked screen can put your fingers at risk of injury due to potential glass splinters.

WPS Office Premium ( File Recovery, Photo Scanning, Convert PDF)–Yearly
2. How Do I Temporarily Fix a Cracked Screen?
If you can’t take your cracked screen to a repair shop, apply a small amount of vegetable oil or petroleum jelly to the screen. Doing this will not fix the issue but will make the cracks less noticeable. On the other hand, you can also apply a screen protector to safeguard your phone against further damage. The screen protector slows down or prevents the cracks from getting worse.
Parental Control Software
### 3\. Can I Use Dr.Fone for Free?You can download and install Dr.Fone – System Repair (iOS) or (Android) for free to evaluate the program’s offerings. You can do the first few steps to see if the app supports your device. However, you need to get the full version and enter a valid license code to repair your smartphone.
safe & secure
4,471,551 people have downloaded it
Conclusion
If the touchscreen is malfunctioning on your smartphone, one of the fixes above should help solve the problem. If it did not solve the issue, consider using Dr. Fone – System Repair for iOS or Android when you need an all-in-one solution to all your phone screen problems.
However, if your screen is broken or cracked, going to an authorized service center is still your best bet, especially when your screen urgently needs a replacement. Delaying it further may hurt your wallet in the long run, so it’s best to fix it as soon as possible.
 Project Manager - Asset Browser for 3Ds Max
What To Do When Lava Yuva 2 Pro Has Black Screen of Death?
Have you ever got the error of freezing the Android device home screen? Or the notification light keeps blinking without anything shown on display? Then you are facing Android black screen of death.
This scenario is common with many Android mobile users, and they always hunt for solutions to get rid of this Android black screen problem. Here are some more situations that can assure you that you are facing Android black screen of death.
- The light of the phone is blinking but the Lava Yuva 2 Pro device is not responding.
- The phone is hanging and freezing very frequently.
- The mobile is rebooting and crashing more often and the battery is draining a lot faster.
- Phone restarts on its own.
If you face these situations, you might be facing the Android black screen of death issue. Follow this article, and we’ll discuss how to get rid of this annoying problem at ease.
Part 1: Why Android device gets black screen of death?
Similar to the “Blue Screen of Death “ (BSOD) on computers, the Android Black Screen of Death indicates a severe system crash or malfunction. When this issue occurs, the Lava Yuva 2 Pro device’s display remains blank, and you are unable to interact with the Lava Yuva 2 Pro device, access apps, or perform any actions. The cause of the Android black screen of death can vary, but some common factors include:
- Install incompatible apps or apps with bugs and viruses.
- Have bugs or errors in the Android operating system.
- Keep the mobile charged for long after it’s fully charged.
- Use a non-compatible charger.
- Use an old battery.
- Incorrectly install or incomplete system updates.
- Excessive heat due to heavy usage or environmental factors.
If you face the situations mentioned above, this is clearly a case of the Android screen black. But don’t worry about that. You can follow the article below to get rid of this situation on your own.
Part 2: How to rescue data when Android gets black screen of death?
This annoying Android black screen of death is making it impossible to access your internal data. So, the possibility is that you might lose all the data. We have a solution for all of your data recovery problems from a damaged Android device.
The solution for recovery data is the Dr.Fone - Data Recovery (Android) toolkit by Wondershare. This tool is highly appreciated worldwide and very popular for its feature-rich user interface. This tool can perform a lot of functions that can successfully recover the data from a damaged device.
 KoolReport Pro is an advanced solution for creating data reports and dashboards in PHP. Equipped with all extended packages , KoolReport Pro is able to connect to various datasources, perform advanced data analysis, construct stunning charts and graphs and export your beautiful work to PDF, Excel, JPG or other formats. Plus, it includes powerful built-in reports such as pivot report and drill-down report which will save your time in building ones.
 It will help you to write dynamic data reports easily, to construct intuitive dashboards or to build a whole business intelligence cockpit.
KoolReport Pro package goes with Full Source Code, Royal Free, ONE (1) Year Priority Support, ONE (1) Year Free Upgrade and 30-Days Money Back Guarantee.
Developer License allows Single Developer to create Unlimited Reports, deploy on Unlimited Servers and able deliver the work to Unlimited Clients.
Use this revolutionary toolkit to get the data back from the black tablet screen of death. Connect the Lava Yuva 2 Pro device with the PC after installing this tool and follow the on-screen instruction, and all of your data will be transferred to your PC. Unfortunately, the tool is supported on selected Lava Yuva 2 Pro Android devices as of now.
Dr.Fone - Data Recovery (Android)
A Dedicated Tool to Retrieve Data from Broken Android Devices .
- Recover data from broken devices or devices that are damaged in any other way, such as those has black screen.
- Recover photos, videos, contacts, messages, call logs, and more.
- Highest retrieval rate in the industry.
- Compatible with most Lava Yuva 2 Pro devices.
3981454 people have downloaded it
Part 3: 9 Solutions to fix the black screen of death of Android
- 3.1 One click to fix the black screen of death
- 3.2 Force restart your Lava Yuva 2 Pro
- 3.3 Check and clean your phone
- 3.4 Remove the battery
- 3.5 Recharge the Lava Yuva 2 Pro device
- 3.6 Wipe cache partition to fix black screen of death
- 3.7 Uninstall incompatible apps
- 3.8 Reboot to safe mode
- 3.9 Factory reset to fix Android black screen of death
3.1 One click to fix the black screen of death
Facing an Android device with a black screen of death, I believe, is one of the gloomiest moments of one’s life, especially for those who know little about the technical part of Android. But here is the truth we have to admit: most cases of the black screen of death arise due to system glitches in Android.
What to do? Shall we find someone who is tech-savvy to seek help? Come on, this is the 21st century, and there are always one-click solutions to deal with technical issues for laymen like you and me.
Dr.Fone - System Repair (Android)
Fix Black Screen of Death for Android In One Click
- Fix all Android system issues like a black screen of death, OTA update failures, etc.
- Update the firmware of Android devices. No technical skills are required.
- Support all the new Lava Yuva 2 Pro devices like Galaxy S22, S23, etc.
- Click-through operations to bring Android out of the black screen of death.
3,364,231 people have downloaded it
Here are the easy steps to get your Lava Yuva 2 Pro out of the black screen of death:
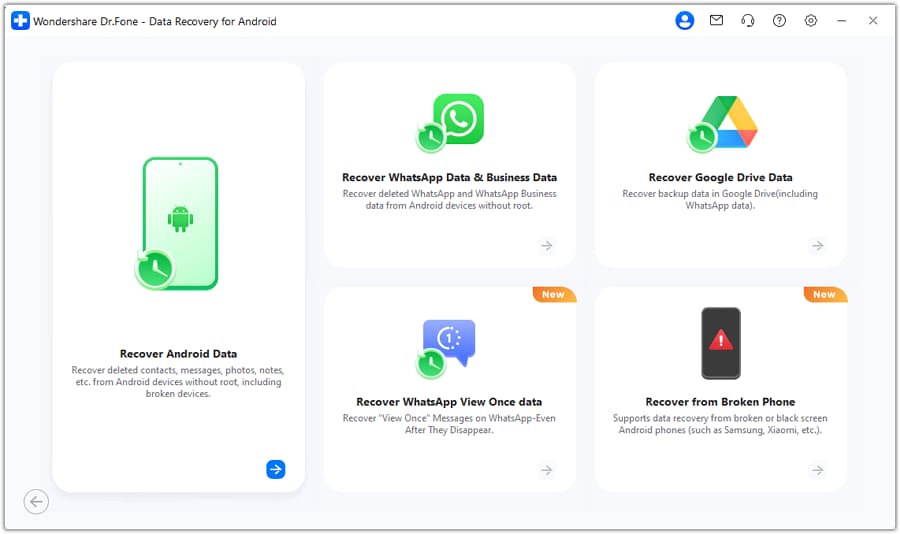
- Download and install the Dr.Fone tool. After launching it, you can see the following screen pop up.

- Select “System Repair” from the home page, and then click on the “Android “.

- Click “Start” to commence the Android system repair. In the next screen, select and confirm your Android model details like name, model, country, etc. and go on.


Boot your Android into Download mode by following the on-screen demonstrations.
Then the tool will download the Android firmware and flash the new firmware to your Lava Yuva 2 Pro.
A moment later, your Lava Yuva 2 Pro will be repaired completely, and the black screen of death will be fixed.


Video guide: How to fix the Android black screen of death step by step
safe & secure
3.2 Force restart your Lava Yuva 2 Pro
Because it is the quickest and most painless solution, most people do this when their Android phone screen goes black too fast. The majority of phone issues can be resolved by performing a hard reboot. Here are the necessary measures if you haven’t tried this method before.
To reboot your Lava Yuva 2 Pro, you may need to press a specific key combination, depending on the model you have, but most Android devices can be force restarted by doing the following steps:
Step 1: Press and hold the power button for about 10-15 seconds. Keep holding it until the Lava Yuva 2 Pro device restarts.
Step 1: For Lava Yuva 2 Pro devices, press and hold down the Power and Volume Down buttons for about 7 seconds.
3.3 Check and clean your phone
This method might not be popular with Android users, but this can do wonders when dealing with an Android black screen of death issue. To do this, follow the steps provided below:
Step 1: Ensure your phone’s buttons and ports are not stuck before anything else.
Step 2: See if dirt prevents you from turning the Lava Yuva 2 Pro device on. Then, quickly press and release the button a few times.
Step 3: If the phone isn’t charging normally, ensure the charging port isn’t clogged with dust and debris by checking and cleaning it. You can gently blow out any debris in the charging port or use a wooden toothpick to pry it open.
Step 4: After you’re done with the cleaning, it’s best to charge the phone for at least 10 minutes. Just give it a quick charge and then try to restart it.
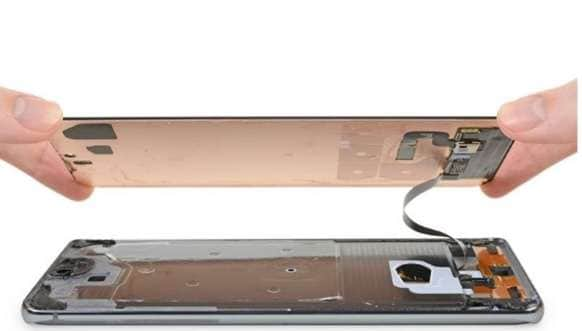
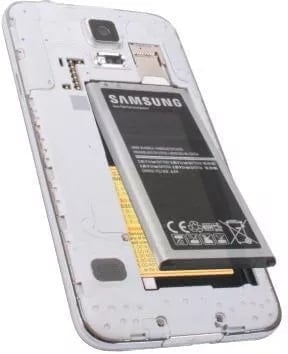
If your phone’s battery is removable, you can try taking it out and trying again if restarting and cleaning it doesn’t fix the problem.
Step 1: To get started, take the phone apart by starting at the back.
Step 2: After 20 to 30 seconds, take out the battery and put it back in.
Note: When replacing the battery, ensure the metal contacts correctly connect to the phone.
This easy and straightforward method should help you fix your Android screen black issue, but if it doesn’t, continue reading, as this article got more techniques you can try.
3.5 Recharge the Lava Yuva 2 Pro device
If your Lava Yuva 2 Pro screen suddenly goes black, let the battery die completely. Then once the battery is completely dead, you should plug it in to charge and turn it on by pressing the Power button. Try to check if you still encounter the issue after doing so.

3.6 Wipe cache partition to fix black screen of death
If your Lava Yuva 2 Pro turns on, but the screen remains black, clearing the cache partition should solve the problem. After all, keeping caches on your phone would cause it to run more slowly and cause other problems. Therefore, the issue can be resolved by clearing the cache partition. Check the following steps on how to do this below:
Step 1: Turn off your Lava Yuva 2 Pro.
Step 2: Boot the Lava Yuva 2 Pro device into Recovery Mode.
Note: The steps necessary to enter recovery mode will vary depending on your specific Android phone model. To ensure you’re doing the correct steps for your device, consult the user manual or look it up online. The following instructions work for Lava Yuva 2 Pro devices:
- For older Lava Yuva 2 Pro devices with the home button: Press and hold the Volume Up button, the Power button, and the Home buttons simultaneously.
- For newer Lava Yuva 2 Pro devices without the home button: Press and hold the Volume Up button and the Power button together.
- If the Lava Yuva 2 Pro device logo appears, release your grip, and the phone will restart.
Step 3: Find the Wipe cache partition option using the volume controls after entering Recovery Mode.
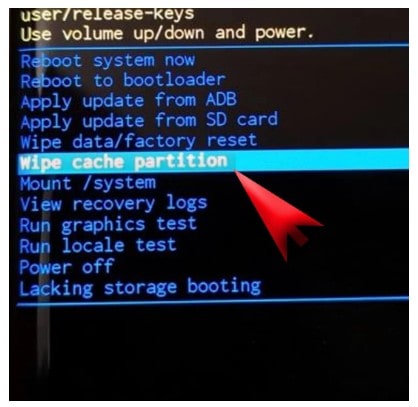
Step 4: Select Wipe cache partition by pressing the Power button.
Step 5: On the next screen, use the Volume Down button to highlight “Yes” and then press the Power button to confirm the cache wipe.
Step 6: The cache partition will be wiped, and you will see the “Cache wipe complete” message on the screen.
Step 7: Use the Volume Down button to navigate to the “Reboot system now” option and press the Power button to reboot your Lava Yuva 2 Pro device.
After rebooting, you can see that you have successfully got rid of the annoying Android black screen of death. For most of the cases, this method solves the problem. If not, you have to move to the next method.

3.7 Uninstall incompatible apps
Android screen black can be a result of installing a bug or incompatible apps. If you have recently installed an app that crashes frequently, that may be the reason for the issue. Uninstalling the app from the Lava Yuva 2 Pro device may solve the problem with ease. For doing this, you need to boot your device in Safe mode. Follow the below steps.
Step 1: Power down your device by pressing and holding the Power button until a menu appears.
Step 2: Navigate to Safe Mode by pressing and holding the Power Off button.
Step 3: Tap the “Safe mode” icon to enter Safe mode. You should now see Safe Mode at the Lava Yuva 2 Pro device’s bottom.
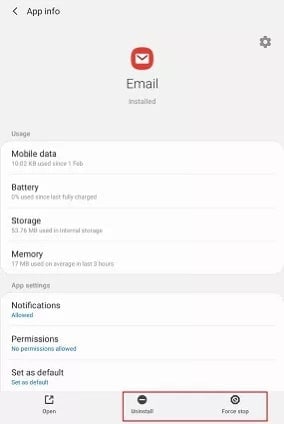
Step 4: After selecting Settings, head to the Apps section.
Step 5: Select the app by clicking on it; the App Info window should appear. To uninstall the app, tap the Uninstall option from the menu below the screen.
Step 6: Now restart the Lava Yuva 2 Pro device by pressing the power button and let it boot up in normal mode.
If the app is the reason for Android black screen of death, then after uninstalling, you can get rid of this issue. If not, now you have to factory reset your device to solve the problem.
3.8 Reboot to safe mode
Even after multiple attempts to launch them, certain applications act suspiciously and cause the Lava Yuva 2 Pro device to crash. When an Android phone suddenly goes black, you can often isolate the problem to a specific app by booting into Safe mode.
Step 1: Begin by restarting your phone. To do that, press the Power button until a menu appears.
Step 2: Press the Power Off button to enter Safe mode.
Step 3: Activate Safe mode by clicking the “Safe Mode” icon.
 Greeting Card Builder
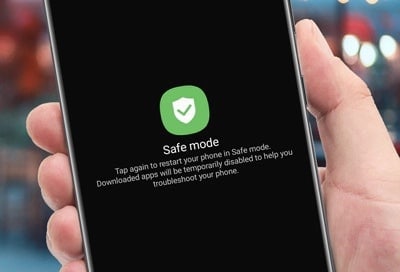
Step 4: To return to Normal mode, turn off your device and then turn it back on.
3.9 Factory reset to fix Android black screen of death
The factory reset is the option that enables the factory state of your device by erasing all data, settings, bugs, and apps. Your device will be fresh like factory condition after this reset. Worth mentioning here, you’ll lose all the internal data and installed apps after this reset. So, to overcome the Android tablet black screen of death, you must perform this action as the last option. Follow the below steps carefully.
Step 1: Turn off the Lava Yuva 2 Pro device. Then press the Volume Up + Power button + home button (or press Volume Up + Power buttonS) altogether and let the mobile boot into recovery mode.
Step 2: After booting up in recovery mode, you can find the “Factory data reset” option. Navigate to that option with the volume up and down arrow and select it with the power button.
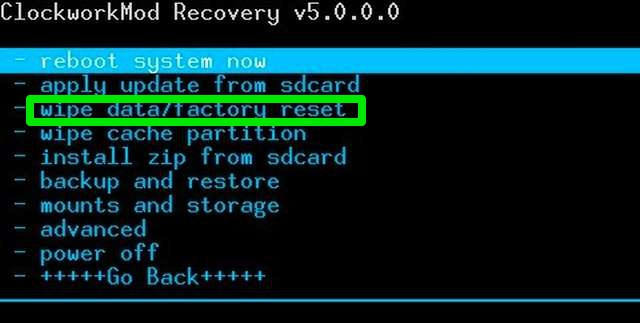
Step 3: In this step, you need to confirm your action by tapping on the “Yes” option. After this, your device will start erasing. This may take a while to complete the whole process.
Now, your device will reboot automatically and you can see the Android black screen of death problem is solved.
 The BootIt Collection covers multi-booting, partitioning, and disk imaging on traditional PC’s using the standard BIOS and newer PC’s using UEFI. The collection includes BootIt Bare Metal (BIBM) for standard BIOS systems and BootIt UEFI (BIU) for UEFI system.
Part 4: How to avoid Android black screen of death?
These are the general methods to overcome the situation of Android screen black. But to avoid this situation, here are a few tips to follow –
- Install apps from trusted suppliers only.
- Use security or antivirus software on your device.
- Take a backup at regular intervals.
- Always keep Android OS updated.
- Don’t keep your mobile charged for a long duration after a full charge.
- If your battery gets old, replace it soon.
- Keep your device’s storage well-maintained. Regularly delete unnecessary data.
- Close unused apps running in the background to conserve system resources.
- Prevent phone overheating by avoiding excessive usage, and not exposing it to direct sunlight for extended periods.
By following these steps, you should avoid the most unpleasant situations, such as the Android screen black. We all know that “Prevention is always better than cure”.
The Bottom Line
There could be a lot of reasons why an Android black screen issue occurs, but the important thing is knowing the correct ways how to fix it. And this article has covered nine proven methods to help you fix an Android phone screen black problem.
But among the methods discussed above, Dr.Fone – System Repair just stood out as this program does not only help you with a black screen of death problem, but it covers many other Android system issues too. It’s also a highly intuitive program that requires no skills to operate.
safe & secure
- Title: Calls on Lava Yuva 2 Pro Go Straight to Voicemail? 12 Fixes | Dr.fone
- Author: Ariadne
- Created at : 2024-07-30 09:52:34
- Updated at : 2024-07-31 09:52:34
- Link: https://howto.techidaily.com/calls-on-lava-yuva-2-pro-go-straight-to-voicemail-12-fixes-drfone-by-drfone-fix-android-problems-fix-android-problems/
- License: This work is licensed under CC BY-NC-SA 4.0.