
Calls on Nokia 130 Music Go Straight to Voicemail? 12 Fixes | Dr.fone
Calls on Nokia 130 Music Go Straight to Voicemail? 12 Fixes
Have you ever experienced incoming calls to your phone go straight to voicemail without ringing? It can be frustrating, especially if you’re expecting an important call. It could be due to simple things like turning down the volume or forgetting to turn off the Do Not Disturb mode. In other cases, it might be because you accidentally blocked the caller’s number.
In most cases, incoming calls going to voicemail without ringing are common. However, if it’s happening frequently or for all calls, your phone may have a problem.
This article will discuss why incoming phone calls go straight to voicemail and how to fix the problem. We’ll also show you how to use Wondershare Dr.Fone, a powerful Android System Repair tool, to solve such issues. So, if you’re uncertain why that last call went straight to voicemail, keep reading, and we’ll cover everything you need to know.


 vMix 4K - Software based live production. vMix 4K includes everything in vMix HD plus 4K support, PTZ control, External/Fullscreen output, 4 Virtual Outputs, 1 Replay, 4 vMix Call, and 2 Recorders.
Part 1: Not Ringing? Here’s Why Calls on Your Phone Go Straight to Voicemail
If an incoming call to your cell phone goes straight to voicemail without ringing, there could be a few reasons. Here’s what to look for and what you should do to fix it:
- Turn Off Do Not Disturb (DND) Mode
DND mode is a feature that silences all incoming calls, notifications, and alerts. If DND mode is enabled, your cell phone goes straight to voicemail when someone calls. To turn off DND mode, swipe down from the top of the screen to open the notification settings panel, then tap the Do not disturb icon.

Here’s an alternative way:
- Step 1: Open the Settings app and go to Notifications.
- Step 2: Tap Do not disturb.

- Step 3: Toggle Do Not Disturb offto disable the mode.
- Turn Off Call Forwarding
One reason calls go straight to voicemail without ringing is if you enabled call forwarding. Call forwarding is a feature that redirects incoming calls to another number. To turn off call forwarding:
- Step 1: Open the Phone Dialer app on your device, then tap the menu icon and select Settings.

- Step 2: Navigate to Supplementary services > Call forwarding.

- Disable Call Barring
If a phone call went straight to voicemail, another possible explanation is the call barring. It is a feature that restricts calls from being made or received on your phone. If activated, it can cause incoming calls to a phone to go straight to voicemail. To turn off call barring on Nokia 130 Music devices:
- Step 1: Open the Phone Dialer app, then tap the menu icon in the top right corner.
- Step 2: Go to Settings > Supplementary services > Call barring, then tap OK.
- Step 3: Select Voice call, then turn off your preferred outgoing and incoming calls. When prompted, enter 0000 as a password.

- Update Your Phone’s Software
Sometimes, software bugs can cause problems with incoming calls, which may be why your last incoming call went straight to voicemail. If your phone runs outdated software, try updating it to the latest version.
To check for updates, open the Settings app and go to Software update or System update. For a seamless update experience, follow the step-by-step instructions on your mobile screen.
 Screensaver Factory, Create stunning professional screensavers within minutes. Create screensavers for yourself, for marketing or unlimited royalty-free commercial distribution. Make screensavers from images, video and swf flash, add background music and smooth sprite and transition effects. Screensaver Factory is very easy to use, and it enables you to make self-installing screensaver files and CDs for easy setup and distribution. Screensaver Factory is the most advanced software of its kind.
- Reset Network Settings
If the incoming calls on your phone go straight to voicemail, consider resetting your phone’s network settings. Network settings control how your phone connects to the cellular network. If these settings are not set up correctly, incoming calls may not be able to reach your device.
Note: Resetting your network settings will erase any saved Wi-Fi networks and Bluetooth pairings, requiring you to re-enter them after the reset is complete.
To reset your network settings on most Android devices:
- Step 1: Open the Settings app on your smartphone, then tap System or General Management.
- Step 2: Go to Reset > Reset Network Settings and confirm the action.

- Turn Off Bluetooth
When Bluetooth is on, it can interfere with your device’s ability to receive calls, causing them to go straight to voicemail without ringing. To turn off Bluetooth on an Android device, you can do one of the following:
- Swipe down from the top of the screen to open the Quick Settingspanel, then tap the Bluetooth icon to turn it off.

- Go to Settings> Connections > Bluetooth and toggle the switch off.

It should help ensure that calls come through to your phone instead of going to voicemail.
- Check Airplane Mode
If turning off Bluetooth didn’t solve the issue, another possible cause could be that your phone is in Airplane Mode. Airplane Mode turns off all wireless connections on your phone, including cellular service, which can cause calls to dial straight to voicemail. There are two ways to turn off Airplane mode on Android:
Using the Settings app:
- Step 1: Open the Settings app.
- Step 2: Tap Network & internet.
- Step 3: Toggle off Airplane mode or Flight mode.
Using the Quick Settings panel:
- Step 1: Swipe down from the top of the phone screen to access the Quick Settings panel.
- Step 2: Look for the Airplane mode or Flight mode icon, then tap it to turn it off.

- Check Blocked Numbers
“My boyfriend’s phone goes straight to voicemail when someone is calling. Any idea why that might be?”
Do you also find yourself asking what does it mean? It could be that he has blocked that phone number. To check this:
- Step 1: Open the Phone dialer app.
- Step 2: Tap the menu icon in the top right corner and select Settings.
- Step 3: Tap Block numbers. If you find the number in the blocked list, remove it to ensure that their calls come through to the phone.
 dotConnect for Oracle is an ADO.NET data provider for Oracle with Entity Framework Support.

If you still have trouble reaching your boyfriend, try calling him from a different number. If your call didn’t go through, you know that he hasn’t blocked your number and that there may be another issue with his phone.
- Turn Off Google One VPN
If you’re using Google One VPN, try turning it off to see if that fixes the problem. Some users have reported that Google One VPN can cause incoming calls to a phone to go straight to voicemail. To turn off Google One VPN:
- Step 1: Open the Google One app on your Nokia 130 Music.
- Step 2: At the bottom, go to the Benefits tab, then tap View Details below the Online protection with a VPN section.

- Step 3: Toggle off Enable VPN.

- Contact Your Carrier
If your phone calls go straight to voicemail after trying all the above, contact your carrier for help. They may be able to troubleshoot the problem or determine if there is a service outage in your area.
And if your carrier confirms that there is no service outage or billing-related block, the problem may be with your phone itself. You may need to try resetting your phone to factory settings or taking it to a repair shop.
- The Caller Used Ringless Voicemail
Ringless voicemail is a service that allows businesses to bypass your phone’s ringtone and send you pre-recorded messages directly to voicemail. Ringless voicemail is often used for marketing purposes. If you think you’re receiving ringless voicemail calls, you can contact the company calling you and ask them to remove you from their list.

Part 2: Not Clear About the Root Cause? Troubleshoot Directly by Wondershare Dr.Fone
If you’re unsure what’s causing your calls to go straight to voicemail, you can try using the Dr.Fone System Repair tool. This software can scan and repair your phone for any underlying problems, which may fix the issue and get your calls ringing again.
Dr.Fone supports over 1000 Android models, including unlocked Nokia 130 Music models and models from carriers like AT&T and Vodafone. It has an intuitive interface and is easy to use, even for beginners. Learn below the steps on how to use Dr.Fone System Repair to fix incoming calls that dial straight to voicemail:
- Step 1: Download Dr.Fone on your computer, then launch it once installed.
 DLNow Video Downloader
 safe & secure
4,118,635 people have downloaded it
- Step 2: Connect your smartphone to your desktop or computer using a USB cable. Next, from the Toolbox homepage, select System Repair.
 Easy and Safe Partition Software & Hard Disk Manager

- Step 3: Select Android as the Nokia 130 Music device type.


- Step 4: Click Start to begin repairing your smartphone.

- Step 5: Select the Nokia 130 Music device details on the Name, Model, Country, and Carrier drop-down lists. Next, select the agreement checkbox, then click Next to proceed.


- Step 6: Follow the in-app instructions to enter Download mode on your Nokia 130 Music, then click Next.

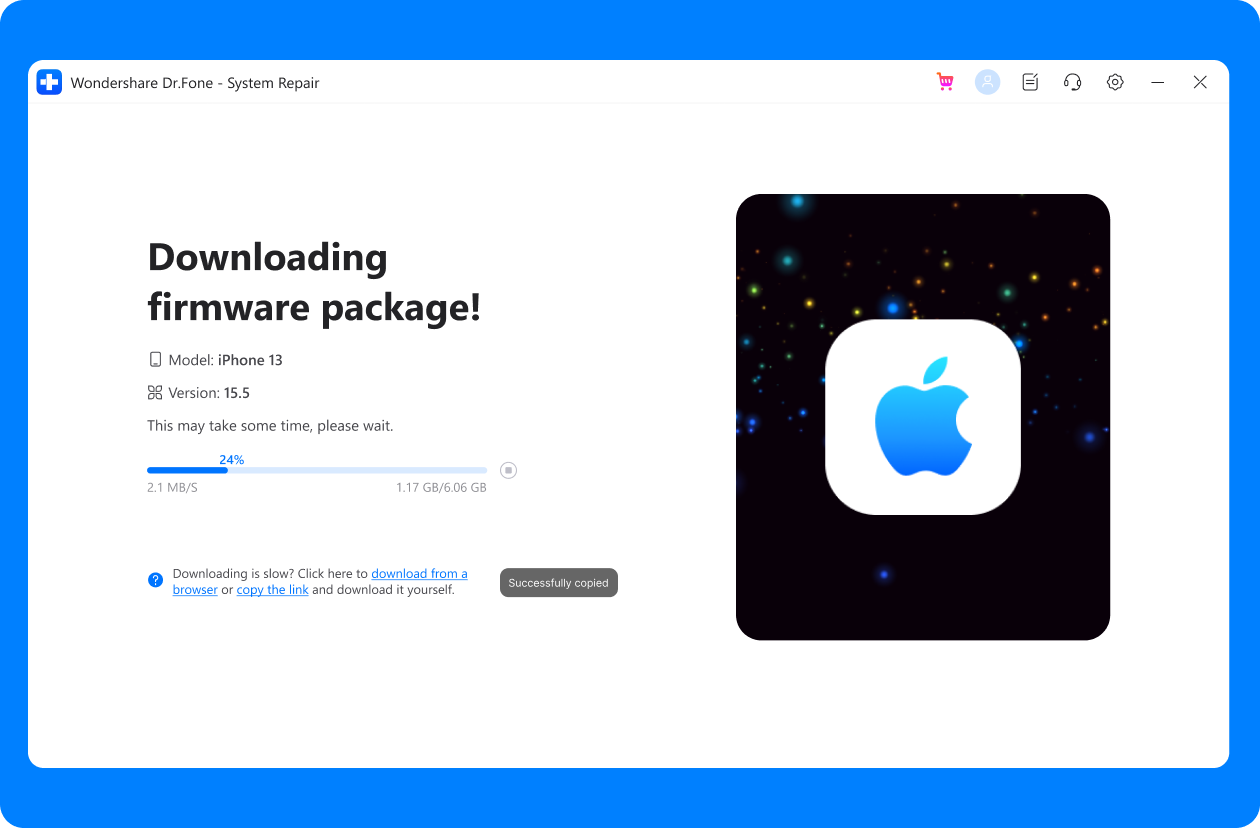
- Step 7: Wait while the app downloads the firmware; once done, click Fix Now.

- Step 8: Enter the code in the input box to verify the Nokia 130 Music device information in the dialogue box, then click Confirm.


- Step 9: The app will start repairing the system issue on your Nokia 130 Music. Once completed, your app should restart, then click Done to close the app.

WPS Office Premium ( File Recovery, Photo Scanning, Convert PDF)–Yearly

You May Also Like:
Top 5 Best Android System Repair Apps
How to Fix It: Android Stuck on Boot Screen?
How to Flash Dead Android Phone Safely
Conclusion
When your phone calls go straight to voicemail without ringing, it can be a frustrating and disruptive experience. Not only do you miss important calls from work, friends, or family, but it also leaves you feeling disconnected and out of the loop. As a temporary measure to avoid missing important calls, check your voicemail regularly.
For a prompt solution, consider using Dr.Fone if incoming calls on your phone go straight to voicemail. It is a powerful mobile solution that can also address other system problems, including stuck boot loops, app crashes, black screens, and bricked devices. If you consistently experience this issue, it’s advisable to reach out to a professional for assistance.
safe & secure
4,215,287 people have downloaded it
 Power Tools add-on for Google Sheets, 12-month subscription
[Solved] Warning: Camera Failed on Nokia 130 Music
In this article, you will learn why camera fails on Nokia 130 Music devices, how to make camera work again, as well as a system repair tool to fix this issue in few clicks.

Nokia 130 Music devices are one of the best Android devices available in the market and their users are always satisfied with their features. However, it is a recent observation that many Nokia 130 Music users complain about Nokia 130 Music camera failed error while using the camera App on the Nokia 130 Music device. It is a strange error and pops up suddenly with only one option to tap on, i.e., “OK”
The error message reads as follows: “Warning: Camera Failed”.
Once you click on “OK” the app shuts down abruptly and your Nokia 130 Music camera is failed. We understand this is not a very pleasing situation, thus, here are ways to tackle the camera failed Nokia 130 Music issue. Let us now move ahead and find out why exactly you experience Warning: Camera Failed error and how to fix it.
Part 1: Why Nokia 130 Music phone has Warning: Camera Failed error?
We are all aware that no device runs smoothly, without any glitches. We also know that there is a cause behind every problem. Listed below are a few reasons behind camera failed error, especially on Nokia 130 Music devices:
 Glarysoft File Recovery Pro - Helps to recover your lost file/data, even permanently deleted data.

- If you have recently updated your OS version, there are chances that certain bugs are preventing the camera App from functioning normally. Also, if the update is interrupted and not downloaded completely, certain apps may suffer.
- There are chances of your internal storage being cluttered with unwanted Apps and files leaving no space for the camera App to save its data and work smoothly.
- If you haven’t cleared camera Cache and Data, the chances of the App to get clogged up increase tremendously which disrupt its working.
- Warning: Camera Failed error can also be a direct outcome of a change in the system settings or the Nokia 130 Music device’s internal settings.
- Finally, if you tamper a lot with the camera settings and do not update the App whenever it is available, Nokia 130 Music Camera App will not be efficient.
There might be much more reasons for the camera failed error, but these are the most obvious ones. Now let us now move on to troubleshooting the problem.
Part 2: How to fix Nokia 130 Music Camera Failed in One Click?
If you are experiencing some kind of issues in your Nokia 130 Musics such as Nokia 130 Music camera failed, the Nokia 130 Music device stopped working, black screen, play store not working, etc. There is a special software is designed for such kind of issues in Android devices, i.e. dr. fone. The tool enables the users to fix various kinds of issues in the Nokia 130 Music devices and perform a complete system repair so the Nokia 130 Music device starts working normally.
 SwifDoo PDF Perpetual (2-PC) Free upgrade. No monthly fees ever.
Dr.Fone - System Repair (Android)
One-click solution to fix camera failed on Nokia 130 Music devices
- The tool has a one-click operation which makes it super easy to use.
- You don’t need any technical skills expertise to operate the software.
- The software supports all the Nokia 130 Music devices including the latest and older ones.
- The software can fix the “warning camera failed”, the app is crashing, failed update, etc.
4,616,396 people have downloaded it
Note: You have to remember that the system repair may erase all the Nokia 130 Music device data. So, create a backup of your Nokia 130 Music data first and then try fixing the Nokia 130 Music phone.
Follow the steps given below and fix the camera failed error:
Step 1. Download the software on your computer and launch it. Connect your device and select the System Repair option from the main interface. In the next screen, select Android Repair module.
Step 2. You will have to provide the Nokia 130 Music device details accurately to ensure that the software provides a precise firmware package to be downloaded. Enter brand, name, model, country, and carrier of your device and agree to the terms and condition.
Step 3. Now put your device in the download mode. The software will provide you with a guide to put the phone in download mode to begin the downloading process.

Step 4. As soon as the firmware is downloaded, the software will automatically initiate the repair process. You will be able to see the ongoing repair.
 CollageIt Pro
When the software is done repairing the system, you will be notified. Thus, the Camera failed Nokia 130 Music error in your phone will be fixed.
Part 3: How to fix Camera Failed error by clearing camera data?
Has anyone ever informed you that it is absolutely necessary to keep clearing camera data every once in a while? Yes, since it deletes all unnecessary data stored in respect of the App and no, it does not mean that all your photos and videos will get deleted. Just follow the steps given below to clear camera data:
1. First, visit “Settings’” on your Nokia 130 Music device and select “Apps” or Application Manager”.

2. Now a list of all Apps will appear before you. Keep scrolling down until your find “Camera”.

Tap on “Camera” to open the “Camera Info” screen and once you are there, hit “Clear Data” option as shown below.

That’s all, now return to the Home Screen and access the camera again. Hopefully, it will work now.
Part 4: How to fix Camera Failed error by removing third-party Apps?
Another tip to fix Nokia 130 Music camera failed error is by deleting a few unwanted third-party Apps (recently installed) to free some space in the Nokia 130 Music device’s internal storage. It is essential to create and keep storage space for the camera App to function smoothly and allow it to store its data as well. Also, if this issue only happens recently, it might be some newly installed Apps causing some glitches with the camera.
Simply, follow the instructions given below to remove Apps from Nokia 130 Music Devices:
1. Click on the “Settings” icon on the Home Screen and from the options before you, select “Apps”/ “Application Manager”.
2. You will see that a list of downloaded and built-in Apps will open up before you as follows.
 PDF application, powered by AI-based OCR, for unified workflows with both digital and scanned documents.
3. Now, once you select the App you want to uninstall, the App Info screen will appear. Tap on “Uninstall” option and then tap on “Uninstall” again on the pop-up message.

The App will be removed immediately and its icon will disappear from the Home Screen and you will notice an increase in the storage capacity of your device.
Part 5: How to fix Camera Failed error by wiping Cache Partition?
This method might seem tedious and time-consuming and you may also lose your data and essential settings. However, wiping the Cache Partition only cleans your device system internally and gets rid off any unwanted and trouble making elements causing Warning: Camera Failed error. Follow the step-by-step guide given below to clean Cache Partition smoothly:
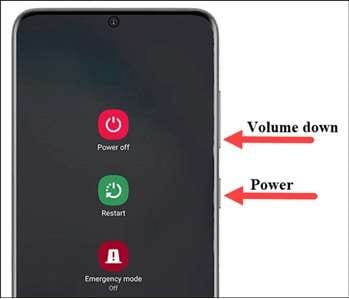
1. Firstly, switch off the Nokia 130 Music device by pressing the power button and tapping on “Power Off” as shown in the screenshot below. Then wait for the lit screen to turn off completely before proceeding further.

2. Now, press and hold the power on/off, home and volume up button simultaneously. Your device will now vibrate. This a signal to let go of the power button (only).

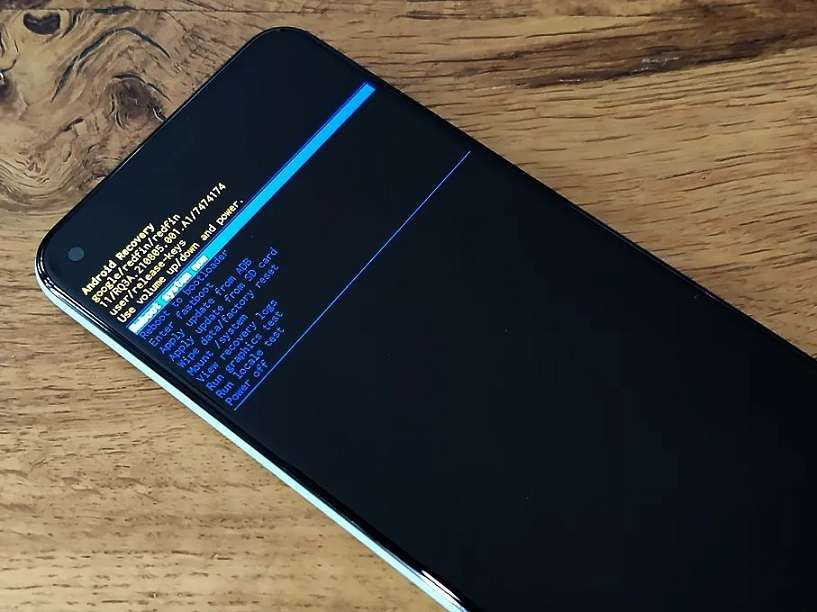
3. Once the Recovery Screen appears, leave all buttons and use the volume down key till you reach “Wipe Cache Partition”.
 PCDJ DEX 3 for Windows & MAC is the total entertainment DJ software solution, offering audio, video, and karaoke mixing ability. Automatic beat-sync, smart looping, 4 decks, DJ MIDI controller support, Karaoke Streaming and much more.
4. Now, to select the option to use the power on/off button and wait for the process to get over. Once this done, tap on “Reboot system now” and see that your device restarts normally.


You may try to use the camera app once the process completes.
Part 6: How to fix Camera Failed error by Reset Settings?
Resetting the camera settings solves the problem 9 out of 10 times and thus is worth a try.
1. To reset, first, launch the Camera App by tapping on its icon.

2. Then go to Camera “Settings” by tapping on the circular gear like icon.

3. Now look for “Reset Settings” options and click on it.

Once done, go back to the Home Screen and start the camera App again to use it.
Part 7: How to fix Camera Failed error by Factory Reset?
Lastly, if the above-mentioned techniques do not help you in fixing the camera failed error, you can consider performing a Factory Reset. Note: This method will delete all your saved data so it is advised to backup before you start the process.
Here are the steps to factory reset your device to fix “Warning: Camera Failed” Error:
1. Start by visiting “Settings” on your Nokia 130 Music device on which the camera has failed.

2. Now from the list of options before you, select “Backup and reset” and move ahead.
 Project Manager - Asset Browser for 3Ds Max

3. Now you must first select “Factory data reset” and then tap on “Reset Device” as shown in the screenshot below.


4. Finally, you have to click on “Erase Everything” and wait for the Nokia 130 Music device to reboot itself.

Note: You will have to set up your Nokia 130 Music device from scratch once it is reset, however, that is a small price to pay to fix your Camera App.
Warning: Camera Failed error is not a rare phenomenon and many users experience it on daily basis. So, there is no need to panic, All you need to do is carefully follow the instructions given above and repair your Camera App yourself. You do not need to seek any technical assistance for the same as the camera failed issue is not difficult to deal with. So go ahead and try these tricks to enjoy using the Camera App on your Nokia 130 Music devices.
How To Deal With the Nokia 130 Music Screen Black But Still Works?
With the advance of technology over the years, many of us rely on smartphones to communicate, work, and play. As such, it can be pretty concerning when your device begins to act strange like your phone screen suddenly went blank.
 WinUtilities Pro
Whether you’re using an iPhone or an Android device, you’ll eventually encounter a problematic symptom like this. Therefore, this article will explore what to do when your phone screen goes black. After exploring below, you’ll learn the common causes of why your phone screen went black and how to fix it. Read on below to learn more.
 Glarysoft File Recovery Pro Annually - Helps to recover your lost file/data, even permanently deleted data.
Part 1: Why Did My Nokia 130 Music Screen Go Black but Still Works? Common Causes
Experiencing a cell phone blank screen is not exclusive to Android or iOS users. A phone screen not turning on happens all the time due to several factors that may or may not be out of your control. While they can be frustrating, here are some common causes you should know as to why your phone screen went black but still works.
A Drained Battery
The first thing that comes to mind when your phone screen suddenly goes black is you have a drained battery. Even though this is obvious, it’s still important to mention, as this is usually what most people encounter. To fix this problem, plug your smartphone into a charger and wait for your device to turn on again. If it works, then you just prevented a rather annoying experience.

App Troubles
If your phone is working, but the screen is black, there’s also a high probability that you are having an isolated issue with a particular application. An app could be loading something, which often happens for streaming apps such as YouTube, Netflix, Prime, and more, especially if you have slow internet connectivity.
Software Issues
A potential reason why your phone screen went black but still works could be because of your smartphone’s software. This problem suggests that your Nokia 130 Music is crashing, potentially freezing your device if not addressed immediately. If this is the cause, then your device is likely experiencing a critical system error, and you should directly try to reboot your phone.
Hardware Problem
If you dropped your phone, there’s a high chance the LCD connectors went loose due to the physical impact. If this happened to you, the phone might be working, but the screen is black due to the LCD cable dislodging. Another issue could be your phone got exposed to extreme temperatures. This can also cause a black screen but your phone is still on.
 Software Update Pro - Check and update software installed on your computer.

Part 2: How To Fix Black Screen on Your Phone
Here are four valuable methods you should know on what to do when your phone screen goes black on your iPhone or Android smartphone to get them working again.
Method 1: Force Restart your Android/iOS Smartphone
If your phone screen is black but still works, force restarting it is the easiest way to fix it. The following are the detailed steps for both Android and iOS devices.
How to Force Restart your Android Device
Here is how you force restart an Android device when your phone screen doesn’t turn on.
Step 1: Press and hold the Power and Volume Down buttons simultaneously.

Step 2: Hold the same buttons until your device restarts, and display the phone’s logo.
How to Force Restart your iOS Device
If you own the latest iPhone models, here are the method of restarting it from iPhone 8 up to 14.
Step 1: Press and immediately release Volume Up. Next, press and immediately release Volume Down.

Step 2: Press and hold Sleep/Wake until you see the Apple logo.
Note
If you own an iPhone 7, press and hold the Side button and Volume Down simultaneously until you see the apple logo.
Method 2: Uninstall or Update Outdated Applications
In some cases, your phone screen is black but still works because of installing incompatible apps on your iOS/Android device. If the installed app is frequently crashing, it may be the source of a blank cell phone screen. Uninstall the problem app to see if the black screen disappears or not.
Method 3: Inspect the LCD Connectors
If your phone screen goes black but still works, you should inspect the logic board to the LCD screen to see if it has become disconnected. It is common for smartphones that often get dropped a few times. It’s best to plug the connectors back to regain your screen’s functionality.
However, this requires technical know-how. It’s better to seek help from a professional as you could risk causing more damage to your device if you don’t know what you’re doing.
Method 4: Perform a Factory Reset
If all the methods above did not solve your problem, the last resort you can take is to perform a Factory Reset. This method works on Android and iOS smartphones and erases all your data. It is the quickest way to try to fix why your phone screen went black. Here are the steps.
For Android Users
If you’re on Android, tap Settings > Backup and Reset. Tap on Factory data reset > Delete all to initiate the factory reset.
If you cannot do this, here’s how to perform a factory reset manually using Recovery Mode.
Note
The process of booting into Recovery Mode is not the same across all Android devices and depends on the manufacturer and model of your phone. Refer to your owners manual to see which method is the right one for your Nokia 130 Music.
Step 1A: Press and hold the Power button and Volume Down buttons simultaneously and continue holding until the screen starts.
Step 1B: For Android devices with a Home button, press and hold the Home button and the Power button and continue holding until the screen starts.
Step 1C: Press and hold the Power button as well as the Volume Up and Volume Down buttons simultaneously and continue holding until the screen starts.

Step 2: Use the Volume buttons to navigate the choices and select Wipe data/factory reset and confirm your choice with the Power button.
Step 3: Simply wait for the process to complete and wait for your Nokia 130 Music to restart automatically.
F****or iOS Users
Step 1: For iOS users, meanwhile, tap Settings > General > Transfer or Reset iPhone.
Step 2: Next, choose Erase All Content and Settings. Check the list of items you want to remove.

Step 3: Tap Continue and enter your iPhone passcode. A message warns you that the process will delete all media and data and reset all settings.
Step 4: Tap Erase iPhone to confirm. You’ll be asked to type in your Apple ID and password if Find My is active. Enter your password and tap Erase.
Part 3: How To Fix Black Screen Phone With an Alternative
If your phone screen went black but still works and doing the methods above did not solve the issue, you can use Wondershare Dr.Fone for iOS and Android as a last resort. It’s one of the most popular smartphone repair tools today, enabling you to fix all kinds of annoying scenarios. These include black screen, boot loop, white screen of death, bricked iOS or Android device, and more.
Key Features
Dr.Fone – System Repair for iOS and Android has fantastic features you can immediately take advantage of. Here are its key features below.
- Fix all Android and iOS Problems in Minutes
Dr.Fone – System Repair can fix all kinds of issues on your Android/iOS, such as a black screen, white screen of death, screen freeze, boot loop, or recovery mode. All of this can be done within less than 10 minutes to save you precious time.
- Supports up to 1000+ Android Smartphones and the latest iOS
All iOS versions, including the latest iOS 16 and iOS 16 beta, are fully supported by Dr.Fone – System Repair. The app handles all your smartphone issues without data loss to secure your info. On the other hand, if you own an Android, the app supports up to 1000+ Android smartphones, making it highly versatile for Android owners.

Tech Specs
Dr.Fone – System Repair (Android)’s minimum system requirements for your computer are listed below.
| Computer OS | Android |
|---|---|
| Windows 11, 10, 8.1, 8, 7 | Android 2.1 and up to the latest |
Meanwhile, here are the system requirements for Dr.Fone – System Repair (iOS).
| Computer OS | iOS |
|---|---|
| Windows 11, 10, 8.1, 8, 7 | Supports all iOS versions, including the latest iOS 16 and iOS 16 beta |
| macOS 12, 11, 10.15, 10.14, 10.13, 10.12, 10.11, 10.10, 10.9, 10.8 |
Pros and Cons
If you’re still undecided about Dr.Fone – System Repair, here are its pros and cons.
Pros
- Fone – System Repair for iOS and Android has a clutter-free and beginner-friendly user interface. It’s easy to understand and use, so you can start immediately.
- Both the iOS and Android versions finish the repair tasks within less than 10 minutes to save you time.
Cons
- Each version for each OS is sold separately.
- The free version works up to your device’s compatibility. Once you start the repair process, the app will ask you for a valid license key.
How to Fix Black Phone Screen With Dr.Fone – System Repair
Here’s how to fix your phone screen with Dr.Fone – System Repair on iOS/Android.
Step 1: Download and install Dr.Fone – System Repair for iOS or Android. Next, open the program and connect your smartphone.
Step 2A (For iOS): Choose the correct model of your iPhone for the program to be able to download the appropriate firmware package.
Step 2B (For Android): Click Start. On the next window, choose the Brand, Name, Model, Country, and Carrier of your smartphone, then click Next.

Step 3: Follow the on-screen instructions provided on the main program window and wait for the repair process to complete.
safe & secure
4,262,204 people have downloaded it
## ConclusionOur increasing reliance on smartphones has led to amazing advancements in new technologies. However, lingering issues such as your phone screen not turning on or your phone screen being black but still working are ongoing problems to many. That’s why learning how to prevent these events is essential to take care of your smartphone.
Doing all the recommended methods above usually solves the case. If the different fixes don’t work for you, Dr.Fone – System Repair for iOS and Android can help resolve all your problems within less than 10 minutes. You can download it for free on Windows and Mac to test it yourself.
- Title: Calls on Nokia 130 Music Go Straight to Voicemail? 12 Fixes | Dr.fone
- Author: Ariadne
- Created at : 2024-07-30 09:53:06
- Updated at : 2024-07-31 09:53:06
- Link: https://howto.techidaily.com/calls-on-nokia-130-music-go-straight-to-voicemail-12-fixes-drfone-by-drfone-fix-android-problems-fix-android-problems/
- License: This work is licensed under CC BY-NC-SA 4.0.