
:max_bytes(150000):strip_icc():format(webp)/18-Hidden-Snapchat-Features-efa75dca521e4cf6bb321dc960276deb.jpg)
Calls on Nokia C12 Go Straight to Voicemail? 12 Fixes | Dr.fone
Calls on Nokia C12 Go Straight to Voicemail? 12 Fixes
Have you ever experienced incoming calls to your phone go straight to voicemail without ringing? It can be frustrating, especially if you’re expecting an important call. It could be due to simple things like turning down the volume or forgetting to turn off the Do Not Disturb mode. In other cases, it might be because you accidentally blocked the caller’s number.
In most cases, incoming calls going to voicemail without ringing are common. However, if it’s happening frequently or for all calls, your phone may have a problem.
This article will discuss why incoming phone calls go straight to voicemail and how to fix the problem. We’ll also show you how to use Wondershare Dr.Fone, a powerful Android System Repair tool, to solve such issues. So, if you’re uncertain why that last call went straight to voicemail, keep reading, and we’ll cover everything you need to know.

Part 1: Not Ringing? Here’s Why Calls on Your Phone Go Straight to Voicemail
If an incoming call to your cell phone goes straight to voicemail without ringing, there could be a few reasons. Here’s what to look for and what you should do to fix it:
- Turn Off Do Not Disturb (DND) Mode
DND mode is a feature that silences all incoming calls, notifications, and alerts. If DND mode is enabled, your cell phone goes straight to voicemail when someone calls. To turn off DND mode, swipe down from the top of the screen to open the notification settings panel, then tap the Do not disturb icon.

Here’s an alternative way:
- Step 1: Open the Settings app and go to Notifications.
- Step 2: Tap Do not disturb.

- Step 3: Toggle Do Not Disturb offto disable the mode.
- Turn Off Call Forwarding
One reason calls go straight to voicemail without ringing is if you enabled call forwarding. Call forwarding is a feature that redirects incoming calls to another number. To turn off call forwarding:
- Step 1: Open the Phone Dialer app on your device, then tap the menu icon and select Settings.

- Step 2: Navigate to Supplementary services > Call forwarding.

- Disable Call Barring
If a phone call went straight to voicemail, another possible explanation is the call barring. It is a feature that restricts calls from being made or received on your phone. If activated, it can cause incoming calls to a phone to go straight to voicemail. To turn off call barring on Nokia C12 devices:
- Step 1: Open the Phone Dialer app, then tap the menu icon in the top right corner.
- Step 2: Go to Settings > Supplementary services > Call barring, then tap OK.
- Step 3: Select Voice call, then turn off your preferred outgoing and incoming calls. When prompted, enter 0000 as a password.

- Update Your Phone’s Software
Sometimes, software bugs can cause problems with incoming calls, which may be why your last incoming call went straight to voicemail. If your phone runs outdated software, try updating it to the latest version.
To check for updates, open the Settings app and go to Software update or System update. For a seamless update experience, follow the step-by-step instructions on your mobile screen.

- Reset Network Settings
If the incoming calls on your phone go straight to voicemail, consider resetting your phone’s network settings. Network settings control how your phone connects to the cellular network. If these settings are not set up correctly, incoming calls may not be able to reach your device.
Note: Resetting your network settings will erase any saved Wi-Fi networks and Bluetooth pairings, requiring you to re-enter them after the reset is complete.
To reset your network settings on most Android devices:
- Step 1: Open the Settings app on your smartphone, then tap System or General Management.
- Step 2: Go to Reset > Reset Network Settings and confirm the action.

- Turn Off Bluetooth
When Bluetooth is on, it can interfere with your device’s ability to receive calls, causing them to go straight to voicemail without ringing. To turn off Bluetooth on an Android device, you can do one of the following:
- Swipe down from the top of the screen to open the Quick Settingspanel, then tap the Bluetooth icon to turn it off.

- Go to Settings> Connections > Bluetooth and toggle the switch off.

It should help ensure that calls come through to your phone instead of going to voicemail.
- Check Airplane Mode
If turning off Bluetooth didn’t solve the issue, another possible cause could be that your phone is in Airplane Mode. Airplane Mode turns off all wireless connections on your phone, including cellular service, which can cause calls to dial straight to voicemail. There are two ways to turn off Airplane mode on Android:
Using the Settings app:
- Step 1: Open the Settings app.
- Step 2: Tap Network & internet.
- Step 3: Toggle off Airplane mode or Flight mode.
Using the Quick Settings panel:
- Step 1: Swipe down from the top of the phone screen to access the Quick Settings panel.
- Step 2: Look for the Airplane mode or Flight mode icon, then tap it to turn it off.

- Check Blocked Numbers
“My boyfriend’s phone goes straight to voicemail when someone is calling. Any idea why that might be?”
Do you also find yourself asking what does it mean? It could be that he has blocked that phone number. To check this:
- Step 1: Open the Phone dialer app.
- Step 2: Tap the menu icon in the top right corner and select Settings.
- Step 3: Tap Block numbers. If you find the number in the blocked list, remove it to ensure that their calls come through to the phone.

If you still have trouble reaching your boyfriend, try calling him from a different number. If your call didn’t go through, you know that he hasn’t blocked your number and that there may be another issue with his phone.
- Turn Off Google One VPN
If you’re using Google One VPN, try turning it off to see if that fixes the problem. Some users have reported that Google One VPN can cause incoming calls to a phone to go straight to voicemail. To turn off Google One VPN:
- Step 1: Open the Google One app on your Nokia C12.
- Step 2: At the bottom, go to the Benefits tab, then tap View Details below the Online protection with a VPN section.

- Step 3: Toggle off Enable VPN.

- Contact Your Carrier
If your phone calls go straight to voicemail after trying all the above, contact your carrier for help. They may be able to troubleshoot the problem or determine if there is a service outage in your area.
And if your carrier confirms that there is no service outage or billing-related block, the problem may be with your phone itself. You may need to try resetting your phone to factory settings or taking it to a repair shop.
- The Caller Used Ringless Voicemail
Ringless voicemail is a service that allows businesses to bypass your phone’s ringtone and send you pre-recorded messages directly to voicemail. Ringless voicemail is often used for marketing purposes. If you think you’re receiving ringless voicemail calls, you can contact the company calling you and ask them to remove you from their list.
Part 2: Not Clear About the Root Cause? Troubleshoot Directly by Wondershare Dr.Fone
If you’re unsure what’s causing your calls to go straight to voicemail, you can try using the Dr.Fone System Repair tool. This software can scan and repair your phone for any underlying problems, which may fix the issue and get your calls ringing again.
Dr.Fone supports over 1000 Android models, including unlocked Nokia C12 models and models from carriers like AT&T and Vodafone. It has an intuitive interface and is easy to use, even for beginners. Learn below the steps on how to use Dr.Fone System Repair to fix incoming calls that dial straight to voicemail:
- Step 1: Download Dr.Fone on your computer, then launch it once installed.
 safe & secure
4,118,635 people have downloaded it
- Step 2: Connect your smartphone to your desktop or computer using a USB cable. Next, from the Toolbox homepage, select System Repair.

- Step 3: Select Android as the Nokia C12 device type.

- Step 4: Click Start to begin repairing your smartphone.

- Step 5: Select the Nokia C12 device details on the Name, Model, Country, and Carrier drop-down lists. Next, select the agreement checkbox, then click Next to proceed.

- Step 6: Follow the in-app instructions to enter Download mode on your Nokia C12, then click Next.

- Step 7: Wait while the app downloads the firmware; once done, click Fix Now.

- Step 8: Enter the code in the input box to verify the Nokia C12 device information in the dialogue box, then click Confirm.

- Step 9: The app will start repairing the system issue on your Nokia C12. Once completed, your app should restart, then click Done to close the app.

You May Also Like:
Top 5 Best Android System Repair Apps
How to Fix It: Android Stuck on Boot Screen?
How to Flash Dead Android Phone Safely
Conclusion
When your phone calls go straight to voicemail without ringing, it can be a frustrating and disruptive experience. Not only do you miss important calls from work, friends, or family, but it also leaves you feeling disconnected and out of the loop. As a temporary measure to avoid missing important calls, check your voicemail regularly.
For a prompt solution, consider using Dr.Fone if incoming calls on your phone go straight to voicemail. It is a powerful mobile solution that can also address other system problems, including stuck boot loops, app crashes, black screens, and bricked devices. If you consistently experience this issue, it’s advisable to reach out to a professional for assistance.
safe & secure
4,215,287 people have downloaded it
Home Button Not Working on Nokia C12? Here Are Real Fixes
There is no doubt that it is quite frustrating when your device buttons, such as home and back don’t work properly. The reasons can be software as well as hardware issues. If you are wondering whether there is any solution to fix this problem, then you’ve come to the right place. Firstly, yes some methods can probably help you to come out of this issue. Here, in this guide, we have covered various solutions you can try to resolve the “home button not working Android” problem no matter whether it is due to software or hardware reason.
Part 1: 4 Common Measures to Fix Home Button Not Working Android
Here, we are going to mention four common methods that you can try to resolve the home button problem on your Nokia C12 with ease.
1.1 One click to fix Android Home Button Not Working
[Try It Free](https://download.wondershare.com/drfone_repair_full3371.exe)When it comes to the home button not working Nokia C12 problem, the most common reason is the unknown system issues. In such a scenario, the best solution is using Dr.Fone - System Repair (Android) software to repair your Android system to normal in one click. This tool is powerful enough to resolve various Android issues within a few minutes.
Dr.Fone - System Repair (Android)
Android repair tool to fix home button not working on Android
- The tool can help you to fix the Android operating system in a wide range of scenarios.
- It is compatible with all Nokia C12 devices.
- There is no need for technical skills to use the software.
- The software comes with a high success rate for fixing the Android system.
- It provides easy steps to resolve Android issues.
3981454 people have downloaded it
To learn how to fix home button not working problem, download and install the Dr.Fone - System Repair (Android) software on your computer, follow the below step-by-step guide:
Step 1: To begin with the process, launch the software on your computer and select the “System Repair” option from the software main window.
Step 2: Thereafter, connect your Nokia C12 to the computer using a USB cable and select the “Android Repair” tab from the left menu.
Step 3: Next, you will navigate to a device information page where you have to provide your device information.
Step 4: After that, the software will download the appropriate firmware to repair your Android system.

Step 5: After downloading the firmware, the software will start the repair process. Wait for a few seconds, the problem should get fixed and your phone will get back to its normal state.
1.2 Force Restart your Android
Whenever you encounter with Android virtual soft keys, not working problem, the first thing you should try is to force restart your phone . If the problem is due to a software issue, then it can be probably fixed by simply force restarting your Android.
Here are simple steps on how to force restart on Android:
Step 1: To begin with, press and hold the power button and either volume up or down button at the same time until your device screen goes off.
Step 2: Next, press the power button for a few moments to force restart your device.

1.3 Restore Factory Settings
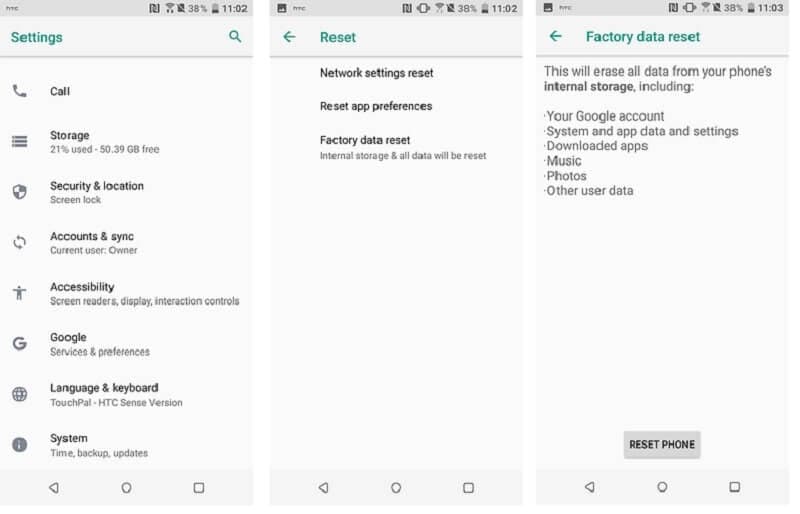
If force restarting won’t help you to fix the problem you are facing, it’s time to reset your Nokia C12 to factory settings. The factory reset on an Android device will erase all of your phone settings, third-party apps, user data, and other app data to restore your device to its original manufacturer condition or settings. It means that this can bring back your device to its normal state.
To learn how to restore factory settings, follow the below steps:
Step 1: Go to your ‘Settings” and then, go to “System”>” Advanced”>” Reset options”.
Step 2: Next, tap on “Erase all data”>” Reset phone” to factory reset on your phone. Here, you may need to enter the password or pin or pattern.
Once you are done with the above steps, restart your phone and restore your data and this might be fixed the problem for you. If not, then try the next solution.
1.4 Update Android Firmware
It might be the case that your Android firmware is not updated and that’s why you are experiencing the home button not working Android problem. Sometimes, not updating your Android firmware can cause various issues and problems while using your device. So, you should update it, and here are steps on how to do it:
Step 1: Open the Settings and then, go to “About device”. Next, click “System updates”.
Step 2: After that, click “Check for updates” and if updates are available, then download and install it to update your Android version.

Part 2: What if the Home Button fails due to hardware reasons?
When your Android home and back button not working because of hardware reasons, you can’t get the problem resolved by simply rebooting your device. In such cases, you have to use alternative apps to replace the home button.
2.1 Simple Control app
The Simple Control app is the first and foremost solution to fix the Android home button not working issue. With the help of this app, you can fix many soft keys of your device. It is specially designed for Android users facing trouble using home, volume, back, and camera buttons. Plus, the app utilizes Accessibility service, but it doesn’t get access to your sensitive and personal information.
Pros:
- It can easily replace broken and failed buttons.
- The app is quite easy to use.
Cons:
- It is not as much efficient as other similar apps available out there.
URL: https://play.google.com/store/apps/details?id=ace.jun.simplecontrol&hl=en_US
2.2 Button Savior app
Button Savior app is one of the ultimate apps that can help you to fix the Android home button not working problem with ease. For this app, root and no root versions are available on the Google Play store. To fix the Home button not working issue, no root version is the right one. But, if you want to fix the Back button or other buttons, then you need to go for the root version.
Pros:
- It comes with a root as well as no root version.
- The app is powerful enough to fix a wide range of buttons.
- It shows information regarding the date and time and battery.
Cons:
- The root version of the app can cause data loss.
URL: https://play.google.com/store/apps/details?id=com.smart.swkey" target="_blank” rel=”nofollow
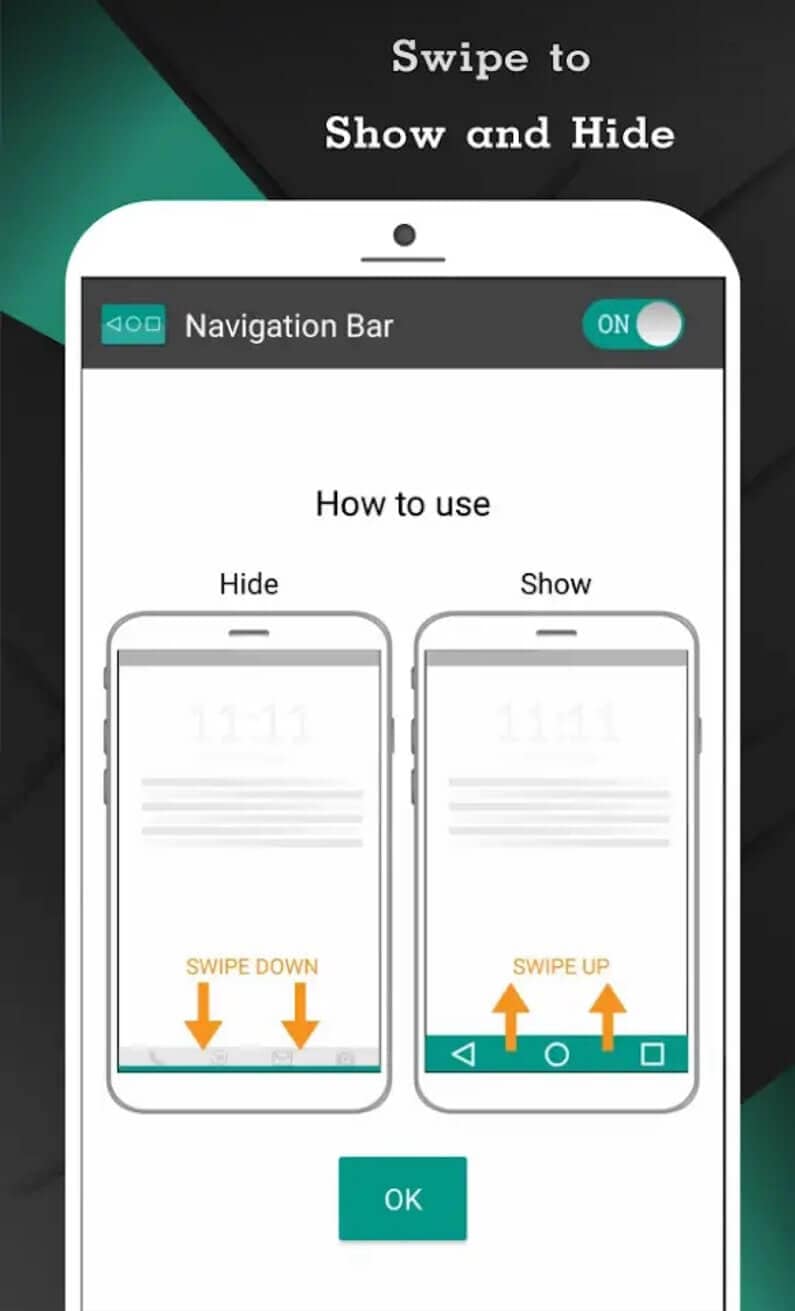
2.3 Navigation Bar (Back, Home, Recent Button) app
Navigation Bar app is another great solution to fix the home button not responding problem. It can replace broken and failed button for users who are facing difficulty using navigation bar panel or buttons not working properly. The app offers numerous features, and it is easy to use.
Pros:
- It offers many colors to make an incredible navigation bar.
- The app provides 15 themes for customization.
- It comes with the ability to change the size of the navigation bar.
Cons:
- Sometimes, the navigation bar stopped working.
- It comes with ads.
URL: https://play.google.com/store/apps/details?id=nu.nav.bar
2.4 Home Button app
Home button app is another remarkable solution to replace broken and failed home buttons for users having trouble while using buttons. With this app, it is quite easy to press or even long press on the home button as assistive touch.
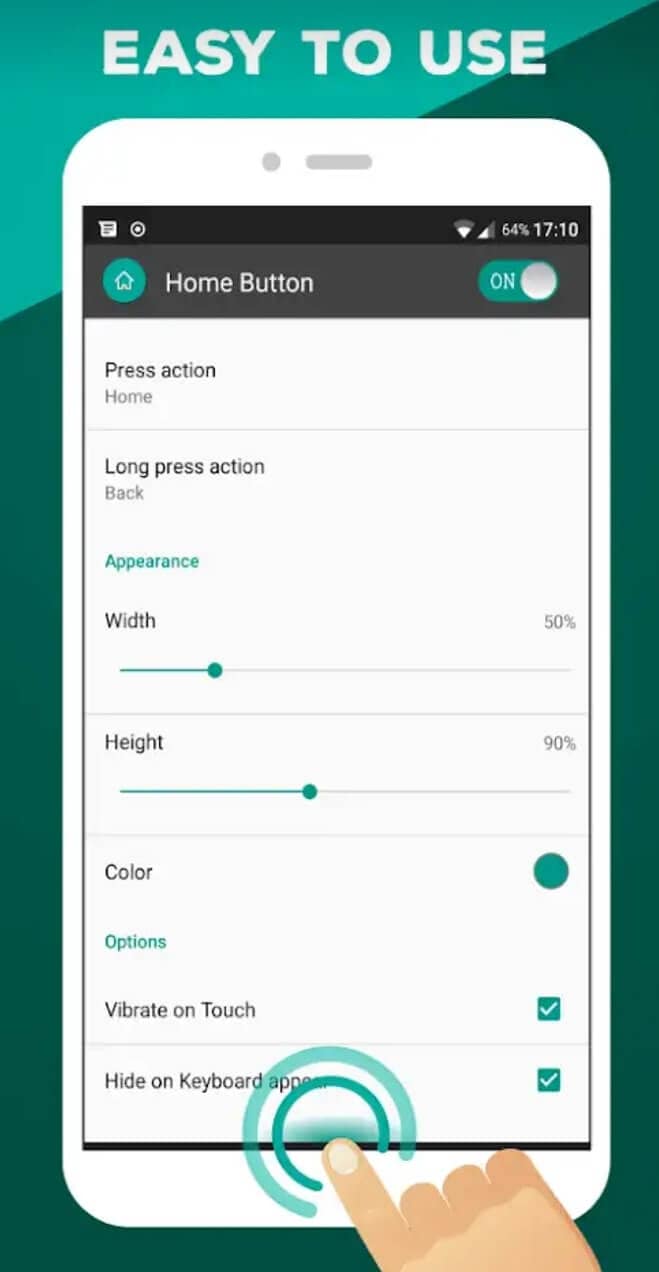
Pros:
- You can change the button of color using the app.
- With the help of it, you can set a vibrate setting on touch.
- It provides support for many press actions, such as home, back, power menu, etc.
Cons:
- It doesn’t come with a lot of features, unlike other apps.
- Sometimes, it shuts down automatically.
URL: https://play.google.com/store/apps/details?id=nu.home.button
2.5 Multi-action Home Button app
Is your Android physical home button is broken or dead? If yes, then the Multi-action Home Button app can help you to fix it with ease. With the help of it, you can create a button in centre-bottom of your device screen, and you can also add numerous actions to that button.
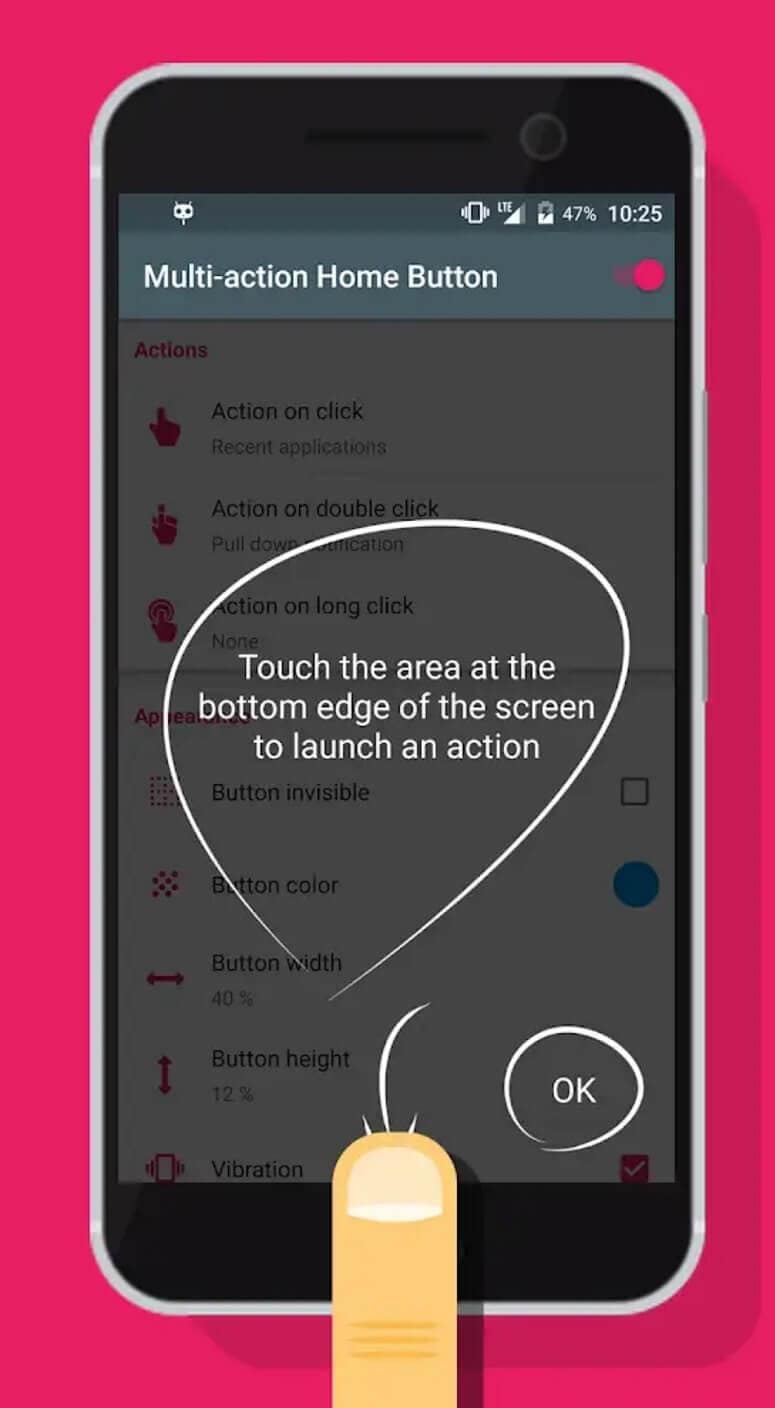
Pros:
- It provides various actions with the button.
- It is very simple and easy to use.
Cons:
- The app’s very useful feature comes with its pro version.
URL: https://play.google.com/store/apps/details?id=com.home.button.bottom
Conclusion
Hopefully, the methods covered in this post helps you to fix Android home and back button not working problem for you. If it is a system issue, then the best thing you can do is to take advantage of Dr.Fone - System Repair (Android) software. It can surely help you to fix your Android system to normal within a few minutes.
11 Proven Solutions to Fix Google Play Store Not Working Issue on Nokia C12
Google Play Store is a necessary and bundled service of any Android device. This app is required to download or even run any apps. So, getting an error like Play store not working or Play Store crashing is very unfortunate and a matter of a headache. Here we tried to put the best solution to overcome this issue. Keep reading this article for all the 11 best solutions.
Part 1. The recommended method to fix Google Play Store issues
If you search on the internet, you may find various tricks dealing with Google Play Store not working issue. However, either to try each of them or choose several to follow would certainly cost a lot of time. What’s more, we are not sure whether they will really work. Therefore, we would recommend you with a more effective and fast way, that is to use Dr.Fone - System Repair (Android) , a dedicated Android repair tool to fix Google Play Store, not working issues just in one click.
Dr.Fone - System Repair (Android)
A most effective method to fix Google Play Store not working
- Fix all Android system issues like the black screen of death, won’t turn on, system UI not working, etc.
- Industry’s 1st tool for one-click Android repair.
- Supports all the new Nokia C12 devices like Galaxy S8, S9, etc.
- Step-by-step instructions provided. No technicals skills required.
3981454 people have downloaded it
Brief steps to guide you through the process of fixing Google Play Store not working (followed by video tutorial):
- Get this tool downloaded on your computer. Install and launch it, and you can find the following welcome screen displayed.
- Select the option “System Repair”. In the new interface, click on the “Android Repair” tab.
- Start fixing Google Play Store not working by clicking “Start”. Select and confirm the correct model details as instructed.
- Activate the Download mode from your Nokia C12.

- After entering the Download mode, the Dr.Fone tool starts to download the correct firmware to your Android.
- The downloaded firmware will be loaded and flashed to your Nokia C12 to fix the Google Play Store not working issue.

- Wait until the Android repair process is complete. Start your Android and Google Play Store, you can then find that the Google Play Store not working issue no longer exists.
Video tutorial to fix Google Play Store not working
Part 2: Other 10 common methods to fix Google Play Store issues
1. Fix Date and Time settings
Sometimes Google creates a problem connecting with the Play Store or Play store crashing due to the wrong date and time. The first and most common thing is you have to check if the date and time are updated or not. If not, update it first by following the below step by step guide.
Step 1 – First, go to the “Settings” of your device. Find ‘Date and time’ and tap on it.

Step 2 – Now you can see several options. Select “Automatic date and time”. This should override the wrong date and time your device have. Else, deselect the tick beside that option and select the date and time manually.
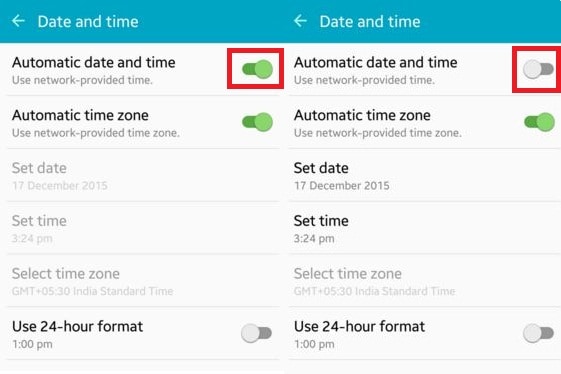
Step 3 – Now, go to the Play store and try to connect again. This should be working without any problem now.
2. Cleaning of Cache data of Play Store
This may happen that sometimes Google Play Store stopped working due to excessive unnecessary data stored in the cache of the Nokia C12 device. So, clearing unnecessary data is very important to keep the application run smoothly. To do this, you need to follow the below steps.
Step 1 – Firstly, go to “Settings” on your device.
Step 2 – Now, navigate to the “Apps” option available at the settings menu.
Step 3 – Here you can find the “Google Play Store” app listed. Open it by tapping.
Step 4 – Now, you can find a screen like below. Tap on “Clear cache” to remove all the cache from the application.
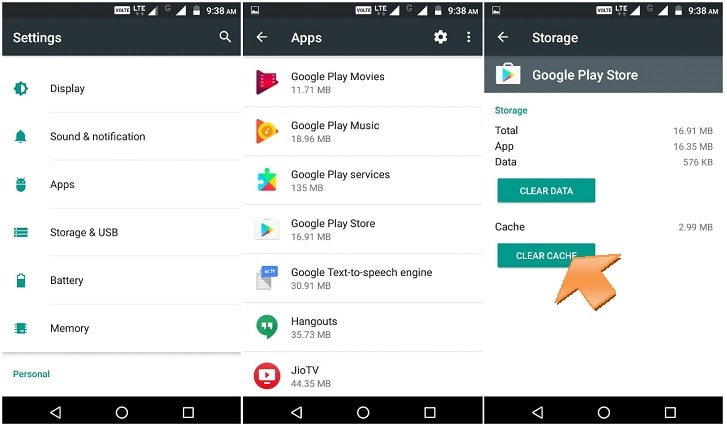
Now, again try to open Google Play Store and you may successfully overcome the Play Store not working issue. If not, check the next solution.
3. Reset Play store by Clear data
If the above solution is not working for you, you might try this option instead. This step will erase all the app data, settings, etc so that it can be set up a fresh one. This will also fix the Google Play store not working issue. For this solution, use the following method step by step.
Step 1 – Like the previous method, head towards the settings and then find “Apps”
Step 2 – Now find “Google Play Store” and open it.
Step 3 – Now, instead of tapping “Clear cache”, tap on “Clear data”. This will erase all the data and settings from the Google Play store.
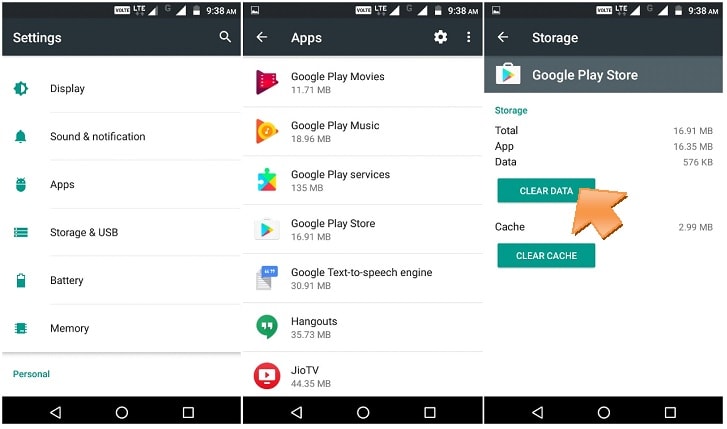
After this, open “Google Play Store” and now your problem might be solved now.
4. Reconnecting the Google account
Sometimes it may happen that removing and reconnecting your Google account may solve the Play Store not working issue. To do this, you need to follow the instructions below.
Step 1 – Go to the “Settings” and then find “Accounts”.
Step 2 – Upon opening the option, select “Google”. Now you can see your Gmail ID listed there. Tap on it.

Step 3 – Now click on the top right side three dots or “more” option. Here you can find the “Remove account” option. Select it to remove the Google Account from your Mobile.
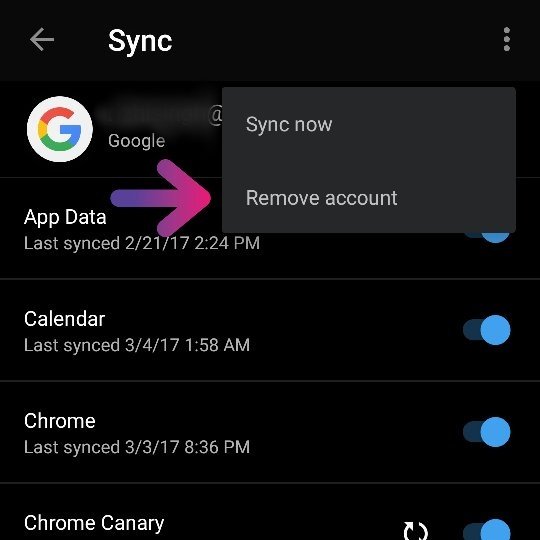
Now, go back and try to open Google Play Store again. This should work now and enter your Google ID and password again to continue. If it’s still not working, move to the next solution.
5. Reinstall the latest version of Google Play Store
Google Play store can’t be uninstalled completed completely from your Nokia C12. But disabling and reinstalling its latest version can resolve the Play Store crashing issue. For doing this, just follow the below guide.
Step 1 – First of all, go to “Settings” and then move on to “Security”. Then find “Device administration” here.
Step 2 – Upon clicking on this option, you can find “Android device manager”. Uncheck this and disable.

Step 3 – Now you can be able to uninstall Google play service by going into application manager.

Step 4 – After that, try to open any app that requires Google Play store to open, and that will automatically guide you to install the Google Play service. Now install the updated version of the Google Play service.
After installing, your problem might be solved by now. If not, try the next solution.
6. Clear Google Service Framework Cache
Besides the Google Play store, this is important to keep healthy the Google Service Framework as well. The cache and unnecessary data should be removed from there also. Follow the steps below.
Step 1 – Go to settings and then tap on “Application Manager”
Step 2 – Here you can find “Google Service Framework”. Open it.
Step 3 – Now, tap on “Clear cache”. And you are done.

Now go back and try to open Google Play store again. This might solve the Google Play Store has stopped the problem by now. If not, check the next solution.
7. Disable the VPN
The VPN is a service to get all the media outside your geographic location. This is also used to install a country-specific app in another country. But sometimes it can create a problem with Play Store crashing. So, this is recommended to try disabling the VPN.
Step 1 – Go to the settings of your device.
Step 2 – Under the “networks”, click on “More”.
Step 3 – Here you can find “VPN”. Tap on it and turn it off.
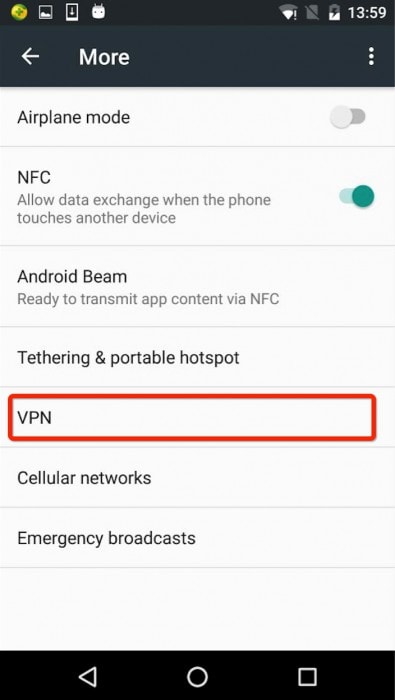
Now, again go back and try to open the Google Play Store. This may solve your problem now. If not, check the next solution.
8. Force stop Google Play Service
Google Play Store needs to be restart just like your PC. This is a really helpful and common trick to overcome the Play Store crashing issue on your Nokia C12. To do this, follow the below steps.
Step 1- Go to settings and then go to the “Application Manager”.
Step 2 – Now find “Google Play Store” and click on it.
Step 3 – Here click on “Force Stop”. This allows the Google Play Store to stop.

Now, try to open Google Play store again and this time the service is being restarted and might work properly. If not, try the next solution.
9. Try a Soft Reset of your device
This easy to use solution will remove all the unnecessary temporary files of your device, close all recent apps, and make it clean. This is just rebooting your device. It won’t delete any data from your device.
Step 1 – Long press the “Power” button on your device.
Step 2 – Now, click on ‘Reboot’ or ‘Restart’ option. Your device will restart in some time.

After restarting, try to open the Google Play Store again and this time you should succeed. If any case, it’s not opening, try the last (but not the least) method by hard reset your Android.
10. Hard reset your device
If you have done with all of the above solutions and still Play Store crashing, and you are aggressive to get it, then only try this method. Using this method will delete all the data of your device. So take a backup of the whole. Follow the step by step instruction below.
Step 1 – Go to setting and find “backup and reset” there.
Step 2 – Click on it. And then Click on the “Factory data reset” option.
Step 3 – Now confirm your action and tap on the “Reset device”.

This will take a while to reset your device completely. After completion, start the Google Play Store and set up as a new device.
The above methods are the best 11 among all the solutions you can get for your Play Store not working on wifi or Play Store crashing error. Try one by one and you might get rid of this problem.
- Title: Calls on Nokia C12 Go Straight to Voicemail? 12 Fixes | Dr.fone
- Author: Ariadne
- Created at : 2024-03-19 11:30:51
- Updated at : 2024-03-21 12:35:51
- Link: https://howto.techidaily.com/calls-on-nokia-c12-go-straight-to-voicemail-12-fixes-drfone-by-drfone-fix-android-problems-fix-android-problems/
- License: This work is licensed under CC BY-NC-SA 4.0.
