
Calls on Oppo A2 Go Straight to Voicemail? 12 Fixes | Dr.fone
Calls on Oppo A2 Go Straight to Voicemail? 12 Fixes
Have you ever experienced incoming calls to your phone go straight to voicemail without ringing? It can be frustrating, especially if you’re expecting an important call. It could be due to simple things like turning down the volume or forgetting to turn off the Do Not Disturb mode. In other cases, it might be because you accidentally blocked the caller’s number.
In most cases, incoming calls going to voicemail without ringing are common. However, if it’s happening frequently or for all calls, your phone may have a problem.
This article will discuss why incoming phone calls go straight to voicemail and how to fix the problem. We’ll also show you how to use Wondershare Dr.Fone, a powerful Android System Repair tool, to solve such issues. So, if you’re uncertain why that last call went straight to voicemail, keep reading, and we’ll cover everything you need to know.

Part 1: Not Ringing? Here’s Why Calls on Your Phone Go Straight to Voicemail
If an incoming call to your cell phone goes straight to voicemail without ringing, there could be a few reasons. Here’s what to look for and what you should do to fix it:
- Turn Off Do Not Disturb (DND) Mode
DND mode is a feature that silences all incoming calls, notifications, and alerts. If DND mode is enabled, your cell phone goes straight to voicemail when someone calls. To turn off DND mode, swipe down from the top of the screen to open the notification settings panel, then tap the Do not disturb icon.

Here’s an alternative way:
- Step 1: Open the Settings app and go to Notifications.
- Step 2: Tap Do not disturb.


- Step 3: Toggle Do Not Disturb offto disable the mode.
- Turn Off Call Forwarding
One reason calls go straight to voicemail without ringing is if you enabled call forwarding. Call forwarding is a feature that redirects incoming calls to another number. To turn off call forwarding:
- Step 1: Open the Phone Dialer app on your device, then tap the menu icon and select Settings.

- Step 2: Navigate to Supplementary services > Call forwarding.


- Disable Call Barring
If a phone call went straight to voicemail, another possible explanation is the call barring. It is a feature that restricts calls from being made or received on your phone. If activated, it can cause incoming calls to a phone to go straight to voicemail. To turn off call barring on Oppo A2 devices:
- Step 1: Open the Phone Dialer app, then tap the menu icon in the top right corner.
- Step 2: Go to Settings > Supplementary services > Call barring, then tap OK.
- Step 3: Select Voice call, then turn off your preferred outgoing and incoming calls. When prompted, enter 0000 as a password.
 The Tube Sites Submitter is a fast and efficient tool for anyone who needs to upload videos quickly, easily and automatically to hundreds of tube sites in mere minutes .
- Update Your Phone’s Software
Sometimes, software bugs can cause problems with incoming calls, which may be why your last incoming call went straight to voicemail. If your phone runs outdated software, try updating it to the latest version.
To check for updates, open the Settings app and go to Software update or System update. For a seamless update experience, follow the step-by-step instructions on your mobile screen.

- Reset Network Settings
If the incoming calls on your phone go straight to voicemail, consider resetting your phone’s network settings. Network settings control how your phone connects to the cellular network. If these settings are not set up correctly, incoming calls may not be able to reach your device.
Note: Resetting your network settings will erase any saved Wi-Fi networks and Bluetooth pairings, requiring you to re-enter them after the reset is complete.
To reset your network settings on most Android devices:
- Step 1: Open the Settings app on your smartphone, then tap System or General Management.
- Step 2: Go to Reset > Reset Network Settings and confirm the action.

- Turn Off Bluetooth
When Bluetooth is on, it can interfere with your device’s ability to receive calls, causing them to go straight to voicemail without ringing. To turn off Bluetooth on an Android device, you can do one of the following:
- Swipe down from the top of the screen to open the Quick Settingspanel, then tap the Bluetooth icon to turn it off.


- Go to Settings> Connections > Bluetooth and toggle the switch off.

It should help ensure that calls come through to your phone instead of going to voicemail.
- Check Airplane Mode
If turning off Bluetooth didn’t solve the issue, another possible cause could be that your phone is in Airplane Mode. Airplane Mode turns off all wireless connections on your phone, including cellular service, which can cause calls to dial straight to voicemail. There are two ways to turn off Airplane mode on Android:
Using the Settings app:
- Step 1: Open the Settings app.
- Step 2: Tap Network & internet.
- Step 3: Toggle off Airplane mode or Flight mode.
Using the Quick Settings panel:
- Step 1: Swipe down from the top of the phone screen to access the Quick Settings panel.
- Step 2: Look for the Airplane mode or Flight mode icon, then tap it to turn it off.

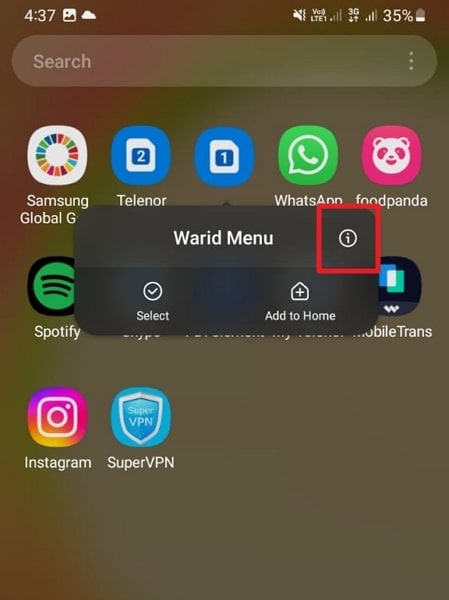
- Check Blocked Numbers
“My boyfriend’s phone goes straight to voicemail when someone is calling. Any idea why that might be?”
Do you also find yourself asking what does it mean? It could be that he has blocked that phone number. To check this:
- Step 1: Open the Phone dialer app.
- Step 2: Tap the menu icon in the top right corner and select Settings.
- Step 3: Tap Block numbers. If you find the number in the blocked list, remove it to ensure that their calls come through to the phone.
 Any DRM Removal for Mac: Remove DRM from Adobe, Kindle, Sony eReader, Kobo, etc, read your ebooks anywhere.
If you still have trouble reaching your boyfriend, try calling him from a different number. If your call didn’t go through, you know that he hasn’t blocked your number and that there may be another issue with his phone.
- Turn Off Google One VPN
If you’re using Google One VPN, try turning it off to see if that fixes the problem. Some users have reported that Google One VPN can cause incoming calls to a phone to go straight to voicemail. To turn off Google One VPN:
- Step 1: Open the Google One app on your Oppo A2.
- Step 2: At the bottom, go to the Benefits tab, then tap View Details below the Online protection with a VPN section.

- Step 3: Toggle off Enable VPN.

- Contact Your Carrier
If your phone calls go straight to voicemail after trying all the above, contact your carrier for help. They may be able to troubleshoot the problem or determine if there is a service outage in your area.
And if your carrier confirms that there is no service outage or billing-related block, the problem may be with your phone itself. You may need to try resetting your phone to factory settings or taking it to a repair shop.
- The Caller Used Ringless Voicemail
Ringless voicemail is a service that allows businesses to bypass your phone’s ringtone and send you pre-recorded messages directly to voicemail. Ringless voicemail is often used for marketing purposes. If you think you’re receiving ringless voicemail calls, you can contact the company calling you and ask them to remove you from their list.
Part 2: Not Clear About the Root Cause? Troubleshoot Directly by Wondershare Dr.Fone
If you’re unsure what’s causing your calls to go straight to voicemail, you can try using the Dr.Fone System Repair tool. This software can scan and repair your phone for any underlying problems, which may fix the issue and get your calls ringing again.
Dr.Fone supports over 1000 Android models, including unlocked Oppo A2 models and models from carriers like AT&T and Vodafone. It has an intuitive interface and is easy to use, even for beginners. Learn below the steps on how to use Dr.Fone System Repair to fix incoming calls that dial straight to voicemail:
- Step 1: Download Dr.Fone on your computer, then launch it once installed.
 safe & secure
4,118,635 people have downloaded it
- Step 2: Connect your smartphone to your desktop or computer using a USB cable. Next, from the Toolbox homepage, select System Repair.

- Step 3: Select Android as the Oppo A2 device type.

- Step 4: Click Start to begin repairing your smartphone.


- Step 5: Select the Oppo A2 device details on the Name, Model, Country, and Carrier drop-down lists. Next, select the agreement checkbox, then click Next to proceed.


- Step 6: Follow the in-app instructions to enter Download mode on your Oppo A2, then click Next.

- Step 7: Wait while the app downloads the firmware; once done, click Fix Now.

- Step 8: Enter the code in the input box to verify the Oppo A2 device information in the dialogue box, then click Confirm.

- Step 9: The app will start repairing the system issue on your Oppo A2. Once completed, your app should restart, then click Done to close the app.

You May Also Like:
Top 5 Best Android System Repair Apps
How to Fix It: Android Stuck on Boot Screen?
How to Flash Dead Android Phone Safely
Conclusion
When your phone calls go straight to voicemail without ringing, it can be a frustrating and disruptive experience. Not only do you miss important calls from work, friends, or family, but it also leaves you feeling disconnected and out of the loop. As a temporary measure to avoid missing important calls, check your voicemail regularly.
For a prompt solution, consider using Dr.Fone if incoming calls on your phone go straight to voicemail. It is a powerful mobile solution that can also address other system problems, including stuck boot loops, app crashes, black screens, and bricked devices. If you consistently experience this issue, it’s advisable to reach out to a professional for assistance.
safe & secure
4,215,287 people have downloaded it
Guide: How To Unbrick a Bricked Oppo A2 Phone
Oppo A2 phones are super popular thanks to their excellent features and affordable prices. But being so popular means people try to customize them with custom software. If you’re not careful, you might have a “bricked” Oppo A2 phone. It won’t work at all. It will be more like a brick than a smartphone.
Don’t worry, though. This guide is here to help. It will show you how to unbrick your phone step by step. You’ll learn to bring your phone back to life and make it work again. So, get started on fixing your bricked Oppo A2 phone by reading this article.
 Easy GIF Animator is a powerful animated GIF editor and the top tool for creating animated pictures, banners, buttons and GIF videos. You get extensive animation editing features, animation effects, unmatched image quality and optimization for the web. No other GIF animation software matches our features and ease of use, that’s why Easy GIF Animator is so popular.
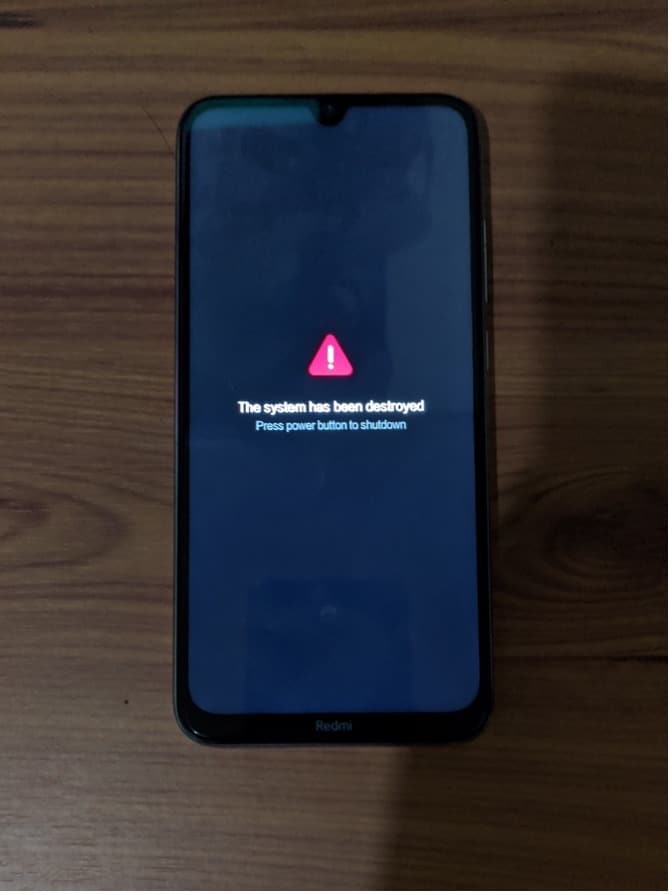

WPS Office Premium ( File Recovery, Photo Scanning, Convert PDF)–Yearly
Part 1. Common Reasons Why Oppo A2 Phones Get Bricked
A bricked phone might sound like a techy term, but it’s pretty simple – when your Oppo A2 phone turns into a lifeless block that won’t do anything. In this section, you’ll learn all about why this happens, so you can avoid these issues and keep your phone alive as long as possible.

- Trying to flash incompatible ROMs. Sometimes, people want their Oppo A2 phones to run different software like a custom version of Android called a ROM. But if you use the correct ROM for your specific phone, it can mess things up nicely. Also, inexperience with ROM flashing can hard brickyour Oppo A2 Be sure to follow guides and ask for community help online.
- Rooting mishaps/failures.“Rooting” means giving your phone superpowers, but if you mess up, it can go wrong. Your phone might not boot up, leaving you with a brick. Like the previous bullet, follow guides carefully, especially if inexperienced.
- Failed Firmware Updates. When your phone asks you to update its software, following the instructions carefully is essential. If you interrupt the process or something goes wrong, your phone could be bricked.
Now, you must know about soft and hard-bricking to learn how to diagnose your phone. Soft bricking is like a phone’s bad day – it might not start up. However, with the right help, you can fix it. Hard bricking is worse. It’s when your phone is a paperweight – it won’t turn on, respond, or do anything useful.
Part 2. Method 1: Use the Oppo A2 Flash Tool To Recover Bricked Oppo A2 Phones
Say you’ve accidentally bricked your Oppo A2 phone due to rooting or ROM flashing. You might feel scared, but imagine having a magic wand that can fix your bricked phone. That’s what the Oppo A2 Flash Tool is –a dedicated Oppo A2 unbricking tool. It lets you install or flash different software onto your phone, giving it a fresh start. Most of the time, a simple firmware flash will unbrick your Oppo A2.
The Oppo A2 Flash Tool is a superhero for various situations. Here are some scenarios where it can save the day:
- **Device Recovery.**If your phone is bricked or acting strange, the Flash Tool can help bring it back to life.
- Firmware Updates. You can use it to install official updates released by Oppo A2, ensuring your phone runs smoothly.
- **Device Customization.**Want a different look for your phone? The Flash Tool can help you install custom ROMs or themes.
- **Bug Fixes.**Got pesky bugs or glitches? The Flash Tool can replace corrupted software to make your phone behave.
- Performance Enhancement. If your phone feels sluggish, the Flash Tool can boost its speed by flashing a new OS.
 CollageIt Pro
How To Use the Oppo A2 Flash Tool To Unbrick a Oppo A2 Phone
Now that you know what the Oppo A2 Flash Tool is all about, it’s time to learn how to use it. If you’ve bricked your Oppo A2 phone, follow the steps below:
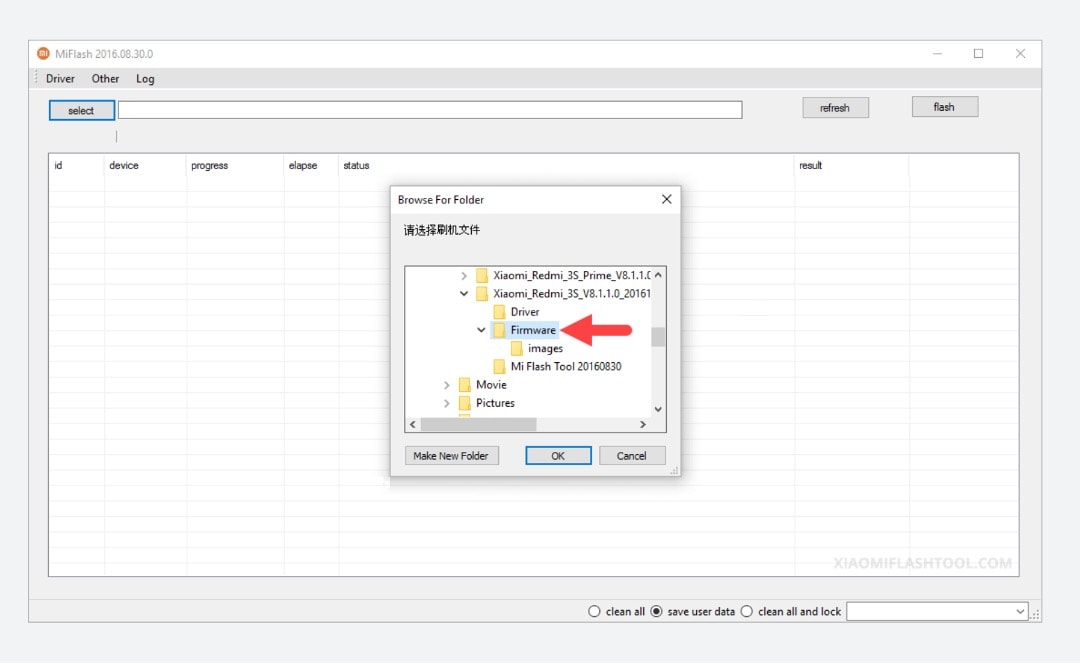
- Step 1. Download the Oppo A2 Flash Tool and the stock firmware of your device on your computer.
- Step 2. Turn off your phone. Then, press and hold the Volume Down + Power Key simultaneously for 6-8 seconds. This will force your phone to enter the Fastboot mode.

- Step 3. Connect your phone to your computer using a cable when you see this screen flash.


- Step 4. Using the Oppo A2 Flash Tool, click Select. Then, locate the firmware files you downloaded earlier.
- Step 5. Click the refresh button until the flash tool recognizes your device. Then, click flash to replace the firmware. A text saying “success” should appear under the result column.
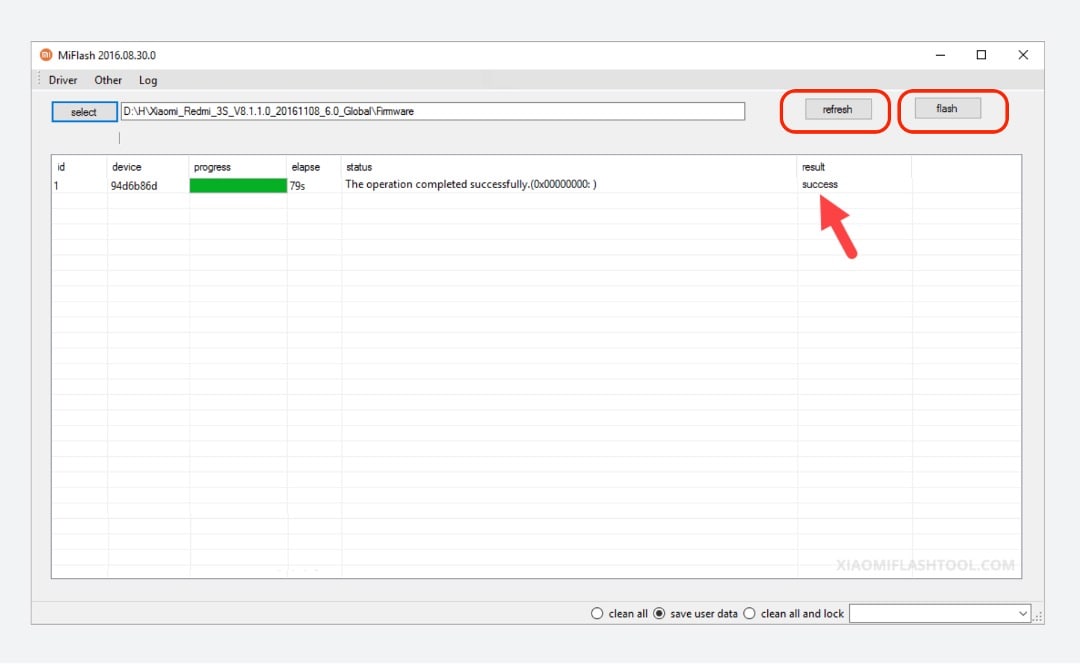
Congratulations! Your phone should be up and working after following these steps.
Part 3. Method 2: Wondershare Dr.Fone System Repair – Your One-Stop Shop for Unbricking Your Oppo A2 Phone
If you gave the Oppo A2 Flash Tool a shot and your phone is still not cooperating, don’t lose hope. Sometimes, the magic touch needs a slight variation. That’s where Dr.Fone comes into play. This dedicated software can work wonders when fixing various phone problems. It can even help in cases of bricked Oppo A2 phones involving software or firmware issues.
![]()

Dr.Fone - System Repair (Android)
Repair Android System Errors without Any Trouble.
- Fix your Android to normal, no skills required.
- Fix various Android system issues, stuck in boot loop , black screen , or won’t turn on , looping on start, etc.
- The high success rate in resolving Android system issues.
- Compatible with a wide range of Android devices and OS versions
- User-friendly interface with easy-to-follow steps.
3981454 people have downloaded it
One of Dr.Fone’s most astonishing powers is its “System Repair” feature. This is where the real magic happens. If your Oppo A2 phone is bricked, it can help repair the underlying software glitches that caused the issue. Moreover, Dr.Fone brings a toolbox of features to the table, making it more than just a one-trick pony. Here are its key features:
- **Data Recovery:**If you’ve lost precious data, Dr.Fone can help recover it, even from a bricked phone.
- **Data Transfer:**You can quickly move data between devices, even if one is unresponsive.
- **System Backup & Restore:**Fone can help you create a backup of your phone’s system and restore it when needed.
- **Unlocking Tools:**If you’re locked out of your phone, Dr.Fone can help you regain access.
How To Use Dr.Fone System Recovery Feature To Unbrick a Oppo A2 Phone
Now that you know about Dr.Fone, it’s time to understand how to use it. Hopefully, it can save your bricked Oppo A2 phone from its problems. Follow the steps below:
- Step 1. DownloadDr.Fone from its official website , and launch it on your computer. After entering the Toolbox menu from the left panel, click System Repair. Make sure that your Oppo A2 phone is connected.
- Step 2. Select Android on the next screen.
- Step 3. Initiate the Android System Repair by clicking Start.

- Step 4. Confirm your device details. You can edit any details that might be wrong.
- Step 5. Put your phone into Download mode. Follow the guidelines for phones with or without home buttons. Your phone will begin downloading the dedicated firmware.

- Step 6. After downloading the firmware, verify and proceed with the installation by clicking Fix Now. Confirm firmware installation by typing “000000” into the text box in the appearing window. Click Confirm afterward.
- Step 7. After the process is finished, your phone should now be okay. Click Done.
Part 4. Best Practices/Tips Before Unbricking Your Phone
Before diving into the unbricking process, you must arm yourself with some tips and precautions to ensure your recovery journey is as smooth as possible. Here’s what you need to know:
- Backing Up Data: An Ounce of Prevention. Remember the golden rule: always back up your data before attempting any phone recovery. Unbricking might save your phone, but being safe is better than sorry.
- **Authentic Tools and Software: Stay on the Safe Side.**Using genuine and trustworthy tools is crucial when unbricking your Oppo A2 This applies especially to Dr.Fone, which you should only download from the official website. Additionally, when recovering your phone’s software, use authentic Oppo A2 ROMs (the operating system’s files).
- **Learning from Online Guides and Communities: Seek Guidance.**Navigating the unbricking process might seem daunting, but you’re not alone. There are many online guides, tutorials, and communities where people share their experiences and solutions.
Conclusion
So, there you have it – your guide to fixing a bricked Oppo A2 phone. Remember, bricking happens when your phone stops working. You won’t be afraid when that happens, as you learned about the Oppo A2 Flash Tool and Dr.Fone. They are your phone-saving superheroes that can unbrick even a hard-bricked Oppo A2 phone.
As a parting reminder, always keep a tool ready for emergencies. For this, choose Dr.Fone. It’s a super tool for all your phone problems. Give it a shot and be confident with your phone wherever you go and whatever you do with it.
safe & secure
3,052,835 people have downloaded it
Fix the Error of Unfortunately the Process.com.android.phone Has Stopped on Oppo A2
Nowadays, smartphones are integral to life. They serve as your communication lifeline and powerful personal assistant. However, it can be frustrating when a sudden error disrupts our phone’s functionality. One common error Android users encounter is the “Unfortunately, The process.com.android.phone has stopped” error. Fear not if you have come across this error message on your Oppo A2.
This beginner’s guide is here to help you understand the causes of this problem. It will also provide you with practical “unfortunately the phone has stopped solutions.”

Part 1: Learn Why Unfortunately the process.com.android.phone Has Stopped
The error message “Unfortunately, the process com.android.phone has stopped“ typically appears on Android devices when there is an issue with the Phone app. Issues with underlying processes responsible for handling phone-related functions are also a cause.
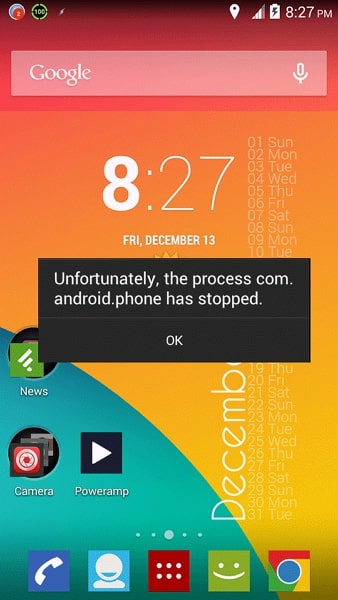
It can prevent you from making or receiving phone calls, accessing contacts, or using other phone-related features. Following are some of the possible reasons why you may encounter this error:
App or System Update
When you update your device’s OS or the Phone app itself, it is possible to encounter bugs or compatibility issues. These issues can lead to the Phone app crashing and displaying this error message. Sometimes, the updated software may not work with the existing configurations of the Phone app. It results in instability which causes this error.
App Cache/Data Corruption
The Phone app relies on cached data and stored settings to function properly. If the cache or data of the app becomes corrupted, it can cause the Phone app to malfunction. The reasons include interrupted app installations or updates, improper shutdowns, or software conflicts. As a result, you may see the error message indicating that the process com.android.phone has stopped.
Insufficient System Resources
Android devices need sufficient memory (RAM) and processing power to run apps smoothly. If your device is running low on memory or processing capacity, it may struggle to handle the Phone app and its processes. It can lead to crashes and the error message. Running many resource-intensive apps at the same time also causes this issue. Other reasons include too many background processes that contribute to this error.
Conflicting Third-Party Apps
Third-party apps installed on your device can sometimes conflict with the Phone app. These conflicts can occur for various reasons, such as incompatible app versions. The software bugs within the third-party apps or configurations can also clash with the Phone app. Such conflicts can disrupt the normal operation of the Phone app. The result of all this trigger the error message.
Software or Firmware Glitches
Software glitches or firmware issues can occasionally occur in Android devices. These glitches can affect the functioning of system processes, including the Phone app. They may arise from programming errors and system inconsistencies. Sometimes unexpected interactions between different OS components can also lead to this error.
Having been denied access to your Phone can cause a lot of issues. Luckily, many simple fixes to the “process.com.android.phone has stopped“ error exist. These solutions have worked for many users, and by following them, you may be able to resolve the issue too. Given below are the top 8 fixes to resolve this error and restore your device’s phone functions:
Fix 1: Restart/Reboot your Android Device
One of the simplest yet effective solutions to tackle the “Unfortunately, the process com.android.phone has stopped“ error is to reboot your Oppo A2. Restarting your device can often resolve temporary software glitches or conflicts. This fix requires no technical expertise.
So, it is worth trying before moving on to more complex solutions. Follow the guide below to restart your Oppo A2 and potentially fix the error:
- Step: Long-press your Oppo A2’s “Side” key and wait for the power menu to appear. Here, select “Restart” to initiate the reboot of your phone.

 Forex Robotron Basic Package
Fix 2: Re-insert the SIM Card
There is also a chance that the reason you are seeing this error message relates to the SIM card. A loose or improperly inserted SIM card can cause disruptions in the phone’s communication functions. As a result, you see the “Unfortunately, the process com.android.phone has stopped“ error.
To fix this error, you can remove the SIM card and then re-insert it. If the issue is actually related to a SIM card, the issue will get resolved after you resolve the problem.

Fix 3: Clear the Cache and Data of the Phone App
The “Unfortunately, the process com.android.phone has stopped“ error is connected to the Phone app. In this situation, clearing the cache and data of the Phone app itself can often resolve the issue. This fix focuses on removing any corrupted or conflicting data within the app.
Once the corrupted data is gone, it will restore the Phone app to proper functioning. Here is how to clear the cache and data of the Phone app on an Android device:
- Step 1: Find the Phone app on your Oppo A2 and long-press its icon. A small menu will pop up where you need to select “App Info.”

- Step 2: It will lead you to detailed information about the Phone app. Here, press “Storage,” and following that, you will see the “Clear Cache” and “Clear Data” options. Use them in the same order to clear the cache and data of the Phone app.

Fix 4: Disable Automatic Updates Feature
In some cases, this error may occur due to conflicts or compatibility issues with the automatic app updates feature. The automatic update on your Oppo A2 keeps your apps updated. Disabling this feature temporarily can help resolve the problem.
As a result, you will be able to use the Phone app without interruptions. To disable the automatic updates option on the Google Play Store, you can use the following steps:
- Step 1: Navigate to the Google Play Store app on your Oppo A2 and launch it. Next, tap on the profile icon in the screen’s top right corner. From the options presented, select “Settings.”
- Step 2: In Settings, press “Network Preferences” to expand the option. Now, open the “Auto-update apps” settings and enable the “Don’t auto-update apps” option.

Fix 5: Clear All Apps Cache and Data
When dealing with this error, clearing the cache and data of all apps on your Oppo A2 can also help. Doing this will remove any corrupt or conflicting data that might be causing the issue. This fix targets the overall app ecosystem on your device.
It intends to ensure a clean slate and potentially resolve the error. Use the following guide to clear the cache and data of all apps:
- Step 1: Access your Oppo A2’s Settings and tap the “Apps” option. It will lead you to all the apps running on your phone. Here, select an app to see detailed app info.

- Step 2: On the app info screen, scroll down and press “Storage.” Now use “Clear Cache” to clean the app’s cache and “Clear Data” to erase the app’s data. Repeat the same process for all the apps installed on your device.


Fix 6: Clear SIM Toolkit Cache and Data
It is worth considering the SIM Toolkit is a potential source of the problem. The SIM Toolkit is an app that provides functionality related to your SIM card. Its functions include accessing value-added services and managing mobile network settings. Clearing the cache and data of the SIM Toolkit app can help resolve this issue. The steps you need to clear the cache and data of this app are the following:
- Step 1: On your Oppo A2, find the SIM Toolkit app. After finding it, press and hold its icon until a short menu appears. Choose “App Info” from the available options to access its settings.

- Step 2: Now, you need to tap “Storage” to proceed. On the next screen, first, tap “Clear Cache” to clean the cache, and later press “Clear Data.”

Fix 7: Perform Factory Reset
If all previous fixes have been unsuccessful, performing a factory reset is also an option to resolve this issue. It is a drastic measure that can potentially address underlying software issues. However, it’s important to note that a factory reset will erase the entire data and settings of your device.
So, it’s crucial to back up your important files before proceeding with this fix. By doing so, you can restore your device to its original state and eliminate the error. Use the detailed guide described below to factory reset your Oppo A2:
- Step 1: Start by launching the Settings app and selecting “General Management.” Here, choose “Reset,” and following that on the next screen, tap “Factory data reset.”

- Step 2: After tapping “Factory data reset,” hit the “Reset” option. Next, enter your Oppo A2 PIN to confirm the process, and use “Delete All” to start the factory reset process.

Fix 8: Try Wondershare Dr.Fone - The Best and Most Reliable Android System Repair Tool
It must be a frustrating experience to try one solution after the next and not be able to resolve the issue. In such situations, the best thing you can do is find a tool that can resolve all Android system problems. While there are many options available online, not all are great. The best Android system repair tool currently available is Wondershare Dr.Fone.
Using Wondershare Dr.Fone, you can fix issues like “Unfortunately, the process.com.android.phone has stopped,” Play Store not working, frozen phone, and many more. It is a specialized tool for resolving Android system issues in Oppo A2 devices with support for all modern Oppo A2 phones.
Key Features of Wondershare Dr.Fone
- You do not need any technical skills to fix your Android system issues when using Dr.Fone.
- It has the highest success rate in fixing complex software issues related to Android OS.
- Wondershare Dr.Fone supports over 1000 Android models for system repair and can fix most issues within minutes.
Steps To Fix the process.com.android.phone Has Stopped via Wondershare Dr.Fone
All you need to fix your Oppo A2’s system issues is a computer with Wondershare Dr.Fone installed and your device connected to it. Here is the simplified process of resolving most Android system issues in a matter of minutes:
- Step 1: Link Your Android Device with Wondershare Dr.Fone
To start, connect your Oppo A2 to your computer. Launch Wondershare Dr.Fone on your computer screen and click on “Toolbox,” located in the left sidebar. From the options available, select “System Repair” and follow it by clicking “Android” on the next screen.
- Step 2: Enter the Required Details of Your Oppo A2
Click on “Start” to initiate the process, and following that, you will be prompted to provide specific details about your Oppo A2. These details include the “Brand,” “Name,” “Model,” “Country,” and “Carrier.” Afterward, tick the box that says, “I agree with the warning, and I am ready to proceed,” and click “Next.”

- Step 3: Resolve The process.com.android.phone Has Stopped Issue
The subsequent step involves entering Download Mode on your device, following the on-screen instructions provided by the software. Once your device is in Download Mode, this Android repair toolkit will proceed to download and install the relevant firmware. Now, select “Fix Now” and confirm the repair of your Oppo A2 by entering the code “000000.”
safe & secure
3,595,007 people have downloaded it

Conclusion
To sum the article up, encountering the frustrating error message “Unfortunately, the process com.android.phone has stopped“ can be daunting. However, with the right knowledge and tools, resolving this issue becomes achievable. Throughout this guide, we have explored various troubleshooting methods. These included clearing the cache, rebooting the Oppo A2 device, and even performing a factory reset.
While there are many options to fix this error, only one is an excellent choice: Wondershare Dr.Fone. With its powerful Android system repair feature, Wondershare Dr.Fone is a reliable solution to resolve this error.
- Title: Calls on Oppo A2 Go Straight to Voicemail? 12 Fixes | Dr.fone
- Author: Ariadne
- Created at : 2024-07-30 09:53:53
- Updated at : 2024-07-31 09:53:53
- Link: https://howto.techidaily.com/calls-on-oppo-a2-go-straight-to-voicemail-12-fixes-drfone-by-drfone-fix-android-problems-fix-android-problems/
- License: This work is licensed under CC BY-NC-SA 4.0.