
Calls on Oppo Find N3 Go Straight to Voicemail? 12 Fixes | Dr.fone
Calls on Oppo Find N3 Go Straight to Voicemail? 12 Fixes
Have you ever experienced incoming calls to your phone go straight to voicemail without ringing? It can be frustrating, especially if you’re expecting an important call. It could be due to simple things like turning down the volume or forgetting to turn off the Do Not Disturb mode. In other cases, it might be because you accidentally blocked the caller’s number.
In most cases, incoming calls going to voicemail without ringing are common. However, if it’s happening frequently or for all calls, your phone may have a problem.
This article will discuss why incoming phone calls go straight to voicemail and how to fix the problem. We’ll also show you how to use Wondershare Dr.Fone, a powerful Android System Repair tool, to solve such issues. So, if you’re uncertain why that last call went straight to voicemail, keep reading, and we’ll cover everything you need to know.


Part 1: Not Ringing? Here’s Why Calls on Your Phone Go Straight to Voicemail
If an incoming call to your cell phone goes straight to voicemail without ringing, there could be a few reasons. Here’s what to look for and what you should do to fix it:
- Turn Off Do Not Disturb (DND) Mode
DND mode is a feature that silences all incoming calls, notifications, and alerts. If DND mode is enabled, your cell phone goes straight to voicemail when someone calls. To turn off DND mode, swipe down from the top of the screen to open the notification settings panel, then tap the Do not disturb icon.

Here’s an alternative way:
- Step 1: Open the Settings app and go to Notifications.
- Step 2: Tap Do not disturb.

- Step 3: Toggle Do Not Disturb offto disable the mode.
- Turn Off Call Forwarding
One reason calls go straight to voicemail without ringing is if you enabled call forwarding. Call forwarding is a feature that redirects incoming calls to another number. To turn off call forwarding:
- Step 1: Open the Phone Dialer app on your device, then tap the menu icon and select Settings.

- Step 2: Navigate to Supplementary services > Call forwarding.


- Disable Call Barring
If a phone call went straight to voicemail, another possible explanation is the call barring. It is a feature that restricts calls from being made or received on your phone. If activated, it can cause incoming calls to a phone to go straight to voicemail. To turn off call barring on Oppo Find N3 devices:
- Step 1: Open the Phone Dialer app, then tap the menu icon in the top right corner.
- Step 2: Go to Settings > Supplementary services > Call barring, then tap OK.
- Step 3: Select Voice call, then turn off your preferred outgoing and incoming calls. When prompted, enter 0000 as a password.


- Update Your Phone’s Software
Sometimes, software bugs can cause problems with incoming calls, which may be why your last incoming call went straight to voicemail. If your phone runs outdated software, try updating it to the latest version.
To check for updates, open the Settings app and go to Software update or System update. For a seamless update experience, follow the step-by-step instructions on your mobile screen.

- Reset Network Settings
If the incoming calls on your phone go straight to voicemail, consider resetting your phone’s network settings. Network settings control how your phone connects to the cellular network. If these settings are not set up correctly, incoming calls may not be able to reach your device.
Note: Resetting your network settings will erase any saved Wi-Fi networks and Bluetooth pairings, requiring you to re-enter them after the reset is complete.
To reset your network settings on most Android devices:
- Step 1: Open the Settings app on your smartphone, then tap System or General Management.
- Step 2: Go to Reset > Reset Network Settings and confirm the action.
![]() FX PRO (Gold Robot + Silver Robot(Basic Package))
FX PRO (Gold Robot + Silver Robot(Basic Package))

- Turn Off Bluetooth
When Bluetooth is on, it can interfere with your device’s ability to receive calls, causing them to go straight to voicemail without ringing. To turn off Bluetooth on an Android device, you can do one of the following:
- Swipe down from the top of the screen to open the Quick Settingspanel, then tap the Bluetooth icon to turn it off.

- Go to Settings> Connections > Bluetooth and toggle the switch off.

It should help ensure that calls come through to your phone instead of going to voicemail.
- Check Airplane Mode
If turning off Bluetooth didn’t solve the issue, another possible cause could be that your phone is in Airplane Mode. Airplane Mode turns off all wireless connections on your phone, including cellular service, which can cause calls to dial straight to voicemail. There are two ways to turn off Airplane mode on Android:
Using the Settings app:
- Step 1: Open the Settings app.
- Step 2: Tap Network & internet.
- Step 3: Toggle off Airplane mode or Flight mode.
Using the Quick Settings panel:
- Step 1: Swipe down from the top of the phone screen to access the Quick Settings panel.
- Step 2: Look for the Airplane mode or Flight mode icon, then tap it to turn it off.
 The BootIt Collection covers multi-booting, partitioning, and disk imaging on traditional PC’s using the standard BIOS and newer PC’s using UEFI. The collection includes BootIt Bare Metal (BIBM) for standard BIOS systems and BootIt UEFI (BIU) for UEFI system.
- Check Blocked Numbers
“My boyfriend’s phone goes straight to voicemail when someone is calling. Any idea why that might be?”
Do you also find yourself asking what does it mean? It could be that he has blocked that phone number. To check this:
- Step 1: Open the Phone dialer app.
- Step 2: Tap the menu icon in the top right corner and select Settings.
- Step 3: Tap Block numbers. If you find the number in the blocked list, remove it to ensure that their calls come through to the phone.

If you still have trouble reaching your boyfriend, try calling him from a different number. If your call didn’t go through, you know that he hasn’t blocked your number and that there may be another issue with his phone.
- Turn Off Google One VPN
If you’re using Google One VPN, try turning it off to see if that fixes the problem. Some users have reported that Google One VPN can cause incoming calls to a phone to go straight to voicemail. To turn off Google One VPN:
- Step 1: Open the Google One app on your Oppo Find N3.
- Step 2: At the bottom, go to the Benefits tab, then tap View Details below the Online protection with a VPN section.

- Step 3: Toggle off Enable VPN.

- Contact Your Carrier
If your phone calls go straight to voicemail after trying all the above, contact your carrier for help. They may be able to troubleshoot the problem or determine if there is a service outage in your area.
And if your carrier confirms that there is no service outage or billing-related block, the problem may be with your phone itself. You may need to try resetting your phone to factory settings or taking it to a repair shop.
- The Caller Used Ringless Voicemail
Ringless voicemail is a service that allows businesses to bypass your phone’s ringtone and send you pre-recorded messages directly to voicemail. Ringless voicemail is often used for marketing purposes. If you think you’re receiving ringless voicemail calls, you can contact the company calling you and ask them to remove you from their list.
Part 2: Not Clear About the Root Cause? Troubleshoot Directly by Wondershare Dr.Fone
If you’re unsure what’s causing your calls to go straight to voicemail, you can try using the Dr.Fone System Repair tool. This software can scan and repair your phone for any underlying problems, which may fix the issue and get your calls ringing again.
Dr.Fone supports over 1000 Android models, including unlocked Oppo Find N3 models and models from carriers like AT&T and Vodafone. It has an intuitive interface and is easy to use, even for beginners. Learn below the steps on how to use Dr.Fone System Repair to fix incoming calls that dial straight to voicemail:
- Step 1: Download Dr.Fone on your computer, then launch it once installed.
 safe & secure
4,118,635 people have downloaded it
- Step 2: Connect your smartphone to your desktop or computer using a USB cable. Next, from the Toolbox homepage, select System Repair.

- Step 3: Select Android as the Oppo Find N3 device type.
 Any DRM Removal for Win:Remove DRM from Adobe, Kindle, Sony eReader, Kobo, etc, read your ebooks anywhere.
- Step 4: Click Start to begin repairing your smartphone.
.png) Kanto Player Professional
Kanto Player Professional
- Step 5: Select the Oppo Find N3 device details on the Name, Model, Country, and Carrier drop-down lists. Next, select the agreement checkbox, then click Next to proceed.

- Step 6: Follow the in-app instructions to enter Download mode on your Oppo Find N3, then click Next.

- Step 7: Wait while the app downloads the firmware; once done, click Fix Now.


- Step 8: Enter the code in the input box to verify the Oppo Find N3 device information in the dialogue box, then click Confirm.

- Step 9: The app will start repairing the system issue on your Oppo Find N3. Once completed, your app should restart, then click Done to close the app.

You May Also Like:
Top 5 Best Android System Repair Apps
How to Fix It: Android Stuck on Boot Screen?
How to Flash Dead Android Phone Safely
Conclusion
When your phone calls go straight to voicemail without ringing, it can be a frustrating and disruptive experience. Not only do you miss important calls from work, friends, or family, but it also leaves you feeling disconnected and out of the loop. As a temporary measure to avoid missing important calls, check your voicemail regularly.
For a prompt solution, consider using Dr.Fone if incoming calls on your phone go straight to voicemail. It is a powerful mobile solution that can also address other system problems, including stuck boot loops, app crashes, black screens, and bricked devices. If you consistently experience this issue, it’s advisable to reach out to a professional for assistance.
safe & secure
4,215,287 people have downloaded it
Restore Missing App Icon on Oppo Find N3: Step-by-Step Solutions
The growing conversation around the missing app icons on Android issue has caught our attention. While it seems confusing, it’s a problem that some Android users have encountered.
After all, the presence of app icons on our Android device’s home screen is important for convenient access to our frequently used applications. When your Oppo Find N3’s icons suddenly disappear, it can leave you feeling lost about how to use and access your apps.
No worries, though. We’ve got you covered with a simple guide in this article. Just follow the steps, and you’ll get those missing app icons back on your Oppo Find N3.
 SwifDoo PDF 2-Year Plan
Part 1: Make Sure if the Missing App Is Installed
Before proceeding with troubleshooting the missing app icon on your Android device, it’s essential to confirm whether the app is still installed or if it has been accidentally deleted. To do it, you can have a quick check on Google Play:
- Step 1: Go to the Play Store.
- Step 2: Tap your Google profile at the top right and find Manage apps and devices.
- Step 3: Open Manage and select the “Installed” tab.
![]()
Now, see whether you can find the app icon that disappeared on your Android. If you can’t find it, it means the app has been accidentally deleted, and you can install it back on your device. However, if it’s confirmed to be installed on your Android but remains missing from your home screen, you can continue the following practice.
Part 2: How To Find the Missing App Icon on Android
“All my apps disappeared from my home Android screen. What should I do?”
If you’ve confirmed that the missing app is installed, but its icon is nowhere to be found on your home screen, don’t fret—there are several solutions you can take to locate and restore the missing app icon on Android.
Parental Control Software
### 1\. Check hidden appsHow could the Android phone icon be missing? Well, app icons can disappear from your home screen for different reasons. One of the common reasons is you might have accidentally hidden it in your phone. To find and check whether the app is hidden, the steps can be different depending on the phone model you are using.
However, as a general guide, you can follow these steps:
- Step 1. Go to your phone’s Settings.
- Step 2. Use the search bar to look for “Hidden app.”
- Step 3. Once you find the “Hidden app” settings, watch the list to see if the missing app is there. If it is, you can toggle off the switch to unhide it.
![]()
2. Move the app to the home screen from the App Drawer
If your app icon disappeared on your Android, you can also easily restore it by adding the app to the home screen from the app drawer. Follow the step-by-step guide below:
- Step 1. Open the App Drawer on your Android. To do this, swipe from the bottom to the top, starting from your home screen. The App Drawer is where all your installed apps are neatly listed.
- Step 2. Once you open the App drawer, locate the app icon that has disappeared from your home screen. For example, you lost the phone icon on Android. Then, look for the phone icon from the App Drawer.
- Step 3. Long-press the Icon of the missing app and move it to the desired location on your home screen. You can drag it to an empty space or a specific folder.
- Step 4. Release to drop the app icon onto the home screen.
 DLNow Video Downloader
![]()
3. Re-enable disabled app
App icons can also disappear on the Android home screen if you unintentionally or intentionally disable them. Certain phone models even offer a functionality known as ‘Freezer,’ allowing users to temporarily halt the apps. While in a frozen state, the app remains inactive and doesn’t appear on the home screen until you unfrozen it.
To re-enable the disabled app, you can follow the steps here:
- Step 1. Open the Apps & Notifications on the Settings.
- Step 2. Select the app which icon is missing on your home screen. For example, tap the phone app if the phone icon disappears on your Android.
- Step 3: In the App Info, tap Enable.
4. Reset Android to factory settings
If the previous methods don’t work, you might need to do a factory reset on your Oppo Find N3. But before doing that, it’s important to back up your data first because a factory reset will clear all your data and cache when you press the reset button.
How to reset Android to factory setting:
- Step 1: Go to your Android Settings.
- Step 2: Select Backup and Reset > Factory data reset. Then, choose to erase all data.
Please be mindful that performing a factory reset on Android will reset your Android completely to its initial state.
![]()
Part 3: How to Fix System Error on Android Easily with Reliable Software
Missing app icons on Android can sometimes be a result of errors in your Android system launcher, causing inconvenience and potential disruptions to your device’s operation. To address this issue effectively, you can turn to Dr.Fone’s advanced system repair tool. This tool is designed to handle various system issues, providing an easy and reliable solution.
How to fix the Android system using Dr.Fone’s system repair tool:
- Step 1. Open the Repair Tool
Start by launching Wondershare Dr.Fone on your computer. Go to the Toolbox section and connect your Oppo Find N3. Choose System Repair and pick Android as your device type.
safe & secure
4,136,839 people have downloaded it
- Step 2. Begin Repair
Click Start on the new screen to kick off the repair. Since you’re dealing with the Android system, select System Damage.
- Step 3. Fill in the Oppo Find N3 device Details
The platform will detect your Oppo Find N3’s brand. Confirm the Name, Model, Country, and Carrier. If your device is unlocked, choose OPEN in the Carrier section. Agree to the warning, click Next, and proceed with the repair.
- Step 4. Activate Download de
Follow the instructions to put your Oppo Find N3 into Download Mode. Once you are in Download Mode, the firmware will be downloaded automatically.

- Step 5. Confirm Installation
Remember, the repair may erase data. It’s advisable to back up your data first before starting the repair. Enter “000000” to confirm the repair process, shown by a progress bar. Once finished, click Done and see if your phone has returned to normal.
More Articles About Android System:
9 Solutions for Android Process System isn’t Responding Error
How to Fix Android App Not Installed Error Quickly?
Authentication Error Occurred? Here Are 10 Proven Fixes
Conclusion
When the app disappears from the home screen of your Android, it can hinder your ability to access and use the app efficiently. There are several reasons why an app might disappear from your Android home screen, and addressing the issue depends on the specific circumstances.
Whether it’s due to accidental deletion or a system glitch, we have discussed various methods to recover the missing app and ensure smooth functionality in this article. In cases of system-related issues on your Oppo Find N3, it’s advisable to rely on trustworthy software such as Dr. Fone’s system repair tool for a comprehensive resolution.
Why Does My Oppo Find N3 Keep Turning Off By Itself? 6 Fixes Are Here
Android users are usually very happy with their smartphones; however, sometimes they do complain about their phones switching off abruptly. This is a weird situation to be in because one moment you are using your phone, and the next moment it suddenly turns itself off, and when you happen to turn it back on, it functions smoothly, but only for a while.
Phones shutting off problem not only disrupts your work but also tests your patience if you are in the middle of executing an important task, playing your favorite game, typing an e-mail/message, or attending a business call, etc.
We often hear Android users ask for solutions for this problem at different forums. If you are one of them and clueless about why My Oppo Find N3 keeps shutting off, here are ways that can help you.
So the next time you ask, “Why does My Oppo Find N3 keep shutting off?”, refer to this article and follow the techniques given hereunder.
 PDF application, powered by AI-based OCR, for unified workflows with both digital and scanned documents.
 Part 1: Possible reasons for phone turning off by itself
We understand your trouble when you ask, “Why does My Oppo Find N3 keep turning off?” thus, here we have four of the possible reasons that might be causing the glitch and help you understand the problem better.
The first one is related to updating the phone’s software or any of the Apps if the download process is interrupted and not duly completed, the phone can act abnormally causing it to switch off at frequent intervals.
Then there are certain Applications that are not supported by the Android software. While using such Apps, the phone may turn off abruptly. This usually happens when you install Apps from unknown sources which are not compatible with Android.
Also, if your battery is low or has become too old, your phone may shut off and not work as smoothly.
Lastly, you can also check if you use a protective cover for your phone. Sometimes, the cover is so tight that it presses the power button continuously turning the phone off.
Now, once you have analyzed the problem, it is easier to move on to the solutions.
Part 2: Check the battery status on Android
If your phone turns off now and then while you are using it and even refuses to start when you press the power button, we suspect that there is a problem with your phone’s battery. Well, Luckily for Android users, there is a test that can be run on the phone to check the battery’s operations and health. Not many users are aware of it, and thus, we have compiled what you need to do the next time you wonder why does My Oppo Find N3 keeps shutting off itself.
First, open the dialer on your Oppo Find N3 shown in the screenshot below.
 PCDJ Karaoki is the complete professional karaoke software designed for KJs and karaoke venues. Karaoki includes an advanced automatic singer rotation list with singer history, key control, news ticker, next singers screen, a song book exporter and printer, a jukebox background music player and many other features designed so you can host karaoke shows faster and easier!
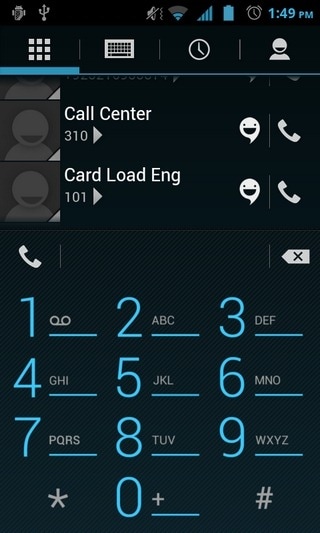
Now dial *#*#4636#*#* just like dialing a usual phone number and wait for the “Battery Info” screen to pop up.
Note: Sometimes, the above-mentioned code may not work. In such cases, try dialing *#*#INFO#*#*. The following screen will appear now.
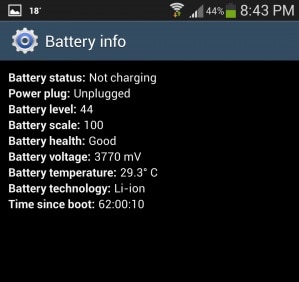
If the battery looks good as you can see in the screenshot above and everything else seems normal, it means that your battery is healthy and need not be replaced. You may now move on to the next step to cure your device.
Part 3: One-click to fix Android phone keeps turning off
We understand how annoying it is to find your Oppo Find N3 turning off randomly on its own. So, when the age-old remedies to fix the phone keeps turning off turns futile, you need to go for a reliable tool like Dr.Fone - System Repair (Android) .
Apart from tackling the Android phone keeps turning off the issue, it can also resolve all Android problems. The issues include system update fail, device stuck on logo, unresponsive, or bricked device with a blue screen of death.
Your trouble with ‘why does My Oppo Find N3 keep shutting off?’ can be resolved easily using Dr.Fone - System Repair (Android). But, before that, you need to ensure that the Android device has been backed up properly to eliminate the risk of data erasing.
![]()
Dr.Fone - System Repair (Android)
Repair Android System Errors without Any Trouble.
- Fix your Android to normal, no skills required.
- Fix various Android system issues, stuck in boot loop , black screen , or won’t turn on , looping on start, etc.
- The high success rate in resolving Android system issues.
- Compatible with a wide range of Android devices and OS versions
- User-friendly interface with easy-to-follow steps.
3981454 people have downloaded it
Below are the steps that help easily fix Android device keeps turning off on its own:
Phase 1: Preparing your Oppo Find N3 and connecting it
Step 1: On your computer, install and launch Dr.Fone. Now, click the ‘System Repair’ button over Dr.Fone window and connect the Android device to your computer.
Step 2: Here, you need to press the ‘Start’ button right after hitting the ‘Android’.

Step 3: Pick your Oppo Find N3 details over the Oppo Find N3 device information interface. Click the ‘Next’ button afterward.
Phase 2: Enter ‘Download’ mode to repair and resolve ‘why does My Oppo Find N3 keep turning off’
Step 1: On your Oppo Find N3, go to ‘Download’ mode following the instructions.
For a device with the ‘Home’ button – Turn off the mobile and then hold down the ‘Home’, ’Volume Down’, and ’Power’ buttons together nearly for 10 seconds. Leave them all and then click the ‘Volume Up’ button to get into the ‘Download’ mode.

For a device lacking ‘Home’ button – After switching off the Android mobile, hold down ‘Bixby’, ‘Power’, ‘Volume Down’ key still 10 seconds. Now, un-hold them and tap the ‘Volume Up’ button to enter the ‘Download’ mode.
Step 2: Hitting the ‘Next’ button will start the Android firmware download.
 Power Tools add-on for Google Sheets, 12-month subscription
Step 3: Now, Dr.Fone - System Repair (Android) will verify the firmware once downloaded. Within some time the Android system gets repaired.
safe & secure
Part 4: Update software to the latest version to fix Android phone keeps turning off
Software glitches or outdated operating systems can trigger automatic shutdowns on Android phones. Updating your Oppo Find N3’s software version can be an effective solution to fix the issue of the phone repeatedly turning off. Regular software updates provided by the phone manufacturer often include bug fixes, performance improvements, and security patches. These updates can address underlying problems that may be causing the random shutdowns, ensuring a more stable and reliable phone performance.
To update the software on your Oppo Find N3, follow these steps:
Go to “Settings” on your Oppo Find N3 and navigate to the “System” or “Software Update” section (the exact wording may vary depending on your device model and Android version). Look for the option to “Check for updates” to see if any new software updates are available.

Part 5: Cool down your phone to avoid your phone keeps turning off
When a phone overheats, it can trigger an automatic shutdown as a protective mechanism to prevent damage to the Oppo Find N3 device’s internal components. Overheating occurs when the phone’s internal temperature rises significantly, typically due to excessive heat generated by the processor and other hardware components during intensive tasks or prolonged usage.
To prevent the phone from turning off due to overheating, you can take various measures, such as limiting intensive usage, avoiding direct sunlight and hot environments, and using the phone on hard surfaces to aid heat dissipation.


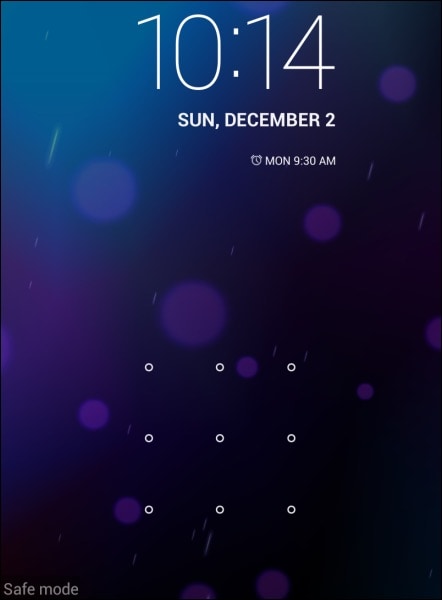
Part 6: Narrow down the randomly turning off issue in Safe Mode
Starting your phone in Safe Mode is a good way to narrow down whether or not the problem is occurring because of some heavy and incompatible Apps as Safe Mode allows only built-in Apps to function. If you can use your phone in Safe Mode, consider deleting the unnecessary Apps which may be burdening the phone’s processor.
To boot into Safe Mode:
Long press the power button to see the following options on the screen.
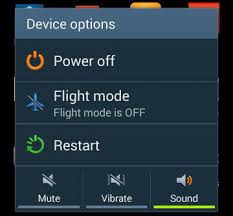
Now tap on “Power Off” for about 10 seconds and click “OK” on the message that pops-up as shown below.
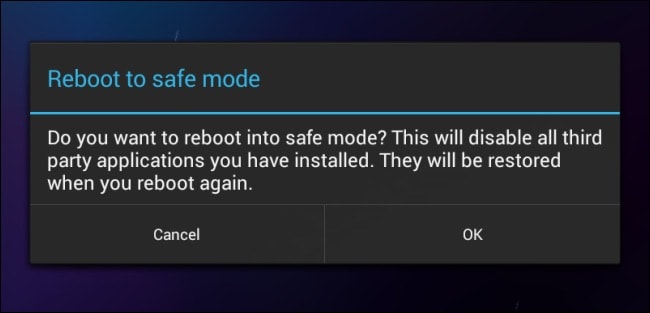
Once done, the phone will reboot and you will see “Safe Mode” on the main screen.
That’s all. Well, booting to Safe Mode is easy and it also helps you to identify the real problem.
Part 7: Back up your data and perform a factory reset
Note: You must take a back-up of all your data because once you perform a factory reset on your device, all media, contents, data, and other files are wiped out, including your device settings.
Wondershare Dr.Fone is a great way to back up all your data to prevent it from getting lost after resetting the phone. It works brilliantly as it backs up all data and allows users to retrieve it fully or selectively. You can backup all files from your Android to PC in just a click and restore them later. Try this software for free before purchasing it to understand it’s working better. It does not tamper with your data and only requires you to follow the simple steps given below to backup your Android data:
Wondershare Dr.Fone
Flexibly Back up and Restore Android Data
- Back up Android data to the computer with one click.
- Preview and selectively restore the backup to any Android device.
- Supports 8000+ Android devices.
- There is no data lost during backup, export, or restoration.
3,981,454 people have downloaded it
To start with, download and run the backup software on the PC.
Once you have the main screen of the software with multiple options that will appear before you, choose the “My Backup” option.
Now connect the Android phone to the PC and make sure that USB debugging is turned on. Then hit “Back Up Now” and wait for the next screen to open.

You will see the file types that will be backed up. Wait for the backup process to complete.

There you go, you have successfully backed up data.

safe & secure
Now moving on to factory reset your phone:
Simply visit “Settings” on your Oppo Find N3 by clicking the settings icon as shown below.
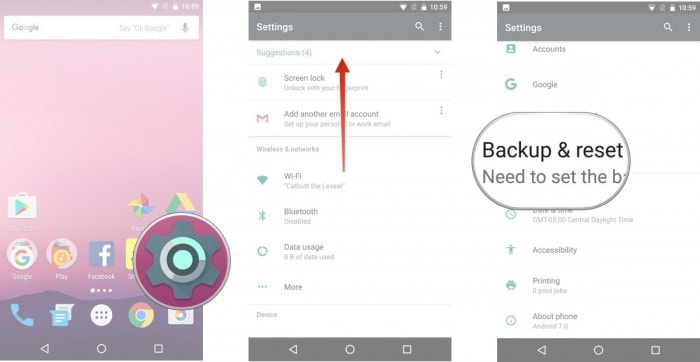
And then select the “Backup and Reset” option.
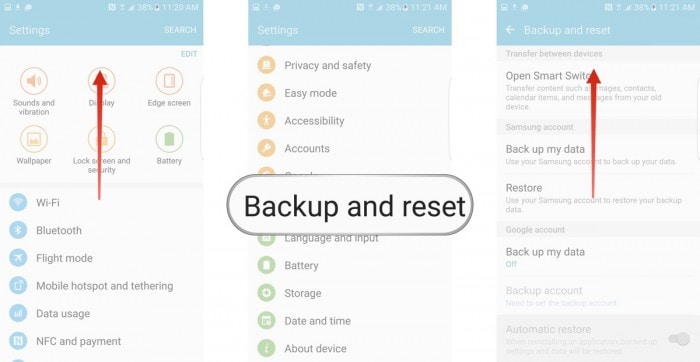
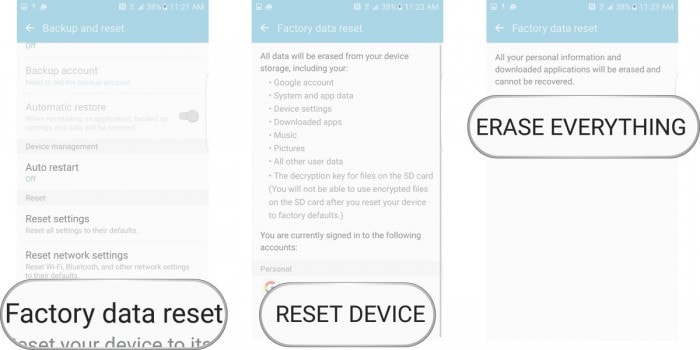
Once selected, tap on “Factory data reset” and then “reset device” as shown in the picture below.
Finally, tap on “ERASE EVERYTHING” as shown below to Factory Reset your device.
Note: Once the factory reset process is complete, your device will automatically restart and you will have to set it up once again. You can restore the backup data on your Oppo Find N3 once you factory reset it, again using the Dr.Fone toolkit.
Now for all those of you who are wondering why does My Oppo Find N3 keeps turning off by itself, please understand that the reasons behind the problem are simple, and so are its fixes. All you need to do is examine the problem carefully and move on to the fixes given in this article. Dr.Fone toolkit Android Data Backup & Restore feature provides an excellent platform for you to store all your data safely on your PC and retrieve it whenever you like so that you can go ahead to solve the error yourself without stressing about data loss.“Why does My Oppo Find N3 keep shutting off?” might be common questions but can be dealt with ease if you follow the methods explained above.
So, do not hold back, go ahead, and try these tricks. They have helped many and will be useful for you too.
safe & secure
- Title: Calls on Oppo Find N3 Go Straight to Voicemail? 12 Fixes | Dr.fone
- Author: Ariadne
- Created at : 2024-07-30 09:54:07
- Updated at : 2024-07-31 09:54:07
- Link: https://howto.techidaily.com/calls-on-oppo-find-n3-go-straight-to-voicemail-12-fixes-drfone-by-drfone-fix-android-problems-fix-android-problems/
- License: This work is licensed under CC BY-NC-SA 4.0.