
Fix App Not Available in Your Country Play Store Problem on Nokia G310 | Dr.fone
Fix App Not Available in Your Country Play Store Problem on Nokia G310
Mobile applications are important for smooth operations when it comes to smartphones. They offer convenience, entertainment, and functionality at your fingertips. However, encountering the “App Not Available in Your Country Play Store“ issue can be frustrating. It can quickly dampen the excitement of discovering a new app.
This is mainly due to geographical restrictions that are often imposed by developers. It poses a hurdle for users eager to access a particular application. However, there is no need to worry, as this article will help you in resolving this issue. It will delve into effective strategies and solutions to ensure the unavailability of an app is no longer an obstacle.

Part 1: Reasons Behind the App Not Available in Your Country Play Store Issue
Encountering the “Google Play App Not Available in Your Country“ issue can feel like hitting a roadblock. This restriction hampers your ability to explore and use valuable apps. It can also disrupt the smooth functioning of your daily digital activities. Before going for solutions, it is crucial to understand the reasons causing this restriction in installing apps on smartphones:
1. Regional Restrictions
One of the primary culprits behind this issue is the regional restrictions imposed by developers. Developers often roll out their apps gradually across different regions. It is done to adhere to legal and licensing requirements. This staggered release strategy ensures compliance with local laws. Moreover, it guarantees a smooth user experience tailored to specific geographical locations.
 vMix 4K - Software based live production. vMix 4K includes everything in vMix HD plus 4K support, PTZ control, External/Fullscreen output, 4 Virtual Outputs, 1 Replay, 4 vMix Call, and 2 Recorders.
2. Licensing and Legal Constraints
Licensing agreements and legal constraints play an important role when it comes to the accessibility of apps. Developers may encounter licensing issues. This can prevent them from offering their apps in certain regions. It is due to copyright, trademark, or other legal considerations. Navigating the complex web of international laws and agreements is a big hassle. It becomes a determining factor in the availability of apps on the Play Store.
3. Localization Challenges
Apps are often designed with specific markets in mind. These incorporate language, cultural, and regulatory considerations to enhance user experience. The absence of proper localization can render an app incompatible with specific regions. It includes factors such as adapting the app for different languages, currencies, and cultural nuances. This can result in the app being excluded from the Play Store app not available in your country.
4. Device and OS Compatibility
The compatibility between the app, the user’s device, and its OS is another factor that contributes to this issue. Developers might restrict their app availability to certain devices or OS versions. It can restrict access for users whose devices or OS do not meet the app’s requirements. This technical limitation adds another layer to the complexity of app availability.
5. Political and Economic Factors
In some instances, political tensions or economic considerations can also be a factor. It may influence the accessibility of apps in certain countries. Geo-political factors, trade sanctions, or economic conditions can impact the distribution of apps. This leads developers to exclude specific regions from their app’s availability.
Part 2: 4 Tested Methods To Fix Google Play App Not Available in Your Country
The right app can make a major difference in work efficiency or personal enjoyment. That’s why facing the “Play Store app not available in your country“ issue can be frustrating. The positive aspect is that many solutions exist for addressing this issue. Presented below are the top 4 approaches to resolving this matter:
Method 1: Change Your Google Play Store Country
One of the most direct ways to address this issue is by manually adjusting your Google Play Store country settings. Google allows users to change their country or region. Remember that you can only do it once a year. To utilize this approach, it’s essential to reside in the specified country. The other option is to provide a payment method originating from that particular region. Below is a detailed walkthrough for this procedure:
- Step 1. Launch the Google Play Store on your Nokia G310 and tap the “Profile” icon from the top right corner. Here, choose “Settings” and follow on to tap “General.”
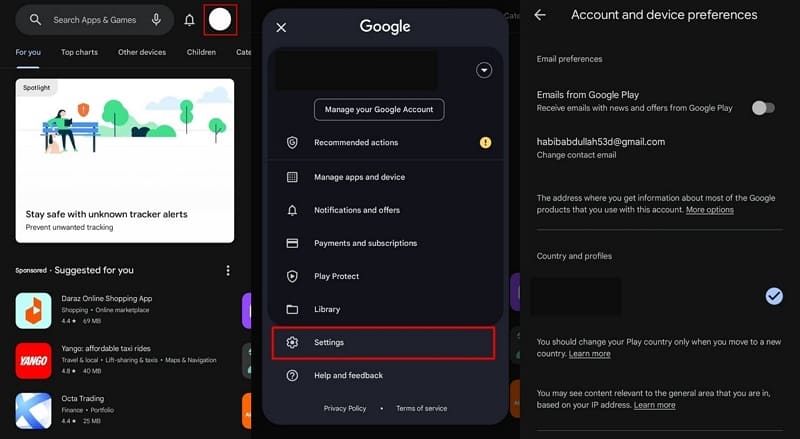
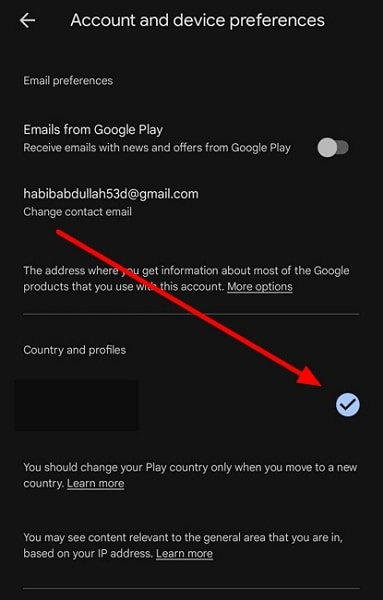
- Step 2. Within the “General” tab, move towards “Account and device preferences” and tap it. There, select “Country and profiles” and tap the country to change it. Now, follow the on-screen prompts to complete the procedure.
 OtsAV TV Webcaster
Method 2: Use a Reliable VPN
Confronting the message “This app is not accessible in your country” on the Play Store? Employing a Virtual Private Network (VPN) can be an effective strategy. It allows you to virtually transcend geographical restrictions. A VPN masks your actual location by routing your internet connection through servers in different regions.
You can utilize a reliable VPN to access the Play Store as though you were in a region where the desired app is accessible. Follow this step-by-step guide to address this concern:
- Step 1. Access the Google Play Store and download a reliable VPN for the procedure. Open the VPN you download and connect to the country of your choice. Once you have connected your device’s IP to another country using the VPN, continue to your home screen.

- Step 2. Look for Google Play Store on the home screen and long-press to open a menu. From the pop-up menu, choose “App Info,” and on the following screen, tap “Clear data.” Now, press “Clear cache” to wipe the cache.


- Step 3: Go back to the “App info” screen and press “Force Stop” to force close the app. Afterward, relaunch the Play Store and access your targeted apps.

 The Tube Sites Submitter is a fast and efficient tool for anyone who needs to upload videos quickly, easily and automatically to hundreds of tube sites in mere minutes .
 Method 3: Download an APK File
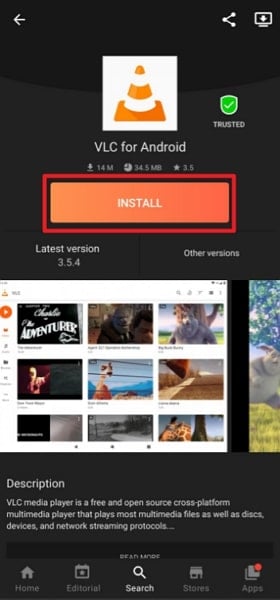
One way to resolve the issue at hand is to sideload the app by downloading its APK file. It can be a viable and direct solution where other methods fail. This method involves installing the application manually, bypassing the Google Play Store. Follow these sequential instructions to download and install an APK file:
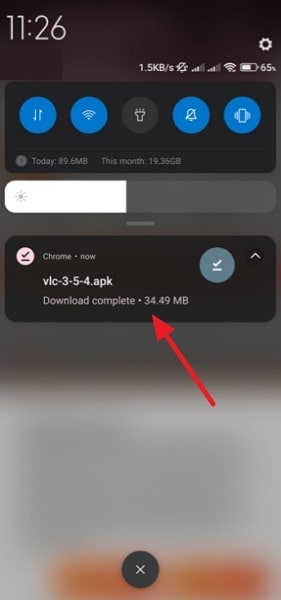
- Step 1. Before starting, ensure that you have enabled the installation from unknown sources. Afterward, find a reliable website and search for your targeted apps.
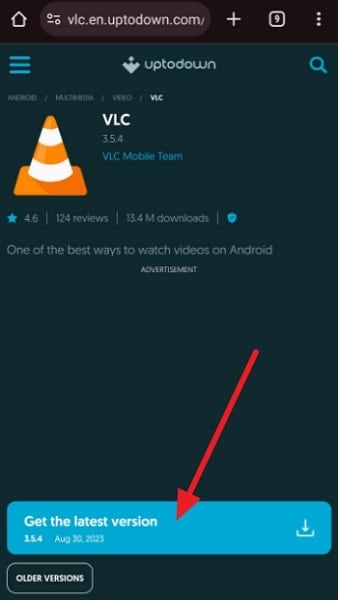
- Step 2. Once you have found the targeted app, download it on your Nokia G310. When the download process is complete, tap the file to start the installation process.
Method 4: Try a Third-Party App Store
Google Play Store isn’t the only apps and games store. There exist many options, and exploring them can help you find the apps you are looking for. Typically, third-party app marketplaces are not bound by geographical limitations. Here’s a guide on acquiring an app from a third-party store:
- Step 1. Use a web browser on your Nokia G310 to look for a reliable third-party app store like Aptoide. Once it is downloaded, install it on your smartphone.

- Step 2. Open the third-party app store and look for your targeted apps. Now, you should be able to download them without any restrictions.
 Allavsoft Batch Download Online Videos, Music Offline to MP4, MP3, MOV, etc format
Pro Tip: Fix Play Store Available in Your Country but Not Working on All Android Smartphones
If the Play Store is not working on your Nokia G310s or an application is not downloading from it, we have a tip for you. Wondershare Dr.Fone – System Repair (Android) is a perfect solution for all the issues for your Nokia G310s. Whether it is the Play Store functionality issue or the downloading of applications problem, System Repair (Android) is there to resolve them.
It fixes various Android issues in a matter of a few seconds. This toolkit has a high success rate of fixing Android issues, including the Play Store Not Working issue. It can also resolve the issue of Apps Keep Crashing, Phone Stuck in a Boot Loop, and much more.
Key Features of Wondershare Dr.Fone
There are some prevalent pointers you should know about Wondershare Dr.Fone. Before you continue using the tool for resolving Android problems, look into these prominent features:
- System Repair (Android) tool is used to fix other issues, too, like the black screen of death in Android.
- This software is compatible with all the Nokia G310 models, including the latest one, Nokia G310 S23.
- With no technical expertise required, you can execute all tasks to repair your Android issues with a few clicks.

![]()
 Glary Utilities PRO - Premium all-in-one utility to clean, speed up, maintain and protect your PC
Dr.Fone - System Repair (Android)
Repair Android System Errors without Any Trouble.
- Fix your Android to normal, no skills required.
- Fix various Android system issues, stuck in boot loop , black screen , or won’t turn on , looping on start, etc.
- The high success rate in resolving Android system issues.
- Compatible with a wide range of Android devices and OS versions
- User-friendly interface with easy-to-follow steps.
3981454 people have downloaded it
Steps Included To Fix Play Store Not Working on All Android Smartphones
While you have learned much about Wondershare Dr.Fone, in situations where an app is available but the Play Store is not working properly, it comes pretty handy. Here is how you can fix the Play Store not working problem on Android devices with Dr.Fone:
- Step 1: Activate Dr.Fone – System Repair Tool
At first, you will have to run Wondershare Dr.Fone - System Repair (Android) on your system and head towards the “System Repair” section from the “Toolbox.” Next, click on the “Android” device to continue, and hit the “Start” button to start the repair process.

- Step 2: Put Android Phone on Download Mode
On the next window, you need to enter the Nokia G310 device details, including the “Name, Model, Country, and Carrier,” and hit the “Next” button. Then, proceed to put your Nokia G310 on the “Download Mode” by following the on-screen instructions.

- Step 3: Confirm the Installation and Conclude the Process
Once the phone has been put in the Download Mode, the firmware will download automatically. Install it on your device by selecting the “Fix Now” icon. Now, enter the “Code” and confirm installation, after which hit the “Done” button once the process concludes.
 safe & secure
3,289,252 people have downloaded it
Frequently Asked Questions
- How do we resolve the inability to change the Play Store country problem?
If you are unable to change your Play Store country, ensure that your Google Play Store account has no pending transactions. Verify that the payment methods associated with your Google account are valid. Clear the cache and data of the Google Play Store app in your device settings to reset any potential issues.
- Can you use the Google Play Store balance after changing the country?
Your Google Play Balance is linked to the country setting on your Google Play account. If you possess a Google Play balance and decide to switch countries, the balance becomes unusable in the new location. Changing countries on your account results in the inability to access or utilize the existing balance.
- Is it safe to download Android applications from a third-party store?
It is risky to download Android applications from a third-party store because of the viral content. There could be issues like App Authenticity, Outdated Apps, Policy Violations, etc. It is better to download these apps from official platforms like Google Play Store since they are more secure.
Conclusion
To summarize, the pursuit of the perfect app sometimes encounters hurdles. One frustrating issue often reported by users is the “App Not Available in Your Country Play Store“ issue. However, armed with the knowledge, you can now navigate through these challenges. From changing your Play Store country to using VPNs, this guide has covered a range of methods. Each method provides a unique approach, catering to different preferences and circumstances.
As a parting recommendation, we introduce Wondershare Dr.Fone. It is a powerful tool designed to tackle Play Store malfunctions head-on. With support for even Android 13, this software offers a complete solution for Android. Its comprehensive approach and easy-to-use interface make it a valuable addition to your toolkit.
Guide: How To Unbrick a Bricked Nokia G310 Phone
Nokia G310 phones are super popular thanks to their excellent features and affordable prices. But being so popular means people try to customize them with custom software. If you’re not careful, you might have a “bricked” Nokia G310 phone. It won’t work at all. It will be more like a brick than a smartphone.
Don’t worry, though. This guide is here to help. It will show you how to unbrick your phone step by step. You’ll learn to bring your phone back to life and make it work again. So, get started on fixing your bricked Nokia G310 phone by reading this article.
Part 1. Common Reasons Why Nokia G310 Phones Get Bricked
A bricked phone might sound like a techy term, but it’s pretty simple – when your Nokia G310 phone turns into a lifeless block that won’t do anything. In this section, you’ll learn all about why this happens, so you can avoid these issues and keep your phone alive as long as possible.
- Trying to flash incompatible ROMs. Sometimes, people want their Nokia G310 phones to run different software like a custom version of Android called a ROM. But if you use the correct ROM for your specific phone, it can mess things up nicely. Also, inexperience with ROM flashing can hard brickyour Nokia G310 Be sure to follow guides and ask for community help online.
- Rooting mishaps/failures.“Rooting” means giving your phone superpowers, but if you mess up, it can go wrong. Your phone might not boot up, leaving you with a brick. Like the previous bullet, follow guides carefully, especially if inexperienced.
- Failed Firmware Updates. When your phone asks you to update its software, following the instructions carefully is essential. If you interrupt the process or something goes wrong, your phone could be bricked.
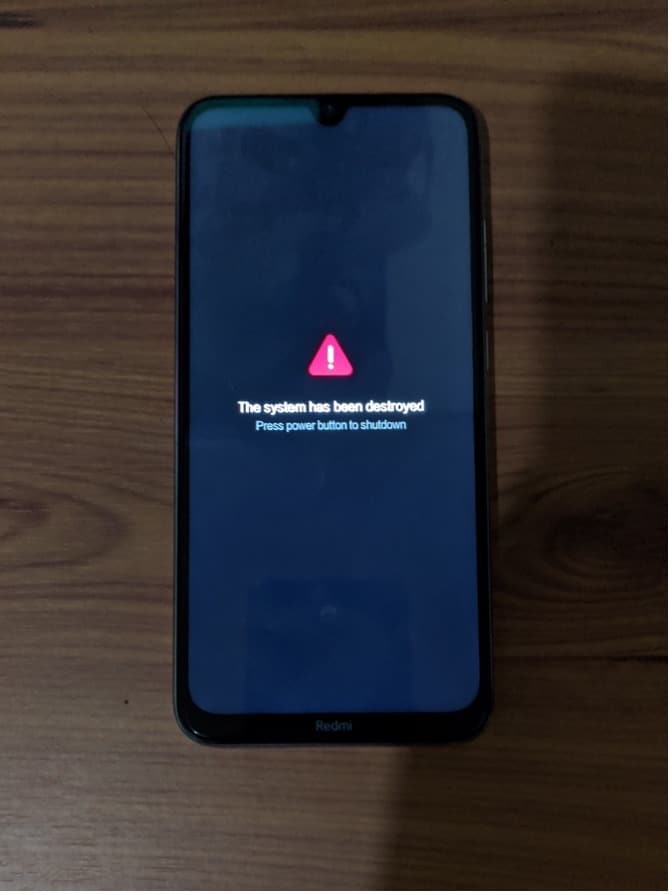
Now, you must know about soft and hard-bricking to learn how to diagnose your phone. Soft bricking is like a phone’s bad day – it might not start up. However, with the right help, you can fix it. Hard bricking is worse. It’s when your phone is a paperweight – it won’t turn on, respond, or do anything useful.
Part 2. Method 1: Use the Nokia G310 Flash Tool To Recover Bricked Nokia G310 Phones
Say you’ve accidentally bricked your Nokia G310 phone due to rooting or ROM flashing. You might feel scared, but imagine having a magic wand that can fix your bricked phone. That’s what the Nokia G310 Flash Tool is –a dedicated Nokia G310 unbricking tool. It lets you install or flash different software onto your phone, giving it a fresh start. Most of the time, a simple firmware flash will unbrick your Nokia G310.
The Nokia G310 Flash Tool is a superhero for various situations. Here are some scenarios where it can save the day:
- **Device Recovery.**If your phone is bricked or acting strange, the Flash Tool can help bring it back to life.
- Firmware Updates. You can use it to install official updates released by Nokia G310, ensuring your phone runs smoothly.
- **Device Customization.**Want a different look for your phone? The Flash Tool can help you install custom ROMs or themes.
- **Bug Fixes.**Got pesky bugs or glitches? The Flash Tool can replace corrupted software to make your phone behave.
- Performance Enhancement. If your phone feels sluggish, the Flash Tool can boost its speed by flashing a new OS.
How To Use the Nokia G310 Flash Tool To Unbrick a Nokia G310 Phone
Now that you know what the Nokia G310 Flash Tool is all about, it’s time to learn how to use it. If you’ve bricked your Nokia G310 phone, follow the steps below:
- Step 1. Download the Nokia G310 Flash Tool and the stock firmware of your device on your computer.
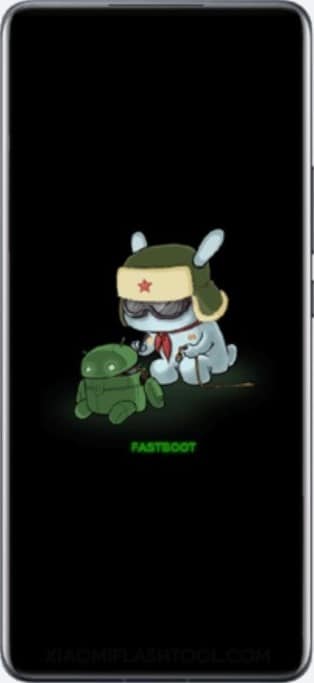
- Step 2. Turn off your phone. Then, press and hold the Volume Down + Power Key simultaneously for 6-8 seconds. This will force your phone to enter the Fastboot mode.
 With Screensaver Wonder you can easily make a screensaver from your own pictures and video files. Create screensavers for your own computer or create standalone, self-installing screensavers for easy sharing with your friends. Together with its sister product Screensaver Factory, Screensaver Wonder is one of the most popular screensaver software products in the world, helping thousands of users decorate their computer screens quickly and easily.
- Step 3. Connect your phone to your computer using a cable when you see this screen flash.
- Step 4. Using the Nokia G310 Flash Tool, click Select. Then, locate the firmware files you downloaded earlier.
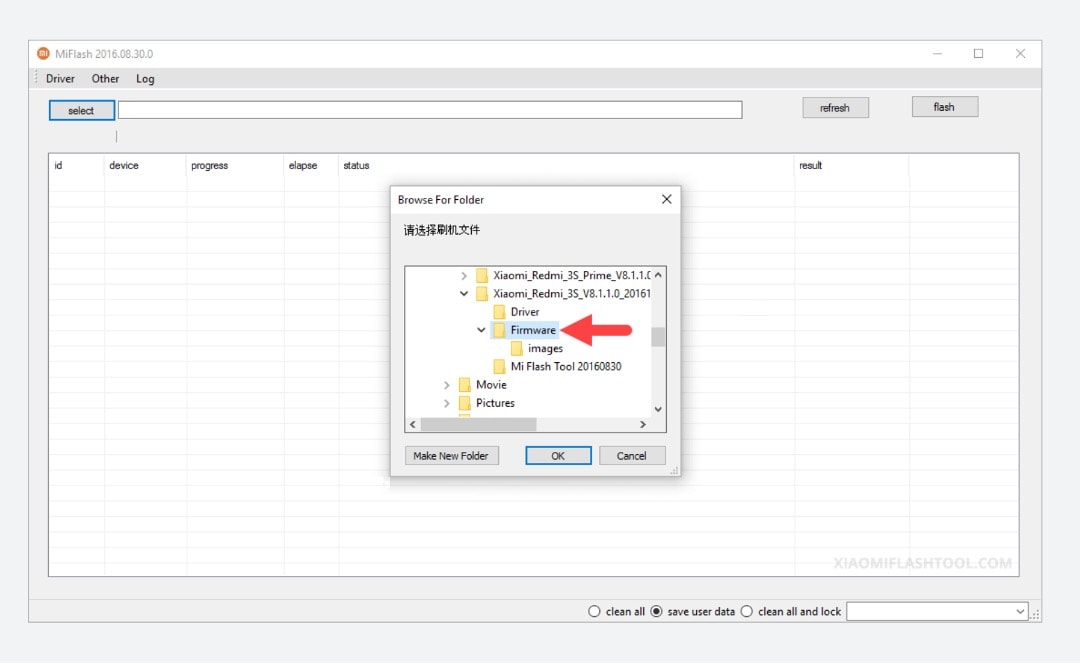
- Step 5. Click the refresh button until the flash tool recognizes your device. Then, click flash to replace the firmware. A text saying “success” should appear under the result column.
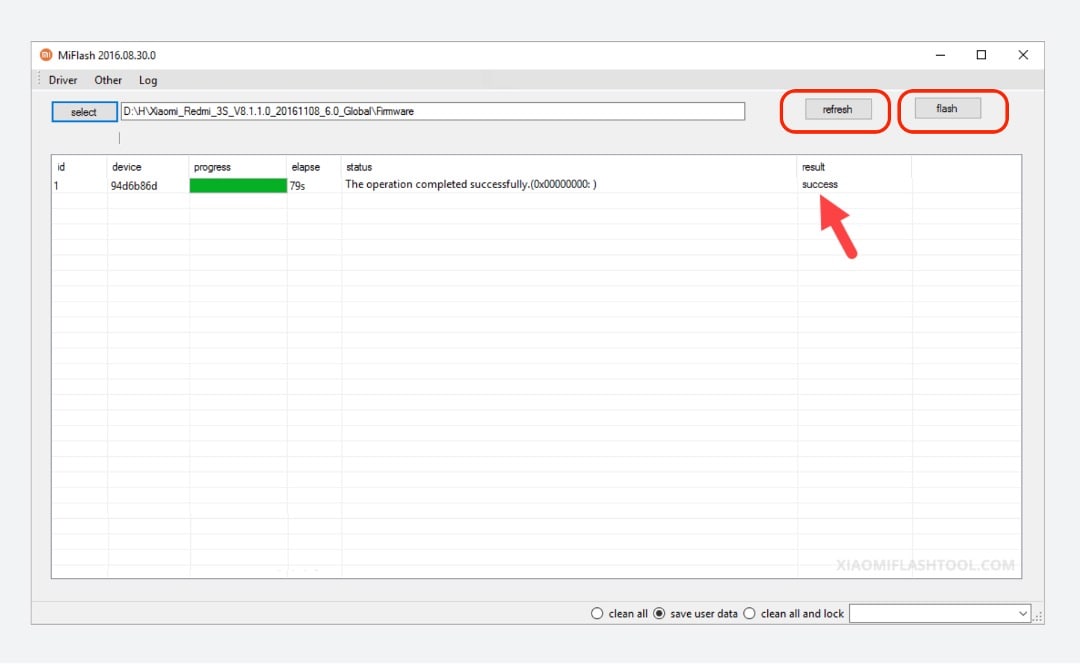
Congratulations! Your phone should be up and working after following these steps.
Part 3. Method 2: Wondershare Dr.Fone System Repair – Your One-Stop Shop for Unbricking Your Nokia G310 Phone
If you gave the Nokia G310 Flash Tool a shot and your phone is still not cooperating, don’t lose hope. Sometimes, the magic touch needs a slight variation. That’s where Dr.Fone comes into play. This dedicated software can work wonders when fixing various phone problems. It can even help in cases of bricked Nokia G310 phones involving software or firmware issues.
![]()
 PaperScan Professional: PaperScan Scanner Software is a powerful TWAIN & WIA scanning application centered on one idea: making document acquisition an unparalleled easy task for anyone.
Dr.Fone - System Repair (Android)
Repair Android System Errors without Any Trouble.
- Fix your Android to normal, no skills required.
- Fix various Android system issues, stuck in boot loop , black screen , or won’t turn on , looping on start, etc.
- The high success rate in resolving Android system issues.
- Compatible with a wide range of Android devices and OS versions
- User-friendly interface with easy-to-follow steps.
3981454 people have downloaded it
One of Dr.Fone’s most astonishing powers is its “System Repair” feature. This is where the real magic happens. If your Nokia G310 phone is bricked, it can help repair the underlying software glitches that caused the issue. Moreover, Dr.Fone brings a toolbox of features to the table, making it more than just a one-trick pony. Here are its key features:
- **Data Recovery:**If you’ve lost precious data, Dr.Fone can help recover it, even from a bricked phone.
- **Data Transfer:**You can quickly move data between devices, even if one is unresponsive.
- **System Backup & Restore:**Fone can help you create a backup of your phone’s system and restore it when needed.
- **Unlocking Tools:**If you’re locked out of your phone, Dr.Fone can help you regain access.
How To Use Dr.Fone System Recovery Feature To Unbrick a Nokia G310 Phone
Now that you know about Dr.Fone, it’s time to understand how to use it. Hopefully, it can save your bricked Nokia G310 phone from its problems. Follow the steps below:
- Step 1. DownloadDr.Fone from its official website , and launch it on your computer. After entering the Toolbox menu from the left panel, click System Repair. Make sure that your Nokia G310 phone is connected.
- Step 2. Select Android on the next screen.

- Step 3. Initiate the Android System Repair by clicking Start.

- Step 4. Confirm your device details. You can edit any details that might be wrong.
- Step 5. Put your phone into Download mode. Follow the guidelines for phones with or without home buttons. Your phone will begin downloading the dedicated firmware.

- Step 6. After downloading the firmware, verify and proceed with the installation by clicking Fix Now. Confirm firmware installation by typing “000000” into the text box in the appearing window. Click Confirm afterward.
- Step 7. After the process is finished, your phone should now be okay. Click Done.

Part 4. Best Practices/Tips Before Unbricking Your Phone
Before diving into the unbricking process, you must arm yourself with some tips and precautions to ensure your recovery journey is as smooth as possible. Here’s what you need to know:
- Backing Up Data: An Ounce of Prevention. Remember the golden rule: always back up your data before attempting any phone recovery. Unbricking might save your phone, but being safe is better than sorry.
- **Authentic Tools and Software: Stay on the Safe Side.**Using genuine and trustworthy tools is crucial when unbricking your Nokia G310 This applies especially to Dr.Fone, which you should only download from the official website. Additionally, when recovering your phone’s software, use authentic Nokia G310 ROMs (the operating system’s files).
- **Learning from Online Guides and Communities: Seek Guidance.**Navigating the unbricking process might seem daunting, but you’re not alone. There are many online guides, tutorials, and communities where people share their experiences and solutions.

Key features:
• Import from any devices and cams, including GoPro and drones. All formats supported. Сurrently the only free video editor that allows users to export in a new H265/HEVC codec, something essential for those working with 4K and HD.
• Everything for hassle-free basic editing: cut, crop and merge files, add titles and favorite music
• Visual effects, advanced color correction and trendy Instagram-like filters
• All multimedia processing done from one app: video editing capabilities reinforced by a video converter, a screen capture, a video capture, a disc burner and a YouTube uploader
• Non-linear editing: edit several files with simultaneously
• Easy export to social networks: special profiles for YouTube, Facebook, Vimeo, Twitter and Instagram
• High quality export – no conversion quality loss, double export speed even of HD files due to hardware acceleration
• Stabilization tool will turn shaky or jittery footage into a more stable video automatically.
• Essential toolset for professional video editing: blending modes, Mask tool, advanced multiple-color Chroma Key
Conclusion
So, there you have it – your guide to fixing a bricked Nokia G310 phone. Remember, bricking happens when your phone stops working. You won’t be afraid when that happens, as you learned about the Nokia G310 Flash Tool and Dr.Fone. They are your phone-saving superheroes that can unbrick even a hard-bricked Nokia G310 phone.
As a parting reminder, always keep a tool ready for emergencies. For this, choose Dr.Fone. It’s a super tool for all your phone problems. Give it a shot and be confident with your phone wherever you go and whatever you do with it.
 HD Video Converter Factory Pro
safe & secure
3,052,835 people have downloaded it
Troubleshooting Guide: How to Fix an Unresponsive Nokia G310 Screen

Smart devices have become an integral part of our lives, and Nokia G310 phones are increasingly popular due to their advanced features and affordable prices. These phones offer numerous benefits, including high-quality cameras, fast processors, long-lasting batteries, and sleek designs.
However, like any other electronic device, Nokia G310 phones can sometimes encounter issues that may impede their functionality. One common problem that users face is an unresponsive screen, which can be frustrating and disruptive to daily activities.
This article will discuss some valuable solutions for dealing with Nokia G310 phone screen unresponsiveness. We will provide step-by-step instructions for troubleshooting and getting your phone back in working order. Whether you’re a novice or an experienced user, these tips and tricks will help you navigate this problem and get back to using your phone without any issues. So, let’s dive in and explore how to fix a Nokia G310 phone with an unresponsive screen.
What causes the Nokia G310 Screen unresponsive?
The Nokia G310 screen may become unresponsive due to various reasons. Here are some common situations and their possible causes:
During Use/Gaming: The screen may become unresponsive due to overheating when using or gaming on a Nokia G310 phone. This can be caused by running too many apps simultaneously or playing games for an extended period, especially on models such as the Nokia G310 9 Pro, which generates much heat during gaming.
**No Response When Touching the Screen:**Sometimes, the Nokia G310 screen may not respond when touched due to a faulty touch screen or display. This can happen due to physical damage or a manufacturing defect. Some Nokia G310 Nord 2 users have reported this issue.
After Dropping the Phone: If a Nokia G310 phone has been dropped, the screen may become unresponsive due to physical damage or a loose connection. This can happen to any model, including the Nokia G310.
Overheating, physical damage, and manufacturing defects are some common causes of Nokia G310 screen unresponsiveness, which may occur during use/gaming, no response when touching the screen, or after dropping the phone.
 WonderFox DVD Ripper Pro
The common solutions to solve a Nokia G310 Screen unresponsive
Here are the three most common solutions to deal with phone screens being unresponsive, regardless of the brand:
Restart the Nokia G310 device

Restarting the Nokia G310 device is a simple and quick solution to an unresponsive phone screen. To restart the phone, press and hold the power button until the screen turns off, then press and hold the power button again to turn the phone back on.
 OtsAV Radio Webcaster
Check the Charging Port and Battery
Sometimes, an unresponsive screen can be caused by a dead battery or a faulty charging port. To check for these issues:
Step 1: Plug the phone into a charger and wait for at least 30 minutes to see if the battery charges.
Step 2: Try a different charger or cable to see if the issue is with the charging accessories.
Contact the Pros

If the above solutions don’t work, contacting a professional is best. A trained technician can diagnose and fix the problem. Contact the phone manufacturer or an authorized repair center to get help with your phone.
For different Nokia G310 models, there may be additional solutions to consider:

Check the Phone’s Temperature

Sometimes, a Nokia G310 phone’s screen, specifically Nokia G310 8 Pro, may become unresponsive due to overheating. To check the phone’s temperature:
Step 1: Go to Settings > Battery > Battery Temperature.
Step 2: If the phone is overheating, let it cool down before using it again.
Reset to Factory Settings
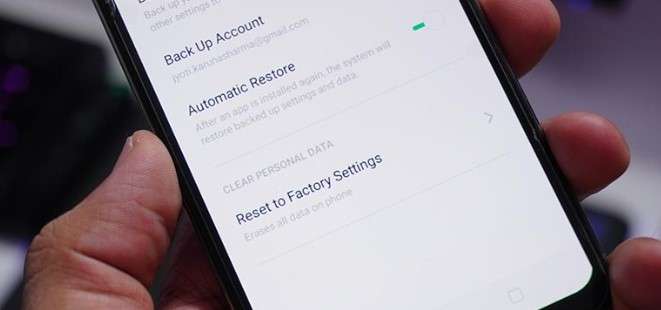
A factory reset may help fix the problem if none of the above solutions work. Note that this will erase all data and settings on the phone, so be sure to back up your data before resetting. To reset the phone:
Step 1: Go to Settings > Additional Settings > Backup and Reset > Erase All Data.
Step 2: Follow the on-screen instructions to reset the phone.
Replace a New Screen

If the phone’s screen is physically damaged or cracked, it may need to be replaced. To replace the screen:
- Contact a professional repair center or the manufacturer for replacement parts and installation.
How to avoid Nokia G310 Screen being unresponsive?
To avoid Nokia G310 screen being unresponsive, here are some suggestions based on the possible causes:
Check Software Updates on Time
Make sure to regularly check for and install software updates on your Nokia G310 phone. These updates often include bug fixes and security patches that can help prevent issues like overheating and screen unresponsiveness.
Check Hardware from Time to Time
Regularly inspect your phone’s hardware components such as charging ports, battery, and screen for any signs of damage or wear and tear. If you notice any issues, get them fixed promptly to prevent them from causing further damage.
Avoid extreme temperatures
Keep your Nokia G310 device in a temperature-controlled environment. High temperatures can cause the screen to become unresponsive, and low temperatures can cause it to freeze.
 DLNow Video Downloader
Keep the screen clean
Dirt and debris on the screen can cause it to become unresponsive. Use a microfiber cloth to clean the screen regularly.
Reduce the number of running apps
Running too many apps at once can overload the system and cause the screen to become unresponsive. Close any apps you’re not using to free up system resources.
Use Wondershare Dr.Fone to Repair or Manage Your Data
Wondershare Dr.Fone is a helpful tool that can help manage and repair your phone’s data. It can be used to back up your data, transfer files between devices, and even fix issues like an unresponsive screen. Dr.Fone has the DF13 version to be launched, which includes more features to help manage your phone’s data effectively.
By following these suggestions, you can help prevent screen unresponsiveness on your Nokia G310 phone. Download Dr.Fone at https://drfone.wondershare.com/ to manage your phone’s data effectively and fix any issues that may arise.
safe & secure
Conclusion
Nokia G310 phones offer numerous benefits, including high-quality cameras, fast processors, long-lasting batteries, and sleek designs. However, like any other electronic device, Nokia G310 phones can sometimes encounter issues, such as an unresponsive screen. The causes of an unresponsive screen may include overheating, physical damage, and manufacturing defects.
To deal with an unresponsive screen, users can try restarting the Nokia G310 device, checking the charging port and battery, or contacting a professional. Additional solutions for specific Nokia G310 models include checking the phone’s temperature, resetting to factory settings, or replacing a new screen. To avoid an unresponsive screen, users can check software updates on time, inspect the phone’s hardware, avoid extreme temperatures, keep the screen clean, and reduce the number of running apps. Dr.Fone is a helpful tool that can help manage and repair your phone’s data.
- Title: Fix App Not Available in Your Country Play Store Problem on Nokia G310 | Dr.fone
- Author: Ariadne
- Created at : 2024-07-30 10:08:17
- Updated at : 2024-07-31 10:08:17
- Link: https://howto.techidaily.com/fix-app-not-available-in-your-country-play-store-problem-on-nokia-g310-drfone-by-drfone-fix-android-problems-fix-android-problems/
- License: This work is licensed under CC BY-NC-SA 4.0.