
Fix App Not Available in Your Country Play Store Problem on Oppo Find N3 | Dr.fone
Fix App Not Available in Your Country Play Store Problem on Oppo Find N3
Mobile applications are important for smooth operations when it comes to smartphones. They offer convenience, entertainment, and functionality at your fingertips. However, encountering the “App Not Available in Your Country Play Store“ issue can be frustrating. It can quickly dampen the excitement of discovering a new app.
This is mainly due to geographical restrictions that are often imposed by developers. It poses a hurdle for users eager to access a particular application. However, there is no need to worry, as this article will help you in resolving this issue. It will delve into effective strategies and solutions to ensure the unavailability of an app is no longer an obstacle.

Part 1: Reasons Behind the App Not Available in Your Country Play Store Issue
Encountering the “Google Play App Not Available in Your Country“ issue can feel like hitting a roadblock. This restriction hampers your ability to explore and use valuable apps. It can also disrupt the smooth functioning of your daily digital activities. Before going for solutions, it is crucial to understand the reasons causing this restriction in installing apps on smartphones:

1. Regional Restrictions
One of the primary culprits behind this issue is the regional restrictions imposed by developers. Developers often roll out their apps gradually across different regions. It is done to adhere to legal and licensing requirements. This staggered release strategy ensures compliance with local laws. Moreover, it guarantees a smooth user experience tailored to specific geographical locations.
2. Licensing and Legal Constraints
Licensing agreements and legal constraints play an important role when it comes to the accessibility of apps. Developers may encounter licensing issues. This can prevent them from offering their apps in certain regions. It is due to copyright, trademark, or other legal considerations. Navigating the complex web of international laws and agreements is a big hassle. It becomes a determining factor in the availability of apps on the Play Store.
3. Localization Challenges
Apps are often designed with specific markets in mind. These incorporate language, cultural, and regulatory considerations to enhance user experience. The absence of proper localization can render an app incompatible with specific regions. It includes factors such as adapting the app for different languages, currencies, and cultural nuances. This can result in the app being excluded from the Play Store app not available in your country.

4. Device and OS Compatibility
The compatibility between the app, the user’s device, and its OS is another factor that contributes to this issue. Developers might restrict their app availability to certain devices or OS versions. It can restrict access for users whose devices or OS do not meet the app’s requirements. This technical limitation adds another layer to the complexity of app availability.
5. Political and Economic Factors
In some instances, political tensions or economic considerations can also be a factor. It may influence the accessibility of apps in certain countries. Geo-political factors, trade sanctions, or economic conditions can impact the distribution of apps. This leads developers to exclude specific regions from their app’s availability.
Part 2: 4 Tested Methods To Fix Google Play App Not Available in Your Country
The right app can make a major difference in work efficiency or personal enjoyment. That’s why facing the “Play Store app not available in your country“ issue can be frustrating. The positive aspect is that many solutions exist for addressing this issue. Presented below are the top 4 approaches to resolving this matter:
Method 1: Change Your Google Play Store Country
One of the most direct ways to address this issue is by manually adjusting your Google Play Store country settings. Google allows users to change their country or region. Remember that you can only do it once a year. To utilize this approach, it’s essential to reside in the specified country. The other option is to provide a payment method originating from that particular region. Below is a detailed walkthrough for this procedure:
- Step 1. Launch the Google Play Store on your Oppo Find N3 and tap the “Profile” icon from the top right corner. Here, choose “Settings” and follow on to tap “General.”

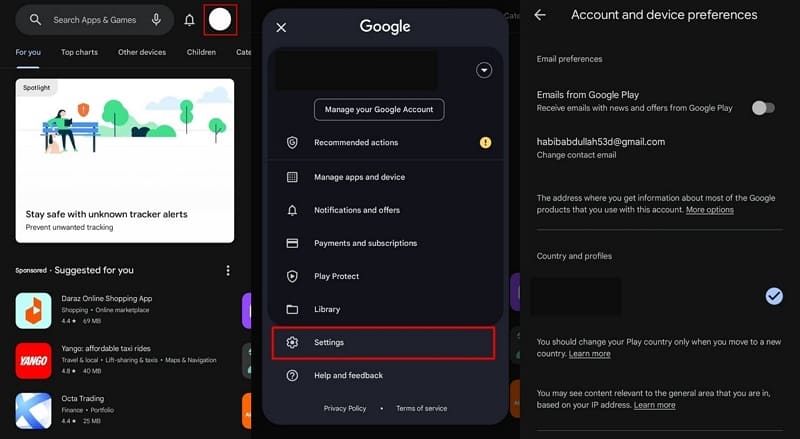
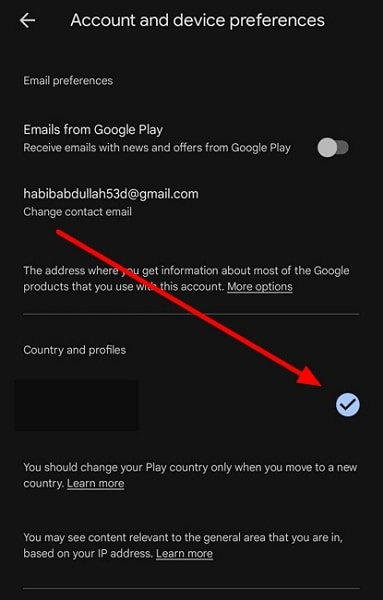
- Step 2. Within the “General” tab, move towards “Account and device preferences” and tap it. There, select “Country and profiles” and tap the country to change it. Now, follow the on-screen prompts to complete the procedure.
Method 2: Use a Reliable VPN
Confronting the message “This app is not accessible in your country” on the Play Store? Employing a Virtual Private Network (VPN) can be an effective strategy. It allows you to virtually transcend geographical restrictions. A VPN masks your actual location by routing your internet connection through servers in different regions.
You can utilize a reliable VPN to access the Play Store as though you were in a region where the desired app is accessible. Follow this step-by-step guide to address this concern:
- Step 1. Access the Google Play Store and download a reliable VPN for the procedure. Open the VPN you download and connect to the country of your choice. Once you have connected your device’s IP to another country using the VPN, continue to your home screen.

- Step 2. Look for Google Play Store on the home screen and long-press to open a menu. From the pop-up menu, choose “App Info,” and on the following screen, tap “Clear data.” Now, press “Clear cache” to wipe the cache.

- Step 3: Go back to the “App info” screen and press “Force Stop” to force close the app. Afterward, relaunch the Play Store and access your targeted apps.

Method 3: Download an APK File
One way to resolve the issue at hand is to sideload the app by downloading its APK file. It can be a viable and direct solution where other methods fail. This method involves installing the application manually, bypassing the Google Play Store. Follow these sequential instructions to download and install an APK file:
- Step 1. Before starting, ensure that you have enabled the installation from unknown sources. Afterward, find a reliable website and search for your targeted apps.
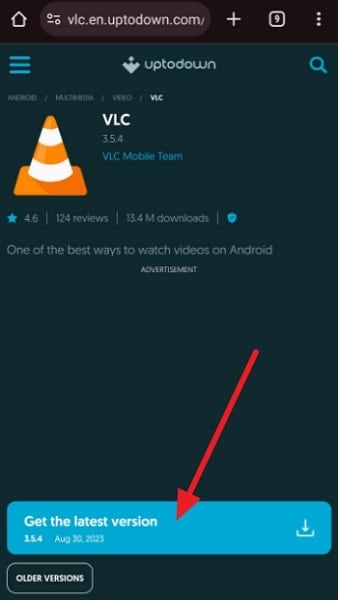
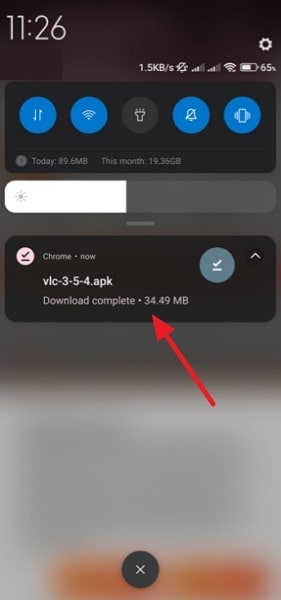
- Step 2. Once you have found the targeted app, download it on your Oppo Find N3. When the download process is complete, tap the file to start the installation process.
![]() FX PRO (Gold Robot + Silver Robot(Basic Package))
FX PRO (Gold Robot + Silver Robot(Basic Package))
Method 4: Try a Third-Party App Store
Google Play Store isn’t the only apps and games store. There exist many options, and exploring them can help you find the apps you are looking for. Typically, third-party app marketplaces are not bound by geographical limitations. Here’s a guide on acquiring an app from a third-party store:
- Step 1. Use a web browser on your Oppo Find N3 to look for a reliable third-party app store like Aptoide. Once it is downloaded, install it on your smartphone.

- Step 2. Open the third-party app store and look for your targeted apps. Now, you should be able to download them without any restrictions.
 Simple and intuitive video editing
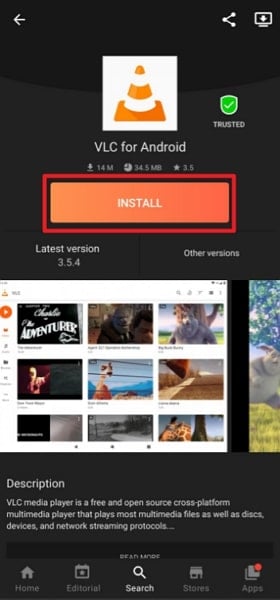
Pro Tip: Fix Play Store Available in Your Country but Not Working on All Android Smartphones
If the Play Store is not working on your Oppo Find N3s or an application is not downloading from it, we have a tip for you. Wondershare Dr.Fone – System Repair (Android) is a perfect solution for all the issues for your Oppo Find N3s. Whether it is the Play Store functionality issue or the downloading of applications problem, System Repair (Android) is there to resolve them.
It fixes various Android issues in a matter of a few seconds. This toolkit has a high success rate of fixing Android issues, including the Play Store Not Working issue. It can also resolve the issue of Apps Keep Crashing, Phone Stuck in a Boot Loop, and much more.
Key Features of Wondershare Dr.Fone
There are some prevalent pointers you should know about Wondershare Dr.Fone. Before you continue using the tool for resolving Android problems, look into these prominent features:
- System Repair (Android) tool is used to fix other issues, too, like the black screen of death in Android.
- This software is compatible with all the Oppo Find N3 models, including the latest one, Oppo Find N3 S23.
- With no technical expertise required, you can execute all tasks to repair your Android issues with a few clicks.
![]()
Dr.Fone - System Repair (Android)
Repair Android System Errors without Any Trouble.
- Fix your Android to normal, no skills required.
- Fix various Android system issues, stuck in boot loop , black screen , or won’t turn on , looping on start, etc.
- The high success rate in resolving Android system issues.
- Compatible with a wide range of Android devices and OS versions
- User-friendly interface with easy-to-follow steps.
3981454 people have downloaded it
Steps Included To Fix Play Store Not Working on All Android Smartphones
While you have learned much about Wondershare Dr.Fone, in situations where an app is available but the Play Store is not working properly, it comes pretty handy. Here is how you can fix the Play Store not working problem on Android devices with Dr.Fone:
- Step 1: Activate Dr.Fone – System Repair Tool
At first, you will have to run Wondershare Dr.Fone - System Repair (Android) on your system and head towards the “System Repair” section from the “Toolbox.” Next, click on the “Android” device to continue, and hit the “Start” button to start the repair process.

- Step 2: Put Android Phone on Download Mode
On the next window, you need to enter the Oppo Find N3 device details, including the “Name, Model, Country, and Carrier,” and hit the “Next” button. Then, proceed to put your Oppo Find N3 on the “Download Mode” by following the on-screen instructions.

- Step 3: Confirm the Installation and Conclude the Process
Once the phone has been put in the Download Mode, the firmware will download automatically. Install it on your device by selecting the “Fix Now” icon. Now, enter the “Code” and confirm installation, after which hit the “Done” button once the process concludes.
 safe & secure
3,289,252 people have downloaded it
 NeoDownloader - Fast and fully automatic image/video/music downloader.
Frequently Asked Questions
- How do we resolve the inability to change the Play Store country problem?
If you are unable to change your Play Store country, ensure that your Google Play Store account has no pending transactions. Verify that the payment methods associated with your Google account are valid. Clear the cache and data of the Google Play Store app in your device settings to reset any potential issues.
- Can you use the Google Play Store balance after changing the country?
Your Google Play Balance is linked to the country setting on your Google Play account. If you possess a Google Play balance and decide to switch countries, the balance becomes unusable in the new location. Changing countries on your account results in the inability to access or utilize the existing balance.
- Is it safe to download Android applications from a third-party store?
It is risky to download Android applications from a third-party store because of the viral content. There could be issues like App Authenticity, Outdated Apps, Policy Violations, etc. It is better to download these apps from official platforms like Google Play Store since they are more secure.
Conclusion
To summarize, the pursuit of the perfect app sometimes encounters hurdles. One frustrating issue often reported by users is the “App Not Available in Your Country Play Store“ issue. However, armed with the knowledge, you can now navigate through these challenges. From changing your Play Store country to using VPNs, this guide has covered a range of methods. Each method provides a unique approach, catering to different preferences and circumstances.
As a parting recommendation, we introduce Wondershare Dr.Fone. It is a powerful tool designed to tackle Play Store malfunctions head-on. With support for even Android 13, this software offers a complete solution for Android. Its comprehensive approach and easy-to-use interface make it a valuable addition to your toolkit.
 Power Tools add-on for Google Sheets, 12-month subscription
How to Fix Unfortunately, Contacts Has Stopped Error on Oppo Find N3
Have you recently noticed a message stating “Contacts has stopped”? This is enough to take away all your peace. As, our native contacts app stashes all our useful contacts which are time and again needed by a user. It’s malfunctioning is enough to give us chills. But, why the Oppo Find N3 or any other Android device incurs such problems?
It can occur while you launch the app or while you’re in the app already finding the required contact or when any other application is trying to gain access to it. So, to rage a battle with this issue, you need to seek help of some powerful methods in killing down the issue of contacts app crashes. And, the best part is that you’ve secured yourself by reaching the right place. We will be taking an in-depth discussion on several methods that may prove to be helpful. Let’s read them up here now.
Part 1: Get Android system fixed in one click
We’re always in search of a method that provides handy solution in a quite speedy and hassle-free manner. There are hundreds of tips and tricks for the same. You never know the possibility of firmware being the major drawback. No amount of manual methods can beat the performance of Dr.Fone - System Repair (Android).It is capable of providing 100% solution to any kind of issues, your phone gets troubled with. It is designed with the technology of combating the problem of black screen of death, app crashes and several other issues. In just a single-click, ward off the issue and free your device with errors
 Software Update Pro - Check and update software installed on your computer.
Dr.Fone - System Repair (Android)
Fix Contacts app crashing on Android in one click
- Incorporates with 1-click technology to resolve any issues occurring in your Oppo Find N3. Black screen of death, app crash, system crash, faulty issues etc.
- fone – Repair (Android) interface is extremely simple for users and lays functionalities aptly.
- One of its kind software with highest success rate in the market.
- Fully compatible with all kinds of Android phones, models, as well as the popular carrier.
- It provides users with 24 hours customer care service to resolve queries.
3,016,434 people have downloaded it
In this tutorial, we will learn the methodology of addressing the contacts keep stopping problem and gain triumph over it.
Step 1: Load program and draw connection of device
Download Dr.Fone - System Repair (Android) on PC. While program installs, use USB cable to connect device with system. From interface, tap on “System Repair” main window.
Step 2: Opt for Android Repair option
You’ll be directed to the “System Repair” screen where you have to opt for “Android Repair” options appearing over the left panel of the program. After that, do not forget to press “Start”.

Step 3: Key in device information
From following screen, fill the fields of “Brand”, “Name”, “Model”, “Country” and several other parameters. Then, tap on “Next” option to proceed further.
Step 4: Download Firmware package
Just follow the on-screen steps for booting your Oppo Find N3 into download mode. Then, hit the “Next” button to proceed with downloading the most suitable firmware package for your Oppo Find N3.

Step 5: Repair Android phone
Once the software downloads, the program will automatically repair any issues irking over your phone. Now, your phone is all free from contacts error.

Part 2: 9 Common ways to fix “Unfortunately, Contacts Has Stopped”
2.1 Restart Android system
Our response to any minuscule issue is straightaway restarting phone. This helps in clearing out any problem that might have disrupt the functioning of phone. So, to fix the problem of “Contacts app won’t open”, you too can try out your hand in this method.
- Get hold of your Android system and long press the power button.
- This will fadeout the main screen and showcase several options from where you’ve to tap on “Reboot/Restart” mode.
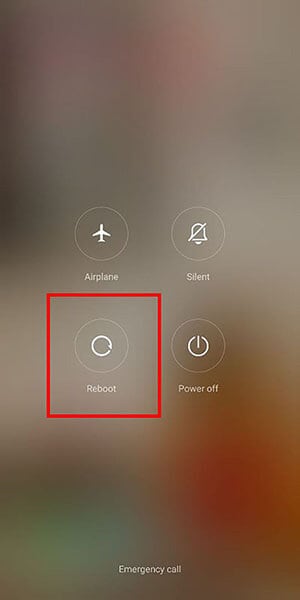
Now, your device will quickly reboot the Oppo Find N3 device. Once, the Oppo Find N3 device regains its normal state, check whether the issue is coming again or not.
2.2 Clear cache and data of Contacts app
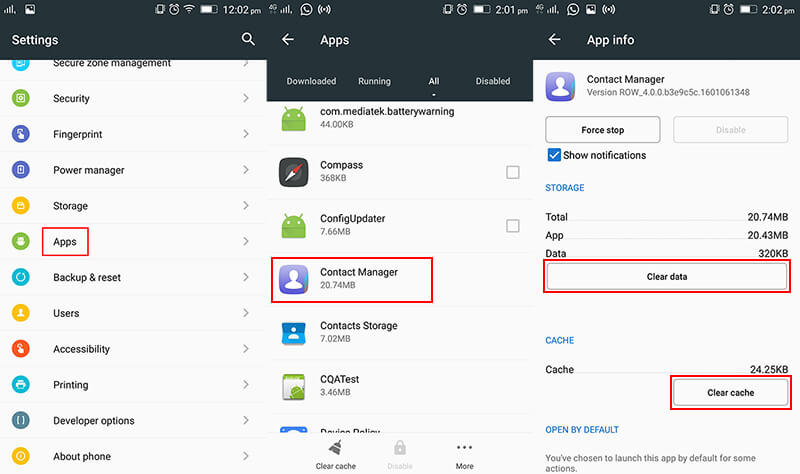
The cache memory basically stashes the copies of the concerned application. It is indeed a streak of copies of the desired app storing information and incurring additional space on the storage. This might be the reason why the contact app crashes rapidly on your Oppo Find N3. Hence, it can prove to be a good remedy for this problem. Just follow down the steps mentioned below-
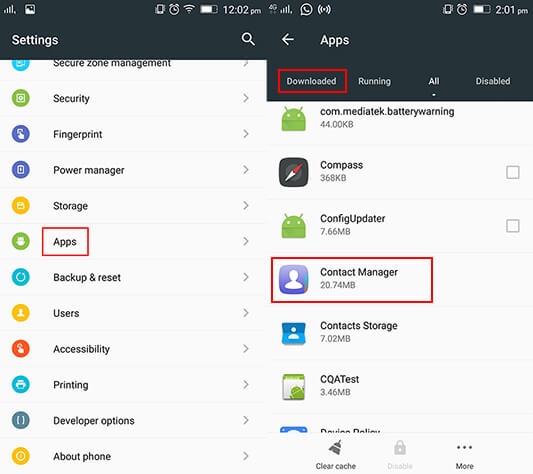
- First of all, go to “Settings” application from the app drawer or from the notification panel.
- Now, surf and select for “Applications” or “Apps & notifications”.
- Here, you need to browse for “Contacts” app and open it.
- On “Contacts” app, just tap on “CLEAR CACHE” and “CLEAR DATA” button. This will prompt the cache memory to be cleared.
2.3 Wipe cache partition
As we know the cache memories are the temporary files build by the firmware. These are of little importance as they are bound to become a bit more corrupted in nature. And sometimes, may indirectly become a hurdle for the working of contacts app. It is good if the Oppo Find N3 device is cleared off from the caches. Instead of manually wiping down the cache memory, we will understand how to clear off the cache partition in the following steps.
- From device, just power off your device. Then, press the “Volume Down + Power” button with “Home” combinations together.
- In a moment’s time, lose fingers from the “Power” button but do not release fingers from “Volume Down” and “Home” buttons.
- Once you view the “Android System Recovery” screen, just lose the “Volume Down” and “Home” buttons.
- Over the options available, just opt for “wipe cache partition” by tapping the “Volume down” button until the desired option is highlighted.
- Finally, push the “Power” key to give consent to the selection.

- After, the process is through there will be an option for “Reboot System Now”. Tap on it and restart the Oppo Find N3 device.

2.4 Disable Google+ app
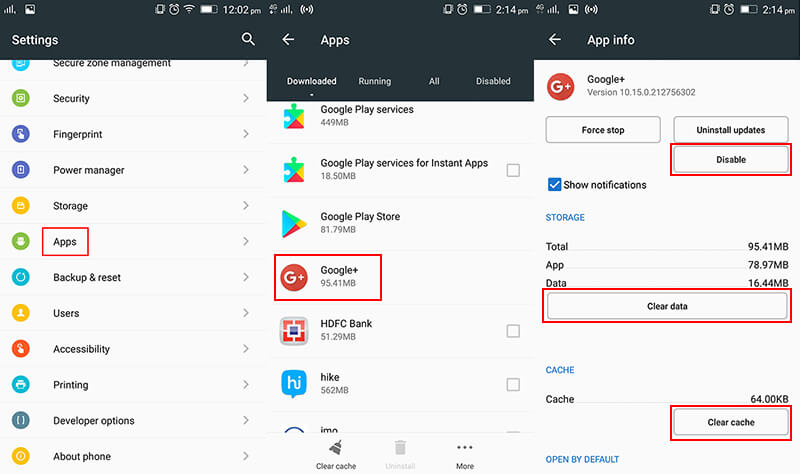
The root cause for detecting any problem is not very easy. You never know the overloading of Google + application might have directly impacted contacts app crashes. To resolve it, disabling it may prove to be a helpful solution. Here is the quick reference for disabling Google+ application.
- First of all, visit “Settings” from your Oppo Find N3.
- In “Settings”, visit the “Application Manager” or “Applications” menu and browse for “Google +” app.
- From the application main page, you can choose to do either of the methods:
- Either, completely disable the application to work by pressing on “Force stop” or “Disable” feature.
- Or, brush away the unnecessary cache piled up on your storage by using “Clear Cache” functionality.
There will be a prompt stating that the application may misbehave. However, you must disable the feature and check whether it worked out for you or not.
2.5 Update your device software
Many a times, we skip updating our device software thinking it is of less importance. In fact, one must not miss out the updates that occurs in phone. As, without the updates, the scope of some applications are affected to some extent. For its better functioning and avoiding issues like “contacts keep stopping”, here is how you should update device software.
- First and foremost, head on to “Settings” menu. Over there, click on “About Device”.
- There, you need to tap over “Software Update”.
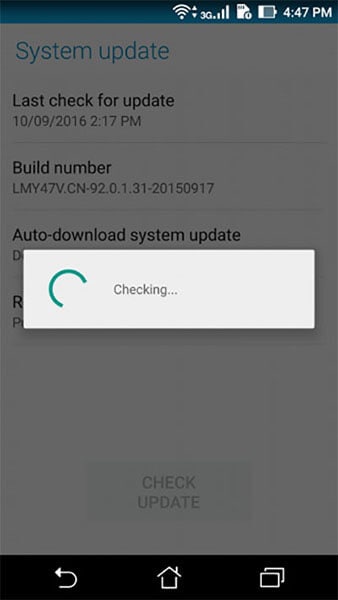
The device will now check whether there are any updates available for your device. If yes, then update application right away.
 vMix Pro - Software based live production. vMix Pro includes everything in vMix 4K plus 8 channels of Replay and 8 vMix Call
2.6 Reset App Preferences
As stated, the malfunctioning of contacts can be due to be any unexpected reason. Hence, users can opt for resetting app preferences. This may prove to be helpful in brushing away the issue of “Contacts app won’t open”.
- Launch “Settings” app and surf for “Apps” or “Applications” option on your Oppo Find N3.
- Just, tap over the three dots appearing at the upper right section and then tap on “Reset app preferences”.
- At last, just select “Reset default apps”.

 PCDJ Karaoki is the complete professional karaoke software designed for KJs and karaoke venues. Karaoki includes an advanced automatic singer rotation list with singer history, key control, news ticker, next singers screen, a song book exporter and printer, a jukebox background music player and many other features designed so you can host karaoke shows faster and easier!
2.7 Delete voicemail
Do you happen to exchange voicemails quite often? It can trigger to be the reason for contact app crashes. If your device happens to have a bulk of voicemails, you must get rid of them sooner or later. As, these might standout to be the prime reason for contacts stopping on Oppo Find N3. If you’re unaware about the procedure of removing all kinds of voicemails, you can proceed to make use of the following steps.
- Start with, launching the “Google Voice” app.
- From there, duly opt for “Voicemail”.
- Just click on the press menu option and at last select “Delete” option.
2.8 Uninstall the downloaded apps
Some applications contain some unwanted advertisements and some elements of malware. This can be enough for disrupting the functionality of the built-in contact app won’t open. It is crucial for your phone to be detoxed from such elements. You need to manually scrap off such applications. Do, ensure to download the application from the genuine source for future use.
- On your Oppo Find N3, just go to “Home” screen and tap on “Apps” icon.
- Then, tap on “Settings” icon followed by going to “Applications” or “Apps & Preferences” menu.
- After that, tap on “Menu icon” which will showcase the apps installed on device.
- Simply, open the app and hit the “Uninstall” button to brush away that app. Repeat the same with other application(s).
Now, check whether you’ve fought the battle with the problem or not.

 Forex Robotron Basic Package
2.9 Reset to Factory Settings
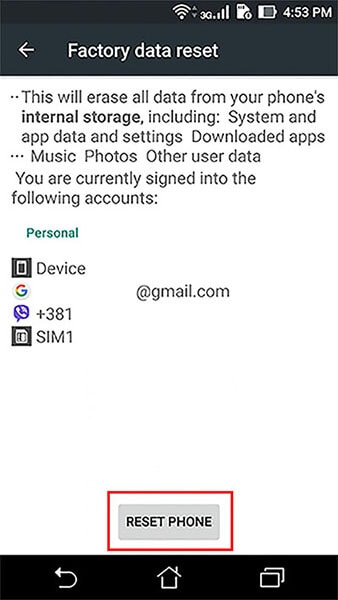
Last but not least, if all the methods falls flat to resolve the issue of contacts app won’t open. Then, it might be your device has some internal problem. This can be any software crash which might not be fixing with the aforementioned steps. That is where reset to factory settings may prove to be a good option. With this method, your phone will be cleared of all the components, settings and everything present in it. Here are is the comprehensive tutorial for biding bye to the problem of contacts app won’t open.
Note: Do ensure to take a backup of all the data available in your device. As, we don’t want you to regret afterwards.
- Just go to “Settings” and surf and select “Backup & Reset” option.
- You need to toggle on the option for performing the backup on your Google account.
- Then, tap on “Reset” button and then tick mark the option for resetting your phone.
Fix Can’t Take Screenshot Due to Security Policy on Oppo Find N3
“Can’t take screenshots due to security policy” is a screenshot restriction on your Android smartphone. You’ve probably seen this error message before, especially when taking screenshots of banking or video streaming apps. But why do apps and websites block screenshots? It’s actually for your good.
Screenshots can be misused to steal money or pirate copyrighted content. By prohibiting screenshots, apps and websites can help to protect your data and privacy. If you want to learn more, keep reading. This article will explain why apps and websites prevent screenshot capture and why it’s important for security. We’ll also give you tips on how to take photos of apps and websites that don’t let you take screenshots.
Part 1. Can’t Take Screenshots Due to Security Policy on Android? Here’s Why
Why can’t you take a screenshot of something on your phone and get the error message that says, “Can’t take screenshot due to security policy”? Apps and websites turn off or remove the screenshot feature for a variety of reasons, including:
Device Restrictions
Lots of workplaces and schools have rules against taking screenshots on devices used for work or school. Organizations do this to protect sensitive information and prevent data breaches.
Protect Sensitive Information
Say you’re trying to take a screenshot on your Oppo Find N3 device, and you get the notification “Can’t take screenshot due to security policy.” Oppo Find N3 smartphones are not necessarily the problem.
Some apps and websites, such as banking apps, store private data like financial and credit card details. Blocking capturing screenshots is a way to prevent unauthorized access to confidential information.


Follow Regulations
Some industries and organizations have regulations that need them to protect sensitive data. Financial institutions must protect their customers’ financial information, for example. Disabling screenshots is one way to follow these regulations.
DRM-Protected Content
Android can’t take screenshots due to security policy, especially to prevent piracy. Piracy is the distribution of copyrighted material without permission. It can harm businesses that depend on copyright protection.
To prevent this, you can use DRM (digital rights management) to protect copyrighted content. DRM-protected content cannot be screenshotted or copied.
Prevent Fraud
Scammers and other criminals often use screenshots to commit fraud. For instance, people might send fake screenshots to trick others into sharing personal details or money. Disabling screenshots can help to prevent this type of fraud.
Protect Intellectual Property
Many businesses and organizations have valuable information they want to keep safe, such as trade secrets. Disabling screenshots can be helpful to prevent the theft of this intellectual property.
Protect User Privacy
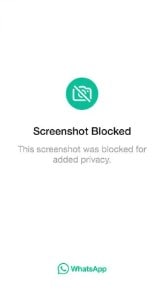
Some apps and websites allow users to share private information. Some apps, like messaging apps, let users share private info. But there are limits.
You can’t take screenshots due to security policy Whatsapp features, View Once media option. This method stops people from taking pictures of private media chats, protecting users’ privacy.
You Are Using a Secure Folder
Companies design secure folders to protect your most sensitive data from unauthorized access, so screenshots are not allowed within them.
Part 2. 8 Ways To Take Screenshots When You Can’t Due to Security Policy
If you’re trying to take a screenshot of an app or website with a security policy in place, there’s usually no way to circumvent it. However, there are a few things you can do to take pictures of these apps and website content.
Enable Screen Capture on Android
Sudden “can’t take screenshot due to security policy” notifications, failing to take a screenshot, and a Oppo Find N3 user?
If you are using this Android device, you can enable the screen capture feature in the Settings app.
- Step 1: Go to Settings > Apps, then tap the More options icon in the upper right corner.


- Step 2: Choose Special access > All files access.

- Step 3: Enable Oppo Find N3 capture.

Once you have enabled screen capture, you can check if you can take screenshots of any app or website.
Enable Screenshots in Incognito Mode
Apps and websites may prohibit screenshots in incognito mode to protect your privacy. However, you can enable the Incognito Screenshot experimental flag in Chrome to bypass this restriction.
- Step 1: Open Chrome on your Oppo Find N3 and type “chrome://flags” in the address bar.

- Step 2: Search for Incognito Screenshot and choose Enabled from the drop-down menu.
 /a>
/a>
- Step 3: Tap Relaunch on the lower right corner of the screen.
Once Chrome has relaunched, you should be able to take screenshots in incognito mode by pressing the power and volume-down buttons at the same time.
Use Google Assistant
With Google Assistant, taking screenshots on your Oppo Find N3 is now easier than ever. Just say, “Hey, Google, take a screenshot,” Google Assistant will capture the screen and save it to your gallery.

Use a Third-Party App To Take Screenshots
You can download several applications on Google Play Store if you still can’t take a screenshot due to security policy. Some popular third-party screenshot apps include:
- Screenshot Easy
- Screenshot Tile
- Screen Master: Screenshot Markup
Third-party screenshot apps often use different methods to capture the screen. These might bypass the security measures that prevent you from taking screenshots with the built-in screenshot function.
Capture Your Phone Display With Another Device
If you own another smartphone, you can use it to take a photo of the screen of the Oppo Find N3 device you’re trying to take a screenshot of. This is a simple workaround for any security policies that may be in place. To do this, open the camera app on your other smartphone and point it at the screen of the first device.
Check the Banking App Settings for Screenshot Permissions
Some banking apps may turn off screenshots by default, but some may allow them in the settings. To check this, open the banking app and select the settings menu. Look for a setting that allows taking in-app photos. If you find it, enable it to allow screenshots to be taken in the app.
Screen Mirroring
Smart View allows you to display your Oppo Find N3 device’s screen on your smart TV, where you can then take a screenshot of the TV to capture the app or website you need.
- Step 1: Swipe down the top of the screen to access the Quick Settings panel.
- Step 2: Tap the Smart View icon.
- Step 3: Select your TV from the list of available devices and tap Start Now.

Alternatively, if you don’t have a smart TV, you can still mirror your phone screen display to your desktop or tablet using the Oppo Find N3 Flow app and take a screenshot of your phone’s screen instead.
Use Disable Flag Secure Magisk Module
Still experiencing the error message, “Can’t take screenshot due to security policy?” Bypass Android phone error like this using a module.
The module patches the Android framework to remove the FLAG_SECURE flag from apps. It is a relatively simple process but requires root access and Magisk. This module will turn off the security flag to take screenshots in Incognito mode and other apps.

Authors Verdict
There are a few ways to bypass screenshot restrictions on Android apps and websites, but some methods are more complicated than others. All methods should work, but if you think your device has been compromised, it is important to check if it is a system issue.
You can use a third-party tool like Wondershare Dr.Fone without rooting your device. It is easy to use and supports many Android smartphones. You can try Dr.Fone for free to test if it supports your device and can fix the underlying system issues.
Part 3. Dr.Fone: A Comprehensive Solution for Fixing Android System Issues
Dr.Fone’s System Repair tool for Android cannot bypass the security apps of banking apps and video streaming apps like Netflix. This is because these apps use sophisticated security measures to protect their users’ data.
However, Dr.Fone System Repair tool for Android can fix a wide range of other Android system issues that might happen from installing third-party apps on your smartphone, such as:
Follow this step-by-step guide and learn how to use Dr.Fone to scan your Android smartphone for system issues and repair them.
- Step 1: Once you have downloaded Dr.Fone, install it and launch it on your desktop. Then, connect your Oppo Find N3 to your desktop using a USB cable.
safe & secure
3,567,199 people have downloaded it
- Step 2: From the Toolbox homepage, select System Repair > Android.
- Step 3: Click Start on the new window.
- Step 4: Select an option from the Name, Model, Country, and Carrier in the drop-down lists. Next, select the checkbox to agree with the warning, then click Next in the bottom right corner.
- Step 5: Follow the in-app instructions to put your Oppo Find N3 on Download mode, then click Next.


- Step 6: Wait while the firmware automatically downloads.
- Step 7: Review the details on the screen and click Fix Now to install the firmware on your smartphone.

- Step 8: Read the dialogue box note, enter the code in the input box, and click Confirm.
 The Tube Sites Submitter is a fast and efficient tool for anyone who needs to upload videos quickly, easily and automatically to hundreds of tube sites in mere minutes .
- Step 9: Keep your smartphone connected and avoid using it while Dr.Fone is repairing it.

- Step 10: If your device has started properly, click Done to close this app. Otherwise, click Try again.
Conclusion
You can fix the “Can’t take screenshot due to security policy” error on Android in different ways. But it depends on the cause of the error. If an app is causing the error, you can try two things. First, remove the app’s screenshot restriction. Second, download a different screenshot app or a different device to take screenshots.
Although there are ways to bypass the “Can’t take screenshot due to security policy” error message, it’s crucial to know why screenshots are not allowed. Many apps and websites do not permit it to protect sensitive information, prevent piracy, and follow regulations. They also do it to prevent fraud, protect user privacy, and safeguard intellectual property.
If you think the issue is with your Android system, or your device becomes bricked after trying other methods, experiencing app crashes, or otherwise malfunctioning, try using the Dr.Fone System Repair tool. It is worth trying and can fix most Android system issues in a few minutes.
- Title: Fix App Not Available in Your Country Play Store Problem on Oppo Find N3 | Dr.fone
- Author: Ariadne
- Created at : 2024-07-30 10:09:00
- Updated at : 2024-07-31 10:09:00
- Link: https://howto.techidaily.com/fix-app-not-available-in-your-country-play-store-problem-on-oppo-find-n3-drfone-by-drfone-fix-android-problems-fix-android-problems/
- License: This work is licensed under CC BY-NC-SA 4.0.