
Fix Unfortunately Settings Has Stopped on Oppo Find N3 Quickly | Dr.fone
Fix Unfortunately Settings Has Stopped on Oppo Find N3 Quickly
All of you, sooner or later, must have found the “Unfortunately Settings has stopped” error on your Oppo Find N3. The problem can occur if the Settings keeps stopping or crashing. Many times, you may try to open the Settings but it doesn’t even open. Or possibly, it may freeze after getting opened thereby hampering the Oppo Find N3 device’s performance.
 Glarysoft File Recovery Pro Annually - Helps to recover your lost file/data, even permanently deleted data.
Well! There can be a number of reasons why this thing happens. For instance, custom ROM installations, not enough space in the Oppo Find N3 device or perhaps an outdated version of Android. If you are struggling with the same issue and want to know what to do when Android Settings is not responding, this post will help you. We have explained everything in detail along with the solutions. So, scroll down and get things sorted.
- Part 1: Clear the cache of Settings and Google Play Service
- Part 2: Clear the Android phone’s RAM and retry
- Part 3: Uninstall the Google update
- Part 4: Uninstall the custom ROM or re-flash the stock ROM
- Part 5: Wipe cache partition to restore Settings
- Part 6: Factory reset your Android
- Part 7: Check and update Android OS

Part 1: Clear the cache of Settings and Google Play Service
It is possible that the corrupted cache files are responsible for this error. Hence, as the first tip, we would like you to clear the Settings cache if that is what triggers the “Unfortunately Settings has stopped” issue. Clearing it would definitely make Settings run appropriately. And The steps to clear the cache of the Google Play Services app are similar. Here is how to clear the cache of Settings:
- Open “Settings” on your Oppo Find N3 and choose “Apps & Notifications”/”Apps”/”Application Manager” (the option may differ on different devices).
- In the list of applications, look for “Settings” and open it.
- Now, select “Storage” followed by “Clear Cache”.

Note: In some phones, the “Clear Cache” option may come after tapping on “Force Stop”. Therefore, go accordingly without getting confused.

Part 2: Clear the Android phone’s RAM and retry
As the next tip, we would like to suggest you clear your device’s RAM by ceasing the running apps in the background. RAM, if at the increased level, is responsible for the Oppo Find N3 device’s freezing, poor performance, and most probably is the reason behind crashing Settings. Also, if the apps in the background keep running, they might conflict with the Settings and stop it to perform properly. Therefore clearing RAM is important when Android Settings is not responding. Here is how to do it.
- Firstly, you need to go to the Recent apps screen. For this, long-press the Home key.
Note: Please note that different devices have different ways to go to the Recent apps screen. Do it according to the Oppo Find N3 device you own. - Now, swipe the apps and tap on the clear option. You will be able to notice the amount of RAM cleared

 Any DRM Removal for Mac: Remove DRM from Adobe, Kindle, Sony eReader, Kobo, etc, read your ebooks anywhere.
Part 3: Uninstall the Google update
Uninstalling Google Play Store updates has also responded well to many users. It has worked in the case of the “Unfortunately Settings has stopped” error. So, we would also like to suggest you use this tip if the others don’t work. Here are the steps to be followed for this.
- Open “Settings” on your Android and tap on “Application manager” or “Apps” or “Application.
- Now, head to all the apps and select “Google Play Store” from there.
- Tap on “Uninstall Updates” and restart your device to check if the crashing Settings issue has been resolved.


Using a custom ROM on your device brings up this problem due to incompatibility or improper installation. Therefore, you should either uninstall the custom ROM or re-flash the stock ROM. in order to re-flash the stock ROM of your Oppo Find N3, the best way would be Dr.Fone - System Repair (Android). It offers one-click functionality to flash stock ROM and that too with full security. Supporting all Oppo Find N3 devices, it ranks among its counterparts when it comes to fixing crashing Phone app issues or any other Android system issue. It is loaded with the beneficial features which are discussed below.
Dr.Fone - System Repair (Android)
Android repair tool to fix “Unfortunately, Settings Has Stopped”
- You needn’t be a tech-savvy to use this
- Supports a wide range of Android devices easily, 1000+ being more precise
- One-click tool and supports any sort of Android system issue
- Higher success rate along with millions of trusted users
- Trustworthy and offers an extremely easy interface
4,635,310 people have downloaded it
How to fix crashing Settings using Dr.Fone - System Repair (Android)
Step 1: Download Tool
Visit the official website of Dr.Fone and download the toolbox from there. Go for the installation process and wait until the installation gets over. Launch it now and choose the “System Repair” tab from the main window.

Step 2: Get the Phone Connected
With the help of a USB cable, plug your Oppo Find N3 into the PC. Upon proper connection, hit on the “Android Repair” option from the left panel.

Step 3: Feed Correct Information
In the next window, you need to fill in some necessary information like the name and model of the mobile device. Enter details like country and career. Check once and hit on “Next”.

Step 4: Enter Download Mode
Now, you need to take your device into Download mode. For this, you need to follow the onscreen instruction according to your device. Click “Next” and you will notice the firmware downloading progress on your screen.

Step 5: Repair the Issue
Once the firmware is completely downloaded, your Oppo Find N3 will automatically start getting repaired. Stay there and you will receive a notification that the repair is done.

Part 5: Wipe cache partition to restore Settings
Like RAM, wiping cache is also vital so as to make the Oppo Find N3 device’s operation smoother. And when you are getting the “Unfortunately Settings has stopped” error, it might be due to the collected cache. To remove it, you will need to enter the recovery mode. And the steps for recovery mode range from device to device. For instance, Oppo Find N3 users have to press the “Home”, “Power” and “Volume Up” buttons. Similarly, HTC and LG device users are supposed to press the “Volume Down” and “Power” buttons. For Nexus, it is “Volume Up, Down” and Power key combinations. Therefore, before going further, make sure what device you own and enter the recovery mode according to it. Now, follow the detailed guide below to wipe the cache partition in order to fix crashing Settings.
- Primarily, turn off the Oppo Find N3 device and enter the recovery mode by pressing the respective key combinations.
- You will notice a Recovery screen on your device.
- On showing up the recovery screen, look for the “Wipe Cache partition” option and use the “Volume Down” and “Volume Up” buttons to scroll down and up respectively.
- On reaching the required option, press the “Power” button to start wiping.
- Once finished, click the reboot option and the Oppo Find N3 device will be rebooted, fixing the issue hopefully.

Part 6: Factory reset your Android
You can also opt for Factory resetting your device to fix the issue of Settings keeps stopping. By removing everything from the Oppo Find N3 device, it will make your device run properly. If you have important data on your device, please make sure to create a backup before taking action if you don’t want to lose it. The steps are as follows.
- In the “Settings, go to “Backup and Reset”.
- Tap on “Factory data reset” followed by “Reset device”.
- Wait for the completion of the process and check if Settings is stopping or not after it gets rebooted.

Part 7: Check and update Android OS
A lot of times minor issues crop up due to the operating systems that get outdated. It is because the Oppo Find N3 device needs to get updated from time-to-time for proper functioning otherwise it will not be able to match up with the fading technologies thereby coming up with issues like “Unfortunately Settings has stopped”. We recommend here you check for the available update and update your device. For this follow the guide below.
- Go to “Settings” and tap “About Phone” on your device.
- Now, hit on “System Update” and the Oppo Find N3 device will look for any available update.
- If there is any, go along with the prompts to install it and make your phone even smarter.

Conclusion
If your Oppo Find N3 shows the “Unfortunately Settings has stopped” error, don’t worry. This problem can come from many things like old software or cache issues. You can try easy fixes like clearing cache or updating your system. Sometimes, removing custom ROMs might be needed.
For iOS users facing similar problems, we recommend using Dr.Fone-System Repair (iOS) . It’s known for fixing many iOS problems without losing any data. Remember, a well-working device is just a few steps away!
 safe & secure
Stuck at Android System Recovery Of Oppo Find N3 ? Fix It Easily
In this article, you will learn what is Android system recovery, and how to fix Android stuck at system recovery step by step. To get out of Android system recovery more easily, you need this Android repair tool.
You know your Oppo Find N3 is stuck in recovery mode when you cannot turn on the Oppo Find N3 device. If you try to turn it on, it shows a message that says, “Android System Recover.” This situation can be quite debilitating for most Android users. Most of the time, you don’t know whether you have lost all of your important Android data. It is even more worrying because of the fact that you cannot turn on your device at all, especially when you don’t know how to fix it.
Part 1. What is Android System Recovery?
Despite all the worry that surrounds an unwanted Android system recovery screen, it is actually a feature that can be quite helpful to your Oppo Find N3 when it’s needed. It can be useful when you want to hard reset the Android device without having to access the settings. This can be very useful if your device is not working very well or if your touch screen is experiencing problems. It can also be very helpful when you are having a problem accessing the settings on your device.
For these reasons, it is actually a good thing, although when it does happen unexpectedly, you may want to know how to fix it.
Part 2. How to get to Android System recovery
Now that you know how useful the Android System can be, you may want to know how to utilize this feature to get out of some of the problems we mentioned above. Here’s how you can safely get to the Android recovery system on your Oppo Find N3.
Step 1: Hold down the power key and then select “Power Off” from the options on the screen. If, however, your screen is unresponsive, keep holding the power key for several seconds until the Oppo Find N3 device is completely turned off.


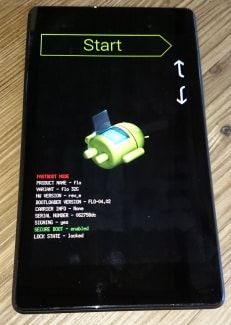
Step 2: Next, you need to hold down the Power and the Volume Key. You should able to see the Android image and a bunch of information about your device. There should also be a “Start” at the top right corner of the screen.
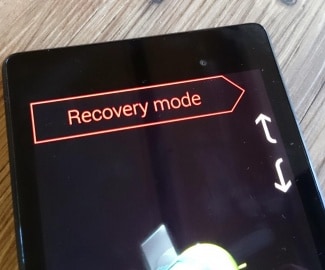
Step 3: Press the Volume up and Volume down keys and use the Power key to select menu options. Press the Volume down key twice to see “Recovery Mode” in red at the top of the screen. Press the Power key to select it.
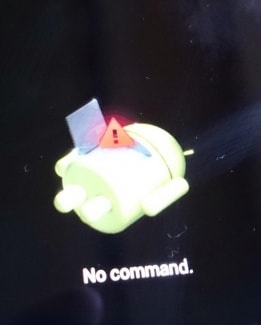
Step 4: The white Google logo will appear immediately followed by the Android logo again as well as the words “No Command” at the bottom of the screen.
Step 5: Finally, press and hold both the Power and the Volume up Key for around 3 seconds and then let go of the Volume up Key but keep holding the Power Key. You should see the Android system recovery options at the top of the screen. Use the Volume keys to highlight and the Power key to select the one you want.

Part 3. Android Stuck at System Recovery? How to fix in one click?
Sometimes during the System Recovery process, the process can glitch, and you’ll lose data on your device, rendering it unusable. However, another solution to fix this is to repair your device using the Dr.Fone - System Repair tool.
Dr.Fone - System Repair (Android)
One-stop solution to fix Android stuck at System recovery
- It’s the #1 software for PC-based Android repair
- It’s easy to use with no technical experience required
- Supports all latest Oppo Find N3 devices
- Easy, one-click fix Android stuck at system recovery
3981454 people have downloaded it
Here’s a step by step guide on how to use it yourself;
Note: Be aware that this process can erase all your personal files on your device, so ensure you’ve backed up your Oppo Find N3 before continuing.
Step #1 Head over to the Dr.Fone website and download the software for your Windows computer.
Once installed on your computer, open onto the main menu and connect your Oppo Find N3 using the official USB cable. Select the System Repair option.
Step #2 Select the ‘Android Repair’ option from the next screen.

Insert your device information, including the brand, carrier details, model and country and region you’re in to ensure you’re downloading the correct firmware.
Step #3 Follow the onscreen instructions on how to put your device in Download Mode.
Your device should already be in this mode but follow the instructions to make sure. There are methods available for devices, both with and without home buttons.
 vMix HD - Software based live production. vMix HD includes everything in vMix Basic HD plus 1000 inputs, Video List, 4 Overlay Channels, and 1 vMix Call
Step #4 The firmware will now start downloading. You’ll be able to track this process in the window.
Ensure your device, and your computer stays connected the entire time, and make sure your internet connection remains stable.


After downloading, the software will automatically start to repair your device by installing the firmware. Again, you can track the progress of this on the screen, and you’ll need to ensure your device remains connected throughout.

You’ll be notified when the operation is complete and when you’re able to disconnect your phone and use it as normal, free from it being stuck on the Android system recovery screen!
Part 4. Android Stuck at System Recovery? How to fix in a common way?
If, however, your device is stuck on system recovery mode, here’s how you can easily get it out of system recovery. The process is slightly different for different Android devices, so you should check your device’s manual before attempting this process.
Step 1: Power off the Oppo Find N3 device, and just to be sure, take out the battery to ensure that the Oppo Find N3 device is fully turned off. Then reinsert the battery.
Step 2: Press and hold down the Home button, Power Button, and the Volume up Key simultaneously until the Oppo Find N3 device vibrates.
Step 3: Once you feel the vibration, release the power button but continue to hold down the Home and Volume up Key. The Android recovery screen will display. Release the Volume up and Home buttons.
Step 4: Press the Volume down key to select the “Wipe Data/ Factory Reset option and then press the Power button to select it.
Step 5: Next, you need to press the Volume down button to highlight “Delete All User Data” and then press the Power button to select it. The device will reset and present the “Reboot System Now” option.
Step 6: Finally, press the Power button to reboot the phone in normal mode.
Part 5. Backup and Restore Android System
Losing data on your Oppo Find N3 is a common occurrence, and since Android devices don’t really have an automatic full backup solution, it is important to know how to backup and restore your device system. Here’s how to easily do that.
Step 1: Enter the recovery mode on your Oppo Find N3, as described in Part 2 above. Use the Volume and Power keys to select the “Backup & Restore” option on the screen.
Step 2: Tap on the backup option or use the Volume and Power keys if your screen is unresponsive. This will begin backing up your system to the SD card.
Step 3: After the process is complete, choose “Reboot” to restart the Oppo Find N3 device.
Step 4: You can then simply check Recovery > backup directory on your SD card. You can rename it to easily find it later during the restore process.
To restore the system from the backup created, follow these simple steps.
Step 1: Once again, enter recovery mode as described in part 2 above and then choose Backup & Restore from the menu list.
Step 2: Press “Restore” to begin the recovery process from the Backup file we created
Step 3: You will be notified when the system restore is complete.
Android system recovery mode can be quite useful, especially when your system is unresponsive. As we have also seen, it is important to know how to get into and out of System Recovery mode if you are going to backup and restore your Android system. It is also quite easy to do both of these things.
Fix Can’t Take Screenshot Due to Security Policy on Oppo Find N3
“Can’t take screenshots due to security policy” is a screenshot restriction on your Android smartphone. You’ve probably seen this error message before, especially when taking screenshots of banking or video streaming apps. But why do apps and websites block screenshots? It’s actually for your good.
Screenshots can be misused to steal money or pirate copyrighted content. By prohibiting screenshots, apps and websites can help to protect your data and privacy. If you want to learn more, keep reading. This article will explain why apps and websites prevent screenshot capture and why it’s important for security. We’ll also give you tips on how to take photos of apps and websites that don’t let you take screenshots.
Part 1. Can’t Take Screenshots Due to Security Policy on Android? Here’s Why
Why can’t you take a screenshot of something on your phone and get the error message that says, “Can’t take screenshot due to security policy”? Apps and websites turn off or remove the screenshot feature for a variety of reasons, including:
Device Restrictions
Lots of workplaces and schools have rules against taking screenshots on devices used for work or school. Organizations do this to protect sensitive information and prevent data breaches.
Protect Sensitive Information
Say you’re trying to take a screenshot on your Oppo Find N3 device, and you get the notification “Can’t take screenshot due to security policy.” Oppo Find N3 smartphones are not necessarily the problem.
Some apps and websites, such as banking apps, store private data like financial and credit card details. Blocking capturing screenshots is a way to prevent unauthorized access to confidential information.

Follow Regulations
Some industries and organizations have regulations that need them to protect sensitive data. Financial institutions must protect their customers’ financial information, for example. Disabling screenshots is one way to follow these regulations.
DRM-Protected Content
Android can’t take screenshots due to security policy, especially to prevent piracy. Piracy is the distribution of copyrighted material without permission. It can harm businesses that depend on copyright protection.
To prevent this, you can use DRM (digital rights management) to protect copyrighted content. DRM-protected content cannot be screenshotted or copied.
Prevent Fraud
Scammers and other criminals often use screenshots to commit fraud. For instance, people might send fake screenshots to trick others into sharing personal details or money. Disabling screenshots can help to prevent this type of fraud.
Protect Intellectual Property
Many businesses and organizations have valuable information they want to keep safe, such as trade secrets. Disabling screenshots can be helpful to prevent the theft of this intellectual property.
Protect User Privacy
Some apps and websites allow users to share private information. Some apps, like messaging apps, let users share private info. But there are limits.
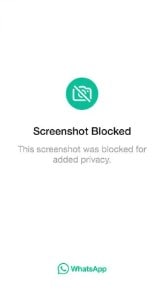
You can’t take screenshots due to security policy Whatsapp features, View Once media option. This method stops people from taking pictures of private media chats, protecting users’ privacy.
You Are Using a Secure Folder
Companies design secure folders to protect your most sensitive data from unauthorized access, so screenshots are not allowed within them.
Part 2. 8 Ways To Take Screenshots When You Can’t Due to Security Policy
If you’re trying to take a screenshot of an app or website with a security policy in place, there’s usually no way to circumvent it. However, there are a few things you can do to take pictures of these apps and website content.
Enable Screen Capture on Android
Sudden “can’t take screenshot due to security policy” notifications, failing to take a screenshot, and a Oppo Find N3 user?
If you are using this Android device, you can enable the screen capture feature in the Settings app.
- Step 1: Go to Settings > Apps, then tap the More options icon in the upper right corner.

- Step 2: Choose Special access > All files access.


- Step 3: Enable Oppo Find N3 capture.


Once you have enabled screen capture, you can check if you can take screenshots of any app or website.
Enable Screenshots in Incognito Mode
Apps and websites may prohibit screenshots in incognito mode to protect your privacy. However, you can enable the Incognito Screenshot experimental flag in Chrome to bypass this restriction.
- Step 1: Open Chrome on your Oppo Find N3 and type “chrome://flags” in the address bar.
 vMix 4K - Software based live production. vMix 4K includes everything in vMix HD plus 4K support, PTZ control, External/Fullscreen output, 4 Virtual Outputs, 1 Replay, 4 vMix Call, and 2 Recorders.
- Step 2: Search for Incognito Screenshot and choose Enabled from the drop-down menu.

- Step 3: Tap Relaunch on the lower right corner of the screen.
Once Chrome has relaunched, you should be able to take screenshots in incognito mode by pressing the power and volume-down buttons at the same time.
Use Google Assistant
With Google Assistant, taking screenshots on your Oppo Find N3 is now easier than ever. Just say, “Hey, Google, take a screenshot,” Google Assistant will capture the screen and save it to your gallery.

Use a Third-Party App To Take Screenshots
You can download several applications on Google Play Store if you still can’t take a screenshot due to security policy. Some popular third-party screenshot apps include:
- Screenshot Easy
- Screenshot Tile
- Screen Master: Screenshot Markup
Third-party screenshot apps often use different methods to capture the screen. These might bypass the security measures that prevent you from taking screenshots with the built-in screenshot function.
Capture Your Phone Display With Another Device
If you own another smartphone, you can use it to take a photo of the screen of the Oppo Find N3 device you’re trying to take a screenshot of. This is a simple workaround for any security policies that may be in place. To do this, open the camera app on your other smartphone and point it at the screen of the first device.
Check the Banking App Settings for Screenshot Permissions
Some banking apps may turn off screenshots by default, but some may allow them in the settings. To check this, open the banking app and select the settings menu. Look for a setting that allows taking in-app photos. If you find it, enable it to allow screenshots to be taken in the app.
Screen Mirroring
Smart View allows you to display your Oppo Find N3 device’s screen on your smart TV, where you can then take a screenshot of the TV to capture the app or website you need.
- Step 1: Swipe down the top of the screen to access the Quick Settings panel.
- Step 2: Tap the Smart View icon.
- Step 3: Select your TV from the list of available devices and tap Start Now.

Alternatively, if you don’t have a smart TV, you can still mirror your phone screen display to your desktop or tablet using the Oppo Find N3 Flow app and take a screenshot of your phone’s screen instead.
Use Disable Flag Secure Magisk Module
Still experiencing the error message, “Can’t take screenshot due to security policy?” Bypass Android phone error like this using a module.
The module patches the Android framework to remove the FLAG_SECURE flag from apps. It is a relatively simple process but requires root access and Magisk. This module will turn off the security flag to take screenshots in Incognito mode and other apps.

Authors Verdict
There are a few ways to bypass screenshot restrictions on Android apps and websites, but some methods are more complicated than others. All methods should work, but if you think your device has been compromised, it is important to check if it is a system issue.
You can use a third-party tool like Wondershare Dr.Fone without rooting your device. It is easy to use and supports many Android smartphones. You can try Dr.Fone for free to test if it supports your device and can fix the underlying system issues.

Part 3. Dr.Fone: A Comprehensive Solution for Fixing Android System Issues
Dr.Fone’s System Repair tool for Android cannot bypass the security apps of banking apps and video streaming apps like Netflix. This is because these apps use sophisticated security measures to protect their users’ data.
However, Dr.Fone System Repair tool for Android can fix a wide range of other Android system issues that might happen from installing third-party apps on your smartphone, such as:
Follow this step-by-step guide and learn how to use Dr.Fone to scan your Android smartphone for system issues and repair them.
- Step 1: Once you have downloaded Dr.Fone, install it and launch it on your desktop. Then, connect your Oppo Find N3 to your desktop using a USB cable.
 safe & secure
3,567,199 people have downloaded it
- Step 2: From the Toolbox homepage, select System Repair > Android.
- Step 3: Click Start on the new window.
- Step 4: Select an option from the Name, Model, Country, and Carrier in the drop-down lists. Next, select the checkbox to agree with the warning, then click Next in the bottom right corner.
- Step 5: Follow the in-app instructions to put your Oppo Find N3 on Download mode, then click Next.
 DLNow Video Downloader
- Step 6: Wait while the firmware automatically downloads.
- Step 7: Review the details on the screen and click Fix Now to install the firmware on your smartphone.

- Step 8: Read the dialogue box note, enter the code in the input box, and click Confirm.

- Step 9: Keep your smartphone connected and avoid using it while Dr.Fone is repairing it.
- Step 10: If your device has started properly, click Done to close this app. Otherwise, click Try again.
Conclusion
You can fix the “Can’t take screenshot due to security policy” error on Android in different ways. But it depends on the cause of the error. If an app is causing the error, you can try two things. First, remove the app’s screenshot restriction. Second, download a different screenshot app or a different device to take screenshots.
Although there are ways to bypass the “Can’t take screenshot due to security policy” error message, it’s crucial to know why screenshots are not allowed. Many apps and websites do not permit it to protect sensitive information, prevent piracy, and follow regulations. They also do it to prevent fraud, protect user privacy, and safeguard intellectual property.
If you think the issue is with your Android system, or your device becomes bricked after trying other methods, experiencing app crashes, or otherwise malfunctioning, try using the Dr.Fone System Repair tool. It is worth trying and can fix most Android system issues in a few minutes.
- Title: Fix Unfortunately Settings Has Stopped on Oppo Find N3 Quickly | Dr.fone
- Author: Ariadne
- Created at : 2024-07-30 10:37:29
- Updated at : 2024-07-31 10:37:29
- Link: https://howto.techidaily.com/fix-unfortunately-settings-has-stopped-on-oppo-find-n3-quickly-drfone-by-drfone-fix-android-problems-fix-android-problems/
- License: This work is licensed under CC BY-NC-SA 4.0.