
Fix Unfortunately Settings Has Stopped on Samsung Galaxy F04 Quickly | Dr.fone
Fix Unfortunately Settings Has Stopped on Samsung Galaxy F04 Quickly
All of you, sooner or later, must have found the “Unfortunately Settings has stopped” error on your Samsung Galaxy F04. The problem can occur if the Settings keeps stopping or crashing. Many times, you may try to open the Settings but it doesn’t even open. Or possibly, it may freeze after getting opened thereby hampering the Samsung Galaxy F04 device’s performance.


Well! There can be a number of reasons why this thing happens. For instance, custom ROM installations, not enough space in the Samsung Galaxy F04 device or perhaps an outdated version of Android. If you are struggling with the same issue and want to know what to do when Android Settings is not responding, this post will help you. We have explained everything in detail along with the solutions. So, scroll down and get things sorted.
- Part 1: Clear the cache of Settings and Google Play Service
- Part 2: Clear the Android phone’s RAM and retry
- Part 3: Uninstall the Google update
- Part 4: Uninstall the custom ROM or re-flash the stock ROM
- Part 5: Wipe cache partition to restore Settings
- Part 6: Factory reset your Android
- Part 7: Check and update Android OS
Part 1: Clear the cache of Settings and Google Play Service
It is possible that the corrupted cache files are responsible for this error. Hence, as the first tip, we would like you to clear the Settings cache if that is what triggers the “Unfortunately Settings has stopped” issue. Clearing it would definitely make Settings run appropriately. And The steps to clear the cache of the Google Play Services app are similar. Here is how to clear the cache of Settings:
- Open “Settings” on your Samsung Galaxy F04 and choose “Apps & Notifications”/”Apps”/”Application Manager” (the option may differ on different devices).
- In the list of applications, look for “Settings” and open it.
- Now, select “Storage” followed by “Clear Cache”.

Note: In some phones, the “Clear Cache” option may come after tapping on “Force Stop”. Therefore, go accordingly without getting confused.

Part 2: Clear the Android phone’s RAM and retry
As the next tip, we would like to suggest you clear your device’s RAM by ceasing the running apps in the background. RAM, if at the increased level, is responsible for the Samsung Galaxy F04 device’s freezing, poor performance, and most probably is the reason behind crashing Settings. Also, if the apps in the background keep running, they might conflict with the Settings and stop it to perform properly. Therefore clearing RAM is important when Android Settings is not responding. Here is how to do it.
- Firstly, you need to go to the Recent apps screen. For this, long-press the Home key.
Note: Please note that different devices have different ways to go to the Recent apps screen. Do it according to the Samsung Galaxy F04 device you own. - Now, swipe the apps and tap on the clear option. You will be able to notice the amount of RAM cleared
 vMix 4K - Software based live production. vMix 4K includes everything in vMix HD plus 4K support, PTZ control, External/Fullscreen output, 4 Virtual Outputs, 1 Replay, 4 vMix Call, and 2 Recorders.
Part 3: Uninstall the Google update
Uninstalling Google Play Store updates has also responded well to many users. It has worked in the case of the “Unfortunately Settings has stopped” error. So, we would also like to suggest you use this tip if the others don’t work. Here are the steps to be followed for this.
- Open “Settings” on your Android and tap on “Application manager” or “Apps” or “Application.
- Now, head to all the apps and select “Google Play Store” from there.
- Tap on “Uninstall Updates” and restart your device to check if the crashing Settings issue has been resolved.

Part 4: Uninstall the custom ROM or re-flash the stock ROM
Using a custom ROM on your device brings up this problem due to incompatibility or improper installation. Therefore, you should either uninstall the custom ROM or re-flash the stock ROM. in order to re-flash the stock ROM of your Samsung Galaxy F04, the best way would be Dr.Fone - System Repair (Android). It offers one-click functionality to flash stock ROM and that too with full security. Supporting all Samsung Galaxy F04 devices, it ranks among its counterparts when it comes to fixing crashing Phone app issues or any other Android system issue. It is loaded with the beneficial features which are discussed below.
Dr.Fone - System Repair (Android)
Android repair tool to fix “Unfortunately, Settings Has Stopped”
- You needn’t be a tech-savvy to use this
- Supports a wide range of Android devices easily, 1000+ being more precise
- One-click tool and supports any sort of Android system issue
- Higher success rate along with millions of trusted users
- Trustworthy and offers an extremely easy interface
4,635,310 people have downloaded it
How to fix crashing Settings using Dr.Fone - System Repair (Android)
Step 1: Download Tool
Visit the official website of Dr.Fone and download the toolbox from there. Go for the installation process and wait until the installation gets over. Launch it now and choose the “System Repair” tab from the main window.


Step 2: Get the Phone Connected
With the help of a USB cable, plug your Samsung Galaxy F04 into the PC. Upon proper connection, hit on the “Android Repair” option from the left panel.
 Software Update Pro - Check and update software installed on your computer.

Step 3: Feed Correct Information
In the next window, you need to fill in some necessary information like the name and model of the mobile device. Enter details like country and career. Check once and hit on “Next”.

Step 4: Enter Download Mode
Now, you need to take your device into Download mode. For this, you need to follow the onscreen instruction according to your device. Click “Next” and you will notice the firmware downloading progress on your screen.

Step 5: Repair the Issue
Once the firmware is completely downloaded, your Samsung Galaxy F04 will automatically start getting repaired. Stay there and you will receive a notification that the repair is done.

Part 5: Wipe cache partition to restore Settings
Like RAM, wiping cache is also vital so as to make the Samsung Galaxy F04 device’s operation smoother. And when you are getting the “Unfortunately Settings has stopped” error, it might be due to the collected cache. To remove it, you will need to enter the recovery mode. And the steps for recovery mode range from device to device. For instance, Samsung Galaxy F04 users have to press the “Home”, “Power” and “Volume Up” buttons. Similarly, HTC and LG device users are supposed to press the “Volume Down” and “Power” buttons. For Nexus, it is “Volume Up, Down” and Power key combinations. Therefore, before going further, make sure what device you own and enter the recovery mode according to it. Now, follow the detailed guide below to wipe the cache partition in order to fix crashing Settings.
- Primarily, turn off the Samsung Galaxy F04 device and enter the recovery mode by pressing the respective key combinations.
- You will notice a Recovery screen on your device.
- On showing up the recovery screen, look for the “Wipe Cache partition” option and use the “Volume Down” and “Volume Up” buttons to scroll down and up respectively.
- On reaching the required option, press the “Power” button to start wiping.
- Once finished, click the reboot option and the Samsung Galaxy F04 device will be rebooted, fixing the issue hopefully.


Part 6: Factory reset your Android
You can also opt for Factory resetting your device to fix the issue of Settings keeps stopping. By removing everything from the Samsung Galaxy F04 device, it will make your device run properly. If you have important data on your device, please make sure to create a backup before taking action if you don’t want to lose it. The steps are as follows.
- In the “Settings, go to “Backup and Reset”.
- Tap on “Factory data reset” followed by “Reset device”.
- Wait for the completion of the process and check if Settings is stopping or not after it gets rebooted.


Part 7: Check and update Android OS
A lot of times minor issues crop up due to the operating systems that get outdated. It is because the Samsung Galaxy F04 device needs to get updated from time-to-time for proper functioning otherwise it will not be able to match up with the fading technologies thereby coming up with issues like “Unfortunately Settings has stopped”. We recommend here you check for the available update and update your device. For this follow the guide below.
- Go to “Settings” and tap “About Phone” on your device.
- Now, hit on “System Update” and the Samsung Galaxy F04 device will look for any available update.
- If there is any, go along with the prompts to install it and make your phone even smarter.


Conclusion
If your Samsung Galaxy F04 shows the “Unfortunately Settings has stopped” error, don’t worry. This problem can come from many things like old software or cache issues. You can try easy fixes like clearing cache or updating your system. Sometimes, removing custom ROMs might be needed.
For iOS users facing similar problems, we recommend using Dr.Fone-System Repair (iOS) . It’s known for fixing many iOS problems without losing any data. Remember, a well-working device is just a few steps away!
 safe & secure
How to Flash Dead Samsung Galaxy F04 Safely
- Fix malfunctioning Android to normal in one click.
- Highest success rate to fix all Android issues.
- Step-by-step guidance through the fixing process.
- No skills required to operate this program.
A phone is considered to be dead when it becomes completely unresponsive and refuses to switch on. Similarly, an Android phone is said to be dead when it does not boot up. You may try to switch it on several times by pressing the power button but in vain. You will see no sign of the phone’s logo or anything like a welcome screen. The Android phone’s screen remains black and does not illuminate when you try to turn it on. Interestingly, even when you charge this dead device, it does not show that it is getting charged.
Many people regard this as a battery issue, and many think of it as a temporary software crash. Some users also seem to believe that this is because of a virus attack. However, if you are looking for ways that tell how to fix a dead Android phone, you must understand that a dead phone or device can be cured by flashing custom firmware safely. If you are keen to know how to flash a dead Android phone or how to flash dead Android phones using PC, here are ways to help you.
Given below are eight techniques to flash your Samsung Galaxy F04 safely, depending upon which phone you are using. It may seem time-consuming and tedious, but we can assure you that it works. So, move ahead and read on to learn about flashing new firmware, your Samsung Galaxy F04, MTK Android, and Samsung Galaxy F04 safely.
.png) Kanto Player Professional
Kanto Player Professional safe & secure
 KoolReport Pro is an advanced solution for creating data reports and dashboards in PHP. Equipped with all extended packages , KoolReport Pro is able to connect to various datasources, perform advanced data analysis, construct stunning charts and graphs and export your beautiful work to PDF, Excel, JPG or other formats. Plus, it includes powerful built-in reports such as pivot report and drill-down report which will save your time in building ones.
 It will help you to write dynamic data reports easily, to construct intuitive dashboards or to build a whole business intelligence cockpit.
KoolReport Pro package goes with Full Source Code, Royal Free, ONE (1) Year Priority Support, ONE (1) Year Free Upgrade and 30-Days Money Back Guarantee.
Developer License allows Single Developer to create Unlimited Reports, deploy on Unlimited Servers and able deliver the work to Unlimited Clients.
Part 1: Can a Dead Phone Be Flashed?
Flashing a dead Android phone might be skeptical for many users who have been in such a situation. Although it is possible to flash a dead Android phone, it is essential to be aware of the reasons that lead you into such a situation. Before a remedy, diagnosing the problem is a necessity for retaining the Samsung Galaxy F04 device.
From battery issues to physical damage to the Samsung Galaxy F04 device, there can be many reasons your Samsung Galaxy F04 died. The reasons for a dead Android phone are not restricted to these points. There can be software-related issues or firmware issues that might cause such havoc on your Android.
Part 2: How to flash Samsung Galaxy F04 in one click
While you are worried about how to flash Samsung Galaxy F04 instantly with a single click, Dr.Fone - System Repair (Android) swiftly makes its way with a galore of options for you. This amazing tool from Wondershare can fix a plethora of Android system issues such as crashing of apps, black screen of death, failed system update, etc. Moreover, it can also get your device out of boot loop, unresponsive bricked Android mobiles as well as stuck at the Samsung Galaxy F04 logo.
Dr.Fone - System Repair (Android)
One-click solution to flash Samsung Galaxy F04
- The high success rate in fixing Samsung Galaxy F04 Android devices.
- All the latest Samsung Galaxy F04 devices are supported by this software.
- One-click operation of this tool helps you how to flash Samsung Galaxy F04 easily.
- Being very intuitive, it doesn’t need you to be tech-savvy to use this software.
- It is one of its kind and the first one-click Android repair software on the market.
3981454 people have downloaded it
Step-by-step Tutorial
We are going to explain how to flash a dead Android phone using a PC using Dr.Fone - System Repair (Android)
Note: Before you understand how to flash Dead Android phone, take a backup of your data and then proceed to avoid any data loss.
Phase 1: Prepare your Samsung Galaxy F04
Step 1: Once you have downloaded and installed Dr.Fone, launch it. From the main menu, tap on ‘System Repair’ and get your Samsung Galaxy F04 connected to it.
Step 2: Click ‘Android Repair’ from the available options, and then press the ‘Start’ button to fix the Dead Android phone by flashing it.
Step 3: On the Samsung Galaxy F04 device information screen, pick the appropriate device brand, name, model, and other details followed by tapping the ‘Next’ button.

Key features:
• Import from any devices and cams, including GoPro and drones. All formats supported. Сurrently the only free video editor that allows users to export in a new H265/HEVC codec, something essential for those working with 4K and HD.
• Everything for hassle-free basic editing: cut, crop and merge files, add titles and favorite music
• Visual effects, advanced color correction and trendy Instagram-like filters
• All multimedia processing done from one app: video editing capabilities reinforced by a video converter, a screen capture, a video capture, a disc burner and a YouTube uploader
• Non-linear editing: edit several files with simultaneously
• Easy export to social networks: special profiles for YouTube, Facebook, Vimeo, Twitter and Instagram
• High quality export – no conversion quality loss, double export speed even of HD files due to hardware acceleration
• Stabilization tool will turn shaky or jittery footage into a more stable video automatically.
• Essential toolset for professional video editing: blending modes, Mask tool, advanced multiple-color Chroma Key
Phase 2: Put the Android device in Download mode to start repair.
Step 1: It is essential to boot your Samsung Galaxy F04 in Download mode before repairing.
- If the Samsung Galaxy F04 device has a ‘Home’ button: Turn it off and then hold down the ‘Volume Down’, ‘Home’, and ‘Power’ buttons altogether for 5-10 seconds. Un-hold all of them and hit the ‘Volume Up’ button for entering ‘Download’ mode.

- In the absence of a ‘Home’ button: Switch off the Android device and hold the ‘Volume Down’, ‘Bixby’, and ‘Power’ buttons for 5 to 10 seconds, then release them. Hit the ‘Volume Up’ button for entering the ‘Download’ mode.
Step 2: Press the ‘Next’ button for initiating firmware download.

Step 3: Once the firmware gets downloaded and verified Dr.Fone - System Repair (Android) starts to flash your Dead Android phone. All the Android system issues will be fixed soon after.
 Any DRM Removal for Win:Remove DRM from Adobe, Kindle, Sony eReader, Kobo, etc, read your ebooks anywhere.
safe & secure
Part 3: How to flash Samsung Galaxy F04 dead phone with Odin?
In this segment, we will learn how to fix the dead Android phone, i.e., Samsung Galaxy F04 phones using Odin software. Odin is software used internally by Samsung Galaxy F04 to generally unblock devices and perform a more utility-based job, namely, flashing new firmware in place of the old one. There are different variants available, so choose the one which is supported by your Galaxy phone. Here is a step-by-step explanation of how to flash dead Android phone (Samsung Galaxy F04) using Odin software.
Step 1: Install the driver software on the computer. You can find the best driver software for your device and PC on the official Samsung Galaxy F04 website. You may also download Samsung Galaxy F04 Kies on your PC. Once you have downloaded and installed the driver software, restart the PC.
Step 2: Now download suitable firmware for your device in the form of a zip folder that you can open and store on your desktop.

Make sure the file is .bin, .tar, or .tar.md5 only as these are the only file types recognized by Odin.


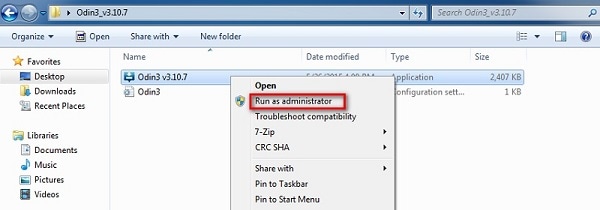
Step 3: In this step, download the latest version of Odin on your PC and move it to the desktop, and then right-click on the downloaded Odin file to select “Run as Administrator”.

Step 4: Now, boot your dead device to Download Mode by pressing the power, volume down, and home button together. When the phone vibrates, release the power button only.


Step 5: Gently press the volume up button, and you will see the Download Mode Screen.

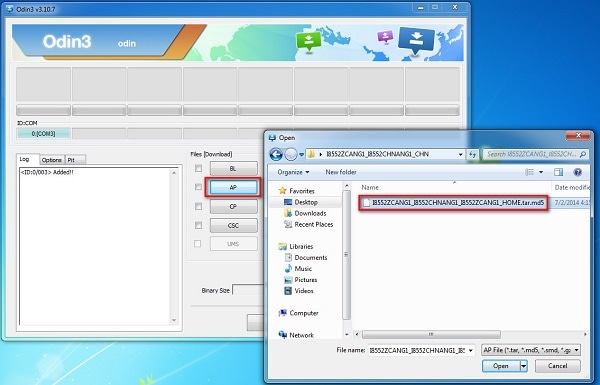
Step 6: Now, you may use a USB to connect your Samsung Galaxy F04 to the PC. Odin will recognize your device, and in the Odin window, you will see a message saying “Added”.

Step 7: In this step, find the tar.md5 file you downloaded by clicking on “PDA” or “AP” on the Odin window and then click “Start”.
Finally, once the flashing process is complete, your Samsung Galaxy F04 phone will reboot and start normally, and you may see a “Pass” or “Reset” message on the Odin window on the PC.
Part 4: How to flash MTK Android dead phone with SP Flash tool?
SP Flash tool, also known as SmartPhone Flash tool is a popular freeware tool used to flash custom ROM or firmware in MTK Android phones. It is a very successful tool and is extremely easy to use.
Let us look at the steps given below to learn how to flash dead Android phones using PC with the help of the SP Flash tool.
Step 1: To start with, download and install the MTK driver on your PC and then download the ROM/firmware you wish to use for flashing purposes.
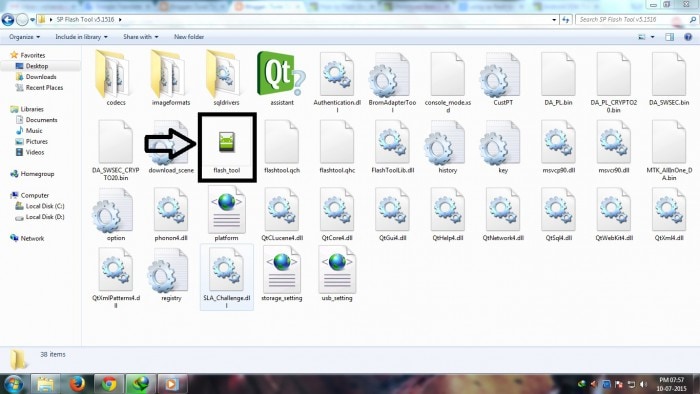
Step 2: Once done, you should download the SP Flash tool and extract it on your PC and move on to launch the Flash_tool.exe file to open the SP Flash tool window.
 SwifDoo PDF Perpetual (1 PC) Free upgrade. No monthly fees ever.
Step 3: Now, on the SP Flash tool window, click on “Download” and select “Scatter-loading”.

Step 4: The last step would be to locate the file downloaded by you and click “Open” and then finally, select “Download” on the SP Flash tool window.
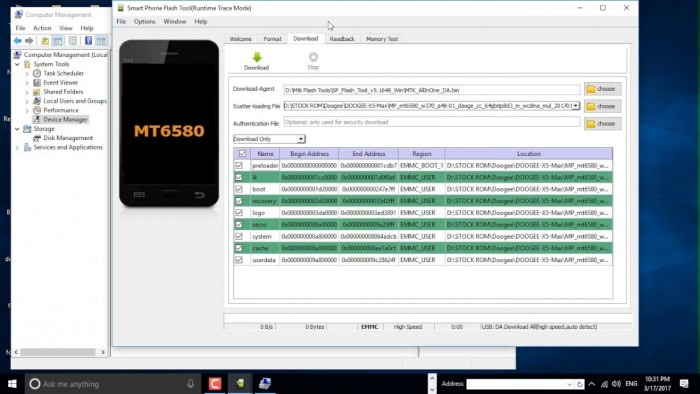
After completing the above steps, connect your dead device to the PC with a USB cable and wait for it to get recognized. The flashing process will take a few minutes to finish and then you will see a green circle indicating “OK Download”.
That’s it! Now simply disconnect your phone and wait for it to reboot.
Part 5: How to flash Samsung Galaxy F04 dead phone with the Phoenix tool?
Phoenix tool, better known as PhoenixSuit, is a tool similar to the SP False tool and Odin. It works very well with Samsung Galaxy F04 and is the best answer to “How to fix dead Android phone?”, “How to flash dead Android phone using PC?”, etc.
Let’s look at the steps of flashing the Samsung Galaxy F04 dead phone with the Phoenix tool.
First, download and install the Samsung Galaxy F04 PC Suite driver on your PC. Then you will need to download the PhoenixSuit tool and then launch it.
 PCDJ DEX 3 for Windows & MAC is the total entertainment DJ software solution, offering audio, video, and karaoke mixing ability. Automatic beat-sync, smart looping, 4 decks, DJ MIDI controller support, Karaoke Streaming and much more.
Now, on the toolbar, click “Tools” and select “Data Package Download” from the drop-down list.
 Forex Robotron Basic Package
Then move to download the firmware for your dead Samsung Galaxy F04 and save it in a new Folder. Once done, go back to the Phoenix tool window and click on “File” and select “Open Product”.

Simply, feed in the details and then click “OK”.

After this, click on “Flashing” and select “Firmware update” and then browse to select the appropriate product code and then click “OK” again.
Then move on to select “Dead Phone USB Flashing” from the Firmware Update Box.
 HD Video Converter Factory Pro

Lastly, just click on “Refurbish” and connect your phone to the PC using a USB cable.
That was it, the flashing process may take up to a few minutes after which your dead Samsung Galaxy F04 will restart automatically.
Part 6: How to flash a dead phone that won’t turn on via factory reset?
Using tools for flashing Android devices can be a solution; however, it is heavily restricted to the Samsung Galaxy F04 device models. For a generalized solution, there can be other options that you can go with. Factory resetting an Android device by putting it in Recovery Mode is one way. To know how to flash a dead Android phone using factory reset, go through the steps featured below:
Step 1: To initiate the process, you will have to put your Samsung Galaxy F04 in Recovery Mode. Generally, Android phones are put in Recovery Mode by holding the “Power” and “Volume Up” keys for a few seconds after turning them off. The key combinations can vary according to your Samsung Galaxy F04.
Step 2: As the Android boot menu opens on your screen, use the “Volume Down” and “Volume Up” keys to scroll up and down the menu. On accessing the “Wipe Data/Factory Reset” option, use the “Power” key to select the particular option.
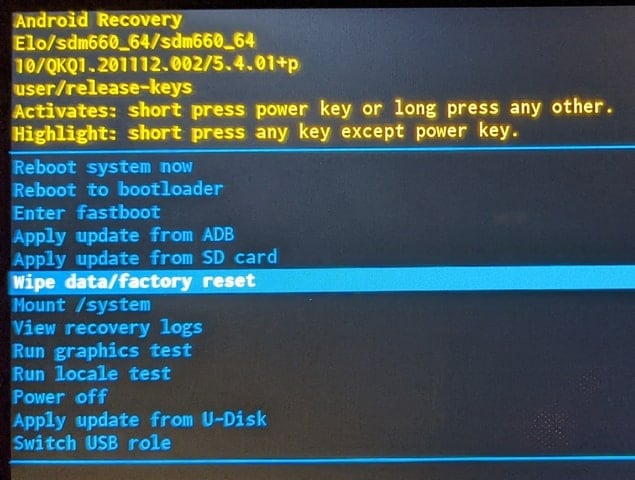
Step 3: Continue to select the “Yes” option for confirming the factory reset of the Android device. The phone will automatically reboot after successfully factory resetting.
Part 7: How to flash a dead Android phone by checking screen faulty
The screen of your Samsung Galaxy F04 may be faulty, due to which it is not launching. While seeking the right way of how to fix a dead Android phone, you can force restart your phone using the Volume buttons according to your device model.
If the Android vibrates on restarting and the screen does not lighten up, the problem can be directed to a hardware fault. The screen is broken and needs physical assistance to resolve the issue.

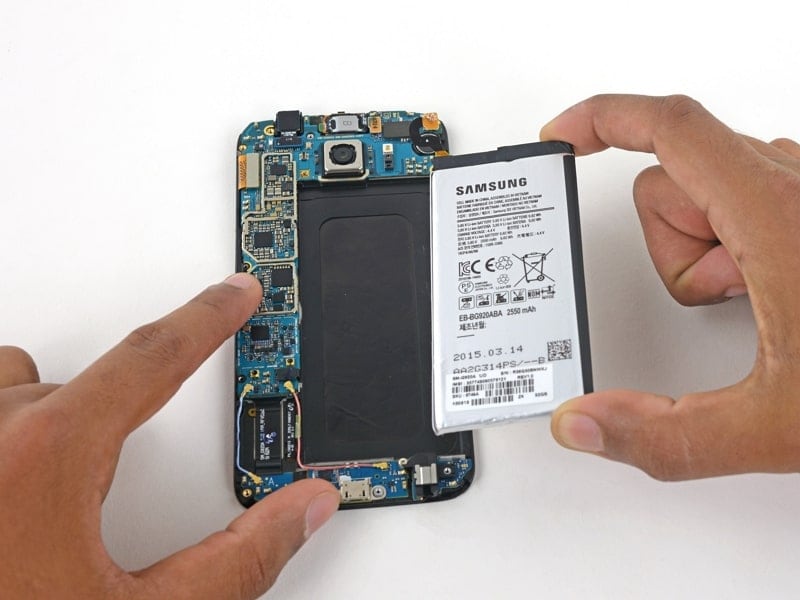
Part 8: How to fix a dead Android phone by changing the battery
Another solution that can help you fix the dead Android phone is changing its battery. The battery of an Android device can last up to 3 years. When its capacity drops to a bare minimum, it is best to change the battery of your Android. Upon trying to restart your Samsung Galaxy F04, if it does not, you might need to replace your battery. All Android phone batteries are removable, which should be regulated with proper supervision.
Part 9: How to repair dead Android phone by contacting official support
If you are unable to discover any proper solution for how to flash dead Android phones, you might have to consult the respective customer support of the Android phone manufacturers. Consult customer support to discover why the phone is dead and how it can be flashed. The respective personnel will assist you in resolving the issue, which might require monetary input from your side.
Conclusion
A dead Android phone might be the cause of worry, but the techniques given above to flash your dead Android device safely are very helpful. These methods have been tried and tested by users all over the world and thus, we recommend them to you. If your phone is dead or has become unresponsive, do not panic. Depending on your phone’s brand, here are ways to guide you on how to fix the dead Android phone and how to flash dead Android phone using PC.
It has been observed that Wondershare Dr.Fone – System Repair (Android) assists in the best way. Resolve all your concerns involving your dead Android phone and flash it to make it operable again.
Carefully follow the instructions given, and you will be able to reboot your dead Android phone successfully.
Ways to Unbrick Your Android Device: Various Ways for Recovery
When your Samsung Galaxy F04 becomes unresponsive or frozen after mistakenly flashing a ROM or rooting, you are informed that the phone has been bricked. The most terrifying aspect will not just be gadget loss, but also data erasure. However, what exactly is a bricked phone, and, more importantly, how do you fix a bricked Android phone?
This article will explain what a bricked android phone is, why an Android phone becomes bricked, how to unbrick an Android phone without losing data and a third-party application you can use.
Part 1. Causes of Bricked Phones
In everyday settings, our mobile devices have become our greatest friends, therefore breaking your phone is the last thing you want to do. There are different reasons why devices brick, and we must be familiar with them in order to comprehend the various techniques to repair bricked devices.
Here are some common reasons why your Samsung Galaxy F04 is bricked:
- **Flashing Stock/Custom ROM:**It is possible that you installed an incompatible ROM in the Android phone, that the phone shuts off during the process, or that you have performed other errors that cause your phone to restart indefinitely or to become stuck at the starting screen.
- **Rooting an Android device:**You are unable to effectively root the Samsung Galaxy F04 device.
- **Android firmware is being updated:**If the phone is interrupted when updating the Android firmware, it will be bricked.
- **Installing harmful applications:**You installed harmful programs on your Samsung Galaxy F04, or the phone was infected with a virus.
Part 2. How to Fix a Bricked Phone
The first step is to establish how badly your device is bricked. In most cases, you will be working with soft bricks that are pretty simple to repair. If your phone is stuck in a boot loop or enters recovery mode every time you turn it on, you may have a soft brick.
To repair bricked Android phones and tablets, you must first thoroughly examine the Samsung Galaxy F04 device’s state. Before you begin troubleshooting, determine the sort of bricking that your phone is experiencing. However, there is no specific software to unbrick your Samsung Galaxy F04; you may need to learn the complexities of this issue or hire a professional to do it for you.
 safe & secure
Here are some simple methods for repairing bricked Android devices:

Method 1. Reboot the Phone in Safe Mode
Trying to reboot your android device in safe mode is the first and easiest thing you should try if your phone is bricked. Here’s how to do it:
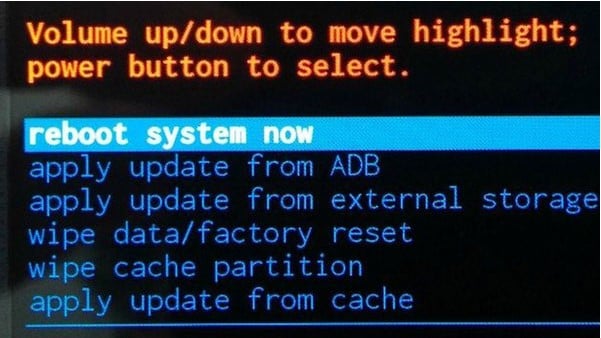
- Step 1: Turn off your smartphone and press the Volume Up + Power button to enter recovery mode. Then, using the volume controls, navigate the menu and select Reboot system now.
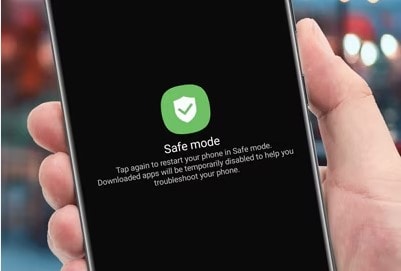
- Step 2: Select the highlighted option by pressing the Power button. After that, wait for your device to reset normally.
- Note: The steps for booting into recovery mode may change based on the manufacturer of your device. For further information, go to the user manual for your phone or tablet.
Method 2. Wipe the Cache Partition
This is the first indication that a user’s phone has gone bricked. The phone turned on automatically, however it became stuck or frozen on the logo screen. The issue might be caused by the undeleting of data and cache, which prevents the phone from displaying the home screen.
This issue, however, may be resolved by wiping the data and cache partitions in recovery mode. You must do the following to do this:
- Step 1: Turn off your smartphone and enter recovery mode by pressing the Power and Volume Down buttons simultaneously. Different devices have various approaches for entering recovery mode, so you may perform better.
- Step 2: After entering recovery mode, you should see the screen below. Remember to pick Advanced and then “Wipe Dalvik Cache” if your device is under Clockwork Mod recovery. Return to the main screen and select “Wipe Cache Partition” once more.
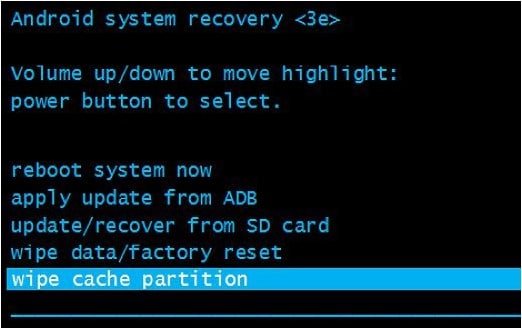
- Step 3: Finally, on your smartphone, choose the Reboot system immediately.

Method 3. Perform a Factory Reset
A factory reset can undo the alterations made to your device that resulted in the brick phone, but you will lose everything you have downloaded and installed in the process. Here’s how to restore a bricked Android phone to factory settings:
- Step 1: Boot your device into recovery mode (turn off your device, then press power button + volume up button).
- Step 2: Select “Wipe Data/“Factory Reset” then confirm the action. When the process is done, you’ll be returned to the recovery mode menu.
- Step 3: Select “Reboot System Now” to restart your device.
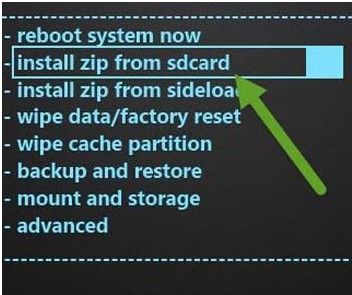
Method 4. Flash a Custom ROM
If you boot your phone directly into recovery mode, there’s a problem with the ROM you loaded. Then simply flash the following custom ROM on your phone:
- Step 1: Save the required ROM (in ZIP format) to an SD card. The SD card should then be inserted into your Samsung Galaxy F04.
- Step 2: Click the “Install zip from sdcard” button. Then, select the ZIP file that contains the ROM. Finally, click the “reboot system now” button.

Method 5. Using Wondershare Dr.Fone to Fix bricked Android Devices
Wondershare Dr.Fone - Data Recovery is the first data recovery solution for any damaged Android smartphone in the globe. It offers one of the greatest recovery rates and can recover a variety of information like images, videos, contacts, messages, and call logs. The program is most effective with Samsung Galaxy F04 smartphones.
While it is not an Android unbrick tool, it is a useful tool for retrieving data when your Samsung Galaxy F04 becomes bricked. It is quite easy to use:
- Step 1: Launch Wondershare Dr.Fone and select “Data Recovery” > “Recover Android Data” from the menu. Then, select “****Recover from Broken Phone”.

- Step 2: Choose the file types you wish to recover. Click “Next” and then select the type of damage your phone is experiencing. Select “Touch screen not responsive, or cannot access the phone” or “Black/broken screen”.

- Step 3: Use the recovery wizard to enter your Android smartphone into Download Mode. Connect your Android handset to the computer after following the instructions to begin automatically analyzing your device.

- Step 4: The program will provide a list of all recoverable files, organized by file type. To preview the file, highlight it. Choose the files you wish to recover and then click “Recover” to save all the data you want to restore.

safe & secure
 vMix Basic HD - Software based live production. vMix Basic HD includes 4 inputs, 3 cameras, streaming, recording, playlist.
Part 3. How to Prevent Bricking Your Phone
How to prevent a device from “bricking” itself and how to repair it if it does The delay is set by the MCU, but it should be long enough to allow the debug adapter to connect to the Samsung Galaxy F04 device and halt it before the Samsung Galaxy F04 device disables itself.
Here are some things to remember to prevent your device from bricking:
- Avoiding unofficial firmware updates: Installing unapproved OS firmware on your phone will most certainly violate any manufacturer’s warranty you have on it. Read the installation instructions for your unique phone model thoroughly and then carefully follow them, taking time and patience.
- **Being cautious when rooting or jail breaking:**Rooting and Jail breaking disables parts of the operating system’s built-in security mechanisms, which are part of what makes the operating system safe, and your data protected from exposure or damage.
- **Install an antivirus application on your device:**Mobile devices increase the danger of data leaks and breaches. As a result, antiviral software is beneficial on mobile phones. Mobile Device Management is an excellent choice for virus protection on your mobile device.
- Backup your phone data regularly: Backing up your phone safeguards your data in the event that you lose it, it is stolen, or it no longer works. When it comes time to replace your phone, having a backup makes it simple to restore your data to the new device. Furthermore, backing up your phone allows you to organize your data so that it is easier to access.
- Avoid installing apps from untrusted sources: Apps installed from unauthorized sources make your device and personal data more exposed to dangers such as Ransomware. So you should be wary of where you download applications.
Conclusion
It is certainly upsetting when your gadget bricks, but you may attempt the solutions listed above to resolve the issue. Meanwhile, if you want to solve the problem quickly and easily, you can try Wondershare Dr.Fone. It can not only help you repair your Android smartphone, but it can also help you extract data from a bricked device, recover data, and many more Android device solutions!
safe & secure
- Title: Fix Unfortunately Settings Has Stopped on Samsung Galaxy F04 Quickly | Dr.fone
- Author: Ariadne
- Created at : 2024-07-30 10:38:59
- Updated at : 2024-07-31 10:38:59
- Link: https://howto.techidaily.com/fix-unfortunately-settings-has-stopped-on-samsung-galaxy-f04-quickly-drfone-by-drfone-fix-android-problems-fix-android-problems/
- License: This work is licensed under CC BY-NC-SA 4.0.