
Full Guide How To Fix Connection Is Not Private on Nubia Red Magic 9 Pro | Dr.fone
Full Guide: How To Fix Connection Is Not Private on Nubia Red Magic 9 Pro
Are you encountering the “your connection is not private” issue on your phone? We found many Android users have increasingly expressed their frustrations with this recurring problem while browsing on the internet.
Usually, you can just reload the page to fix the error. But in case it doesn’t help, you may need to look for more advanced solutions. In the following discussion, we will delve into why this “your connection is not private” on Android happens and explore solutions that work for you.
Part 1: Addressing Your Connection Is Not Private on Android
First of all, what does “your connection is not private” on Android mean? To answer this question, it’s essential to understand that this error is often associated with Secure Socket Layer (SSL) protocol issues.
SSL is a cryptographic protocol created to establish a secure communication channel over the internet. Its primary purpose is to ensure the confidentiality and integrity of data exchanged between a user’s device and a website’s server.
The error message appears when there’s a problem with the SSL/TLS (Transport Layer Security) certificate of the website you are trying to access. This certificate is a digital document that authenticates the website and encrypts the data transmitted between the user’s device and the server.

Some common factors that could trigger the “your connection is not private” on Chrome Android error:
- Expired or invalid SSL certificate of the website;
Certificates are issued for a specific period, and if the website owner fails to renew it in time, your browser will detect it as not secure.
- There is a mismatch between the domain on the certificate and the actual domain you are trying to visit;
This discrepancy might occur due to a misconfiguration on the website or, in some cases, due to a man-in-the-middle attack where a third party intercepts the communication between your device and the server.
- No HTTPS enforcement;
Another reason for the issue is if the installed SSL certificate doesn’t turn on the “force HTTPS” option. This means visitors might be using the non-secure HTTP version of the site instead of the safe URL.
So, the error serves as a warning to users, indicating that the connection may not be secure and sensitive information could be at risk.
Browsers, including those on Android devices, prioritize user safety and privacy. They will block access to potentially compromised websites to prevent data theft or unauthorized access. That’s why when you get the “your connection is not private” message on Android, you can’t access the website.

Part 2: What The Error Codes in “Your Connection Is Not Private” Mean
When “your connection is not private” on Chrome Android error shows up, it often comes along with specific error codes that can indicate the root cause of the issue. Understanding these error codes is crucial for troubleshooting and resolving the problem effectively.
- ERR_CERT_SYMANTEC_LEGACY: Unsupported Symantec-issued certificate
This error code indicates that the website you are attempting to access is equipped with an unsupported Symantec-issued certificate. Symantec, a prominent Certificate Authority, had faced concerns about the security of its certificate issuance processes.
As a result, major browsers, including Google Chrome, no longer support certificates issued by Symantec. If you encounter this error, it implies that the website’s SSL certificate is outdated and needs to be updated with a certificate from a trusted Certificate Authority.
- NET::ERR_CERT_AUTHORITY_INVALID: Unauthenticated SSL certificate
The presence of this error code suggests that the SSL certificate of the website cannot be authenticated by your browser. This could occur if the certificate is self-signed or issued by an unrecognized Certificate Authority.
- NET::ERR_CERT_DATE_INVALID: Date and time mismatch
This error code points to a discrepancy between your Nubia Red Magic 9 Pro’s date and time settings and the information on the website’s SSL certificate, as they have expiration dates. If the date and time settings on your device are incorrect, it may prevent the certificate from being validated. Correcting your device’s date and time settings should resolve this issue.
- SSL certificate error: Generic or unspecified problem
This is a more generic error message that indicates a problem with the website’s SSL certificate without specifying the exact nature of the issue. It could indicate various issues, such as an expired certificate, a misconfiguration in the certificate chain, or other SSL-related problems.
Part 3: How To Fix Your Connection Is Not Private on Android
Encountering the “your connection is not private” error on Android can be a frustrating experience. Fortunately, there are various methods to address and fix this issue, depending on its underlying cause.
In this section, we will explore some effective solutions to help you regain a secure and private connection.
Method 1: Clear your cache
When you use the internet, web browsers store information about your online activities in cached data and cookies to speed things up. However, having too much of this data can cause problems instead. It might even stop your browser from connecting securely.
So, clearing your browser cache and data can be a quick and simple “your connection is not private” Android fix. Follow the steps here:
- Step 1: Open and launch Chrome.
- Step 2: Access the Menu (the three dots button) to open the Settings. Select Privacy and Security > Clear Browsing Data.
- Step 3: Opt for the “All Time” option and click “Clear Data” to erase your cache.

After successfully clearing your browser cache and data, revisit the website to check if the problem persists.
Method 2: Repair the Android system
Addressing the “your connection is not private” to fix on Android involves examining both the Nubia Red Magic 9 Pro device and the website. If clearing browser data doesn’t help, there might be an issue with your Android system. One solution is to use the Wondershare Dr.Fone system repair tool to fix the issues safely.
How to perform system repair with Dr.Fone:
- Step 1. Open the Repair Tool
Start by launching Wondershare Dr.Fone on your computer. Go to the Toolbox section and connect your Nubia Red Magic 9 Pro. Choose System Repair and pick Android as your device type.
 safe & secure
4,322,863 people have downloaded it
- Step 2. Begin Repair
Click Start on the new screen to kick off the repair. Since you’re dealing with a connection private issue on Android, select System Damage.

- Step 3. Fill in the Nubia Red Magic 9 Pro device Details
The platform will detect your Nubia Red Magic 9 Pro’s brand. Confirm the Name, Model, Country, and Carrier. If your device is unlocked, choose OPEN in the Carrier section. Agree to the warning, click Next, and proceed with the repair.

- Step 4. Activate Download Mode
Follow the instructions to put your Nubia Red Magic 9 Pro into Download Mode. Once in Download Mode, you will start downloading the firmware.

- Step 5. Confirm Installation
Remember, the repair may erase data. It’s advisable to back up your data first before starting the repair. Enter “000000” to confirm the repair process, shown by a progress bar.

When done, click Done if your Android starts properly. If not, click Try Again to repeat the process.

Method 3: Check and fix the date and time on your Android
Since the error code “NET::ERR_CERT_DATE_INVALID” indicates a mismatch between the date and time on your device and your browser, you need to adjust the date and time settings on your Android to fix it.
The specific steps can vary based on your Android model, but the general approach involves locating the “date and time” settings on your phone. How to fix the date and time on Android to bypass “your connection is not private” on Chrome Android:
- Step 1: Go to your Nubia Red Magic 9 Pro’s Settings > Date & Time.
- Step 2: Switch on the “Automatic Date & Time” to sync with the network-provided time.

Method 4: Perform factory reset
If nothing else works, there might be malware on your phone causing trouble. It’s crucial to eliminate this threat before further damage occurs. The recommended action is to perform a factory reset on your phone.
However, keep in mind that this process can result in data loss, so it’s essential to back up your data beforehand. Follow the steps to perform a factory reset on Android:
- Step 1: Go to your Android Settings.
- Step 2: Select Backup and Reset > Factory data reset. Then, opt to erase all data.

Most of the time, you won’t need to go to the extreme of a factory reset. The simpler solutions mentioned earlier should take care of the Security Certificate Error on your Android.
Conclusion
By now, you should have a good grasp of the “Your Connection Is Not Private” problem on Android. This issue typically arises from complications with the SSL certificate of the website, designed to ensure a secure connection.
When you see the error message, it often comes with specific codes that indicate the underlying problem. Several methods can be employed to fix the “Your Connection Is Not Private” on Android. Clearing the browser cache, repairing the Android system using tools like Dr.Fone, checking and fixing date and time settings, and performing a factory reset as a last resort are among the solutions.
By prioritizing user safety and following the step-by-step approach in this guide, you can navigate and resolve this common internet browsing challenge on your Nubia Red Magic 9 Pros.
How to Fix the Soft Bricked Nubia Red Magic 9 Pro?
Bricked phone is a serious problem, as your brick smartphone could be suffering from a soft brick or hard brick problem, and must be dealt with carefully. It is very common to see a brick smartphone these days. If you are wondering what exactly is a bricked phone, here is your answer.
A bricked phone, hard brick or soft brick, is a smartphone which refuses to start or boot all the way up the home/main screen of the Nubia Red Magic 9 Pro device. This issue is observed within most Android phones because users have a tendency to tamper with the Nubia Red Magic 9 Pro device settings, flashing new and customized ROMs and tweaking with the essential files. Playing around with the phone’s internal set-up leads to such errors, worst of them being a brick smartphone. Usually, a bricked phone does not switch on and stays frozen at the Nubia Red Magic 9 Pro device logo, a blank screen or even worse, doesn’t respond to any command, even the power on command.
If you are confused about the soft brick and hard brick problems and looking for solutions to fix your priced phone, then here is all you need to know.
Read on to find out more.
Part 1: What is the difference between soft brick and hard brick?
To begin with, let us understand the basic difference between a soft brick and hard brick issue. Both versions of a bricked phone prevent it from booting but differ in their causes and gravity of the problem.
A soft-brick problem is caused merely by a software error/crash and makes your device switch on automatically every time you manually turn it off. This phenomenon is referred to as Boot Loop. Soft bricked Android phones are not as difficult to fix as the hard bricked Android phones. It is convenient to say that a soft bricked phone only boots up half-way and not fully, whereas a hard bricked device does not switch on at all. A hard brick error is thus caused when the kernel, which is nothing but an interface for the software to communicate with the hardware, is tampered with. A hard bricked phone is not recognized by your PC when plugged in and is a serious problem. It requires troubleshooting techniques and cannot be easily fixed as the soft brick problem.

Hard bricked phones are a rare sight, but the soft brick is very common. Given below are ways to fix a soft brick Android phone. The techniques listed here are the best and the most efficient ways to get your phone back to its normal working conditions without losing your important data or damaging your device or its software.
Part 2: Stuck at the Boot Loop
This is the first sign of a soft bricked Android phone. Boot Loop is nothing but when your phone does not remain switched off and turns itself on automatically, and freezes at the logo screen or blank screen, every time you manually try to power it off.
Stuck at boot loop problem can be fixed by clearing your Cache partitions. These partitions are nothing but storage locations for your modem, kernels, system files, drivers and built-in Apps data.
It is advisable to clear Cache partitions regularly to keep your phone free from such glitches.
Since the phone refuses to boot, Cache can be cleared from entering into the Recovery Mode. Different Android devices have different ways to put it in recovery mode. Normally pressing the power key and volume down key helps, but you may refer to your phone’s guide for better understanding and then follow the steps given below to clear the cache partition:
Once you are the recovery mode screen, you will see a number of options as shown in the screenshot.

Use the volume down key to scroll down and select ”Wipe cache partition” as shown below.
 ZoneAlarm Extreme Security NextGen
 >
>
After the process is completed, select “Reboot System” which is the first option in the recovery mode screen.
This method will help you erase all the clogged up and unwanted files. You may loose some App related data, but that is a small price to pay to fix your bricked phone.
If this method does not boot up your brick smartphone and the problem still persists, there are two more things you can try. Read ahead to find out about them.

Part 3: Booting straight into recovery mode
If your bricked phone does not boot up to your Home Screen or Lock screen and instead boots directly into Recovery Mode, there is not much left to do. Booting straight into recovery mode is undoubtedly a soft brick error but it also indicates a possible problem with your current ROM. The only option you have to flash a new ROM to reboot your bricked phone back to its normal functioning.
To flash a new ROM:
Firstly, you must root your phone and unlock the Bootloader. Every phone’s mechanism to unlock the bootloader is different, thus, we suggest to refer to your user manual.
Once the Bootloader is unlocked, take a backup of all your data by selecting “Backup” or “Android” back in recovery mode. The process should not take long and all you need to do is tap “OK” to config backup.

In this step, download a ROM of your choice and store it in your SD Card. Insert the SD Card in your phone to begin the flashing process.
Once at the recovery mode, select “Install Zip from SD Card” from the options.

Scroll down using the volume key and use the power key to select the downloaded ROM.


This might take a few minutes of your time, but once the process is complete, reboot your phone.
Hopefully, your bricked phone will not boot normally and work smoothly.
Part 4: Booting straight into Bootloader
If your bricked phone boots straight into Bootloader, then this a serious issue and must not be taken lightly. Flashing a new ROM or clearing cache partitions are of little help in such a brick smartphone situation. Booting straight into Bootloader is a peculiar soft bricked Android phone feature and can be tackled only by downloading and flashing your original ROM from the manufacturer. In order to do so, a detailed study about your manufacturer’s ROM, ways to download and flash must be carried out. Since different Android phones come with different types of ROMs, it difficult to cover all the aspects about the different types of ROMs.
Brick smartphone problem has become more prominent than phone freezing or hanging issue. Android users are often seen looking for solutions to fix their soft brick and hard brick phones. Android phones are prone to get bricked and thus, it is important for us to know about the three techniques given above. These methods have been tried, tested and recommended by ay affected bricked phone users. Therefore, these tips are reliable and worth a try. So if your phone acts stubborn and refuses to boot normally, examine the problem carefully and adopt one of the solutions given above which best suits your situation.

7 Solutions to Fix Chrome Crashes or Won’t Open on Nubia Red Magic 9 Pro
Google Chrome is one of the most popular web browsers in the world. It is fast, secure, and easy to use. However, like any other app, it is not free from errors. Many users have reported that Chrome crashes or won’t open on their Nubia Red Magic 9 Pro. If you are also facing this issue, then you have come to the right place. In this article, we will discuss the reasons behind this problem and provide you with 7 solutions to fix Chrome crashes or won’t open on Nubia Red Magic 9 Pro.
Being one of the widely used browsers, Chrome is always our rescue whenever vital information is our need. Imagine, you launched Chrome for some urgent work and all of a sudden, got “Unfortunately Chrome has stopped” error. You re-opened it thinking about proper functioning of it now but to no avail. Does this situation sound familiar? Are you in a same problem as well? Fret not! We will discuss in this article why your Chrome is crashing on Android and the potential solutions to do away with the problem. Please read the article attentively and know what helps you best.
Part 1: Too many tabs opened
One of the main reasons why Chrome keeps crashing could be the multiple opened tabs. If you keep open the tabs, it may slow down the performance of Chrome and the app will use RAM. As a result, it will obviously get stopped midway. Therefore, we suggest you to close the tabs which are opened. And once you do that, exit the app and then launch it again.
Part 2: Too much memory used
When Chrome or any other app keeps running on the background, issues like “Unfortunately Chrome has stopped” are likely to occur. Moreover, the opened apps will eat the memory of your device. Hence, as the next solution, it is suggested that the Chrome should be closed by force quitting and then you need to try to launch it again to work. See if it works or still Chrome is not responding.
1. Simply tap on the Home button twice to get on the recent apps screen. Please note that the button may vary to reach the screen. Please check once and move accordingly.
2. Now simply swipe the app up/left/right (according to the Nubia Red Magic 9 Pro device).
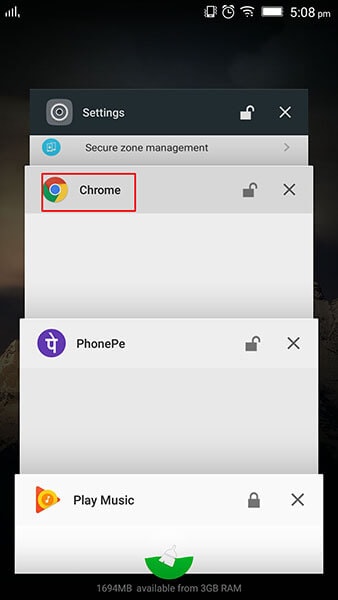
3. The app will be force quit now. You can then start it again to check if thing get back to normal.

Part 3: Chrome cache overflowing
While using any app for long, the temporary files for those gets collected in the form of cache. And when cache is not getting cleared, one may face the freezing, crashing or sluggish apps. And this could also be the cause why your Chrome keeps stopping. Hence, the following steps will show you how to clear cache and make Chrome work as before.
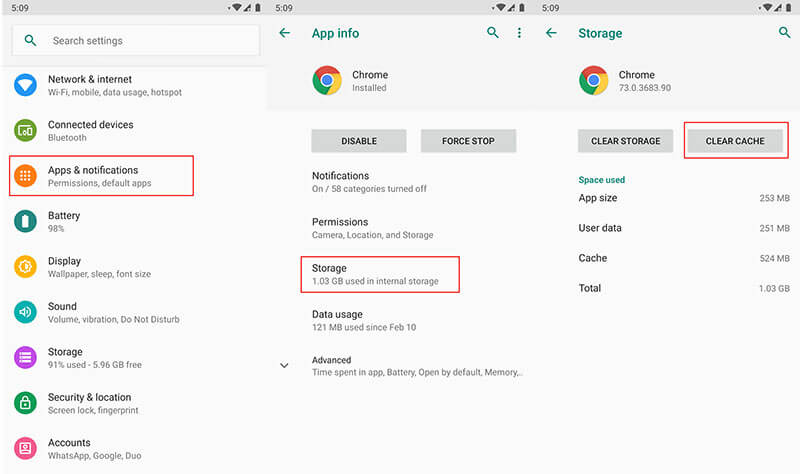
1. Open “Settings” and go to “Apps & Notifications”.
2. Look for “Chrome” and tap on it.
3. Go to “Storage” and click on “Clear Cache”.

Part 4: Exclude the issue of website itself
Most probably Chrome is not able to support the website you are trying to access. We doubt if the particular website you are making use of is the culprit and making Chrome keeps stopping. In such case, we would like to recommend you to make use of another browser and try to access the website from there. See if this works or not. If now, please follow the next solution.
 Epubor Audible Converter for Win: Download and convert Audible AAXC/AA/AAX to MP3 with 100% original quality preserved.
Part 5: Android firmware corruption
Another reason why your Chrome has stopped could be the corrupted software. You can’t expect anything normal when your firmware corruption occurs and so in the case of Chrome. If this is the case, the re-flashing the stock ROM is the most recommended solution. And the best that can help you in this is none other than Dr.Fone - System Repair (Android) . Within one click, it vows to help users in flashing the ROM without any complications. Read the advantages offered by this tool.
Dr.Fone - System Repair (Android)
Android repair tool to fix crashing Chrome
- It works like a pro no matter what problem your device is stuck with.
- More than 1000 types of Android devices are compatible with this tool.
- Easy to use and holds higher success rate.
- No need for any special technical knowledge to use this
- Offers an incredible interface from which anyone can work with.
3,605,074 people have downloaded it
How to Use Dr.Fone - System Repair (Android) when Chrome is crashing on Android
Step 1: Install the Tool to Begin
Start downloading it from there. Install it once downloading is completed and open the tool. The main screen will show you some tabs. You need to hit on “System Repair” among those.

Step 2: Get Android Device Connected
Now, you need to connect your Nubia Red Magic 9 Pro with the computer using USB cord. When the Nubia Red Magic 9 Pro device is connected successfully, click on the “Android Repair” option from the left panel.
Step 3: Enter Details
On the following screen, you need to select the right phone brand, name model and enter career details. Check once to confirm and hit on “Next”.
Step 4: Download Firmware
Now, follow the steps displaying on the screen to enter the DFU mode. When you do this, click on “Next” and the program will download the firmware.
Step 5: Repair the Issue
Once the firmware is downloaded, you will notice that the repairing process will start by the program. Wait until it gets finished and try to start Chrome again and you’ll surely get rid of the problem.


Part 6: File Downloading issue from Chrome
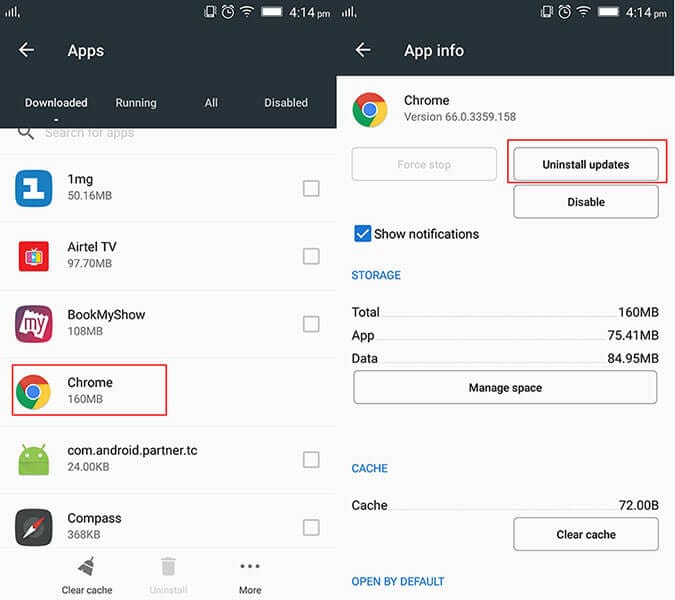
While you were trying to download from internet, the file didn’t download properly or it might get stuck and eventually crashing Chrome occurs. In such instances, many times, uninstalling and installing helps. Therefore, follow the steps below to uninstall and install Chrome and fix Chrome keeps stopping
- Go to “Settings” and tap on “Apps”.
- Select “Chrome” and tap on “Uninstall Updates”.
 HD Video Converter Factory Pro
- Now, you need to re-install it from Play Store. From the “My Apps” section, tap on Chrome and update it.
Part 7: Clashes between Chrome and system
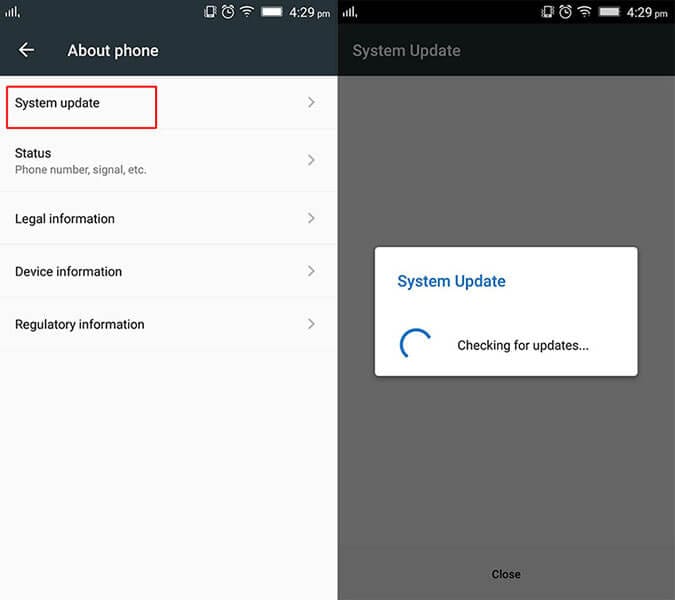
Of still you are receiving “Unfortunately Chrome has stopped” pop-up, it might be because of the incompatibility between the Chrome and system. Maybe your device is not updated and therefore is at odds with the Chrome app. So, the last tip that we would like give you is to update your Nubia Red Magic 9 Pro. Following are the steps for it. Follow them and stop the Chrome crashing on Android issue.
- Go to “Settings” and tap on “System”/”About Phone”/”About Device”.
- Now, choose “Software Update”/”System Update” and your device will detect if there is any update present on your device. Proceed accordingly.
- Title: Full Guide How To Fix Connection Is Not Private on Nubia Red Magic 9 Pro | Dr.fone
- Author: Ariadne
- Created at : 2024-07-30 11:01:06
- Updated at : 2024-07-31 11:01:06
- Link: https://howto.techidaily.com/full-guide-how-to-fix-connection-is-not-private-on-nubia-red-magic-9-pro-drfone-by-drfone-fix-android-problems-fix-android-problems/
- License: This work is licensed under CC BY-NC-SA 4.0.