
Full Guide How To Fix Connection Is Not Private on ZTE Nubia Z60 Ultra | Dr.fone
Full Guide: How To Fix Connection Is Not Private on ZTE Nubia Z60 Ultra
Are you encountering the “your connection is not private” issue on your phone? We found many Android users have increasingly expressed their frustrations with this recurring problem while browsing on the internet.
Usually, you can just reload the page to fix the error. But in case it doesn’t help, you may need to look for more advanced solutions. In the following discussion, we will delve into why this “your connection is not private” on Android happens and explore solutions that work for you.
Part 1: Addressing Your Connection Is Not Private on Android
First of all, what does “your connection is not private” on Android mean? To answer this question, it’s essential to understand that this error is often associated with Secure Socket Layer (SSL) protocol issues.
SSL is a cryptographic protocol created to establish a secure communication channel over the internet. Its primary purpose is to ensure the confidentiality and integrity of data exchanged between a user’s device and a website’s server.
The error message appears when there’s a problem with the SSL/TLS (Transport Layer Security) certificate of the website you are trying to access. This certificate is a digital document that authenticates the website and encrypts the data transmitted between the user’s device and the server.


Some common factors that could trigger the “your connection is not private” on Chrome Android error:
- Expired or invalid SSL certificate of the website;
Certificates are issued for a specific period, and if the website owner fails to renew it in time, your browser will detect it as not secure.
- There is a mismatch between the domain on the certificate and the actual domain you are trying to visit;
This discrepancy might occur due to a misconfiguration on the website or, in some cases, due to a man-in-the-middle attack where a third party intercepts the communication between your device and the server.
- No HTTPS enforcement;
Another reason for the issue is if the installed SSL certificate doesn’t turn on the “force HTTPS” option. This means visitors might be using the non-secure HTTP version of the site instead of the safe URL.
So, the error serves as a warning to users, indicating that the connection may not be secure and sensitive information could be at risk.
Browsers, including those on Android devices, prioritize user safety and privacy. They will block access to potentially compromised websites to prevent data theft or unauthorized access. That’s why when you get the “your connection is not private” message on Android, you can’t access the website.

Part 2: What The Error Codes in “Your Connection Is Not Private” Mean
When “your connection is not private” on Chrome Android error shows up, it often comes along with specific error codes that can indicate the root cause of the issue. Understanding these error codes is crucial for troubleshooting and resolving the problem effectively.
- ERR_CERT_SYMANTEC_LEGACY: Unsupported Symantec-issued certificate
This error code indicates that the website you are attempting to access is equipped with an unsupported Symantec-issued certificate. Symantec, a prominent Certificate Authority, had faced concerns about the security of its certificate issuance processes.
As a result, major browsers, including Google Chrome, no longer support certificates issued by Symantec. If you encounter this error, it implies that the website’s SSL certificate is outdated and needs to be updated with a certificate from a trusted Certificate Authority.
- NET::ERR_CERT_AUTHORITY_INVALID: Unauthenticated SSL certificate
The presence of this error code suggests that the SSL certificate of the website cannot be authenticated by your browser. This could occur if the certificate is self-signed or issued by an unrecognized Certificate Authority.
- NET::ERR_CERT_DATE_INVALID: Date and time mismatch
This error code points to a discrepancy between your ZTE Nubia Z60 Ultra’s date and time settings and the information on the website’s SSL certificate, as they have expiration dates. If the date and time settings on your device are incorrect, it may prevent the certificate from being validated. Correcting your device’s date and time settings should resolve this issue.
- SSL certificate error: Generic or unspecified problem
This is a more generic error message that indicates a problem with the website’s SSL certificate without specifying the exact nature of the issue. It could indicate various issues, such as an expired certificate, a misconfiguration in the certificate chain, or other SSL-related problems.
 Easy and Safe Partition Software & Hard Disk Manager
Part 3: How To Fix Your Connection Is Not Private on Android
Encountering the “your connection is not private” error on Android can be a frustrating experience. Fortunately, there are various methods to address and fix this issue, depending on its underlying cause.
In this section, we will explore some effective solutions to help you regain a secure and private connection.
Method 1: Clear your cache
When you use the internet, web browsers store information about your online activities in cached data and cookies to speed things up. However, having too much of this data can cause problems instead. It might even stop your browser from connecting securely.
So, clearing your browser cache and data can be a quick and simple “your connection is not private” Android fix. Follow the steps here:
- Step 1: Open and launch Chrome.
- Step 2: Access the Menu (the three dots button) to open the Settings. Select Privacy and Security > Clear Browsing Data.
- Step 3: Opt for the “All Time” option and click “Clear Data” to erase your cache.

After successfully clearing your browser cache and data, revisit the website to check if the problem persists.
Method 2: Repair the Android system
Addressing the “your connection is not private” to fix on Android involves examining both the ZTE Nubia Z60 Ultra device and the website. If clearing browser data doesn’t help, there might be an issue with your Android system. One solution is to use the Wondershare Dr.Fone system repair tool to fix the issues safely.
How to perform system repair with Dr.Fone:
- Step 1. Open the Repair Tool
Start by launching Wondershare Dr.Fone on your computer. Go to the Toolbox section and connect your ZTE Nubia Z60 Ultra. Choose System Repair and pick Android as your device type.


 safe & secure
4,322,863 people have downloaded it
- Step 2. Begin Repair
Click Start on the new screen to kick off the repair. Since you’re dealing with a connection private issue on Android, select System Damage.

- Step 3. Fill in the ZTE Nubia Z60 Ultra device Details
The platform will detect your ZTE Nubia Z60 Ultra’s brand. Confirm the Name, Model, Country, and Carrier. If your device is unlocked, choose OPEN in the Carrier section. Agree to the warning, click Next, and proceed with the repair.

- Step 4. Activate Download Mode
Follow the instructions to put your ZTE Nubia Z60 Ultra into Download Mode. Once in Download Mode, you will start downloading the firmware.

- Step 5. Confirm Installation
Remember, the repair may erase data. It’s advisable to back up your data first before starting the repair. Enter “000000” to confirm the repair process, shown by a progress bar.

When done, click Done if your Android starts properly. If not, click Try Again to repeat the process.
Method 3: Check and fix the date and time on your Android
Since the error code “NET::ERR_CERT_DATE_INVALID” indicates a mismatch between the date and time on your device and your browser, you need to adjust the date and time settings on your Android to fix it.
The specific steps can vary based on your Android model, but the general approach involves locating the “date and time” settings on your phone. How to fix the date and time on Android to bypass “your connection is not private” on Chrome Android:
- Step 1: Go to your ZTE Nubia Z60 Ultra’s Settings > Date & Time.
- Step 2: Switch on the “Automatic Date & Time” to sync with the network-provided time.

 DEX 3 RE is Easy-To-Use DJ Mixing Software for MAC and Windows Designed for Today’s Versatile DJ.
Mix from your own library of music, iTunes or use the Pulselocker subsciprtion service for in-app access to over 44 million songs. Use with over 85 supported DJ controllers or mix with a keyboard and mouse.
DEX 3 RE is everything you need without the clutter - the perfect 2-deck mixing software solution for mobile DJs or hard-core hobbiests.
PCDJ DEX 3 RE (DJ Software for Win & MAC - Product Activation For 3 Machines)
Method 4: Perform factory reset
If nothing else works, there might be malware on your phone causing trouble. It’s crucial to eliminate this threat before further damage occurs. The recommended action is to perform a factory reset on your phone.
However, keep in mind that this process can result in data loss, so it’s essential to back up your data beforehand. Follow the steps to perform a factory reset on Android:
- Step 1: Go to your Android Settings.
- Step 2: Select Backup and Reset > Factory data reset. Then, opt to erase all data.


Most of the time, you won’t need to go to the extreme of a factory reset. The simpler solutions mentioned earlier should take care of the Security Certificate Error on your Android.
Conclusion
By now, you should have a good grasp of the “Your Connection Is Not Private” problem on Android. This issue typically arises from complications with the SSL certificate of the website, designed to ensure a secure connection.
When you see the error message, it often comes with specific codes that indicate the underlying problem. Several methods can be employed to fix the “Your Connection Is Not Private” on Android. Clearing the browser cache, repairing the Android system using tools like Dr.Fone, checking and fixing date and time settings, and performing a factory reset as a last resort are among the solutions.
By prioritizing user safety and following the step-by-step approach in this guide, you can navigate and resolve this common internet browsing challenge on your ZTE Nubia Z60 Ultras.
9 Solutions to Fix Process System Isn’t Responding Error on ZTE Nubia Z60 Ultra
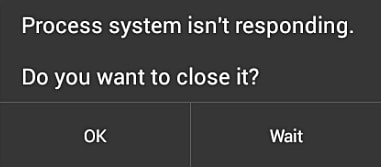
The “Process system isn’t responding” is a common error that occurs in almost every kind of Android device. Even though most Android smartphone manufacturers have taken a huge leap in the last few years, the operating system still suffers from a few pitfalls. The process system isn’t responding Android is one of those errors that have been reported plenty of times. I definitely understand encountering the ‘Process System Isn’t Responding’ error on your ZTE Nubia Z60 Ultra can be frustrating.

However, there are several straightforward methods to resolve this issue. This article will provide a step-by-step guide on how to fix the problem and restore your device to normal functionality.
Before solving any Android system issues, try this Android backup software to take a full backup, in case any data loss happens.
Part 1: Reasons for process system isn’t responding error
There could be plenty of reasons for getting the process system is not responding in Android.
- Software Glitch: Android systems may experience temporary glitches due to factors like memory management issues, conflicts between apps or services, or system updates.
- Insufficient System Resources: Low system storage is another reason for getting the error. If you have too many apps on your phone, then it might take a toll on its memory and generate the “process system isn’t responding” prompt.
- Third-Party Apps: Users have also complained that they receive the “Android process system is not responding” error after installing a new app. If you have installed an app from a source other than Google Play Store, then the chances are that you can get this error. Though, even after installing an app from Play Store, there is a bleak probability of facing this issue as well.
- Outdated Software: Using outdated apps, particularly system apps or critical components, may lead to compatibility issues with the latest Android version.
- System Updates: Most of the time, it happens whenever a device is restarted after updating its Android version. Your device could have undergone a bad update or might have had an unsupported driver. This can result in the occurrence of process system not responding issue.
- Corrupt Cache Files: Corrupted cache files can lead to conflicts and result in error.
- Overclocking or Modifications: Rooting or modifying the Android device, or applying overclocking settings, can lead to instability and the process system not responding error.
- Hardware Issues: Rarely, hardware problems like failing components can interfere with the proper functioning of the system.
No matter what the cause is, there are plenty of ways to overcome this issue. We have listed a handful of them in this post.
Part 2: How to Fix Android Process Not Responding? 8 Fixes
When this error occurs, it can disrupt the normal operation of the ZTE Nubia Z60 Ultra device, causing apps to freeze or crash. Fortunately, there are several effective methods to address this problem.
Fix 1: Restart your device
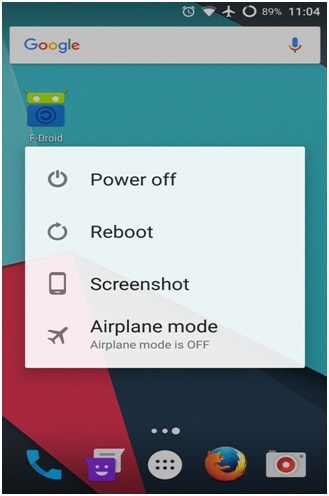
This is one of the easiest ways to resolve the process system not responding error. If you are getting this error on your phone, then try to manually restart your device. The way to restart your phone might differ from one device to another. Mostly, it can be done by long-pressing the power button. This will provide different power options. Tap on the “Reboot” one to restart your phone.
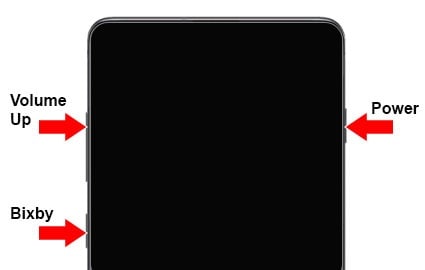
If it won’t work, then long press the Power and Volume up buttons at the same time until the screen goes off. Afterward, use the power button again to turn it on.

Fix 2: Reset App Preferences
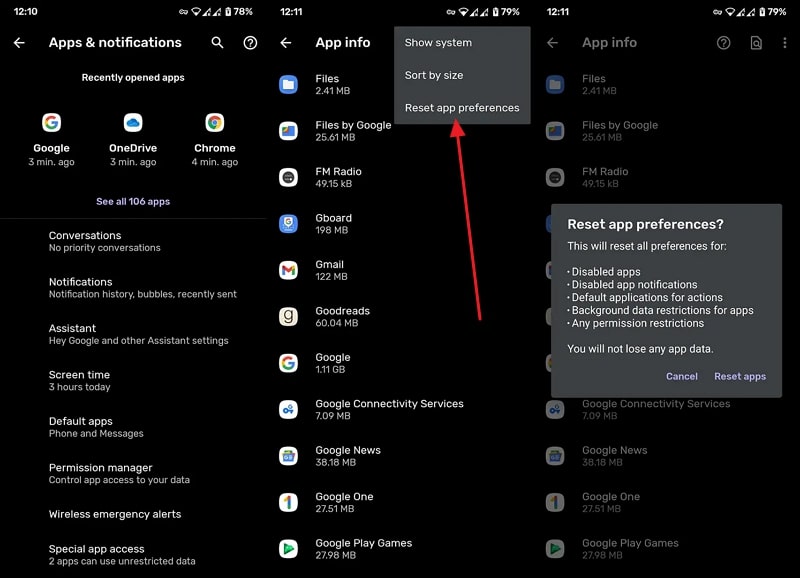
Sometimes the apps interfere with the ZTE Nubia Z60 Ultra device’s settings because they were given permission to access specific functions. It is recommended to allow the asked permission precisely because some suspicious apps can also steal your sensitive data. Here are the straightforward instructions you need to follow to reset the app preferences:
Proceed to the “Apps and Notifications” settings from the Settings app. Next, tap the “See All Apps” option and access the “Three Dots” menu. Here select the “Reset App Preferences” option and confirm the process from the confirmation pop-up.

Fix 3: Free Up Space to Make Sure Android Have Enough Internal Memory
In case the Android internal memory is completely filled, it will slow down the processing speed of the ZTE Nubia Z60 Ultra device. Internal memory is vital for the ZTE Nubia Z60 Ultra device to run all the background apps or the process required by the OS to run the ZTE Nubia Z60 Ultra device efficiently. You can follow these steps to free up some space on your ZTE Nubia Z60 Ultra:
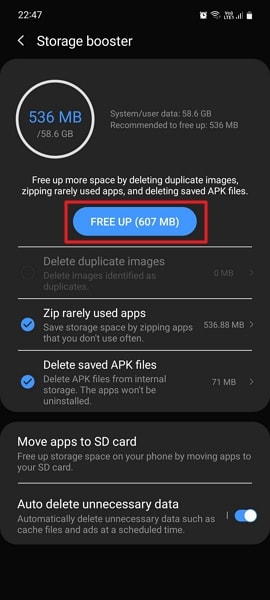
Step 1: Open the Settings app on your ZTE Nubia Z60 Ultra and access the “Battery and Device Care” option by scrolling down. Next, tap on the “Three Dots” from the top right corner and choose the “Storage Booster” feature.

Step 2: Following this, you can select the data you want to remove from the internal memory. Your device will show the space it will free up for you, and you can press the “Free Up” button to free up the storage.

Fix 4: Enter Safe Mode to Uninstall Suspicious Apps
This issue can also occur if you have installed an app from the Google Play Store with a very low rating or an APK. Unlike Apple App Store, anyone can easily upload their mobile apps on Play Store, so it is important to check the app’s credibility before installing it. Following are the simplified instructions to enter the safe mode and delete all suspicious applications:
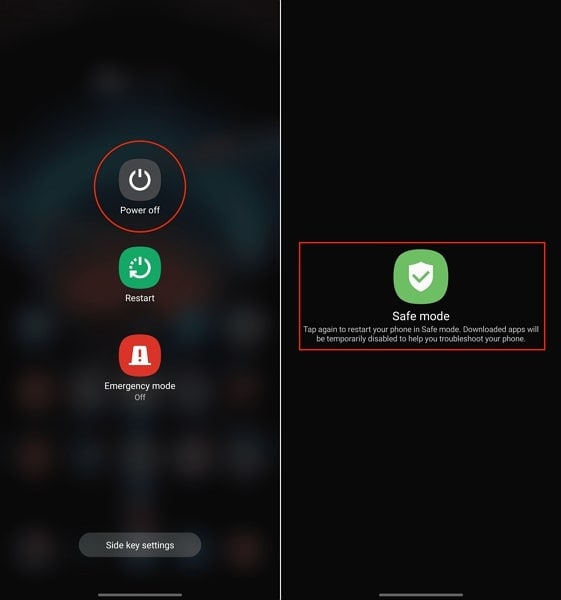
Press and hold the “Power” button of your Android and press and hold the “Power Off” option to access the “Safe Mode” feature. Afterward, confirm to enter the safe mode and remove all the suspicious apps from the ZTE Nubia Z60 Ultra device. You can do this by holding on to the app and selecting the “Uninstall” option from the pop-up options.
Fix 5: Update All Apps on your Device
Updating the apps is crucial for any Android device to work with high efficiency and performance. Apps are developed to make the users’ daily tasks easy to execute. However, there might be some negligence in the development, which can leave some bugs in the app. These bugs are fixed with time by releasing the new version of the app. To update your Android app, proceed with the following step-by-step instructions:
Step 1: Locate the Play Store from the Android home screen and access it. Then, tap the “Profile” icon from the top right corner and proceed to the “Manage apps and devices” option. Afterward, you can check how many app updates are available from the “Updates available” option. To update the apps, you will have to go inside this option.
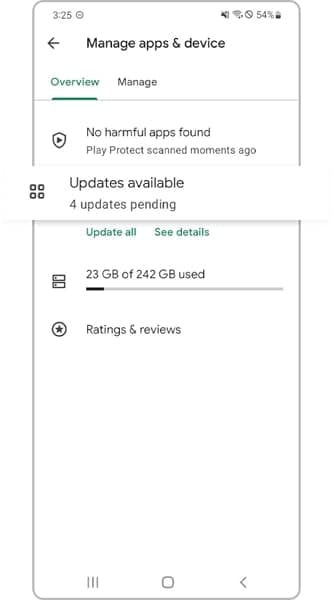
Step 2: You can tap on the “Update All” button if you want to update all the apps one by one. Otherwise, you can press the “Update” option adjacent to each app name to update the frequently used ones.

Fix 6: Check the SD card
If you are still getting the process system isn’t responding to Android error, then chances are that there could be an issue with your SD card. Firstly, check if your SD card is working fine or not. If it is corrupted, then get another memory card for your phone. Also, it should have a prominent amount of free storage. You might be facing this issue if the SD card has limited free space.
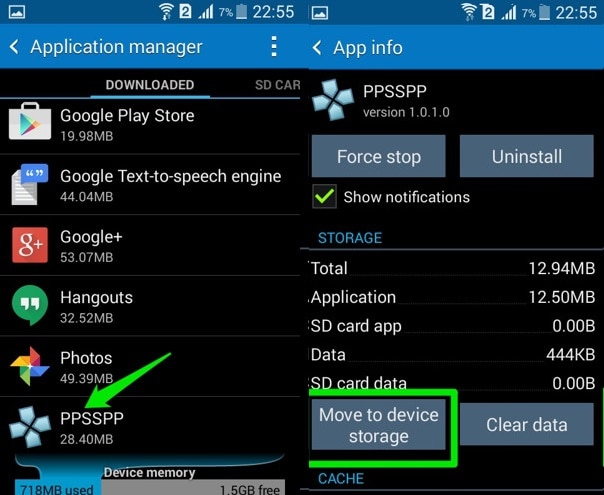
Also, if you are storing apps on the SD card, then your phone might encounter the process isn’t responding issue whenever you run a respective app. Therefore, you should move apps from your SD card to the phone’s internal memory. To do this, go to your phone’s Settings > Application Manager and select any app. If the app is stored on the SD card, then you will get an option of “Move to devise storage”. Just tap on it and manually move every app to your device storage.
Parental Control Software
Fix 7: One click to fix the process system isn’t responding error
If all the above tricks don’t get your device out of the process system not responding state, then there may be some system issues on your Android. In this case, an Android repair can successfully fix issues like process system isn’t responding.
Note: Android repair may wipe out existing Android data. Back up your Android data before going on.
Dr.Fone - System Repair (Android)
Android repair tool to fix all Android system issues in one click
- Fix all Android system issues like the black screen of death, system UI not working, etc.
- One-click for Android repair. No technical skills are required.
- Supports all the new ZTE Nubia Z60 Ultra devices like Galaxy S8, S9, S22, etc.
- Step-by-step instructions are provided. Friendly UI.
3981454 people have downloaded it
Follow the easy steps below to fix process system isn’t responding error:
- 1. Download and install the Dr.Fone tool. Then select “System Repair” from the main window.
- 2. Connect your ZTE Nubia Z60 Ultra to the PC. After the ZTE Nubia Z60 Ultra device is detected, select the “Android” tab.

- 3. Select and confirm the correct device details of your Android. Then boot your ZTE Nubia Z60 Ultra in download mode and proceed.

- 4. Download the firmware and click “Fix Now”.
- 5. After a while, your Android will be repaired with the “process system isn’t responding” error fixed.

safe & secure
Fix 8: Factory reset Android
It is always considered the most used way to factory reset your phone in order to resolve the process system not responding error. Though, this should be your last resort, as it will wipe off your device’s data entirely. Even if you are performing a factory reset, make sure that you back up your data by using a reliable tool like Wondershare Dr.Fone .

Wondershare Dr.Fone
Flexibly Back up and Restore Android Data
- Back up Android data to the computer with one click.
- Preview and restore selectively the backup to any Android device.
- Supports 8000+ Android devices.
- There is no data lost during backup, export, or restoration.
3,981,454 people have downloaded it
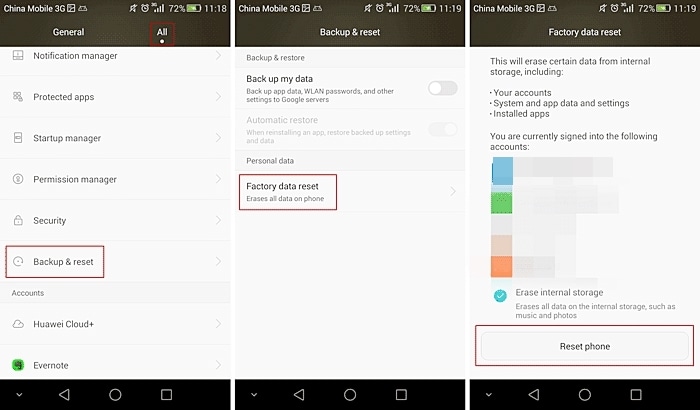
If your phone is functioning, then you can easily factory reset it by visiting Settings > General > Backup & Restore and selecting the option of “Factory Data Reset”. Your device will display a warning regarding all the data files that would be lost or un-synced. Just tap on the “Reset” button to factory reset your device.

If your device is not functioning or locked, then you can perform the factory reset operation by putting your phone into Recovery mode. Most of the time, it can be done by pressing the Power and Volume up button simultaneously for at least 10 seconds. Though, the key combinations might change from one device to another.
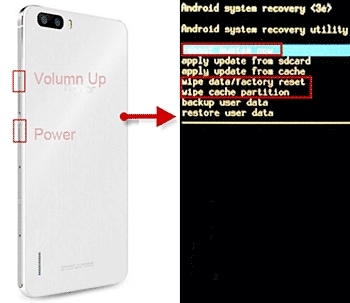
After entering the Recovery mode, go to the “wipe data/factory reset” option using the Volume up and down button. Use the Power button to make a selection. If you get an additional message, then select the “yes – delete all data” option. When it is done, you can simply reboot your device.
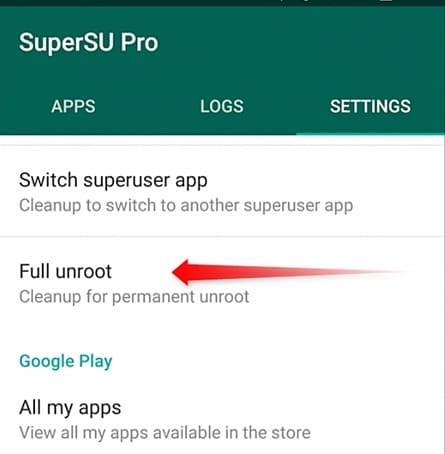
### Fix 9: Unroot the ZTE Nubia Z60 Ultra deviceIt has been further discovered that the process system isn’t responding error is more common in rooted devices. Therefore, if you also have a rooted Android device, then you can choose to unroot it in order to fix this issue. There are different ways to unroot an Android device. One of the easiest ways to do it is by using the SuperSU app.
You can always download either SuperSU or SuperSU Pro app from its website here . Simply install it on our device and launch it whenever you wish to unroot it. Visit its “Settings” tab and select the option of “Full unroot”.
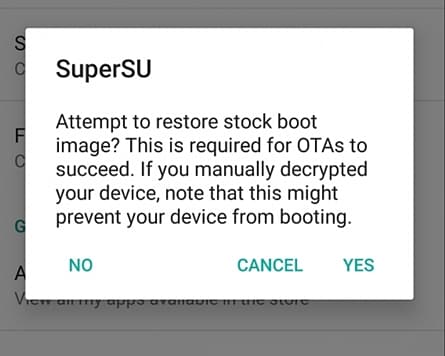
This will generate a warning message regarding all the repercussions of the unrooting process. Just tap on “Continue” to initiate the process.
 OtsAV DJ Pro
If you are using an older version of Android, then you might get another pop-up to restore boot images. Simply make the desired selection and start the process. After a while, your device would be restarted the usual way, and it would be unrooted. Most probably, this will resolve the process system isn’t responding error as well.

Now that you know different ways to fix the process system not responding error, you can easily overcome this issue and make the most out of your device. Simply start with the easy fixes, and if they don’t work, then take extreme measures like unrooting your device or restoring it to factory setting. Also, make sure to back up your data before taking any extreme measures.
What To Do if Your ZTE Nubia Z60 Ultra Auto Does Not Work
Embracing the convenience of Android Auto enhances your driving experience. It seamlessly connects your smartphone with your vehicle. However, in the realm of technology, glitches and malfunctions are commonplace. Android Auto, too, may encounter software or hardware issues that disrupt its functionality.
In this guide, you’ll delve into the common problems users face when Android Auto does not work and provide practical solutions to get you back on the road smoothly. From troubleshooting software glitches to addressing hardware concerns, this article aims to equip you with the knowledge to tackle Android Auto problems effectively.

Part 1. A Briefer on Android Auto
Android Auto is a revolutionary application designed to enhance the in-car experience by seamlessly connecting Android smartphones to compatible vehicles. It serves as a co-pilot, offering hands-free navigation, communication, and entertainment options, minimizing distractions while driving.

WPS Office Premium ( File Recovery, Photo Scanning, Convert PDF)–Yearly
How Android Auto Works
Understanding the mechanics of this technology is essential for effective Android Auto troubleshooting. It mirrors your Android smartphone’s interface onto your car’s infotainment system. It provides a simplified and optimized version of your device’s features on the road.
Android Auto connects your smartphone to your car’s infotainment system via USB cable or wirelessly, depending on your device and car compatibility. Once clicked, it displays a user-friendly interface on your car’s screen, allowing you to access navigation through Google Maps, make calls, send messages, and control multimedia apps with voice commands or touchscreen gestures.
By integrating familiar smartphone functionalities into your car, Android Auto aims to provide a safer and more enjoyable driving experience, reducing the need for manual phone interactions while on the road. Understanding this foundation will empower you to effectively troubleshoot when issues arise.


Part 2. Common Issues Android Auto Faces + Troubleshooting/Repair
Even if it is such a great technology, sometimes Android Auto won’t connect. It also deals with common issues that can affect its performance. In this section, you’ll delve into these challenges and equip you with practical troubleshooting solutions to fix your Android Auto experience.
Connection Issues
Connection glitches through Bluetooth or USB can cause Android Auto issues. USB connection problems often come from subpar cables.
The solution here is straightforward – invest in a high-quality USB cable. This ensures a stable link between your smartphone and the car’s infotainment system. Meanwhile, Bluetooth pairing problems may require a bit of digital maneuvering. Try restarting your phone, rebooting the car’s infotainment system, or resetting Bluetooth settings to establish a smooth connection.
App-Specific Problems (Certain Apps Not Working)
Android Auto relies heavily on various navigation, communication, and entertainment applications.
If specific apps refuse to cooperate, a quick remedy is to restart the head unit. If the issue persists, consider uninstalling and reinstalling the problematic applications. This step ensures a clean slate for the apps, potentially resolving any underlying compatibility or performance issues.

Screen and Display Problems (Head Unit)
Issues with the screen or display on your car’s head unit can be disconcerting. To troubleshoot, commence with a simple restart of the head unit.
If the problem lingers, escalate the solution by restarting the entire car. Should these steps prove ineffective, seeking professional assistance at a maintenance center is advisable. This ensures a thorough examination and potential resolution of hardware-related problems, providing a comprehensive fix for persistent screen and display issues.
Voice commands serve as a cornerstone of the Android Auto hands-free experience. When they falter, it can disrupt the seamless interaction with the system.
Begin by scrutinizing your internet connection, as voice commands rely on a stable link to function effectively. If the issue persists, a basic restart of the head unit might recalibrate the system, restoring the functionality of voice commands.
Understanding that these issues are inherent to any technology, Android Auto users can confidently navigate and troubleshoot these problems with the provided solutions. By addressing these commonplace concerns, users empower themselves to swiftly overcome hurdles, ensuring a seamless and gratifying driving experience with Android Auto.
Part 3. A Quicker Solution: Wondershare Dr.Fone – System Repair
If navigating through various troubleshooting steps seems complicated, especially if the issue resides within your ZTE Nubia Z60 Ultra, a swift and efficient solution comes in the form of Wondershare Dr.Fone - System Repair.
While the methods presented earlier primarily address software glitches, Dr.Fone can tackle more profound issues, offering a quick fix to revitalize your Android Auto experience. It is a comprehensive toolkit that caters to various Android needs, ensuring a seamless and optimized experience. Among its array of features, the System Repair feature in Dr.Fone acts as a reset button for your ZTE Nubia Z60 Ultra.
It addresses issues that go beyond the scope of regular troubleshooting. It gives your phone a fresh start by repairing the Android system and resolving glitches, crashes, and other persistent software-related problems. This revitalizes your telephone and can significantly impact Android Auto’s performance.
Note: If the problem persists and is related to the car’s head unit, a visit to the maintenance center might be necessary after exhausting these software-based solutions.
.png) Kanto Player Professional
Kanto Player ProfessionalHow To Use Wondershare Dr. Fone’s System Repair
To use Dr. Fone’s System Repair feature, follow the steps below. These steps will work with any Android phone.
- Step 1: Begin by launching Dr.Fone on your computer. From the left panel, access the Toolbox menu and click System Repair. Ensure your ZTE Nubia Z60 Ultra is connected.

company, user or members of the same household. Action! - screen and game recorder</a>
safe & secure
4,014,082 people have downloaded it
- Step 2: On the subsequent screen, select Android as your device.

- Step 3: Initiate the Android System Repair by clicking Start.
- Step 4: Confirm the accuracy of your device details. If needed, edit any information that may be incorrect.
- Step 5: Place your phone into Download mode following the guidelines tailored for phones with or without home buttons. Your phone will commence downloading the dedicated firmware.

WPS Office Premium ( File Recovery, Photo Scanning, Convert PDF)–Yearly

- Step 6: Once the firmware is downloaded, verify and proceed with the installation by clicking Fix Now. Confirm the firmware installation by inputting “000000” into the text box in the appearing window. Click Confirm afterward.
- Step 7: Upon completion of the process, your phone should now be restored. Click Done to conclude.
 PearlMountain Image Converter
safe & secure
4,276,578 people have downloaded it
 Nero Burning ROM:
The ultimate burning program for all your needs!
Conclusion
In wrapping up this guide, you’ve explored common reasons Android Auto does not work. You’ve also been provided practical solutions to keep your driving experience seamless. Remember, regular maintenance of your car’s head unit and periodic checks on your ZTE Nubia Z60 Ultra can preemptively address potential issues.
By staying proactive, you ensure a consistently smooth ride with Android Auto. For comprehensive system repair and addressing broader Android-related needs, consider trying out Dr.Fone. It’s a versatile tool that can enhance your Android experience and keep your digital journey hassle-free. Take control of your drive and explore the full potential of your ZTE Nubia Z60 Ultras with Dr.Fone today.
- Title: Full Guide How To Fix Connection Is Not Private on ZTE Nubia Z60 Ultra | Dr.fone
- Author: Ariadne
- Created at : 2024-07-30 11:05:50
- Updated at : 2024-07-31 11:05:50
- Link: https://howto.techidaily.com/full-guide-how-to-fix-connection-is-not-private-on-zte-nubia-z60-ultra-drfone-by-drfone-fix-android-problems-fix-android-problems/
- License: This work is licensed under CC BY-NC-SA 4.0.