
Full Solutions to Fix Error Code 920 In Google Play on Nokia G42 5G | Dr.fone
Full Solutions to Fix Error Code 920 In Google Play on Nokia G42 5G
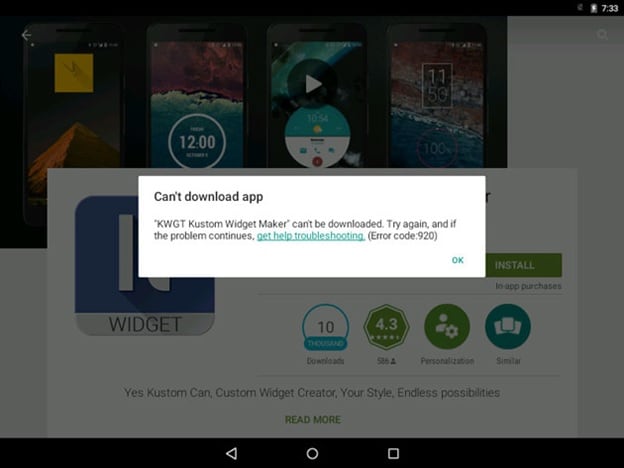
If you are using an Android device, you might have encountered the error code 920 in Google Play Store. This error usually occurs when you are trying to download or update an app from the Google Play Store. The error code 920 can be quite frustrating, as it prevents you from downloading or updating your favorite apps. However, there are several ways to fix this error and get your apps back up and running. In this article, we will show you some of the best solutions to fix error code 920 in Google Play Store on Nokia G42 5G.
Trust me, once you face an error it’s frustrating until you find a solution to it. Almost 90 % of the time we search on the internet for an appropriate solution. But finding a legitimate solution can be hard. Most websites just upload only one method to solve an error. And most times that one single method may not be enough for us. And again we are back to Square one trying to figure out what’s wrong and where we screwed up. Most people face an error 920 on play store. It’s frustrating to get the play store error 920.And not everyone knows what the error 920 is. Rest assured, this article will provide you four methods to get rid of the error 920 problems you face and you will not have to depend on any other further sources for finding out what play store error 920 is or find any other method to get rid of the error 920 on play store.
- (i) Re-installing the application
- (ii) Switching off and turning the wifi (cellular data) on
- (iii) Clearing the cache and data of Google Play Store
- (iv) Removing and adding back your Google account
Part 1: What is Error Code 920?
Sometimes people think that they have endangered the fate of humanity because of the error that is being displayed (Just Kidding). Don’t worry you haven’t crashed any server or did any damage to your device but you just gave your device a lot of work. Before you got this error you were downloading a lot of apps right. Well, that’s the exact reason why you came up with this error in the first place. There are various reasons behind this error code 920, however, the prominent ones are –

- a. Too much load on your data connection.
- b. The cache is not cleaned. Thus the connection is getting hampered due to overload.
- c. Network connection is not stable.
There are a lot of Android users out there and the error 920 on play store doesn’t have a unique solution. You’ll have to try out a bunch of them and find out what works for your device. So one of the given four methods below is definitely going to work on your device.

Part 2: 5 Solutions to fix error 920
METHOD 1: Fix Error Code 920 By Android Repair
If you’re writing a lot of data to your device in one go, this can sometimes overload your phone which can cause data corruption. This could have happened if you try the method above and then still encounter the play store error 920.
If this is the case, there’s a solution known as Dr.Fone - System Repair that can help. This is an industry-leading package that has everything you need to get your device running as it should be.
Dr.Fone - System Repair (Android)
Easiest Fix to Error Code 920
- Easy operation with no technical knowledge required
- Simple, one-click play store error 920 fix
- Clean and simple to understand user-interface
- Supports various Nokia G42 5G devices, including the latest Nokia G42 5G S9/S8
- The #1 Android repair software in the world
3,545,081 people have downloaded it
If this is the answer you’re looking for to help you fix your error code 920 problems, here’s a step by step guide on how to use it;
Note: please note that this method may erase all personal data on your device, so make sure you’ve backed up your device before continuing.
Step #1 Head over to the Dr.Fone website and download the Repair software for your Windows computer.
Step #2 Once installed, open the software and select the ‘System Repair’ option from the main menu.
 Allavsoft Batch Download Online Videos, Music Offline to MP4, MP3, MOV, etc format

Then connect your Nokia G42 5G using the official cable and select the ‘Android Repair’ option.

Step #3 On the next screen, insert your device information to ensure you’re downloading the correct firmware.
 Epubor Audible Converter for Win: Download and convert Audible AAXC/AA/AAX to MP3 with 100% original quality preserved.
Step #4 Put your phone into Download mode by following the onscreen instructions.
Parental Control Software
Dr.Fone will now download your firmware and automatically install it onto your device. Your phone will then reset, and you’ll be ready to use it without experiencing that annoying error 920 play store code!
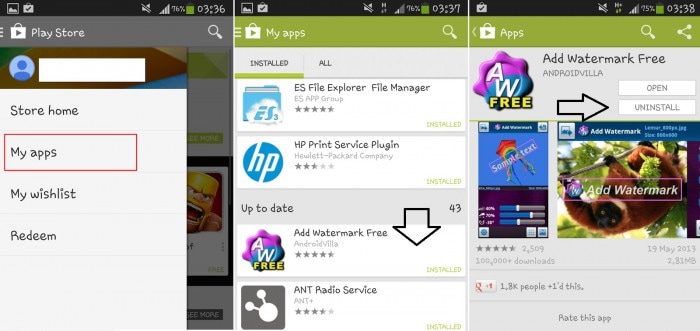
METHOD 2: Re-installing the application
This is the first thing that you want to try before going on to the more advanced one. In fact, this is the first thing I’d recommend you to try if you come up with an Error code 920. Just try this whenever you get any error.
Step 1 - Go to the application that you got the error with.
Step 2 - Open that application download page on the Play store.
Step 3 - Uninstall it or even uninstall all the update (If the error came when you were updating the application).
Step 4 - Now you clear the task manager and try installing it once again. If the play store error 920 doesn’t come then you have solved the problem and now wasn’t that easy. So it’s always best to try this step before doing anything else.
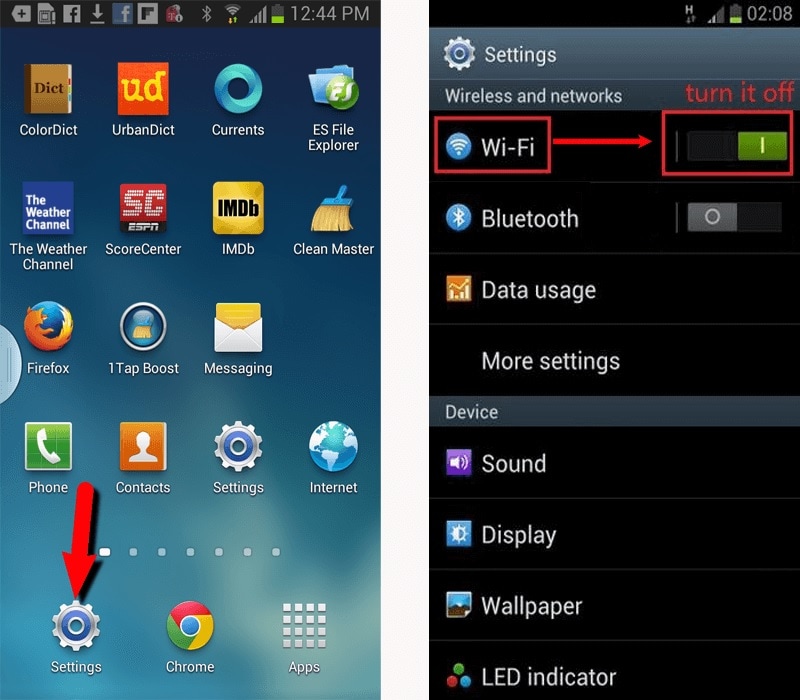
METHOD 3: Switching off and turning the wifi (cellular data) on
This is another basic method in solving the play store error 920. This error comes in when you have given too many tasks to download.
Step 1 - To remove that load Just turn your wifi off and then turn your wifi on (the same goes with your cellular data).
Step 2 - Now after doing this go to your Play Store application and download the application that you were going to download. Now your Play Store Error 920 won’t be bothering you anymore.
METHOD 4: Clearing the cache and data of Google Play Store
This is a little more complicated (complicated as in you will need to do a little more than the previous two methods). What you need to do is clear the cache and clear the data of the play store. This will get rid of the error code 920 the next time you download or update any application from the Google Play store.
Step 1 – Go to settings of your device.
Step 2 – Now find “Applications” option under the settings menu. Here you can find “Google Play Store” option. Open it.
Step 3 – Now, at the bottom, you can find “Clear Cache” option. Tap on it and your all cache will be cleared.
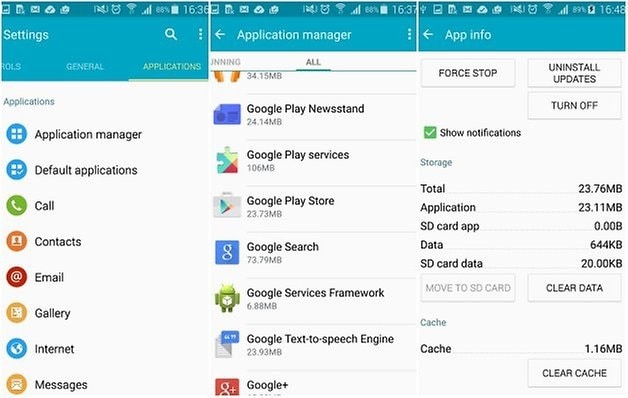
After doing this step clear your task manager (delete all recent applications). Go to play store and resume your download or update.
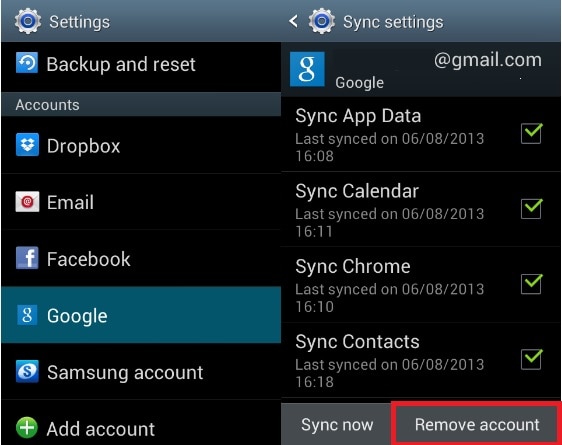
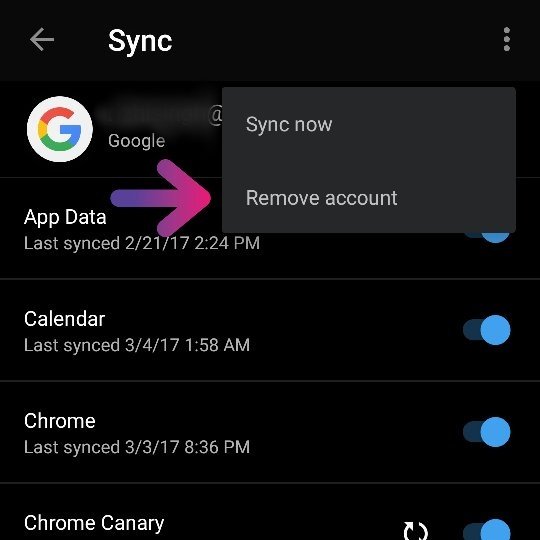
METHOD 5: Removing and adding back your Google account
It is best if you follow the order of the methods mentioned. Like, try each method in the given order until you get rid of the play store error 920. If you reach here then you truly must be in a desperate position to get rid of this error. The best and guaranteed way is to delete your Google account from your phone. By deleting what is meant here is to temporarily remove your account and the adding it in again. What this does is it kind of resets your play store details and it eradicates the error code 920. To do this you need to
Step 1 - go to Settings of your Mobile.
Step 2- Now, find “Accounts” and then go to “Google Accounts”.
Step 3 - In that section find the account you use for the play store or the account that you were using while the error came in. Once you tap on your specific account you’ll find an option to remove the account. Tap on it.
Step 4 - Now you have successfully removed your account and after that re-add your account. After entering your email id and password and hence adding your account. Go back to the play store and find the application that you were downloading or updating when the error code 920 came in. Now re-install it or update it back again. This time you won’t be faced with the play store error 920.
Again it is best if you follow the methods as illustrated above for removing error code 920 and this might have solved your problem by now. If now, you go for a complete factory reset, do it only at the extreme stage as this will delete all your personal data.
Play Store error 920 is a pretty common error and its solutions are also very easy. Please do ensure that you follow each and every step in sync so that you can get the best result out of these methods and get over with the error code 920 on Google play store.
11 Proven Solutions to Fix Google Play Store Not Working Issue on Nokia G42 5G
Google Play Store is a necessary and bundled service of any Android device. This app is required to download or even run any apps. So, getting an error like Play store not working or Play Store crashing is very unfortunate and a matter of a headache. Here we tried to put the best solution to overcome this issue. Keep reading this article for all the 11 best solutions.
Part 1. The recommended method to fix Google Play Store issues
If you search on the internet, you may find various tricks dealing with Google Play Store not working issue. However, either to try each of them or choose several to follow would certainly cost a lot of time. What’s more, we are not sure whether they will really work. Therefore, we would recommend you with a more effective and fast way, that is to use Dr.Fone - System Repair (Android) , a dedicated Android repair tool to fix Google Play Store, not working issues just in one click.
Dr.Fone - System Repair (Android)
A most effective method to fix Google Play Store not working
- Fix all Android system issues like the black screen of death, won’t turn on, system UI not working, etc.
- Industry’s 1st tool for one-click Android repair.
- Supports all the new Nokia G42 5G devices like Galaxy S8, S9, etc.
- Step-by-step instructions provided. No technicals skills required.
3981454 people have downloaded it
Brief steps to guide you through the process of fixing Google Play Store not working (followed by video tutorial):
- Get this tool downloaded on your computer. Install and launch it, and you can find the following welcome screen displayed.
- Select the option “System Repair”. In the new interface, click on the “Android Repair” tab.
- Start fixing Google Play Store not working by clicking “Start”. Select and confirm the correct model details as instructed.
- Activate the Download mode from your Nokia G42 5G.

- After entering the Download mode, the Dr.Fone tool starts to download the correct firmware to your Android.
 Glary Utilities PRO - Premium all-in-one utility to clean, speed up, maintain and protect your PC

- The downloaded firmware will be loaded and flashed to your Nokia G42 5G to fix the Google Play Store not working issue.

- Wait until the Android repair process is complete. Start your Android and Google Play Store, you can then find that the Google Play Store not working issue no longer exists.
 DLNow Video Downloader
Video tutorial to fix Google Play Store not working
Part 2: Other 10 common methods to fix Google Play Store issues
1. Fix Date and Time settings
Sometimes Google creates a problem connecting with the Play Store or Play store crashing due to the wrong date and time. The first and most common thing is you have to check if the date and time are updated or not. If not, update it first by following the below step by step guide.
Step 1 – First, go to the “Settings” of your device. Find ‘Date and time’ and tap on it.

Step 2 – Now you can see several options. Select “Automatic date and time”. This should override the wrong date and time your device have. Else, deselect the tick beside that option and select the date and time manually.

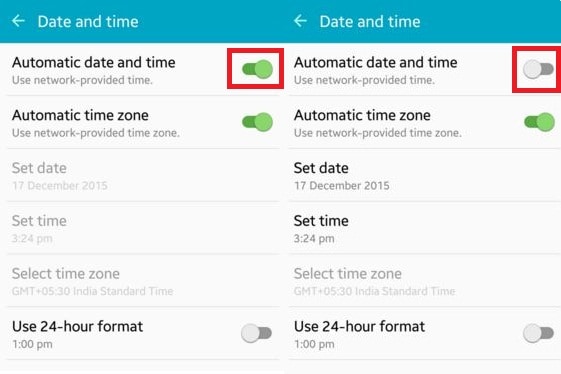
Step 3 – Now, go to the Play store and try to connect again. This should be working without any problem now.
2. Cleaning of Cache data of Play Store
This may happen that sometimes Google Play Store stopped working due to excessive unnecessary data stored in the cache of the Nokia G42 5G device. So, clearing unnecessary data is very important to keep the application run smoothly. To do this, you need to follow the below steps.
Step 1 – Firstly, go to “Settings” on your device.
Step 2 – Now, navigate to the “Apps” option available at the settings menu.
Step 3 – Here you can find the “Google Play Store” app listed. Open it by tapping.
Step 4 – Now, you can find a screen like below. Tap on “Clear cache” to remove all the cache from the application.
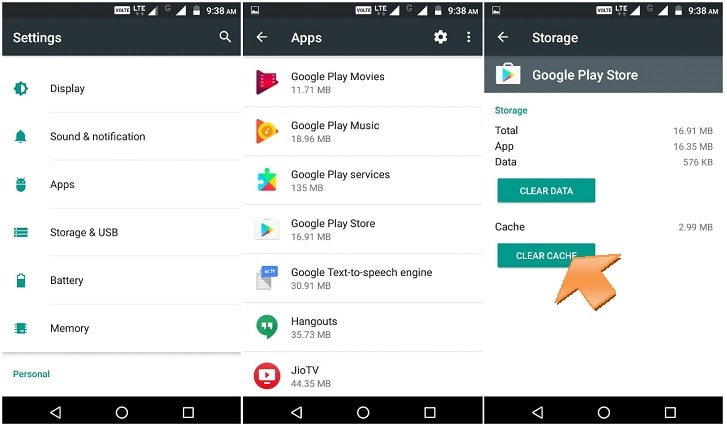
Now, again try to open Google Play Store and you may successfully overcome the Play Store not working issue. If not, check the next solution.
3. Reset Play store by Clear data
If the above solution is not working for you, you might try this option instead. This step will erase all the app data, settings, etc so that it can be set up a fresh one. This will also fix the Google Play store not working issue. For this solution, use the following method step by step.
Step 1 – Like the previous method, head towards the settings and then find “Apps”
Step 2 – Now find “Google Play Store” and open it.
Step 3 – Now, instead of tapping “Clear cache”, tap on “Clear data”. This will erase all the data and settings from the Google Play store.
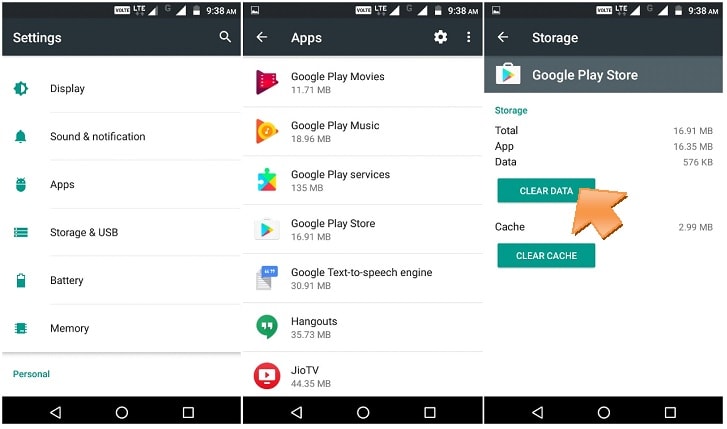
After this, open “Google Play Store” and now your problem might be solved now.

4. Reconnecting the Google account
Sometimes it may happen that removing and reconnecting your Google account may solve the Play Store not working issue. To do this, you need to follow the instructions below.
Step 1 – Go to the “Settings” and then find “Accounts”.
Step 2 – Upon opening the option, select “Google”. Now you can see your Gmail ID listed there. Tap on it.

Step 3 – Now click on the top right side three dots or “more” option. Here you can find the “Remove account” option. Select it to remove the Google Account from your Mobile.

Now, go back and try to open Google Play Store again. This should work now and enter your Google ID and password again to continue. If it’s still not working, move to the next solution.

5. Reinstall the latest version of Google Play Store
Google Play store can’t be uninstalled completed completely from your Nokia G42 5G. But disabling and reinstalling its latest version can resolve the Play Store crashing issue. For doing this, just follow the below guide.
Step 1 – First of all, go to “Settings” and then move on to “Security”. Then find “Device administration” here.
Step 2 – Upon clicking on this option, you can find “Android device manager”. Uncheck this and disable.

Step 3 – Now you can be able to uninstall Google play service by going into application manager.

Step 4 – After that, try to open any app that requires Google Play store to open, and that will automatically guide you to install the Google Play service. Now install the updated version of the Google Play service.
After installing, your problem might be solved by now. If not, try the next solution.

6. Clear Google Service Framework Cache
Besides the Google Play store, this is important to keep healthy the Google Service Framework as well. The cache and unnecessary data should be removed from there also. Follow the steps below.
Step 1 – Go to settings and then tap on “Application Manager”
Step 2 – Here you can find “Google Service Framework”. Open it.
Step 3 – Now, tap on “Clear cache”. And you are done.

Now go back and try to open Google Play store again. This might solve the Google Play Store has stopped the problem by now. If not, check the next solution.
7. Disable the VPN
The VPN is a service to get all the media outside your geographic location. This is also used to install a country-specific app in another country. But sometimes it can create a problem with Play Store crashing. So, this is recommended to try disabling the VPN.
Step 1 – Go to the settings of your device.
Step 2 – Under the “networks”, click on “More”.
Step 3 – Here you can find “VPN”. Tap on it and turn it off.
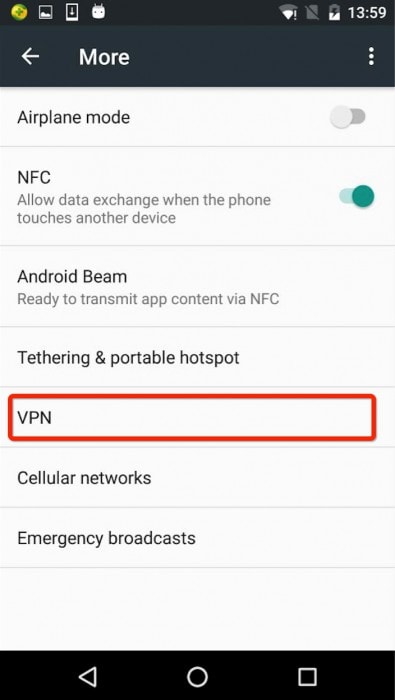
Now, again go back and try to open the Google Play Store. This may solve your problem now. If not, check the next solution.
 PaperScan Professional: PaperScan Scanner Software is a powerful TWAIN & WIA scanning application centered on one idea: making document acquisition an unparalleled easy task for anyone.
8. Force stop Google Play Service
Google Play Store needs to be restart just like your PC. This is a really helpful and common trick to overcome the Play Store crashing issue on your Nokia G42 5G. To do this, follow the below steps.
Step 1- Go to settings and then go to the “Application Manager”.
Step 2 – Now find “Google Play Store” and click on it.
Step 3 – Here click on “Force Stop”. This allows the Google Play Store to stop.

Now, try to open Google Play store again and this time the service is being restarted and might work properly. If not, try the next solution.
9. Try a Soft Reset of your device
This easy to use solution will remove all the unnecessary temporary files of your device, close all recent apps, and make it clean. This is just rebooting your device. It won’t delete any data from your device.
Step 1 – Long press the “Power” button on your device.
Step 2 – Now, click on ‘Reboot’ or ‘Restart’ option. Your device will restart in some time.

After restarting, try to open the Google Play Store again and this time you should succeed. If any case, it’s not opening, try the last (but not the least) method by hard reset your Android.
10. Hard reset your device
If you have done with all of the above solutions and still Play Store crashing, and you are aggressive to get it, then only try this method. Using this method will delete all the data of your device. So take a backup of the whole. Follow the step by step instruction below.
Step 1 – Go to setting and find “backup and reset” there.
Step 2 – Click on it. And then Click on the “Factory data reset” option.
Step 3 – Now confirm your action and tap on the “Reset device”.

This will take a while to reset your device completely. After completion, start the Google Play Store and set up as a new device.
The above methods are the best 11 among all the solutions you can get for your Play Store not working on wifi or Play Store crashing error. Try one by one and you might get rid of this problem.

How to Exit Android Factory Mode On Nokia G42 5G?
You’ve often heard that recovery mode will solve just about any problem your Nokia G42 5G is experiencing. This is mostly true and one of the components of Android’s recovery mode, factory mode or factory reset is one of the most efficient ways to solve various problems on your device. While factory mode is often a good thing, there are times when your device can enter factory mode on its own. Other times, you can safely enter factory mode but not know how to get out.
Fortunately for you, this article will explain all aspects of factory mode and especially how to safely exit factory mode.
Part 1. What is Android Factory Mode?
Factory mode or what is commonly known as factory reset is one of the options available for you when your Nokia G42 5G is in recovery mode. Several options are available for you once you enter Recovery mode on your device but few are as effective as the wipe data/ factory reset option. This option is useful in solving a whole host of problems that your device could be experiencing.
If you have been using your Nokia G42 5G for a while now and its performance to be less than ideal, a factory reset might be a good solution. That is however not the only problem a factory reset or factory mode can solve. It will also work for a number or Android errors that you may experience, problems caused by faulty firmware updates and also tweaks made on your device that may not have worked as expected.
It is however important to note that a factory reset or factory mode does often result in the loss of all your data. Therefore a backup is necessary to protect against this data loss risk.
Part 2. Backup your Android Device First
Before we can see how to safely enter and exit factory mode, it is important to have a full backup of your device. We mentioned that a factory mode will likely erase all the data on your device. A backup will ensure that you can get your phone back to its original state before the factory mode.
In order to do a full and complete backup of your device you need to have a tool that will not only ensure that you backup everything on your device but one that makes it easy for you to accomplish this. One of the best tools in the market is Dr.Fone - Backup & Resotre (Android) . This software is designed to enable you to create a full backup of your device.
Dr.Fone - Backup & Restore (Android)
Flexibly Backup and Restore Android Data
- Selectively backup Android data to computer with one click.
- Preview and restore backup to any Android devices.
- Supports 8000+ Android devices.
- There is no data lost during backup, export or restore.
3,428,803 people have downloaded it
Follow these very simple steps to use this MobileTrans Phone Transfer software to create a full backup of your device.
Step 1. Launch Dr.Fone on your computer and choose “Backup & Restore”
Run the software on your computer and you can see all features displayed in the primary window. Choose this one: Backup & Restore. It allows you to get your device backed up entirely with one click.

WPS Office Premium ( File Recovery, Photo Scanning, Convert PDF)–Yearly
Step 2. Plug in with your device
Then plug in with your device to the computer. When your devic is detected, click on Backup.

Step 3. Select the file types to backup
The program will display all the file types it can support to backup. Just select the ones you would like to backup and hit Backup.

Step 4. Start backing up your device to the computer
After choosing the file’s type for backup, click “Backup” to begin backing up your device to your computer. It will take you a few minutes, depending on the storage of the data.

Note: You can use the feature of “Restore From Backup” to restore the backup file to your device, when you have the need later.
Part 3: One Click Solution to fix Android stuck in factory mode
From the above parts, you are well aware about what is factory mode. As we discussed, this mode fixes most troubles with Android devices.
But for situations when your Nokia G42 5G gets stuck in this very same factory mode, the most feasible solution for you is Dr.Fone - System Repair (Android) . This tool fixes all Android system issues including unresponsive or bricked device, stuck on Nokia G42 5G logo or factory mode or blue screen of death with a single click.
Dr.Fone - System Repair (Android)
One click fix to Android stuck in factory mode
- You can easily fix your Android stuck in factory mode with this tool.
- The one-click solution’s ease of operation is appreciable.
- It has carved a niche being the first Android repair tool in the market.
- You don’t need to be a pro in technology to use this program.
- It is compatible with all latest Nokia G42 5G devices like Galaxy S9.
3,645,867 people have downloaded it
In this part we will explain how to exit Android recovery mode using Dr.Fone - System Repair (Android) . Prior to proceeding, you got to remember that device backup is paramount to keep your data safe. This process might erase your Nokia G42 5G data.
Phase 1: Ready your device and connect it
Step 1: Installation completion needs to be followed by running Dr.Fone on your system. Over the program window, tap ‘Repair’ afterwards and get the Android device connected.
Step 2: Select the ‘Android Repair’ option from the list to fix Android stuck in factory modeissue. Hit the ‘Start’ button soon after.
Step 3: Select Android device details on the Nokia G42 5G device information window, followed by tapping the ‘Next’ button.
 vMix HD - Software based live production. vMix HD includes everything in vMix Basic HD plus 1000 inputs, Video List, 4 Overlay Channels, and 1 vMix Call
Step 4: Enter ‘000000’ for confirmation then proceed.


Phase 2: Get in ‘Download’ mode for repairing the Android device
Step 1: It’s important to put the Android device in ‘Download’ mode, here are the steps to do so –
- On a ‘Home’ button-less device – turn off the Nokia G42 5G device and push down the ‘Volume Down’, ‘Power’ and ‘Bixby’ buttons for about 10 seconds and un-hold. Now, hit the ‘Volume Up’ button to get into ‘Download’ mode.

- For a device with ‘Home’ button – switch it off and hold down the ‘Power’, ‘Volume Down’ and ‘Home’ buttons together for 10 seconds and release. Click the ‘Volume Up’ button for entering ‘Download’ mode.
Step 2: Press ‘Next’ for initiating firmware downloading.
Step 3: Dr.Fone –Repair (Android) starts Android repair as soon as download and verification of firmware is done. All Android issues along with Android stuck in factory mode will be fixed now.
Part 4. Common Solutions to Exit Factory Mode on Android
Having a backup of all your data will eliminate the risk of losing any of your data. You can now safely exit factory mode using one of the 2 methods below. These two methods will work on a rooted device.
Method 1: Using “ES File Explorer”
To use this method, you will need to have installed file explorer on your device.
Step 1: Open “ES File Explorer” and then press the icon on the top left corner
Step 2: Next, go to “Tools” and then turn on “Root Explorer”
Step 3: Go to Local> Device> efs> Factory App and then open factorymode as text in the “ES Note Editor” Turn it ON
Step 4: Open keystr as text in the “ES Note Editor” and change it to ON. Save it.
Step 5: Reboot the Nokia G42 5G device


Method 2: Using Terminal Emulator
Step 1: Install Terminal emulator
Step 2: Type “su”
Step 3: Then Type the following;
rm /efs/FactoryApp/keystr
rm /efs / FactoryApp/ Factorymode
Echo –n ON >> / efs/ FactoryApp/ keystr
Echo –n ON >> / efs/ FactoryApp/ factorymode
chown 1000.1000/ efs/FactoryApp/keystr
chown 1000.1000/ efs/FactoryApp/ factorymode
chmod 0744 / efs/FactoryApp/keystr
chmod 0744 / efs/ FactoryApp/ factorymode
reboot
You can also exit factory mode on unrooted device by going to Settings> Application manager> All and the search for Factory Test and “Clear Data”, “Clear Cache”
As much as factory mode can be a useful solution to a number of problems, it can be quite annoying when it pops up unexpectedly. Now you are equipped with 2 effective solutions to help you safely exit factory mode if ever you find yourself in this situation.
- Title: Full Solutions to Fix Error Code 920 In Google Play on Nokia G42 5G | Dr.fone
- Author: Ariadne
- Created at : 2024-07-30 11:08:21
- Updated at : 2024-07-31 11:08:21
- Link: https://howto.techidaily.com/full-solutions-to-fix-error-code-920-in-google-play-on-nokia-g42-5g-drfone-by-drfone-fix-android-problems-fix-android-problems/
- License: This work is licensed under CC BY-NC-SA 4.0.