
Full Solutions to Fix Error Code 920 In Google Play on Nubia Red Magic 9 Pro+ | Dr.fone
Full Solutions to Fix Error Code 920 In Google Play on Nubia Red Magic 9 Pro+
If you are using an Android device, you might have encountered the error code 920 in Google Play Store. This error usually occurs when you are trying to download or update an app from the Google Play Store. The error code 920 can be quite frustrating, as it prevents you from downloading or updating your favorite apps. However, there are several ways to fix this error and get your apps back up and running. In this article, we will show you some of the best solutions to fix error code 920 in Google Play Store on Nubia Red Magic 9 Pro+.
Trust me, once you face an error it’s frustrating until you find a solution to it. Almost 90 % of the time we search on the internet for an appropriate solution. But finding a legitimate solution can be hard. Most websites just upload only one method to solve an error. And most times that one single method may not be enough for us. And again we are back to Square one trying to figure out what’s wrong and where we screwed up. Most people face an error 920 on play store. It’s frustrating to get the play store error 920.And not everyone knows what the error 920 is. Rest assured, this article will provide you four methods to get rid of the error 920 problems you face and you will not have to depend on any other further sources for finding out what play store error 920 is or find any other method to get rid of the error 920 on play store.
- (i) Re-installing the application
- (ii) Switching off and turning the wifi (cellular data) on
- (iii) Clearing the cache and data of Google Play Store
- (iv) Removing and adding back your Google account
Part 1: What is Error Code 920?
Sometimes people think that they have endangered the fate of humanity because of the error that is being displayed (Just Kidding). Don’t worry you haven’t crashed any server or did any damage to your device but you just gave your device a lot of work. Before you got this error you were downloading a lot of apps right. Well, that’s the exact reason why you came up with this error in the first place. There are various reasons behind this error code 920, however, the prominent ones are –
- a. Too much load on your data connection.
- b. The cache is not cleaned. Thus the connection is getting hampered due to overload.
- c. Network connection is not stable.
There are a lot of Android users out there and the error 920 on play store doesn’t have a unique solution. You’ll have to try out a bunch of them and find out what works for your device. So one of the given four methods below is definitely going to work on your device.

Part 2: 5 Solutions to fix error 920
METHOD 1: Fix Error Code 920 By Android Repair
If you’re writing a lot of data to your device in one go, this can sometimes overload your phone which can cause data corruption. This could have happened if you try the method above and then still encounter the play store error 920.
If this is the case, there’s a solution known as Dr.Fone - System Repair that can help. This is an industry-leading package that has everything you need to get your device running as it should be.
 dotConnect for Oracle is an ADO.NET data provider for Oracle with Entity Framework Support.
Dr.Fone - System Repair (Android)
Easiest Fix to Error Code 920
- Easy operation with no technical knowledge required
- Simple, one-click play store error 920 fix
- Clean and simple to understand user-interface
- Supports various Nubia Red Magic 9 Pro+ devices, including the latest Nubia Red Magic 9 Pro+ S9/S8
- The #1 Android repair software in the world
3,545,081 people have downloaded it
If this is the answer you’re looking for to help you fix your error code 920 problems, here’s a step by step guide on how to use it;
Note: please note that this method may erase all personal data on your device, so make sure you’ve backed up your device before continuing.
Step #1 Head over to the Dr.Fone website and download the Repair software for your Windows computer.
Step #2 Once installed, open the software and select the ‘System Repair’ option from the main menu.
 LYRX is an easy-to-use karaoke software with the professional features karaoke hosts need to perform with precision. LYRX is karaoke show hosting software that supports all standard karaoke file types as well as HD video formats, and it’s truly fun to use.
Then connect your Nubia Red Magic 9 Pro+ using the official cable and select the ‘Android Repair’ option.

Step #3 On the next screen, insert your device information to ensure you’re downloading the correct firmware.

Step #4 Put your phone into Download mode by following the onscreen instructions.

Dr.Fone will now download your firmware and automatically install it onto your device. Your phone will then reset, and you’ll be ready to use it without experiencing that annoying error 920 play store code!
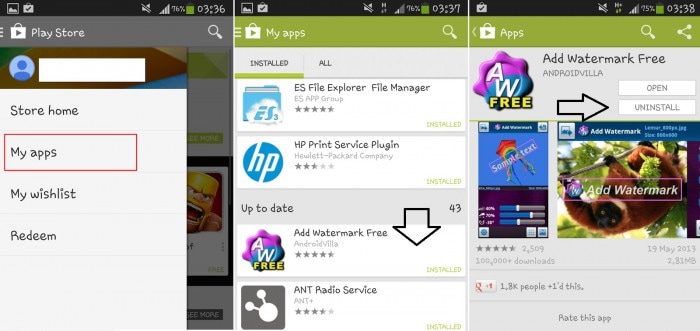
METHOD 2: Re-installing the application
This is the first thing that you want to try before going on to the more advanced one. In fact, this is the first thing I’d recommend you to try if you come up with an Error code 920. Just try this whenever you get any error.
Step 1 - Go to the application that you got the error with.
Step 2 - Open that application download page on the Play store.
Step 3 - Uninstall it or even uninstall all the update (If the error came when you were updating the application).
Step 4 - Now you clear the task manager and try installing it once again. If the play store error 920 doesn’t come then you have solved the problem and now wasn’t that easy. So it’s always best to try this step before doing anything else.

company, user or members of the same household. Action! - screen and game recorder</a>
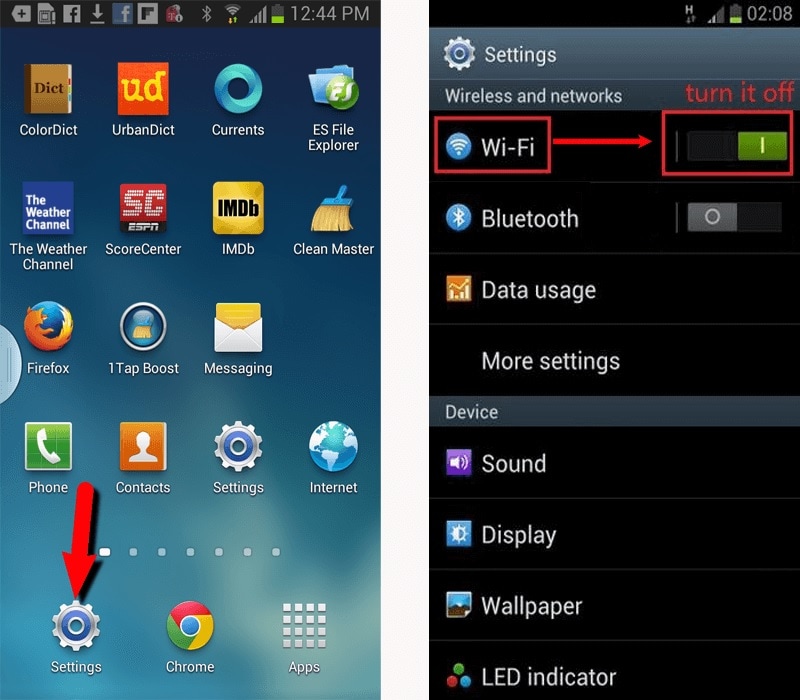
METHOD 3: Switching off and turning the wifi (cellular data) on
This is another basic method in solving the play store error 920. This error comes in when you have given too many tasks to download.
Step 1 - To remove that load Just turn your wifi off and then turn your wifi on (the same goes with your cellular data).
Step 2 - Now after doing this go to your Play Store application and download the application that you were going to download. Now your Play Store Error 920 won’t be bothering you anymore.
METHOD 4: Clearing the cache and data of Google Play Store
This is a little more complicated (complicated as in you will need to do a little more than the previous two methods). What you need to do is clear the cache and clear the data of the play store. This will get rid of the error code 920 the next time you download or update any application from the Google Play store.
Step 1 – Go to settings of your device.
Step 2 – Now find “Applications” option under the settings menu. Here you can find “Google Play Store” option. Open it.
Step 3 – Now, at the bottom, you can find “Clear Cache” option. Tap on it and your all cache will be cleared.

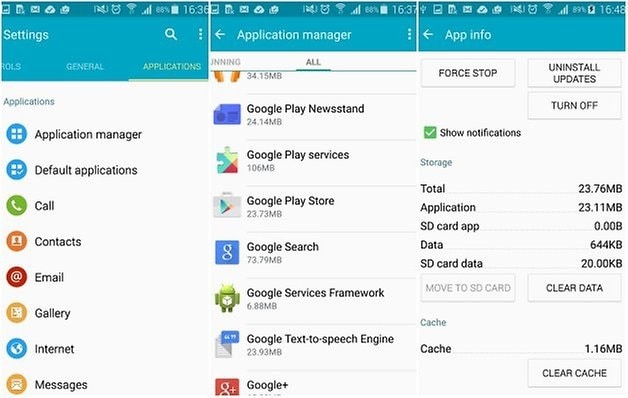
After doing this step clear your task manager (delete all recent applications). Go to play store and resume your download or update.
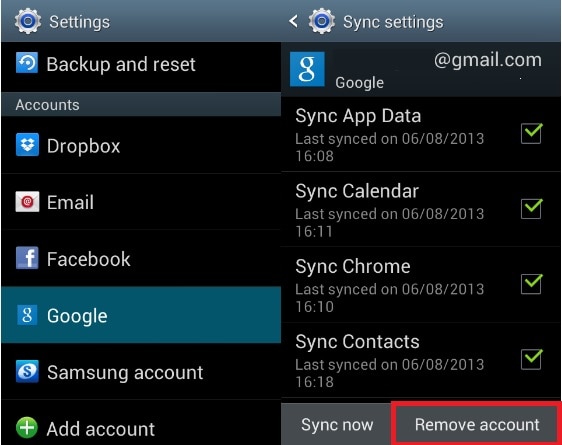
METHOD 5: Removing and adding back your Google account
It is best if you follow the order of the methods mentioned. Like, try each method in the given order until you get rid of the play store error 920. If you reach here then you truly must be in a desperate position to get rid of this error. The best and guaranteed way is to delete your Google account from your phone. By deleting what is meant here is to temporarily remove your account and the adding it in again. What this does is it kind of resets your play store details and it eradicates the error code 920. To do this you need to
Step 1 - go to Settings of your Mobile.
Step 2- Now, find “Accounts” and then go to “Google Accounts”.
Step 3 - In that section find the account you use for the play store or the account that you were using while the error came in. Once you tap on your specific account you’ll find an option to remove the account. Tap on it.
Step 4 - Now you have successfully removed your account and after that re-add your account. After entering your email id and password and hence adding your account. Go back to the play store and find the application that you were downloading or updating when the error code 920 came in. Now re-install it or update it back again. This time you won’t be faced with the play store error 920.
Again it is best if you follow the methods as illustrated above for removing error code 920 and this might have solved your problem by now. If now, you go for a complete factory reset, do it only at the extreme stage as this will delete all your personal data.
Play Store error 920 is a pretty common error and its solutions are also very easy. Please do ensure that you follow each and every step in sync so that you can get the best result out of these methods and get over with the error code 920 on Google play store.
Proven Ways to Fix There Was A Problem Parsing the Package on Nubia Red Magic 9 Pro+
Unable to install your favorite Apps from Google Play Store because there was a problem parsing the package?
The Parse Error or there was a problem parsing the package error is very common with Android devices. Android is a versatile platform and, therefore, a very popular OS. It is an open software and allows users to download and use various types of apps from the Play store. Android is also a cheaper alternative as compared to other Operating Software.
Since many of us are well versed with most of the Android devices, parse error, or there is a problem parsing the package is an error is not something new and uncommon.
The error message usually pops up on the Nubia Red Magic 9 Pro+ device screen when we try to download and install an App, for example, “There is a problem parsing the package Pokémon Go ”.
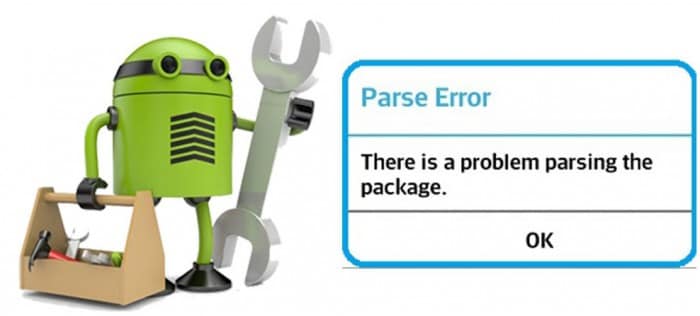
The error message which appears reads as follows:
“Parse error: There is a problem parsing the package”.
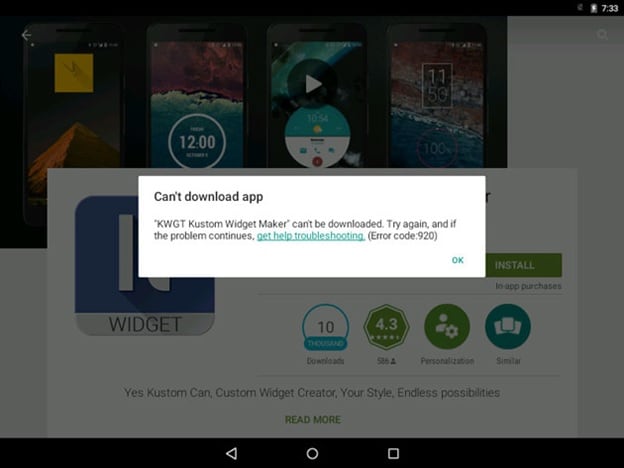
Android users who have experienced this would know that the parse error leaves us with only one option, i.e., “OK” as shown in the image below.
There was a problem parsing the package may occur due to several reasons, most of which are listed and explained below. Furthermore, there is a list of solutions to choose from to eliminate the “there is a problem parsing the package” error.
Read on to find out more.
Part 1: Reasons for the parsing error
Parse Error, better known as “there was a problem parsing the package” error is very common and normally surfaces when we try to download and install new Apps onto our Android devices from Google Play Store.

The reason for the error message to pop-up are many but none of them can be blamed singularly for the “there is a problem parsing the package” error. Given below is a list of the most probable reasons for Parse Error to stop an App from installing. Examine them carefully before moving on to the solutions to fix the “there was a problem parsing the package” error.
• Updating the OS may cause some disturbances in the manifest files of different Apps leading to Parse Error.
• Sometimes, the APK File, i.e., Android Application Package, gets infected due to improper or incomplete App installation causing “there is a problem parking the package” error.
• When Apps are downloaded and installed from unknown sources, due permission is needed. In the absence of such permission, the chances of the Parse Error to occur increase.
• Certain Apps are not compatible or supported by the latest and updated Android versions.
• Anti-virus and other cleaning Apps are also a major reason for the “there was a problem parsing the package” error.
The causes listed above are not App specific. The Parse Error may occur due to any one or more of these reasons, but what is more important is to try to get rid of the problem.
Let us move on to learn ways to fix the there was a problem parsing the package error.
Part 2: 8 Solutions to fix the parsing error
“There is problem parking the package” error can be dealt with easily if only we do not panic and deliberately follows the steps explained in this segment. Here are 7 of the most reliable and trustworthy methods to fix the Parse Error.
They are easy, user-friendly, and do not take much of your time. So don not waste any more of your time and try them now.
2.1 One Click to Fix ‘There is a Problem Parsing the Package
If you’re still encountering the Parsing error, there may be a problem with the Nubia Red Magic 9 Pro+ device data on your device, which means you’ll need to repair it. Luckily, there’s a simple, one-click solution you can follow called Dr.Fone - System Repair .
Dr.Fone - System Repair (Android)
Android repair tool to fix all android system issues in one click
- Simple, clean, and user-friendly interface
- No technical knowledge required
- Easy one-click repair to fix ‘there is a problem parsing the package’ error
- Should repair most parsing problems with apps, like ‘there is a problem parsing the package Pokemon Go’ error
- Supports most Nubia Red Magic 9 Pro+ devices and all the latest models like Galaxy S9/S8/Note 8
3981454 people have downloaded it
If this sounds like the solution you’re looking for, here’s a step by guide on how to use it yourself;
Note: Please note that this repair process can erase all data on your phone, including your personal information. This is why it’s so important to back up your Nubia Red Magic 9 Pro+ before proceeding.
Step #1 Head over to the Dr.Fone website and download the software. Install the downloaded software and open it. From the main menu, select the System Repair option.
Input your device and firmware information to confirm you’re installing the right version of the operating system.
Step #2 Follow the onscreen instructions on how to get into Download Mode to start the Repair process.
Once complete, the firmware will start downloading.

Step #3 Once the firmware has downloaded, it will automatically install it to your device.
When this is completed, you’ll be free to disconnect your Nubia Red Magic 9 Pro+ and use it how you please without the ‘there is a problem with the parsing package’ error.

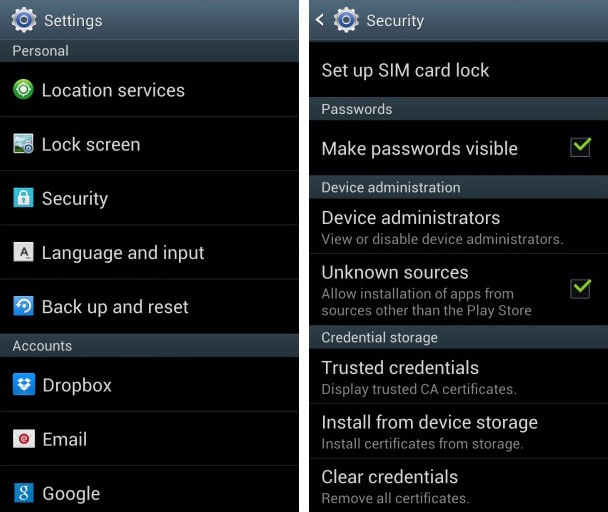
2.2 Allow installation from unknown sources
When we install Apps from other sources and not Google Play Store, there might be a glitch in using such Apps. To overcome this problem, turn on “Allow App installation from other sources”. Follow the steps given below for better understanding:
• Visit “Settings” and select “Applications”.
• Now tick mark on the option saying allow App installation from unknown sources.
2.3 Enable USB debugging
USB debugging is not considered necessary by many users but these methods give you an edge over others while using an Android device as it lets you access things on your phone, etc which you could not earlier.
To enable USB Debugging to fix “There is a problem parsing the package” error, follow these steps:
• Visit “Settings” and select “About Device”.
• Now click on “Build Number” not once but continuously for seven times.

• Once you see a pop-up saying “You are now a developer”, go back to “Settings”.

• In this step, select “Developer Options” and turn on “USB Debugging”.

This should solve the problem. If not, move on to the other techniques.
2.4 Check APK File
An incomplete and irregular App installation may cause the .apk file to get corrupted. Make sure you download the file completely. If need be, delete the existing App or its .apk file and reinstall it from Google Play Store for it to be compatible with your device’s software and to use the App smoothly.
2.5 Check App Manifest File
Manifested App files are nothing but .apk files which are improvised by you. Such changes may cause the Parse Error to occur more frequently. Modifications in the App file can be made by changing its name, App settings, or more advanced customizations. Make sure you roll back all changes and restore the App file to its original state to prevent it from getting corrupted.
2.6 Disable Antivirus and other cleaner Apps
Antivirus software and other cleaning Apps are very helpful in blocking unwanted and harmful Apps from damaging your device. However, sometimes such Apps also prevent you from using other safe Apps.
We do not suggest that you delete the Antivirus App permanently. Temporary uninstallation will be useful here. To do so:
• Visit “Settings” and then select “Apps”.
• Select the antivirus App to click on “Uninstall” and then tap “OK”.
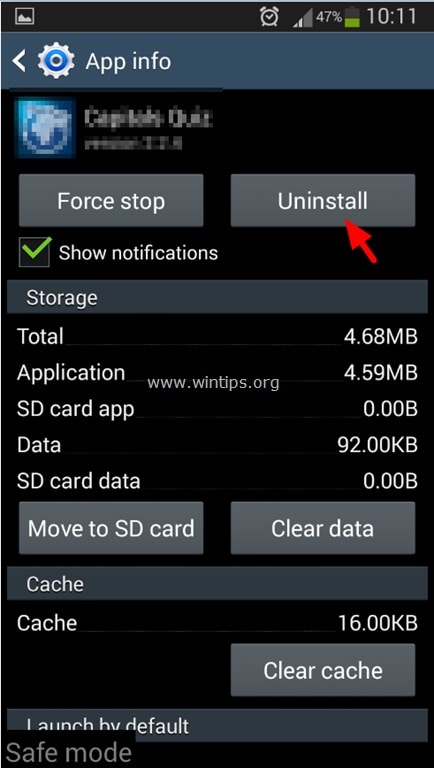
Now download and install the desired App again. Once this is done, do not forget to install the Antivirus App again.
2.7 Clear Cache cookies of Play Store
Clearing Play Store Cache cleans the Android Market platform by deleting all clogged up unwanted data. Follow the steps given below to delete Play Store cache:
• Tap on Google Play Store App.
• Now visit Play Store’s “Settings”.


• Select “General Settings” to “Clear local search history”.
 vMix 4K - Software based live production. vMix 4K includes everything in vMix HD plus 4K support, PTZ control, External/Fullscreen output, 4 Virtual Outputs, 1 Replay, 4 vMix Call, and 2 Recorders.
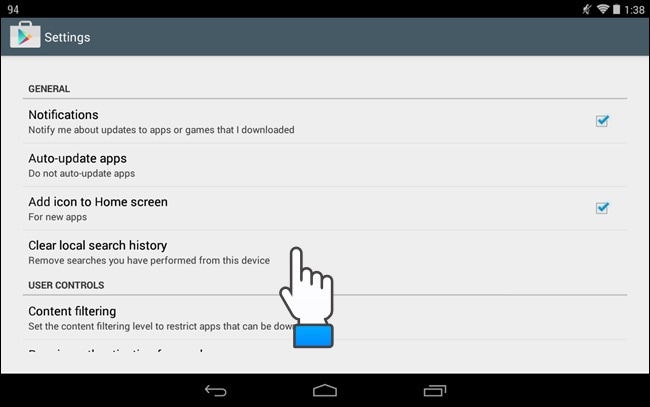
2.8 Factory Reset Android
Factory Resetting your device to fix the Parse Error should be the last thing you try. Make sure you take a back-up of all your data on your Google Account or a Pen Drive because this technique erases all media, contents, data, and other files, including your device settings.
Follow the steps given below to factory reset your device:
• Visit “Settings”.
• Now select “Backup and Reset”.

• In this step, select “Factory data reset” and then “Reset Device” to confirm Factory Reset.
The whole process of factory resetting your Nubia Red Magic 9 Pro+ might sound tedious, risky, and cumbersome but it helps to fix the Android SystemUI has stopped error 9 out of 10 times. So, think carefully before using this remedy.
Parse Error: There was a problem parsing the package is an error message that has troubled many Android users. The good part is that the above-stated fixes not only solve the problem but also prevent it from occurring in the future. So, keep them in mind the next time you or anyone you know faces such an issue.
 The BootIt Collection covers multi-booting, partitioning, and disk imaging on traditional PC’s using the standard BIOS and newer PC’s using UEFI. The collection includes BootIt Bare Metal (BIBM) for standard BIOS systems and BootIt UEFI (BIU) for UEFI system.
Want to Uninstall Google Play Service from Nubia Red Magic 9 Pro+? Here is How
In this article, you will learn the pros and cons of uninstalling Google Play services, as well as a free root tool to help you do this.
Acts as a one-stop destination to download various kinds of apps from the Play Store. The Play service also provides a way to manage these apps without much hassle. From uninstalling to updating an app, all of this can be done with Google Play service. Nevertheless, there are times when users wish to uninstall Google Play services. To start with, it takes a lot of storage and makes it pretty tough for users to manage their devices. To help you, we will let you know how to uninstall Google Play Store in this informative post.
Part 1: Reason you might want to get rid of Google Play Service
Before we proceed and discuss different ways on how to update Play Store after uninstalling updates, it is important to cover the basics. We have heard plenty of users who wish to uninstall Google Play services, but are not sure of the repercussions. One of the main reasons is that it consumes a lot of space on phone’s storage. Not just that, it only consumes plenty of battery as well.
If your device is giving the insufficient storage warning, then you need to start by clearing your phone’s data. It is observed that the Google Play Service accumulates most of the data in a device. This leads to users looking for different ways to how to uninstall Google Play Store.

Key features:
• Import from any devices and cams, including GoPro and drones. All formats supported. Сurrently the only free video editor that allows users to export in a new H265/HEVC codec, something essential for those working with 4K and HD.
• Everything for hassle-free basic editing: cut, crop and merge files, add titles and favorite music
• Visual effects, advanced color correction and trendy Instagram-like filters
• All multimedia processing done from one app: video editing capabilities reinforced by a video converter, a screen capture, a video capture, a disc burner and a YouTube uploader
• Non-linear editing: edit several files with simultaneously
• Easy export to social networks: special profiles for YouTube, Facebook, Vimeo, Twitter and Instagram
• High quality export – no conversion quality loss, double export speed even of HD files due to hardware acceleration
• Stabilization tool will turn shaky or jittery footage into a more stable video automatically.
• Essential toolset for professional video editing: blending modes, Mask tool, advanced multiple-color Chroma Key
Part 2: What will it affect to uninstall Google Play Service?
If you think that Google Play Service only provides a platform to download new apps, then you are wrong. It provides several other functions that might alter the way you use your smartphone. It is linked with other essential Google services as well, like Google Maps, Gmail, Google Music, etc. After uninstalling the Google Play Service, you might face trouble using various essential apps.
Furthermore, it might tamper with the overall functionality of your device as well. For instance, you could encounter network issues, messaging problems, app crashing, and more. Since the Play Service is closely associated with Android system, it might have a prominent effect on your phone. If you have a rooted device, then you can easily install custom ROM and resolve these issues. Though, for a non-rooted device, overcoming these problems could be a big hurdle.
Part 3: How to disable Google Play Service?
By now, you already know all the repercussions of getting rid of Google Play Services permanently. Before you learn how to update Play Store after uninstalling updates, be sure whether you wish to uninstall Google Play Services or not. You can also choose to simply disable the services as well. If you face any severe issue afterward, then you can always enable the services manually.
To disable the Google Play Services, just go to your phone’s Settings > Applications > All and open Google Play Services. You will get to know about the app’s detail and a few other options here. Just tap on the “Disable” button. It will generate another pop-up message. Confirm it by tapping on the “Ok” button. This will disable Google Play Services on your device. Later, you can follow the same drill to enable it as well.

Now when you know how to uninstall Google Play Store on your device, you can easily customize it. Get rid of any kind of problem you are facing due to lack of storage or battery issues related to Google Play services after following these instructions. Feel free to drop a comment below if you face any setback while following this tutorial.
- Title: Full Solutions to Fix Error Code 920 In Google Play on Nubia Red Magic 9 Pro+ | Dr.fone
- Author: Ariadne
- Created at : 2024-07-30 11:08:27
- Updated at : 2024-07-31 11:08:27
- Link: https://howto.techidaily.com/full-solutions-to-fix-error-code-920-in-google-play-on-nubia-red-magic-9-proplus-drfone-by-drfone-fix-android-problems-fix-android-problems/
- License: This work is licensed under CC BY-NC-SA 4.0.