
Full Solutions to Fix Error Code 920 In Google Play on Xiaomi Redmi Note 12 4G | Dr.fone
Full Solutions to Fix Error Code 920 In Google Play on Xiaomi Redmi Note 12 4G
If you are using an Android device, you might have encountered the error code 920 in Google Play Store. This error usually occurs when you are trying to download or update an app from the Google Play Store. The error code 920 can be quite frustrating, as it prevents you from downloading or updating your favorite apps. However, there are several ways to fix this error and get your apps back up and running. In this article, we will show you some of the best solutions to fix error code 920 in Google Play Store on Xiaomi Redmi Note 12 4G.
Trust me, once you face an error it’s frustrating until you find a solution to it. Almost 90 % of the time we search on the internet for an appropriate solution. But finding a legitimate solution can be hard. Most websites just upload only one method to solve an error. And most times that one single method may not be enough for us. And again we are back to Square one trying to figure out what’s wrong and where we screwed up. Most people face an error 920 on play store. It’s frustrating to get the play store error 920.And not everyone knows what the error 920 is. Rest assured, this article will provide you four methods to get rid of the error 920 problems you face and you will not have to depend on any other further sources for finding out what play store error 920 is or find any other method to get rid of the error 920 on play store.
- (i) Re-installing the application
- (ii) Switching off and turning the wifi (cellular data) on
- (iii) Clearing the cache and data of Google Play Store
- (iv) Removing and adding back your Google account
Part 1: What is Error Code 920?
Sometimes people think that they have endangered the fate of humanity because of the error that is being displayed (Just Kidding). Don’t worry you haven’t crashed any server or did any damage to your device but you just gave your device a lot of work. Before you got this error you were downloading a lot of apps right. Well, that’s the exact reason why you came up with this error in the first place. There are various reasons behind this error code 920, however, the prominent ones are –
 Simple and intuitive video editing
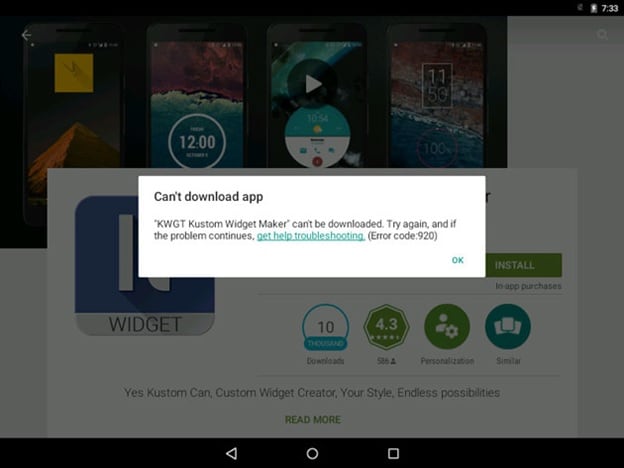
- a. Too much load on your data connection.
- b. The cache is not cleaned. Thus the connection is getting hampered due to overload.
- c. Network connection is not stable.
There are a lot of Android users out there and the error 920 on play store doesn’t have a unique solution. You’ll have to try out a bunch of them and find out what works for your device. So one of the given four methods below is definitely going to work on your device.
Part 2: 5 Solutions to fix error 920
METHOD 1: Fix Error Code 920 By Android Repair
If you’re writing a lot of data to your device in one go, this can sometimes overload your phone which can cause data corruption. This could have happened if you try the method above and then still encounter the play store error 920.
If this is the case, there’s a solution known as Dr.Fone - System Repair that can help. This is an industry-leading package that has everything you need to get your device running as it should be.
Dr.Fone - System Repair (Android)
Easiest Fix to Error Code 920
- Easy operation with no technical knowledge required
- Simple, one-click play store error 920 fix
- Clean and simple to understand user-interface
- Supports various Xiaomi Redmi Note 12 4G devices, including the latest Xiaomi Redmi Note 12 4G S9/S8
- The #1 Android repair software in the world
3,545,081 people have downloaded it
If this is the answer you’re looking for to help you fix your error code 920 problems, here’s a step by step guide on how to use it;
Note: please note that this method may erase all personal data on your device, so make sure you’ve backed up your device before continuing.
Step #1 Head over to the Dr.Fone website and download the Repair software for your Windows computer.
Step #2 Once installed, open the software and select the ‘System Repair’ option from the main menu.


Then connect your Xiaomi Redmi Note 12 4G using the official cable and select the ‘Android Repair’ option.

Step #3 On the next screen, insert your device information to ensure you’re downloading the correct firmware.

Step #4 Put your phone into Download mode by following the onscreen instructions.

Dr.Fone will now download your firmware and automatically install it onto your device. Your phone will then reset, and you’ll be ready to use it without experiencing that annoying error 920 play store code!
METHOD 2: Re-installing the application
This is the first thing that you want to try before going on to the more advanced one. In fact, this is the first thing I’d recommend you to try if you come up with an Error code 920. Just try this whenever you get any error.
Step 1 - Go to the application that you got the error with.
Step 2 - Open that application download page on the Play store.
Step 3 - Uninstall it or even uninstall all the update (If the error came when you were updating the application).
Step 4 - Now you clear the task manager and try installing it once again. If the play store error 920 doesn’t come then you have solved the problem and now wasn’t that easy. So it’s always best to try this step before doing anything else.
 PCDJ Karaoki is the complete professional karaoke software designed for KJs and karaoke venues. Karaoki includes an advanced automatic singer rotation list with singer history, key control, news ticker, next singers screen, a song book exporter and printer, a jukebox background music player and many other features designed so you can host karaoke shows faster and easier!
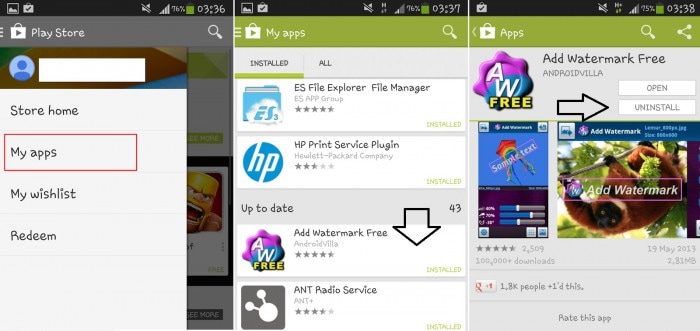
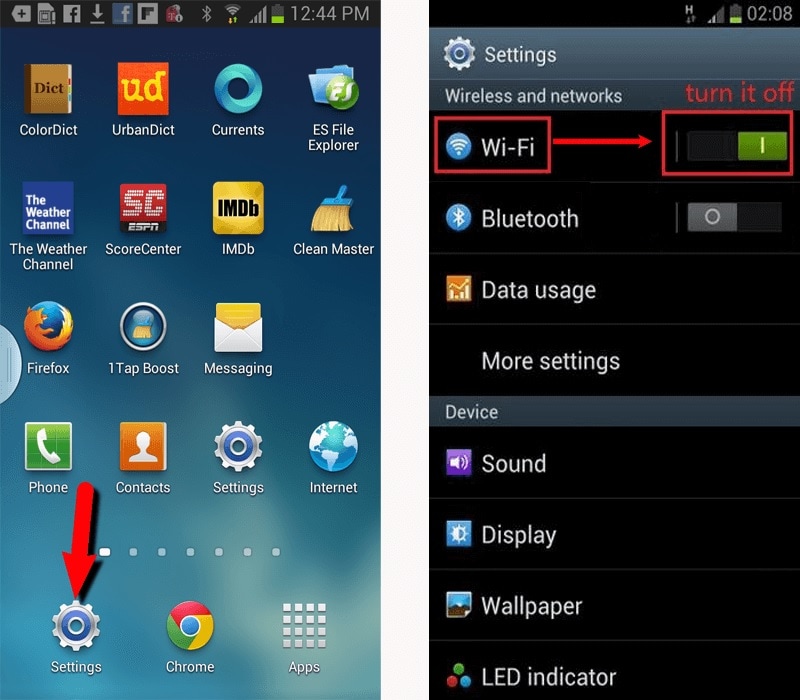
METHOD 3: Switching off and turning the wifi (cellular data) on
This is another basic method in solving the play store error 920. This error comes in when you have given too many tasks to download.
Step 1 - To remove that load Just turn your wifi off and then turn your wifi on (the same goes with your cellular data).
Step 2 - Now after doing this go to your Play Store application and download the application that you were going to download. Now your Play Store Error 920 won’t be bothering you anymore.
METHOD 4: Clearing the cache and data of Google Play Store
This is a little more complicated (complicated as in you will need to do a little more than the previous two methods). What you need to do is clear the cache and clear the data of the play store. This will get rid of the error code 920 the next time you download or update any application from the Google Play store.
Step 1 – Go to settings of your device.
Step 2 – Now find “Applications” option under the settings menu. Here you can find “Google Play Store” option. Open it.
Step 3 – Now, at the bottom, you can find “Clear Cache” option. Tap on it and your all cache will be cleared.
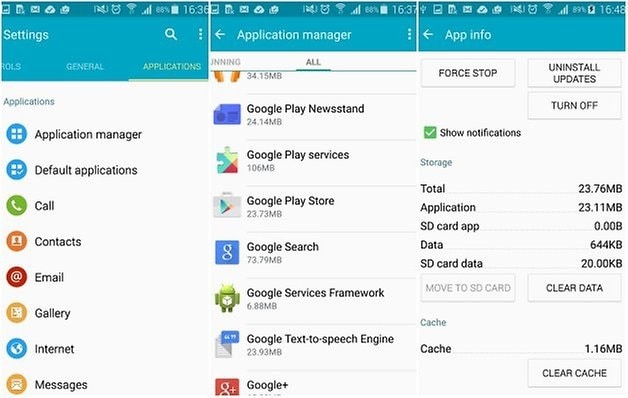
After doing this step clear your task manager (delete all recent applications). Go to play store and resume your download or update.
METHOD 5: Removing and adding back your Google account
It is best if you follow the order of the methods mentioned. Like, try each method in the given order until you get rid of the play store error 920. If you reach here then you truly must be in a desperate position to get rid of this error. The best and guaranteed way is to delete your Google account from your phone. By deleting what is meant here is to temporarily remove your account and the adding it in again. What this does is it kind of resets your play store details and it eradicates the error code 920. To do this you need to
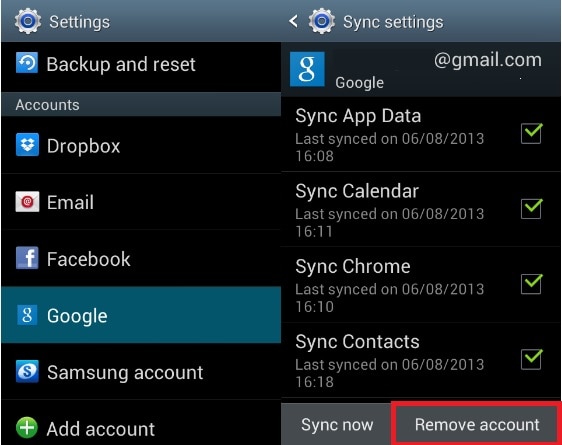
Step 1 - go to Settings of your Mobile.
Step 2- Now, find “Accounts” and then go to “Google Accounts”.
Step 3 - In that section find the account you use for the play store or the account that you were using while the error came in. Once you tap on your specific account you’ll find an option to remove the account. Tap on it.
Step 4 - Now you have successfully removed your account and after that re-add your account. After entering your email id and password and hence adding your account. Go back to the play store and find the application that you were downloading or updating when the error code 920 came in. Now re-install it or update it back again. This time you won’t be faced with the play store error 920.
Again it is best if you follow the methods as illustrated above for removing error code 920 and this might have solved your problem by now. If now, you go for a complete factory reset, do it only at the extreme stage as this will delete all your personal data.
Play Store error 920 is a pretty common error and its solutions are also very easy. Please do ensure that you follow each and every step in sync so that you can get the best result out of these methods and get over with the error code 920 on Google play store.
 CalendarBudget - Monthly subscription membership to CalendarBudget via web browser or mobile app. Support included.
 Fix Can’t Take Screenshot Due to Security Policy on Xiaomi Redmi Note 12 4G
“Can’t take screenshots due to security policy” is a screenshot restriction on your Android smartphone. You’ve probably seen this error message before, especially when taking screenshots of banking or video streaming apps. But why do apps and websites block screenshots? It’s actually for your good.
Screenshots can be misused to steal money or pirate copyrighted content. By prohibiting screenshots, apps and websites can help to protect your data and privacy. If you want to learn more, keep reading. This article will explain why apps and websites prevent screenshot capture and why it’s important for security. We’ll also give you tips on how to take photos of apps and websites that don’t let you take screenshots.
Part 1. Can’t Take Screenshots Due to Security Policy on Android? Here’s Why
Why can’t you take a screenshot of something on your phone and get the error message that says, “Can’t take screenshot due to security policy”? Apps and websites turn off or remove the screenshot feature for a variety of reasons, including:
Device Restrictions
Lots of workplaces and schools have rules against taking screenshots on devices used for work or school. Organizations do this to protect sensitive information and prevent data breaches.
Protect Sensitive Information
Say you’re trying to take a screenshot on your Xiaomi Redmi Note 12 4G device, and you get the notification “Can’t take screenshot due to security policy.” Xiaomi Redmi Note 12 4G smartphones are not necessarily the problem.
Some apps and websites, such as banking apps, store private data like financial and credit card details. Blocking capturing screenshots is a way to prevent unauthorized access to confidential information.

Follow Regulations
Some industries and organizations have regulations that need them to protect sensitive data. Financial institutions must protect their customers’ financial information, for example. Disabling screenshots is one way to follow these regulations.
DRM-Protected Content
Android can’t take screenshots due to security policy, especially to prevent piracy. Piracy is the distribution of copyrighted material without permission. It can harm businesses that depend on copyright protection.
To prevent this, you can use DRM (digital rights management) to protect copyrighted content. DRM-protected content cannot be screenshotted or copied.
Prevent Fraud
Scammers and other criminals often use screenshots to commit fraud. For instance, people might send fake screenshots to trick others into sharing personal details or money. Disabling screenshots can help to prevent this type of fraud.
Protect Intellectual Property
Many businesses and organizations have valuable information they want to keep safe, such as trade secrets. Disabling screenshots can be helpful to prevent the theft of this intellectual property.
Protect User Privacy
Some apps and websites allow users to share private information. Some apps, like messaging apps, let users share private info. But there are limits.
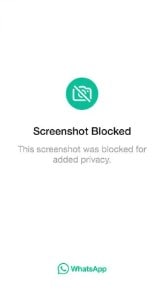
You can’t take screenshots due to security policy Whatsapp features, View Once media option. This method stops people from taking pictures of private media chats, protecting users’ privacy.
You Are Using a Secure Folder
Companies design secure folders to protect your most sensitive data from unauthorized access, so screenshots are not allowed within them.
Part 2. 8 Ways To Take Screenshots When You Can’t Due to Security Policy
If you’re trying to take a screenshot of an app or website with a security policy in place, there’s usually no way to circumvent it. However, there are a few things you can do to take pictures of these apps and website content.
Enable Screen Capture on Android
Sudden “can’t take screenshot due to security policy” notifications, failing to take a screenshot, and a Xiaomi Redmi Note 12 4G user?
If you are using this Android device, you can enable the screen capture feature in the Settings app.
- Step 1: Go to Settings > Apps, then tap the More options icon in the upper right corner.

- Step 2: Choose Special access > All files access.
 Power Tools add-on for Google Sheets, Lifetime subscription

- Step 3: Enable Xiaomi Redmi Note 12 4G capture.


Once you have enabled screen capture, you can check if you can take screenshots of any app or website.
Enable Screenshots in Incognito Mode
Apps and websites may prohibit screenshots in incognito mode to protect your privacy. However, you can enable the Incognito Screenshot experimental flag in Chrome to bypass this restriction.
- Step 1: Open Chrome on your Xiaomi Redmi Note 12 4G and type “chrome://flags” in the address bar.

- Step 2: Search for Incognito Screenshot and choose Enabled from the drop-down menu.


- Step 3: Tap Relaunch on the lower right corner of the screen.
Once Chrome has relaunched, you should be able to take screenshots in incognito mode by pressing the power and volume-down buttons at the same time.
Use Google Assistant
With Google Assistant, taking screenshots on your Xiaomi Redmi Note 12 4G is now easier than ever. Just say, “Hey, Google, take a screenshot,” Google Assistant will capture the screen and save it to your gallery.

Use a Third-Party App To Take Screenshots
You can download several applications on Google Play Store if you still can’t take a screenshot due to security policy. Some popular third-party screenshot apps include:
- Screenshot Easy
- Screenshot Tile
- Screen Master: Screenshot Markup
Third-party screenshot apps often use different methods to capture the screen. These might bypass the security measures that prevent you from taking screenshots with the built-in screenshot function.
Capture Your Phone Display With Another Device
If you own another smartphone, you can use it to take a photo of the screen of the Xiaomi Redmi Note 12 4G device you’re trying to take a screenshot of. This is a simple workaround for any security policies that may be in place. To do this, open the camera app on your other smartphone and point it at the screen of the first device.
Check the Banking App Settings for Screenshot Permissions
Some banking apps may turn off screenshots by default, but some may allow them in the settings. To check this, open the banking app and select the settings menu. Look for a setting that allows taking in-app photos. If you find it, enable it to allow screenshots to be taken in the app.
Screen Mirroring
Smart View allows you to display your Xiaomi Redmi Note 12 4G device’s screen on your smart TV, where you can then take a screenshot of the TV to capture the app or website you need.
- Step 1: Swipe down the top of the screen to access the Quick Settings panel.
- Step 2: Tap the Smart View icon.
- Step 3: Select your TV from the list of available devices and tap Start Now.

Alternatively, if you don’t have a smart TV, you can still mirror your phone screen display to your desktop or tablet using the Xiaomi Redmi Note 12 4G Flow app and take a screenshot of your phone’s screen instead.
Use Disable Flag Secure Magisk Module
Still experiencing the error message, “Can’t take screenshot due to security policy?” Bypass Android phone error like this using a module.
The module patches the Android framework to remove the FLAG_SECURE flag from apps. It is a relatively simple process but requires root access and Magisk. This module will turn off the security flag to take screenshots in Incognito mode and other apps.


Authors Verdict
There are a few ways to bypass screenshot restrictions on Android apps and websites, but some methods are more complicated than others. All methods should work, but if you think your device has been compromised, it is important to check if it is a system issue.
You can use a third-party tool like Wondershare Dr.Fone without rooting your device. It is easy to use and supports many Android smartphones. You can try Dr.Fone for free to test if it supports your device and can fix the underlying system issues.
Part 3. Dr.Fone: A Comprehensive Solution for Fixing Android System Issues
Dr.Fone’s System Repair tool for Android cannot bypass the security apps of banking apps and video streaming apps like Netflix. This is because these apps use sophisticated security measures to protect their users’ data.
However, Dr.Fone System Repair tool for Android can fix a wide range of other Android system issues that might happen from installing third-party apps on your smartphone, such as:
Follow this step-by-step guide and learn how to use Dr.Fone to scan your Android smartphone for system issues and repair them.
- Step 1: Once you have downloaded Dr.Fone, install it and launch it on your desktop. Then, connect your Xiaomi Redmi Note 12 4G to your desktop using a USB cable.
 safe & secure
3,567,199 people have downloaded it
- Step 2: From the Toolbox homepage, select System Repair > Android.
- Step 3: Click Start on the new window.
- Step 4: Select an option from the Name, Model, Country, and Carrier in the drop-down lists. Next, select the checkbox to agree with the warning, then click Next in the bottom right corner.
- Step 5: Follow the in-app instructions to put your Xiaomi Redmi Note 12 4G on Download mode, then click Next.

Key features:
• Import from any devices and cams, including GoPro and drones. All formats supported. Сurrently the only free video editor that allows users to export in a new H265/HEVC codec, something essential for those working with 4K and HD.
• Everything for hassle-free basic editing: cut, crop and merge files, add titles and favorite music
• Visual effects, advanced color correction and trendy Instagram-like filters
• All multimedia processing done from one app: video editing capabilities reinforced by a video converter, a screen capture, a video capture, a disc burner and a YouTube uploader
• Non-linear editing: edit several files with simultaneously
• Easy export to social networks: special profiles for YouTube, Facebook, Vimeo, Twitter and Instagram
• High quality export – no conversion quality loss, double export speed even of HD files due to hardware acceleration
• Stabilization tool will turn shaky or jittery footage into a more stable video automatically.
• Essential toolset for professional video editing: blending modes, Mask tool, advanced multiple-color Chroma Key

- Step 6: Wait while the firmware automatically downloads.

- Step 7: Review the details on the screen and click Fix Now to install the firmware on your smartphone.

- Step 8: Read the dialogue box note, enter the code in the input box, and click Confirm.
 Allavsoft Batch Download Online Videos, Music Offline to MP4, MP3, MOV, etc format

- Step 9: Keep your smartphone connected and avoid using it while Dr.Fone is repairing it.
 PDF application, powered by AI-based OCR, for unified workflows with both digital and scanned documents.
- Step 10: If your device has started properly, click Done to close this app. Otherwise, click Try again.

Conclusion
You can fix the “Can’t take screenshot due to security policy” error on Android in different ways. But it depends on the cause of the error. If an app is causing the error, you can try two things. First, remove the app’s screenshot restriction. Second, download a different screenshot app or a different device to take screenshots.
Although there are ways to bypass the “Can’t take screenshot due to security policy” error message, it’s crucial to know why screenshots are not allowed. Many apps and websites do not permit it to protect sensitive information, prevent piracy, and follow regulations. They also do it to prevent fraud, protect user privacy, and safeguard intellectual property.
If you think the issue is with your Android system, or your device becomes bricked after trying other methods, experiencing app crashes, or otherwise malfunctioning, try using the Dr.Fone System Repair tool. It is worth trying and can fix most Android system issues in a few minutes.
8 Workable Fixes to the SIM not provisioned MM#2 Error on Xiaomi Redmi Note 12 4G
SIM cards are small chips that act as a connecting medium between your cell phone and your carrier. It is programmed to help your carrier identify your cell phone account with certain information. And eventually, you are enabled to make calls and to make use of mobile internet. Now, if your device is showing “SIM not provisioned” on Android then it signifies that the connection to carrier network cannot be established or perhaps, your carrier isn’t able to identify your cell phone account.
Part 1. Why does the error “SIM not provisioned MM#2” pop up?
There can be numerous reasons behind the pop up that reads “SIM not provisioned” on Android. But basically, it most probably affects the users who have registered a new SIM card. If you get to experience this issue in other situations or if the SIM is not working in Android, then the problem is with the SIM card and needs to be replaced. Anyways, here is a list of situations when the “SIM not provisioned” error may bother you.
- You got a new SIM card for your new phone.
- You are transferring your contacts into the new SIM card.
- In case, the carrier network provider’s authorization server is unavailable.
- Perhaps, you’re out of the reach of the carrier coverage area and that too, without active roaming agreement.
- Though new SIM cards work flawlessly. But it is often necessary to get your SIM card activated due to security reasons.
Just in case, you haven’t bought any new SIM card and the one you were using was working fine until now, then the most probable reasons behind it could be listed below:
- If your SIM card is too old, possibly it might have gone dead, try replacing it.
- Perhaps, the SIM card was not properly inserted into the slot or there might be some dirt between the SIM and smartphone pins.
A yet another reason could be that your SIM card got deactivated by your carrier provider as it could have been locked to a particular phone. Now, if you insert such a SIM card to another device or a new device even, you may get to witness a message that reads “SIM not valid”.
2.1 One click to fix the “SIM not provisioned MM#2” error on Android
Without talking any further, let’s straightly get to the first and the easiest way to repair SIM not provisioned issue on Android. For this purpose, we’re glad to introduce Dr.Fone - System Repair (Android) , one of its kind of tool that is capable of repairing almost all sort of Android OS issues in just a matter of few clicks. Whether it is SIM not provisioned on Android or SIM not working in Android or your device stuck in a boot loop or black/white screen of death. The most probable reason for these errors is Android OS corruption. And with Dr.Fone – Repair (Android) you can efficiently and effectively repair your Android OS in a hassle freeway.
Dr.Fone - System Repair (Android)
Android repair tool to fix “SIM not provisioned MM#2” error
- Fix any type of Android system issue with ease.
- Even novice users can use it without any hassle.
- Compatible with all major Xiaomi Redmi Note 12 4G smartphone models.
- Highest success rate in the market for fixing Android issues.
- Supports all Android OS versions.
3981454 people have downloaded it
Step by step Tutorial to fix “SIM not provisioned MM#2” error
Step 1. Connect your Xiaomi Redmi Note 12 4G
Download and launch the Dr.Fone toolkit on your computer and then opt for the “System Repair” option from the main interface. Meanwhile, get your Xiaomi Redmi Note 12 4G connected with the computer using a genuine cable.
Step 2. Opt for Android Repair and key in important information
Now, hit on the “Android Repair” from the 3 options on the left, followed by hitting the “Start” button. From the upcoming screen, you’ll be asked to key in important device-related information, like brand, model, country, and carrier details. Hit “Next” afterward.
Step 3. Boot your device in Download mode
You must put your device in Download mode for better repairing of your Android OS. Simply follow the onscreen guide to boot your Android in DFU mode and hit “Next” thereafter. Once done, the software will automatically start downloading the most compatible and recent firmware for your device.
Step 4. Initiate Repairing
As soon as the download completes, the software verifies the firmware and automatically initiates repairing your Xiaomi Redmi Note 12 4G. Within a short period, you’ll notice that your Xiaomi Redmi Note 12 4G has been successfully repaired.
 safe & secure
2.2 Ensure the SIM card is not dirty or wet
At times, the issue can be as simple as cleaning your SIM card and SIM slot properly. Ensuring that SIM is not wet either and then putting it back into its place. If this works, then the SIM not working in Android was due to the dirt or moisture that was preventing proper contact between SIM card pins and smartphone circuit.
2.3 Insert the SIM card correctly
If your SIM card was working properly until yet, there is a good possibility that the SIM card may have moved a bit from its actual location. Eventually, there is poor contact between the SIM card pins and the circuit. Try inserting your SIM card properly with the following steps.
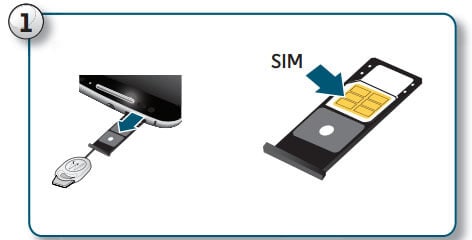
- Power off your Xiaomi Redmi Note 12 4G and with the help of Q pin, eject the SIM card holder from the SIM slot of your device.
- Now, grab a soft rubber pencil eraser and gently rub it in on the gold pins of SIM card to clean them properly. Then, with the help of a soft cloth wipe away the rubber residue from the SIM card.
- Next, push the SIM back into the SIM card holder properly and push it back into the SIM slot now.
- Turn your device back on and look if your SIM not provisioned on the Android issue is resolved or not.
2.4 Activate the SIM card
Usually, when you buy a new SIM card, it gets automatically activated within 24 hours of being plugged into a new device. But if that’s not happening in your case and you’re wondering how to activate SIM card, make use of the three options below to enable activation:
- Call your carrier service provider
- Send an SMS
- Log on to your carrier’s website and look for the activation page over it.
Note: The aforementioned options are straightforward and are quick ways to enable activation. It depends on your carrier network whether they support them.
2.5 Contact your carrier
Even if your SIM isn’t activated, grab another working device to make a phone call to your carrier or network. Ensure, to explain the entire situation and the error message to them. Be patient while they investigate the issue. It may eat up a heck load of time or may get resolved in a few minutes that completely depend upon the complexity of the issue.


2.6 Try the other SIM card slot
A yet another reason why SIM not working in Android can be because of the SIM card slot might have gone corrupted. Thanks to the dual SIM technology, you do not have to rush immediately to get it to check or repair. You can simply rule out this possibility by ejecting the SIM card from its original SIM slot and then replacing it into the other SIM card slot. If this solution did work out for you then it is obvious that the problem was with the SIM card slot that got corrupted. And hence, it was triggering SIM not responding issue.
2.7 Try the SIM card in other phones
Or just in case, you’ve still no joy and the SIM not provisioned on Android message is bothering you. Try making use of another Android device. Eject the SIM card from the Xiaomi Redmi Note 12 4G device which is creating problems and try plugging it into other Xiaomi Redmi Note 12 4G] and other smartphones. Perhaps, this will let you know whether the issue is with your device only or with the SIM card itself.
2.8 Try a new SIM card
Still, wondering how to fix SIM not provisioned? Perhaps, nothing worked for you, right? Well, on that note, you must head to your carrier store and request a new SIM card. Also, inform them about the “SIM not provisioned MM2” error, they will be able to execute proper diagnostics over your old SIM card and hopefully get it resolved. Or else, they’ll equip you with a brand new SIM card and swap the new SIM card into your device and get it activated in the meantime. Eventually, restoring the normal functioning of your device.
Conclusion
In wrapping up, SIM not provisioned errors on Android can be troubling, but they’re certainly fixable. There are several methods, from a simple device restart to reaching out to your network provider. But if these don’t work, we suggest trying Dr.Fone - System Repair (Android) . This tool is known for its ability to handle an array of Android issues and could be just what your device needs. Navigate your tech challenges with ease using Dr.Fone.
safe & secure
- Title: Full Solutions to Fix Error Code 920 In Google Play on Xiaomi Redmi Note 12 4G | Dr.fone
- Author: Ariadne
- Created at : 2024-07-30 11:12:51
- Updated at : 2024-07-31 11:12:51
- Link: https://howto.techidaily.com/full-solutions-to-fix-error-code-920-in-google-play-on-xiaomi-redmi-note-12-4g-drfone-by-drfone-fix-android-problems-fix-android-problems/
- License: This work is licensed under CC BY-NC-SA 4.0.