
Gmail Not Working on Google Pixel 8 7 Common Problems & Fixes | Dr.fone
Gmail Not Working on Google Pixel 8: 7 Common Problems & Fixes
Ever since Android is introduced, it has almost eliminated the need of computers to work through Gmail. Gmail carries much importance especially when you’re a working person. A lot of work is done through mails on daily basis. But maybe today is not your lucky day. Maybe Gmail is giving you a hard time today. Is it? Is your Gmail not responding or keeps stopping you from going further? Well! There is no need to be bothered anymore. We are discussing some of the general Gmail problems along with their fixes. So, if your Gmail is not working on Android, you can go through this article and find the relevant solution.
Problem 1: Gmail App not responding or keeps crashing
First and foremost, the most common situation people meet with is when there Gmail keeps crashing. Or simply, it doesn’t respond at all. When you open it, it stuck for a few seconds and then you have to close it. It seriously is an annoying issue. If your Gmail is also not responding or crashing and you aren’t able to work properly, following are the solution you can follow.
Clear Cache
The first thing you can do to fix Gmail not responding issue is to clear the cache of Gmail. This has higher chance to get the issue resolved. To do this:
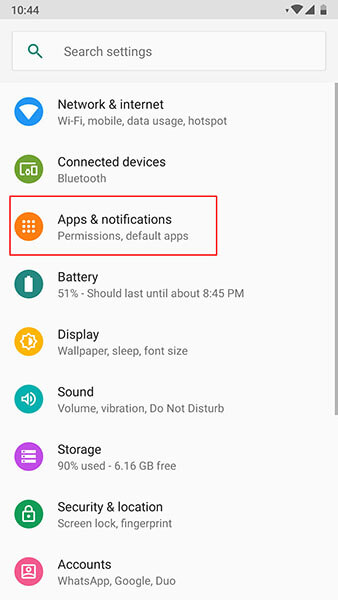
Go to “Settings” and look for “Apps & Notifications”. Please note that the option may vary in some Android phone like it maybe “Application” or “App Manager”. So, don’t panic and look for the option carefully.

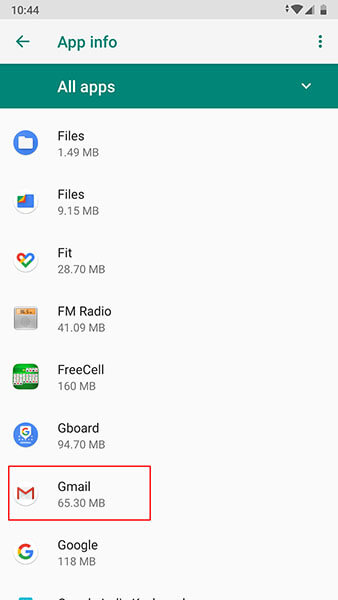
Now, from the apps list, search “Gmail” and tap on it.
 NeoDownloader - Fast and fully automatic image/video/music downloader.
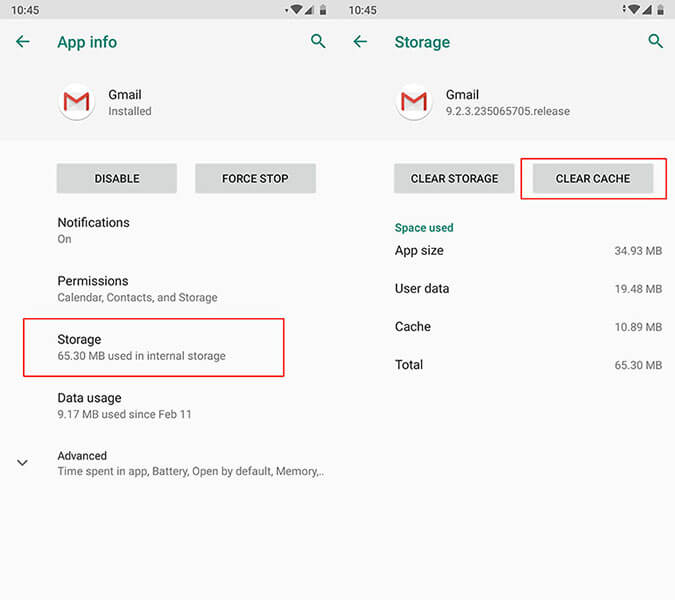
- Go to “Storage” followed by “Clear Cache”.
Restart the Google Pixel 8 device
Restarting the Google Pixel 8 device in the first place simply resolves many problems and so in the instance when Gmail keeps stopping. Simply long press the power button of your device and restart the Google Pixel 8 device. See of the problem gets vanished or not.
 The BootIt Collection covers multi-booting, partitioning, and disk imaging on traditional PC’s using the standard BIOS and newer PC’s using UEFI. The collection includes BootIt Bare Metal (BIBM) for standard BIOS systems and BootIt UEFI (BIU) for UEFI system.
Factory Reset the Google Pixel 8 device
The next option that you can try is resetting your device. This will lead to data loss so we suggest you to take backup firstly and then proceed with this method.
Hit on “Settings” and search for “Backup & Reset” option.
Tap on “Reset” or “Erase all data” (the option name again may vary).

If unfortunately the above solutions don’t work, there is a requirement to flash the stock Android ROM again. Before you wonder how, there is a professional one-click tool that can surely be of assistance. It is Dr.Fone - System Repair (Android) . The tool takes special care of the Android phones and fixes almost every system issues with ease. It takes no special technical skills and performs efficiently.
Problem 2: Gmail won’t sync between all ends
The next most common problem where people get stuck with is when there Gmail won’t sync. Here are the solutions to this particular problem.
Make Space in the Phone
When Gmail stops syncing, one of the things that can save you is clearing the storage. It is the space that maybe the culprit and therefore the syncing don’t work at all. We would like to suggest you removing the unwanted apps to clear the storage or deleting the downloaded files. You can also transfer the important files to your computer and make the space vacant.

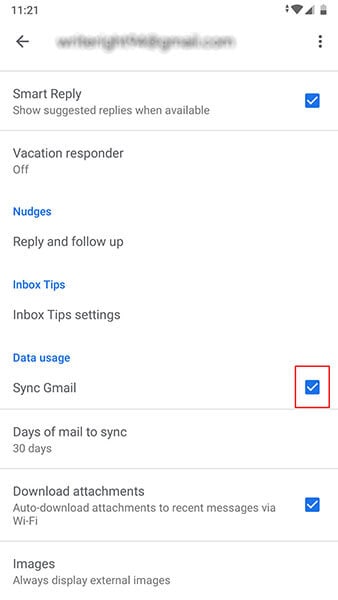
Check Gmail Sync Settings
When still the Gmail not working issue persists and you can’t sync, make sure to check the Gmal sync settings. For this, follow the steps below:
- Launch the Gmail app and tap on the menu icon (three horizontal lines).
- Tap “Settings” and choose your account.
- Check the box next to “Sync Gmail” if it’s not checked.

Restart the Google Pixel 8 device
Again, restarting can also be helpful in this situation. When you boot the Google Pixel 8 device again, check if your Gmail can sync or not.
.png) Kanto Player Professional
Kanto Player ProfessionalProblem 3: Gmail won’t load
In case you are using the Gmail over your web browser and it has tested your patience in loading, here are the solutions that could prove to be fruitful for you. Please check these out.
First of all, you need to make sure that the browser you are using works with Gmail or not. Gmail can smoothly perform in Google Chrome, Firefox, Safari, Internet Explorer and Microsoft Edge. However, the browsers should be updated. So, please make sure that these browsers are running on the latest versions. Moreover, in case you use Chromebook, don’t forget to update the operating system in order to let it support Gmail.
Clear Cache of web browser
If you tried the above method but to no avail, try to clear the cache and cookies of the web browser. But by doing so, the browser history will be removed. As well as, the records of the websites you previously enjoyed will also be lost.
Check browser extensions or add-ons
If not the above one, try this tip. It encourages you to check your browser extensions. Perhaps these are interfering with the Gmail and due to this conflict, Gmail won’t load. You can either turn off these extensions and plug-ins temporarily or make use of the incognito mode of the browser where there are no such things like extensions and plug-ins.
Problem 4: Gmail can’t send or receive
Gmail also gives you problem in sending or receive mails and messages. And to troubleshoot such issue, following are the solutions mentioned.
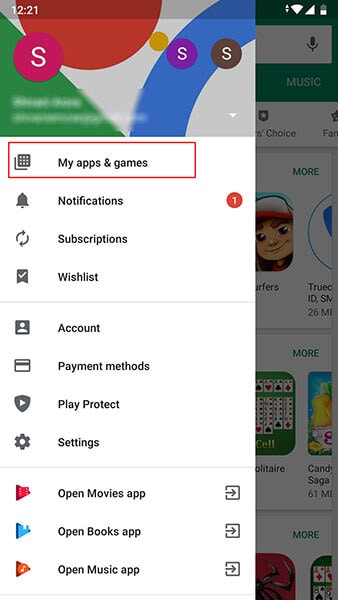
Check the Latest Version of Gmail
This issue is likely to emerge when you are using an outdated version of Gmail. And therefore, the first solution says you to check if the Gmail update is available. You can go to the Play Store and from the “My apps & games” option, you can see if Gmail needs to be updated or not.
Verify Internet Connection
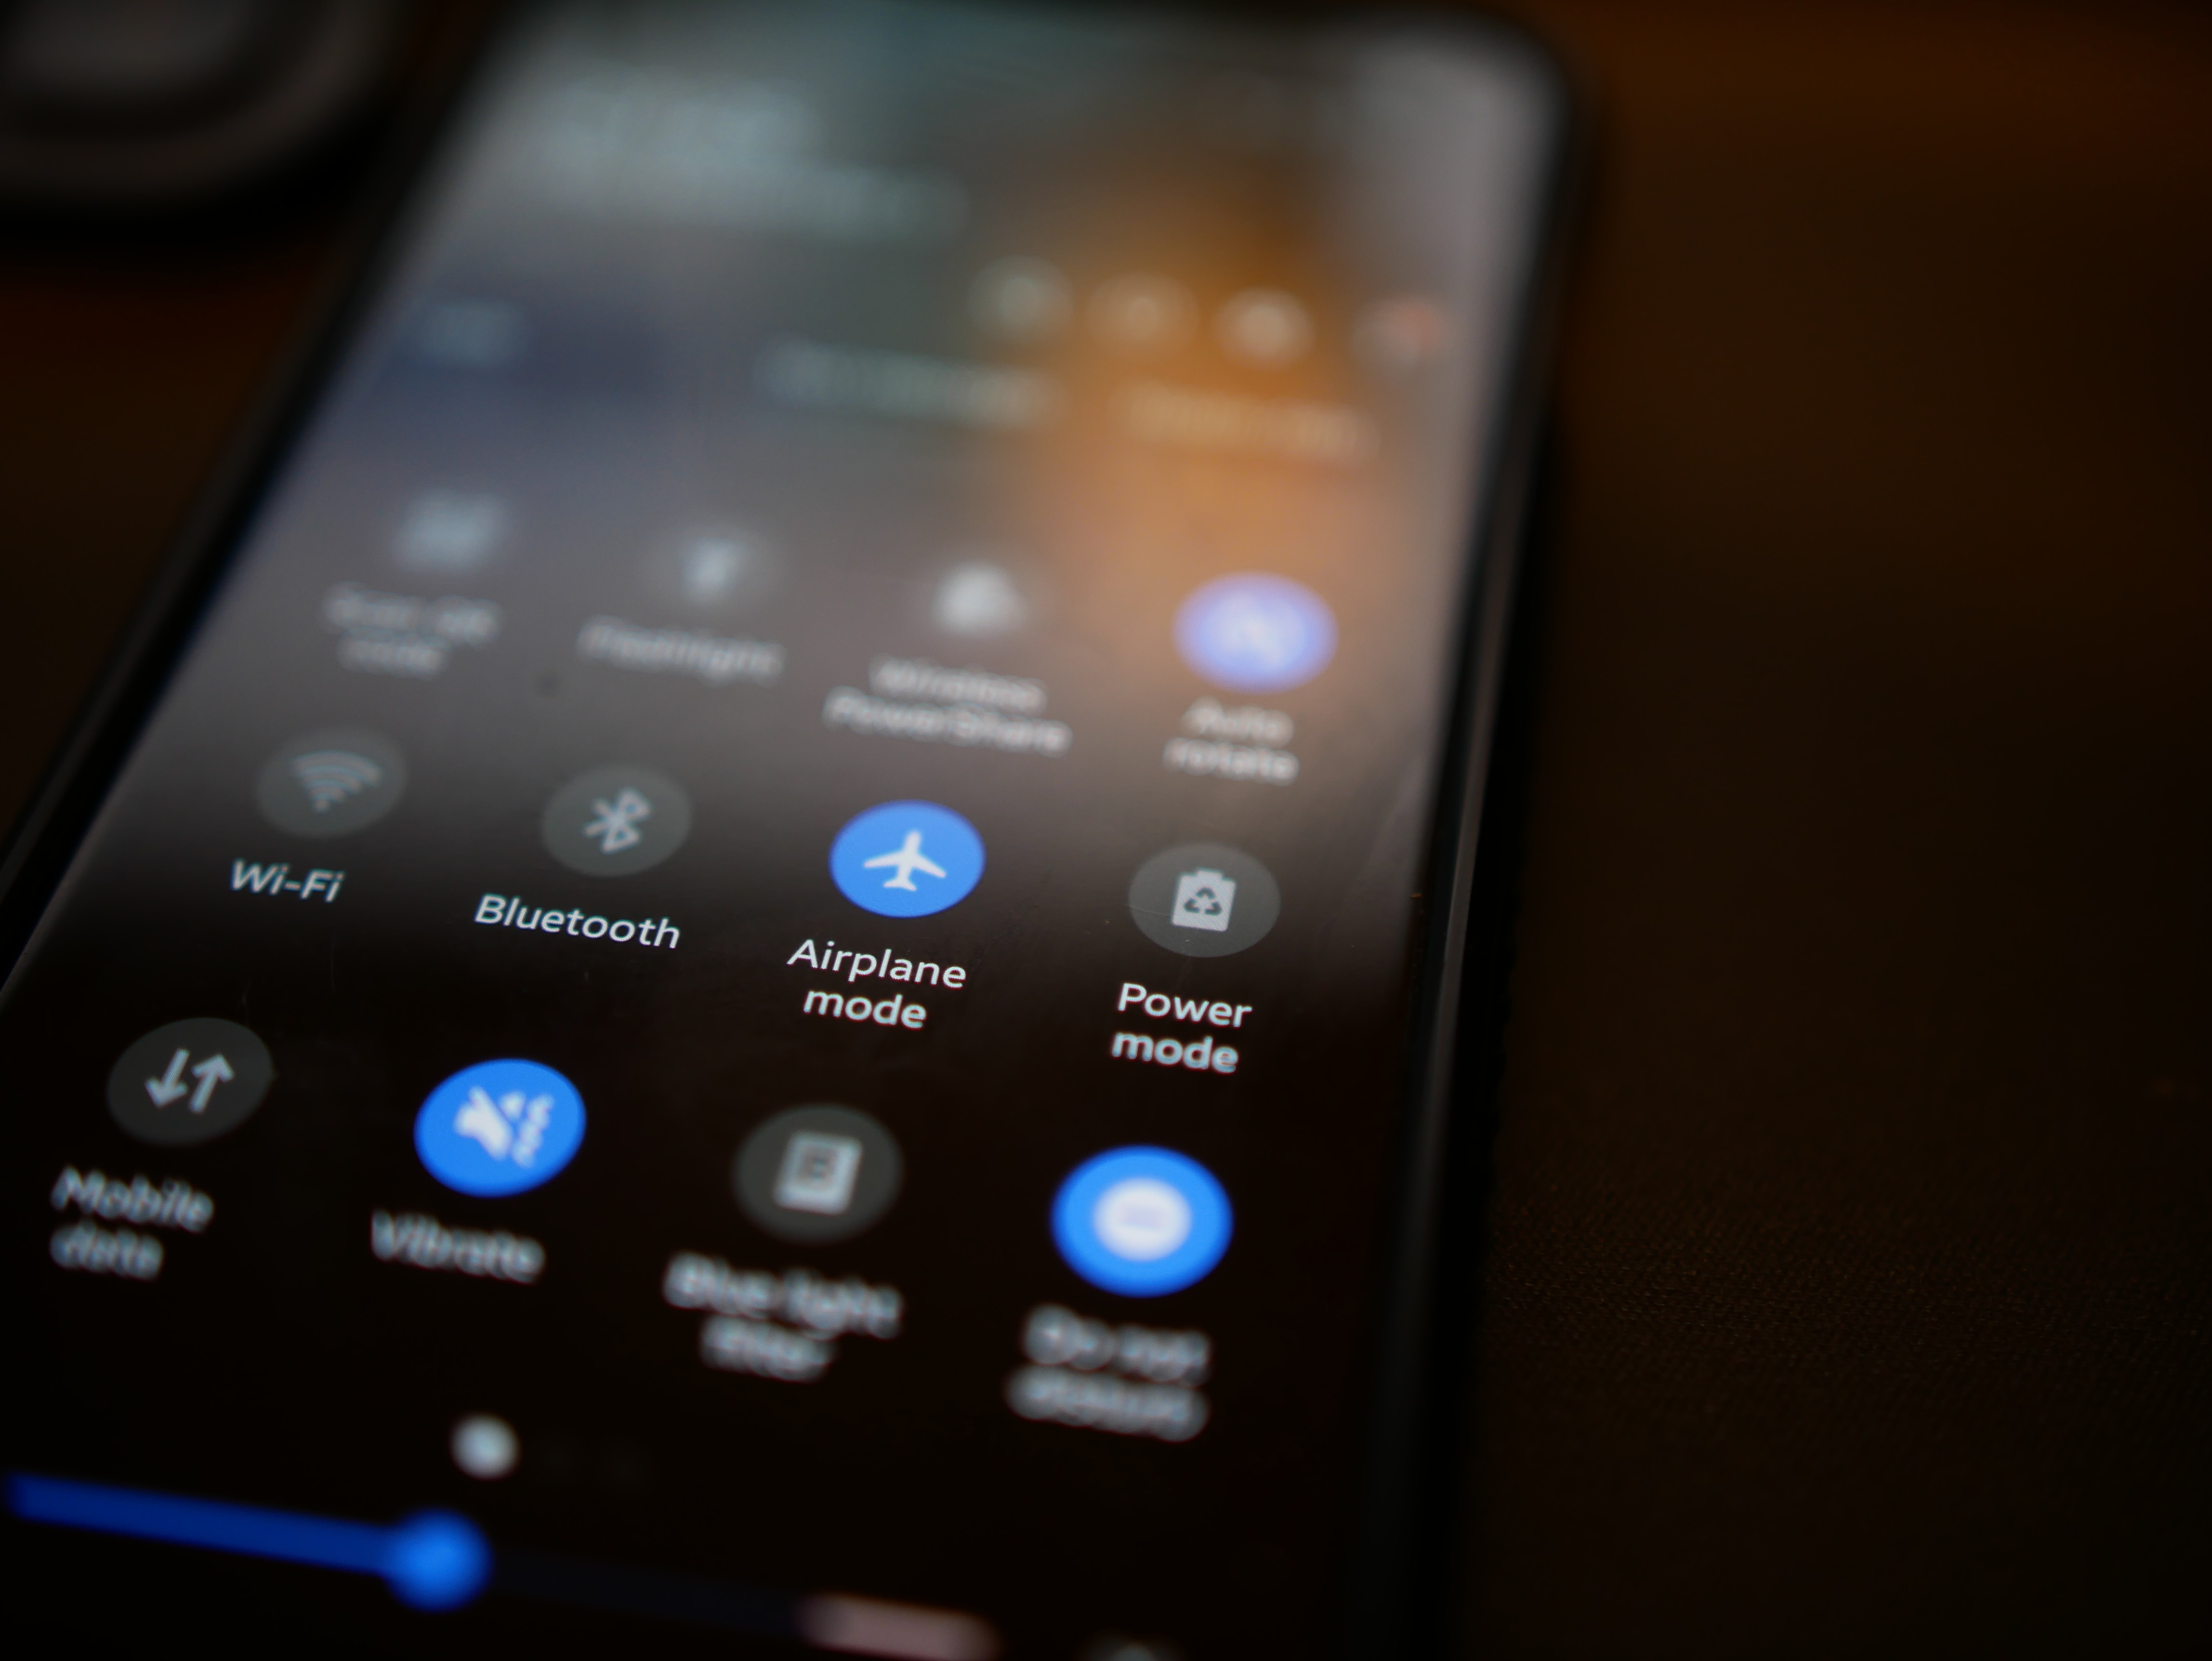
Another thing that carries weight while you can send or receive mails is the internet connection. As we all know that Gmail won’t respond if the Google Pixel 8 device is not connected to the internet. Therefore, you are advised to turn off Wi-Fi and then enable it again. Also, please ensure to switch to Wi-Fi if you are using the cellular data. This may hamper the process and stop you from receiving or sending mails.
Remove you Account and Add Again
If still Gmail keeps stopping you to go ahead, make sure to once sign out from it. To do this:
- Open your Gmail app and go to “Manage accounts on this device”.
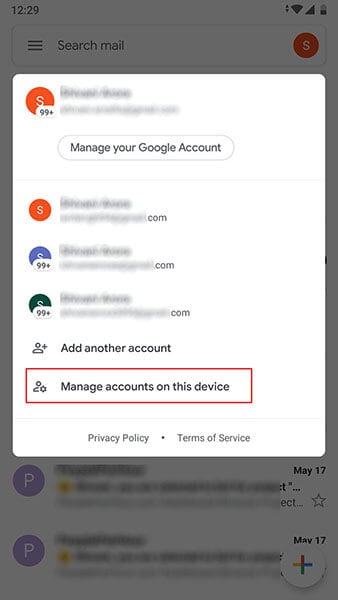
- Now, tap on the account you are working with. Tap on “REMOVE ACCOUNT” thereafter. After this, you can again sign in and then check if the problem is gone or not.

Problem 5: Stuck in sending
Now, here is another annoying problem that doesn’t let Gmail working on Android properly. This problem addresses the situation where users send a mail but it gets stuck on sending. If this is the problem that you are going through, the following solutions will help you.
Try Alternative Gmail Address
First of all, if Gmail is not working due to stuck in sending issue, we advise you to make use of some other Gmail address to send the mail. If the problem still occurs, jump to the next solution.
Check Network Connection
As already mentioned, be sure of an active internet connection while working with Gmail. When you are not using a stable connection, it may lead to stuck on sending, Gmail crashing and many other issues. You can fix the issue by doing these three things:
- Most importantly, use only Wi-Fi rather than cellular data if you want a smoother process.
- Turn off Wi-Fi and then turn it on again after nearly 5 seconds. Do the same with the router. Plug it out and the plug in.
- Lastly, turn on Airplane mode and after a few seconds, turn it off again.
Now try to send the mail and see if things are still the same or not.
Check Attachments
Large attachments can also be the reason for this issue. We would here like to suggest you to check the attachments you are sending. If these are not so important, you can remove them and send the mail. Or if it is not possible to send the mail without attachments, compressing the files can be a solution.
Problem 6: “Account not synced” issue
Many times, the users get the error that says “Account not synced” while they try to work with Gmail. And this is the 6th problem we are introducing. The ways mentioned below will assist to get out of the trouble.
Make Space in the Phone
When Gmail stops to further the process by prompting “Accounts not synced” issue, be sure that your Google Pixel 8 has some storage in it. If not, create it straight away. As we also mentioned in one of the above solutions, you can either delete the unnecessary files or transfer the important files to the PC to make the space in the phone. Go along with this tip and see if it works.
Check Gmail Sync Settings
As another solution, check Gmail sync settings to get the issue fixed.
Simply open Gmail and hit the menu icon which is three horizontal lines on the top.
Go to “Settings” and choose your account.
See the tiny box beside “Sync Gmail” and check it if it is not.

Restart the Google Pixel 8 device
If the above method went futile, simply restart your device. Take help of the Power button on your device. Long press it and from the options, restart it. This will hopefully work for you.
Problem 7: Gmail app running slow
The last problem that you may face is the slow-going Gmail app. In simple words, you may experience that Gmail app is operating extremely slowly. To fix this, following solutions will help you.
Restart the Phone
It is a universal method to fix minor Android system issues. And here too, we would like you to restart your Google Pixel 8 in the first place when you find that Gmail is not responding due to the sluggish behavior.

Clear Storage of Device
Usually all the apps start running slow when the Google Pixel 8 device is not having sufficient space. As the apps need space to function quickly and appropriately, having the Google Pixel 8 device on low storage can prove to be a bad luck for Gmail. So, make sure you wipe out the items you no longer needed on your device and create some room so that the Gmail responds nicely and won’t be running slow anymore.
Update Gmail App
As the last tip that will indeed help you is to update the Gmail app. Until you update the app when required, Gmail keeps stopping you from working and you will definitely get frustrated. Therefore, go to Play Store and look for the Gmail update. If it is available, welcome it with smile and bid farewell to the problem of slow running Gmail.
What if your problem still doesn’t get resolved after following these 3 tips? Well! If that is the case, we will again recommend you to make use of an expert one-click tool to flash the stock Android ROM.
Dr.Fone - System Repair (Android) is going to help you serving the purpose. This mighty tool possesses huge success rate and one can rely on it for its simplicity and security. It is designed to work with numerous problem related to Android system. So, no matter if your Gmail keeps crashing or keeps stopping, it has the solution for everything.
Dr.Fone - System Repair
Fix all Gmail issues caused by Android system:
- Gmail app corruption or not opening
- Gmail app crashing or stopping
- Gmail app not responding
There’s a reason Android holds over two-thirds of the mobile operating system market share. It’s a powerful OS that gives you the utmost freedom and flexibility, allowing you to customize your phone to suit your needs.
However, regardless of the capabilities of Android phones and the features that come with their OS, just like any other smartphone, they’re prone to glitches and annoying issues – especially with their video files.
You may encounter videos not playing on your Google Pixel 8 more frequently than you like. Whether it’s video files you’ve recorded using your phone or files you’ve downloaded, this glitch can get pretty annoying pretty fast. Fortunately, there are several solutions you could try to fix it.
See what you can do if videos won’t play on your Android.
Why Are My Videos Not Playing On Android?

Considering how most smartphone manufacturers tend to emphasize the unbelievable quality of their cameras, perfect night modes, seamless slow-motion recordings, superb resolution, and more, you’d expect all images and videos to function flawlessly on your Android. Unfortunately, that’s not always the case.
Occasionally, you could find that the videos you access from your gallery won’t play, sending you the message that “video cannot be played” or “can’t play video.” Other times, you might find that YouTube videos won’t load correctly or your downloaded videos won’t open in your media player.
There could be a wide variety of reasons that is happening, including:
- Corrupted video
- Corrupted SD card
- Outdated media player
- Outdated OS
- Incomplete download from the source
- Low storage
- Video downloaded from a suspicious source
An array of hardware and software issues could lead to you being unable to play videos on your Android. However, that doesn’t mean you should immediately send your device for repairs or delete the videos that won’t play. There might be a few better solutions you could try.
What You Can Do if Your Videos Aren’t Playing On Android Phone
Since there are many reasons for having problems with videos not playing on your Android, you could also try many solutions.
1. Do a Factory Reset
While a factory reset shouldn’t always be the first solution you go to, it can usually prove to be the most effective one.
A factory reset, aka a master reset or a hard reset, returns all your software configurations to the original state when the phone was first manufactured. In the process, all your data is lost – any photos and videos you have on your phone and the apps you’ve installed will be deleted. You’ll be logged out of all your accounts and won’t have access to your message history, contacts, and more.
While it seems like an extreme step, it can help fix any video issues you might encounter due to software bugs.
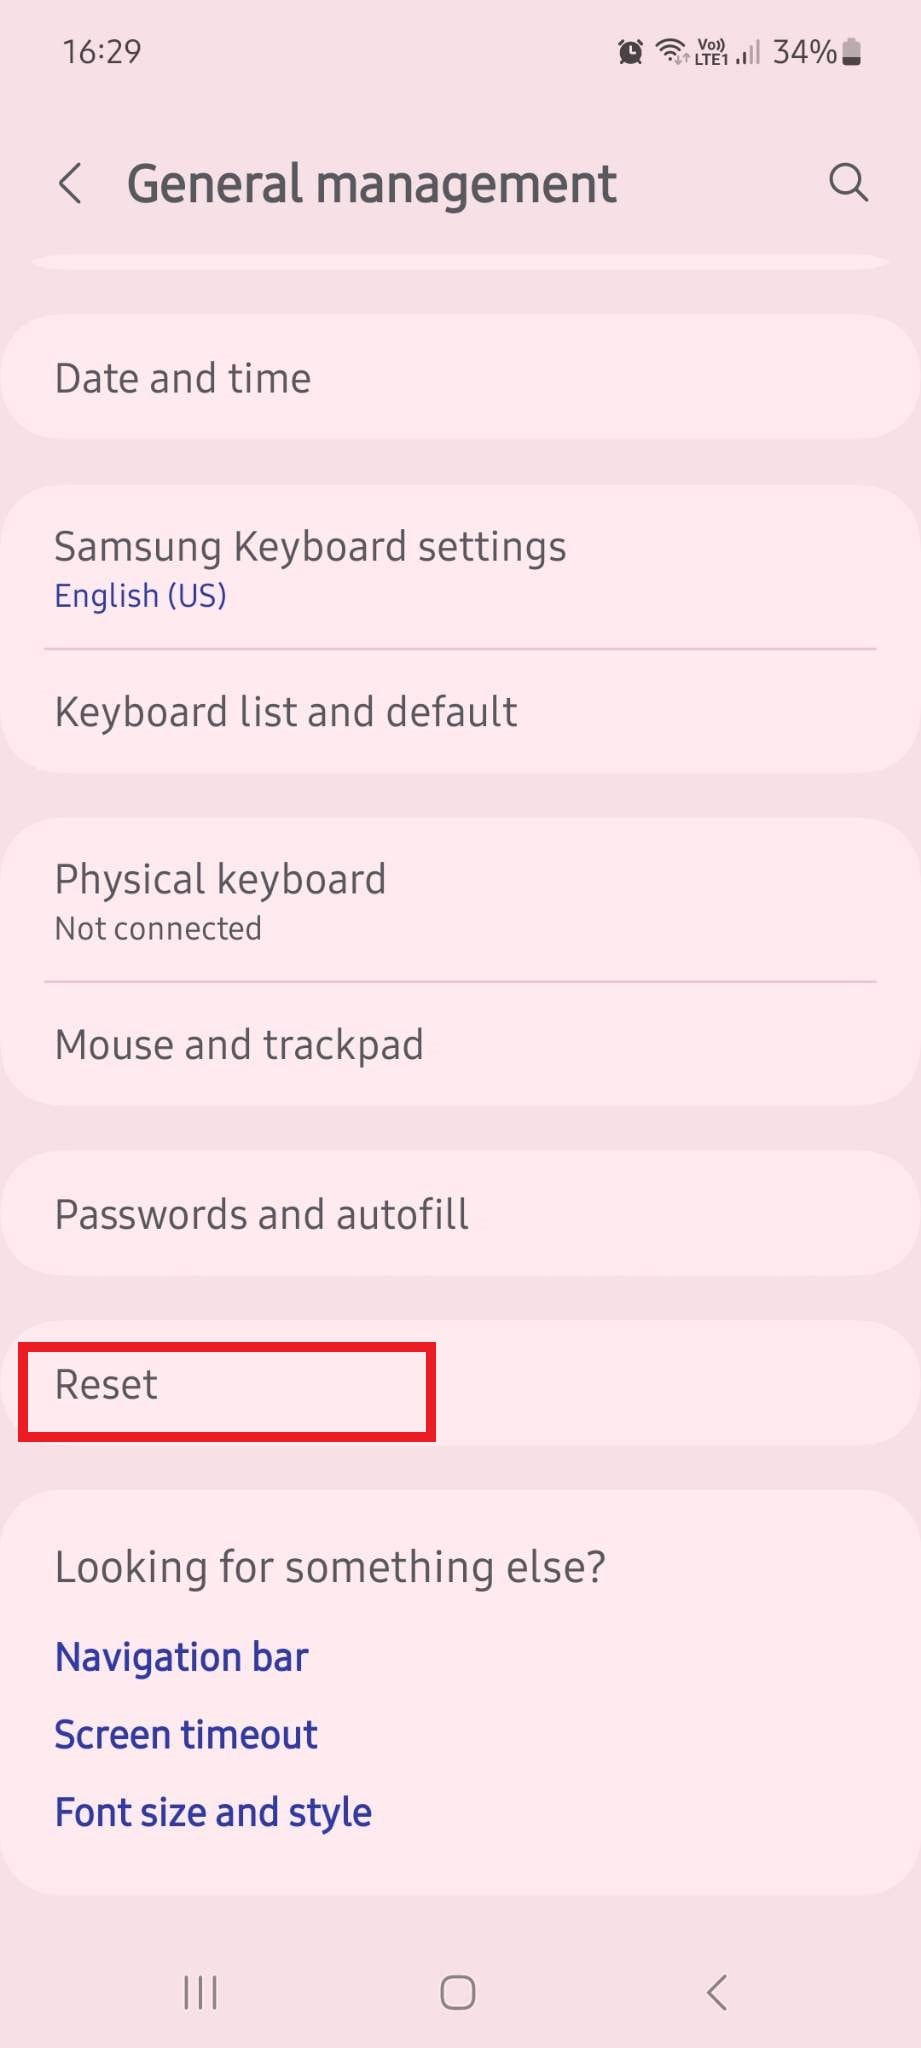
Though there could be slight variations between different phones, you can usually perform a factory reset by going to Settings > General Management > Reset > Factory data reset > Reset.
2. Restart Your Google Pixel 8
While a factory reset is all but guaranteed to fix the issues you’re encountering with your videos, sometimes a simple restart might do the trick just fine. A restart works by clearing your RAM (Random Access Memory).
In a nutshell, RAM stores short-term data that helps your processor complete tasks quickly. This data is always easily accessible, and it’s what helps your phone quickly open webpages and apps you’ve recently used.
Over time, however, your RAM can get filled with unnecessary data and data fragments, which, in turn, can confuse your processor.
Restarting your phone will clear your RAM and potentially eliminate any data fragments causing your videos to be unplayable.
3. Check the Video Format
As a general rule of thumb, the videos you capture should be in a format your device supports. However, the videos you’ve downloaded might not be. That’s why checking the files’ video format before trying other possible fixes is in your best interest.
If the format isn’t supported, installing the right video player with the necessary compatibility is the most straightforward fix. Some of the most popular video players for Android include VLC for Android, GOM Player, MX Player, Bsplayer, and RealPlayer. You can easily find all of them in the Google Play Store.
4. Check the Internet Connection
If you’re having problems playing downloaded or online videos, check your internet connection to see if there’s an issue there. If your internet’s down, any downloaded videos might not have downloaded correctly, and any online videos that haven’t been loaded will not play.
Make sure that you turn the Airplane mode off and your Wi-Fi on. Check the connection and test your internet speed to see if everything works properly.
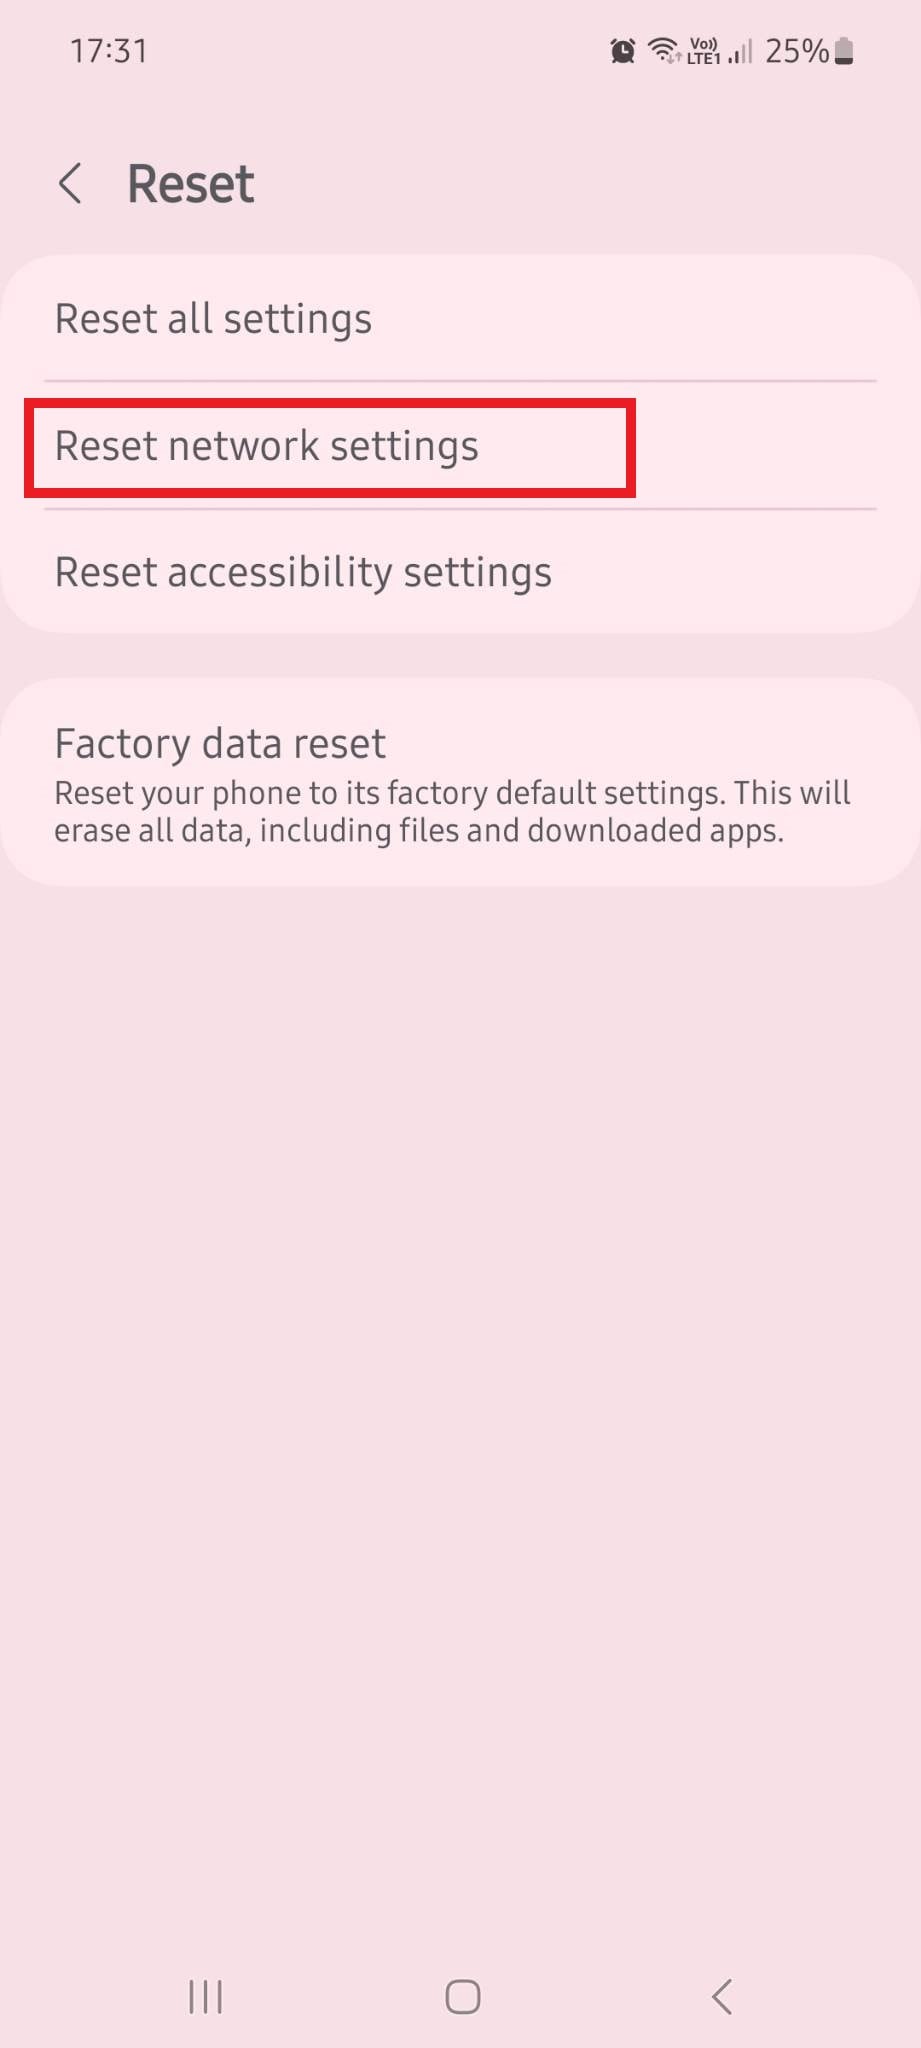
You might need a network reset if your phone can’t connect to a Wi-Fi network. The path might differ between Android devices, but you should be able to find the option for a network reset at the exact location of your factory reset. Go to Settings > General Management > Reset > Reset Network settings > Reset settings.
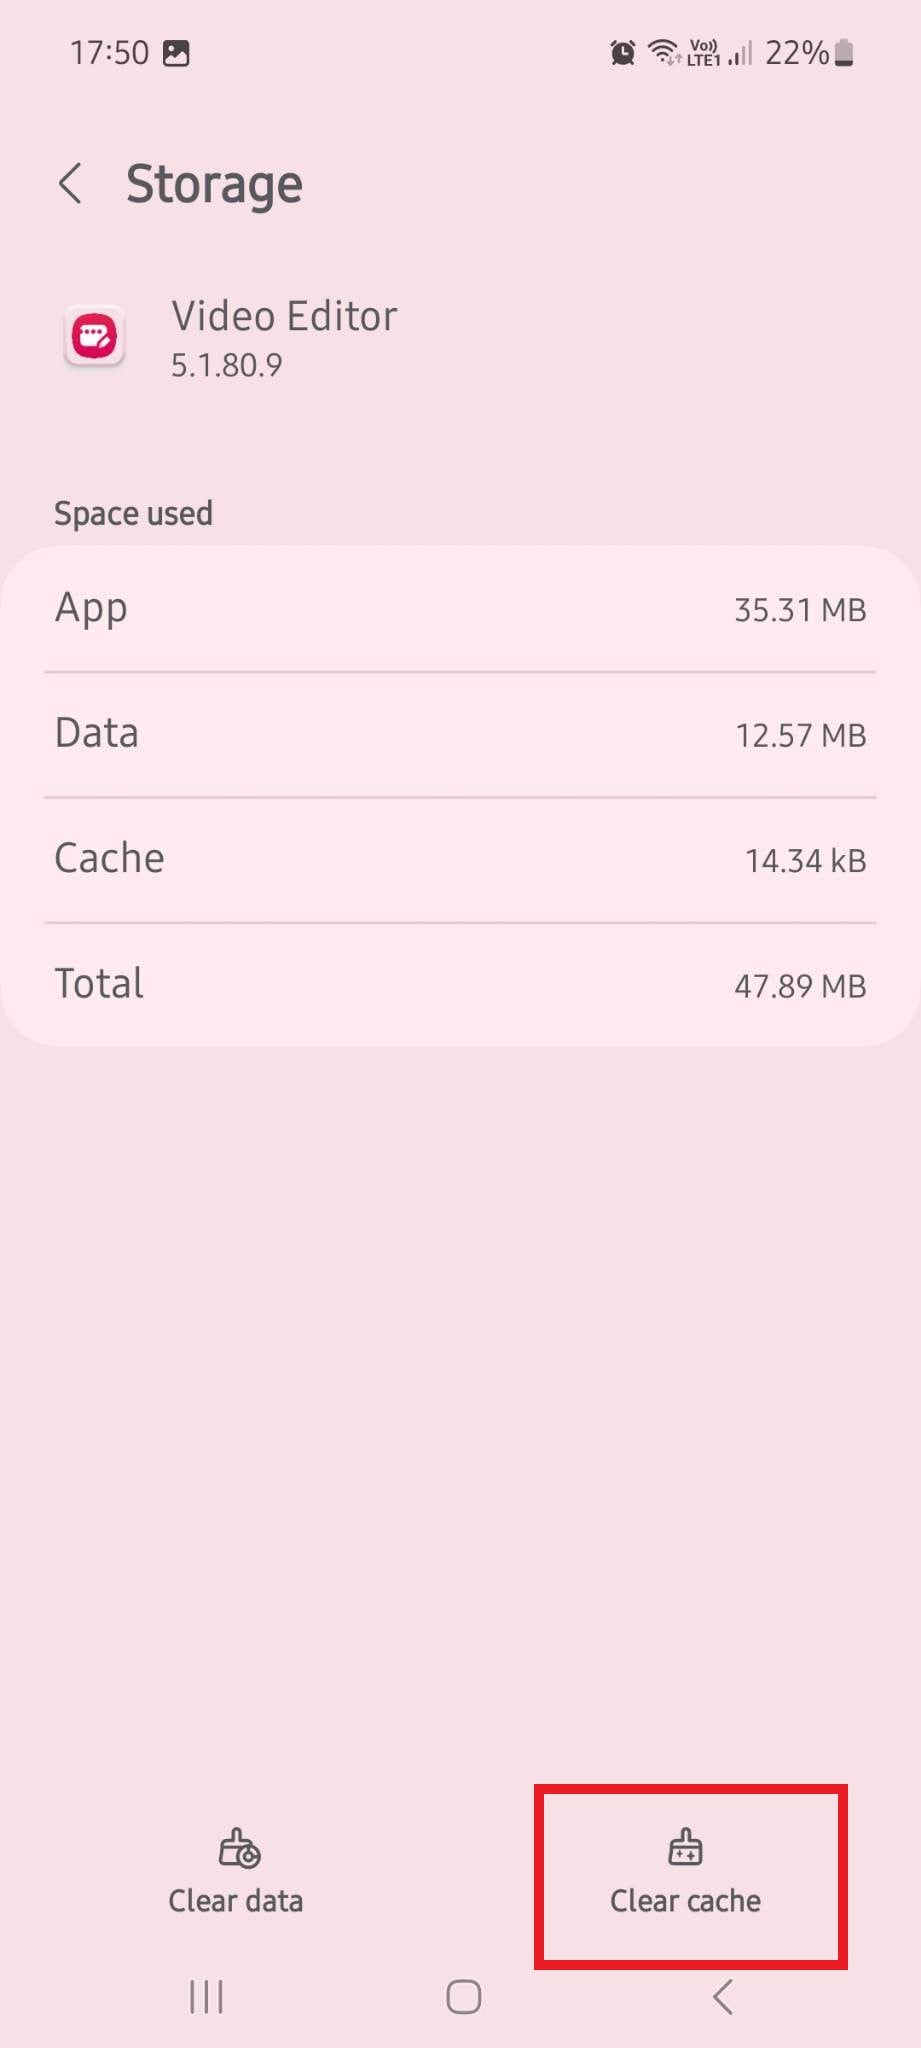
5. Clear the Cache
The cache stores a copy of your most commonly used data, helping decrease loading time and improve your phone’s performance. However, too much cache data can take up too much space and cause data corruption, preventing you from accessing some of your apps.
On average, you should clear your phone’s cache every few months to ensure that everything runs smoothly. If you encounter issues with your videos not playing on Android, clearing the cache could be just the fix you need.
To clear the cache from your apps, you’ll want to go to Settings > Apps. From there, select the app you want to remove the cache from, scroll down to Storage, then choose Clear Cache.
6. Update Android OS
An outdated Android OS is usually the culprit behind many bugs and glitches you may encounter on your phone. It can prevent you from playing video files, accessing apps, taking photos, and more. It can lead to data corruption and loss, expose you to malware and cyberattacks, and compromise phone performance.
Regularly updating your OS to its latest version is always in your best interest. It can solve the problem of your videos not playing and protect you and your sensitive data.
7. Repair Your Android OS
 Allavsoft Batch Download Online Videos, Music Offline to MP4, MP3, MOV, etc format
You might already have the latest version of Android OS, but that still doesn’t mean your OS is functioning as it should. Maybe your phone was interrupted while downloading or installing the new OS version. Maybe your phone had underlying OS issues, or you accidentally downloaded files you shouldn’t have. Whatever the case is, if your videos don’t play due to an OS problem, you’ll need to repair your OS.
The best way to do it is with a reliable Android OS repair solution like Wondershare Dr.Fone.
Fast, efficient, and powerful, Wondershare Dr.Fone can repair your Google Pixel 8 in several simple steps:
- Step 1: Download and launch Wondershare Dr.Fone on your PC.
- Step 2: Go to Toolbox, then use a cable to connect your Google Pixel 8 to your PC.


- Step 3: Select System Repair > Android.
- Step 4: In the new window, select Start.

- Step 5: Fill in information about your phone’s Brand, Name, Model, Country, and Carrier.
- Step 6: Agree with the warning and select Next.

- Step 7: Follow the on-screen instructions to put your device in Download Mode.
- Step 8: Wondershare Dr.Fone will automatically start downloading the necessary firmware, so wait for the process to finish.

- Step 9: When the download is complete, select Fix Now to install it.
- Step 10: Type 000000, then select Confirmto continue fixing your device.

- Step 11: Wait for the Repairing Nowprocess to finish.
- Step 12: Once the process is complete, click Done.
If the reason your videos wouldn’t play on your Google Pixel 8 was a fault in the OS, everything should be functioning well after repairing your phone with Wondershare Dr.Fone.
Remember that repairing your device with Wondershare Dr.Fone might result in data loss. Back up all your essential data before fixing your OS using this software to stay safe.
8. Update the Video App
Sometimes, it’s not the outdated OS version causing issues but rather the out-of-date video app. Like OS updates, app and other software updates often contain fixes for common problems and security patches. Not every update is there simply to introduce new features.
To check whether you’re using the latest version of your video player, go to Settings > Apps. Find your video player app, tap it, and scroll down to the bottom of the page to see the version installed on your phone.
 Glarysoft File Recovery Pro - Helps to recover your lost file/data, even permanently deleted data.
9. Clear Cookies and Browsing Data
If online videos are causing problems, not your recorded or downloaded ones, you might be due for a quick cookie and browsing data clearing.
Cookies are usually there to improve the user experience, allowing you to load websites faster and enjoy improved performance. However, if your cookies and browsing data occupy too much space, they could pose problems.
You’ll first need to launch your mobile browser to clear cookies and browsing data. If you’re using Google Chrome, the process is simple and streamlined. Tap the three dots in the upper right corner and go to Settings. From there, go to Privacy and security > Clear browsing data > Clear data.
10. Reinstall Video Apps
If you still have issues with videos not playing on your Google Pixel 8, you could try deleting and reinstalling your video apps. Sometimes, simply updating the video app might still retain the glitch causing problems. However, if you delete it in its entirety and then install it again, the issue should be gone.
To uninstall the video app on your Android, go to Settings > Apps. Locate the app you want to delete, then tap Uninstall at the bottom of your screen.
To reinstall it again, go to the Google Play Store, search for the video app you want to have, then click Install.
 safe & secure
4,974,400 people have downloaded it

Conclusion
Like other smartphones, Android devices occasionally encounter glitches when playing video files. In most instances, the solution can be as simple as restarting your device. In others, you might have to perform a full factory reset or use software like Wondershare Dr.Fone to repair your Android OS.
Whatever the case is, don’t despair. There’s usually a solution that can fix the problem and ensure your device works as expected.
4 Solutions to Fix Unfortunately Your App Has Stopped Error on Google Pixel 8
We often find people complaining, “Unfortunately Youtube has stopped”, “Unfortunately the internet has stopped” or “Unfortunately Netalpha has stopped”. An error that causes Apps to randomly stop working is experienced by users daily. This is a strange error as it occurs while you are using an App, and it suddenly stops working or crashes. You are brought back from the App screen to the Home Screen of your device with an error message saying: “Unfortunately, it has stopped working.”
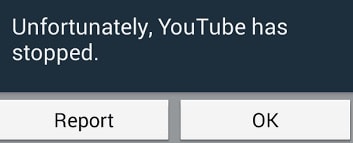
Apps not working or stopped while working, such as unfortunately Netalpha has stopped or unfortunately the internet has stopped, is a very confusing error because one moment your App is running smoothly and the next moment it shuts down automatically with an error message. Unfortunately, Youtube has stopped working, Netalpha has stopped. Unfortunately, the internet has stopped, and many more such examples of Apps stopping while working normally are witnessed by users all over the world, and they are constantly on a lookout for solutions to fix such an error.
Read on to find out why exactly your App stops working suddenly and 3 of the best and most effective ways to tackle the problem.
Part 1: Why your App stops working suddenly?
Unfortunately, Youtube has stopped; unfortunately, Netalpha has stopped working, etc. are error messages that pop-up now and then while using Apps on Android mobile devices. It is important to understand that such errors are not App/Apps specific and may occur to any App/Apps. There is no one specific App or genre of Apps that face this problem.
The reason behind unfortunately internet has stopped or any other App which experiences such a glitch in data crash. A data crash is not a serious problem and only means a situation wherein an App, OS, or software stops working normally and exits abruptly. This may happen due to various reasons such as unstable internet connection, both cellular and WiFi. Another reason for Apps to stop working could be corrupted Cache files, which have not been cleared in a long time.
Many users also feel that incomplete or improper installation may cause the App to crash and stop working suddenly.
There may be many more reasons for them; unfortunately, App has stopped error to show up, but no one reason can be blamed for it.
Therefore it is important for us to carefully examine the problem and choose from the solutions given below to fix Unfortunately, Youtube has stopped; unfortunately, Netalpha has stopped; unfortunately, the internet has stopped and many other similar unfortunately App has stopped working errors.
Part 2: A One-Click Fix to ‘Unfortunately App has Stopped’
Fortunately, while this is an annoying problem that stops you from doing what you’re doing, the best way to eliminate this error is simply to repair the data glitch, thus preventing it from happening.
The easiest solution is to use a software application known as Dr.Fone - System Repair , a specialist piece of programming designed to help you fix your devices as quickly as possible.
If this sounds like the option you need to alleviate your, unfortunately, YouTube has stopped errors; this is how to use it.
How to Use Dr.Fone -Repair to Fix Unfortunately App has Stopped Error
Note: Please note that using this solution may rewrite and repair all data on your phone, meaning there is the potential to lose data during the process. Make sure you back up your device before continuing.
Step #1 - Acquire the Software
Head over to the Dr.Fone - System Repair website and download the software to your Mac or Windows computer.
Step #2 - Connect Your Android Device
Launch Dr.Fone and click the System Repair option from the main menu. Now connect your Google Pixel 8 using the official cable.
From the next menu, select the ‘Android Repair’ option and press ‘Start’.
Step #3 - Input Information & Repair
Tap in your phone information. This is to make sure your device is repaired correctly while minimizing the risk of bricking your device.
Follow the on-screen instructions on how to then boot your Google Pixel 8 in Download mode.


Once booted, the software will verify your firmware and start repairing your device. Make sure your phone stays connected throughout the process, and you’ll be ready to go and your ‘unfortunately the internet [or another app] has stopped’ error should be erased!

This could take some time, depending on your internet connection and speeds, so be mindful that everything stays connected.
Part 3: Fix your App has unfortunately stopped by clearing App Cache
Herein we bring to you 3 of the most effective remedies to combat the; unfortunately, App has stopped error, which has helped many users facing similar problems.
First among these is to clear the App’s cache. Clearing App Cache to fix Unfortunately Youtube has stopped, and such errors are very popular as it cleans your App/Apps by wiping off data that has been stored due to constant App usage, and it makes the App/Apps as good as new. It is advised to all users to clear the App cache regularly for Apps to function better.
Follow the steps given below to learn how to clear App cache:
• Visit “Settings” to find an option named “Apps”.

• Tap on “Apps” and look for the App which has suddenly stopped.
• Click the App name, say, for example, “Youtube” by scrolling down in “All” Apps.
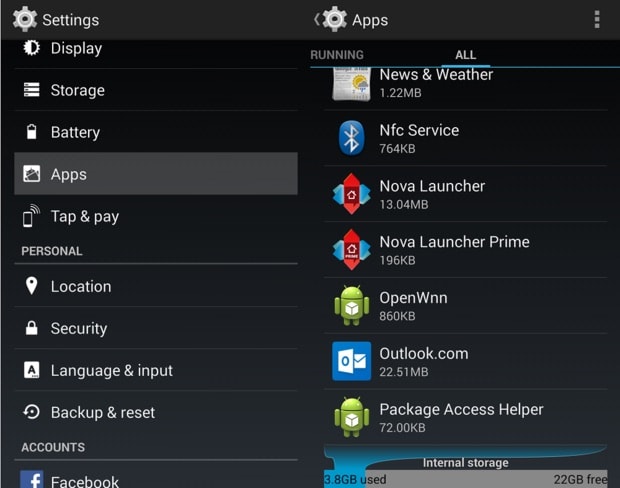
• From the options that appear, tap on “Storage” and then on “Clear cache” as shown below.

Clearing App cache is always a good idea as it prevents any errors which may be caused due to the cache being corrupt or too full. This method is likely to help you, but if the problem persists, read on to find out about 2 more solutions.
 EmEditor Professional (Lifetime License, non-store app)
Part 4: Fix your App has unfortunately stopped by the fresh installation
Sometimes, unfortunately, Youtube has stopped; unfortunately, the internet has stopped, and such errors are caused due to improper or inappropriate App installation. It is mandatory to completely download the App from the Google Play Store and use it after it is successfully installed on your device.
Firstly, to uninstall all an existing App from your device, follow the instructions given hereunder:
• Visit “Settings” and search for “Application Manager” or “Apps”.
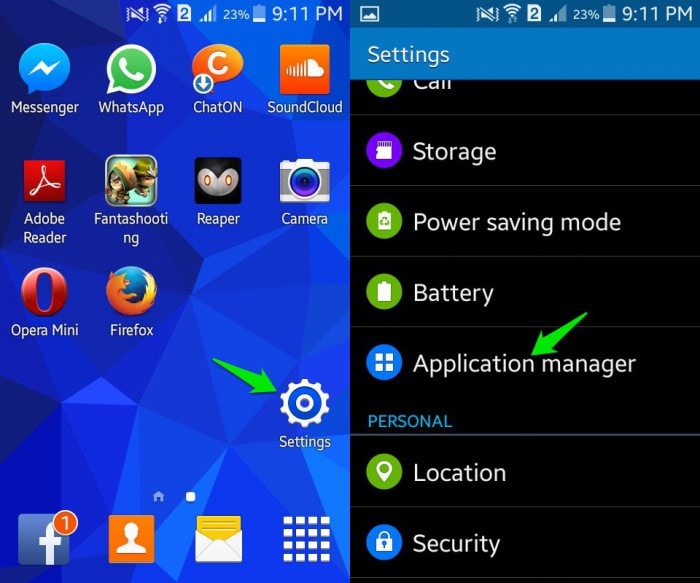
• Select the App you wish to uninstall, say, for example, “Messenger”.
• From the options that appear before you, click on “Uninstall” to delete the App from your device.

You may also uninstall an app directly from the Home Screen (only possible in certain devices) or the Play Store.
To re-install the App, visit Google Play Store, search for the App name and click on “Install”. You will also find the deleted App in “My Apps and games” on your Play store.
This method has helped many and will be useful to you too. So don’t hesitate to try it. It may sound tedious and time-consuming, but it hardly takes 5 minutes of your time.


Part 5: Fix your App has unfortunately stopped by factory reset
Factory Reset must be used only when nothing else works. Please remember to take a back-up of all your data and contents on the cloud or an external memory device, such as a pen drive before adopting this method because the one you perform a factory reset on your device, all media, contents, data and other files are wiped out, including device settings. Do remember to back up the data on an Android device before performing a factory reset.
Follow the step-by-step explanation given below to factory reset your device to fix Unfortunately Youtube has stopped; unfortunately, the internet has stopped working and similar errors:
• Visit “Settings” by clicking the settings icon, as shown below.
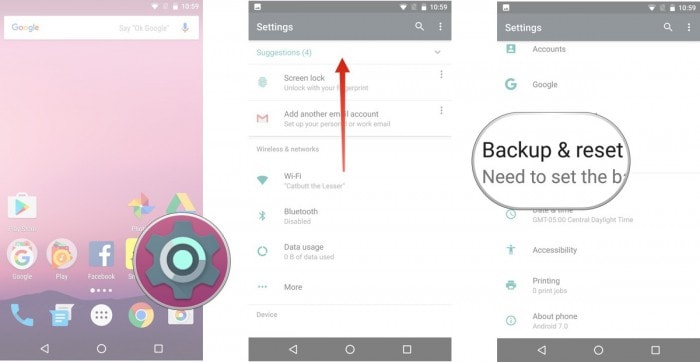
• Now select “Backup and Reset” and move on.
 Forex Robotron Gold Package
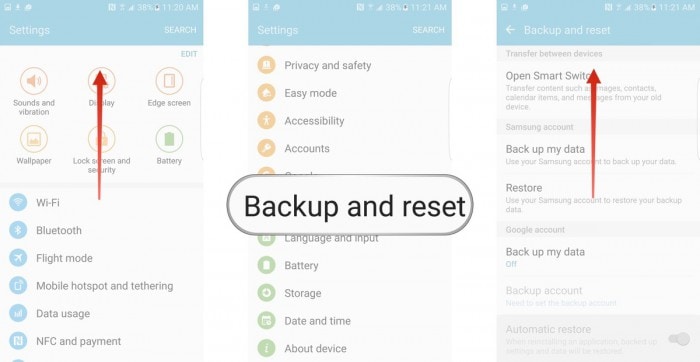
• In this step, select “Factory data reset” and then “Reset Device”.
• Finally, tap on “ERASE EVERYTHING” as shown below to Factory Reset your device.
 LYRX is an easy-to-use karaoke software with the professional features karaoke hosts need to perform with precision. LYRX is karaoke show hosting software that supports all standard karaoke file types as well as HD video formats, and it’s truly fun to use.
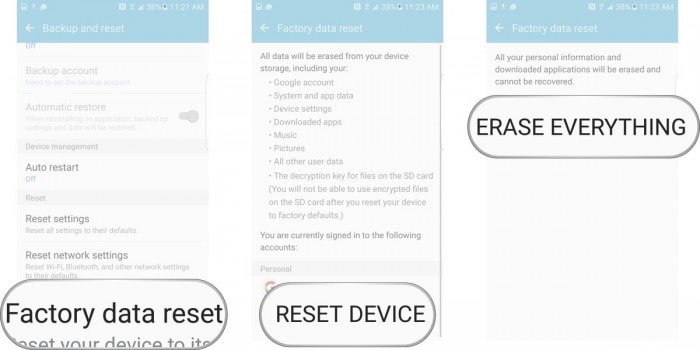
Note: Once the factory reset process is complete, your device will automatically restart and you will have to set it up once again.
Errors such as unfortunately, Youtube has stopped, unfortunately, Netalpha has stopped, unfortunately, the internet has stopped working and so on are very common these days. They disrupt the normal functioning of an App/Apps and prevent you from using the App/Apps smoothly. Unfortunately, App has stopped error is not a serious problem and does not mean there is a problem with the App, your Android OS version, or your handset. It is a random error which occurs due to various reasons in a given situation. If you experience such an error while sign in your favorite App/Apps, DO NOT panic as unfortunately, App has stopped error can be fixed easily. All you need to do is be patient with the App’s software and not try to launch it again and again once it crashes, and an error message pops-up. Just follow the methods listed and explained in detail in the previous segments to solve the problem of unfortunately App has stopped.
- Title: Gmail Not Working on Google Pixel 8 7 Common Problems & Fixes | Dr.fone
- Author: Ariadne
- Created at : 2024-07-30 11:13:22
- Updated at : 2024-07-31 11:13:22
- Link: https://howto.techidaily.com/gmail-not-working-on-google-pixel-8-7-common-problems-and-fixes-drfone-by-drfone-fix-android-problems-fix-android-problems/
- License: This work is licensed under CC BY-NC-SA 4.0.