
Gmail Not Working on Lava Yuva 3 7 Common Problems & Fixes | Dr.fone
Gmail Not Working on Lava Yuva 3: 7 Common Problems & Fixes
Ever since Android is introduced, it has almost eliminated the need of computers to work through Gmail. Gmail carries much importance especially when you’re a working person. A lot of work is done through mails on daily basis. But maybe today is not your lucky day. Maybe Gmail is giving you a hard time today. Is it? Is your Gmail not responding or keeps stopping you from going further? Well! There is no need to be bothered anymore. We are discussing some of the general Gmail problems along with their fixes. So, if your Gmail is not working on Android, you can go through this article and find the relevant solution.
Problem 1: Gmail App not responding or keeps crashing
First and foremost, the most common situation people meet with is when there Gmail keeps crashing. Or simply, it doesn’t respond at all. When you open it, it stuck for a few seconds and then you have to close it. It seriously is an annoying issue. If your Gmail is also not responding or crashing and you aren’t able to work properly, following are the solution you can follow.

Clear Cache
The first thing you can do to fix Gmail not responding issue is to clear the cache of Gmail. This has higher chance to get the issue resolved. To do this:
- Go to “Settings” and look for “Apps & Notifications”. Please note that the option may vary in some Android phone like it maybe “Application” or “App Manager”. So, don’t panic and look for the option carefully.

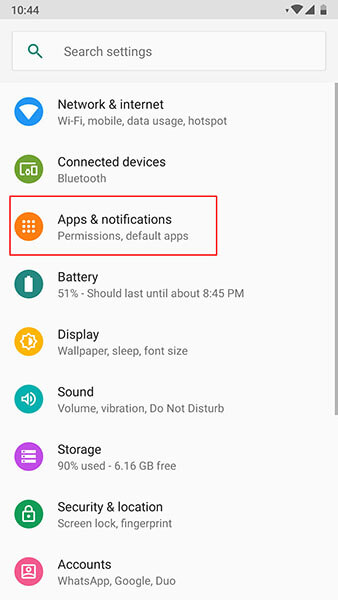
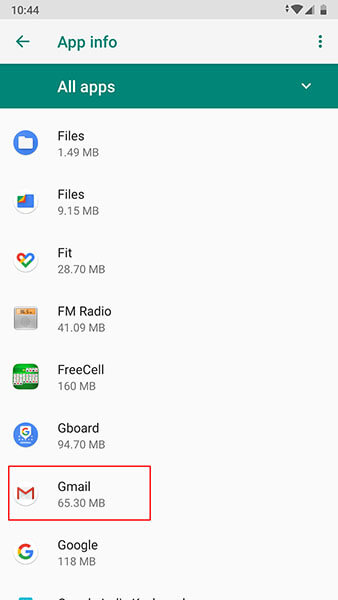
Now, from the apps list, search “Gmail” and tap on it.
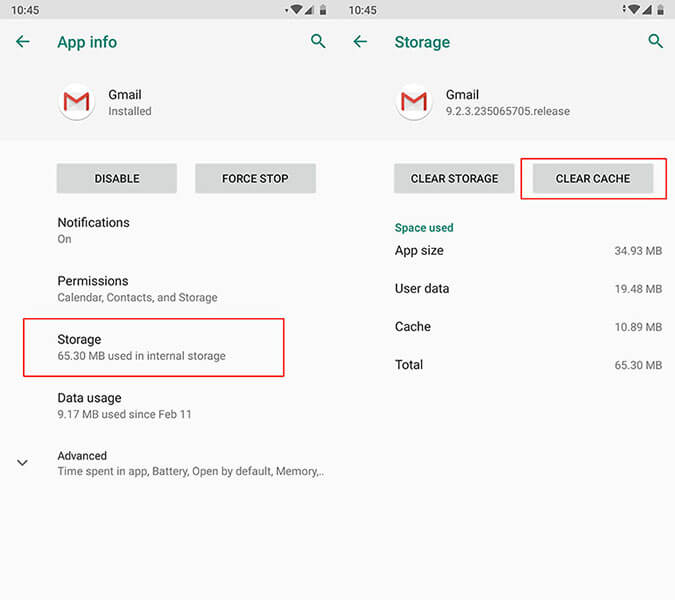
Go to “Storage” followed by “Clear Cache”.
Restart the Lava Yuva 3 device
Restarting the Lava Yuva 3 device in the first place simply resolves many problems and so in the instance when Gmail keeps stopping. Simply long press the power button of your device and restart the Lava Yuva 3 device. See of the problem gets vanished or not.
 /a>
/a>Factory Reset the Lava Yuva 3 device
The next option that you can try is resetting your device. This will lead to data loss so we suggest you to take backup firstly and then proceed with this method.
Hit on “Settings” and search for “Backup & Reset” option.
Tap on “Reset” or “Erase all data” (the option name again may vary).

If unfortunately the above solutions don’t work, there is a requirement to flash the stock Android ROM again. Before you wonder how, there is a professional one-click tool that can surely be of assistance. It is Dr.Fone - System Repair (Android) . The tool takes special care of the Android phones and fixes almost every system issues with ease. It takes no special technical skills and performs efficiently.
Problem 2: Gmail won’t sync between all ends
The next most common problem where people get stuck with is when there Gmail won’t sync. Here are the solutions to this particular problem.
Make Space in the Phone
When Gmail stops syncing, one of the things that can save you is clearing the storage. It is the space that maybe the culprit and therefore the syncing don’t work at all. We would like to suggest you removing the unwanted apps to clear the storage or deleting the downloaded files. You can also transfer the important files to your computer and make the space vacant.
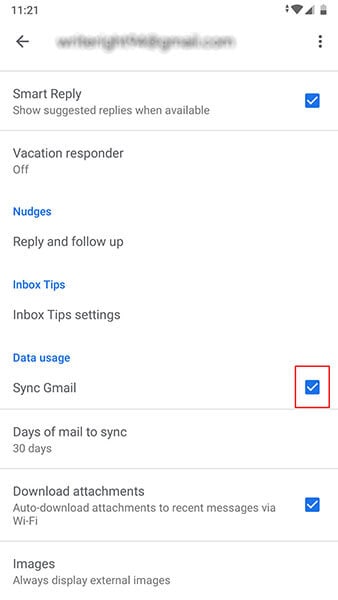
Check Gmail Sync Settings
When still the Gmail not working issue persists and you can’t sync, make sure to check the Gmal sync settings. For this, follow the steps below:
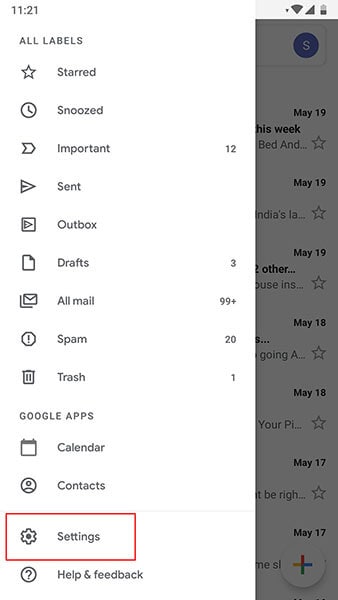
Launch the Gmail app and tap on the menu icon (three horizontal lines).
Tap “Settings” and choose your account.
Check the box next to “Sync Gmail” if it’s not checked.
Restart the Lava Yuva 3 device
Again, restarting can also be helpful in this situation. When you boot the Lava Yuva 3 device again, check if your Gmail can sync or not.
Problem 3: Gmail won’t load
In case you are using the Gmail over your web browser and it has tested your patience in loading, here are the solutions that could prove to be fruitful for you. Please check these out.

Ensure to Use Gmail Supported Browser
First of all, you need to make sure that the browser you are using works with Gmail or not. Gmail can smoothly perform in Google Chrome, Firefox, Safari, Internet Explorer and Microsoft Edge. However, the browsers should be updated. So, please make sure that these browsers are running on the latest versions. Moreover, in case you use Chromebook, don’t forget to update the operating system in order to let it support Gmail.

Clear Cache of web browser
If you tried the above method but to no avail, try to clear the cache and cookies of the web browser. But by doing so, the browser history will be removed. As well as, the records of the websites you previously enjoyed will also be lost.
Check browser extensions or add-ons
If not the above one, try this tip. It encourages you to check your browser extensions. Perhaps these are interfering with the Gmail and due to this conflict, Gmail won’t load. You can either turn off these extensions and plug-ins temporarily or make use of the incognito mode of the browser where there are no such things like extensions and plug-ins.
Problem 4: Gmail can’t send or receive
Gmail also gives you problem in sending or receive mails and messages. And to troubleshoot such issue, following are the solutions mentioned.
 PearlMountain Image Converter
Check the Latest Version of Gmail
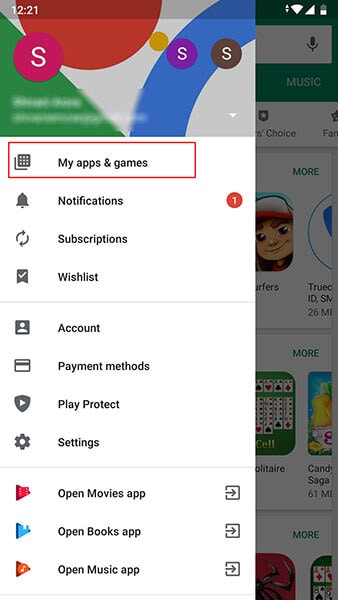
This issue is likely to emerge when you are using an outdated version of Gmail. And therefore, the first solution says you to check if the Gmail update is available. You can go to the Play Store and from the “My apps & games” option, you can see if Gmail needs to be updated or not.

Verify Internet Connection
Another thing that carries weight while you can send or receive mails is the internet connection. As we all know that Gmail won’t respond if the Lava Yuva 3 device is not connected to the internet. Therefore, you are advised to turn off Wi-Fi and then enable it again. Also, please ensure to switch to Wi-Fi if you are using the cellular data. This may hamper the process and stop you from receiving or sending mails.
Remove you Account and Add Again
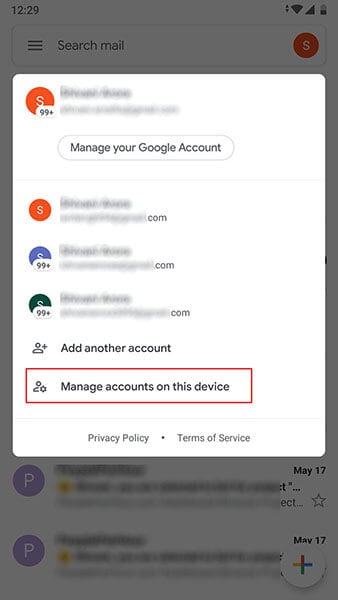
If still Gmail keeps stopping you to go ahead, make sure to once sign out from it. To do this:
Open your Gmail app and go to “Manage accounts on this device”.
Now, tap on the account you are working with. Tap on “REMOVE ACCOUNT” thereafter. After this, you can again sign in and then check if the problem is gone or not.


Problem 5: Stuck in sending
Now, here is another annoying problem that doesn’t let Gmail working on Android properly. This problem addresses the situation where users send a mail but it gets stuck on sending. If this is the problem that you are going through, the following solutions will help you.
Try Alternative Gmail Address
First of all, if Gmail is not working due to stuck in sending issue, we advise you to make use of some other Gmail address to send the mail. If the problem still occurs, jump to the next solution.
 vMix Pro - Software based live production. vMix Pro includes everything in vMix 4K plus 8 channels of Replay and 8 vMix Call
Check Network Connection
As already mentioned, be sure of an active internet connection while working with Gmail. When you are not using a stable connection, it may lead to stuck on sending, Gmail crashing and many other issues. You can fix the issue by doing these three things:
- Most importantly, use only Wi-Fi rather than cellular data if you want a smoother process.
- Turn off Wi-Fi and then turn it on again after nearly 5 seconds. Do the same with the router. Plug it out and the plug in.
- Lastly, turn on Airplane mode and after a few seconds, turn it off again.
Now try to send the mail and see if things are still the same or not.
 CollageIt Pro
Check Attachments
Large attachments can also be the reason for this issue. We would here like to suggest you to check the attachments you are sending. If these are not so important, you can remove them and send the mail. Or if it is not possible to send the mail without attachments, compressing the files can be a solution.
Problem 6: “Account not synced” issue
Many times, the users get the error that says “Account not synced” while they try to work with Gmail. And this is the 6th problem we are introducing. The ways mentioned below will assist to get out of the trouble.
Make Space in the Phone
When Gmail stops to further the process by prompting “Accounts not synced” issue, be sure that your Lava Yuva 3 has some storage in it. If not, create it straight away. As we also mentioned in one of the above solutions, you can either delete the unnecessary files or transfer the important files to the PC to make the space in the phone. Go along with this tip and see if it works.

Check Gmail Sync Settings
As another solution, check Gmail sync settings to get the issue fixed.
- Simply open Gmail and hit the menu icon which is three horizontal lines on the top.
- Go to “Settings” and choose your account.
 WonderFox DVD Ripper Pro
- See the tiny box beside “Sync Gmail” and check it if it is not.

Restart the Lava Yuva 3 device
If the above method went futile, simply restart your device. Take help of the Power button on your device. Long press it and from the options, restart it. This will hopefully work for you.
Problem 7: Gmail app running slow
The last problem that you may face is the slow-going Gmail app. In simple words, you may experience that Gmail app is operating extremely slowly. To fix this, following solutions will help you.
Restart the Phone
It is a universal method to fix minor Android system issues. And here too, we would like you to restart your Lava Yuva 3 in the first place when you find that Gmail is not responding due to the sluggish behavior.

Clear Storage of Device
Usually all the apps start running slow when the Lava Yuva 3 device is not having sufficient space. As the apps need space to function quickly and appropriately, having the Lava Yuva 3 device on low storage can prove to be a bad luck for Gmail. So, make sure you wipe out the items you no longer needed on your device and create some room so that the Gmail responds nicely and won’t be running slow anymore.
Update Gmail App
As the last tip that will indeed help you is to update the Gmail app. Until you update the app when required, Gmail keeps stopping you from working and you will definitely get frustrated. Therefore, go to Play Store and look for the Gmail update. If it is available, welcome it with smile and bid farewell to the problem of slow running Gmail.
What if your problem still doesn’t get resolved after following these 3 tips? Well! If that is the case, we will again recommend you to make use of an expert one-click tool to flash the stock Android ROM.
Dr.Fone - System Repair (Android) is going to help you serving the purpose. This mighty tool possesses huge success rate and one can rely on it for its simplicity and security. It is designed to work with numerous problem related to Android system. So, no matter if your Gmail keeps crashing or keeps stopping, it has the solution for everything.
Dr.Fone - System Repair
Fix all Gmail issues caused by Android system:
- Gmail app corruption or not opening
- Gmail app crashing or stopping
- Gmail app not responding
 Epubor Audible Converter for Mac: Download and convert Audible AAXC/AA/AAX to MP3 with 100% original quality preserved.
How To Fix Part of the Touch Screen Not Working on Lava Yuva 3
You probably touch the screen of your phone hundreds of times per day. It’s no surprise that smartphone touchscreens are one of the most common components to fail, given their delicate glass construction. However, a part of the touch screen not working on your Lava Yuva 3 does not necessarily mean it is a hardware issue. There could be other reasons why your Android’s touch screen stopped responding.
If your phone’s touchscreen frequently fails to respond, there are several things you can try before calling a professional. This article will reveal those proven fixes you can easily perform independently.
Part 1. Why Is Part of My Screen Not Working
There are two possible causes as to why your phone’s touch screen is not working. One is the touch screen may have been damaged, and the other is the Lava Yuva 3 device may be experiencing technical difficulties.
If you drop your phone and it becomes stuck against something, the touch screen’s connectivity may fail. Only a part of the touch screen may sometimes become damaged and unresponsive. That may also occur when there is a technical failure, such as the phone hanging. A part of the touch screen not working can occur when malware is downloaded or when phone settings are changed.
Now, the problem can affect any Android phone, and users may encounter the following error messages on their respective phone models:
- Lava Yuva 3 P40 lite half touch screen not working
- Nexus touch screen not working
- LG screen is unresponsive to touch
- Lava Yuva 3 left side of the screen is not working
- Redmi’s whole screen is unresponsive to touch
Part 2. Different Types of Touch Screen Issues and What You Should Check Before Fixing
You may experience a variety of touch screens not working on Android issues:
- A certain part of the touch screen is not working.
- Your touches do not register on the touch screen.
- The touch screen incorrectly responds to your touch.
- Half touch screen is not working.
- The touch screen becomes frozen or hangs.
- The screen flashes, flickers, or remains blank.
- Theleft side of the phone screen is not working.
Before proceeding to how to fix an unresponsive touch screen on an Android device, you should complete the following steps:
- Examine the screen of your device. Check to see if it is cracked or chipped.
- If the screen is damaged, it must be replaced.
- Remove the Lava Yuva 3 device cover and screen protector if they are not damaged.
- If there is a sticker on the Lava Yuva 3 device screen, you must remove it.
- Before continuing, make sure your screen is spotless.
Part 3. How To Fix Part of the Touch Screen Not Working (No Physical Damage)
If you have already tried running the Lava Yuva 3 device in diagnostic mode and verified that it is not physically damaged, then the problem is most likely technical. If your Lava Yuva 3’s screen is not responding to touches for technical reasons, follow the methods below to resolve the issue.
Restart Your Device
When your touch screen stops working, the first thing you should do is restart your device. The operation is known as soft resetting. You cannot turn your device off from the option on the screen because the touch screen is not responding. Here are the steps to take.
Step 1: Hold the “Power” button until the Lava Yuva 3 device turns off.
Tip: If you hold down the power button for a few seconds, you will see the “Power Off” and “Restart” options on the screen. You can’t use it because the entire screen isn’t responding. Hence, you should press and hold the “Power” button for as long as necessary.

Step 2: When the Lava Yuva 3 device turns off, wait a few seconds.
Step 3: Press and hold the “Power” button to restart the Lava Yuva 3 device.
Check to see if the Android auto touch screen is not working problem has been resolved. Otherwise, proceed with the following methods.
 ZoneAlarm Extreme Security NextGen
Turn On Safe Mode
You should switch to Safe mode whenever an application or piece of software causes a problem on your device. Only the most fundamental system components are loaded and used when operating in Safe mode.
If your touch screen is functional in safe mode, the issue is most likely internal. You can quickly fix the Android touchscreen issue by following the prompts given below to activate the safe mode:
Step 1: To force a restart, press and hold the Lava Yuva 3 device’s “Power” button for an extended period.
Step 2: Maintain pressure on the “Power” button. Take your finger off it once you see the manufacturer’s logo.
Step 3: When you let go of the “Power” button, press and hold the “Volume Down” button. After that, a “Safe Mode” label will appear in your screen’s lower-left corner.

Turn Off Developer Options
Every smartphone is bound to have limitations. However, smartphone makers include a “Developer Options” menu for advanced users. Here, restrictions are removed, and user preferences can be customized.
If you enable Developer Options on some Android devices, they may stop working properly. If you have recently activated Developer Options and your touchscreen is no longer responding as expected, you should disable it. To do so, follow the instructions below:
Step 1: Launch the Settings app on your device.
Step 2: Select the System menu item, which usually locates at the bottom of the screen.
Step 3: Tap the Advanced options menu, then select Developer Options.
Step 4: You will then find the switch to turn it on or off. Disable itby toggling the button off.

Step 5: Restart your device to check if the part of the touch screen not working issue has been resolved.

Reset Device to Factory Settings
Resetting your device to its factory settings will return it to its state when you first unboxed it. All your phone’s data and installed apps will be erased, including any malware on your device that may be causing the issue to occur. Here’s how to restore your device to factory settings:
Step 1: Since your touch screen is not working, you can factory reset it using Google’s Find My Device web service.
Step 2: Go to Find My Device from any device and sign in to the Google account associated with the damaged screen device.
Step 3: After successfully logging in, you will see your device’s name. Select the Erase Device option.
 Jet Profiler for MySQL, Enterprise Version: Jet Profiler for MySQL is real-time query performance and diagnostics tool for the MySQL database server. Its detailed query information, graphical interface and ease of use makes this a great tool for finding performance bottlenecks in your MySQL databases.
Step 4: Confirm by pressing the Erase Device button.
Tip: Since all your data will be removed, it’s recommended to back up your data first before resetting your device to factory settings.

Part 4. Fix Using a Third-Party App – Wondershare Dr.Fone
If you’ve exhausted all other options and still can’t fix your Android’s part of the touch screen not working issue, it’s time to resort to Dr.Fone – System Repair! It allows you to repair Android system issues with a single click.
Many users have reported exceptions on their Android devices, such as touch screen failure, black screen of death, system UI failure, app crashing, etc. And in this case, people should seek an Android repair tool.
Dr.Fone – System Repair has made it easier than ever for Android users experiencing technical issues with their device, including an unresponsive touch screen, among other system issues. The best part is that no data will be lost while repairing Android system issues.
Follow the steps given below on how to use Wondershare Dr.Fone System Repair for Android:
Step 1: Select the System Repair option from the main window after starting Dr. Fone.
 Easy GIF Animator is a powerful animated GIF editor and the top tool for creating animated pictures, banners, buttons and GIF videos. You get extensive animation editing features, animation effects, unmatched image quality and optimization for the web. No other GIF animation software matches our features and ease of use, that’s why Easy GIF Animator is so popular.
Step 2: Connect your Lava Yuva 3 or tablet to the computer using the appropriate cable. Choose Android Repair from the three options shown on the left side of the screen.

Step 3: The device information screen will appear in the next window. There, input your device’s unified brand, name, model, country/region, and carrier information. Then click Next after you confirm the warning.

The Android repair procedure may wipe out all data on your device. To confirm and proceed, enter “000000”.
Note: It is strongly advised that you back up your Android data before attempting Android repair.

Step 4: Before repairing your Lava Yuva 3, you must boot it into Download mode. To boot your Lava Yuva 3 or tablet into DFU mode, follow the steps below:
For a device that has a Home button:
- Turn off your phone or tablet.
- Hold the Volume Down, Home, and Power buttons for 5 to 10 seconds.
- To enter Download mode, release all the buttons and press the Volume Up button.

For a device that lacks a Home button:
- Turn off the Lava Yuva 3 device.
- Hold the Volume Down, Bixby, and Power buttons for 5 to 10 seconds.
- To enter Download mode, release all the buttons and press the Volume Up button.

Step 5: Then press the Next button. The program will then download the firmware. After downloading and verifying the firmware, the program will automatically repair your Lava Yuva 3. And in a while, your Lava Yuva 3’s system issues will be resolved.

Supported OS
Check Dr.Fone’s supported operating systems below before using the application to fix your mobile technical issues.
| Platform | Supported OS |
|---|---|
| Windows | Windows 11/10/8.1/8/7/Vista/XP |
| Mac | Mac 14/13/12/11/10.15/10.14/X/10.13/10.12/10.11/10.10/10.9/10.8 |

Key Features
Dr.Fone – System Repair is a data management and recovery tool that contains several toolkits in one program, each designed to repair a specific phone problem. Check out its key features below:
- One-click Android Repair Tool
- Troubleshoots and repairs a wide range of Android system problems, including black screen of death, Play Store not working, apps crashing, phone stuck in a boot loop, and bricked Android issues
- A high success rate for fixing Android system issues
- Fixes Android system back to normal
Pros
Here are the advantages of using Dr.Fone – System Repair:
- Highly intuitive UI/UX/. No need for any skill to operate it
- Provides a comprehensive set of toolkits, including advanced data recovery and system repair
- Data management is simple and seamless for both Android and iOS devices
- Data backup with Dr. Fone is simple and quick.
 PaperScan Professional: PaperScan Scanner Software is a powerful TWAIN & WIA scanning application centered on one idea: making document acquisition an unparalleled easy task for anyone.
Cons
Check below to know Dr.Fone – System Repair’s limitations:
- Depending on the toolkit required, the program can be costly.

 safe & secure
Conclusion
Fixing an Android part of the touch screen not working issue can be quickly done with just a few fixes you can do on your own. However, there may be times when the solutions provided above may not work, and the worst part is factory resetting your phone erases all your data.
That’s why Dr.Fone – System Repair might be your best solution. It has all the tools you need to keep your Lava Yuva 3 100%. Not only that, but with Dr.Fone, you can repair your Android system issues without dealing with any data loss.

Calls on Lava Yuva 3 Go Straight to Voicemail? 12 Fixes
Have you ever experienced incoming calls to your phone go straight to voicemail without ringing? It can be frustrating, especially if you’re expecting an important call. It could be due to simple things like turning down the volume or forgetting to turn off the Do Not Disturb mode. In other cases, it might be because you accidentally blocked the caller’s number.
In most cases, incoming calls going to voicemail without ringing are common. However, if it’s happening frequently or for all calls, your phone may have a problem.
This article will discuss why incoming phone calls go straight to voicemail and how to fix the problem. We’ll also show you how to use Wondershare Dr.Fone, a powerful Android System Repair tool, to solve such issues. So, if you’re uncertain why that last call went straight to voicemail, keep reading, and we’ll cover everything you need to know.

Part 1: Not Ringing? Here’s Why Calls on Your Phone Go Straight to Voicemail
If an incoming call to your cell phone goes straight to voicemail without ringing, there could be a few reasons. Here’s what to look for and what you should do to fix it:
- Turn Off Do Not Disturb (DND) Mode
DND mode is a feature that silences all incoming calls, notifications, and alerts. If DND mode is enabled, your cell phone goes straight to voicemail when someone calls. To turn off DND mode, swipe down from the top of the screen to open the notification settings panel, then tap the Do not disturb icon.

Here’s an alternative way:
- Step 1: Open the Settings app and go to Notifications.
- Step 2: Tap Do not disturb.

- Step 3: Toggle Do Not Disturb offto disable the mode.
- Turn Off Call Forwarding
One reason calls go straight to voicemail without ringing is if you enabled call forwarding. Call forwarding is a feature that redirects incoming calls to another number. To turn off call forwarding:
- Step 1: Open the Phone Dialer app on your device, then tap the menu icon and select Settings.
 OtsAV DJ Pro
- Step 2: Navigate to Supplementary services > Call forwarding.

- Disable Call Barring
If a phone call went straight to voicemail, another possible explanation is the call barring. It is a feature that restricts calls from being made or received on your phone. If activated, it can cause incoming calls to a phone to go straight to voicemail. To turn off call barring on Lava Yuva 3 devices:
- Step 1: Open the Phone Dialer app, then tap the menu icon in the top right corner.
- Step 2: Go to Settings > Supplementary services > Call barring, then tap OK.
- Step 3: Select Voice call, then turn off your preferred outgoing and incoming calls. When prompted, enter 0000 as a password.

- Update Your Phone’s Software
Sometimes, software bugs can cause problems with incoming calls, which may be why your last incoming call went straight to voicemail. If your phone runs outdated software, try updating it to the latest version.
To check for updates, open the Settings app and go to Software update or System update. For a seamless update experience, follow the step-by-step instructions on your mobile screen.

- Reset Network Settings
If the incoming calls on your phone go straight to voicemail, consider resetting your phone’s network settings. Network settings control how your phone connects to the cellular network. If these settings are not set up correctly, incoming calls may not be able to reach your device.
Note: Resetting your network settings will erase any saved Wi-Fi networks and Bluetooth pairings, requiring you to re-enter them after the reset is complete.
To reset your network settings on most Android devices:
- Step 1: Open the Settings app on your smartphone, then tap System or General Management.
- Step 2: Go to Reset > Reset Network Settings and confirm the action.
 dotConnect for Oracle is an ADO.NET data provider for Oracle with Entity Framework Support.

- Turn Off Bluetooth
When Bluetooth is on, it can interfere with your device’s ability to receive calls, causing them to go straight to voicemail without ringing. To turn off Bluetooth on an Android device, you can do one of the following:
- Swipe down from the top of the screen to open the Quick Settingspanel, then tap the Bluetooth icon to turn it off.

- Go to Settings> Connections > Bluetooth and toggle the switch off.


It should help ensure that calls come through to your phone instead of going to voicemail.
- Check Airplane Mode
If turning off Bluetooth didn’t solve the issue, another possible cause could be that your phone is in Airplane Mode. Airplane Mode turns off all wireless connections on your phone, including cellular service, which can cause calls to dial straight to voicemail. There are two ways to turn off Airplane mode on Android:
Using the Settings app:
- Step 1: Open the Settings app.
- Step 2: Tap Network & internet.
- Step 3: Toggle off Airplane mode or Flight mode.
Using the Quick Settings panel:
- Step 1: Swipe down from the top of the phone screen to access the Quick Settings panel.
- Step 2: Look for the Airplane mode or Flight mode icon, then tap it to turn it off.

- Check Blocked Numbers
“My boyfriend’s phone goes straight to voicemail when someone is calling. Any idea why that might be?”
Do you also find yourself asking what does it mean? It could be that he has blocked that phone number. To check this:
- Step 1: Open the Phone dialer app.
- Step 2: Tap the menu icon in the top right corner and select Settings.
- Step 3: Tap Block numbers. If you find the number in the blocked list, remove it to ensure that their calls come through to the phone.

If you still have trouble reaching your boyfriend, try calling him from a different number. If your call didn’t go through, you know that he hasn’t blocked your number and that there may be another issue with his phone.
- Turn Off Google One VPN
If you’re using Google One VPN, try turning it off to see if that fixes the problem. Some users have reported that Google One VPN can cause incoming calls to a phone to go straight to voicemail. To turn off Google One VPN:
- Step 1: Open the Google One app on your Lava Yuva 3.
- Step 2: At the bottom, go to the Benefits tab, then tap View Details below the Online protection with a VPN section.

- Step 3: Toggle off Enable VPN.

- Contact Your Carrier
If your phone calls go straight to voicemail after trying all the above, contact your carrier for help. They may be able to troubleshoot the problem or determine if there is a service outage in your area.
And if your carrier confirms that there is no service outage or billing-related block, the problem may be with your phone itself. You may need to try resetting your phone to factory settings or taking it to a repair shop.
- The Caller Used Ringless Voicemail
Ringless voicemail is a service that allows businesses to bypass your phone’s ringtone and send you pre-recorded messages directly to voicemail. Ringless voicemail is often used for marketing purposes. If you think you’re receiving ringless voicemail calls, you can contact the company calling you and ask them to remove you from their list.
 EmEditor Professional (Lifetime License, non-store app)
Part 2: Not Clear About the Root Cause? Troubleshoot Directly by Wondershare Dr.Fone
If you’re unsure what’s causing your calls to go straight to voicemail, you can try using the Dr.Fone System Repair tool. This software can scan and repair your phone for any underlying problems, which may fix the issue and get your calls ringing again.
Dr.Fone supports over 1000 Android models, including unlocked Lava Yuva 3 models and models from carriers like AT&T and Vodafone. It has an intuitive interface and is easy to use, even for beginners. Learn below the steps on how to use Dr.Fone System Repair to fix incoming calls that dial straight to voicemail:
- Step 1: Download Dr.Fone on your computer, then launch it once installed.
safe & secure
4,118,635 people have downloaded it
- Step 2: Connect your smartphone to your desktop or computer using a USB cable. Next, from the Toolbox homepage, select System Repair.

- Step 3: Select Android as the Lava Yuva 3 device type.

- Step 4: Click Start to begin repairing your smartphone.
- Step 5: Select the Lava Yuva 3 device details on the Name, Model, Country, and Carrier drop-down lists. Next, select the agreement checkbox, then click Next to proceed.
- Step 6: Follow the in-app instructions to enter Download mode on your Lava Yuva 3, then click Next.
- Step 7: Wait while the app downloads the firmware; once done, click Fix Now.

- Step 8: Enter the code in the input box to verify the Lava Yuva 3 device information in the dialogue box, then click Confirm.
- Step 9: The app will start repairing the system issue on your Lava Yuva 3. Once completed, your app should restart, then click Done to close the app.
You May Also Like:
Top 5 Best Android System Repair Apps
How to Fix It: Android Stuck on Boot Screen?
How to Flash Dead Android Phone Safely

WPS Office Premium ( File Recovery, Photo Scanning, Convert PDF)–Yearly
Conclusion
When your phone calls go straight to voicemail without ringing, it can be a frustrating and disruptive experience. Not only do you miss important calls from work, friends, or family, but it also leaves you feeling disconnected and out of the loop. As a temporary measure to avoid missing important calls, check your voicemail regularly.
For a prompt solution, consider using Dr.Fone if incoming calls on your phone go straight to voicemail. It is a powerful mobile solution that can also address other system problems, including stuck boot loops, app crashes, black screens, and bricked devices. If you consistently experience this issue, it’s advisable to reach out to a professional for assistance.
safe & secure
4,215,287 people have downloaded it
- Title: Gmail Not Working on Lava Yuva 3 7 Common Problems & Fixes | Dr.fone
- Author: Ariadne
- Created at : 2024-07-30 11:15:02
- Updated at : 2024-07-31 11:15:02
- Link: https://howto.techidaily.com/gmail-not-working-on-lava-yuva-3-7-common-problems-and-fixes-drfone-by-drfone-fix-android-problems-fix-android-problems/
- License: This work is licensed under CC BY-NC-SA 4.0.