
Gmail Not Working on Oppo K11 5G 7 Common Problems & Fixes | Dr.fone
Gmail Not Working on Oppo K11 5G: 7 Common Problems & Fixes
Ever since Android is introduced, it has almost eliminated the need of computers to work through Gmail. Gmail carries much importance especially when you’re a working person. A lot of work is done through mails on daily basis. But maybe today is not your lucky day. Maybe Gmail is giving you a hard time today. Is it? Is your Gmail not responding or keeps stopping you from going further? Well! There is no need to be bothered anymore. We are discussing some of the general Gmail problems along with their fixes. So, if your Gmail is not working on Android, you can go through this article and find the relevant solution.

Problem 1: Gmail App not responding or keeps crashing
First and foremost, the most common situation people meet with is when there Gmail keeps crashing. Or simply, it doesn’t respond at all. When you open it, it stuck for a few seconds and then you have to close it. It seriously is an annoying issue. If your Gmail is also not responding or crashing and you aren’t able to work properly, following are the solution you can follow.
Clear Cache
The first thing you can do to fix Gmail not responding issue is to clear the cache of Gmail. This has higher chance to get the issue resolved. To do this:
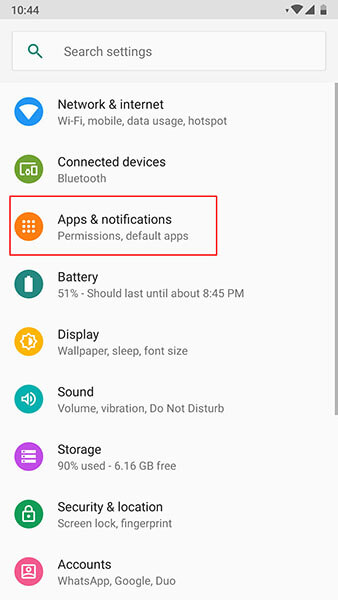
Go to “Settings” and look for “Apps & Notifications”. Please note that the option may vary in some Android phone like it maybe “Application” or “App Manager”. So, don’t panic and look for the option carefully.

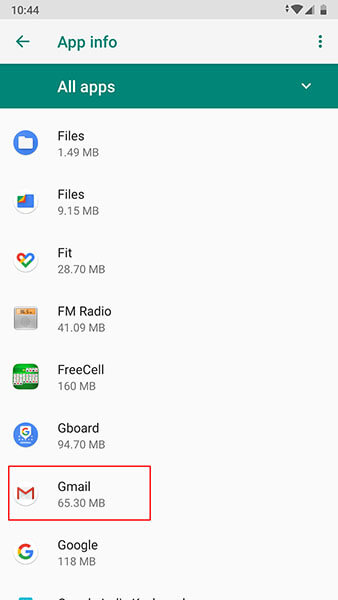
Now, from the apps list, search “Gmail” and tap on it.
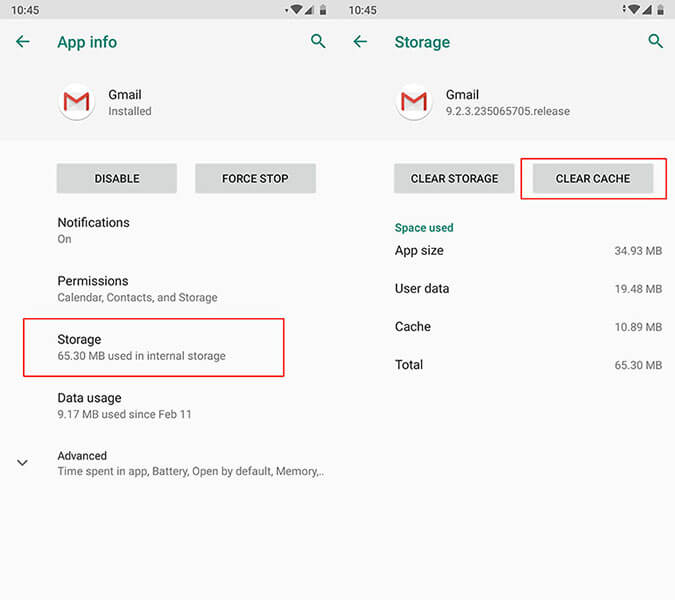
Go to “Storage” followed by “Clear Cache”.
Restart the Oppo K11 5G device
Restarting the Oppo K11 5G device in the first place simply resolves many problems and so in the instance when Gmail keeps stopping. Simply long press the power button of your device and restart the Oppo K11 5G device. See of the problem gets vanished or not.
Factory Reset the Oppo K11 5G device
The next option that you can try is resetting your device. This will lead to data loss so we suggest you to take backup firstly and then proceed with this method.
Hit on “Settings” and search for “Backup & Reset” option.
Tap on “Reset” or “Erase all data” (the option name again may vary).

If unfortunately the above solutions don’t work, there is a requirement to flash the stock Android ROM again. Before you wonder how, there is a professional one-click tool that can surely be of assistance. It is Dr.Fone - System Repair (Android) . The tool takes special care of the Android phones and fixes almost every system issues with ease. It takes no special technical skills and performs efficiently.
 Easy GIF Animator is a powerful animated GIF editor and the top tool for creating animated pictures, banners, buttons and GIF videos. You get extensive animation editing features, animation effects, unmatched image quality and optimization for the web. No other GIF animation software matches our features and ease of use, that’s why Easy GIF Animator is so popular.
Problem 2: Gmail won’t sync between all ends
The next most common problem where people get stuck with is when there Gmail won’t sync. Here are the solutions to this particular problem.
Make Space in the Phone
When Gmail stops syncing, one of the things that can save you is clearing the storage. It is the space that maybe the culprit and therefore the syncing don’t work at all. We would like to suggest you removing the unwanted apps to clear the storage or deleting the downloaded files. You can also transfer the important files to your computer and make the space vacant.
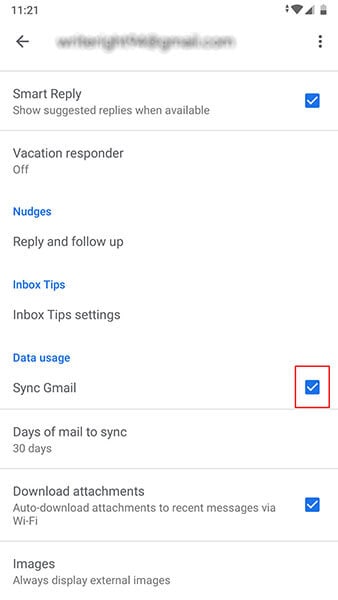
Check Gmail Sync Settings
When still the Gmail not working issue persists and you can’t sync, make sure to check the Gmal sync settings. For this, follow the steps below:
- Launch the Gmail app and tap on the menu icon (three horizontal lines).
- Tap “Settings” and choose your account.

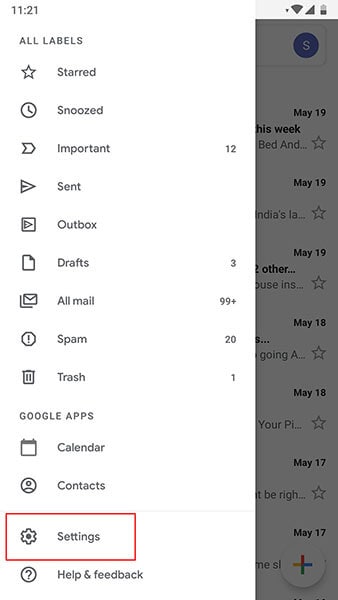
- Check the box next to “Sync Gmail” if it’s not checked.
 Any DRM Removal for Win:Remove DRM from Adobe, Kindle, Sony eReader, Kobo, etc, read your ebooks anywhere.
Restart the Oppo K11 5G device
Again, restarting can also be helpful in this situation. When you boot the Oppo K11 5G device again, check if your Gmail can sync or not.
Problem 3: Gmail won’t load
In case you are using the Gmail over your web browser and it has tested your patience in loading, here are the solutions that could prove to be fruitful for you. Please check these out.
Ensure to Use Gmail Supported Browser
First of all, you need to make sure that the browser you are using works with Gmail or not. Gmail can smoothly perform in Google Chrome, Firefox, Safari, Internet Explorer and Microsoft Edge. However, the browsers should be updated. So, please make sure that these browsers are running on the latest versions. Moreover, in case you use Chromebook, don’t forget to update the operating system in order to let it support Gmail.
Clear Cache of web browser
If you tried the above method but to no avail, try to clear the cache and cookies of the web browser. But by doing so, the browser history will be removed. As well as, the records of the websites you previously enjoyed will also be lost.
 Allavsoft Batch Download Online Videos, Music Offline to MP4, MP3, MOV, etc format
Check browser extensions or add-ons
If not the above one, try this tip. It encourages you to check your browser extensions. Perhaps these are interfering with the Gmail and due to this conflict, Gmail won’t load. You can either turn off these extensions and plug-ins temporarily or make use of the incognito mode of the browser where there are no such things like extensions and plug-ins.

Problem 4: Gmail can’t send or receive
Gmail also gives you problem in sending or receive mails and messages. And to troubleshoot such issue, following are the solutions mentioned.
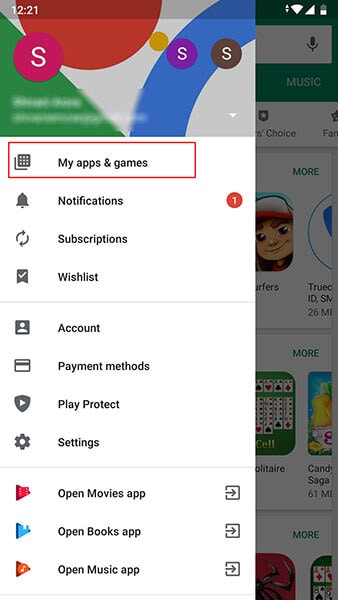
Check the Latest Version of Gmail
This issue is likely to emerge when you are using an outdated version of Gmail. And therefore, the first solution says you to check if the Gmail update is available. You can go to the Play Store and from the “My apps & games” option, you can see if Gmail needs to be updated or not.
 DEX 3 RE is Easy-To-Use DJ Mixing Software for MAC and Windows Designed for Today’s Versatile DJ.
Mix from your own library of music, iTunes or use the Pulselocker subsciprtion service for in-app access to over 44 million songs. Use with over 85 supported DJ controllers or mix with a keyboard and mouse.
DEX 3 RE is everything you need without the clutter - the perfect 2-deck mixing software solution for mobile DJs or hard-core hobbiests.
PCDJ DEX 3 RE (DJ Software for Win & MAC - Product Activation For 3 Machines)
 Software Update Pro - Check and update software installed on your computer.
Verify Internet Connection
Another thing that carries weight while you can send or receive mails is the internet connection. As we all know that Gmail won’t respond if the Oppo K11 5G device is not connected to the internet. Therefore, you are advised to turn off Wi-Fi and then enable it again. Also, please ensure to switch to Wi-Fi if you are using the cellular data. This may hamper the process and stop you from receiving or sending mails.
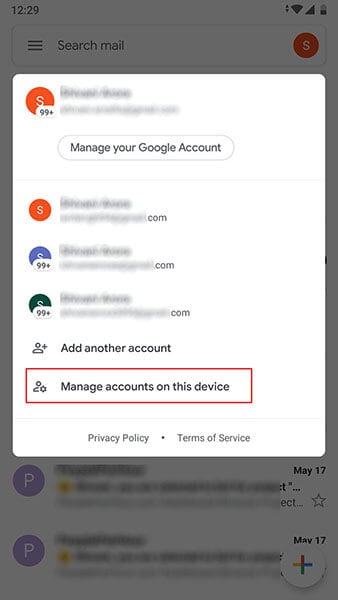
Remove you Account and Add Again
If still Gmail keeps stopping you to go ahead, make sure to once sign out from it. To do this:
Open your Gmail app and go to “Manage accounts on this device”.
Now, tap on the account you are working with. Tap on “REMOVE ACCOUNT” thereafter. After this, you can again sign in and then check if the problem is gone or not.


Problem 5: Stuck in sending
Now, here is another annoying problem that doesn’t let Gmail working on Android properly. This problem addresses the situation where users send a mail but it gets stuck on sending. If this is the problem that you are going through, the following solutions will help you.
Try Alternative Gmail Address
First of all, if Gmail is not working due to stuck in sending issue, we advise you to make use of some other Gmail address to send the mail. If the problem still occurs, jump to the next solution.
Check Network Connection
As already mentioned, be sure of an active internet connection while working with Gmail. When you are not using a stable connection, it may lead to stuck on sending, Gmail crashing and many other issues. You can fix the issue by doing these three things:
- Most importantly, use only Wi-Fi rather than cellular data if you want a smoother process.
- Turn off Wi-Fi and then turn it on again after nearly 5 seconds. Do the same with the router. Plug it out and the plug in.
- Lastly, turn on Airplane mode and after a few seconds, turn it off again.
Now try to send the mail and see if things are still the same or not.
Check Attachments
Large attachments can also be the reason for this issue. We would here like to suggest you to check the attachments you are sending. If these are not so important, you can remove them and send the mail. Or if it is not possible to send the mail without attachments, compressing the files can be a solution.
Problem 6: “Account not synced” issue
Many times, the users get the error that says “Account not synced” while they try to work with Gmail. And this is the 6th problem we are introducing. The ways mentioned below will assist to get out of the trouble.
Make Space in the Phone
When Gmail stops to further the process by prompting “Accounts not synced” issue, be sure that your Oppo K11 5G has some storage in it. If not, create it straight away. As we also mentioned in one of the above solutions, you can either delete the unnecessary files or transfer the important files to the PC to make the space in the phone. Go along with this tip and see if it works.

Check Gmail Sync Settings
As another solution, check Gmail sync settings to get the issue fixed.
- Simply open Gmail and hit the menu icon which is three horizontal lines on the top.
- Go to “Settings” and choose your account.
 The BootIt Collection covers multi-booting, partitioning, and disk imaging on traditional PC’s using the standard BIOS and newer PC’s using UEFI. The collection includes BootIt Bare Metal (BIBM) for standard BIOS systems and BootIt UEFI (BIU) for UEFI system.
- See the tiny box beside “Sync Gmail” and check it if it is not.
Restart the Oppo K11 5G device
If the above method went futile, simply restart your device. Take help of the Power button on your device. Long press it and from the options, restart it. This will hopefully work for you.
 CollageIt Pro
Problem 7: Gmail app running slow
The last problem that you may face is the slow-going Gmail app. In simple words, you may experience that Gmail app is operating extremely slowly. To fix this, following solutions will help you.
Restart the Phone
It is a universal method to fix minor Android system issues. And here too, we would like you to restart your Oppo K11 5G in the first place when you find that Gmail is not responding due to the sluggish behavior.
Clear Storage of Device
Usually all the apps start running slow when the Oppo K11 5G device is not having sufficient space. As the apps need space to function quickly and appropriately, having the Oppo K11 5G device on low storage can prove to be a bad luck for Gmail. So, make sure you wipe out the items you no longer needed on your device and create some room so that the Gmail responds nicely and won’t be running slow anymore.
Update Gmail App
As the last tip that will indeed help you is to update the Gmail app. Until you update the app when required, Gmail keeps stopping you from working and you will definitely get frustrated. Therefore, go to Play Store and look for the Gmail update. If it is available, welcome it with smile and bid farewell to the problem of slow running Gmail.
What if your problem still doesn’t get resolved after following these 3 tips? Well! If that is the case, we will again recommend you to make use of an expert one-click tool to flash the stock Android ROM.
Dr.Fone - System Repair (Android) is going to help you serving the purpose. This mighty tool possesses huge success rate and one can rely on it for its simplicity and security. It is designed to work with numerous problem related to Android system. So, no matter if your Gmail keeps crashing or keeps stopping, it has the solution for everything.
Dr.Fone - System Repair
Fix all Gmail issues caused by Android system:
- Gmail app corruption or not opening
- Gmail app crashing or stopping
- Gmail app not responding
8 Solutions to Solve YouTube App Crashing on Oppo K11 5G
YouTube can be considered among the apps that are widely used by users. And seeing “Unfortunately YouTube has stopped” error on the Android display screen is a thing that you can’t stand. The reasons can be multiple for why YouTube is not working or it keeps crashing. For instance, an outdated app, not updated OS, low storage, or corrupted cache. No matter what has triggered the problem on your device, we have solutions for it. Please read and follow this article to get the problem sorted.
Restart the app
The issues like YouTube keeps crashing are often get disappeared by just quitting and restarting the app. This is helpful to give a fresh start to the app and restarting will bring your device back to normal. Hence, the first resolution we would like to recommend is to restart your app. Follow the steps to do this.
- Go to “Settings” and tap “Apps & Notifications” or “Application”.
- Choose “YouTube” from the list of apps and open it.
- Tap on “Force Close” or “Force Stop”.
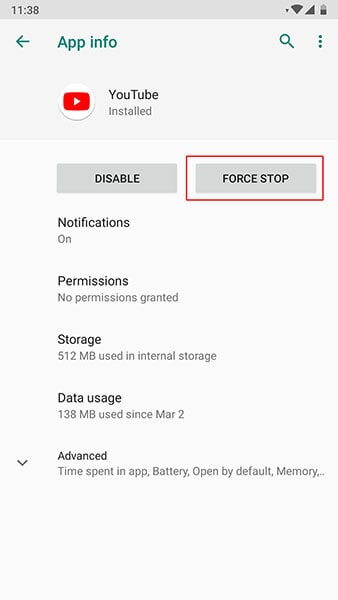
- You can now restart your device and then launch the app again. Check if this works or not.

Restart the Android
Similar to the app, if you restart the Oppo K11 5G device, it will start operating properly making the YouTube app work better than before. So, as the next tip, please restart your device.
- Long press the “Power” key.
- Press “Restart” and confirm.

Use a VPN
There is a possibility that YouTube is prohibited in your region. Banning some apps is done for some safety reasons. And therefore, you need to check if this is done in your area or not. If yes, then we shouldn’t mention the reason why YouTube is not working on Android. In such a case, use a VPN to access YouTube.
Clear the Cache of YouTube
When the stored cache files start getting crash, the “Unfortunately YouTube has stopped” sort of errors are likely to appear. And therefore, if the above method didn’t work, try this one to get the problem resolved. We are going to clear the cache of YouTube to make it run smoothly.
- Go to “Settings” and tap “Apps & Notifications”/”Applications”.
- Now, choose “YouTube” from the list of apps.
- Open “Storage” and click on “Clear Cache”.
 OtsAV TV Webcaster
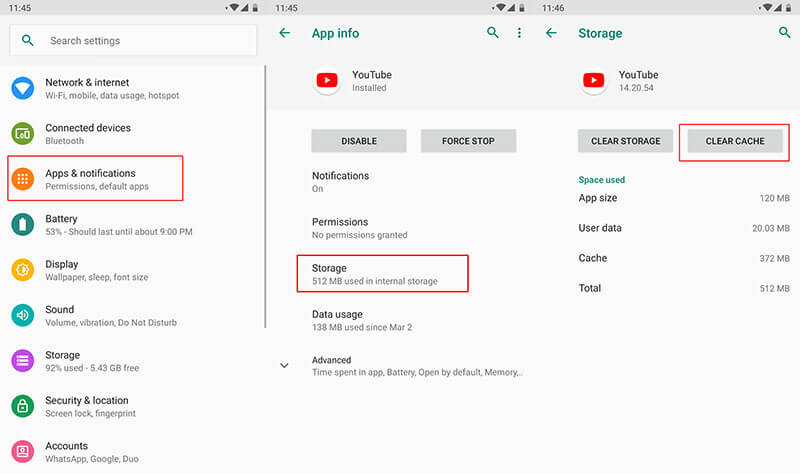
 Simple and intuitive video editing
Reinstall YouTube from Play Store
If YouTube keeps crashing, make sure to uninstall and reinstall it from Play Store. Doing this will make the app gets refreshed, remove the glitches, and make it normal as a result. Here are the steps for it.
- Firstly, uninstall it by “Settings” > “Apps” > “YouTube” > “Uninstall”.
- Now, go to the “Play Store” and search “YouTube”. Tap on “Install”.
Reset Network Settings
The apps that run on the internet might start crashing due to connectivity issues. Therefore, resetting the network settings once can work as a great remedy to follow when YouTube has stopped on your Oppo K11 5G. This will remove all your network settings like Wi-Fi passwords etc.
- Tap on “Settings” followed by “Backup and reset”.
- Look for “Reset Network Settings”.
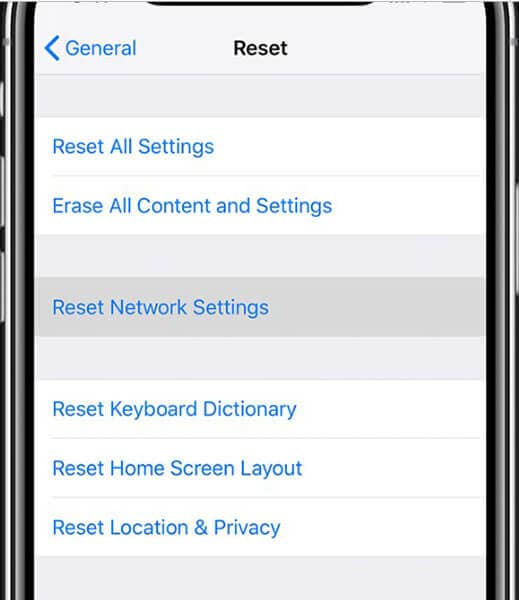
Note: In some phones, you may find the option in “System” > “Advanced” > “Reset”.
Re-flash the stock ROM of Android in one click
There are times when a corrupted system gives you such errors. And therefore, you should try re-flashing the stock ROM on your Oppo K11 5G. Before you wonder how we would like to introduce a highly recommended tool for this. It is Dr.Fone - System Repair (Android). It holds the proficiency to flash the stock ROM in just a click. So, when your YouTube is not responding due to a corrupted system, make use of this tool to get it solved. The benefits associated with this tool are as follows.
Dr.Fone - System Repair (Android)
Android repair tool to flash the stock ROM of Android
- Easy to use and quickly fixes the issues
- Has the capability to repair any Android system issue
- 1000+ Android models are supported
- Takes no special technical knowledge to use
- Higher success rate with promising results
3981454 people have downloaded it
Step 1: Launch the Tool
Start with visiting the website on your PC and downloading the Dr.Fone toolkit. Install and open the tool. Now, from the main screen, choose “System Repair”.

Step 2: Connect Device
With the help of the USB cord, connect your Oppo K11 5G to the computer. Click on “Android Repair” now from the left panel.

Step 3: Enter Information
Now, as the next step, you need to make sure of the details of your device. Please enter the name and brand of the phone. The country, region, and career are also to be added. Hit on “Next” once done.

Step 4: Download Firmware
Now, follow the instructions given on the screen according to your device. Click on “Next” and the program will start downloading the firmware.

Step 5: Repair the Issue
Lastly, when the firmware is downloaded, the system will start getting repaired on its own. You need to wait until you are informed about the completion of the process.

Reset Factory Settings of this Device
When nothing works, the last resort you can go with is resetting the Oppo K11 5G device to factory state. Doing this will remove any sort of conflicting bugs and other stuff. However, this will remove the data from your device. So make sure to backup everything before going with this method. The steps are:
- Open “Settings” and tap “Backup & reset”.
- Go to “Factory data reset” and tap “Reset phone”

Authentication Error Occurred on Oppo K11 5G? Here Are 10 Proven Fixes
There are times when users get an authentication error while they connect to a Wifi network. The problem is mostly found in Android whenever a device tries to establish a connection to Wifi. If your device is also experiencing an authentication problem Wifi, then don’t worry. It can easily be resolved. In this post, we will make you familiar with the root cause for the Oppo K11 5G Wifi problem and how you can resolve whenever authentication error occurred on your device.
Part 1: Any idea about the Wi-Fi authentication problem?
Wi-Fi authentication has to be done every time you wish to connect to a Wi-Fi network over your smartphone or laptop. To authenticate yourself and connect to the protected Wi-Fi network, you need to have the password of it. But if after you’re putting in the correct password and still experiencing the wifi authentication problem. Here’s what you need to know.
Authentication error occurs when the “deal” between the Wi-Fi router and device fails due to certain reasons. First, the Oppo K11 5G device sends the password of the network and the “connect” request in an encrypted format to the Wi-Fi router. Then, the router decrypts the password and compares the password saved on it. Now, if the password matches, it sends affirmation for the “connect” request, and then the Oppo K11 5G device is allowed to connect to the network.
Part 2: Why Authentication Error Occurred when Connecting to Wifi?
There could be plenty of reasons for facing an authentication error on your device. Most of the time, it occurs whenever a Wifi router seems to malfunction. Furthermore, if your phone has been recently updated, then chances are that there could be an issue with its drivers. A security attack can also make your device malfunction as well. An unstable connection or a router blockage can also be a reason for this issue.
In this scenario, whenever you try to connect to a Wifi network (even after supplying the correct password and username), it doesn’t connect to it. Instead, it displays an authentication error occurred promptly. Thankfully, there are plenty of ways to overcome the authentication problem Wifi. In the next section, we have provided three different solutions to fix the Oppo K11 5G Wifi problem (as it mostly happens on Android devices).
Part 3: 10 Solutions to Fix Wifi Authentication Error
Before we make you familiar with different fixes for the Wifi authentication error, it is important to check your router beforehand. Chances are that you could be getting the authentication error because your router is not functioning properly. You can restart it and try to connect any other device to it as well to check it. After making sure that there is no problem with your network or router, follow these suggestions to overcome the authentication error occurred issue.
Check if extra characters added in Wi-Fi password
Ensure that no other extra characters are being added in the Wi-Fi password while you’re entering it. Key in the password carefully while viewing the characters, and then check if the authentication error occurs or not.
One-Click to Fix Wifi Authentication Error by Android System Repair
Android system repair is considered the most effective way to fix Wifi Authentication Error. As the bottom-layer Android system files may be corrupted unconsciously with days of phone use, the Wifi Authentication Error may be one of the symptoms.
So Android repair requires programming knowledge to do it?
No! With Dr.Fone - System Repair (Android), you can do Android repair in just a few steps and get all issues like Wifi Authentication error fixed easily.
Dr.Fone - System Repair (Android)
An easy-to-operate tool to fix Android system issues like a Wifi authentication error
- Fixes all Android system issues like a black screen of death, Wifi authentication error, etc.
- One-click to fix the Wifi authentication error. No technical skills required.
- Supports all the new Oppo K11 5G devices like Galaxy S8, S9, etc.
- Easy-to-follow instructions provided on each of the screens.
3981454 people have downloaded it
Here are the steps to fix Wifi Authentication Error by Android system repair:
Note: Android repair is effective to permanently fix Wifi Authentication Error, but may wipe out the existing phone data. Backup all the important Android data to PC before you go on.
- After the Dr.Fone tool is downloaded, install, and launch it. You can see the following screen.
- Connect your Oppo K11 5G to the computer, and select “Android Repair” in the middle.
- Select all the details that match your device, and click “Next”.
- Next up, you should boot your Oppo K11 5G in download mode by following the on-screen instructions.

- Allow the program to download the corresponding firmware. After that, the Android repair will start and get the Wifi Authentication Error fixed in minutes.

Use static IP address instead of DHCP
DHCP, or Dynamic Host Configuration Protocol is the default IP address assignment for the Wi-Fi settings on many devices. Whereas DHCP can cause IP address conflict during the dynamic IP address assignment. So, you’d better change “DHCP” to “Static” to see if the authentication error persists.
Step 1: Head to the “Settings” of your Oppo K11 5G and then opt for “Wireless and Networks” followed by “WLAN/WiFi”.
Step 2: Now, hit on the WiFi network that is showing “authentication error occurred”.
Step 3: Depending on your Oppo K11 5G model, look for “IP Settings” and tap on it. Now, switch the “DHCP” to “Static”.
Step 4: Note down the static IP address fields and wipe off all the fields. Punch it in again and then save it.


Check carefully for duplicate Wi-Fi names before you connect
Perhaps, you might connect to a WiFi with a similar name. There are good chances that some users do not modify their WiFi network name and possibly, your neighbor may have the same WiFi network, service provider. Therefore, ensure you connect to the correct WiFi network.
Reset the Wifi network
One of the easiest ways to fix the authentication problem of Wifi is to reset the network. To do this, you would be required to forget the respective network first and then connect to it again. This can be done by simply following these steps.
1. Firstly, you need to forget a Wifi network. To do it, go to your phone’s Settings > WiFi and network. From here, you can see a list of all the Wifi hotspots that your phone connects to. Select the network you wish to forget.

2. When you would select a network, it will provide the basic information related to it. Just tap on the “Forget” button and agree to the pop-up message. This will erase the network’s information from your device.

3. Afterward, turn on your Wifi again and tap to the network you wish to connect to. Simply provide the credentials and tap on the “Connect” button to reestablish the connection. This way, you can reset the network successfully.

Modify network connection
If the above solution won’t work, then you would be required to walk the extra mile to fix the Oppo K11 5G Wifi problem. After you reset a network connection, if still getting issues regarding the authentication of the network, you need to modify the connection. In this technique, you will be changing the IP settings on your phone to alter the way it establishes a secure connection. You can do it by following these steps.
1. To start with, visit your phone’s Settings and open the Wifi page.

2. This will display a list of all the Wifi networks that are associated with your device. Just long-tap on the Wifi network that you wish to modify. It will open another pop-up window. From here, tap on the option of “Manage network settings”. Sometimes, users also get an option of “Modify network settings” here as well. Simply select it to proceed.

3. It will display basic information related to your Wifi network. Just tap on the “Show advanced options” button to access more options related to the network setting.


4. From the IP Settings menu, change the field from DHCP to Static. This will let you establish a static connection between your device and the router.


5. As soon as you will change it to static, you will get different fields related to your network’s IP address, gateway, DNS, and more. Simply fill these fields and tap on the “Save” button once you are done.

Now, try to connect to the Wifi hotspot again. You would be able to overcome the authentication problem of Wifi.
Change Network Security Type
It has been observed that, when we connect to Wifi, our device chooses a wrong security type. This clashes with the default security protocol of the router and authentication error occurred due to this. If your device is facing the same issue, then it can be fixed by simply changing its security type. To do this, follow these instructions:
1. To change the security type of a network, you need to “Add the network”. If you already have the Wifi network saved, then simply forget the network by following the above-mentioned tutorial.
2. Now, turn on your device’s Wifi and tap on the option of “Add network”. Here, you would be asked to give a network name and select the security type. To manually select it, tap on the “Security” option.

3. From here, you will get a list of various security protocols that you can pick. Select “WPA/WPA2-PSK” and save your selection.

Now, try to connect to the network again. Most likely, it will let you fix the authentication error on your device.
Update Android firmware to the latest
There are instances where an outdated OS version of your Oppo K11 5G may create a hindrance in establishing a connection between your device and the WiFi network. You need to update your Android firmware to the latest version and then check if the problem persists or not.
Step 1: Launch “Settings” of your Oppo K11 5G and then get into the “About Phone” option.
Step 2: Now, opt for the “System Update” option. If the update is available, get your device updated to the latest OS version.
Restart the router and reset Android network settings
Sometimes, the WiFi router may hang up while establishing a connection and therefore, the wifi authentication problem occurs. Try restarting your Wi-Fi router and then check if your device connects successfully. If this doesn’t work, try to reset your Android Network Settings .
Bonus tip: Turn Airplane mode on/off
By simply turning on the Airplane mode (and later turning it off), you can easily fix the authentication problem Wifi most of the time. You can find a toggle button for Airplane mode on the notification bar of your phone. If you can’t find it there, then go to your phone’s Settings > Connection > More Networks and turn on the feature of “Airplane Mode”.


Let it do for a while. Afterward, turn it off and try to connect to the Wifi network again.
After following these quick and easy suggestions, you would be able to fix the Oppo K11 5G Wifi problem for sure. Even if you use any other Android device, then its authentication error can easily be resolved after these effective solutions. Go ahead and give these expert solutions a try and let us know about your experience as well. If you have any other solution to fix the authentication problem Wifi, then share it with us as well in the comments.
- Title: Gmail Not Working on Oppo K11 5G 7 Common Problems & Fixes | Dr.fone
- Author: Ariadne
- Created at : 2024-07-30 11:16:41
- Updated at : 2024-07-31 11:16:41
- Link: https://howto.techidaily.com/gmail-not-working-on-oppo-k11-5g-7-common-problems-and-fixes-drfone-by-drfone-fix-android-problems-fix-android-problems/
- License: This work is licensed under CC BY-NC-SA 4.0.