
Gmail Not Working on Samsung Galaxy S23+ 7 Common Problems & Fixes | Dr.fone
Gmail Not Working on Samsung Galaxy S23+: 7 Common Problems & Fixes
Ever since Android is introduced, it has almost eliminated the need of computers to work through Gmail. Gmail carries much importance especially when you’re a working person. A lot of work is done through mails on daily basis. But maybe today is not your lucky day. Maybe Gmail is giving you a hard time today. Is it? Is your Gmail not responding or keeps stopping you from going further? Well! There is no need to be bothered anymore. We are discussing some of the general Gmail problems along with their fixes. So, if your Gmail is not working on Android, you can go through this article and find the relevant solution.
Problem 1: Gmail App not responding or keeps crashing
First and foremost, the most common situation people meet with is when there Gmail keeps crashing. Or simply, it doesn’t respond at all. When you open it, it stuck for a few seconds and then you have to close it. It seriously is an annoying issue. If your Gmail is also not responding or crashing and you aren’t able to work properly, following are the solution you can follow.
Clear Cache
The first thing you can do to fix Gmail not responding issue is to clear the cache of Gmail. This has higher chance to get the issue resolved. To do this:
- Go to “Settings” and look for “Apps & Notifications”. Please note that the option may vary in some Android phone like it maybe “Application” or “App Manager”. So, don’t panic and look for the option carefully.

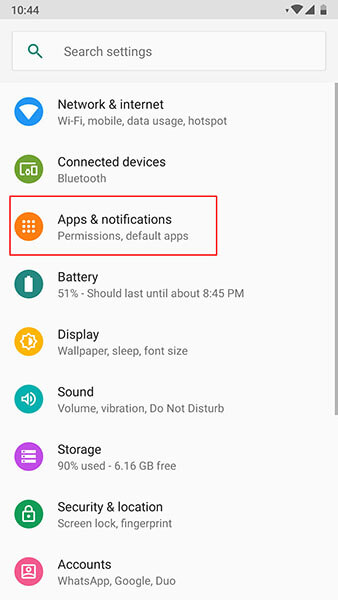
- Now, from the apps list, search “Gmail” and tap on it.
 The BootIt Collection covers multi-booting, partitioning, and disk imaging on traditional PC’s using the standard BIOS and newer PC’s using UEFI. The collection includes BootIt Bare Metal (BIBM) for standard BIOS systems and BootIt UEFI (BIU) for UEFI system.
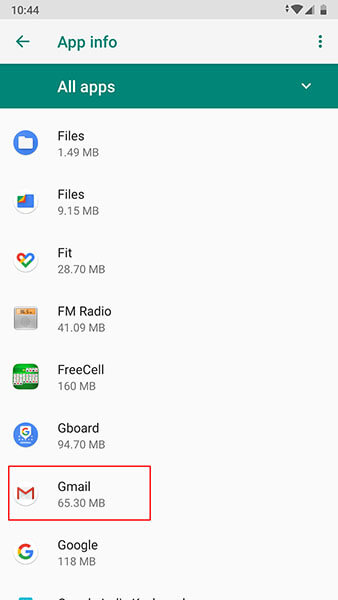
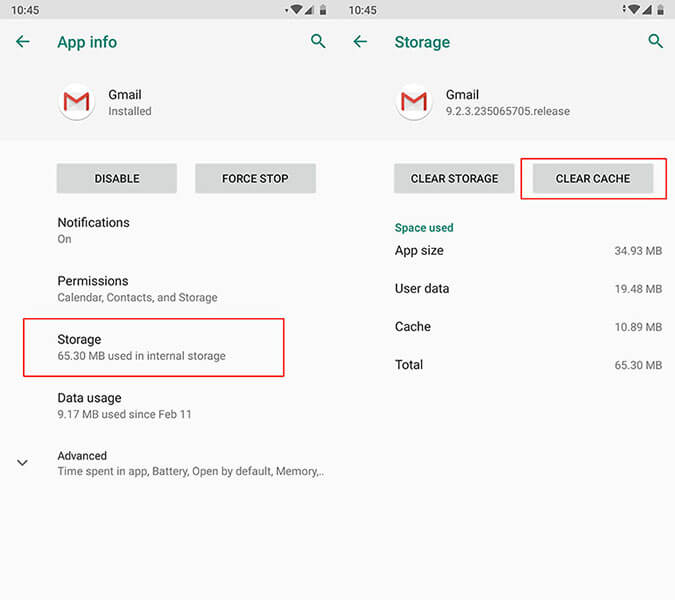
- Go to “Storage” followed by “Clear Cache”.

Restart the Samsung Galaxy S23+ device
Restarting the Samsung Galaxy S23+ device in the first place simply resolves many problems and so in the instance when Gmail keeps stopping. Simply long press the power button of your device and restart the Samsung Galaxy S23+ device. See of the problem gets vanished or not.
Factory Reset the Samsung Galaxy S23+ device
The next option that you can try is resetting your device. This will lead to data loss so we suggest you to take backup firstly and then proceed with this method.
Hit on “Settings” and search for “Backup & Reset” option.
Tap on “Reset” or “Erase all data” (the option name again may vary).

If unfortunately the above solutions don’t work, there is a requirement to flash the stock Android ROM again. Before you wonder how, there is a professional one-click tool that can surely be of assistance. It is Dr.Fone - System Repair (Android) . The tool takes special care of the Android phones and fixes almost every system issues with ease. It takes no special technical skills and performs efficiently.
 OtsAV Radio Webcaster
Problem 2: Gmail won’t sync between all ends
The next most common problem where people get stuck with is when there Gmail won’t sync. Here are the solutions to this particular problem.
 Power Tools add-on for Google Sheets, 12-month subscription
Make Space in the Phone
When Gmail stops syncing, one of the things that can save you is clearing the storage. It is the space that maybe the culprit and therefore the syncing don’t work at all. We would like to suggest you removing the unwanted apps to clear the storage or deleting the downloaded files. You can also transfer the important files to your computer and make the space vacant.
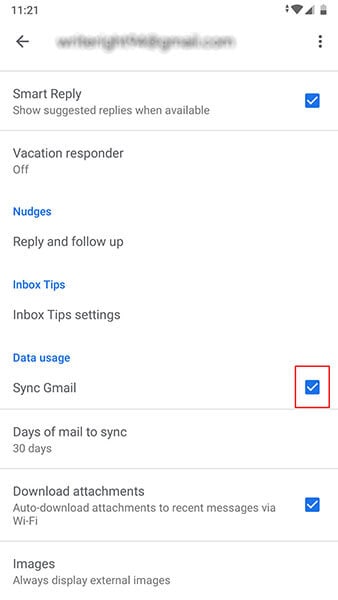
Check Gmail Sync Settings
When still the Gmail not working issue persists and you can’t sync, make sure to check the Gmal sync settings. For this, follow the steps below:
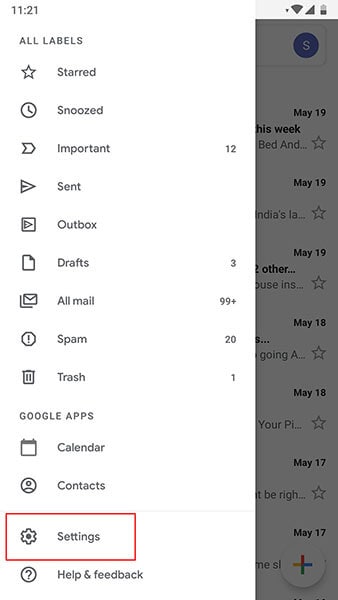
Launch the Gmail app and tap on the menu icon (three horizontal lines).
Tap “Settings” and choose your account.
Check the box next to “Sync Gmail” if it’s not checked.
Restart the Samsung Galaxy S23+ device
Again, restarting can also be helpful in this situation. When you boot the Samsung Galaxy S23+ device again, check if your Gmail can sync or not.
Problem 3: Gmail won’t load
In case you are using the Gmail over your web browser and it has tested your patience in loading, here are the solutions that could prove to be fruitful for you. Please check these out.
Ensure to Use Gmail Supported Browser
First of all, you need to make sure that the browser you are using works with Gmail or not. Gmail can smoothly perform in Google Chrome, Firefox, Safari, Internet Explorer and Microsoft Edge. However, the browsers should be updated. So, please make sure that these browsers are running on the latest versions. Moreover, in case you use Chromebook, don’t forget to update the operating system in order to let it support Gmail.
Clear Cache of web browser
If you tried the above method but to no avail, try to clear the cache and cookies of the web browser. But by doing so, the browser history will be removed. As well as, the records of the websites you previously enjoyed will also be lost.
Check browser extensions or add-ons
If not the above one, try this tip. It encourages you to check your browser extensions. Perhaps these are interfering with the Gmail and due to this conflict, Gmail won’t load. You can either turn off these extensions and plug-ins temporarily or make use of the incognito mode of the browser where there are no such things like extensions and plug-ins.

Problem 4: Gmail can’t send or receive
Gmail also gives you problem in sending or receive mails and messages. And to troubleshoot such issue, following are the solutions mentioned.
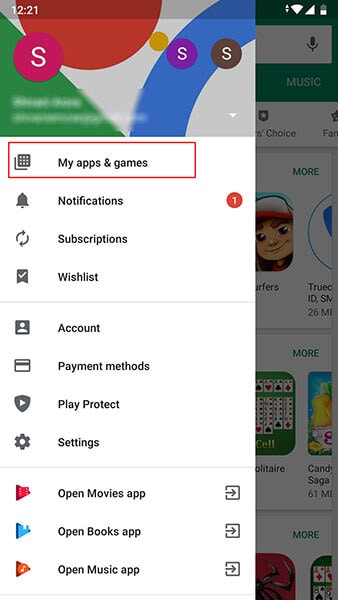
Check the Latest Version of Gmail
This issue is likely to emerge when you are using an outdated version of Gmail. And therefore, the first solution says you to check if the Gmail update is available. You can go to the Play Store and from the “My apps & games” option, you can see if Gmail needs to be updated or not.
 Epubor Audible Converter for Mac: Download and convert Audible AAXC/AA/AAX to MP3 with 100% original quality preserved.
Verify Internet Connection
Another thing that carries weight while you can send or receive mails is the internet connection. As we all know that Gmail won’t respond if the Samsung Galaxy S23+ device is not connected to the internet. Therefore, you are advised to turn off Wi-Fi and then enable it again. Also, please ensure to switch to Wi-Fi if you are using the cellular data. This may hamper the process and stop you from receiving or sending mails.
Remove you Account and Add Again
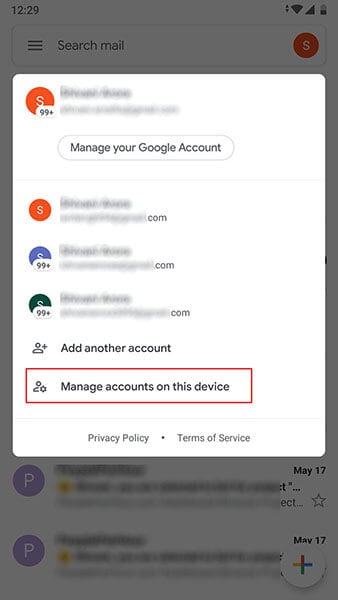
If still Gmail keeps stopping you to go ahead, make sure to once sign out from it. To do this:
Open your Gmail app and go to “Manage accounts on this device”.
Now, tap on the account you are working with. Tap on “REMOVE ACCOUNT” thereafter. After this, you can again sign in and then check if the problem is gone or not.
 Glarysoft File Recovery Pro - Helps to recover your lost file/data, even permanently deleted data.

Problem 5: Stuck in sending
Now, here is another annoying problem that doesn’t let Gmail working on Android properly. This problem addresses the situation where users send a mail but it gets stuck on sending. If this is the problem that you are going through, the following solutions will help you.
Try Alternative Gmail Address
First of all, if Gmail is not working due to stuck in sending issue, we advise you to make use of some other Gmail address to send the mail. If the problem still occurs, jump to the next solution.
Check Network Connection
As already mentioned, be sure of an active internet connection while working with Gmail. When you are not using a stable connection, it may lead to stuck on sending, Gmail crashing and many other issues. You can fix the issue by doing these three things:
- Most importantly, use only Wi-Fi rather than cellular data if you want a smoother process.
- Turn off Wi-Fi and then turn it on again after nearly 5 seconds. Do the same with the router. Plug it out and the plug in.
- Lastly, turn on Airplane mode and after a few seconds, turn it off again.
Now try to send the mail and see if things are still the same or not.
Check Attachments
Large attachments can also be the reason for this issue. We would here like to suggest you to check the attachments you are sending. If these are not so important, you can remove them and send the mail. Or if it is not possible to send the mail without attachments, compressing the files can be a solution.
Problem 6: “Account not synced” issue
Many times, the users get the error that says “Account not synced” while they try to work with Gmail. And this is the 6th problem we are introducing. The ways mentioned below will assist to get out of the trouble.
Make Space in the Phone
When Gmail stops to further the process by prompting “Accounts not synced” issue, be sure that your Samsung Galaxy S23+ has some storage in it. If not, create it straight away. As we also mentioned in one of the above solutions, you can either delete the unnecessary files or transfer the important files to the PC to make the space in the phone. Go along with this tip and see if it works.
Check Gmail Sync Settings
As another solution, check Gmail sync settings to get the issue fixed.
- Simply open Gmail and hit the menu icon which is three horizontal lines on the top.
- Go to “Settings” and choose your account.
 Software Update Pro - Check and update software installed on your computer.

- See the tiny box beside “Sync Gmail” and check it if it is not.
Restart the Samsung Galaxy S23+ device
If the above method went futile, simply restart your device. Take help of the Power button on your device. Long press it and from the options, restart it. This will hopefully work for you.
Problem 7: Gmail app running slow
The last problem that you may face is the slow-going Gmail app. In simple words, you may experience that Gmail app is operating extremely slowly. To fix this, following solutions will help you.
 TubeDigger - online video downloader from mostly any site
Restart the Phone
It is a universal method to fix minor Android system issues. And here too, we would like you to restart your Samsung Galaxy S23+ in the first place when you find that Gmail is not responding due to the sluggish behavior.

company, user or members of the same household. Action! - screen and game recorder</a>
Clear Storage of Device
Usually all the apps start running slow when the Samsung Galaxy S23+ device is not having sufficient space. As the apps need space to function quickly and appropriately, having the Samsung Galaxy S23+ device on low storage can prove to be a bad luck for Gmail. So, make sure you wipe out the items you no longer needed on your device and create some room so that the Gmail responds nicely and won’t be running slow anymore.
Update Gmail App
As the last tip that will indeed help you is to update the Gmail app. Until you update the app when required, Gmail keeps stopping you from working and you will definitely get frustrated. Therefore, go to Play Store and look for the Gmail update. If it is available, welcome it with smile and bid farewell to the problem of slow running Gmail.
What if your problem still doesn’t get resolved after following these 3 tips? Well! If that is the case, we will again recommend you to make use of an expert one-click tool to flash the stock Android ROM.
Dr.Fone - System Repair (Android) is going to help you serving the purpose. This mighty tool possesses huge success rate and one can rely on it for its simplicity and security. It is designed to work with numerous problem related to Android system. So, no matter if your Gmail keeps crashing or keeps stopping, it has the solution for everything.
Dr.Fone - System Repair
Fix all Gmail issues caused by Android system:
- Gmail app corruption or not opening
- Gmail app crashing or stopping
- Gmail app not responding

Spotify Keeps Crashing: A Complete List of Fixes You Can Use on Samsung Galaxy S23+

Does your Spotify keep crashing? You’re not alone. This problem is widespread and can happen to anyone. Fortunately, there are ways to rectify it quickly and easily. We’ve prepared a guide to fixing your Spotify crashing problem.
In our guide, you’ll find out why your Spotify keeps crashing. Moreover, you’ll get a list of fixes for your Spotify closing problem and detailed instructions. Once you’ve read our guide, you’ll successfully solve the problem of Spotify crashing on Android.
Part 1. Why Spotify Keeps Crashing

Some people have encountered a problem with their Spotify accounts. Spotify can sometimes keep crashing and closing due to several reasons. For example, it can happen due to your phone not being compatible with the app. This can happen if your operating system isn’t updated to the newest version.
Another reason the Spotify app keeps crashing could be an antivirus or a VPN blocking Spotify from working. Moreover, your device might be out of storage space, causing your phone to slow down and crash apps.
Several other reasons for this problem include network issues, a weak Wi-Fi signal, or the battery saving mode. Furthermore, your apps and files might be corrupted, or an app on your phone might block Spotify from working correctly.
Part 2. Spotify Keeps Crashing: Best Fixes
As you can see, there are numerous reasons for your Spotify crashing. Fortunately, all of them are easy fixes, and there’s no need to worry. We’ve prepared a list of 11 ways to fix your Spotify. With these fixes and detailed instructions, you’ll be able to eliminate your Spotify problem with ease.
1. Fix the Spotify Closing Issue by Repairing Your System
The reason for your Spotify crashing may be more significant than just a bug. Your device system might be behind it. If that’s the case, you might need to repair your system before trying to fix Spotify.
If you want to repair your mobile device’s system quickly and efficiently, try Wondershare Dr.Fone.
Wondershare Dr.Fone is an app that gives you complete control over your phone. You can manage it, back it up, recover files, and repair your system. The system repair option will fix your Android in just a few clicks and allow you to use Spotify freely. The steps go as follows:
- Step 1: Install and open Wondershare Dr.Fone on your computer and connect your Android.
- Step 2: Go to the Toolbox section and select System Repair.

- Step 3: Choose the Android


- Step 4: See which Android errors Wondershare Dr.Fone can fix and click Start.

- Step 5: Select the **Brand,**Name, Model, Country, and Carrier In the Carrier section, choose OPEN if your device is unlocked.

- Step 6: Tick the “I agree with the warning, and I am ready to proceed”checkbox and click Next.
- Step 7: Put your Android in Download Mode. You can find the steps below these instructions.
- Step 8: The program will automatically download once you put the phone in Download Mode.

- Step 9: Once the firmware downloads, click Fix Nowto install it on your Android.

- Step 10: Type “000000” in the dialog box and click Confirm.


- Step 11: That will start the system reparation, which you can follow on the screen.


- Step 12: Once it finishes, click Doneto complete the system repair.

There are two ways to enter Download Mode: one for Android devices with the Home button and another for those without it.
The steps for entering Download Mode on an Android phone with the Home button are as follows:

- Step 1: Turn off your phone.
- Step 2: Press and hold the Volume Down,Home, and Power buttons simultaneously.
- Step 3: Press the Volume Upbutton to enter Download Mode.
The steps for entering Download Mode on Android devices without the Home button are as follows:

- Step 1: Turn off your phone.
- Step 2: Press and hold the Volume Down, Bixby, andPower buttons simultaneously.
- Step 3: Press the Volume Upbutton to enter Download Mode.
2. Force-Close the App
You can force-close Spotify and open it again to make it work properly. That is an easy fix if your Spotify has developed a bug. If that is the case, follow the next steps:
- Step 1: Try opening Spotify.
- Step 2: If it’s not working, open App Switcher or Recent Apps. Different Android devices open it differently. Thus, you can swipe up from your Home screen, or if you have three buttons at the bottom, press Recent Apps.
 dotConnect for Oracle is an ADO.NET data provider for Oracle with Entity Framework Support.

- Step 3: Find Spotify in Recent Appsand click X or swipe up over it to force-close it.
- Step 4: Try opening Spotify again.
3. Re-Login to Your Spotify
The Spotify app may be working fine. Maybe you’re having problems with your Spotify account. If so, you can try logging out and logging in again to see if that works. That isn’t a big problem; sometimes Spotify accounts start bugging. You can re-login to your Spotify account by following these steps:
- Step 1: Open Spotify.
- Step 2: Tap Settingsin the upper right corner.

- Step 3: Scroll to the bottom of the settings and tap Log Out.

- Step 4: Tap Log In.

- Step 5: Enter your login credentials.
- Step 6: Tap Loginagain, and you’re in.
.png) Kanto Player Professional
Kanto Player Professional

4. Restart Your Device
Another way to stop Spotify from crashing can be restarting your Android. The steps may vary slightly depending on the Samsung Galaxy S23+ device, but they’re mostly the same. Follow these steps to restart your device:
- Step 1: Press and hold the Power button(you must press and hold both the Power and Volume Up buttons on a newer Android device).
- Step 2: Tap Restart. That will restart your Android, and you can try opening Spotify again.
 Glarysoft File Recovery Pro Annually - Helps to recover your lost file/data, even permanently deleted data.

5. Set Up Your Time and Date
Another possible reason for your Spotify closing problem could be the incorrect time and date on your Android. That is also an easy fix; you must set it correctly and try opening the app again. Set up your time and date with these steps:
- Step 1: Open Settingson your Android.
- Step 2: Go to Systemor General Management (depending on your Android model).
- Step 3: Go to Date and Time.
- Step 4: Tap Set Dateand set the correct date.

- Step 5: Go to Set Timeand set the right time.


 SwifDoo PDF Perpetual (2-PC) Free upgrade. No monthly fees ever.
6. Update Your System Software
Your Spotify app might keep crashing because your system is outdated. Try updating it to the latest version to try and fix the crashing problem. The steps for the Android system update are as follows:
- Step 1: Open Settings.


- Step 2: Go to System or About Phone.


- Step 3: Select System Update.
- Step 4: If there’s an available update, tap

7. Update Your App
If your system is updated, then Spotify might need an update. The app might malfunction if you’re using an older version. Thus, updating the app might solve the Spotify crashing problem. You can update Spotify by following these steps:
- Step 1: Go to the Play Store.


- Step 2: Search and open Spotify in the Play Store.
- Step 3: Tap Update

8. Free up Storage
Spotify can start crashing if your Android’s storage space is at capacity. That can also cause other apps to crash, not only Spotify. Therefore, check the storage space and free up as much as possible. Follow these steps:
- Step 1: Open
- Step 2: Go to Device Maintenance > Storageor go directly to Storage.

- Step 3: Here, you can see how much of your storage space is available and what’s taking up the most space.

- Step 4: Then, you can go ahead and clear as much space as you can.
9. Reinstall Spotify
There’s another solution if the Spotify app keeps crashing. You can try uninstalling and reinstalling it again on your Android. That will reset the app and might solve your problem. Follow the next steps to reinstall Spotify:
- Step 1: Find the Spotify app on your Android.
- Step 2: Hold the app icon.
- Step 3: Then, press Uninstall.

- Step 4: Press OK.
- Step 5: Then, open the PlayStore and find Spotify.
- Step 6: Tap Installto reinstall the app again.

- Step 7: Once it installs, log in to test if it’s working.

10. Check if Spotify Is Down
If your Spotify keeps crashing and closing, it might not be your device’s problem. Sometimes, Spotify’s server can be down, and many people face the same issue. If that’s the case, you can check with your friends if their Spotify is working or check online if Spotify is down. To do that, follow these steps:
- Step 1: Open your web browser.
- Step 2: Type “Is Spotify down” in the search bar.

- Step 3: You’ll see several websites that check real-time app servers and if they’re down.

- Step 4: Go to one or two and see what they say. If Spotify is down, you’ll need to wait for them to fix the problem.

11. Clear the Cache
When using different apps and websites, your device caches data from those sources. Since there’s no need to pile up your Spotify cache, you can clear it. Follow these steps:
- Step 1: Open Settings.

- Step 2: Go to Apps.
- Step 3: Find Spotify and tap it.

- Step 4: Tap Storageor Storage usage.

- Step 5: Tap Clear Cache.

 safe & secure
Conclusion
If your Spotify app keeps crashing, several reasons might be behind it. For instance, your storage space might be at capacity, your system might need an update, your phone might have a software bug, or the Spotify server might be down.
We’ve given you 11 solutions to fix the Spotify crashing problem. However, if your system needs repairing, you can try Wondershare Dr.Fone for quick and easy repair. This solution and all others will surely help you fix the crashing problem.
Quick Fixes for Why Is My Samsung Galaxy S23+ Black and White
Why is My Samsung Galaxy S23+ in black and white? This sudden shift in display colors can be perplexing and impact user experience. This issue affects various devices, including Samsung Galaxy S23+ and other Android models. The abrupt shift to monochrome can impact your daily use. It can make apps and content appear dull.
If you’re asking why is my Android phone in black and white, then you’re in luck. Dive into the article below to unravel the causes behind your phone’s black-and-white display. Discover insights on addressing this unexpected issue, enhancing your overall mobile experience.
 The Tube Sites Submitter is a fast and efficient tool for anyone who needs to upload videos quickly, easily and automatically to hundreds of tube sites in mere minutes .
Part 1. Phone Screen in Black and White? Easy Fixes for Android Devices
Discovering your Samsung Galaxy S23+ going monochrome can be annoying. The section below answers the question: why did my Samsung Galaxy S23+ phone go black and white? It involves a combination of software adjustments and careful troubleshooting. Follow the practical solutions below to restore vibrant colors to your device.

Accessibility Settings
Accidental activation of accessibility settings may turn your display monochromatic. The “Grayscale“ or “Color Inversion“ option in the Accessibility or Vision section of your phone’s settings might be enabled. It can cause a black-and-white display. Here’s the solution:
- Step 1: Open your phone’s settings. Navigate to the Accessibility or Vision section.

- Step 2: Disable the Grayscale or Color Inversion option.
App Conflicts
Certain third-party apps can cause conflicts, leading to a black-and-white display . Newly installed apps might be the culprit, affecting your device’s color settings. Some apps also have grayscale modes that can impact the overall display. Here’s how to fix it:
- Step 1: Identify and uninstall recently installed apps.
- Step 2: Check individual app settings for grayscale modes.
System glitches or software bugs can trigger display issues. It can result in a black-and-white screen. Outdated software versions may contain bugs affecting color output as well. Regularly checking for software updates can prevent or resolve such glitches. Here’s how.
- Step 1: Go to your phone’s settings. Check for software updates in the Software update or System update section.

- Step 2: Update your device if there is a software update available. Ensure your device is running the latest software version.
Battery Saving Modes
Battery-saving modes can also alter display settings to conserve energy. It can sometimes result in a black-and-white screen. These modes limit power consumption by reducing color output. Reviewing and adjusting these settings can restore the normal color display. Follow the steps below.
- Step 1: Open your Samsung Galaxy S23+’s Settings. Navigate to the Battery or Battery & Performance section.

- Step 2: Check and adjust battery-saving settings, including toggling power-saving modes on or off.
 DLNow Video Downloader
Hardware Issues
In rare cases, hardware issues may cause a black-and-white display. Physical damage, loose connectors, or problems with the display hardware can impact color reproduction. Identifying and addressing these hardware issues may be crucial for resolving the problem. Here’s what you should do.
- Step 1: Check for physical damage, loose connectors, or display hardware issues.

- Step 2: Seek professional assistance or contact the Samsung Galaxy S23+ device manufacturer if hardware problems are suspected.
Consider a reliable third-party tool if your phone persists in black and white despite troubleshooting attempts. Tools such as Dr.Fone System Repair Android offer advanced solutions for complex system issues. They ensure your phone regains its vibrant display without a hitch.
Part 2. Using a Dedicated Tool: Dr.Fone for Fixing Black and White Display Problems
Dr.Fone is a reliable solution for addressing black-and-white display issues on Android devices. For a stress-free repair experience, follow these simple steps using Dr.Fone - System Repair (Android).
![]()
Dr.Fone - System Repair (Android)
Repair Android System Errors without Any Trouble.
- Fix your Android to normal, no skills required.
- Fix various Android system issues, stuck in boot loop , black screen , or won’t turn on , looping on start, etc.
- The high success rate in resolving Android system issues.
- Compatible with a wide range of Android devices and OS versions
- User-friendly interface with easy-to-follow steps.
3981454 people have downloaded it
- Step 1: Download and install Dr.Fone. Launch the program and click on System Repair on the main window. Connect your Samsung Galaxy S23+ to the computer using the correct cable. Choose Android among the options.

safe & secure
3,601,336 people have downloaded it
- Step 2: Provide accurate device information, including brand, name, model, country/region, and carrier details. Confirm the warning and click Next.
- Step 3: Follow the on-screen instructions and wait for the program to download the firmware. Once downloaded and verified, Dr.Fone automatically initiates the repair process on your Samsung Galaxy S23+.

- Step 4: After a while, your Samsung Galaxy S23+ will have all system issues fixed. Click Done to complete the process or choose Try again if the problem persists, allowing you to repeat the steps.
Note
It’s highly recommended to back up your Android data before using Dr.Fone for repair.
How Dr.Fone Can Help You Beyond Display Issues
Beyond resolving black-and-white display problems, Dr.Fone serves as a comprehensive tool for all Android issues. The platform can enhance your device functionality.
Key Features
Here are key features that make Dr.Fone an invaluable resource:
- Fix All Kinds of Android Problems
Dr.Fone is designed to address a wide range of Android issues. These include black screens, malfunctioning Play Store, app crashes, boot loops , and bricked Android devices . Its versatility makes it a go-to solution for diverse system challenges.
- Wide Device Compatibility
With support for over 1000 Android models, Dr.Fone ensures compatibility with a vast array of devices. The platform is versatile and a widely applicable tool for Android users.
- High Success Rate
Dr.Fone boasts a high success rate in resolving Android issues. It provides users with confidence in its effectiveness and reliability.
Additional Functionalities
Below are additional functionalities of Dr.Fone that support your device to keep it in top shape.
- **Phone Manager.**Fone acts as a comprehensive phone manager. It allows you to transfer contacts, SMS, photos, videos, and more between your Samsung Galaxy S23+ and computer. The feature simplifies data management and ensures seamless organization.
- Phone Backup. The tool enables selective backup of Android data on a computer. It provides you with the flexibility to safeguard essential information. The selective backup feature ensures efficient use of storage and allows for easy restoration when needed.
- **Screen Unlock Without Losing Data.**Fone offers a secure way to unlock the screen of Android devices without losing data. You can regain access to your devices without compromising valuable data, whether due to forgotten passwords, pattern locks, or PINs.
Part 3. Tips for Maintaining Your Phone Display Brilliance
Maintaining a vibrant phone display enhances user experience and ensures optimal visual clarity. Follow these tips to keep your phone’s display at its best:

Adjust Brightness Mindfully
Optimize brightness settings based on ambient lighting. Avoid excessively high brightness levels, which can strain your eyes and impact battery life.
- Update Regularly
Keep your phone’s software up-to-date to benefit from performance enhancements, bug fixes, and display optimizations provided by system updates.
- Be Mindful of Background Apps
Close unused background apps to free up system resources and prevent unnecessary strain on your phone’s display and overall performance.
- Use Static Wallpapers
Dynamic wallpapers and live backgrounds consume more power. Opt for static wallpapers to reduce battery drain and maintain consistent display performance.
- Avoid Extreme Temperatures
Exposure to extreme hot and cold temperatures can affect your phone’s display and overall performance. Store your device in a moderate environment.
- Implement Screen Timeout
Set a screen timeout to turn off the display when not in use automatically. This conserves battery life and prevents unnecessary wear on the screen.
- Clean Your Screen Regularly
Fingerprints, dust, and smudges can affect display clarity. Clean your screen regularly with a microfiber cloth to ensure a crisp and vibrant view.
- Secure Your Phone
Implement security measures to prevent unauthorized access. This protects your data and ensures the display remains secure and untouched.
- Enable Night Mode
Many phones offer a night mode that reduces blue light emission. It promotes better sleep and reduces eye strain, especially during nighttime use.
- Implement App-Specific Settings
Some apps have specific display settings. Explore and adjust these settings within individual apps to enhance your visual experience and reduce strain.

Conclusion
The guide highlights the “Why is My Samsung Galaxy S23+ black and white“ query. It offers practical solutions for Android and Samsung Galaxy S23+ users. By addressing common issues such as accessibility settings, app conflicts, and system glitches, you can restore their vibrant displays. Maintaining your phone display involves mindful practices, from adjusting brightness to regular updates.
The guide provided solutions for display issues and showcased the versatility of Dr.Fone System Repair Android. It’s a holistic solution for users seeking a seamless and reliable Android experience, addressing diverse concerns with precision and efficiency.
- Title: Gmail Not Working on Samsung Galaxy S23+ 7 Common Problems & Fixes | Dr.fone
- Author: Ariadne
- Created at : 2024-07-30 11:18:22
- Updated at : 2024-07-31 11:18:22
- Link: https://howto.techidaily.com/gmail-not-working-on-samsung-galaxy-s23plus-7-common-problems-and-fixes-drfone-by-drfone-fix-android-problems-fix-android-problems/
- License: This work is licensed under CC BY-NC-SA 4.0.