
Google Pixel 7a Not Receiving Texts? 10 Hassle-Free Solutions Here | Dr.fone
Google Pixel 7a Not Receiving Texts? 10 Hassle-Free Solutions Here
If you are using an Google Pixel 7a, you might have encountered the issue of not receiving texts. This issue can be quite frustrating, as it prevents you from staying connected with your friends and family. However, there are several ways to fix this issue and get your texts back up and running. In this article, we will show you some of the best solutions to fix the issue of not receiving texts on Google Pixel 7a.
It is very common that the Android messaging app is not working on many devices especially broken devices . People often encounter this issue in Google Pixel 7a phones, even the latest ones.
You might find lots of people online stating I can’t receive text messages on Android. And usually, people don’t find a legit solution for this issue. If you are also experiencing this sort of issue on your Google Pixel 7as, then don’t panic. We have a series of methods that can supposedly fix the problem. But at first, we will learn what the main reasons this problem arises are and how do you know that it is consistent not some random error.
Take a look at the sections below, and you will learn all possible things regarding the messaging application on your phone.

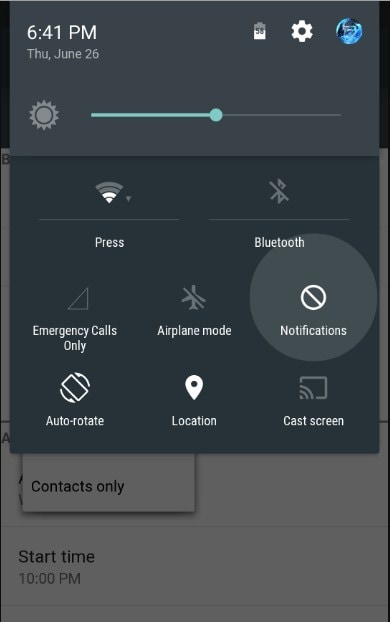
Part 0. Symptoms and Causes of Android Not Receiving Texts
The most common symptoms that would clarify that your Android messaging service is not working right are given below:
- You will stop receiving any texts all of a sudden.
- You can’t send or receive a text message.
- Whenever you try to text someone, the message sent failed notification pop up on the screen.
The reasons why your Android is not receiving texts are given below:
- Network issue
- Insufficient memory
- Mis-configuration of device settings
- Switching of devices
- A glitch in the messaging app
- Software issue
- Carrier problem with the registered network.
Apart from all these reasons, some additional causes are also there that can lead to this issue.
Part 1: One-click to Fix Android not Receiving Texts by Android System Repair
If you are not willing to waste your precious time fixing the message problem, then you can switch to the top-rated Android repair tool, i.e., Dr.Fone - System Repair (Android) . With this software, you can easily fix issues like the black screen of death, crashing apps, can’t receive text messages on Android, or failed download. If you have no idea what is causing the message app problem, you can simply think of repairing the whole Android system.
You surely need to try the software as it can perform the following tasks:
Dr.Fone - System Repair (Android)
Android repair tool to fix Android Not Receiving Texts
- Fix the Android system without technical knowledge.
- Complete Android repair tool for all brands and models.
- Simple and Easy Repair procedure
- 100% guarantee that the problem will be fixed.
- Also available for iOS devices.
3981454 people have downloaded it
You can download and install the software on your system and use it to fix any issue. Then follow the steps given below:
Step 1: Launch the application and choose the System Repair option from the main interface. Connect your Google Pixel 7a to the computer and choose the Android Repair mode, and hit the Start button to begin.
 Screensaver Factory, Create stunning professional screensavers within minutes. Create screensavers for yourself, for marketing or unlimited royalty-free commercial distribution. Make screensavers from images, video and swf flash, add background music and smooth sprite and transition effects. Screensaver Factory is very easy to use, and it enables you to make self-installing screensaver files and CDs for easy setup and distribution. Screensaver Factory is the most advanced software of its kind.
Step 2: You will have to provide information about your device, including the brand, name, model, country, and carrier. In between, you will be notified that your device repair might erase the existing data of your device.
 PDF application, powered by AI-based OCR, for unified workflows with both digital and scanned documents.
Step 3: Agree with the conditions and hit the Next button. The software will download the firmware package automatically. It might take a while to finish the download, and when it is finished, the repair process will be initiated automatically.

It won’t take long, and your Google Pixel 7a will be repaired. Now you will be able to receive and send text messages without any hassle.
Part 2: Remove and Insert the SIM
The easiest thing that you can try if your Google Pixel 7a is not receiving any text messages is because the SIM is not inserted right. If your SIM card is inserted wrong, then it is obvious you can’t receive text messages on Android. Simply take out the SIM card, see how it must be inserted, and do it correctly. Once the SIM is inserted in the right way, you will receive the pending text messages immediately unless there is another issue preventing it.
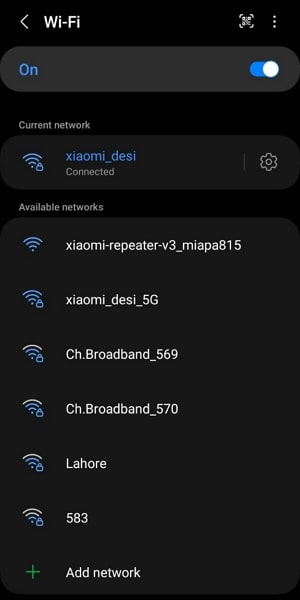
Part 3: Check Network Connection
Another simple method that you can try if you are not receiving text messages on Google Pixel 7a phone is to check your network connection. Usually, you can see the bar on the top of the screen. Maybe the problem exists because you have no signal strength at the moment.
Part 4: Consult your Carrier about the Data Plan
Maybe you are unable to get messages on your Google Pixel 7as because your existing data plan has expired. You can directly contact your Carrier about the issues where your Google Pixel 7a is not receiving texts. If your plan has expired, then you might have to renew it immediately. If not, then try out other fixes to resolve this issue.
Part 5: Try the SIM card in Another Phone or Slot
Sometimes, people complain that Google Pixel 7a is not receiving texts from iPhone, and it might be because of the SIM card issue. So, the best thing you can try is to remove the SIM from your current phone and insert it into another phone.
When you are offline the message is saved on the server and just about when you get online, the text messages are delivered. If it is the SIM issue, then you will not get the message unless you contact your network operator.
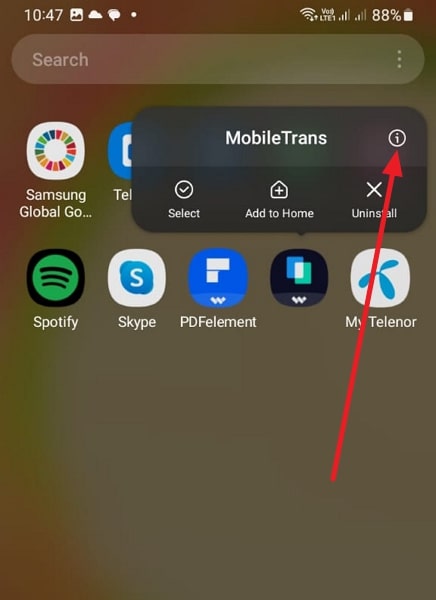
Part 6: Clear the Cache of Messaging App
In smartphones, the memory space often gets filled up with cache. And not everyone remembers that they have to clear the cache from time to time. The accumulated cache can also lead to this issue. So, if your Android messaging app is not working, you have to clear the cache memory.
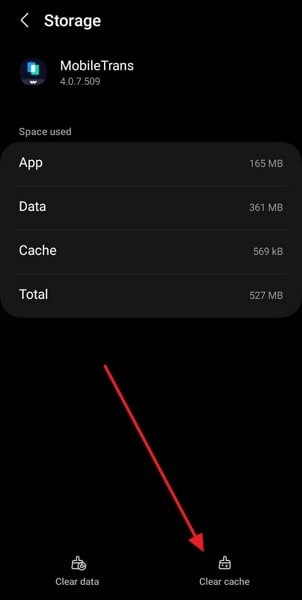
Step 1: Open the Settings and go to Apps. Find the Messages app from the list and tap to open it. There you will see the storage occupied by the app along with the cache.
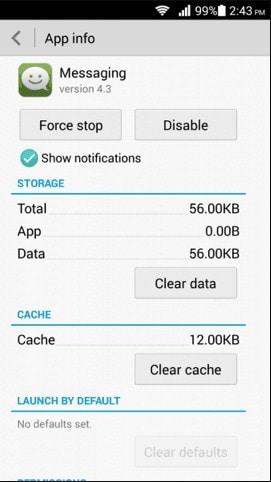
Step 2: Click on the Clear Cache button and wait as the Google Pixel 7a device free up the memory of your device.
Once the cache is cleared, you can also clear the data if you want to and you’ll instantly receive the text messages on your phone.
Part 7: Delete Useless Messages to Free Up Space
Sometimes, if you are not receiving text messages on Google Pixel 7a, it means that you need to clean up the clutter of useless messages from your phone and SIM both. The phone messages can be deleted directly from your phone. But the SIM card messages needed to be deleted separately. The SIM cards don’t have enough memory to hold plenty of messages. Therefore, once the storage is full, you will stop receiving messages entirely.
Step 1: Open the messages app and open settings. Look for an option that says “Manage SIM Card Messages”. Sometimes, you can find this option under Advanced Settings.
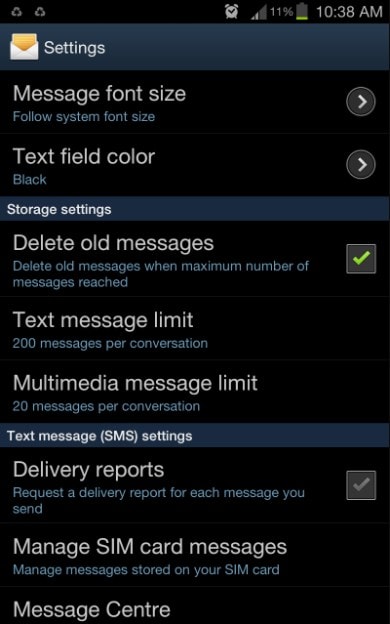
Step 2: There, you will see the existing messages on the SIM. You can either delete all the messages or perform a selective deletion to free up space.
Part 8: Try a Third-party Messaging App
If you can’t receive messages on your default app, then you can try installing a third-party messaging app. Nowadays, most people use social media messaging apps like WhatsApp, Skype, etc. for messaging. So, if somehow, the Android is not receiving texts, then the new apps can help you to send and receive messages with a non-native network.
Further Reading: 15 Best Free Chat Apps in 2022. Chat Now!
Part 9: Ensure your Phone is Fully Charged
Another possible fix to this problem might be your phone’s battery percentage. Sometimes, when the Android is in power saving mode, it disables the default apps too. As a result, you can’t even receive text messages on Android. So, when you plug in the charger, the power saving mode will be disabled, and you will get your text messages.
Part 10: Ensure It’s Not An iMessage From iPhone
If the Google Pixel 7a phone is not receiving texts from iPhone, then this might be a different issue. Usually, there is an option on the iPhone where they can send texts as iMessage and simple messages. If the iPhone user sends the text as iMessage, then it will not show up on the Android device. To resolve this, you have to follow the steps below:
Taking the iPhone in hand makes sure that you are connected to a network. Open settings and scroll to look for the Message option. Toggle the bar next to the iMessage option to turn it off.

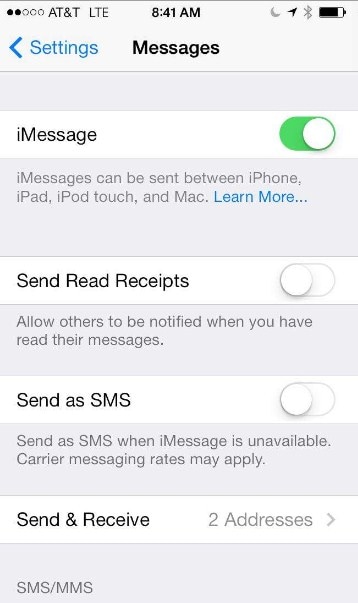
If the FaceTime option is also on, you might have to deactivate that too to send messages and calls as regular ones.
 LYRX is an easy-to-use karaoke software with the professional features karaoke hosts need to perform with precision. LYRX is karaoke show hosting software that supports all standard karaoke file types as well as HD video formats, and it’s truly fun to use.
Part 11: Update Your Android
Updating the operating system to the latest Android version can fix some system errors which may cause the “Android not receiving texts” issue because the latest version always brings a better user experience and fix the know bugs.
Conclusion
Now you know several methods that can work if the Android messaging app is not working. If you experience this kind of issue with your Google Pixel 7a, then you are most likely to resolve them with these fixes. If none of the solutions seem to fix the issue, then you can take the help of Dr. Fone - System Repair (Android) feature. With this tool, you can resolve all kinds of working issues on your device.
Fixes for Apps Keep Crashing on Google Pixel 7a
The rapid evolution of technology has transformed our smartphones into powerful devices. Presently, with just a few taps, they possess the ability to accomplish a diverse array of tasks. It has been possible due to the extensive availability of mobile applications. However, it can be incredibly frustrating when your favorite apps keep crashing repeatedly.
You’re not alone if you’re an Android user who encounters app crashes. This article will explore ten practical ways to fix apps that keep crashing on Android devices. We will also discuss the causes behind app crashes and how to prevent them.
Part 1: What Are the Causes Behind Apps Keep Crashing on Android?
There are many reasons for the app crashing on Android devices. These reasons range from insufficient storage space to bugs and glitches in the apps. Finding out the root cause of an app crashing is important so that you can find the appropriate solution. Discussed below are some of the reasons why your Android apps keep crashing:
Insufficient Memory
When a device is low on memory, it may struggle to run multiple apps simultaneously. Each app requires memory to store its data and execute its processes. If the available memory is limited, it can cause apps to crash. That happens because they don’t have enough resources to operate properly.
 SwifDoo PDF Perpetual (2-PC) Free upgrade. No monthly fees ever.
Software Compatibility
Android devices come in various models and run different operating system versions. That’s why it is essential to use apps compatible with your device. Since there are a lot of Android variants, it is hard to optimize apps for all devices. An app not optimized for an Android version or device leads to crashes or malfunctions.
Outdated Apps
Apps are regularly updated to introduce new features, fix bugs, and enhance performance. Using an outdated version of an app may cause instability or compatibility problems. Since the app is not optimized for the current version of Android, it can keep crashing.
Network Problems
Some apps rely heavily on network connectivity to function properly. They need a stable and strong internet connection to perform all the functions. These apps can crash if there are network connectivity issues, such as a weak Wi-Fi or network outage. Unstable connections can disrupt data transmission, making the app’s function challenging.
 CalendarBudget - Monthly subscription membership to CalendarBudget via web browser or mobile app. Support included.
 App Bugs
Despite rigorous testing, apps can still have bugs or coding errors that lead to crashes. Bugs in apps can occur due to various reasons. It mostly relates to incorrect implementation of features or unexpected user interactions. App developers work to identify and fix these bugs, often releasing updates.
Part 2: How to Fix the Apps Keep Crashing on Android?
Once you discover why your Android apps keep crashing, fixing them becomes a lot easier. However, there is no need to worry even if you cannot locate the problem source. Below we have listed 10 general and specialized solutions to fix app crashing:
 SwifDoo PDF Perpetual (1 PC) Free upgrade. No monthly fees ever.
Fix 1: Check the Internet Connection
As mentioned before, some apps rely on the internet to function. If you don’t have an active internet connection, they will not work. To avoid the app crashing, you need to ensure that the internet connection on your device is working. If you use Wi-Fi, check the router and turn Wi-Fi off and on again. In the case of mobile data, try enabling Airplane mode and then disabling it.
Fix 2: Force Stop the Apps Keep Crashing
If your apps keep crashing, you should try force-closing the targeted app and re-opening it. Doing this will flush out minor bugs and glitches from the app. These temporary bugs and glitches can occur due to various reasons and hamper the app’s working. Use the following steps to force stop the app that keeps crashing and re-open it:
- Step 1: On your Google Pixel 7a, move the app icon and press it to select “App Info.” On the App Info screen, tap the “Force Stop” button to force close the app. The button can be either on the down left or down right corner.
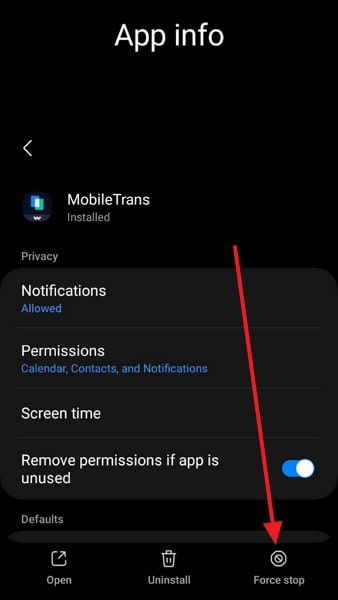
- Step 2: After force closing the app, relaunch it and see if the app crashing issue is resolved.

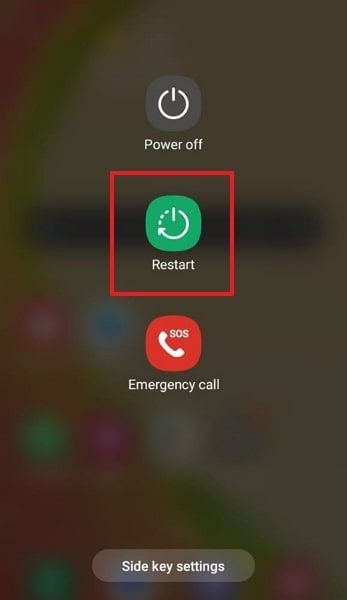
Fix 3: Restart your Android Device
In case restarting the app hasn’t worked, you should try restarting your Google Pixel 7a. Rebooting your device reset all the processes and apps in the Google Pixel 7a device. It helps remove conflicts between different apps, which can be the cause of your apps keep crashing on Android. To reboot your Google Pixel 7a, adhere to the following guidelines:
- Step: Press and hold the “Power” key until you see the power menu on the screen. Here, tap the “Restart/Reboot” button to restart your Google Pixel 7a.
 ZoneAlarm Pro Antivirus + Firewall NextGen
Fix 4: Update the Android OS
Not updating your Android OS for a long while can cause many performance issues in your device. One of these issues is the incompatibility with the latest apps. That’s why make sure that your Google Pixel 7a is running the latest available version of the operating system. You can check and update the Android OS of your device using these steps:
- Step 1: Launch the Settings app on your Google Pixel 7a and scroll down to select “Software Update.” On the next screen, tap “Download and Install” to look for new updates.
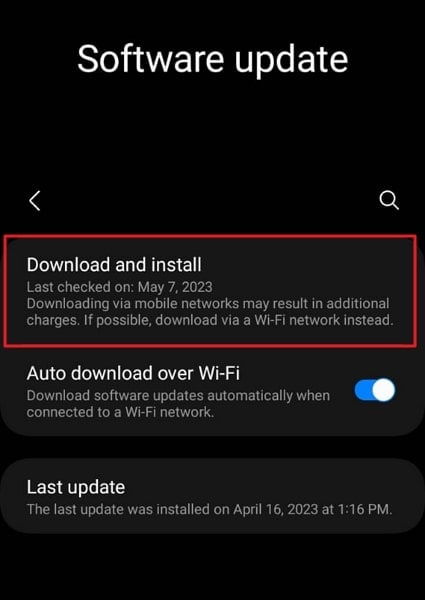
- Step 2: During the update process, ensure you have a stable internet connection. Moreover, your device should be fully charged to avoid any complications.

Fix 5: Clear the App Cache
Have you tried clearing the cache of the app that keeps crashing? The app cache consists of temporary files and data that are stored to enhance app performance. However, if the app cache becomes corrupted, it can cause crashes. In such a situation, clearing the app cache can help resolve the app crashing issue. To clear the app cache on your Google Pixel 7a, follow these steps:
- Step 1: Navigate to your targeted app icon and long-press it. Now, tap “App Info” from the pop-up menu to access app information.
- Step 2: Following this, press “Storage,” and on the following screen, hit “Clear Cache.” It will clean the cache for the targeted app.
Fix 6: Reinstall the Buggy App
Bugs in the app can prove a nightmare and hard to remove from the app. If your apps keep crashing due to bugs, it is best to uninstall and then reinstall the app. It will help you eliminate any corrupted files or settings that might be causing the crashes. Given below are the steps needed to uninstall and reinstall the apps on Android device:
- Step 1: Go to the problematic app on your device and press the app icon for a while. Select “Uninstall” and remove the app by pressing “OK.”
- Step 2: After removing the app, go to Google Play Store and find the targeted app. Here, tap “Install” to reinstall the app on your device.


Sometimes, app crashes can occur due to improper or conflicting permissions. Whenever you install an app on your device, it needs related permission to function. If you have not granted the required permissions, the apps will not function, leading to apps keep crashing on Android. You can check the app permissions using the following procedure:
- Step 1: You will need to launch Settings on your Google Pixel 7a and tap “Apps.” Here find and select the targeted app to open App Info.
- Step 2: On the App Info screen, press “Permissions” to access all permission settings. Here, ensure that your app has the required permissions.
 OtsAV Radio Webcaster

Fix 8: Check and Clear the Phone Storage
Insufficient storage space on your device can also lead to app crashes. Check the available storage space on your Google Pixel 7a and ensure it has enough free space. If the storage is full, consider deleting unnecessary files or apps to create more space. Explained below is the process to check and free up storage on Android devices:
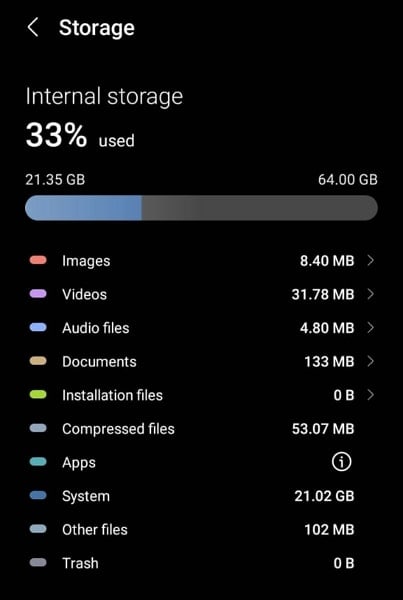
- Step 1: Open Settings on your Google Pixel 7a and scroll down to find and select “Battery and Device Care.” Here, tap “Storage” to view the Google Pixel 7a device storage.

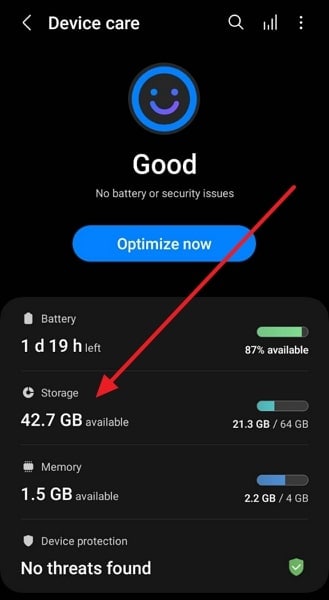
- Step 2: Here, you will see detailed information about everything stored on your device. If the storage space is full, remove the unnecessary data.
Fix 9: Reboot Into Safe Mode
It can be hard to find the app crashing root cause if it happens due to conflicts between different apps. In such scenarios, the best way to find the problematic apps is to use Safe Mode on your device. Safe Mode disables all third-party apps, allowing you to determine if the crashes are caused by a specific app. Follow the process given below to reboot your device into Safe Mode:
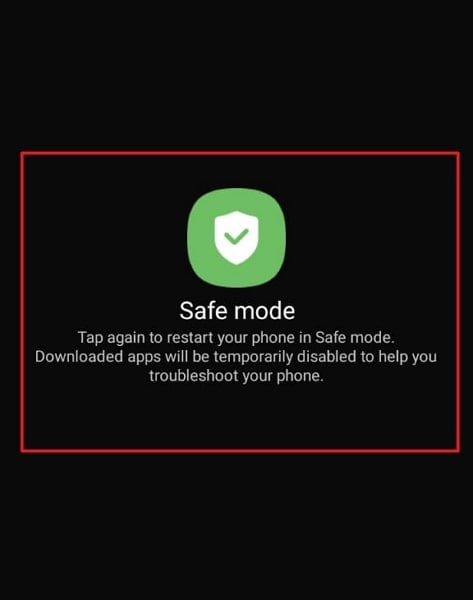
- Step 1: Press and hold the “Volume Down” and “Power” buttons together for 3 seconds to access the power menu. Here, long-press the “Power Off” option.
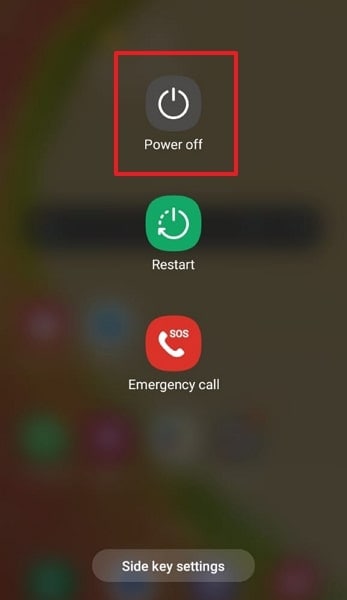
- Step 2: Press the “Power Off” button until “Restart in Safe Mode” appears on the screen. Now reboot the Google Pixel 7a device into Safe Mode. To exit Safe Mode, you will need to restart the phone.
Fix 10: 100% Working Solution to Fix the Android Apps Keep Crashing – Wondershare Dr.Fone
Trying to fix an app crashing with multiple methods can be a tiring and frustrating experience. That’s why the best option is always to find and use a specialized Android system repair tool. The best Android repair tool currently available is Wondershare Dr.Fone. It is a comprehensive system repairing tool that can fix almost all system issues in Android devices.
Using Wondershare Dr.Fone, you can fix issues like apps crashing, black screen of death, Play Store not working, and many more. Furthermore, you do not need any technical skills to use Wondershare Dr.Fone to repair your Android system issues.
Main Features of Wondershare Dr.Fone
- Wondershare Dr.Fone is a specialized tool for fixing problems with Google Pixel 7a devices, including the latest Google Pixel 7a phones.
- It supports the Android system repair feature for over 1000 Android phones across the spectrum.
- With this tool, you can also fix bricked Android devices with ease.
Step to Fix the Android Apps Keep Crashing via Wondershare Dr.Fone
The process of fixing apps that keeps crashing on Android devices is straightforward when using Wondershare Dr.Fone. Here are the simple steps you need to follow to fix the app crashing:
- Step 1: Access System Repair from Toolbox
Open Wondershare Dr.Fone on your system after installation and select “System Repair” from the “Toolbox.” Now connect your Google Pixel 7a using a USB cable and select “Android” in Wondershare Dr.Fone.
- Step 2: Provide Your Android Device Information
Click “Start” to initiate the repair process and provide your device information. You will need to provide device details like Brand, Name, Model, Country, and Carrier. Now, check the “I agree with the warning, and I am ready to proceed” box and tap “Next.”

- Step 3: Repair the Apps Keeps Crashing on Android
Follow the on-screen instruction to activate Download Mode on your device. Wondershare Dr.Fone will download the related firmware once you have enabled Download Mode. Afterward, click “Fix Now” and confirm your action by inserting the “000000” code. Now, wait for the repair process to finish.

 safe & secure
Conclusion
To sum up, if your apps keep crashing on Android, you can resolve it in many ways. Using the fixes given in this article, you can improve apps’ performance and reduce crashes. However, if you’re looking for a reliable and convenient solution, we highly recommend Wondershare Dr.Fone.
With its clean interface and powerful features, Wondershare Dr.Fone stands out as the best choice to fix app crashes. It provides a comprehensive toolkit to diagnose and resolve various software issues.
Fix Unfortunately Settings Has Stopped on Google Pixel 7a Quickly
All of you, sooner or later, must have found the “Unfortunately Settings has stopped” error on your Google Pixel 7a. The problem can occur if the Settings keeps stopping or crashing. Many times, you may try to open the Settings but it doesn’t even open. Or possibly, it may freeze after getting opened thereby hampering the Google Pixel 7a device’s performance.

Well! There can be a number of reasons why this thing happens. For instance, custom ROM installations, not enough space in the Google Pixel 7a device or perhaps an outdated version of Android. If you are struggling with the same issue and want to know what to do when Android Settings is not responding, this post will help you. We have explained everything in detail along with the solutions. So, scroll down and get things sorted.
- Part 1: Clear the cache of Settings and Google Play Service
- Part 2: Clear the Android phone’s RAM and retry
- Part 3: Uninstall the Google update
- Part 4: Uninstall the custom ROM or re-flash the stock ROM
- Part 5: Wipe cache partition to restore Settings
- Part 6: Factory reset your Android
- Part 7: Check and update Android OS
Part 1: Clear the cache of Settings and Google Play Service
It is possible that the corrupted cache files are responsible for this error. Hence, as the first tip, we would like you to clear the Settings cache if that is what triggers the “Unfortunately Settings has stopped” issue. Clearing it would definitely make Settings run appropriately. And The steps to clear the cache of the Google Play Services app are similar. Here is how to clear the cache of Settings:
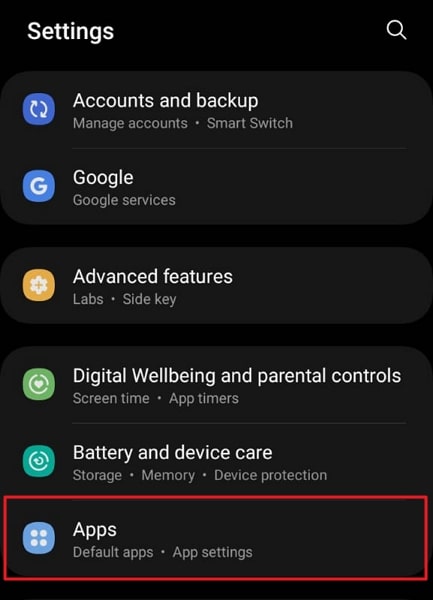
- Open “Settings” on your Google Pixel 7a and choose “Apps & Notifications”/”Apps”/”Application Manager” (the option may differ on different devices).
- In the list of applications, look for “Settings” and open it.
- Now, select “Storage” followed by “Clear Cache”.

Note: In some phones, the “Clear Cache” option may come after tapping on “Force Stop”. Therefore, go accordingly without getting confused.
Part 2: Clear the Android phone’s RAM and retry
As the next tip, we would like to suggest you clear your device’s RAM by ceasing the running apps in the background. RAM, if at the increased level, is responsible for the Google Pixel 7a device’s freezing, poor performance, and most probably is the reason behind crashing Settings. Also, if the apps in the background keep running, they might conflict with the Settings and stop it to perform properly. Therefore clearing RAM is important when Android Settings is not responding. Here is how to do it.
- Firstly, you need to go to the Recent apps screen. For this, long-press the Home key.
Note: Please note that different devices have different ways to go to the Recent apps screen. Do it according to the Google Pixel 7a device you own. - Now, swipe the apps and tap on the clear option. You will be able to notice the amount of RAM cleared


Part 3: Uninstall the Google update
Uninstalling Google Play Store updates has also responded well to many users. It has worked in the case of the “Unfortunately Settings has stopped” error. So, we would also like to suggest you use this tip if the others don’t work. Here are the steps to be followed for this.
- Open “Settings” on your Android and tap on “Application manager” or “Apps” or “Application.
- Now, head to all the apps and select “Google Play Store” from there.
- Tap on “Uninstall Updates” and restart your device to check if the crashing Settings issue has been resolved.


Key features:
• Import from any devices and cams, including GoPro and drones. All formats supported. Сurrently the only free video editor that allows users to export in a new H265/HEVC codec, something essential for those working with 4K and HD.
• Everything for hassle-free basic editing: cut, crop and merge files, add titles and favorite music
• Visual effects, advanced color correction and trendy Instagram-like filters
• All multimedia processing done from one app: video editing capabilities reinforced by a video converter, a screen capture, a video capture, a disc burner and a YouTube uploader
• Non-linear editing: edit several files with simultaneously
• Easy export to social networks: special profiles for YouTube, Facebook, Vimeo, Twitter and Instagram
• High quality export – no conversion quality loss, double export speed even of HD files due to hardware acceleration
• Stabilization tool will turn shaky or jittery footage into a more stable video automatically.
• Essential toolset for professional video editing: blending modes, Mask tool, advanced multiple-color Chroma Key
Part 4: Uninstall the custom ROM or re-flash the stock ROM
Using a custom ROM on your device brings up this problem due to incompatibility or improper installation. Therefore, you should either uninstall the custom ROM or re-flash the stock ROM. in order to re-flash the stock ROM of your Google Pixel 7a, the best way would be Dr.Fone - System Repair (Android). It offers one-click functionality to flash stock ROM and that too with full security. Supporting all Google Pixel 7a devices, it ranks among its counterparts when it comes to fixing crashing Phone app issues or any other Android system issue. It is loaded with the beneficial features which are discussed below.
Dr.Fone - System Repair (Android)
Android repair tool to fix “Unfortunately, Settings Has Stopped”
- You needn’t be a tech-savvy to use this
- Supports a wide range of Android devices easily, 1000+ being more precise
- One-click tool and supports any sort of Android system issue
- Higher success rate along with millions of trusted users
- Trustworthy and offers an extremely easy interface
4,635,310 people have downloaded it
How to fix crashing Settings using Dr.Fone - System Repair (Android)
Step 1: Download Tool
Visit the official website of Dr.Fone and download the toolbox from there. Go for the installation process and wait until the installation gets over. Launch it now and choose the “System Repair” tab from the main window.
Step 2: Get the Phone Connected
With the help of a USB cable, plug your Google Pixel 7a into the PC. Upon proper connection, hit on the “Android Repair” option from the left panel.
Step 3: Feed Correct Information
In the next window, you need to fill in some necessary information like the name and model of the mobile device. Enter details like country and career. Check once and hit on “Next”.
Step 4: Enter Download Mode
Now, you need to take your device into Download mode. For this, you need to follow the onscreen instruction according to your device. Click “Next” and you will notice the firmware downloading progress on your screen.

Step 5: Repair the Issue
Once the firmware is completely downloaded, your Google Pixel 7a will automatically start getting repaired. Stay there and you will receive a notification that the repair is done.

 HD Video Converter Factory Pro
Part 5: Wipe cache partition to restore Settings
Like RAM, wiping cache is also vital so as to make the Google Pixel 7a device’s operation smoother. And when you are getting the “Unfortunately Settings has stopped” error, it might be due to the collected cache. To remove it, you will need to enter the recovery mode. And the steps for recovery mode range from device to device. For instance, Google Pixel 7a users have to press the “Home”, “Power” and “Volume Up” buttons. Similarly, HTC and LG device users are supposed to press the “Volume Down” and “Power” buttons. For Nexus, it is “Volume Up, Down” and Power key combinations. Therefore, before going further, make sure what device you own and enter the recovery mode according to it. Now, follow the detailed guide below to wipe the cache partition in order to fix crashing Settings.
- Primarily, turn off the Google Pixel 7a device and enter the recovery mode by pressing the respective key combinations.
- You will notice a Recovery screen on your device.
- On showing up the recovery screen, look for the “Wipe Cache partition” option and use the “Volume Down” and “Volume Up” buttons to scroll down and up respectively.
- On reaching the required option, press the “Power” button to start wiping.
- Once finished, click the reboot option and the Google Pixel 7a device will be rebooted, fixing the issue hopefully.


Part 6: Factory reset your Android
You can also opt for Factory resetting your device to fix the issue of Settings keeps stopping. By removing everything from the Google Pixel 7a device, it will make your device run properly. If you have important data on your device, please make sure to create a backup before taking action if you don’t want to lose it. The steps are as follows.
- In the “Settings, go to “Backup and Reset”.
- Tap on “Factory data reset” followed by “Reset device”.
- Wait for the completion of the process and check if Settings is stopping or not after it gets rebooted.

Part 7: Check and update Android OS
A lot of times minor issues crop up due to the operating systems that get outdated. It is because the Google Pixel 7a device needs to get updated from time-to-time for proper functioning otherwise it will not be able to match up with the fading technologies thereby coming up with issues like “Unfortunately Settings has stopped”. We recommend here you check for the available update and update your device. For this follow the guide below.
- Go to “Settings” and tap “About Phone” on your device.
- Now, hit on “System Update” and the Google Pixel 7a device will look for any available update.
- If there is any, go along with the prompts to install it and make your phone even smarter.
 vMix Basic HD - Software based live production. vMix Basic HD includes 4 inputs, 3 cameras, streaming, recording, playlist.
Conclusion
If your Google Pixel 7a shows the “Unfortunately Settings has stopped” error, don’t worry. This problem can come from many things like old software or cache issues. You can try easy fixes like clearing cache or updating your system. Sometimes, removing custom ROMs might be needed.
For iOS users facing similar problems, we recommend using Dr.Fone-System Repair (iOS) . It’s known for fixing many iOS problems without losing any data. Remember, a well-working device is just a few steps away!
 safe & secure
- Title: Google Pixel 7a Not Receiving Texts? 10 Hassle-Free Solutions Here | Dr.fone
- Author: Ariadne
- Created at : 2024-07-30 11:20:48
- Updated at : 2024-07-31 11:20:48
- Link: https://howto.techidaily.com/google-pixel-7a-not-receiving-texts-10-hassle-free-solutions-here-drfone-by-drfone-fix-android-problems-fix-android-problems/
- License: This work is licensed under CC BY-NC-SA 4.0.