
Google Play Services Wont Update? 12 Fixes are Here on Oppo A2 | Dr.fone
Google Play Services Won’t Update? 12 Fixes are Here on Oppo A2
Google Play Services is a crucial component of any Android device, responsible for supporting various Google apps and services. However, at times, users may encounter issues with updating Google Play Services, preventing them from accessing the latest features and security updates.
It’s pretty much annoying when you try to launch Google Play Services but it isn’t able to operate correctly. You get some of the notifications like Google Play Services won’t run unless you update Google Play Services. On the other hand, when you start to update Google Play Services, you stuck again with the error pop-ups, and Google Play Services won’t update. This can create a lot of chaos in one’s life. So, what action should one need to take in such a situation? Well! You needn’t rankle more as we will explore some of the causes and tips to fix the issue. Keep reading!

Part 1: Causes for Google Play Services Won’t Update Issue
Before diving into the solutions, it’s essential to understand the potential causes of the Google Play Services update problem. Let’s talk about the causes without further ado.
- 1. Incompatibility with Custom ROMs: Using a custom ROM on your Oppo A2 can cause compatibility issues and prevent the installation of Google Play Services updates.
- 2. Network connectivity issues: Poor or unstable internet connection can prevent the download and installation of updates.
- 3. Insufficient storage space: When your device doesn’t have enough free space, it can hinder the installation of updates for Google Play Services.
- 4. Excessive Installed Apps: a large number of installed apps on your device can exacerbate the update problem with Google Play Services.
- 5. Cache Conflicts: Accumulated cache can lead to conflicts and cause issues with the updating process of “Google Play Services”.
- 6. Outdated version of Google Play Store: If your device has an outdated version of the Google Play Store app, it may interfere with the update process for Google Play Services.
- 7. Google Play Components: If certain components of Google Play Services are corrupted, it can contribute to update issues.
Part 2: One-Click Fix When Google Play Services Won’t Update
For those seeking a quick and effortless solution, several third-party tools offer one-click fixes for the Google Play Services update problem. These tools automate the update process, ensuring that you have the latest version of Google Play Services installed. However, it is crucial to use reputable and trusted tools to avoid potential security risks.
If you cannot update Google play services by the reason of custom ROM incompatibility or Google Play component corruption, there is a serious need of repairing firmware then. And to repair Android firmware, one of the expert ways is Dr.Fone - System Repair (Android) . This professional tool vows to bring your Oppo A2s back to normal by fixing the issues with ease. Here are the advantages of this tool.
Dr.Fone - System Repair (Android)
Android repair tool to fix Google Play Services not updating
- A completely user-friendly tool where no technical skills are needed.
- All Android models are easily supported.
- Any kind of Android issue like black screen , stuck in boot loop , Google play services won’t update, or app crashing can easily be resolved with these.
- Full security is promised with the tool so there’s no need to worry about harmful activities like viruses or malware.
- Trusted by a lot of users and carries a high success rate.
3,485,019 people have downloaded it
How to Fix Google Play Services can’t be installed using Dr.Fone - System Repair (Android)
- Step 1: Install the Software
Initiate the process of downloading the software on your computer. Now, click on “Install” button and go along with the installation procedure. Click on “System Repair” option from the Toolbox window.

- Step 2: Device Connection
Now, taking the assistance of an original USB cable, connect your Oppo A2 to the PC. Then hit on “Start”.

- Step 3: Check the Information
You will notice the next screen which asks for some information. Please ensure to choose the correct device brand, name, model, career, and other needed details. Click on “Next” after this.


- Step 4: Download Mode
You will now see some instructions on your PC screen. Just follow those according to your device. And then your device will boot in Download mode. Once done, hit on “Next”. The program will now download the firmware.

- Step 5: Repair the Problem
When the firmware is downloaded completely, the program will automatically start getting fixed the issue. Wait for a while until you get the notification of the process completion.

 safe & secure
 Glary Utilities PRO - Premium all-in-one utility to clean, speed up, maintain and protect your PC
Part 3: 10 Common Fixes When Google Play Services Won’t Update
Method 1. Restart your Android and try to update again
In most cases, restarting the Oppo A2 device can simply do the trick. When you restart the Oppo A2 device, most of the issues get eliminated making the Oppo A2 device perform better than before. Also, it is all about RAM. While you restart your device, the RAM gets cleared. As a result, the apps work properly. So, in the first place, we would like you to restart your Oppo A2 when you cannot update Google Play Services. Once restarted, try to update again and see if the results are positive.
Method 2. Uninstall Google Play Services Updates and Reattempt the Update
Uninstalling previous Google Play Services updates resolves conflicts and errors, often addressing the issue of updates. This process clears potential obstacles, enabling a successful update of Google Play Services. Here’s how you can do it:
- Open your device’s “Settings.”
- Scroll down and select “Apps” or “App Manager.”
- Locate and tap on “Google Play Services.”
- Depending on your device and Android version, you might need to tap on “App info” or “Storage.”
- Look for the option to “Uninstall updates.” This will revert Google Play Services to its original version.
- Confirm the action when prompted.
- Once the updates are uninstalled, go back to the Google Play Store.
- Search for “Google Play Services” using the search bar at the top.
- If an update is available, you’ll see the option to “Update.” Tap on it to start the update process.
- After the update is complete, restart your device to ensure the changes take effect.
Method 3. Update Google Play Store
Ensure that you have the latest version of the Google Play Store app installed on your device. Open the Play Store, go to Settings, and check for updates. Updating the Play Store can often resolve compatibility issues with Google Play Services updates.
Method 4. Google account and re-add it
Go to your device’s Settings, select Accounts or Users, and remove your Google account. Restart your device and add the account again. This process can refresh the connection and resolve update issues.
Method 5. Uninstall unnecessary apps
As we mentioned above, due to a lot of apps being installed at the same time, the issue can crop up. And hence, if the above solution didn’t help, you can try to uninstall the apps that you don’t need currently. We hope this works. But if not, you can go to the next fix.
Method 6. Clear Google Play Services cache
If still you cannot update Google Play Services, clearing cache can solve your problem. We also stated this in the beginning as the reason. If you don’t know, cache holds the app’s data temporarily so that it can remember the information when you next open the app. Many times, old cache files get corrupted. And clearing cache can also help in saving storage space on your device. For these reasons, you need to clear cache of Google Play Services to get rid of the problem.
Here is how to clear Google Play Services cache:

- Launch “Settings” on your phone and go to “Apps & Notifications” or “Application” or “Application Manager”.
- Now, from all the apps’ list, choose “Google Play Services”.
- On opening it, tap “Storage” followed by “Clear Cache”.
Method 7. Boot into download mode to clear cache of whole phone
If unfortunately, things are still the same, we would like to recommend you wipe the cache of the whole device to fix the issue. This is an advanced method to solve issues and is helpful when the Oppo A2 device is facing any flaws or malfunctions. For this, you need to go to the download mode or recovery mode of your device. Every device has its own steps for this. Like in some, you need to simultaneously press the “Power” and “Volume Down” keys. While in some, the “Power” and both “Volume” keys work.
This is how it works when Google Play Services can’t be installed on your device:
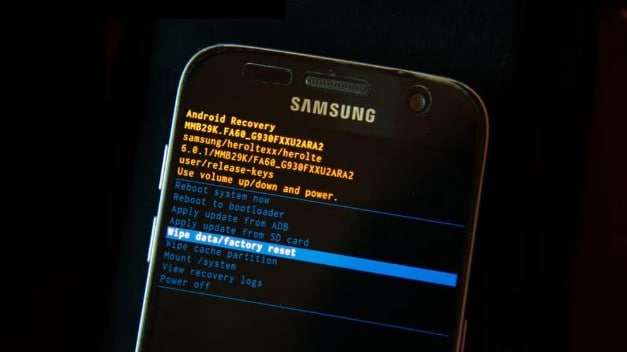
- Turn off the Oppo A2 device to begin with and then follow the steps for recovery mode.
- On the recovery screen, use the “Volume” buttons for scrolling up and down and go to “Wipe cache partition”.
- To confirm, press the “Power” button. Now, the Oppo A2 device will begin to wipe the cache.
- Hit reboot when asked and the Oppo A2 device will now be rebooted finishing the issue.
Method 8. Check your Android storage
Generally speaking, Google Play Services can update automatically in the background. But if there is not enough storage on your Android, the automatic update may fail, so check your android space.

Method 9. battery optimization
Some devices aggressively optimize battery usage, which can interfere with the background processes required for updating Google Play Services. Disable battery optimization for Google Play Services in the Oppo A2 device’s Settings to ensure uninterrupted updates.
Method 10. Check date and time settings
Sometimes, incorrect date and time settings on your device can cause conflicts with Google Play Services updates. Ensure that your device’s date and time are set correctly and set to automatic. Follow the steps below to set the date and time on your android correctly.

- Open “Settings” and go to “General Management”.
- Click “Date & time” and then enable “Automatic date & time”. Or you can disable and re-enable it.
 The BootIt Collection covers multi-booting, partitioning, and disk imaging on traditional PC’s using the standard BIOS and newer PC’s using UEFI. The collection includes BootIt Bare Metal (BIBM) for standard BIOS systems and BootIt UEFI (BIU) for UEFI system.
Method 11. Factory Reset your Android
As a final measure, if everything went in vain, you can perform a factory reset on your device. This method will wipe away all your data while performing and make the Oppo A2 device go to factory state. Please ensure to keep backing up your important data if you are going to take the help of this method.
The steps are:
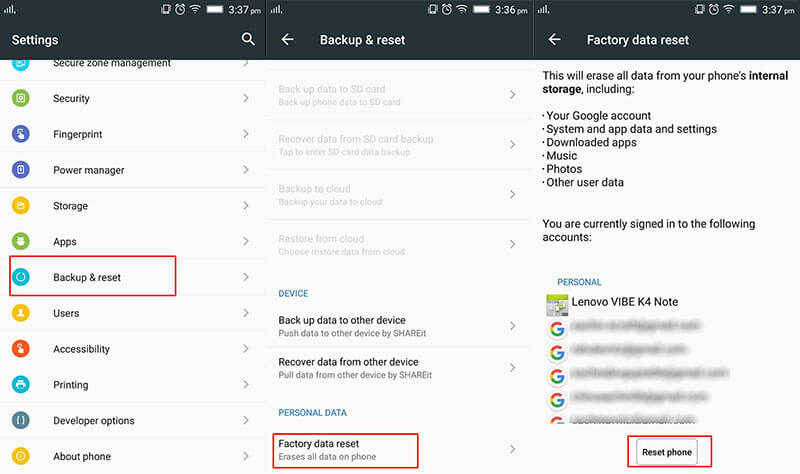
- Open “Settings” and go to “Backup & Reset”.
- Choose “Factory Reset” followed by “Reset Phone”.
FAQs about Google Play Services
To provide further clarity, here are some frequently asked questions about Google Play Services:
1. What is Google Play Services?
Google Play Services is a background service on Android devices that provides essential functionality and support for various Google apps and services. It includes features like authentication, push notifications, location services, and more, enabling seamless integration and enhanced performance for Google apps.
 vMix 4K - Software based live production. vMix 4K includes everything in vMix HD plus 4K support, PTZ control, External/Fullscreen output, 4 Virtual Outputs, 1 Replay, 4 vMix Call, and 2 Recorders.
2. Why is it important to keep Google Play Services updated?
Keeping Google Play Services updated is crucial for several reasons. It ensures compatibility with the latest versions of Google apps, improves app performance, and enhances security. Updates often introduce new features, bug fixes, and optimizations, providing a better user experience and access to the latest advancements offered by Google.
3. Can I uninstall Google Play Services?
No, Google Play Services cannot be uninstalled as it is a core system component required for the proper functioning of Google apps and services. Removing or disabling it can lead to malfunctions and render many Google apps non-functional. However, you can disable specific permissions or clear its cache and data if troubleshooting issues related to Google Play Services.

4. How can I check the version of Google Play Services on my device?
To check the version of Google Play Services on your Oppo A2, follow these steps:
- Step 1. Open the Google Play Store app.
- Step 2. Tap on the menu icon (three horizontal lines) in the upper-left corner.
- Step 3. Scroll down and select “Settings.”
- Step 4. Scroll to the bottom and find the “Play Store version” or “Play Services version”. The number displayed indicates the version of Google Play Services installed on your device.
5. Why is my device not compatible with the latest version of Google Play Services?
There can be several reasons why a device is not compatible with the latest version of Google Play Services. It could be due to hardware limitations, an outdated Android operating system version, or the Oppo A2 device no longer receiving official software updates. Compatibility requirements can change with newer versions of Google Play Services, and older devices may not meet the necessary criteria to support the latest updates.
Conclusion
Encountering difficulties when updating Google Play Services can be frustrating, but with the right approach, these issues can be resolved. By understanding the causes and implementing the suggested fixes outlined in this guide, you can overcome the Google Play Services update problem. Remember to prioritize storage space, ensure a stable internet connection, and keep your apps and system components up to date. By doing so, you can enjoy the full functionality of Google Play Services and benefit from the latest features and security enhancements.
How to Quickly Fix Bluetooth Not Working on Oppo A2
One of the key features of an Android device these days is the Bluetooth technology. This is such an important part of the phone that many of us take for granted, but as soon as the feature stops working, it can cause all kinds of problems.
Fortunately, despite there being many reasons why a problem could occur to your Bluetooth feature, there are also plenty of fixes. Today, we’re going to share with you the complete guide that details everything you need to know to get your Bluetooth up and running once again as quickly as possible.
Let’s get straight into it!
Part 1. About Bluetooth Not Working on Android
Of course, the most common problem to occur with Bluetooth technology in your Oppo A2 is when it doesn’t connect to the Oppo A2 device you’re trying to link it to. This could be anything from a Bluetooth headset or headphones, to a portable speaker or even an in-car audio system.
However, the problems don’t stop there. You may have problems with turning your Bluetooth settings on through your actual device. Perhaps the software simply isn’t loading, or maybe the Bluetooth feature keeps turning itself off randomly.
Due to the complicated nature of Bluetooth technology, there could be many reasons as to why your Bluetooth feature is playing up in this way, but that doesn’t mean it can’t be fixed. For the rest of this guide, we’re going to explore the nine need-to-know ways you can fix the Bluetooth problems not working on your Oppo A2 as quickly as possible.

Part 2. 9 fixes for Bluetooth not working on Android
2.1 One click to fix Android Bluetooth issues due to Android system
Since Bluetooth is an internal technology, this indicates there’s a problem with the software or firmware of your Oppo A2. If something’s broken, this means you need to fix it. Fortunately, there’s a quick and easy way to do this using software known as Dr.Fone - System Repair (Android).
Dr.Fone - System Repair (Android) is a powerful Android repair tool which is hailed as many as being on the best software applications in the industry. With all the tools you need to repair your phone not just for Bluetooth errors, but basically any internal firmware problems, this is a one-shot-tool that gets the job done.
Dr.Fone - System Repair (Android)
Android repair tool to fix Bluetooth issues in one click
- Can fix most internal software and firmware issues
- Trusted by over 50+ million people around the world
- Supports over 1,000+ unique Android brands, manufacturers, and devices
- Incredibly user-friendly and easy-to-use
- Compatible with all Windows computers
3981454 people have downloaded it
To ensure you have the best experience while using the Dr.Fone - System Repair (Android) software, here’s a complete step-by-step guide on how it works when fixing your Android’s Bluetooth problems.
Step One Make your way over to the Wondershare website and download the Dr.Fone - System Repair (Android) software to either your Mac or Windows computer. Install the downloaded file by following the on-screen instructions. Once installed, open the software, so you’re on the Main Menu.
Step Two Connect your Oppo A2 to your computer using the USB cable, wait a couple of seconds, and then click the System Repair option. On the Menu on the left, click Android Repair, and then press Start.
Step Three Next, use the drop-down menus to make sure all the information about your specific device is correct, including your device, operating system number, and carrier information. Click Next to confirm your selections.
Step Four When prompted, put your phone into Download Mode needed for repairs. You can do this by following the on-screen instructions which will depend on which device you have and the available buttons.

Step Five The software will now begin the repair process. This will happen automatically, and all you’ll need to do is make sure your device doesn’t disconnect during this process, and your computer doesn’t turn off.
When the repair process has been completed, you’ll receive the screen below, which means you can try again if the process didn’t work, or you can disconnect your Oppo A2 and start using it and your Bluetooth features.
2.2 Restart Android and turn on Bluetooth again

One of the most common solutions in technology is simply to turn it on and off again, which is the case to happen here. By restarting your device, you can clear out any problems you may be suffering from to help it get up and running again. Here’s how;
- Turn your Oppo A2 off by holding down the Power button
- Wait for several minutes and then turn your phone on again
- Wait for your phone to completely power up, so you’re on the Main Menu
- Navigate Settings > Bluetooth and then enable the setting
- Try to connect your Bluetooth device to what you were trying to do before
2.3 Clear the Bluetooth cache


Every service on your Oppo A2 using a feature called a cache. This is where information is stored to help the feature run properly and give you the best experience. However, over time this can get messy and can cause problems with your Bluetooth feature.
By clearing the cache, you can restart the service and hopefully clear up any issues or problems you may be experiencing.
- On your phone, navigate Settings > Application Manager, and you’ll see all the apps and services on your phone. Locate and select the Bluetooth service.
- Select the Storage option
- Tap the Clear Cache option
- Go back of the Menu and restart your phone
- Now turn your Bluetooth feature on and turn connecting it to your preferred device
2.4 Remove paired devices

Sometimes, you may have a problem with the Oppo A2 device you’re trying to connect to via Bluetooth, especially if this is a device you’ve updated. To counter and repair this, you’re going to need to remove the paired devices saved with your device and then reconnect them.
Here’s how;
- From the Main Menu of your Oppo A2, head to Settings > Bluetooth > Connected Devices.
- Turn Bluetooth on, and you’ll see all the connections your Oppo A2 is paired with
- Go through these settings and remove/delete/forget every connection on your device
- Now when you go to connect to a device using Bluetooth, repair the Oppo A2 device, enter the passcode, and use a fresh paired connection.
2.5 Use Bluetooth in safe mode

If you’re having problems with your connection and paired devices, sometimes you may have conflicting software faults in your device that are causing the problems. If this is the case, you’ll need to boot your Oppo A2 in Safe Mode.
This is an operating state in which your phone will run the bare minimum services it needs to perform. If your Bluetooth works in Safe Mode, you know you have an app or a service that’s causing the problem.
Here’s how to find out;
- Hold the power button down, so the Android power menu turns on
- Long-press the power button again and the restart in Safe Mode option will come up
- The phone will automatically boot into Safe Mode
- Wait a minute on the Main Menu
- Now turn on your Bluetooth and connect it to your preferred device
2.6 Turn on the discoverable feature

To ensure your Bluetooth can connect to other devices, it’s important to make sure you’re making your device discoverable to other Bluetooth devices. If it’s hidden, other devices won’t be able to find it, and sometimes it can bug and prevent connections.
Here’s how to turn on your Bluetooth discoverable feature;
- From the home screen of your Android, navigate to the Menu> Settings > Bluetooth
- Toggle the Bluetooth switch, so it’s on
- Under the available settings, tick the box that allows your Bluetooth device to be discoverable
- Turn your Bluetooth feature on and connect to the Oppo A2 device you’re trying to connect too

2.7 Exclude Bluetooth issues of the other device

Sometimes, you might not even have a problem with your Oppo A2, but rather the Bluetooth device you’re trying to connect to, whether that’s a Bluetooth speaker, an in-car entertainment system, or any other kind of Bluetooth device.
By testing out another Bluetooth device to see if it will work with your preferred device, you can rule this out from being the issue.
- Disconnect your Oppo A2 from the Bluetooth device and turn your Bluetooth off
- Now take another Bluetooth device and connect this to the Oppo A2 device you’re trying to connect too. This could be another Android device, or even a computer or iOS device
- If the new device doesn’t connect to your Bluetooth device, you’ll know there’s a problem with your Bluetooth device, not your Oppo A2
- If the Oppo A2 devices connect, you’ll know there’s a problem with your Oppo A2

2.8 Place both devices within close proximity

One of the common misconceptions of Bluetooth is just how far the wireless range is of the service. You need to make sure your devices are well and truly close to each other to make sure a stable connection can be formed.
The further away the Oppo A2 devices are from each other, the less likely the connection will remain secure. As a rule of thumb, Bluetooth can work up to 100 meters, but to play it safe, always try and keep your devices under 50m apart.
### 2.9 Avoid interference of other Bluetooth sources With Screensaver Wonder you can easily make a screensaver from your own pictures and video files. Create screensavers for your own computer or create standalone, self-installing screensavers for easy sharing with your friends. Together with its sister product Screensaver Factory, Screensaver Wonder is one of the most popular screensaver software products in the world, helping thousands of users decorate their computer screens quickly and easily.
The final consideration you’ll want to think about is that Bluetooth radio waves, or wireless waves, can interfere with each other. This means they can bounce off each other or get muddled up and make things confusing from your devices.
With this in mind, you’ll want to make sure you’re limiting the amount of Bluetooth activity in the area where you’re trying to use a device. While uncommon, this could be the problem.
To fix this issue, turn off all the Bluetooth connections in the area. This includes computers, laptops, mobile phones, tablets, and any other Bluetooth devices you may have. Then, try connecting your Oppo A2 to the Oppo A2 device you were trying to use. If it works, you know you were experiencing Bluetooth interference.
## How to Exit Android Factory Mode On Oppo A2?You’ve often heard that recovery mode will solve just about any problem your Oppo A2 is experiencing. This is mostly true and one of the components of Android’s recovery mode, factory mode or factory reset is one of the most efficient ways to solve various problems on your device. While factory mode is often a good thing, there are times when your device can enter factory mode on its own. Other times, you can safely enter factory mode but not know how to get out.
Fortunately for you, this article will explain all aspects of factory mode and especially how to safely exit factory mode.
Part 1. What is Android Factory Mode?
Factory mode or what is commonly known as factory reset is one of the options available for you when your Oppo A2 is in recovery mode. Several options are available for you once you enter Recovery mode on your device but few are as effective as the wipe data/ factory reset option. This option is useful in solving a whole host of problems that your device could be experiencing.
If you have been using your Oppo A2 for a while now and its performance to be less than ideal, a factory reset might be a good solution. That is however not the only problem a factory reset or factory mode can solve. It will also work for a number or Android errors that you may experience, problems caused by faulty firmware updates and also tweaks made on your device that may not have worked as expected.
It is however important to note that a factory reset or factory mode does often result in the loss of all your data. Therefore a backup is necessary to protect against this data loss risk.
Part 2. Backup your Android Device First
Before we can see how to safely enter and exit factory mode, it is important to have a full backup of your device. We mentioned that a factory mode will likely erase all the data on your device. A backup will ensure that you can get your phone back to its original state before the factory mode.
In order to do a full and complete backup of your device you need to have a tool that will not only ensure that you backup everything on your device but one that makes it easy for you to accomplish this. One of the best tools in the market is Dr.Fone - Backup & Resotre (Android) . This software is designed to enable you to create a full backup of your device.
Dr.Fone - Backup & Restore (Android)
Flexibly Backup and Restore Android Data
- Selectively backup Android data to computer with one click.
- Preview and restore backup to any Android devices.
- Supports 8000+ Android devices.
- There is no data lost during backup, export or restore.
3,428,803 people have downloaded it
Follow these very simple steps to use this MobileTrans Phone Transfer software to create a full backup of your device.
Step 1. Launch Dr.Fone on your computer and choose “Backup & Restore”
Run the software on your computer and you can see all features displayed in the primary window. Choose this one: Backup & Restore. It allows you to get your device backed up entirely with one click.
Step 2. Plug in with your device
Then plug in with your device to the computer. When your devic is detected, click on Backup.

Step 3. Select the file types to backup
The program will display all the file types it can support to backup. Just select the ones you would like to backup and hit Backup.

 Jet Profiler for MySQL, Enterprise Version: Jet Profiler for MySQL is real-time query performance and diagnostics tool for the MySQL database server. Its detailed query information, graphical interface and ease of use makes this a great tool for finding performance bottlenecks in your MySQL databases.
 Step 4. Start backing up your device to the computer
After choosing the file’s type for backup, click “Backup” to begin backing up your device to your computer. It will take you a few minutes, depending on the storage of the data.

Note: You can use the feature of “Restore From Backup” to restore the backup file to your device, when you have the need later.
Part 3: One Click Solution to fix Android stuck in factory mode
From the above parts, you are well aware about what is factory mode. As we discussed, this mode fixes most troubles with Android devices.
But for situations when your Oppo A2 gets stuck in this very same factory mode, the most feasible solution for you is Dr.Fone - System Repair (Android) . This tool fixes all Android system issues including unresponsive or bricked device, stuck on Oppo A2 logo or factory mode or blue screen of death with a single click.
Dr.Fone - System Repair (Android)
One click fix to Android stuck in factory mode
- You can easily fix your Android stuck in factory mode with this tool.
- The one-click solution’s ease of operation is appreciable.
- It has carved a niche being the first Android repair tool in the market.
- You don’t need to be a pro in technology to use this program.
- It is compatible with all latest Oppo A2 devices like Galaxy S9.
3,645,867 people have downloaded it
In this part we will explain how to exit Android recovery mode using Dr.Fone - System Repair (Android) . Prior to proceeding, you got to remember that device backup is paramount to keep your data safe. This process might erase your Oppo A2 data.
Phase 1: Ready your device and connect it
Step 1: Installation completion needs to be followed by running Dr.Fone on your system. Over the program window, tap ‘Repair’ afterwards and get the Android device connected.
Step 2: Select the ‘Android Repair’ option from the list to fix Android stuck in factory modeissue. Hit the ‘Start’ button soon after.
Step 3: Select Android device details on the Oppo A2 device information window, followed by tapping the ‘Next’ button.

Step 4: Enter ‘000000’ for confirmation then proceed.

Phase 2: Get in ‘Download’ mode for repairing the Android device
Step 1: It’s important to put the Android device in ‘Download’ mode, here are the steps to do so –
- On a ‘Home’ button-less device – turn off the Oppo A2 device and push down the ‘Volume Down’, ‘Power’ and ‘Bixby’ buttons for about 10 seconds and un-hold. Now, hit the ‘Volume Up’ button to get into ‘Download’ mode.

- For a device with ‘Home’ button – switch it off and hold down the ‘Power’, ‘Volume Down’ and ‘Home’ buttons together for 10 seconds and release. Click the ‘Volume Up’ button for entering ‘Download’ mode.

Step 2: Press ‘Next’ for initiating firmware downloading.
Step 3: Dr.Fone –Repair (Android) starts Android repair as soon as download and verification of firmware is done. All Android issues along with Android stuck in factory mode will be fixed now.

Part 4. Common Solutions to Exit Factory Mode on Android
Having a backup of all your data will eliminate the risk of losing any of your data. You can now safely exit factory mode using one of the 2 methods below. These two methods will work on a rooted device.
Method 1: Using “ES File Explorer”
To use this method, you will need to have installed file explorer on your device.
Step 1: Open “ES File Explorer” and then press the icon on the top left corner
Step 2: Next, go to “Tools” and then turn on “Root Explorer”
Step 3: Go to Local> Device> efs> Factory App and then open factorymode as text in the “ES Note Editor” Turn it ON
Step 4: Open keystr as text in the “ES Note Editor” and change it to ON. Save it.
Step 5: Reboot the Oppo A2 device

Method 2: Using Terminal Emulator
Step 1: Install Terminal emulator
Step 2: Type “su”
Step 3: Then Type the following;
rm /efs/FactoryApp/keystr
rm /efs / FactoryApp/ Factorymode
Echo –n ON >> / efs/ FactoryApp/ keystr
Echo –n ON >> / efs/ FactoryApp/ factorymode
chown 1000.1000/ efs/FactoryApp/keystr
chown 1000.1000/ efs/FactoryApp/ factorymode
chmod 0744 / efs/FactoryApp/keystr
chmod 0744 / efs/ FactoryApp/ factorymode
reboot
You can also exit factory mode on unrooted device by going to Settings> Application manager> All and the search for Factory Test and “Clear Data”, “Clear Cache”
As much as factory mode can be a useful solution to a number of problems, it can be quite annoying when it pops up unexpectedly. Now you are equipped with 2 effective solutions to help you safely exit factory mode if ever you find yourself in this situation.
- Title: Google Play Services Wont Update? 12 Fixes are Here on Oppo A2 | Dr.fone
- Author: Ariadne
- Created at : 2024-07-30 11:24:21
- Updated at : 2024-07-31 11:24:21
- Link: https://howto.techidaily.com/google-play-services-wont-update-12-fixes-are-here-on-oppo-a2-drfone-by-drfone-fix-android-problems-fix-android-problems/
- License: This work is licensed under CC BY-NC-SA 4.0.