
How to Fix It Oppo Find N3 Wont Turn On | Dr.fone
How to Fix It: Oppo Find N3 Won’t Turn On
Did your Oppo Find N3 decide to go on vacation and refuses to turn on? If your Oppo Find N3 won’t turn on for no apparent reason, finding why it failed to power on and the solution for it is not a fun process.
Here, we hope we are able to give you a checklist of reasons behind this issue and the possible steps you can take to rectify it.
Part 1: Common Reasons That Your Oppo Find N3 Won’t Turn On
If you cannot find any reason why your Oppo Find N3 will not switch on, here are some possible reasons:
- Your Android phone is simply frozen in power-off or sleep mode. In which case, it fails to switch itself on or wake itself up when you initiate it.
- Your phone’s battery may be out of charge.
- The operating system or installed software is corrupted. The tell-tale sign if this is that if you manage to switch on your Oppo Find N3, it freezes or crash soon after.
- Your device is clogged up with dust and lint causing the hardware to not work properly.
- Your power button is broken , which caused it to not be able to trigger the necessary action needed to power up the Android phone. Check to also see if your connectors have no carbon build-up which will cause your phone to not be charged properly.
Part 2: Rescue Data on Android Phone That Will Not Turn On
If you need some help rescuing data from an Android phone that will not turn on, the Dr.Fone - Data Recovery (Android) will be your best friend in your data recovery attempt. With the help of this data recovery solution, you will be able to intuitively recover lost, deleted or corrupted data on any Android devices. Its flexibility and efficiency in rescuing data make it one of the best software out there.
Note: For now, the tool can rescue data from broken Android only if your phone is earlier than Android 8.0, or rooted.
Dr.Fone - Data Recovery (Android)
World’s 1st data retrieval software for broken Android devices.
- It can also be used to recover data from broken devices or devices that are damaged in any other way such as those stuck in a reboot loop.
- Highest retrieval rate in the industry.
- Recover photos, videos, contacts, messages, call logs, and more.
- Compatible with Oppo Find N3 devices.
3981454 people have downloaded it
If your Oppo Find N3 won’t turn on, here is how you can use the software to recover data:
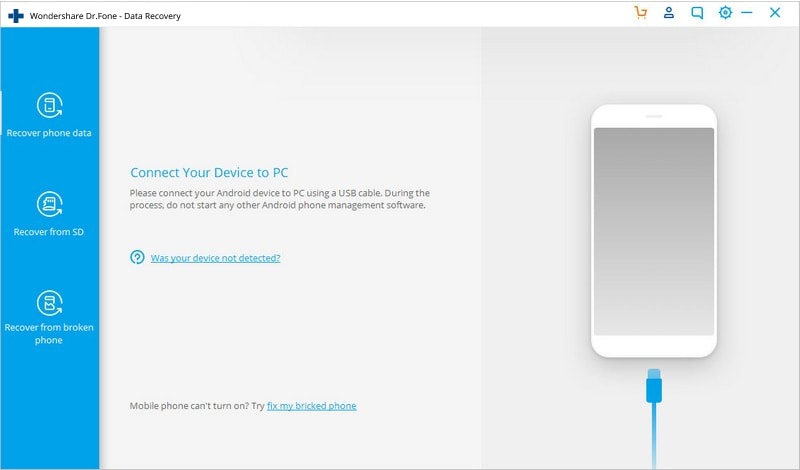
Step 1: Launch Wondershare Dr.Fone
On your desktop computer or laptop, open Wondershare Dr.Fone. Click on Data Recovery on the left column. Connect your Oppo Find N3 to the computer using a USB cable.
Step 2: Decide which file types to recover
On the next window, you will need to check the boxes corresponding to the type of files you can recover from a list. You can get back Contacts, Messages, Call History, WhatsApp messages & attachments, Photos, Audio and more.

Step 3: Select the problem with your phone
Opt for “Touch screen not responsive or cannot access the phone” or “Black/broken screen”. Click Next to continue.

Look up for your device – pick the Oppo Find N3 device Name and Device Model. Advance by clicking on the Next button.

Step 4: Go into your Oppo Find N3’s Download Mode.
The data recovery tool will guide you on how you can go into your Oppo Find N3’s Download Mode. You should be getting a step-by-step guide on your computer.

Step 5: Scan the Android Phone.
Using the provided USB cable, attach your Oppo Find N3 to your computer – the data recovery tool should be able to discover your device automatically and scan it for recoverable data.


Step 6: Review and Retrieve the Data from Broken Android Phone.
Wait for the program to finish scanning the phone – once completed, you will be able to get a list of recoverable files. You can have a preview of the file by highlighting them. Tick the box next to the file name and click on Recover to start retrieving the files and save them in the destination of your choosing.

Part 3: Android Phone Won’t Turn On: One Click Fix
After repeated attempts, when your Android mobile/tablet stops buzzing, what options do you have to revive it?
Well, we would recommend picking Dr.Fone - System Repair (Android) to fix an Android phone will not switch problem. This one-click Android system repair tool resolves every Android system issue without any fuss including Android Phone won’t turn on issue.
Dr.Fone - System Repair (Android)
The real fix to issues like “Android phone will not switch on”
- This tool is aptly effective for all the latest Oppo Find N3 devices.
- With a high success rate for fixing Android devices, Dr.Fone - System Repair (Android) ranks at the top.
- This is a single click application to fix all Android system issues effortlessly.
- It is the first tool to repair all Android system issues in the industry.
- It is intuitive and requires no tech expertise to work with.
3981454 people have downloaded it
Prior to fixing the Android phone will not switch and getting things back in action. You need to make sure that you have backed up the Android device . It is recommended that rescuing data from an Android phone by backing up is better than recovering it post the process.
Phase 1: Get the Oppo Find N3 device ready and connect it
Step 1: Run Dr.Fone on your computer once the installation is complete and tap the ‘Repair’ option form the interface. Now, connect your Android mobile with the computer.

Step 2: You will find a range of options, tap on the ‘Android Repair’ one. Hit the ‘Start’ button so that you can proceed to fix Android Phone won’t turn on hassle.

Step 3: Now, over the Oppo Find N3 device information window, ensure to feed your exact device details. Press the ‘Next’ button then on.

Phase 2: Enter ‘Download’ mode for fixing your Oppo Find N3
Step 1: You need to put your Oppo Find N3 in Download mode for resolving the Android phone will not switch on.
- For the Oppo Find N3 device having ‘Home’ button, you got to switch it off and press ‘Volume Down’, ‘Home’, and ‘Power’ keys for 5-10 seconds at once. Let them go and click on the ‘Volume Up’ button to put your phone in ‘Download’ mode.

- For ‘Home’ button-less device, turn the phone/tablet down first. For 5 – 10 seconds, hold down the ‘Volume Down’, ‘Bixby’, and ‘Power’ buttons. Tap on the ‘Volume Up’ button to get into the ‘Download’ mode, after releasing the 3 buttons.

Step 2: Hitting the ‘Next’ key will allow you to download firmware and proceed with the next step.

Step 3: Dr.Fone - System Repair (Android) would verify your firmware download and then take a while to rectify and resolve Android Phone won’t turn on issue.

Part 4: Android Phone Won’t Turn On: Common Fix
To try fixing an Android Phone that won’t turn on, follow these steps:
- For any Android devices, remove the battery (considering the battery of your Oppo Find N3 can be removed) and leave it out for at least 30 minutes. Put back the battery in and try to turn it on.
- Press and hold down the Power and Volume Down buttons at the same time for 15-30 minutes to reboot the Oppo Find N3 device.
- Should the first two steps do not work, charge your Oppo Find N3 to get it out of the start-up loop. You can also opt to use a different battery, just in case your current battery is the source of the problem.
- If there are any connected hardware e.g. SD card, remove them from the Oppo Find N3 device.
- Start your Oppo Find N3 in Safe Mode by pressing and holding down the Menu or Volume Down button on your device.
- Should the first five steps do not work for you, perform a hard reset. Do take note that each device will have a different way to do so and that data that is stored locally on the phone will be deleted.
- Send your Oppo Find N3 to the repair shop should none of these steps work.
Part 5: Useful Tips to Protect Your Oppo Find N3
There are several reasons as to why your Oppo Find N3 won’t turn on. The problem could be a hardware or software issue which could be prevented. Here are some useful tips to protect your Oppo Find N3.
I. Hardware
- Remember that the components that make your Oppo Find N3 is sensitive. To protect these components from being damaged, use a good guard casing.
- Take apart your Oppo Find N3 and clean it routinely to avoid dust and lint from clogging the phone and overheating it.
II. Software
- It is recommended to download apps from Google Play Store. This way, you can be sure that your app comes from a trusted source.
- Read the app’s permission to see which part of the operating system and your personal information that you are giving access to.
- Install reliable anti-virus and anti-malware software to safeguard your Oppo Find N3 from malicious attacks.
- Make sure you update your operating system, software and apps to make sure you have the latest version – the developer may have fixed the bugs that have caused problems on Android phones.
It is important to note that your phone contains some important data. Therefore, when your Oppo Find N3 won’t turn on do not just give up - there are plenty of tools at your disposal to recover back your files and phone.
How to Fix the Soft Bricked Oppo Find N3?
Bricked phone is a serious problem, as your brick smartphone could be suffering from a soft brick or hard brick problem, and must be dealt with carefully. It is very common to see a brick smartphone these days. If you are wondering what exactly is a bricked phone, here is your answer.
A bricked phone, hard brick or soft brick, is a smartphone which refuses to start or boot all the way up the home/main screen of the Oppo Find N3 device. This issue is observed within most Android phones because users have a tendency to tamper with the Oppo Find N3 device settings, flashing new and customized ROMs and tweaking with the essential files. Playing around with the phone’s internal set-up leads to such errors, worst of them being a brick smartphone. Usually, a bricked phone does not switch on and stays frozen at the Oppo Find N3 device logo, a blank screen or even worse, doesn’t respond to any command, even the power on command.
If you are confused about the soft brick and hard brick problems and looking for solutions to fix your priced phone, then here is all you need to know.
Read on to find out more.
Part 1: What is the difference between soft brick and hard brick?
To begin with, let us understand the basic difference between a soft brick and hard brick issue. Both versions of a bricked phone prevent it from booting but differ in their causes and gravity of the problem.
A soft-brick problem is caused merely by a software error/crash and makes your device switch on automatically every time you manually turn it off. This phenomenon is referred to as Boot Loop. Soft bricked Android phones are not as difficult to fix as the hard bricked Android phones. It is convenient to say that a soft bricked phone only boots up half-way and not fully, whereas a hard bricked device does not switch on at all. A hard brick error is thus caused when the kernel, which is nothing but an interface for the software to communicate with the hardware, is tampered with. A hard bricked phone is not recognized by your PC when plugged in and is a serious problem. It requires troubleshooting techniques and cannot be easily fixed as the soft brick problem.

Hard bricked phones are a rare sight, but the soft brick is very common. Given below are ways to fix a soft brick Android phone. The techniques listed here are the best and the most efficient ways to get your phone back to its normal working conditions without losing your important data or damaging your device or its software.
Part 2: Stuck at the Boot Loop
This is the first sign of a soft bricked Android phone. Boot Loop is nothing but when your phone does not remain switched off and turns itself on automatically, and freezes at the logo screen or blank screen, every time you manually try to power it off.
Stuck at boot loop problem can be fixed by clearing your Cache partitions. These partitions are nothing but storage locations for your modem, kernels, system files, drivers and built-in Apps data.
It is advisable to clear Cache partitions regularly to keep your phone free from such glitches.
Since the phone refuses to boot, Cache can be cleared from entering into the Recovery Mode. Different Android devices have different ways to put it in recovery mode. Normally pressing the power key and volume down key helps, but you may refer to your phone’s guide for better understanding and then follow the steps given below to clear the cache partition:
Once you are the recovery mode screen, you will see a number of options as shown in the screenshot.

Use the volume down key to scroll down and select ”Wipe cache partition” as shown below.
 >
>
After the process is completed, select “Reboot System” which is the first option in the recovery mode screen.
This method will help you erase all the clogged up and unwanted files. You may loose some App related data, but that is a small price to pay to fix your bricked phone.
If this method does not boot up your brick smartphone and the problem still persists, there are two more things you can try. Read ahead to find out about them.
Part 3: Booting straight into recovery mode
If your bricked phone does not boot up to your Home Screen or Lock screen and instead boots directly into Recovery Mode, there is not much left to do. Booting straight into recovery mode is undoubtedly a soft brick error but it also indicates a possible problem with your current ROM. The only option you have to flash a new ROM to reboot your bricked phone back to its normal functioning.
To flash a new ROM:
Firstly, you must root your phone and unlock the Bootloader. Every phone’s mechanism to unlock the bootloader is different, thus, we suggest to refer to your user manual.
Once the Bootloader is unlocked, take a backup of all your data by selecting “Backup” or “Android” back in recovery mode. The process should not take long and all you need to do is tap “OK” to config backup.

In this step, download a ROM of your choice and store it in your SD Card. Insert the SD Card in your phone to begin the flashing process.
Once at the recovery mode, select “Install Zip from SD Card” from the options.

Scroll down using the volume key and use the power key to select the downloaded ROM.


This might take a few minutes of your time, but once the process is complete, reboot your phone.
Hopefully, your bricked phone will not boot normally and work smoothly.
Part 4: Booting straight into Bootloader
If your bricked phone boots straight into Bootloader, then this a serious issue and must not be taken lightly. Flashing a new ROM or clearing cache partitions are of little help in such a brick smartphone situation. Booting straight into Bootloader is a peculiar soft bricked Android phone feature and can be tackled only by downloading and flashing your original ROM from the manufacturer. In order to do so, a detailed study about your manufacturer’s ROM, ways to download and flash must be carried out. Since different Android phones come with different types of ROMs, it difficult to cover all the aspects about the different types of ROMs.
Brick smartphone problem has become more prominent than phone freezing or hanging issue. Android users are often seen looking for solutions to fix their soft brick and hard brick phones. Android phones are prone to get bricked and thus, it is important for us to know about the three techniques given above. These methods have been tried, tested and recommended by ay affected bricked phone users. Therefore, these tips are reliable and worth a try. So if your phone acts stubborn and refuses to boot normally, examine the problem carefully and adopt one of the solutions given above which best suits your situation.
6 Fixes to Unfortunately WhatsApp has stopped Error Popups On Oppo Find N3
Ever seen a wheel going on without cog? Similarly, WhatsApp has become the cog of our lives. Be it in the professional era or personal (gossips, oomph) stuffs, it is a crucial engaging kind of application. WhatsApp is the slow poison yet a useful tool used worldwide after call logs or messages. Imagining a day without is enough to put someone off. And if one has recently faced a problem in WhatsApp crashing or not opening, then it is enough to give a heart break. It can be due to Cache memory piled up, storage running out of space, WhatsApp components getting corrupted. In such a case, resolving the problem by using an effective solution is very important! Don’t worry and wander as we will provide impeccable range of fixes to bid bye to WhatsApp stopping problem.
Cause 1: WhatsApp-related Firmware Components went wrong
You should start fixing the WhatsApp crashing issue with fixing the Android firmware. This is because the Android firmware components are many times the hidden culprit behind the problem of why a particular app stops working. And to fix these components in one click, you need Dr.Fone - System Repair (Android). It is one of the safest tools around in the market and works efficiently with Android system issues. It promises to bring your device back to normal and healthy state. Here are the benefits you get with this amazing tool.
Dr.Fone - System Repair (Android)
Android repair tool to fix firmware component issues
- Fixes all kinds of Android system issues with ease
- Supports 1000+ Android device in a hassle-free way
- Really easy to use and free from any virus infection
- One needn’t to be a tech pro to use this tool
- Can be downloaded for free and repairs the Oppo Find N3 device in few easy steps
4,388,871 people have downloaded it
Step 1: Download Dr.Fone Tool
To start repairing, go to the official website of Dr.Fone - System Repair (Android) and download it. Install it and then open the tool on your PC. To proceed, look for the “System Repair” tab and click on it.
Step 2: Choose the Right Tab
As the next step, you need to take the help of USB cable and then plug your device to the computer. Once connected appropriately, make sure to click on the “Android Repair” tab from the left panel.
Step 3: Enter Details
Next will be the information screen. Simply enter the model, brand and other details. Check everything once and click on “Next”.
Step 4: Enter Download Mode
Subsequently, you need to go along with the onscreen instructions. This will boot your device in the download mode. The step is necessary to download the firmware. When you follow the steps, you need to click “Next”. The program will then start downloading the firmware.
Step 5: Repair Android
Now, you just have to sit back and relax. The program will begin to repair your device. Wait until you get the notification for completion.

Cause 2: Cache conflict
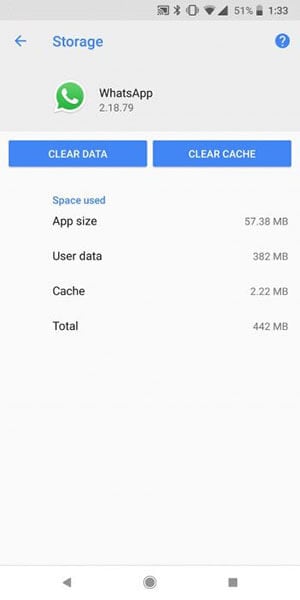
The purpose of Cache in a device is to keep the track of frequently used data and information of an application. And when there are the files or data that are corrupted in the cache, this might raise the “Unfortunately WhatsApp has stopped” error. Therefore, you need to clear the WhatsApp data if the above method went futile. Here are the steps.
- Open “Settings” and go to “App Manager” or “Apps & Notifications” or “Applications”.
- Now, from the list of all applications, choose “WhatsApp”.
- Click on “Storage” and tap “Clear Data”.
Cause 3: WhatsApp components corruption
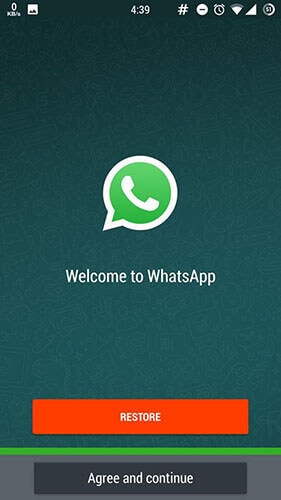
A lot of times, the WhatsApp crashes due to the corrupted components of WhatsApp. In such case, all you need to do is uninstall and install the WhatsApp again. This is how you do it.
- Uninstall the app right away from your Homescreen or from the “Settings” > “Applications” > “All” > “WhatsApp” > “Uninstall” (for some phones).
- Go to “Play Store” and search “WhatsApp” on the search bar.
- Tap on it and start downloading followed by installing it.

Cause 4: Not Enough Storage on your Phone
Insufficient storage could be the other reason why for your WhatsApp has stopped. When your device starts running out of space, some apps may not be able to operate properly for their functions take up space in the Oppo Find N3 device. And probably WhatsApp is one of them. If the space is the case with you, we suggest you the following two things to go with.
- Firstly, go to Settings and check the storage. Make sure it is enough i.e. at least 100 to 200MB.
- Secondly, start eliminating the apps that are no longer needed. This will indeed create more space in your device and will let your WhatsApp wok properly.
Cause 5: Gmail Account no longer valid or hacked
It is a well-known fact that Android device and Gmail account go hand in hand. To run the Oppo Find N3 device smoothly, it is always asked to enter your Gmail address for further configurations. And when WhatsApp stops on your device, the reason might be your Gmail account. Most probably it is not valid now or maybe hacked. If this is the case, we suggest you to log out and log in with some another Gmail account.
- Log out by opening “Settings” and tap on “Accounts”.
- Choose your Google account and tap on “REMOVE ACCOUNT”.
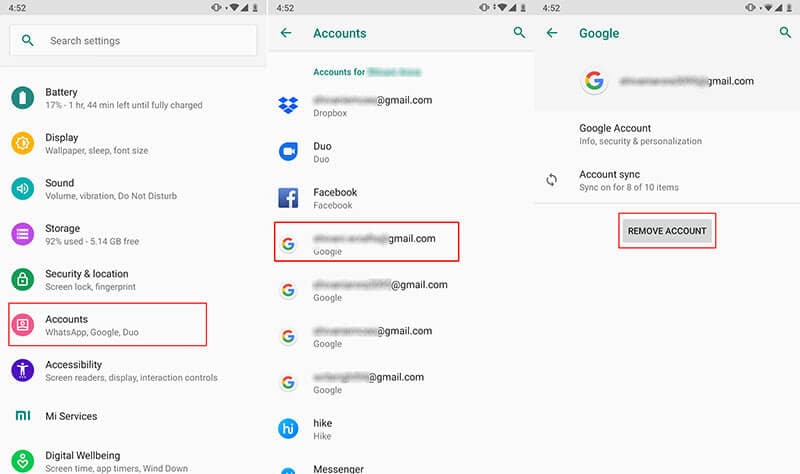
Now, you can login again and check if WhatsApp works or not.
Cause 6: WhatsApp Incompatible with your Android Phone
If still nothing works and your WhatsApp keeps stopping, most likely the reason is the incompatibility of your WhatsApp with your device. In such case, the thing that comes to your rescue is mod WhatsApp version like GBWhatsApp. It is a mod app which is similar to WhatsApp but in a more modified way. With this, a user gets more functionalities and customizable settings when compared to WhatsApp.
If you’re wondering how you can find this app and install, you should keep reading.
To find GBWhatsApp:
Since you can look for this mod app on the Play Store, here are some of the other secure places from where you can download apk file for this GBWhatsApp. Note down these websites to get GBWhatsApp downloaded if WhatsApp has stopped.
- Latest Mod APKs
- UptoDown
- Android APKs Free
- Soft Alien
- OpenTechInfo
To Install GBWhatsApp:
Now that you have decided where to download the apk file, these are the following steps that you should follow to install it on your phone. Please have a look:
- Firstly, open “Settings” on your device and go to “Security”. Turn the “Unknown Sources” option. Doing this will let you install the apps from other locations than Play Store.

- Using the browser on your phone, download the app from any of the aforementioned website.
- Launch the GBWhatsApp apk and follow the onscreen instruction in order to install. You need to go in a similar way as you do in mormal WhatsApp app.
- Simply proceed with entering your name, country and contact number. The app will verify your account. You are now ready to use this app.

Also read:
- [New] Mastering Gaming Nostalgia Discovering The Most Acclaimed GB Console Emulators on PC for 2024
- [Updated] A Fresh Perspective on Sony Blu-Ray S6500 Features
- 3 Easy Solutions to Hard Reset Xiaomi Redmi Note 13 5G | Dr.fone
- 3 Solutions to Hard Reset Realme C67 5G Phone Using PC | Dr.fone
- Calls on Honor X7b Go Straight to Voicemail? 12 Fixes | Dr.fone
- Full Guide How To Fix Connection Is Not Private on Oppo Reno 10 5G | Dr.fone
- Guidelines for Selecting an Engaging Movie Trailer Song for 2024
- How To Revive Your Bricked Nokia C300 in Minutes | Dr.fone
- In 2024, Explore Multimedia Craftsmanship with XP Movie Maker
- In 2024, Top 12 Prominent Itel P40+ Fingerprint Not Working Solutions
- Inside Look at NHL '19 Digital Play: A Game Reviewer’s Perspective
- Mastering PC Builds with Insights From Tom's Hardware Authority
- Reliable User Guide to Fix Realme 12 Pro+ 5G Running Slow and Freezing | Dr.fone
- Top 4 Android System Repair Software for Samsung Galaxy A23 5G Bricked Devices | Dr.fone
- Title: How to Fix It Oppo Find N3 Wont Turn On | Dr.fone
- Author: Ariadne
- Created at : 2024-11-04 22:38:09
- Updated at : 2024-11-12 03:15:14
- Link: https://howto.techidaily.com/how-to-fix-it-oppo-find-n3-wont-turn-on-drfone-by-drfone-fix-android-problems-fix-android-problems/
- License: This work is licensed under CC BY-NC-SA 4.0.