
How to Fix It Realme V30 Wont Turn On | Dr.fone
How to Fix It: Realme V30 Won’t Turn On
Did your Realme V30 decide to go on vacation and refuses to turn on? If your Realme V30 won’t turn on for no apparent reason, finding why it failed to power on and the solution for it is not a fun process.
Here, we hope we are able to give you a checklist of reasons behind this issue and the possible steps you can take to rectify it.
Part 1: Common Reasons That Your Realme V30 Won’t Turn On
If you cannot find any reason why your Realme V30 will not switch on, here are some possible reasons:
- Your Android phone is simply frozen in power-off or sleep mode. In which case, it fails to switch itself on or wake itself up when you initiate it.
- Your phone’s battery may be out of charge.
- The operating system or installed software is corrupted. The tell-tale sign if this is that if you manage to switch on your Realme V30, it freezes or crash soon after.
- Your device is clogged up with dust and lint causing the hardware to not work properly.
- Your power button is broken , which caused it to not be able to trigger the necessary action needed to power up the Android phone. Check to also see if your connectors have no carbon build-up which will cause your phone to not be charged properly.
Part 2: Rescue Data on Android Phone That Will Not Turn On
If you need some help rescuing data from an Android phone that will not turn on, the Dr.Fone - Data Recovery (Android) will be your best friend in your data recovery attempt. With the help of this data recovery solution, you will be able to intuitively recover lost, deleted or corrupted data on any Android devices. Its flexibility and efficiency in rescuing data make it one of the best software out there.
Note: For now, the tool can rescue data from broken Android only if your phone is earlier than Android 8.0, or rooted.
Dr.Fone - Data Recovery (Android)
World’s 1st data retrieval software for broken Android devices.
- It can also be used to recover data from broken devices or devices that are damaged in any other way such as those stuck in a reboot loop.
- Highest retrieval rate in the industry.
- Recover photos, videos, contacts, messages, call logs, and more.
- Compatible with Realme V30 devices.
3981454 people have downloaded it
If your Realme V30 won’t turn on, here is how you can use the software to recover data:
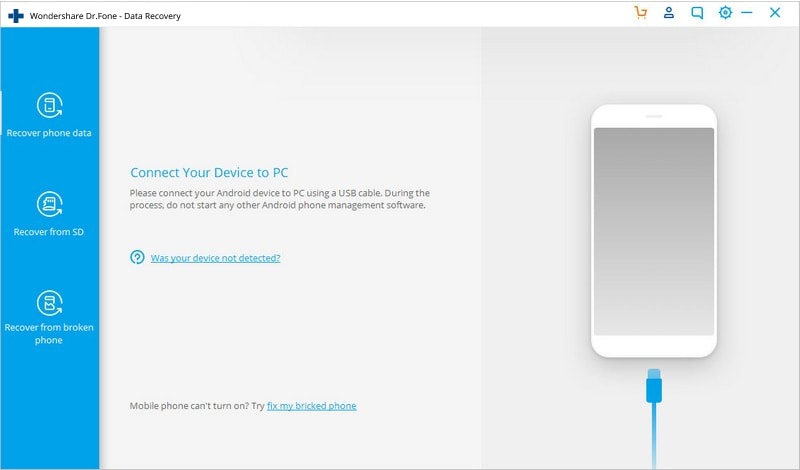
Step 1: Launch Wondershare Dr.Fone
On your desktop computer or laptop, open Wondershare Dr.Fone. Click on Data Recovery on the left column. Connect your Realme V30 to the computer using a USB cable.
Step 2: Decide which file types to recover
On the next window, you will need to check the boxes corresponding to the type of files you can recover from a list. You can get back Contacts, Messages, Call History, WhatsApp messages & attachments, Photos, Audio and more.


Step 3: Select the problem with your phone
Opt for “Touch screen not responsive or cannot access the phone” or “Black/broken screen”. Click Next to continue.

Look up for your device – pick the Realme V30 device Name and Device Model. Advance by clicking on the Next button.

Step 4: Go into your Realme V30’s Download Mode.
The data recovery tool will guide you on how you can go into your Realme V30’s Download Mode. You should be getting a step-by-step guide on your computer.

Step 5: Scan the Android Phone.
Using the provided USB cable, attach your Realme V30 to your computer – the data recovery tool should be able to discover your device automatically and scan it for recoverable data.

Step 6: Review and Retrieve the Data from Broken Android Phone.
Wait for the program to finish scanning the phone – once completed, you will be able to get a list of recoverable files. You can have a preview of the file by highlighting them. Tick the box next to the file name and click on Recover to start retrieving the files and save them in the destination of your choosing.

Part 3: Android Phone Won’t Turn On: One Click Fix
After repeated attempts, when your Android mobile/tablet stops buzzing, what options do you have to revive it?
Well, we would recommend picking Dr.Fone - System Repair (Android) to fix an Android phone will not switch problem. This one-click Android system repair tool resolves every Android system issue without any fuss including Android Phone won’t turn on issue.
Dr.Fone - System Repair (Android)
The real fix to issues like “Android phone will not switch on”
- This tool is aptly effective for all the latest Realme V30 devices.
- With a high success rate for fixing Android devices, Dr.Fone - System Repair (Android) ranks at the top.
- This is a single click application to fix all Android system issues effortlessly.
- It is the first tool to repair all Android system issues in the industry.
- It is intuitive and requires no tech expertise to work with.
3981454 people have downloaded it
Prior to fixing the Android phone will not switch and getting things back in action. You need to make sure that you have backed up the Android device . It is recommended that rescuing data from an Android phone by backing up is better than recovering it post the process.
Phase 1: Get the Realme V30 device ready and connect it
Step 1: Run Dr.Fone on your computer once the installation is complete and tap the ‘Repair’ option form the interface. Now, connect your Android mobile with the computer.

Step 2: You will find a range of options, tap on the ‘Android Repair’ one. Hit the ‘Start’ button so that you can proceed to fix Android Phone won’t turn on hassle.

Step 3: Now, over the Realme V30 device information window, ensure to feed your exact device details. Press the ‘Next’ button then on.

Phase 2: Enter ‘Download’ mode for fixing your Realme V30
Step 1: You need to put your Realme V30 in Download mode for resolving the Android phone will not switch on.
- For the Realme V30 device having ‘Home’ button, you got to switch it off and press ‘Volume Down’, ‘Home’, and ‘Power’ keys for 5-10 seconds at once. Let them go and click on the ‘Volume Up’ button to put your phone in ‘Download’ mode.

- For ‘Home’ button-less device, turn the phone/tablet down first. For 5 – 10 seconds, hold down the ‘Volume Down’, ‘Bixby’, and ‘Power’ buttons. Tap on the ‘Volume Up’ button to get into the ‘Download’ mode, after releasing the 3 buttons.

Step 2: Hitting the ‘Next’ key will allow you to download firmware and proceed with the next step.

Step 3: Dr.Fone - System Repair (Android) would verify your firmware download and then take a while to rectify and resolve Android Phone won’t turn on issue.

Part 4: Android Phone Won’t Turn On: Common Fix
To try fixing an Android Phone that won’t turn on, follow these steps:
- For any Android devices, remove the battery (considering the battery of your Realme V30 can be removed) and leave it out for at least 30 minutes. Put back the battery in and try to turn it on.
- Press and hold down the Power and Volume Down buttons at the same time for 15-30 minutes to reboot the Realme V30 device.
- Should the first two steps do not work, charge your Realme V30 to get it out of the start-up loop. You can also opt to use a different battery, just in case your current battery is the source of the problem.
- If there are any connected hardware e.g. SD card, remove them from the Realme V30 device.
- Start your Realme V30 in Safe Mode by pressing and holding down the Menu or Volume Down button on your device.
- Should the first five steps do not work for you, perform a hard reset. Do take note that each device will have a different way to do so and that data that is stored locally on the phone will be deleted.
- Send your Realme V30 to the repair shop should none of these steps work.
Part 5: Useful Tips to Protect Your Realme V30
There are several reasons as to why your Realme V30 won’t turn on. The problem could be a hardware or software issue which could be prevented. Here are some useful tips to protect your Realme V30.
I. Hardware
- Remember that the components that make your Realme V30 is sensitive. To protect these components from being damaged, use a good guard casing.
- Take apart your Realme V30 and clean it routinely to avoid dust and lint from clogging the phone and overheating it.
II. Software
- It is recommended to download apps from Google Play Store. This way, you can be sure that your app comes from a trusted source.
- Read the app’s permission to see which part of the operating system and your personal information that you are giving access to.
- Install reliable anti-virus and anti-malware software to safeguard your Realme V30 from malicious attacks.
- Make sure you update your operating system, software and apps to make sure you have the latest version – the developer may have fixed the bugs that have caused problems on Android phones.
It is important to note that your phone contains some important data. Therefore, when your Realme V30 won’t turn on do not just give up - there are plenty of tools at your disposal to recover back your files and phone.
How to Fix Error 495 While Download/Updating Android Apps On Realme V30
Error 495 is a common error that occurs while downloading or updating apps from Google Play Store. This error is usually caused by a problem with the Google Play Store, and it can be fixed by clearing the cache and data of the Google Play Store app. If you are experiencing this error, follow the steps below to fix it.
In this article, you will learn why the Android error 495 pops up, possible solutions to bypass, as well as a dedicated repair tool to radically fix error 495.
We always like to explore every new feature or the features that already exist on our devices. We have a tendency to be the master of our device and want to know every bit of the handset. Unexpected errors ruin that experience and it is just frustrating to experience these errors. And the worst part is that we have no idea where we are wrong or what we did that led to the error. Same is the case with the error 495 which occurs due to downloading or updating of Android Apps. You may have spent countless hours on the internet to find the right solution for error code 495 but even after following many of the most guaranteed steps sometimes the error still doesn’t go away.
However, this article will provide you various methods to get rid of the Error 495 play store problem that you face and you will not have to depend on any other sources for your solution.
Reasons for Google play error 495
Android Apps are most commonly downloaded from the Google Play Store with the help of Wi-Fi or Cellular Data. One may come across many types of errors. Mostly the errors come in during the download or update or installing time. Error 495 occurs when the user isn’t being able to download or install an app over Wi-Fi, but the user is able to do the same thing over cellular data.
Technically speaking, the issue is caused when the connection to the Google Play servers, where the app is hosted, times out. Which is unable to resolve by itself.
Also, there could be another reason that it cannot sync with the servers.
Now that we know the possible reasons for the error 495, let us also know how to get rid of it in the sections below.
Solution 1: One Click to Fix error 495 by Android Repair
Tried several methods to make the error 495 disappear, but nothing works? Well, many people have experienced the same frustration. The root cause is that something is wrong with the Android system. You need to have your Android system repaired to fix error 495 in this situation.
Note: Having your Android system repaired may lose existing data on your Android. Backup the data on your Android before the Android repair.
Dr.Fone - System Repair (Android)
Best tool for fundamental Android repair in one click
- Fixes all Android system issues like error 495, system UI not working, etc.
- One click for Android repair. No special technics needed.
- Supports all the new Realme V30 devices like Galaxy Note 8, S8, S9, etc.
- Step-by-step on-screen instructions provided to fix error 495 without any hassle.
3,390,486 people have downloaded it
With Dr.Fone - System Repair (Android) , you can easily fix error 495 in few steps. Here is how:
- Download, install, and launch Dr.Fone - System Repair (Android). Connect your Android to your computer with a USB cable.
- Select the option “Repair” > “Android Repair”, and click “Start”.
- Select the Realme V30 device information like brand, name, model, etc., and confirm your selection by typing in “000000”.

- Press the stated keys to boot your Android in download mode to download the firmware as instructed.
- After the firmware is downloaded, the program will automatically start to repair your Android.

Solution 2: Clear the Google Service Framework cache to Fix error 495
Step 1:
Go to the “settings” of your device. Once the series of sections comes up, tap on the “APPS” section.
Step 2:
Click on ‘All Apps’ or ‘Swipe to All’ and the open the section named “Google Services Framework App”
 .
.
STEP 3:
Open “App Details” and the screen shown in the image should come up on your device. As shown in the image, follow the three steps. First, tap on “Force Stop” and then second, tap on the “Clear Data” option and finally go ahead and tap on the “Clear Cache” option.
Following the above steps should solve your problem of Google Play Error 495. And you can enjoy back to using the apps which you couldn’t download or update due to the Error 495.
Solution 3: Reset App Preference in Google play Store to Fix error 495
STEP 1:
Go to the settings section in your device. It will be differently placed for different devices and different users.

STEP 2:
Once the Settings section is open. A lot of further sections will pop up. No find the section named “Application Manager” or “Apps”. After locating it, tap on that section.

STEP 3:
Now go ahead and tap or slide to a section named “ALL”.
STEP 4:
After reaching the “ALL” section tap the touch button to open menu/properties and choose an option named “Reset Apps” or “Reset App Preferences”.
There’s no need to be alarmed because on clicking the reset option, the apps won’t be deleted but it is only going to re-set them. And hence solving the Error 495 created in the Google Play.

Solution 4: Fix Error Code 495 by installing a VPN app
The Error code 495 can be easily removed in another interesting way too. On downloading a Virtual Private Network (VPN) and then operating the play store automatically solves the error 495.
STEP 1:
Install Hideman VPN (using any other VPN will also make it work) from Google Play store. (If the error persists for this app too then download it from a different app store or by using a third-party store).
STEP 2:
Now open the app and select the United States as the country of connection and press the option named Connect.
STEP 3:
Open Google Play Store and Download any app without the Error Code 495 coming in and bothering.
This fix will work for most of the Google Play Errors and not just only The Error Code 495.
Solution 5: Remove your Google Account & Reconfigure it to fix error 495
Removing the Google account and re-configuring it is a very common method adopted to get rid of the Error 495. Adopt the following steps to complete this method.
STEP 1:
Go to the “Settings” section of your device. Like it was mentioned before, different devices and different users will have the placement of the settings section in a different place.

STEP 2:
Go to the accounts section in the settings tab.

STEP 3:
In the accounts section tap on the Google Account part
STEP 4:
Inside The Google section, there’ll be an option called “Remove Account”. Tap on that section, to remove your google account.

STEP 5:
Now go ahead and re-enter/ re-register your Google account and check if the Error 495 still persists.
Now you have completed all the steps and your problem should be solved.
Solution 6: Fix error code 495 by Removing your Google Play Store Data & Cache
One of the best and most accurate methods in the series of various steps in eradicating the Error Code 495 in Google Play Store is by removing the Google play Store Data and Cache. In order to do so follow the steps mentioned below. After following the steps it is guaranteed that the Error code 495 will be done with and you won’t experience any such problems in the future.
STEP 1:
Go to the “Settings” section into your mobile device. The settings can be accessed by scrolling down and pulling down the drop-down menu and most likely the settings app will be on the top-right corner. Otherwise, it will be found after opening the app drawer.

STEP 2:
Once after opening the settings section, select the “Installed apps” or the “Apps” section.

STEP 3:
Find the “Google Play Store” section and select that too.
STEP 4:
Tap on the “Clear data” & “Clear Cache”.

Doing the above steps will clear your caches of the Google Play Store. Now you have a new google Play store.
Hence in this article, we got to know about the error 495 and the possible solutions to it as well. Also, this article explains how Error code 495 can be removed by 5 different ways. These are the best ways by which you can remove or get rid of the Error Code 495. In case one of the method fails, use the other one to rectify this recurring error 495 on your Realme V30.
Cellular Network Not Available for Voice Calls On Realme V30
The “Cellular Network Not Available for Voice Calls“ error is a common experience for many Android users. In our contemporary world, communication stands as the fundamental pillar of our existence. Yet, the malfunctioning of our devices hinders this connectivity. It often gives rise to numerous complications. Fortunately, your concerns are now a thing of the past.
This article serves as your guide for troubleshooting and overcoming this frustrating dilemma. It has compiled expert perspectives, valuable tips, and detailed, systematic solutions. The article will go through the underlying causes behind this issue and explore potential fixes. By the conclusion of this article, you’ll be armed with the necessary knowledge to tackle this problem.

Part 1. Preliminary Reasons For Cellular Network Not Available For Voice Calls
Facing the “Cellular Network Not Available for Voice Calls Android“ error can be overwhelming. Thus, it becomes evident that specific reasons underlie this issue. Solutions indeed exist to tackle this problem. Yet, comprehending the underlying reasons is equally crucial to resolve the issue:
1. Internet Access
One primary reason behind cellular network unavailability glitches lies in unstable internet access. Voice calls over cellular networks often require a stable internet connection. When this connection fluctuates or drops, it can result in the dreaded error message.
2. Terrain Coverage
Another contributing factor is the geographical terrain. In remote or sparsely populated areas, cellular tower coverage might be limited. It causes a signal disturbance or complete loss of the network.
3. Network Congestion
During peak usage hours or in densely populated areas, network congestion can also be a cause. It leads to temporary unavailability of the cellular network for voice calls. When the network is overloaded with traffic, it might struggle to accommodate more voice calls. That results in connectivity issues.
4. Technical Glitches
Furthermore, technical glitches within the Realme V30 device or network infrastructure can cause this issue. These glitches could range from software bugs to hardware malfunctions.
5. Battery or Power Issues
In some instances, insufficient battery power or power-saving modes on devices can cause this issue. They affect the Realme V30 device’s capacity to sustain a consistent connection with the cellular network. This consequently causes voice call unavailability.
Part 2. Prominent Solutions For Cellular Network Not Available For Voice Calls Android
A myriad of purposeful solutions exists to resolve the TracFone cellular network not available for voice calls issue. These solutions are specifically designed to address various underlying causes. The aim of these solutions is to restore smooth connectivity for voice calls. Described below are the top 8 solutions to fix the “Cellular Network Not Available” error:
| Method | Efficiency | Difficulty | Duration (Minutes) |
|---|---|---|---|
| Check Network Availability | Moderate | Easy | 5-10 |
| Check Airplane Mode | Low | Easy | 2-5 |
| Select Network Operator | Moderate | Moderate | 5-10 |
| Restart Device | Low to Moderate | Easy | 3-5 |
| Enable Roaming Settings | Moderate | Easy | 3-7 |
| Update Android Smartphone | Moderate | Moderate | 15-30 |
| Performing Factory Reset | High (Last Resort) | Difficult | 30-60+ |
| Contact Carrier Provider | High (Specialized Help) | Moderate | Varies (Depends on Carrier Provider) |
| Wondershare Dr.Fone - System Repair | Highest (Complex Issues) | Easiest | 5-10 |
Solution 1. Check the Availability of Cellular Networks
Before diving into complex fixes, the first thing to do is to check if nearby cell networks are available and how strong their signals are. It is an essential step when trying to fix the “Cellular Network Not Available“ error. This basic check ensures your phone is close enough to a working network tower, which matters for staying connected. It allows you to find out the availability of nearby cellular networks.
Moreover, with it, you can ensure your device is connected to a reliable network. This preliminary check sets the foundation for further troubleshooting.
Solution 2. Check the Airplane Mode of the Smartphone
Another crucial step in resolving this error involves ensuring that the Airplane Mode is disabled. This mode, when activated, disables all wireless connections. It also includes cellular networks, which could lead to connectivity issues. Follow these simple steps to check and disable Airplane Mode on your device:
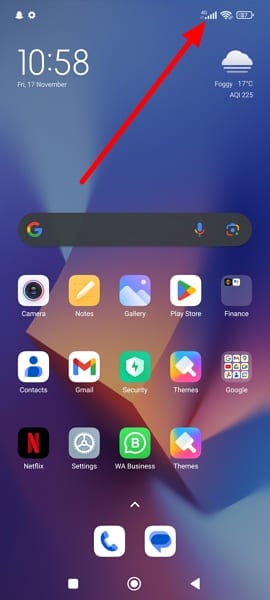
Instructions: Swipe down on your phone’s screen from the top to access the Notification Panel, unveiling the Quick Settings tiles. Search for the airplane-shaped icon; if Airplane Mode is active, the icon will be highlighted or shown in a distinct color. Tap the Airplane Mode to turn off the Airplane Mode on your Android.

Solution 3. Selecting the Network Operator of the Realme V30 device
In certain instances, manually selecting your network operator can help. It effectively resolves the “Cellular Network Not Available for Voice Calls Android“ error on your Realme V30. By choosing the network operator manually, you ensure a deliberate connection to a specific carrier. This potentially bypasses issues related to automatic network selection. Follow these steps to select your network operator manually:
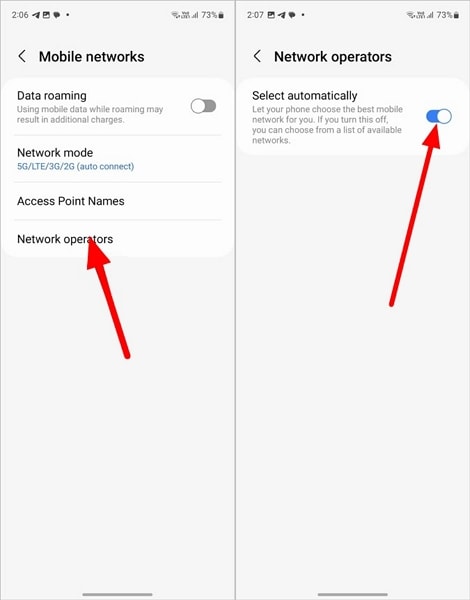
- Step 1. Access “Settings” on your Realme V30, then tap on “Connections.” From there, navigate to “Mobile Networks” and proceed by selecting “Network Operators.”

- Step 2. Look for the “Automatically Select” toggle, which will be turned on. Toggle it off to see available networks and choose the one best suited to your device.
Solution 4. Restart Your Device
Sometimes, resolving the “Cellular Network Not Available for Voice Calls“ error on your Realme V30 can be as simple as performing a restart. This basic troubleshooting step helps refresh the Realme V30 device’s software. It clears temporary glitches and reestablishes essential connections, potentially resolving network-related issues. Follow these straightforward steps to restart your Realme V30:
Instructions: Hold down the “Power” button until the Power menu emerges on the display. From there, select “Restart” to initiate the Realme V30 device’s reboot process.

Solution 5. Enable Roaming Settings
There are situations where you’re in an area with weak or no coverage from your primary network provider. In such a case, enabling roaming settings on your Realme V30 can sometimes resolve the issue at hand. Enabling roaming allows your device to connect to partner networks. This extends your coverage beyond your home network’s reach. Follow these steps to enable roaming settings on your Realme V30:
- Step 1. Start by accessing your device’s Settings and tapping the “Connections” option. Here, scroll downward to press “Mobile Networks.”

- Step 2. Presently, you will encounter the “Data Roaming” option. Toggle this option on to enable data roaming on your device and resolve the issue.

Solution 6. Update Android Smartphone
Updating your Realme V30’s OS to the latest version can often resolve performance issues. It can also fix network connectivity issues, including the “Cellular Network Not Available” error. Manufacturers regularly release system updates containing bug fixes and security patches. It also includes enhancements that can address underlying software-related problems. Follow these steps to update your Android smartphone:
- Step 1. In your device’s Settings, scroll through to find the “Software Update” option. Select it, and on the subsequent screen, verify the availability of any updates.

- Step 2. If an update is accessible, select the ‘Download and Install’ choice. Then, proceed by following the prompts displayed on the screen to finalize the process.

Solution 7. Performing Factory Reset
Performing a factory reset is a drastic but effective measure. It can resolve persistent software-related issues, including the “Cellular Network Not Available” error. Be aware that initiating a factory reset results in the deletion of all data and settings stored on your device. Hence, it is crucial to back up any vital information before proceeding with this action. Here is how to fix the Verizon cellular network not available for voice calls:
- Step 1. To access your device’s “General Management” section, navigate through Settings. There, tap on “Reset,” and select “Factory Data Reset” from the subsequent screen.

- Step 2. You will need to tap “Reset” to confirm your choice. Then, follow the on-screen guidelines carefully to complete the reset process.

Solution 8. Contact Carrier Provider
If you’ve exhausted all options and the issue persists, reaching out to your carrier provider for assistance is a viable solution. Carrier providers can offer specific insights and guidance regarding network-related issues. When connected to customer service, explain the issue you’re experiencing in detail. Contacting your carrier provider enables you to tap into their expertise and resources.

You May Also Like:
Top 5 DFU Tools for iPhone to Enter DFU Mode
9 Ways to Fix iPhone Error 4013 or iTunes Error 4013
Realme V30 ROM Download & Install: The Definitive Guide
Part 3. [100% Resolvable] Resolve Cellular Network Not Available For Calls Issues
Despite all your attempts, the cellular network not available for voice calls remains unresolved. It might state a more complex software-related issue or glitch within the Realme V30 device. However, there’s a solution designed explicitly for addressing such complex issues. That software is Wondershare Dr.Fone, a comprehensive toolkit for Android devices. It stands out as the world’s first one-click Android repair tool.
Dr.Fone specializes in resolving a wide array of Android system issues, including the notorious black screen of death. With this tool, users can effortlessly restore their Android system to normal functionality.
Key Features of Wondershare Dr.Fone
- Fone’s advanced repairing mechanism has the ability to repair even the bricked Android devices.
- This tool supports more than 1000 models of Android devices across different brands for system repair.
- It boasts the highest success rate when it comes to fixing Android devices.
![]()
Dr.Fone - System Repair (Android)
Repair Android System Errors without Any Trouble.
- Fix your Android to normal, no skills required.
- Fix various Android system issues, stuck in boot loop , black screen , or won’t turn on , looping on start, etc.
- The high success rate in resolving Android system issues.
- Compatible with a wide range of Android devices and OS versions
- User-friendly interface with easy-to-follow steps.
3981454 people have downloaded it
Steps Needed To Fix the Cellular Network Not Available for Calls Issue via Wondershare Dr.Fone
The following are the steps to resolve the Tracfone cellular network not available for voice calls using Wondershare Dr.Fone:
- Step 1. Open Wondershare Dr.Fone and Opt for System Repair
Launch the software. Then, navigate to the “Toolbox” section located in the left panel. Connect your Realme V30 and proceed by choosing “System Repair.” Then, opt for “Android” to specify the Realme V30 device type. On the subsequent screen, click “Start” to commence the repair procedure.
- Step 2. Provide Details of Your Android Device
The system automatically identifies the brand of the Android device undergoing repair. Afterward, choose the “Name,” “Model,” “Country,” and “Carrier” from the provided list options. If the Realme V30 device is already unlocked, you can choose OPEN in the Carrier section. Then, confirm by checking the warning box indicating agreement and readiness to proceed. Click on “Next” to initiate the repair process for your Realme V30.
- Step 3. Complete the Android Repair Process Successfully
Follow the guidance displayed on your device’s screen to access Download Mode. Once in, the firmware download begins automatically. During this process, the platform verifies and presents the firmware details. Select “Fix Now” to proceed with the installation of the firmware onto your Realme V30. Since Android repair will result in the deletion of all data, input “000000” to confirm. This action initiates the system repair process.
 safe & secure
3,336,459 people have downloaded it
Conclusion
In conclusion, facing the “Cellular Network Not Available for Voice Calls“ problem on your Realme V30 can be frustrating. This article has explored many ways to fix this issue. These include simple checks like turning off Airplane Mode to solutions like contacting your carrier. However, when facing persistent network problems, a tool like Wondershare Dr.Fone becomes the only hope.
Among the various methods discussed, Dr.Fone stands out as a top choice. Its thorough system repair function targets and removes complex software glitches. The tool’s easy interface, broad compatibility, and secure repair process make it perfect. It is ideal for users looking for a reliable solution beyond regular troubleshooting.
![]() Why isn’t My Realme V30 establishing a connection with the cellular network?
Why isn’t My Realme V30 establishing a connection with the cellular network?
![]() What steps can I take when the mobile network isn’t available?
What steps can I take when the mobile network isn’t available?
![]() What might be causing my SIM card to not display a network?
What might be causing my SIM card to not display a network?
Also read:
- [New] Mastering Your Business Niche The Best YouTube Channels Guide
- [Updated] 2024 Approved Voice-Over Strategies for PowerPoint Success Stories
- Essential Graphic Design Software: Ranking the Top 17 Platforms
- Fixes for Apps Keep Crashing on Vivo S17 Pro | Dr.fone
- How To Fix Unresponsive Phone Touchscreen Of Infinix Smart 8 Pro | Dr.fone
- How to Flash Dead Realme Narzo 60 5G Safely | Dr.fone
- How to Quickly Fix Bluetooth Not Working on Nokia 105 Classic | Dr.fone
- In 2024, 11 Step by Step Pathways to Perfect Grading
- Revive Deleted ADT Recorded Sessions for Free Using Three Simple Techniques
- Shining a Light Top Photo Illumination Hacks for 2024
- Sync Facebook Media for Larger Display Views
- Why Is My Infinix Zero 30 5G Offline? Troubleshooting Guide | Dr.fone
- Title: How to Fix It Realme V30 Wont Turn On | Dr.fone
- Author: Ariadne
- Created at : 2024-11-06 09:26:02
- Updated at : 2024-11-12 09:45:01
- Link: https://howto.techidaily.com/how-to-fix-it-realme-v30-wont-turn-on-drfone-by-drfone-fix-android-problems-fix-android-problems/
- License: This work is licensed under CC BY-NC-SA 4.0.