
How to Fix the Soft Bricked Itel P55 5G? | Dr.fone
How to Fix the Soft Bricked Itel P55 5G?
Bricked phone is a serious problem, as your brick smartphone could be suffering from a soft brick or hard brick problem, and must be dealt with carefully. It is very common to see a brick smartphone these days. If you are wondering what exactly is a bricked phone, here is your answer.
A bricked phone, hard brick or soft brick, is a smartphone which refuses to start or boot all the way up the home/main screen of the Itel P55 5G device. This issue is observed within most Android phones because users have a tendency to tamper with the Itel P55 5G device settings, flashing new and customized ROMs and tweaking with the essential files. Playing around with the phone’s internal set-up leads to such errors, worst of them being a brick smartphone. Usually, a bricked phone does not switch on and stays frozen at the Itel P55 5G device logo, a blank screen or even worse, doesn’t respond to any command, even the power on command.
If you are confused about the soft brick and hard brick problems and looking for solutions to fix your priced phone, then here is all you need to know.
Read on to find out more.
Part 1: What is the difference between soft brick and hard brick?
To begin with, let us understand the basic difference between a soft brick and hard brick issue. Both versions of a bricked phone prevent it from booting but differ in their causes and gravity of the problem.
A soft-brick problem is caused merely by a software error/crash and makes your device switch on automatically every time you manually turn it off. This phenomenon is referred to as Boot Loop. Soft bricked Android phones are not as difficult to fix as the hard bricked Android phones. It is convenient to say that a soft bricked phone only boots up half-way and not fully, whereas a hard bricked device does not switch on at all. A hard brick error is thus caused when the kernel, which is nothing but an interface for the software to communicate with the hardware, is tampered with. A hard bricked phone is not recognized by your PC when plugged in and is a serious problem. It requires troubleshooting techniques and cannot be easily fixed as the soft brick problem.

Hard bricked phones are a rare sight, but the soft brick is very common. Given below are ways to fix a soft brick Android phone. The techniques listed here are the best and the most efficient ways to get your phone back to its normal working conditions without losing your important data or damaging your device or its software.
Part 2: Stuck at the Boot Loop
This is the first sign of a soft bricked Android phone. Boot Loop is nothing but when your phone does not remain switched off and turns itself on automatically, and freezes at the logo screen or blank screen, every time you manually try to power it off.
Stuck at boot loop problem can be fixed by clearing your Cache partitions. These partitions are nothing but storage locations for your modem, kernels, system files, drivers and built-in Apps data.
It is advisable to clear Cache partitions regularly to keep your phone free from such glitches.
Since the phone refuses to boot, Cache can be cleared from entering into the Recovery Mode. Different Android devices have different ways to put it in recovery mode. Normally pressing the power key and volume down key helps, but you may refer to your phone’s guide for better understanding and then follow the steps given below to clear the cache partition:
Once you are the recovery mode screen, you will see a number of options as shown in the screenshot.

Use the volume down key to scroll down and select ”Wipe cache partition” as shown below.
 >
>
After the process is completed, select “Reboot System” which is the first option in the recovery mode screen.
This method will help you erase all the clogged up and unwanted files. You may loose some App related data, but that is a small price to pay to fix your bricked phone.
If this method does not boot up your brick smartphone and the problem still persists, there are two more things you can try. Read ahead to find out about them.
Part 3: Booting straight into recovery mode
If your bricked phone does not boot up to your Home Screen or Lock screen and instead boots directly into Recovery Mode, there is not much left to do. Booting straight into recovery mode is undoubtedly a soft brick error but it also indicates a possible problem with your current ROM. The only option you have to flash a new ROM to reboot your bricked phone back to its normal functioning.
To flash a new ROM:
Firstly, you must root your phone and unlock the Bootloader. Every phone’s mechanism to unlock the bootloader is different, thus, we suggest to refer to your user manual.
Once the Bootloader is unlocked, take a backup of all your data by selecting “Backup” or “Android” back in recovery mode. The process should not take long and all you need to do is tap “OK” to config backup.

In this step, download a ROM of your choice and store it in your SD Card. Insert the SD Card in your phone to begin the flashing process.
Once at the recovery mode, select “Install Zip from SD Card” from the options.

Scroll down using the volume key and use the power key to select the downloaded ROM.


This might take a few minutes of your time, but once the process is complete, reboot your phone.
Hopefully, your bricked phone will not boot normally and work smoothly.
Part 4: Booting straight into Bootloader
If your bricked phone boots straight into Bootloader, then this a serious issue and must not be taken lightly. Flashing a new ROM or clearing cache partitions are of little help in such a brick smartphone situation. Booting straight into Bootloader is a peculiar soft bricked Android phone feature and can be tackled only by downloading and flashing your original ROM from the manufacturer. In order to do so, a detailed study about your manufacturer’s ROM, ways to download and flash must be carried out. Since different Android phones come with different types of ROMs, it difficult to cover all the aspects about the different types of ROMs.
Brick smartphone problem has become more prominent than phone freezing or hanging issue. Android users are often seen looking for solutions to fix their soft brick and hard brick phones. Android phones are prone to get bricked and thus, it is important for us to know about the three techniques given above. These methods have been tried, tested and recommended by ay affected bricked phone users. Therefore, these tips are reliable and worth a try. So if your phone acts stubborn and refuses to boot normally, examine the problem carefully and adopt one of the solutions given above which best suits your situation.
My Videos Aren’t Playing on Itel P55 5G – What Can I Do?
There’s a reason Android holds over two-thirds of the mobile operating system market share. It’s a powerful OS that gives you the utmost freedom and flexibility, allowing you to customize your phone to suit your needs.
However, regardless of the capabilities of Android phones and the features that come with their OS, just like any other smartphone, they’re prone to glitches and annoying issues – especially with their video files.
You may encounter videos not playing on your Itel P55 5G more frequently than you like. Whether it’s video files you’ve recorded using your phone or files you’ve downloaded, this glitch can get pretty annoying pretty fast. Fortunately, there are several solutions you could try to fix it.
See what you can do if videos won’t play on your Android.
Why Are My Videos Not Playing On Android?
Considering how most smartphone manufacturers tend to emphasize the unbelievable quality of their cameras, perfect night modes, seamless slow-motion recordings, superb resolution, and more, you’d expect all images and videos to function flawlessly on your Android. Unfortunately, that’s not always the case.
Occasionally, you could find that the videos you access from your gallery won’t play, sending you the message that “video cannot be played” or “can’t play video.” Other times, you might find that YouTube videos won’t load correctly or your downloaded videos won’t open in your media player.
There could be a wide variety of reasons that is happening, including:
- Corrupted video
- Corrupted SD card
- Outdated media player
- Outdated OS
- Incomplete download from the source
- Low storage
- Video downloaded from a suspicious source
An array of hardware and software issues could lead to you being unable to play videos on your Android. However, that doesn’t mean you should immediately send your device for repairs or delete the videos that won’t play. There might be a few better solutions you could try.
What You Can Do if Your Videos Aren’t Playing On Android Phone
Since there are many reasons for having problems with videos not playing on your Android, you could also try many solutions.

1. Do a Factory Reset
While a factory reset shouldn’t always be the first solution you go to, it can usually prove to be the most effective one.
A factory reset, aka a master reset or a hard reset, returns all your software configurations to the original state when the phone was first manufactured. In the process, all your data is lost – any photos and videos you have on your phone and the apps you’ve installed will be deleted. You’ll be logged out of all your accounts and won’t have access to your message history, contacts, and more.
While it seems like an extreme step, it can help fix any video issues you might encounter due to software bugs.
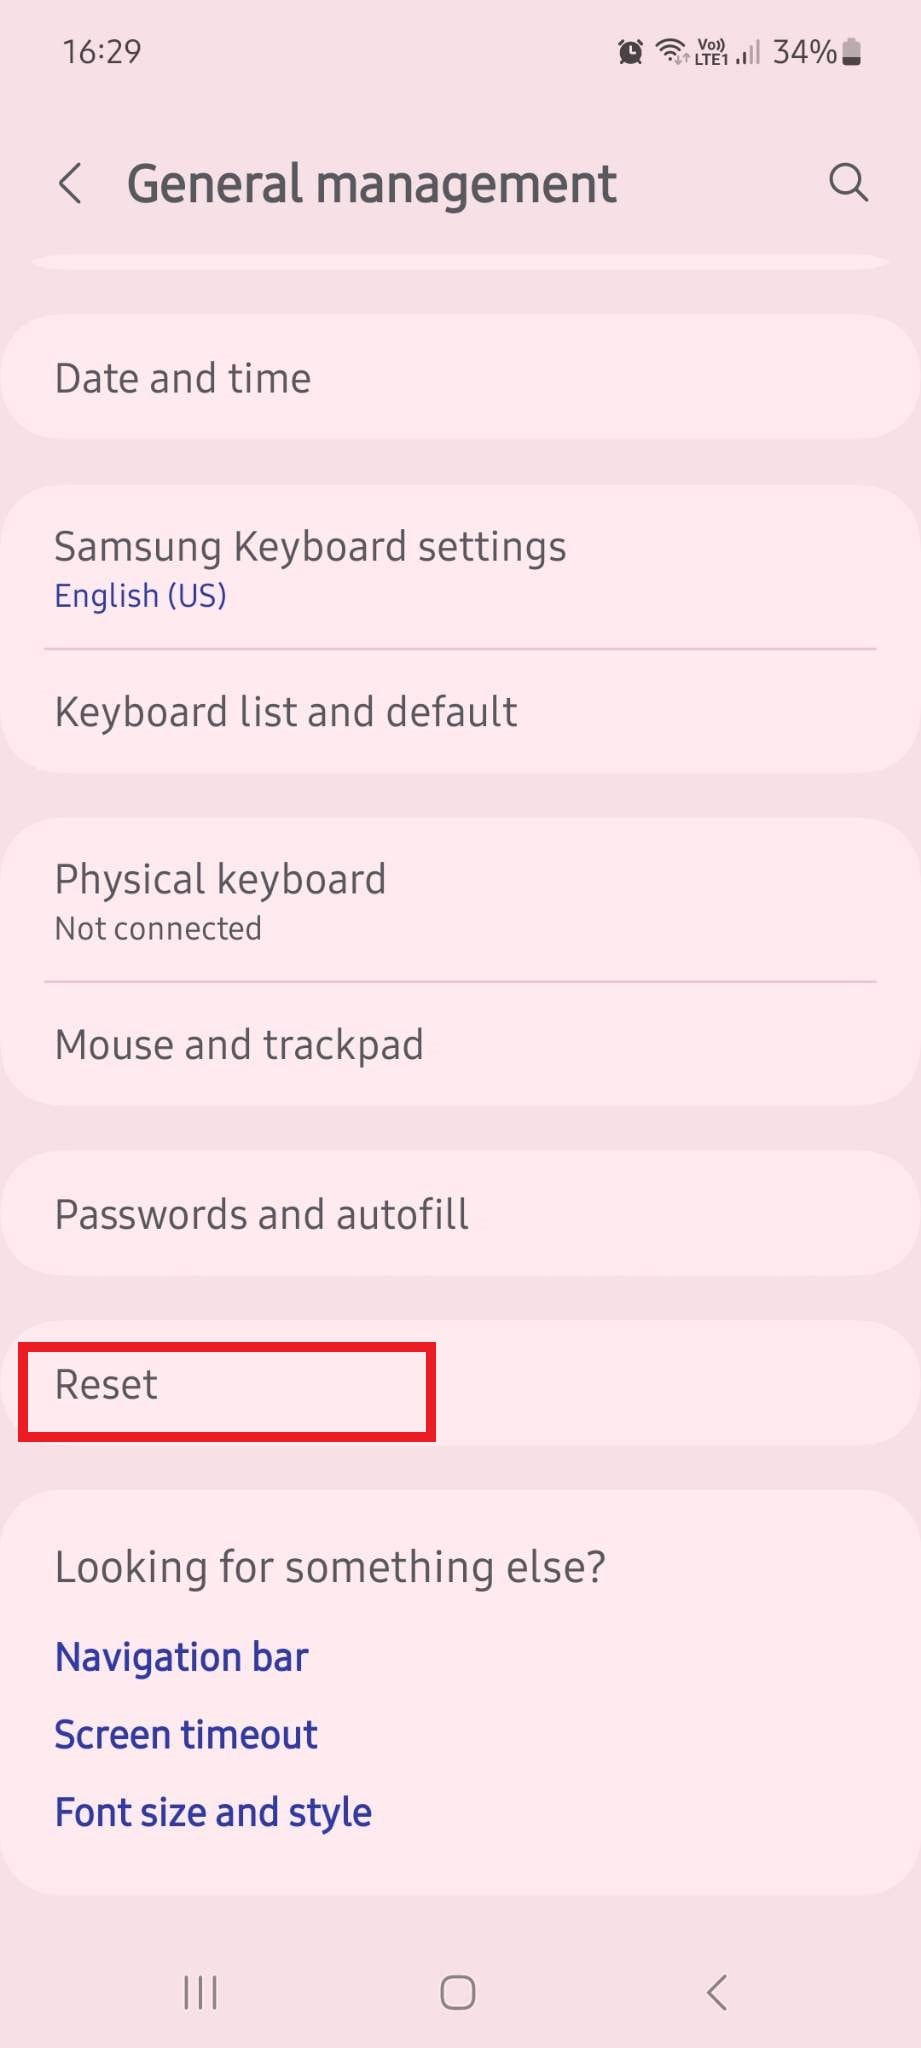
Though there could be slight variations between different phones, you can usually perform a factory reset by going to Settings > General Management > Reset > Factory data reset > Reset.
2. Restart Your Itel P55 5G
While a factory reset is all but guaranteed to fix the issues you’re encountering with your videos, sometimes a simple restart might do the trick just fine. A restart works by clearing your RAM (Random Access Memory).
In a nutshell, RAM stores short-term data that helps your processor complete tasks quickly. This data is always easily accessible, and it’s what helps your phone quickly open webpages and apps you’ve recently used.
Over time, however, your RAM can get filled with unnecessary data and data fragments, which, in turn, can confuse your processor.
Restarting your phone will clear your RAM and potentially eliminate any data fragments causing your videos to be unplayable.
3. Check the Video Format
As a general rule of thumb, the videos you capture should be in a format your device supports. However, the videos you’ve downloaded might not be. That’s why checking the files’ video format before trying other possible fixes is in your best interest.
If the format isn’t supported, installing the right video player with the necessary compatibility is the most straightforward fix. Some of the most popular video players for Android include VLC for Android, GOM Player, MX Player, Bsplayer, and RealPlayer. You can easily find all of them in the Google Play Store.
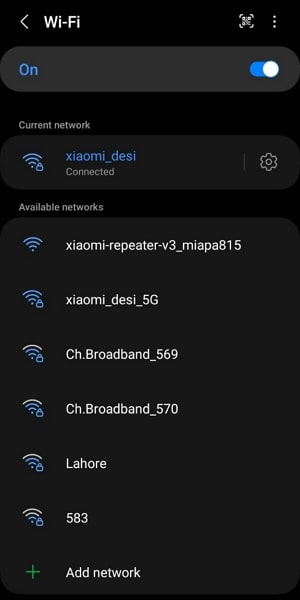
4. Check the Internet Connection
If you’re having problems playing downloaded or online videos, check your internet connection to see if there’s an issue there. If your internet’s down, any downloaded videos might not have downloaded correctly, and any online videos that haven’t been loaded will not play.
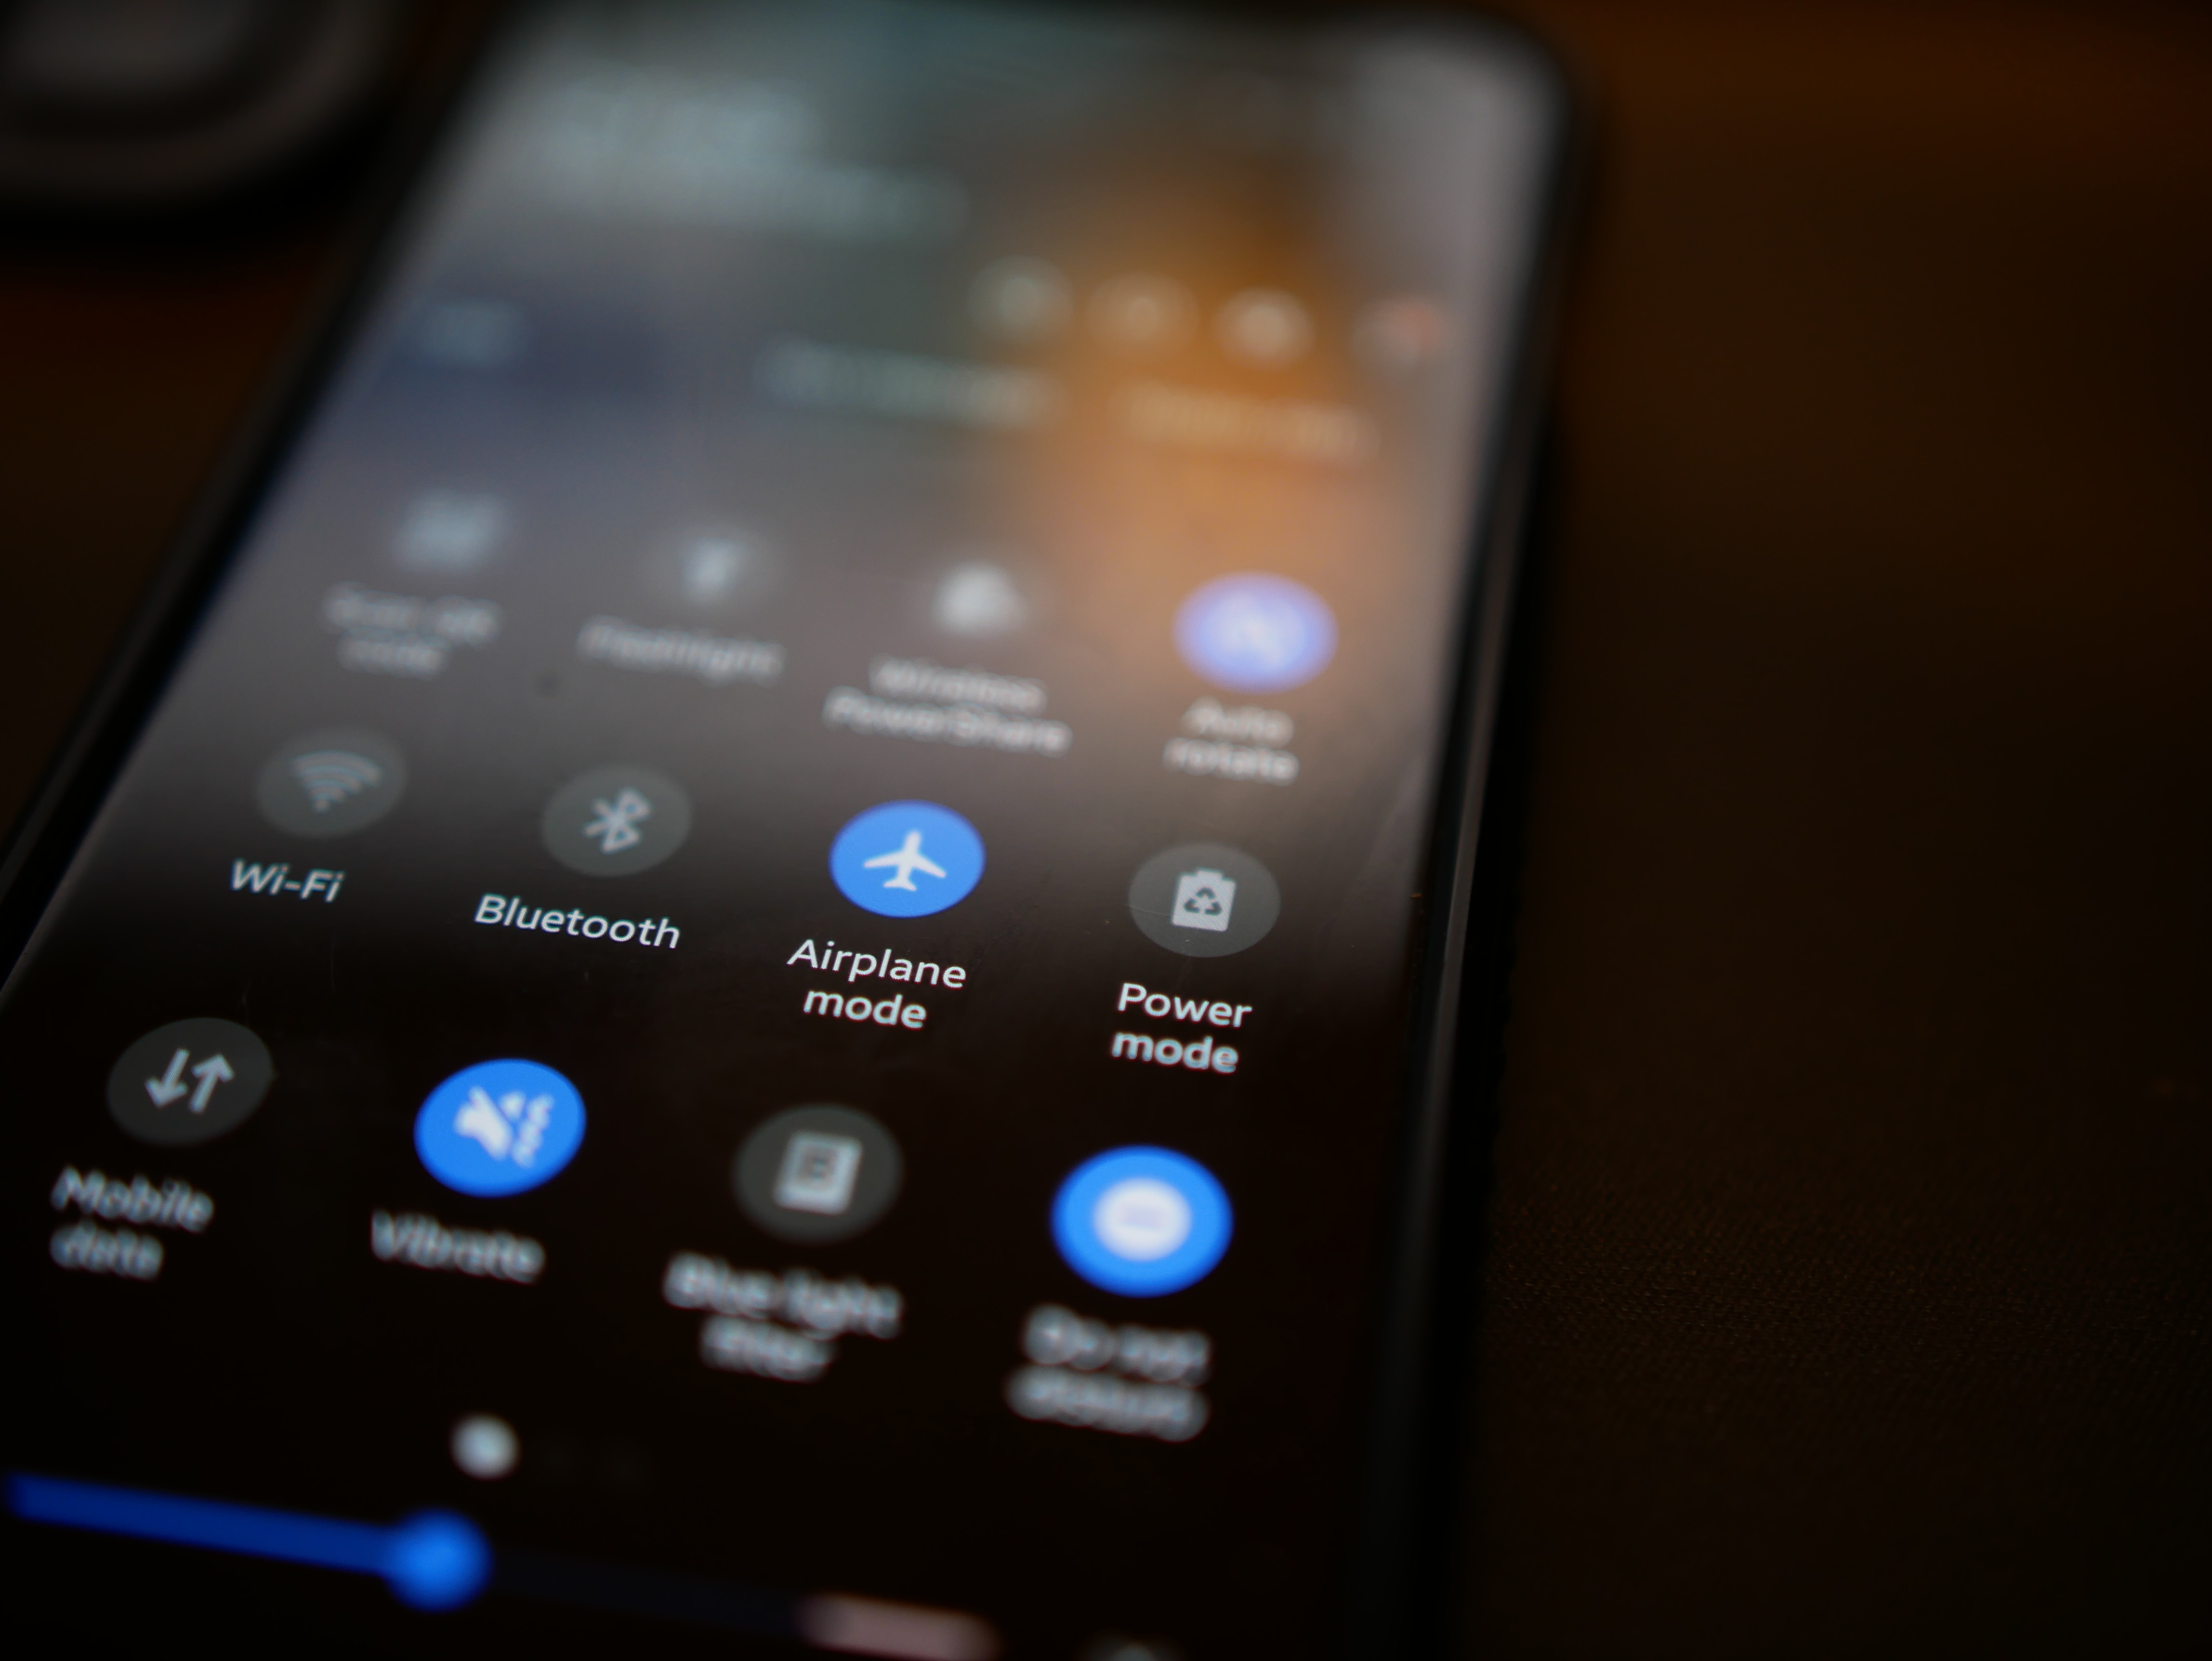
Make sure that you turn the Airplane mode off and your Wi-Fi on. Check the connection and test your internet speed to see if everything works properly.
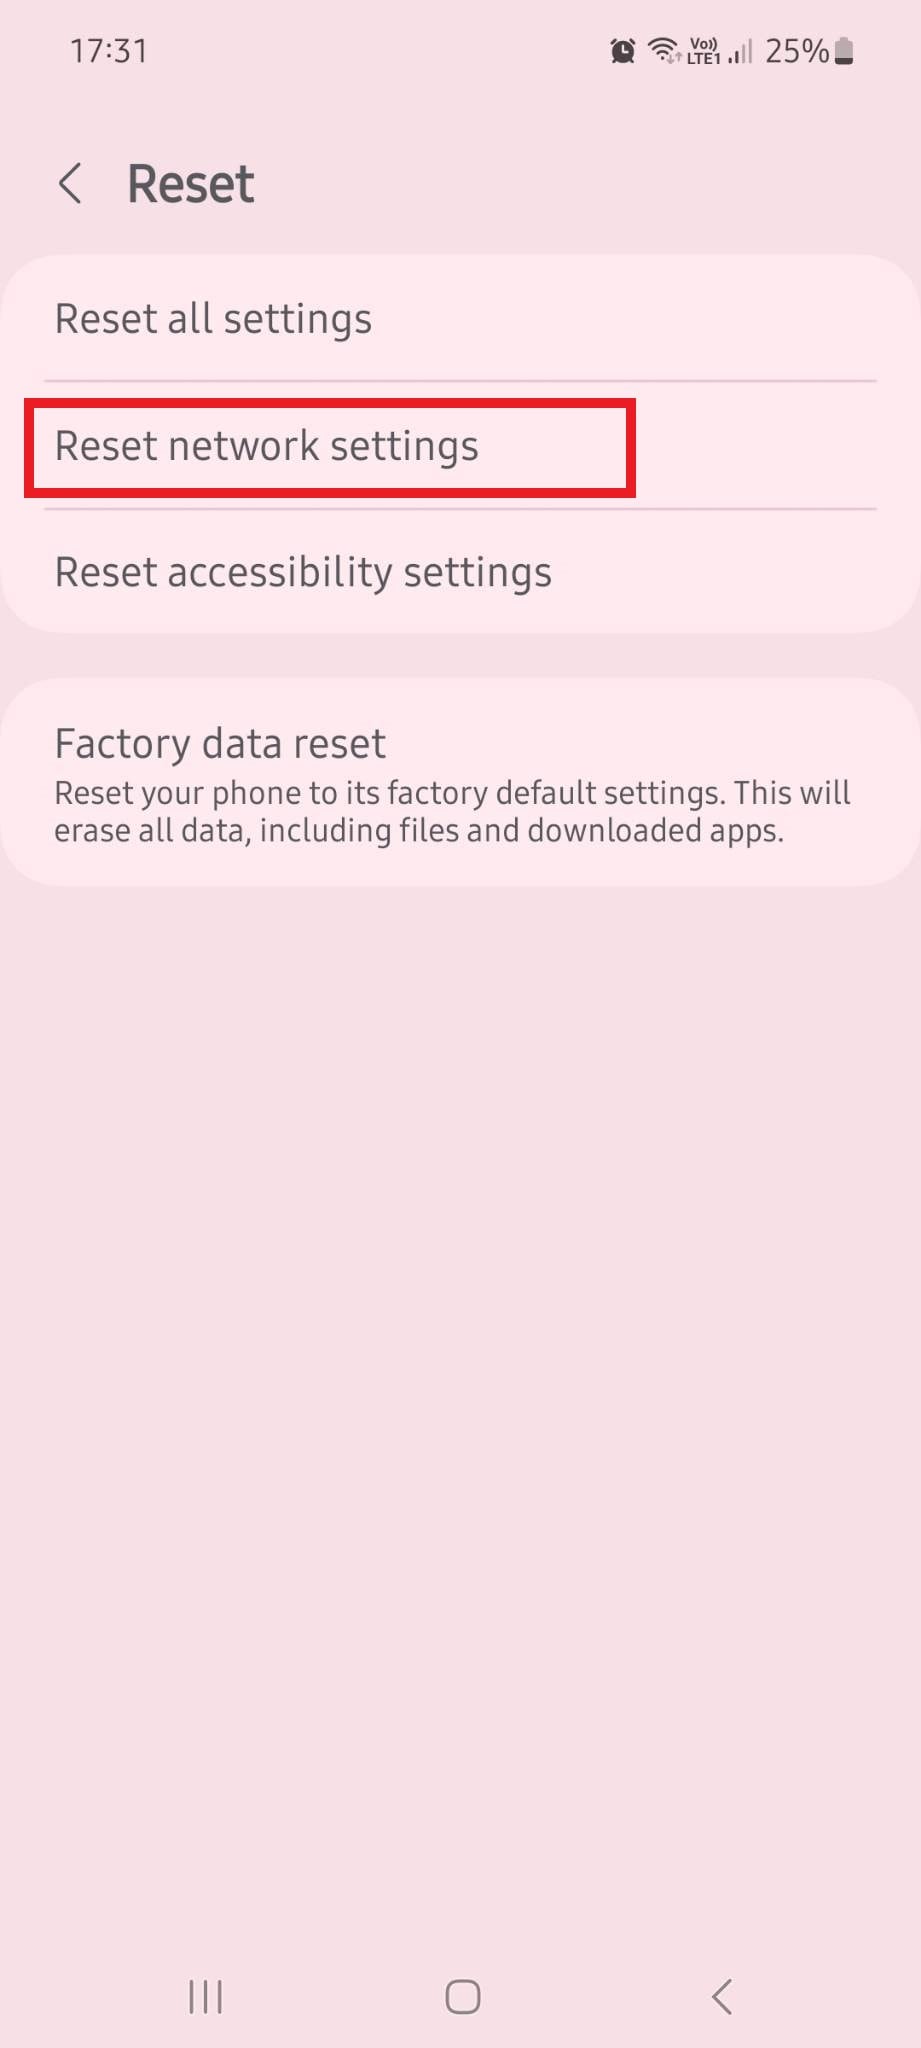
You might need a network reset if your phone can’t connect to a Wi-Fi network. The path might differ between Android devices, but you should be able to find the option for a network reset at the exact location of your factory reset. Go to Settings > General Management > Reset > Reset Network settings > Reset settings.
5. Clear the Cache
The cache stores a copy of your most commonly used data, helping decrease loading time and improve your phone’s performance. However, too much cache data can take up too much space and cause data corruption, preventing you from accessing some of your apps.
On average, you should clear your phone’s cache every few months to ensure that everything runs smoothly. If you encounter issues with your videos not playing on Android, clearing the cache could be just the fix you need.
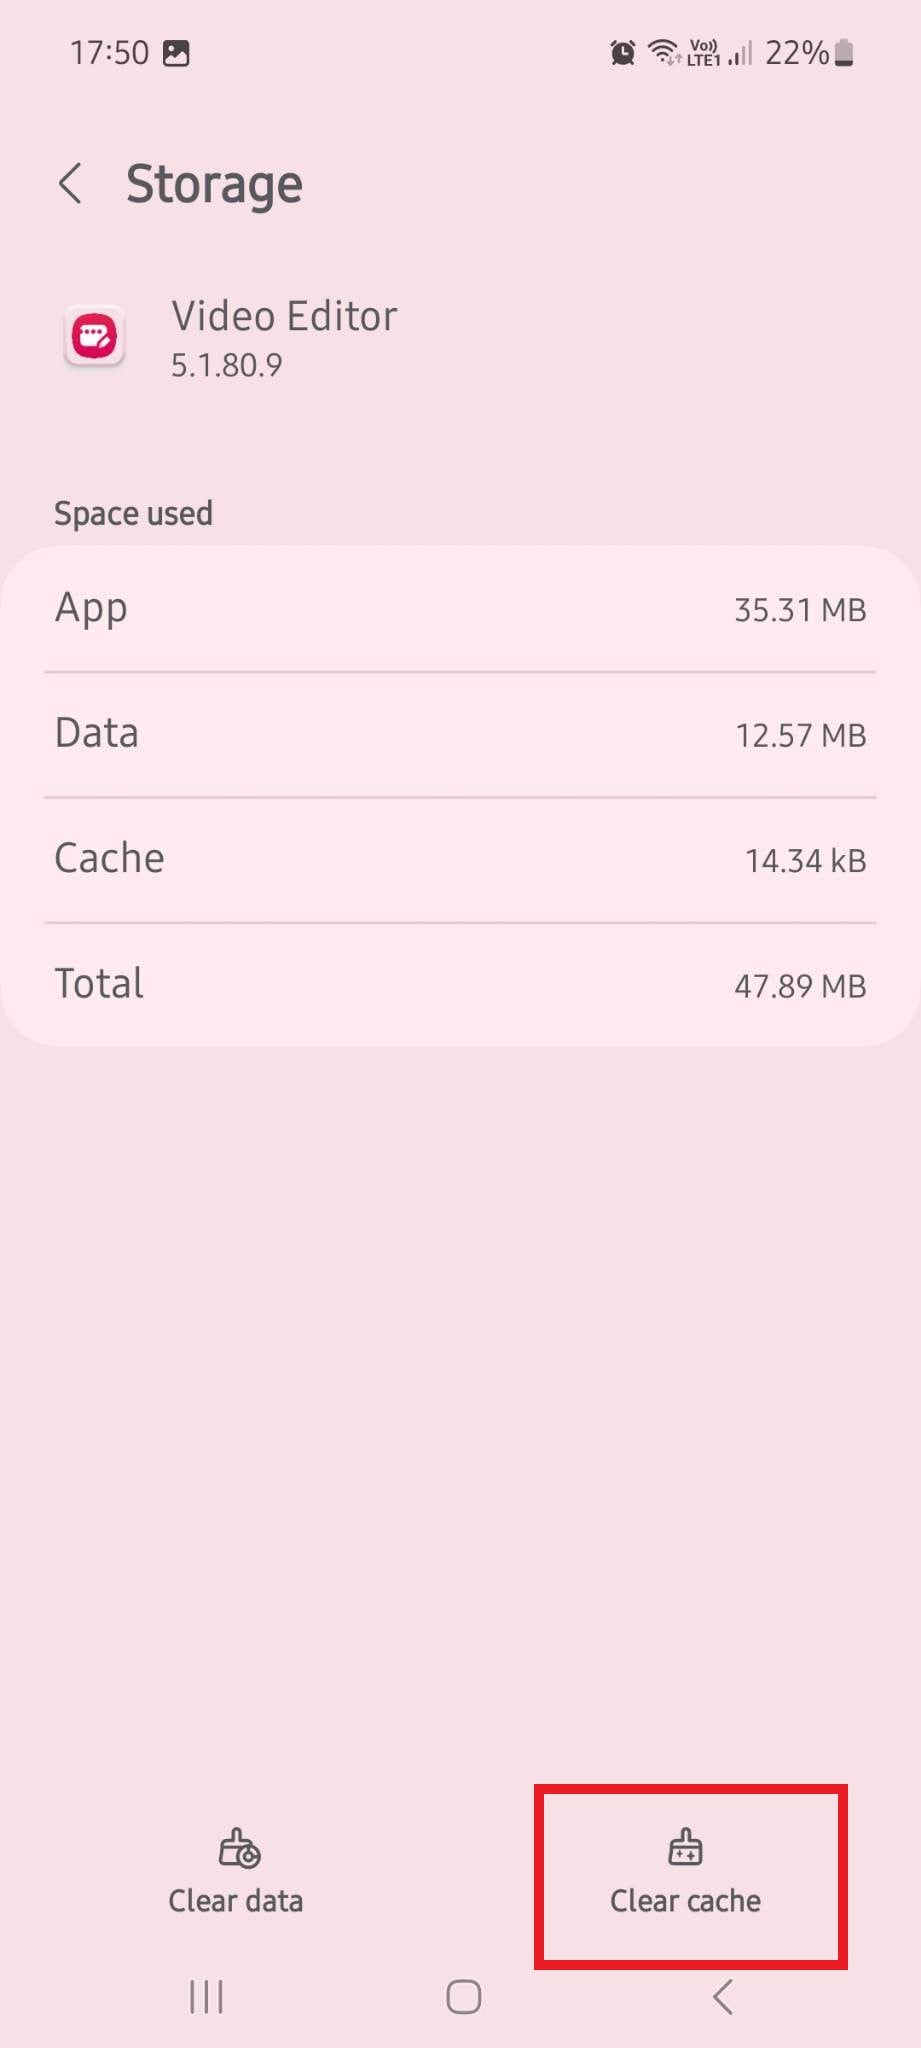
To clear the cache from your apps, you’ll want to go to Settings > Apps. From there, select the app you want to remove the cache from, scroll down to Storage, then choose Clear Cache.
6. Update Android OS
An outdated Android OS is usually the culprit behind many bugs and glitches you may encounter on your phone. It can prevent you from playing video files, accessing apps, taking photos, and more. It can lead to data corruption and loss, expose you to malware and cyberattacks, and compromise phone performance.
Regularly updating your OS to its latest version is always in your best interest. It can solve the problem of your videos not playing and protect you and your sensitive data.
7. Repair Your Android OS

You might already have the latest version of Android OS, but that still doesn’t mean your OS is functioning as it should. Maybe your phone was interrupted while downloading or installing the new OS version. Maybe your phone had underlying OS issues, or you accidentally downloaded files you shouldn’t have. Whatever the case is, if your videos don’t play due to an OS problem, you’ll need to repair your OS.
The best way to do it is with a reliable Android OS repair solution like Wondershare Dr.Fone.
Fast, efficient, and powerful, Wondershare Dr.Fone can repair your Itel P55 5G in several simple steps:
- Step 1: Download and launch Wondershare Dr.Fone on your PC.
- Step 2: Go to Toolbox, then use a cable to connect your Itel P55 5G to your PC.

- Step 3: Select System Repair > Android.
- Step 4: In the new window, select Start.

- Step 5: Fill in information about your phone’s Brand, Name, Model, Country, and Carrier.
- Step 6: Agree with the warning and select Next.

- Step 7: Follow the on-screen instructions to put your device in Download Mode.
- Step 8: Wondershare Dr.Fone will automatically start downloading the necessary firmware, so wait for the process to finish.

- Step 9: When the download is complete, select Fix Now to install it.
- Step 10: Type 000000, then select Confirmto continue fixing your device.

- Step 11: Wait for the Repairing Nowprocess to finish.
- Step 12: Once the process is complete, click Done.
If the reason your videos wouldn’t play on your Itel P55 5G was a fault in the OS, everything should be functioning well after repairing your phone with Wondershare Dr.Fone.
Remember that repairing your device with Wondershare Dr.Fone might result in data loss. Back up all your essential data before fixing your OS using this software to stay safe.
8. Update the Video App
Sometimes, it’s not the outdated OS version causing issues but rather the out-of-date video app. Like OS updates, app and other software updates often contain fixes for common problems and security patches. Not every update is there simply to introduce new features.
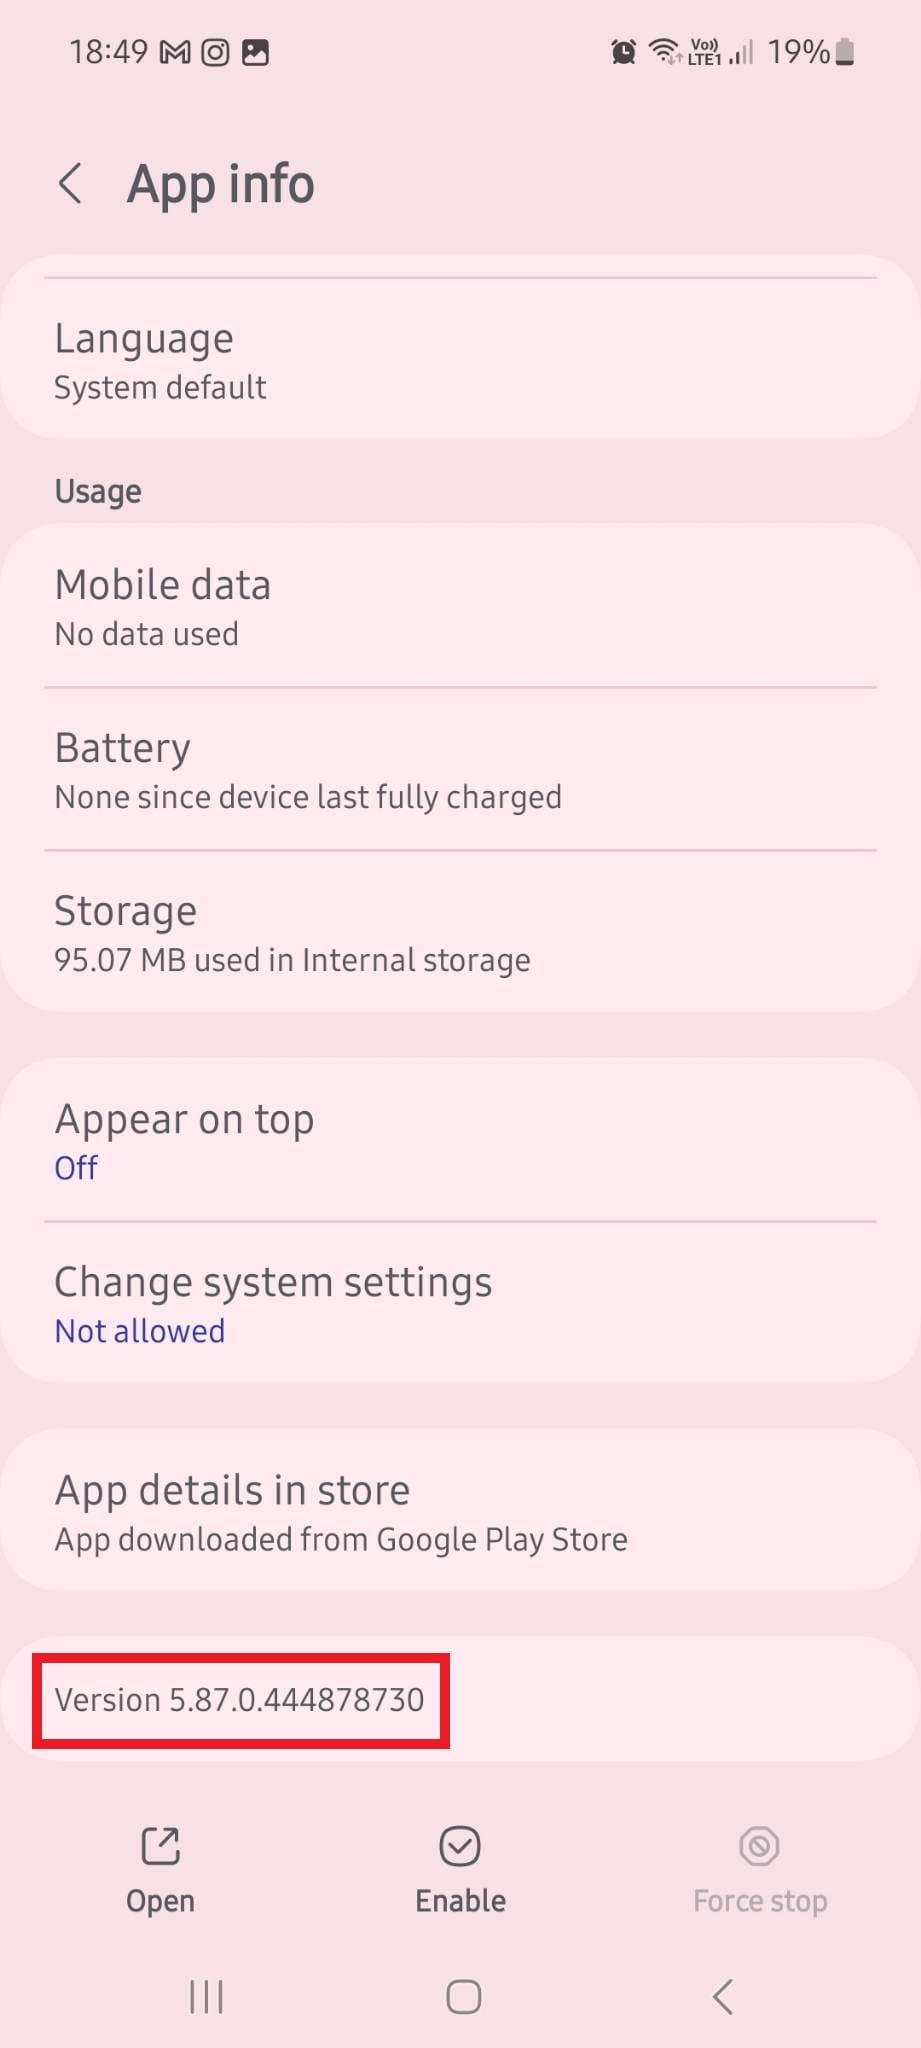
To check whether you’re using the latest version of your video player, go to Settings > Apps. Find your video player app, tap it, and scroll down to the bottom of the page to see the version installed on your phone.
9. Clear Cookies and Browsing Data
If online videos are causing problems, not your recorded or downloaded ones, you might be due for a quick cookie and browsing data clearing.
Cookies are usually there to improve the user experience, allowing you to load websites faster and enjoy improved performance. However, if your cookies and browsing data occupy too much space, they could pose problems.
You’ll first need to launch your mobile browser to clear cookies and browsing data. If you’re using Google Chrome, the process is simple and streamlined. Tap the three dots in the upper right corner and go to Settings. From there, go to Privacy and security > Clear browsing data > Clear data.
10. Reinstall Video Apps
If you still have issues with videos not playing on your Itel P55 5G, you could try deleting and reinstalling your video apps. Sometimes, simply updating the video app might still retain the glitch causing problems. However, if you delete it in its entirety and then install it again, the issue should be gone.
To uninstall the video app on your Android, go to Settings > Apps. Locate the app you want to delete, then tap Uninstall at the bottom of your screen.
To reinstall it again, go to the Google Play Store, search for the video app you want to have, then click Install.
 safe & secure
4,974,400 people have downloaded it
Conclusion
Like other smartphones, Android devices occasionally encounter glitches when playing video files. In most instances, the solution can be as simple as restarting your device. In others, you might have to perform a full factory reset or use software like Wondershare Dr.Fone to repair your Android OS.
Whatever the case is, don’t despair. There’s usually a solution that can fix the problem and ensure your device works as expected.
Fixes for Apps Keep Crashing on Itel P55 5G
The rapid evolution of technology has transformed our smartphones into powerful devices. Presently, with just a few taps, they possess the ability to accomplish a diverse array of tasks. It has been possible due to the extensive availability of mobile applications. However, it can be incredibly frustrating when your favorite apps keep crashing repeatedly.
You’re not alone if you’re an Android user who encounters app crashes. This article will explore ten practical ways to fix apps that keep crashing on Android devices. We will also discuss the causes behind app crashes and how to prevent them.
Part 1: What Are the Causes Behind Apps Keep Crashing on Android?
There are many reasons for the app crashing on Android devices. These reasons range from insufficient storage space to bugs and glitches in the apps. Finding out the root cause of an app crashing is important so that you can find the appropriate solution. Discussed below are some of the reasons why your Android apps keep crashing:
Insufficient Memory
When a device is low on memory, it may struggle to run multiple apps simultaneously. Each app requires memory to store its data and execute its processes. If the available memory is limited, it can cause apps to crash. That happens because they don’t have enough resources to operate properly.
Software Compatibility
Android devices come in various models and run different operating system versions. That’s why it is essential to use apps compatible with your device. Since there are a lot of Android variants, it is hard to optimize apps for all devices. An app not optimized for an Android version or device leads to crashes or malfunctions.
Outdated Apps
Apps are regularly updated to introduce new features, fix bugs, and enhance performance. Using an outdated version of an app may cause instability or compatibility problems. Since the app is not optimized for the current version of Android, it can keep crashing.
Network Problems
Some apps rely heavily on network connectivity to function properly. They need a stable and strong internet connection to perform all the functions. These apps can crash if there are network connectivity issues, such as a weak Wi-Fi or network outage. Unstable connections can disrupt data transmission, making the app’s function challenging.
App Bugs
Despite rigorous testing, apps can still have bugs or coding errors that lead to crashes. Bugs in apps can occur due to various reasons. It mostly relates to incorrect implementation of features or unexpected user interactions. App developers work to identify and fix these bugs, often releasing updates.
Part 2: How to Fix the Apps Keep Crashing on Android?
Once you discover why your Android apps keep crashing, fixing them becomes a lot easier. However, there is no need to worry even if you cannot locate the problem source. Below we have listed 10 general and specialized solutions to fix app crashing:
Fix 1: Check the Internet Connection
As mentioned before, some apps rely on the internet to function. If you don’t have an active internet connection, they will not work. To avoid the app crashing, you need to ensure that the internet connection on your device is working. If you use Wi-Fi, check the router and turn Wi-Fi off and on again. In the case of mobile data, try enabling Airplane mode and then disabling it.
Fix 2: Force Stop the Apps Keep Crashing
If your apps keep crashing, you should try force-closing the targeted app and re-opening it. Doing this will flush out minor bugs and glitches from the app. These temporary bugs and glitches can occur due to various reasons and hamper the app’s working. Use the following steps to force stop the app that keeps crashing and re-open it:
- Step 1: On your Itel P55 5G, move the app icon and press it to select “App Info.” On the App Info screen, tap the “Force Stop” button to force close the app. The button can be either on the down left or down right corner.
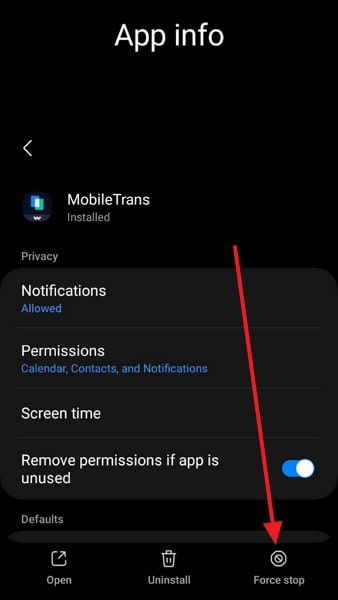
- Step 2: After force closing the app, relaunch it and see if the app crashing issue is resolved.
Fix 3: Restart your Android Device
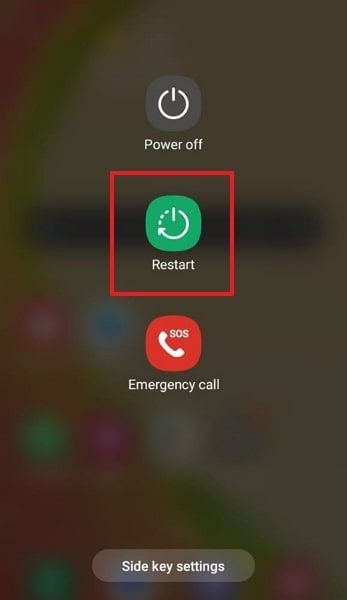
In case restarting the app hasn’t worked, you should try restarting your Itel P55 5G. Rebooting your device reset all the processes and apps in the Itel P55 5G device. It helps remove conflicts between different apps, which can be the cause of your apps keep crashing on Android. To reboot your Itel P55 5G, adhere to the following guidelines:
- Step: Press and hold the “Power” key until you see the power menu on the screen. Here, tap the “Restart/Reboot” button to restart your Itel P55 5G.
Fix 4: Update the Android OS
Not updating your Android OS for a long while can cause many performance issues in your device. One of these issues is the incompatibility with the latest apps. That’s why make sure that your Itel P55 5G is running the latest available version of the operating system. You can check and update the Android OS of your device using these steps:
- Step 1: Launch the Settings app on your Itel P55 5G and scroll down to select “Software Update.” On the next screen, tap “Download and Install” to look for new updates.
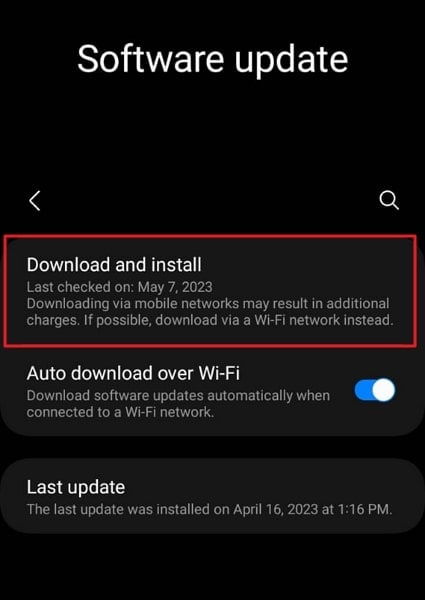
- Step 2: During the update process, ensure you have a stable internet connection. Moreover, your device should be fully charged to avoid any complications.
Fix 5: Clear the App Cache
Have you tried clearing the cache of the app that keeps crashing? The app cache consists of temporary files and data that are stored to enhance app performance. However, if the app cache becomes corrupted, it can cause crashes. In such a situation, clearing the app cache can help resolve the app crashing issue. To clear the app cache on your Itel P55 5G, follow these steps:
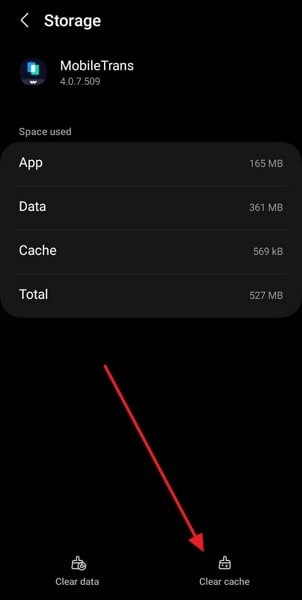
- Step 1: Navigate to your targeted app icon and long-press it. Now, tap “App Info” from the pop-up menu to access app information.
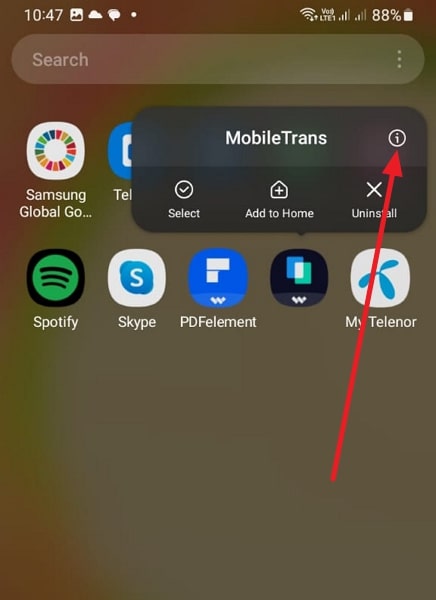
- Step 2: Following this, press “Storage,” and on the following screen, hit “Clear Cache.” It will clean the cache for the targeted app.
Fix 6: Reinstall the Buggy App
Bugs in the app can prove a nightmare and hard to remove from the app. If your apps keep crashing due to bugs, it is best to uninstall and then reinstall the app. It will help you eliminate any corrupted files or settings that might be causing the crashes. Given below are the steps needed to uninstall and reinstall the apps on Android device:
- Step 1: Go to the problematic app on your device and press the app icon for a while. Select “Uninstall” and remove the app by pressing “OK.”
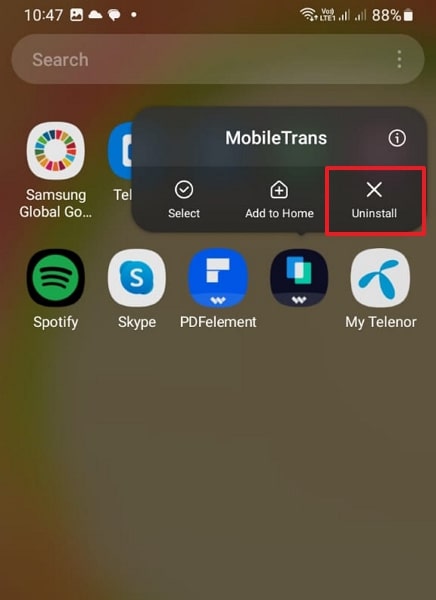
- Step 2: After removing the app, go to Google Play Store and find the targeted app. Here, tap “Install” to reinstall the app on your device.

Fix 7: Check the App Permissions
Sometimes, app crashes can occur due to improper or conflicting permissions. Whenever you install an app on your device, it needs related permission to function. If you have not granted the required permissions, the apps will not function, leading to apps keep crashing on Android. You can check the app permissions using the following procedure:
- Step 1: You will need to launch Settings on your Itel P55 5G and tap “Apps.” Here find and select the targeted app to open App Info.
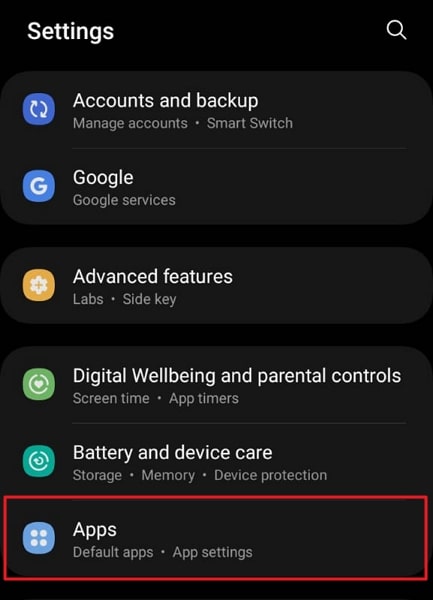
- Step 2: On the App Info screen, press “Permissions” to access all permission settings. Here, ensure that your app has the required permissions.

Fix 8: Check and Clear the Phone Storage
Insufficient storage space on your device can also lead to app crashes. Check the available storage space on your Itel P55 5G and ensure it has enough free space. If the storage is full, consider deleting unnecessary files or apps to create more space. Explained below is the process to check and free up storage on Android devices:
- Step 1: Open Settings on your Itel P55 5G and scroll down to find and select “Battery and Device Care.” Here, tap “Storage” to view the Itel P55 5G device storage.
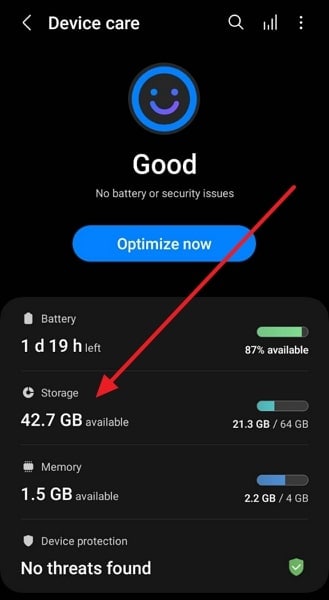
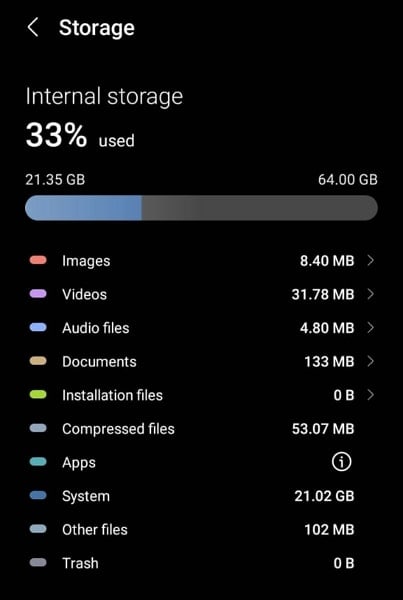
- Step 2: Here, you will see detailed information about everything stored on your device. If the storage space is full, remove the unnecessary data.
Fix 9: Reboot Into Safe Mode
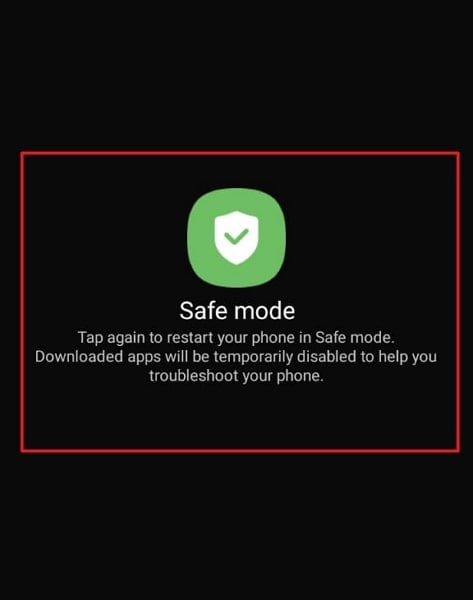
It can be hard to find the app crashing root cause if it happens due to conflicts between different apps. In such scenarios, the best way to find the problematic apps is to use Safe Mode on your device. Safe Mode disables all third-party apps, allowing you to determine if the crashes are caused by a specific app. Follow the process given below to reboot your device into Safe Mode:
- Step 1: Press and hold the “Volume Down” and “Power” buttons together for 3 seconds to access the power menu. Here, long-press the “Power Off” option.
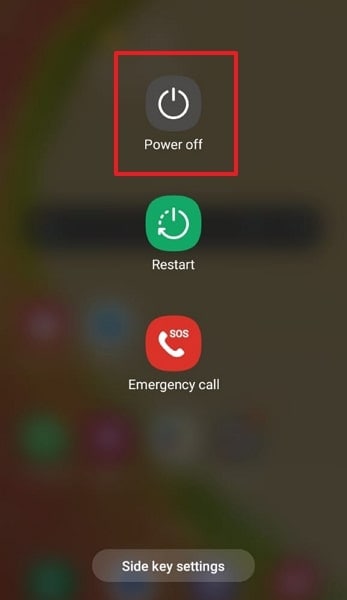
- Step 2: Press the “Power Off” button until “Restart in Safe Mode” appears on the screen. Now reboot the Itel P55 5G device into Safe Mode. To exit Safe Mode, you will need to restart the phone.
Fix 10: 100% Working Solution to Fix the Android Apps Keep Crashing – Wondershare Dr.Fone
Trying to fix an app crashing with multiple methods can be a tiring and frustrating experience. That’s why the best option is always to find and use a specialized Android system repair tool. The best Android repair tool currently available is Wondershare Dr.Fone. It is a comprehensive system repairing tool that can fix almost all system issues in Android devices.
Using Wondershare Dr.Fone, you can fix issues like apps crashing, black screen of death, Play Store not working, and many more. Furthermore, you do not need any technical skills to use Wondershare Dr.Fone to repair your Android system issues.
Main Features of Wondershare Dr.Fone
- Wondershare Dr.Fone is a specialized tool for fixing problems with Itel P55 5G devices, including the latest Itel P55 5G phones.
- It supports the Android system repair feature for over 1000 Android phones across the spectrum.
- With this tool, you can also fix bricked Android devices with ease.
Step to Fix the Android Apps Keep Crashing via Wondershare Dr.Fone
The process of fixing apps that keeps crashing on Android devices is straightforward when using Wondershare Dr.Fone. Here are the simple steps you need to follow to fix the app crashing:
- Step 1: Access System Repair from Toolbox
Open Wondershare Dr.Fone on your system after installation and select “System Repair” from the “Toolbox.” Now connect your Itel P55 5G using a USB cable and select “Android” in Wondershare Dr.Fone.
- Step 2: Provide Your Android Device Information
Click “Start” to initiate the repair process and provide your device information. You will need to provide device details like Brand, Name, Model, Country, and Carrier. Now, check the “I agree with the warning, and I am ready to proceed” box and tap “Next.”
- Step 3: Repair the Apps Keeps Crashing on Android
Follow the on-screen instruction to activate Download Mode on your device. Wondershare Dr.Fone will download the related firmware once you have enabled Download Mode. Afterward, click “Fix Now” and confirm your action by inserting the “000000” code. Now, wait for the repair process to finish.

safe & secure
Conclusion
To sum up, if your apps keep crashing on Android, you can resolve it in many ways. Using the fixes given in this article, you can improve apps’ performance and reduce crashes. However, if you’re looking for a reliable and convenient solution, we highly recommend Wondershare Dr.Fone.
With its clean interface and powerful features, Wondershare Dr.Fone stands out as the best choice to fix app crashes. It provides a comprehensive toolkit to diagnose and resolve various software issues.
Also read:
- [New] 10 Superior Video Text Enhancements
- [New] Access a Wide Range of Content via 12 Streaming Apps for 2024
- [Updated] 15 YouTube Starter Templates A Guide to Popularity
- 2024 Approved Smooth Photo & Video Flow PC-to-iPhone Upload
- 9 Solutions to Fix Vivo Y02T System Crash Issue | Dr.fone
- App Wont Open on Your Vivo Y200e 5G? Here Are All Fixes | Dr.fone
- Fix Realme Narzo 60 5G Android System Webview Crash 2024 Issue | Dr.fone
- Google Play Services Wont Update? 12 Fixes are Here on Motorola G24 Power | Dr.fone
- Head-to-Head Showdown: How Does Samsung Galaxy S6 Hold Up Against the iPhone 6 – In-Depth Review Insights!
- How to Fix It Oppo Reno 10 Pro 5G Wont Turn On | Dr.fone
- Recover Deleted E-Mails with This Simple Guide - Google Mail Edition
- Recover lost data from Itel P40+
- Smoothly Blending Bio & Linktree on Your TikTok Platform
- The Synergistic Launch Approach That Proves 'It Takes Two'
- Top 4 Android System Repair Software for Nokia G42 5G Bricked Devices | Dr.fone
- Top 4 Android System Repair Software for Tecno Spark 20 Pro+ Bricked Devices | Dr.fone
- What To Do if Your Realme Note 50 Auto Does Not Work | Dr.fone
- Title: How to Fix the Soft Bricked Itel P55 5G? | Dr.fone
- Author: Ariadne
- Created at : 2024-10-27 11:52:30
- Updated at : 2024-11-03 06:02:54
- Link: https://howto.techidaily.com/how-to-fix-the-soft-bricked-itel-p55-5g-drfone-by-drfone-fix-android-problems-fix-android-problems/
- License: This work is licensed under CC BY-NC-SA 4.0.