
How to Fix the Soft Bricked Vivo Y200? | Dr.fone
How to Fix the Soft Bricked Vivo Y200?
Bricked phone is a serious problem, as your brick smartphone could be suffering from a soft brick or hard brick problem, and must be dealt with carefully. It is very common to see a brick smartphone these days. If you are wondering what exactly is a bricked phone, here is your answer.
A bricked phone, hard brick or soft brick, is a smartphone which refuses to start or boot all the way up the home/main screen of the Vivo Y200 device. This issue is observed within most Android phones because users have a tendency to tamper with the Vivo Y200 device settings, flashing new and customized ROMs and tweaking with the essential files. Playing around with the phone’s internal set-up leads to such errors, worst of them being a brick smartphone. Usually, a bricked phone does not switch on and stays frozen at the Vivo Y200 device logo, a blank screen or even worse, doesn’t respond to any command, even the power on command.
If you are confused about the soft brick and hard brick problems and looking for solutions to fix your priced phone, then here is all you need to know.
Read on to find out more.
Part 1: What is the difference between soft brick and hard brick?
To begin with, let us understand the basic difference between a soft brick and hard brick issue. Both versions of a bricked phone prevent it from booting but differ in their causes and gravity of the problem.
A soft-brick problem is caused merely by a software error/crash and makes your device switch on automatically every time you manually turn it off. This phenomenon is referred to as Boot Loop. Soft bricked Android phones are not as difficult to fix as the hard bricked Android phones. It is convenient to say that a soft bricked phone only boots up half-way and not fully, whereas a hard bricked device does not switch on at all. A hard brick error is thus caused when the kernel, which is nothing but an interface for the software to communicate with the hardware, is tampered with. A hard bricked phone is not recognized by your PC when plugged in and is a serious problem. It requires troubleshooting techniques and cannot be easily fixed as the soft brick problem.

Hard bricked phones are a rare sight, but the soft brick is very common. Given below are ways to fix a soft brick Android phone. The techniques listed here are the best and the most efficient ways to get your phone back to its normal working conditions without losing your important data or damaging your device or its software.
Part 2: Stuck at the Boot Loop
This is the first sign of a soft bricked Android phone. Boot Loop is nothing but when your phone does not remain switched off and turns itself on automatically, and freezes at the logo screen or blank screen, every time you manually try to power it off.
Stuck at boot loop problem can be fixed by clearing your Cache partitions. These partitions are nothing but storage locations for your modem, kernels, system files, drivers and built-in Apps data.
It is advisable to clear Cache partitions regularly to keep your phone free from such glitches.
Since the phone refuses to boot, Cache can be cleared from entering into the Recovery Mode. Different Android devices have different ways to put it in recovery mode. Normally pressing the power key and volume down key helps, but you may refer to your phone’s guide for better understanding and then follow the steps given below to clear the cache partition:
Once you are the recovery mode screen, you will see a number of options as shown in the screenshot.

Use the volume down key to scroll down and select ”Wipe cache partition” as shown below.
 >
>
After the process is completed, select “Reboot System” which is the first option in the recovery mode screen.
This method will help you erase all the clogged up and unwanted files. You may loose some App related data, but that is a small price to pay to fix your bricked phone.
If this method does not boot up your brick smartphone and the problem still persists, there are two more things you can try. Read ahead to find out about them.
Part 3: Booting straight into recovery mode
If your bricked phone does not boot up to your Home Screen or Lock screen and instead boots directly into Recovery Mode, there is not much left to do. Booting straight into recovery mode is undoubtedly a soft brick error but it also indicates a possible problem with your current ROM. The only option you have to flash a new ROM to reboot your bricked phone back to its normal functioning.
To flash a new ROM:
Firstly, you must root your phone and unlock the Bootloader. Every phone’s mechanism to unlock the bootloader is different, thus, we suggest to refer to your user manual.
Once the Bootloader is unlocked, take a backup of all your data by selecting “Backup” or “Android” back in recovery mode. The process should not take long and all you need to do is tap “OK” to config backup.

In this step, download a ROM of your choice and store it in your SD Card. Insert the SD Card in your phone to begin the flashing process.
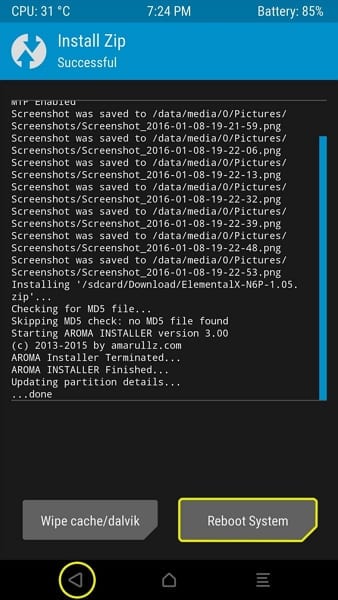
Once at the recovery mode, select “Install Zip from SD Card” from the options.

Scroll down using the volume key and use the power key to select the downloaded ROM.


This might take a few minutes of your time, but once the process is complete, reboot your phone.
Hopefully, your bricked phone will not boot normally and work smoothly.
Part 4: Booting straight into Bootloader
If your bricked phone boots straight into Bootloader, then this a serious issue and must not be taken lightly. Flashing a new ROM or clearing cache partitions are of little help in such a brick smartphone situation. Booting straight into Bootloader is a peculiar soft bricked Android phone feature and can be tackled only by downloading and flashing your original ROM from the manufacturer. In order to do so, a detailed study about your manufacturer’s ROM, ways to download and flash must be carried out. Since different Android phones come with different types of ROMs, it difficult to cover all the aspects about the different types of ROMs.
Brick smartphone problem has become more prominent than phone freezing or hanging issue. Android users are often seen looking for solutions to fix their soft brick and hard brick phones. Android phones are prone to get bricked and thus, it is important for us to know about the three techniques given above. These methods have been tried, tested and recommended by ay affected bricked phone users. Therefore, these tips are reliable and worth a try. So if your phone acts stubborn and refuses to boot normally, examine the problem carefully and adopt one of the solutions given above which best suits your situation.
11 Proven Solutions to Fix Google Play Store Not Working Issue on Vivo Y200
Google Play Store is a necessary and bundled service of any Android device. This app is required to download or even run any apps. So, getting an error like Play store not working or Play Store crashing is very unfortunate and a matter of a headache. Here we tried to put the best solution to overcome this issue. Keep reading this article for all the 11 best solutions.
Part 1. The recommended method to fix Google Play Store issues
If you search on the internet, you may find various tricks dealing with Google Play Store not working issue. However, either to try each of them or choose several to follow would certainly cost a lot of time. What’s more, we are not sure whether they will really work. Therefore, we would recommend you with a more effective and fast way, that is to use Dr.Fone - System Repair (Android) , a dedicated Android repair tool to fix Google Play Store, not working issues just in one click.
Dr.Fone - System Repair (Android)
A most effective method to fix Google Play Store not working
- Fix all Android system issues like the black screen of death, won’t turn on, system UI not working, etc.
- Industry’s 1st tool for one-click Android repair.
- Supports all the new Vivo Y200 devices like Galaxy S8, S9, etc.
- Step-by-step instructions provided. No technicals skills required.
3981454 people have downloaded it
Brief steps to guide you through the process of fixing Google Play Store not working (followed by video tutorial):
- Get this tool downloaded on your computer. Install and launch it, and you can find the following welcome screen displayed.

- Select the option “System Repair”. In the new interface, click on the “Android Repair” tab.

- Start fixing Google Play Store not working by clicking “Start”. Select and confirm the correct model details as instructed.

- Activate the Download mode from your Vivo Y200.

- After entering the Download mode, the Dr.Fone tool starts to download the correct firmware to your Android.

- The downloaded firmware will be loaded and flashed to your Vivo Y200 to fix the Google Play Store not working issue.

- Wait until the Android repair process is complete. Start your Android and Google Play Store, you can then find that the Google Play Store not working issue no longer exists.

Video tutorial to fix Google Play Store not working
Part 2: Other 10 common methods to fix Google Play Store issues
1. Fix Date and Time settings
Sometimes Google creates a problem connecting with the Play Store or Play store crashing due to the wrong date and time. The first and most common thing is you have to check if the date and time are updated or not. If not, update it first by following the below step by step guide.
Step 1 – First, go to the “Settings” of your device. Find ‘Date and time’ and tap on it.

Step 2 – Now you can see several options. Select “Automatic date and time”. This should override the wrong date and time your device have. Else, deselect the tick beside that option and select the date and time manually.
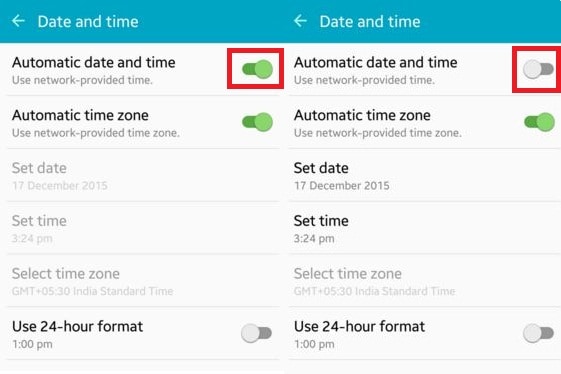
Step 3 – Now, go to the Play store and try to connect again. This should be working without any problem now.
2. Cleaning of Cache data of Play Store
This may happen that sometimes Google Play Store stopped working due to excessive unnecessary data stored in the cache of the Vivo Y200 device. So, clearing unnecessary data is very important to keep the application run smoothly. To do this, you need to follow the below steps.
Step 1 – Firstly, go to “Settings” on your device.
Step 2 – Now, navigate to the “Apps” option available at the settings menu.
Step 3 – Here you can find the “Google Play Store” app listed. Open it by tapping.
Step 4 – Now, you can find a screen like below. Tap on “Clear cache” to remove all the cache from the application.
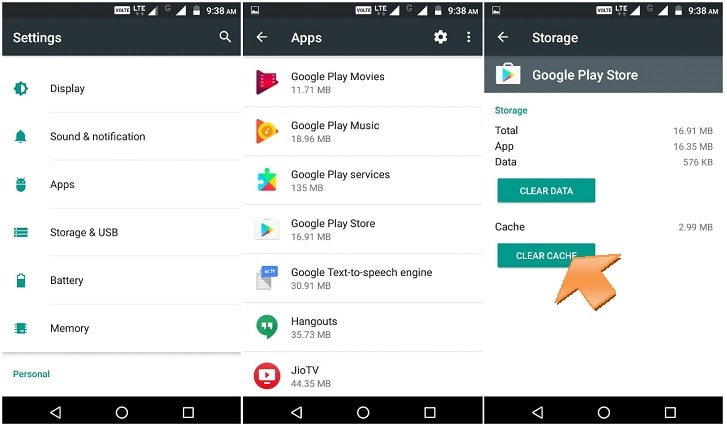
Now, again try to open Google Play Store and you may successfully overcome the Play Store not working issue. If not, check the next solution.
3. Reset Play store by Clear data
If the above solution is not working for you, you might try this option instead. This step will erase all the app data, settings, etc so that it can be set up a fresh one. This will also fix the Google Play store not working issue. For this solution, use the following method step by step.
Step 1 – Like the previous method, head towards the settings and then find “Apps”
Step 2 – Now find “Google Play Store” and open it.
Step 3 – Now, instead of tapping “Clear cache”, tap on “Clear data”. This will erase all the data and settings from the Google Play store.
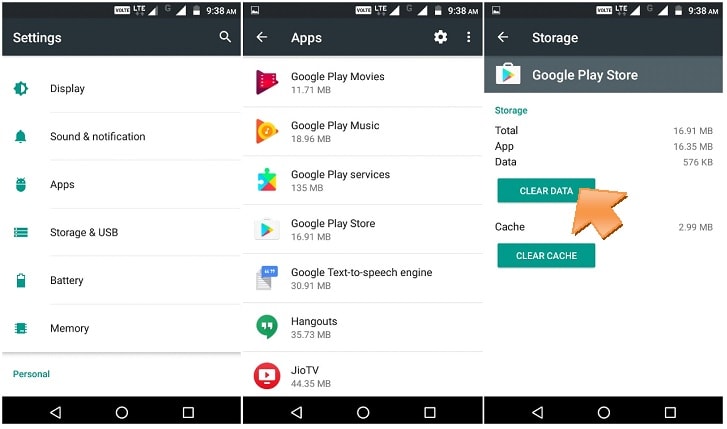
After this, open “Google Play Store” and now your problem might be solved now.
4. Reconnecting the Google account
Sometimes it may happen that removing and reconnecting your Google account may solve the Play Store not working issue. To do this, you need to follow the instructions below.
Step 1 – Go to the “Settings” and then find “Accounts”.
Step 2 – Upon opening the option, select “Google”. Now you can see your Gmail ID listed there. Tap on it.

Step 3 – Now click on the top right side three dots or “more” option. Here you can find the “Remove account” option. Select it to remove the Google Account from your Mobile.
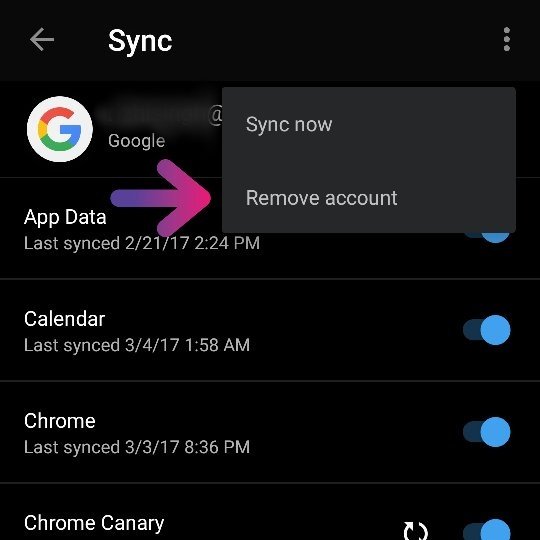
Now, go back and try to open Google Play Store again. This should work now and enter your Google ID and password again to continue. If it’s still not working, move to the next solution.
5. Reinstall the latest version of Google Play Store
Google Play store can’t be uninstalled completed completely from your Vivo Y200. But disabling and reinstalling its latest version can resolve the Play Store crashing issue. For doing this, just follow the below guide.
Step 1 – First of all, go to “Settings” and then move on to “Security”. Then find “Device administration” here.
Step 2 – Upon clicking on this option, you can find “Android device manager”. Uncheck this and disable.

Step 3 – Now you can be able to uninstall Google play service by going into application manager.

Step 4 – After that, try to open any app that requires Google Play store to open, and that will automatically guide you to install the Google Play service. Now install the updated version of the Google Play service.
After installing, your problem might be solved by now. If not, try the next solution.
6. Clear Google Service Framework Cache
Besides the Google Play store, this is important to keep healthy the Google Service Framework as well. The cache and unnecessary data should be removed from there also. Follow the steps below.
Step 1 – Go to settings and then tap on “Application Manager”
Step 2 – Here you can find “Google Service Framework”. Open it.
Step 3 – Now, tap on “Clear cache”. And you are done.

Now go back and try to open Google Play store again. This might solve the Google Play Store has stopped the problem by now. If not, check the next solution.
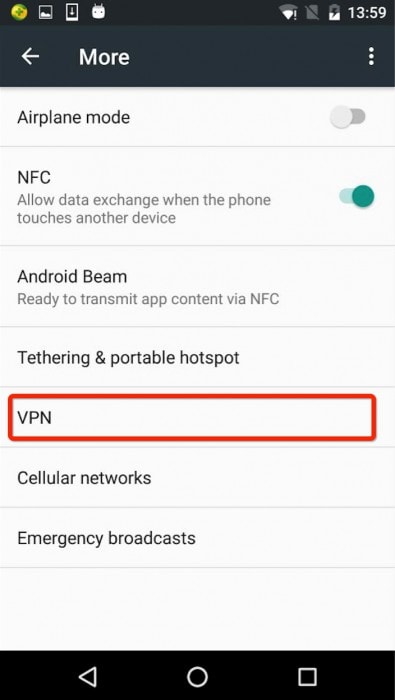
7. Disable the VPN
The VPN is a service to get all the media outside your geographic location. This is also used to install a country-specific app in another country. But sometimes it can create a problem with Play Store crashing. So, this is recommended to try disabling the VPN.
Step 1 – Go to the settings of your device.
Step 2 – Under the “networks”, click on “More”.
Step 3 – Here you can find “VPN”. Tap on it and turn it off.
Now, again go back and try to open the Google Play Store. This may solve your problem now. If not, check the next solution.
8. Force stop Google Play Service
Google Play Store needs to be restart just like your PC. This is a really helpful and common trick to overcome the Play Store crashing issue on your Vivo Y200. To do this, follow the below steps.
Step 1- Go to settings and then go to the “Application Manager”.
Step 2 – Now find “Google Play Store” and click on it.
Step 3 – Here click on “Force Stop”. This allows the Google Play Store to stop.

Now, try to open Google Play store again and this time the service is being restarted and might work properly. If not, try the next solution.
9. Try a Soft Reset of your device
This easy to use solution will remove all the unnecessary temporary files of your device, close all recent apps, and make it clean. This is just rebooting your device. It won’t delete any data from your device.
Step 1 – Long press the “Power” button on your device.
Step 2 – Now, click on ‘Reboot’ or ‘Restart’ option. Your device will restart in some time.

After restarting, try to open the Google Play Store again and this time you should succeed. If any case, it’s not opening, try the last (but not the least) method by hard reset your Android.
10. Hard reset your device
If you have done with all of the above solutions and still Play Store crashing, and you are aggressive to get it, then only try this method. Using this method will delete all the data of your device. So take a backup of the whole. Follow the step by step instruction below.
Step 1 – Go to setting and find “backup and reset” there.
Step 2 – Click on it. And then Click on the “Factory data reset” option.
Step 3 – Now confirm your action and tap on the “Reset device”.

This will take a while to reset your device completely. After completion, start the Google Play Store and set up as a new device.
The above methods are the best 11 among all the solutions you can get for your Play Store not working on wifi or Play Store crashing error. Try one by one and you might get rid of this problem.
8 Ultimate Fixes for Google Play Your Vivo Y200 Isn’t Compatible
Nowadays, keeping yourself informed about the newest apps and features is essential. Have you encountered the error message “Google Play your device isn’t compatible with this version?” When attempting to download or update an application, this problem can pose a significant obstacle. The good news is that you can now alleviate those concerns.
In this article, we delve into how to resolve the “your device isn’t compatible with this version Google Play” error. It will discuss the top 8 ultimate fixes for this vexing issue that many Android users face. From practical tips to advanced solutions, this article aims to empower you with the knowledge to overcome this challenge.
Part 1: Reasons Behind Your Device Isn’t Compatible With This Version Play Store
Encountering the frustrating “your device isn’t compatible with this version Google Play“ error can be disruptive. That’s why it is essential to go through the underlying reasons causing this compatibility issue:
1. Outdated Operating System Firmware
One of the primary culprits behind the compatibility error is outdated OS firmware. App developers release updates to keep up with the latest features and security patches. That’s why an obsolete OS version on your device may render it incompatible with the newer app versions available on the Google Play Store.
2. Insufficient Hardware Requirements
Each application has specific hardware prerequisites that your device needs to fulfill. In case your smartphone does not meet the required specifications, you won’t be able to utilize the app. Thus, Google Play Store may restrict access to certain applications, citing compatibility issues.
3. Corrupted Cache Files
Cache files are designed to enhance the speed and efficiency of app loading. Yet, they can sometimes become corrupt. When this occurs, it disrupts the app’s normal operation. Clearing these corrupted cache files is often a crucial step.
4. Geographic Restrictions
In certain cases, app developers or Google Play itself may impose geographic restrictions. This could lead to compatibility issues if your device is located in an area where the app is restricted. Understanding the geographical availability of an app is vital in finding the root cause.
4. Beta Versions and Unstable Releases
Engaging with beta versions or unstable releases of an app can result in compatibility issues. These versions are typically in the testing phase. That’s why their compatibility with a wide range of devices may not be guaranteed. If you find yourself facing compatibility errors, it’s worth checking if you are in a beta program.
Part 2: 8 Reliable Fixes for Google Play Your Device Isn’t Compatible With This Version
Facing the “Play Store your device isn’t compatible with this version” error is an all-too-familiar setback. However, fear not, as this article will be your guide in resolving this issue. Summarized below are the top 8 solutions to fix this error with ease:
Fix 1: Force Quit Google Play Store
Force quitting the Google Play Store is a simple yet effective first step in resolving compatibility issues. Occasionally, the app may encounter glitches or background errors. These can hinder its proper functioning. Force quitting the Google Play Store and restarting it can often rectify these issues. You can use the following steps to force quit Google Play Store:
- Step 1. On your Vivo Y200, find the Google Play Store and long-press its icon. Press “App info” from the pop-up menu to access the app information screen.
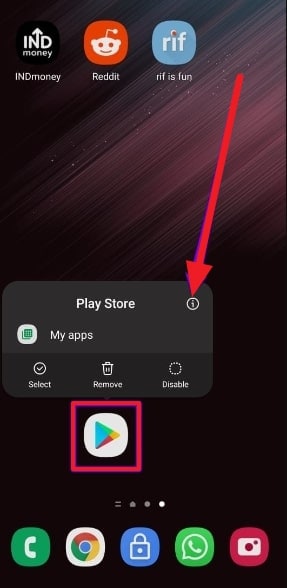
- Step 2. Here, tap the “Force Stop” option to force close the Google Play Store. After a while, relaunch the app to see if the issue is resolved.

Fix 2: Clear Google Play Store Cache
Clearing the cache of the Google Play Store is a targeted solution. It addresses potential compatibility issues arising from corrupted or outdated temporary files. The cache stores data that helps the app load faster. Yet, when these files become corrupted, it can lead to performance issues. Follow these steps to clear the Google Play Store cache and the “device not compatible Google Play” issue:
- Step 1. After finding the Google Play Store on your device, press and hold the icon until a pop-up menu appears. Here, touch the “App info” option to reach the screen displaying information about the app.

- Step 2. Here, press “Storage and Cache,” and on the following screen, tap “Clear cache.” Confirm your action to wipe the cache data. Afterward, access the targeted app again to check if the issue is resolved.

Fix 3: Remove the Google Services Framework’s Cache and Data
The Google Services Framework plays a crucial role in your Vivo Y200. It is essential in the functioning of various Google services, including the Google Play Store. Clearing its cache and data can be an effective method to tackle compatibility issues. Here’s a step-by-step guide on how to remove the Google Services Framework’s cache and data:
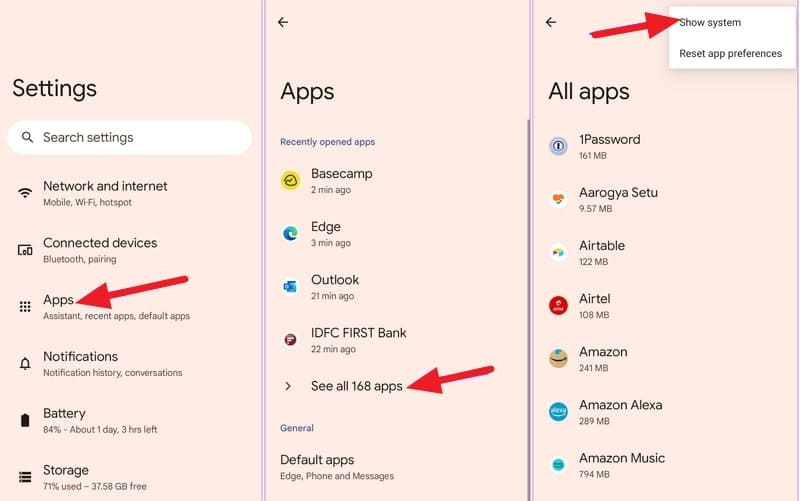
- Step 1. Open your device’s Settings and scroll down to tap “Apps.” There, press the “All Apps” options, and on the following screen, choose “Show System” from the top right corner.
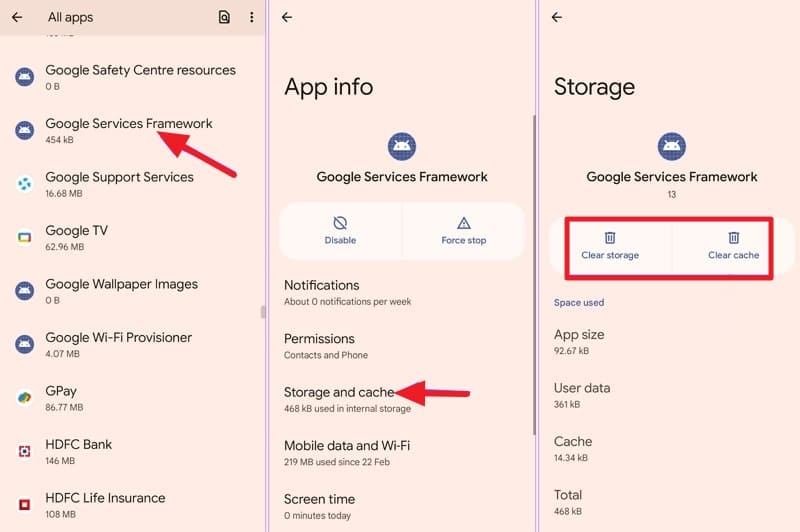
- Step 2. Now, find and tap the “Google Services Framework” app and go on to press “Storage and Cache.” Here, use “Clear Cache” and “Clear Storage” to clear its cache and data.
Fix 4: Update the Android OS Version
An outdated operating system is a common factor behind compatibility issues. This case is often used with Google Play Store and other important apps. Maintaining your Vivo Y200’s compatibility with the latest app releases is essential. To ensure your Android operating system is up-to-date, please proceed with the following steps:
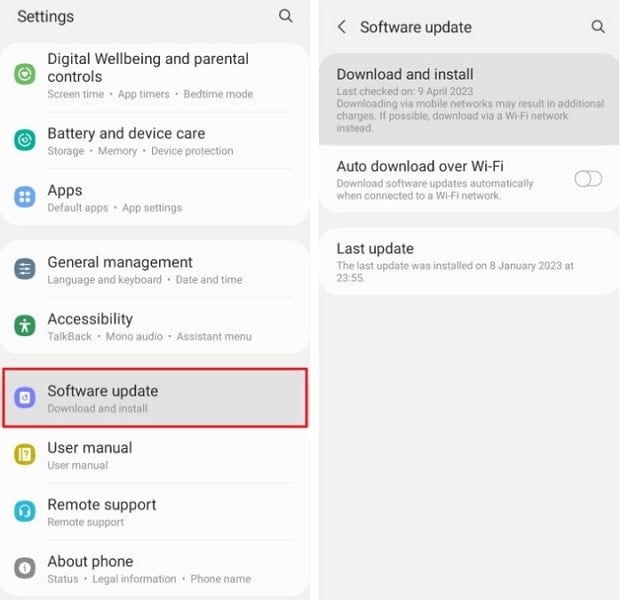
Instructions. You will need to start by accessing the Vivo Y200 device’s “Settings.” Scroll down to find and press the “System” option. On the following screen, tap “Software Update” to check if an update is available. If there is one, follow the on-screen prompts to update your device’s OS.
Fix 5: Uninstall the Google Play Store Updates
In certain cases, issues with the Google Play Store itself may be contributing to compatibility errors. Uninstalling recent updates can revert the app to its default state. It can potentially resolve the problem. Follow these steps to uninstall updates for the Google Play Store and resolve “device not compatible Play Store” issues:
- Step 1. Using your Vivo Y200’s Settings, access the Google Play Store app in the “Apps” tab. Once on its info page, tap the three dots icon from the top right corner.

- Step 2. From the available options, choose “Uninstall updates.” Then confirm your decision when prompted to delete the Google Play Store updates.

Fix 6: Sideload the Incompatible Android App
If all else fails and the compatibility issue persists, sideloading the app can be a workaround. It means installing the app manually without using the Google Play Store. This approach proves especially valuable for users with a strong determination to access a specific application. Below is a comprehensive, step-by-step tutorial on how to sideload an app:
- Step 1. Long-press the Google Chrome icon to open the app info menu. Navigate to the “Install unknown apps” section. Here, toggle the switch to enable “Allow from this source.”

- Step 2. Afterward, access a reliable, trusted website where the APK for the targeted app is available. Download and install the app to resolve the compatibility issues.

Fix 7: Install a Custom ROM
Have you exhausted other options and are still grappling with compatibility issues? Installing a custom ROM could be a more advanced but effective solution. Custom ROMs are modified versions of Android operating systems developed by the Android community. Engaging in this procedure entails large modifications to your device’s software. It is crucial to comprehend the potential consequences and proceed with caution.
Installing a custom ROM may void your device’s warranty. Moreover, it’s crucial to choose a ROM compatible with your device model. Installing a custom ROM is an advanced solution that should be approached with caution. It has the capability to address compatibility issues. Nevertheless, it demands a certain level of technical expertise and may not be suitable for all users.
Fix 8: Try Using a Third-Party App Store
The final solution to avoid compatibility issues on the Google Play Store is to use a different app store. Exploring alternative app stores can be a pragmatic workaround. Several third-party app stores offer a diverse range of applications. They might provide the desired app without encountering compatibility errors and help avoid the “device not compatible Google Play” error.
You can explore reputable third-party app stores such as Aptoide, Amazon Appstore, GetJar, or SlideME. Ensure the chosen app store is reputable and widely used, minimizing potential security risks. Exercise caution and ensure the legitimacy of the app store to avoid security risks.

Part 3: Is Your Play Store Not Working Properly? Fix It Now With Wondershare Dr.Fone
If you are unable to download any application on your Vivo Y200, it might be because of your Play Store issue. Play Store is the crucial element in your device, providing your facility with many features and functions. Get it fixed by trying Wondershare Dr.Fone – System Repair (Android) tool within a few clicks.
The System Repair tool in Dr.Fone helps you to resolve this issue in your Android Phone with powerful mechanisms and efficient working. It provides a user-friendly interface to fix Play Store Not Working with much ease.
Key Features of Wondershare Dr.Fone
- Fone – System Repair (Android) allows you to repair your Vivo Y200 easily in just a few clicks.
- This tool is also used to resolve the Black Screen of Death issue and Bricked Android devices problem.
- Users can fix their Android devices of any model or brand within minutes.
- With its easy-to-follow guide and steps, no technical expertise is required to use Dr.Fone’s software.
![]()
Dr.Fone - System Repair (Android)
Repair Android System Errors without Any Trouble.
- Fix your Android to normal, no skills required.
- Fix various Android system issues, stuck in boot loop , black screen , or won’t turn on , looping on start, etc.
- The high success rate in resolving Android system issues.
- Compatible with a wide range of Android devices and OS versions
- User-friendly interface with easy-to-follow steps.
3981454 people have downloaded it
Steps Involved To Fix Play Store Not Working Properly via Wondershare Dr.Fone
Now, we will be discussing the guide to resolve your “Google Play your device isn’t compatible with this version” errors. Here is how to fix the Play Store not working properly with Wondershare Dr.Fone – System Repair (Android):
- Step 1: Access Wondershare Dr.Fone on Computer
The first thing you need to do is to launch Wondershare Dr.Fone on your PC and access the “Toolbox” panel, followed by the “System Repair” section. Then, select the “Android” device and hit the “Start” button to proceed with the repair process.
- Step 2: Put Device Details and Download the Firmware
After that, you need to enter the Vivo Y200 device details like the “Name, Model, Brand, etc.” and put your phone on a Download Mode. Following this step, the firmware will download on its own, and you need to click the “Fix Now” button to install it on your Vivo Y200.
- Step 3: Confirm the Installation and End the Process
In the last step, you will have to put in the code and proceed with the “Confirm” button to initiate the repair process. This may delete all your data in the Vivo Y200 device, and once it has ended, select the “Done” button to conclude the process.

 safe & secure
3,120,524 people have downloaded it
Conclusion
To conclude, encountering compatibility issues like “Google Play your device isn’t compatible with this version,” can be a frustrating roadblock. However, this article has armed you with the knowledge through exploring various fixes. You now possess a toolkit of solutions to overcome the notorious issue. From forced quitting the Google Play Store to exploring the realm of custom ROMs, each fix has been crafted to cater to different user preferences.
For users seeking a comprehensive solution, Wondershare Dr.Fone emerges as a versatile and powerful tool. It goes beyond conventional troubleshooting methods. Its “Android Repair” feature is tailored to address various Android system issues, including those affecting the Google Play Store.
Also read:
- [New] Mastering Soft Image Effects in iPhone Photography (4 Tips!)
- [Updated] Mastering the Art of Podcast Scheduling
- 10 Free Location Spoofers to Fake GPS Location on your Infinix Zero 30 5G | Dr.fone
- 4 Ways to Fix Android Blue Screen of Death On Vivo X100 | Dr.fone
- 9 Solutions to Fix Oppo Find X6 System Crash Issue | Dr.fone
- App Wont Open on Your Samsung Galaxy XCover 7? Here Are All Fixes | Dr.fone
- Cellular Network Not Available for Voice Calls On Realme 11 5G | Dr.fone
- Experience Cutting-Edge AI Search on the Go with Bing's New App Support for Android and iOS
- In 2024, Fixing Foneazy MockGo Not Working On Oppo Find X6 Pro | Dr.fone
- In 2024, How to Turn Off Google Location to Stop Tracking You on OnePlus Ace 2V | Dr.fone
- In 2024, Navigating the M1 Space Apple's Lightest or Heaviest Model?
- New In 2024, Bring Your Vision to Life Advanced Video Editing Techniques for Home Movie Makers
- Super Easy Ways To Deal with Vivo V30 Pro Unresponsive Screen | Dr.fone
- Troubleshooting Guide How to Fix an Unresponsive Vivo S17e Screen | Dr.fone
- Unveiling the Truth Behind the Hype: ASUS ExpertBook B3's Performance Gaps Critically Reviewed
- What to Do if Google Play Services Keeps Stopping on Nubia Red Magic 8S Pro | Dr.fone
- Why Does My Honor X50 GT Keep Turning Off By Itself? 6 Fixes Are Here | Dr.fone
- Title: How to Fix the Soft Bricked Vivo Y200? | Dr.fone
- Author: Ariadne
- Created at : 2024-11-02 06:35:30
- Updated at : 2024-11-02 22:57:37
- Link: https://howto.techidaily.com/how-to-fix-the-soft-bricked-vivo-y200-drfone-by-drfone-fix-android-problems-fix-android-problems/
- License: This work is licensed under CC BY-NC-SA 4.0.