
How To Fix Unresponsive Phone Touchscreen Of Lava Yuva 2 Pro | Dr.fone
How To Fix Unresponsive Phone Touchscreen Of Lava Yuva 2 Pro
Smartphones nowadays contribute to our daily workflow, whether you’re a student or a professional. They get more sophisticated and add new features every year, making them more attractive with each new release. However, users sometimes deal with their screen touch not working on Android, raising various concerns.

If you are facing a similar issue, this page has all the solutions to teach you what to do if your phone screen is not working. By exploring the different methods below, you will be able to know how to fix a frozen phone touch screen as an Android user. Read on for more information.
Part 1: Top Causes of an Unresponsive Touchscreen
Android has been the best-selling OS since 2011, with over three billion active users. With the release of Android 13, complaints over touch issues on certain Android phones have popped up over the internet. Meanwhile, software updates over the years can sometimes make their phones stuck on the loading screen, causing worry among Android users.
Here are some of the top causes why your phone screen stopped working, mainly for Android.
- Physical Damage
If your Android phone is not responding to touch, it can be due to a cracked LCD causing temperature variants or magnetic fields to malfunction on your Lava Yuva 2 Pro.

For iOS users, your iPhone will temporarily stop working if it detects extreme temperatures such as a too-hot or too-cold reading. You should turn off your iPhone and let it cool down or warm to a normal temperature.
- Faulty Applications
Certain apps can sometimes make your phone experience touch issues. Your Android screen may work everywhere except a particular app. In this case, the fault is likely on the app, not your smartphone. It’s recommended to download the latest apps with frequent software updates to prevent malicious apps from corrupting or crashing your phone.
- iOS/Android Software Issues
Your phone screen not responding can also be due to software glitches that your smartphone picks up during regular use. Your iOS/Android device will sometimes freeze or hang if you run too many intensive apps simultaneously. The situation can lead to touch issues when using the phone.
- Dirty Screen or Bad Peripherals
It may not respond properly when an Android device is dirty due to water, sweat, or body oils. It will not be able to take inputs, causing your phone to not respond to touch. A poor screen protector and a tightly pressed phone case will also negatively impact your smartphone.
Part 2: What To Do When Your Smartphone Is Not Responding to Touch
Here is a list of things you should do how to fix a frozen phone touch screen, whether you’re using an iPhone or an Android smartphone.
1. Clean Your Smartphone
Your screen touch not working can sometimes get fixed by simply cleaning the screen on your smartphone. Use a soft dry cloth, gently clean your iPhone or Android device, and ensure water, oils, dirt, or other debris are no longer on your display. If you recently dropped your device in water, turn it off and leave it untouched for the next few hours.

2. Remove Extra Peripherals
Unplug any external device connected to your iPhone’s Lightning port or USB-C if your phone screen stops working. For Android users, meanwhile, disconnect any accessories like chargers or wireless headphones. After that, try using the touchscreen. If it works, the outcome proves that the fault appeared due to the external device.
3. Force Restart Your Device
If your phone screen is still unresponsive,maybe it is overloaded. You should force restart your Lava Yuva 2 Pro. It doesn’t delete any data. Here’s how.
Example 1: For Lava Yuva 2 Pro Smart Phones
Here’s how to force restart your smartphone to fix your phone screen that’s not responding.
- Press and hold the Powerand Volume Down buttons simultaneously for more than 7 seconds to force a reboot.

E****xample 2: For Lava Yuva 2 Pro Redmi
If your Lava Yuva 2 Pro Redmi phone is stuck on loading screen or “thinking” for a long time without responding, reboot it in just two steps.
Step 1: Press and hold the power button on the right side of the screen, then a screen showing several options appears.
Step 2: Choose Restart, then Accept if a confirmation message spears. Then wait a few seconds or minutes when your device is performing the reboot.


4. Update Your Software
Your smartphone may behave erratically due to software bugs. While these are out of your control, you can quickly fix your phone not responding to touch by simply updating your OS to the latest version. Here’s how.
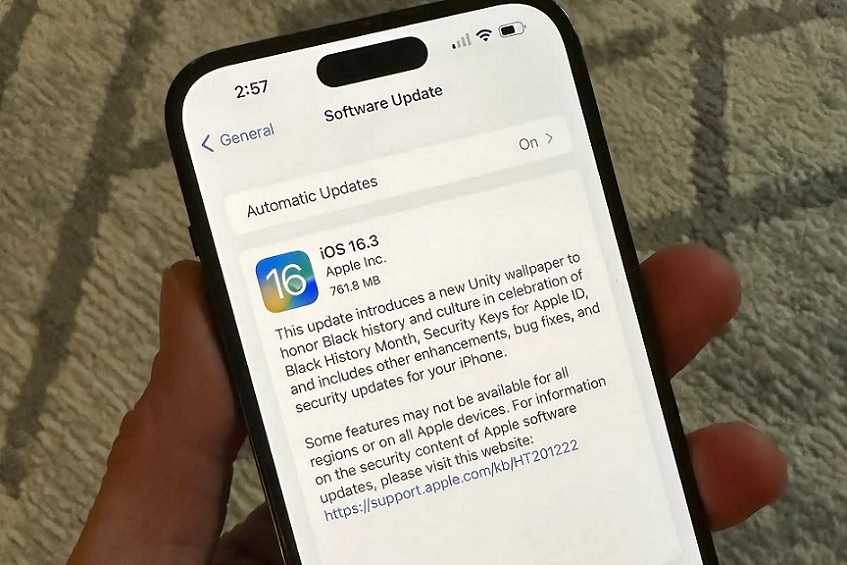
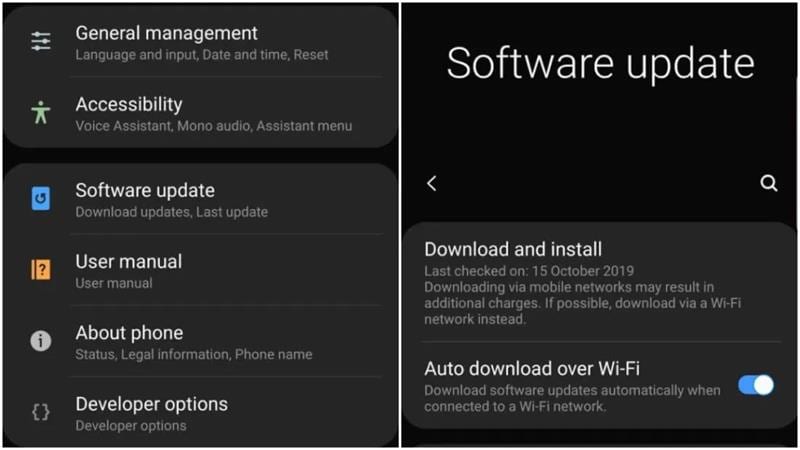
- For iOS users, go to your iPhone Settings> General > Software Update > Download and Install.
- For Android owners, go to Settings > Software Update. Tap the Check for software updatesto see if a new update is available.
5. Perform a Factory Reset
If nothing helps, your remaining option is to try completing a Factory Reset. Doing this will erase all your data, but this is arguably the quickest way to restore your screen-frozen phone to its factory default settings. Factory Reset is available on Android devices with almost similar steps. Here’s how.
For Android, Lava Yuva 2 Pro Series
Step 1: Search and tap the Settings option, and open General management.
S****tep 2: Swipe the options, find and tap Reset > Factory data reset, and check the information below. Then swipe and press the Reset button.
Note:
You might be asked to enter the pin of the security lock on the phone if you’ve set one.
S****tep 3: You may need to enter your Lava Yuva 2 Pro account password if you have bounded an account to your phone after taping Delete all. Then your Lava Yuva 2 Pro phone will reset. You’ll see its initial setup screen when it turns back on.
Part 3: How to Fix Unresponsive Touchscreen With an Alternative
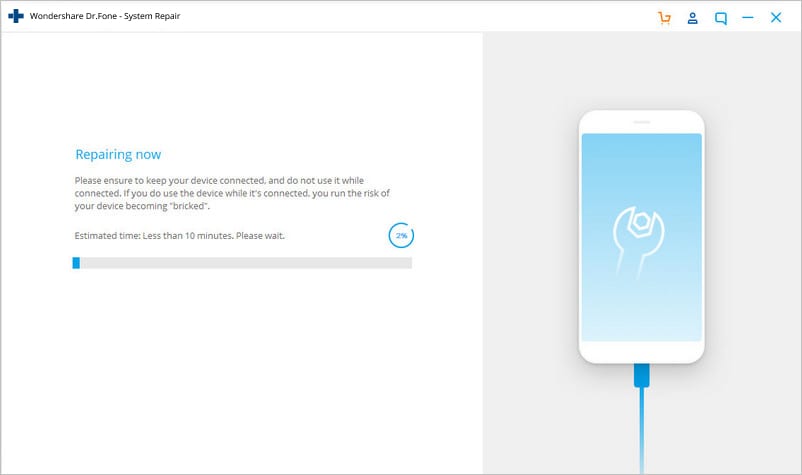
The methods outlined above usually solve issues on your smartphone not responding to touch. If all else fails, Wondershare Dr.Fone for iOS and Android can fix various smartphone issues within less than 10 minutes. The program enables you to fix common scenarios such as black screen, boot loop, bricked iOS or Android, and much more without any required skills.

Key Features
The key features of Wondershare Dr.Fone for iOS and Android are listed below.
- Fix all iOS and Android Problems in Minutes
Wondershare Dr.Fone for Android and iOS allows you to fix your smartphone within less than 10 minutes. For iPhone owners, common issues such as a black screen, white screen of death, iPhone frozen, stuck on a restart loop, or recovery mode can easily be repaired with Dr.Fone. For Android users, meanwhile, problems, including unresponsive screen, black screen of death, boot loop, and more, are done within minutes.
- Supports up to 1000+ Android Models and iOS 16
The program supports all iOS versions, including the latest iOS 16 and iOS 16 beta. Compared to the iTunes store or other methods, the app can quickly fix any iPhone issues without data loss. For Android users, meanwhile, Dr.Fone supports up to 1000+ Android smartphones making it highly versatile even if you’re using an older Android device or the latest models.
Tech Specs
Here are the minimum system requirements of Wondershare Dr.Fone (iOS) for your computer.
| Computer OS | iOS |
|---|---|
| Windows: 7, 8, 8.1, 10, 11 | Support all iOS versions, including the latest iOS 16 & iOS 16 beta |
| macOS: 12, 11, 10.15, 10.14, 10.13, 10.12, 10.11, 10.10, 10.9, or 10.8 |
Meanwhile, here are the tech specs for Wondershare Dr.Fone (Android)’s minimum system requirements.
| Computer OS | Android |
|---|---|
| Windows 7, 8, 8.1, 10, 11 | Android 2.1 and up |
Pros and Cons
Here are the pros and cons of using Wondershare Dr.Fone (Android)
Pros
- Fone – System Repair’s UI for iOS and Android is clutter free and beginner-friendly. You can start repairing your phone right away after installation.
- Repairing your iOS or Android smartphone within less than 10 minutes saves you precious time.
Cons
- The iOS and Android versions of Wondershare Dr.Fone are sold separately. You’ll have to get each version of the program if you own a smartphone for both iOS and Android.
Pricing
The iOS and Android versions of Wondershare Dr.Fone has different price plans. See them below.
Wondershare Dr.Fone (iOS) offers a quarterly, 1-year, and perpetual license, depending on your budget. Here’s the pricing below.
- Quarterly License (1-5 Mobile Devices) - $6.65/Month – With Auto Renew
- 1 Quarter License (1-5 Mobile Devices) - $7.32/Month – No Auto Renew
- 1-Year License (1-5 Mobile Devices) - $4.99/Month – No Auto Renew
- Perpetual License (1-5 Mobile Devices) - $79.95
Wondershare Dr.Fone (Android) price plans are available for a 1-Year or Perpetual License, depending on your budget.
- 1-Year License (1-5 Mobile Devices) - $39.95
- Perpetual License (1-5 Mobile Devices) - $49.95
- 1-Year Business License (Unlimited Devices) - $399.00
How To Fix Unresponsive Touchscreen With Wondershare Dr.Fone
In this step-by-step guide below, you can fix your unresponsive phone screen using Wondershare Dr.Fone on iOS and Android.
Step 1: Download and install Wondershare Dr.Fone for iOS or Android on your computer. Launch the app afterward and connect your smartphone.

Step 2A (For iOS): Choose the correct model of your iPhone to download the appropriate firmware package.
Step 2B (For Android): Choose the correct Brand, Name, Model, Country, as well as Carrier, then click Next.

Step 3: Follow the on-screen instructions provided on the main program window and wait for the repair process to complete.
Part 4: People Also Ask
Some common questions you should know when taking care of an unresponsive phone touchscreen are listed below.
1. Why Did My iPhone Screen Go Black After Not Responding to Touch?
Your iPhone screen with a touch issue will sometimes go black after not responding to touch due to several issues. It could be hardware, software, issues with a particular app, software crash, or you have a low battery. If it’s a drained battery, you’re in luck; all you have to do is charge it. Otherwise, you’ll have to perform a force restart on your iPhone to try to reboot it.
2. How Do I Keep My Android From Crashing?
Keeping your apps updated should help you solve app crashing issues that can impact your Android OS. These apps build up large caches throughout your normal usage. Clearing cached data from time to time can drastically improve your smartphone’s performance and prevent touch issues. To remove your app cache, go to Settings > Storage and tap Cached Data.
3. Can I Use Dr.Fone for Free?
Wondershare Dr.Fone for iOS and Android is free to download and install. You can also test the first few steps and see if the program supports your device. However, when you click the Fix Now button to start the repair process, you will be required to enter a valid license to activate the program.
 safe & secure
Conclusion
Knowing the common causes of an unresponsive phone touchscreen is the first step to preventing it from happening to your smartphone. While there are ways to fix it when it does happen, prevention is better than cure, as most experts say. However, if the methods outlined above don’t work, your best bet is to use a dedicated program such as Wondershare Dr.Fone for Android and iOS.
Wondershare Dr.Fone works on almost all modern smartphones today and can fix a stop-working phone screen within less than 10 minutes. It’s beginner-friendly and doesn’t require advanced technical know-how to use right away.
7 Fixes for “Unfortunately, Phone Has Stopped” on Lava Yuva 2 Pro
Encountering issues with the Phone app is never welcoming. Being one of the useful apps, seeing it crashing and unresponsive gives sheer despondency. If talked about the triggering points, they are numerous. But the central point is what to do when the Phone app keeps crashing. In this article, we have discussed this issue in detail. To know this and more about why the “Unfortunately, Phone has stopped” error crops up, read this article and get the problem sorted on your own.
Part 1: When can the “Unfortunately, Phone has stopped” error come?
First things first! You need to stay updated on why the Phone app keeps stopping or crashing before jumping to any solution. Following are the points when this error comes up to annoy you.
- When you install a custom ROM, the issue might occur.
- The upgrading of the software or incomplete updates can lead to crashing the Phone app.
- Data crashes can be another reason why this error shows up.
- Infection through malware and virus on your phone is also included when the Phone app might crash.
Part 2: 7 Fixes for the “Unfortunately, Phone Has Stopped” error
2.1 Open the Phone app in Safe Mode
First and foremost, the thing that can let you get rid of this trouble is Safe Mode. It is a feature that will end any excessive background functioning of the Lava Yuva 2 Pro device. For instance, your device will be able to run sans any third-party apps when in Safe mode. Since the important functions and the naïve apps will be running on the Lava Yuva 2 Pro device, you will get to know if it’s really a software glitch or not by running the Phone app in Safe mode. And this is the first solution we would recommend you make use of when the Phone app has stopped. Here is how to enable Safe Mode.
- Switch off the Lava Yuva 2 Pro phone first.
- Now keep pressing the “Power” button until you see the Lava Yuva 2 Pro logo on the screen.
- Release the button and immediately press and hold the “Volume Down” key.
- Leave the key once the Lava Yuva 2 Pro device is in Safe mode. Now, the third-party apps will be disabled and you can check if the Phone app is still not responding or everything is fine.
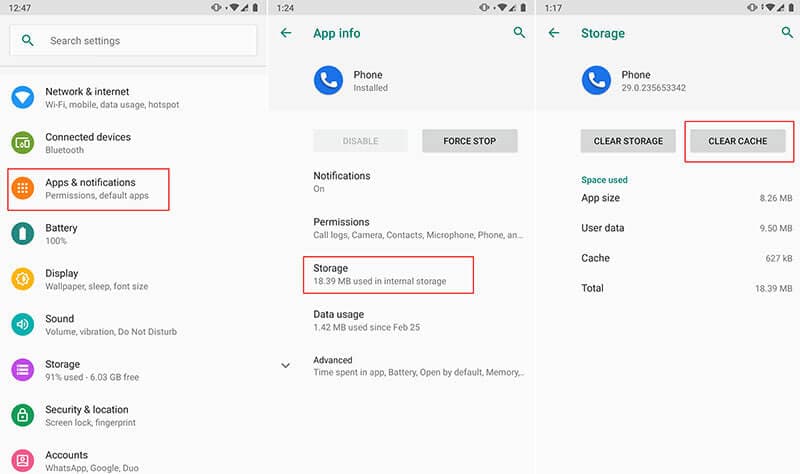
2.2 Clear the cache of the Phone app
The cache should be cleaned timely if you want any app to work properly. Due to the constant usage, the temporary files get collected and may corrupt if not cleared. Hence, the next solution you should try when the Phone app keeps stopping is to clear the cache. Here are the steps to be performed.
- Open “Settings” on your device and go to “Application” or “Apps”.
- Now from the list of all applications, go to “Phone” and tap on it.
- Now, click on “Storage” and choose “Clear Cache”.
2.3 Update Google Play services
Since Android is created by Google, there must be some Google Play services that are crucial to run several system functions. And if attempting the previous methods isn’t of any use, try updating Google Play services when you find the Phone app stopped. For doing this, you need to make sure that automatic updates are turned on in Google settings. If not, enable it and get the apps including Google Play services updated for smoother functions.
2.4 Update the Lava Yuva 2 Pro firmware
When the firmware is not updated, it may conflict with some apps and maybe that’s why your Phone app falls prey. Therefore, updating Lava Yuva 2 Pro firmware will be a sane step that should be taken when the Phone app has stopped. Follow the below-mentioned steps and then check if the Phone app is opening or not.
- Open “Settings” and go to “About Device”.
- Now tap on “Software Updates” and check for the availability of the new update.
- Download and install it and then try to use the Phone app.
2.5 Clear partition cache
Here is another resolution for the “Unfortunately Phone has stopped” error. Clearing the partition cache will remove the whole cache of the Lava Yuva 2 Pro device and make it work like before.
- Switch off your device to begin with and enter the recovery mode by pressing the “Home”, “Power” and “Volume Up” buttons.
- The recovery mode screen will appear now.
- From the menu, you need to choose “Wipe Cache Partition”. For this, you can use the Volume keys to scroll up and down.
- To select, press the “Power” button.
- The process will begin and the Lava Yuva 2 Pro device will restart post it. Check if the problem still persists or it is finished. If unfortunately not, get to the next and the most productive solution.

2.6 Get the Lava Yuva 2 Pro system repaired in one click
If still, the Phone app keeps stopping after trying everything, here is the most effective method that can surely help you. Dr.Fone - System Repair (Android) is a one-click tool that promises to repair Android devices hassle-free. Be it apps crashing, the black screen, or any other issue, the tool has no problem fixing any sort of issue. Here are the benefits of Dr.Fone - System Repair (Android).

Dr.Fone - System Repair (Android)
Android repair tool to fix “Unfortunately, Phone Has Stopped” on Lava Yuva 2 Pro devices.
- It takes no special skills to operate it and fairly works to bring the Android system to normalcy.
- It shows great compatibility with all Lava Yuva 2 Pro devices and other Android phones supporting over 1000 Android brands.
- Fixes any kind of Android issue without any complication.
- Easy to use and trusted by millions of users and therefore has a higher success rate.
- Can be downloaded freely and friendly user interface.
3,106,444 people have downloaded it
How to fix crashing Phone app using Dr.Fone - System Repair (Android)
Step 1: Get the Software Installed
Click the “Start Download” button to download the tool on your computer, and then open the program to begin the repair, click on “System Repair”.
Step 2: Plug the Phone with PC
Take your original USB cord and then connect your Lava Yuva 2 Pro to the computer. When the Lava Yuva 2 Pro device is connected, click on “Android” from the two tabs > click “Start”
Step 3: Enter the Details
As the next step, enter some important details on the next screen. Be sure to enter the right name, brand, and model of the Lava Yuva 2 Pro device. When done everything, verify once and click on “Next”.

Step 4: Downloading Firmware
Downloading firmware will be the next step. Prior to this, you have to go through the instructions given onscreen to enter the DFU mode. Please click on “Next” and the program will bring the suitable firmware version and start downloading it.

Step 5: Get the Lava Yuva 2 Pro device Repaired
When you see the firmware has been downloaded, the issue will begin to get resolved. Hang on and wait until you get notified for the repair of the Lava Yuva 2 Pro device.

safe & secure
2.7 Factory reset
If none of the above methods worked for you, the last resort you are left with is a factory reset. This method will wipe everything from your device and make it function like normal. We also suggest you make a backup of your data if it is important so as to prevent the loss. Here is how to do this to fix the crashing Phone app.
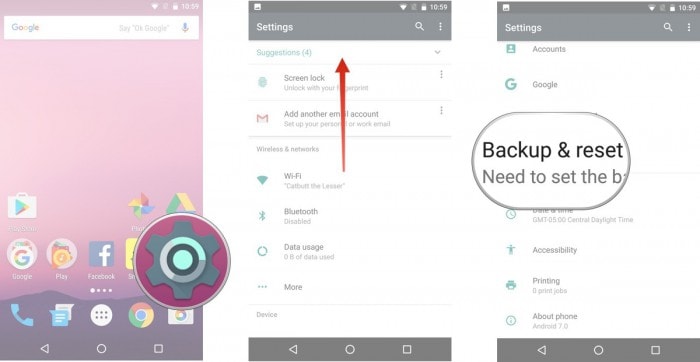
- Open “Settings” and go to the “Backup and Reset” option.
- Look for “Factory data reset” and then tap on “Reset phone”.
- Within a while, your device will go through resetting and boot up to normalcy.

safe & secure
11 Ways to Fix it When My Lava Yuva 2 Pro Won’t Charge
What would you do if your phone or other device’s battery is draining? You will plug it into a power source. Right? What if you realize that your phone won’t charge? My phone won’t charge, and the Lava Yuva 2 Pro tablet won’t charge is a common problem.
Android devices are very prone to this problem, and hence Android device owners complain frequently that My Lava Yuva 2 Pro won’t charge even when it is plugged into a power source properly. The reason behind the phone won’t charge, or Lava Yuva 2 Pro tablet won’t charge are not very complicated and, therefore, can be dealt with by you sitting at home.
A charging problem can occur due to a temporary software crash. It is also possible that a corrupted device cache may be causing such a glitch. Another reason for phones not to charge normally or charge slowly is an inappropriate power source or defective charging cable and adapter. All these and many more problems will be cured in the 10 solutions to fix My Lava Yuva 2 Pro won’t charge error.
So if you’re still thinking about why won’t My Lava Yuva 2 Pro charge, read on to find out solutions to fix My Lava Yuva 2 Pro won’t charge problem.
Part 1. One-click solution to fix Android phone won’t charge
While you are upset over ‘why My Lava Yuva 2 Pro won’t charge?’, would you mind us helping you around?
Well, we have got Dr.Fone - System Repair (Android) at your fingertips to get rid of this annoying phone won’t charge issues (caused by system corruption). Whether the Lava Yuva 2 Pro device froze or became unresponsive, bricked, or got stuck on the Lava Yuva 2 Pro logo/blue screen of death or apps started crashing. It can fix every Android system problem.
Dr.Fone - System Repair (Android)
Easy-to-operate program to fix Android phone won’t charge
- As it supports all the latest Lava Yuva 2 Pro devices, it can even easily fix the Lava Yuva 2 Pro tablet won’t charge issue.
- With a single click, you can fix your entire Android system issues.
- The very first tool is available in the market for Android system repair.
- Without any technical knowledge, one can use this software.
- This tool is intuitive with a high success rate.
3981454 people have downloaded it
Note: When you are stressed over ‘why won’t My Lava Yuva 2 Pro charge’, we are ready to eliminate the tension and make things easier for you. But, before you start fixing the phone won’t charge the problem, make sure to back up the Android device . This fixing process might wipe out all the Lava Yuva 2 Pro device data.
Phase 1: Preparing and connecting the Android device
Step 1: Install and then run Dr.Fone - System Repair (Android), the ultimate Android repair software on your PC. Hit the ‘System Repair’ tab, followed by connecting your Lava Yuva 2 Pro.
Step 2: Tap on the ‘Android Repair’ option and then click ‘Start’ for moving ahead.
Step 3: Mention the detailed information about your Lava Yuva 2 Pro under the Lava Yuva 2 Pro device information section. Press ‘Next’ then on.
Phase 2: Get to ‘Download’ mode for repairing the Lava Yuva 2 Pro device
Step 1: It’s essential that you put the Android device under ‘Download’ mode to resolve the phone won’t charge the issue. Here comes how to do –
- With a ‘Home’ button device, switch off it before holding down the set of keys, including ‘Power’, ‘Volume Down’, and ‘Home’ key for 5-10 seconds. Let them go and hit the ‘Volume Up’ key for entering the ‘Download’ mode.

- If the ‘Home’ button is not there, you got to turn down the Lava Yuva 2 Pro device and altogether hold down the ‘Volume Down’, ‘Bixby’, and ‘Power’ keys between 5-10 seconds. Soon after you release the keys, tap the ‘Volume Up’ button for entering the ‘Download’ mode.
Step 2: Click ‘Next’ to start downloading the Android firmware.

Step 3: Now, Dr.Fone - System Repair (Android) would verify the firmware and then start repairing the Android system on its own. It will ultimately fix your ‘why won’t My Lava Yuva 2 Pro charge’ trouble.
Part 2. 10 common ways to fix Android won’t charge
1. Check/replace charging cable
Charging cables fray or become defunct after prolonged usage. Therefore, it is advised to always use the Lava Yuva 2 Pro device’s original charging cable or purchase a good quality charging cord, which doesn’t damage your device or your adapter.
It is also very commonly observed that the charging end of the cable which gets connected to the charging port of the Lava Yuva 2 Pro device gets damaged and prevents the current from flowing to the phone/tablet.

2. Check/clean charging port
The charging port in your device is a small opening where the charging end of the cabbie is inserted for the current to flow to the phone/tablet. Very often, we notice that the charging port gets blocked with tiny particles of dirt. The charging port might also get clogged if dirt and dust get accumulated in it, preventing the sensors from receiving and forwarding the current to the Lava Yuva 2 Pro device.

The best way to take this problem is to clean the port with a blunt pin or a soft bristle unused toothbrush. Make sure you clean the port gently and do not damage it or its sensors.

3. Check/replace charging adapter
This method is fairly simple, and all you need to do is check whether or not the charging adapter is working properly as sometimes, the adapter itself is to be blamed for the charge. To make sure that you are not using a defective adapter, connect your charging cable/USB to another adapter. If your device charges normally, it means there is a problem is with your adapter, and you must replace it at the earliest to solve My Lava Yuva 2 Pro won’t charge the issue.

4. Try another power source
This technique is more like a quick trick. It means to switch from one power source to another or use a more efficient and suitable power source. Laptops and PCs charge slower than a direct power source, i.e., a wall socket. Sometimes, the charging speed is slower, and the battery is draining. In such a scenario, choose to charge your device by directly plugging it into a socket on the wall to never experience My Lava Yuva 2 Pro won’t charge problem.
5. Clear device Cache
Clearing Cache is a great technique as it cleans your device and all its partitions. By clearing the cache, all the unwanted data and files stored in your device get deleted, which may be causing glitches in the Lava Yuva 2 Pro device’s software, preventing it from recognizing the current.
Follow the steps given below to clear your device’s cache:
• Visit “Settings” and find “Storage”

• Now tap on “Cached Data”.

• Click “OK” to clear all unwanted cache from your device as shown above.
Try charging your phone after clearing the cache. If your phone doesn’t charge even now, do not worry. There are more ways to help you combat My Lava Yuva 2 Pro won’t charge problem.
6. Re-start/reboot your phone/tablet
Restarting your device to fix why won’t My Lava Yuva 2 Pro charge error is a very effective remedy. This method of rebooting your device not only fixes software glitches but other but also tackles other factors/operations that might be running in the background preventing your device from charging.
Restarting a device is simple and can be done by following the steps given below:
• Long press the power button of your device.
• From the options that appear, click on “Restart”/ “Reboot” as shown in the image below.

To restart your device, you may also press the power button for about 20-25 seconds for the phone/tablet to automatically reboot.
7. Download and install the Ampere App
The Ampere app can be downloaded from the Google Play Store. It is very helpful to fix the why won’t my charge error as it gives you real-time information about your device’s battery consumption, charging status, and other essential data.
If the App gives information in green color, it means all is wetland your device is charging normally, however, if the information before you is in orange, you need to take steps to fix the charging problem.


8. Install software updates
Installing your Android version updates is a good idea as the software is the interface that receives charge from the charging port sensors and gives a command for the phone/tablet to charge. People often continue to use older OS versions, which cause trouble and prevent the Lava Yuva 2 Pro device from charging.
To check for and install updates on your device, you must be connected to WiFi or a cellular network. Next, visit “Settings” and select “About device”. Now click on “Software Update”.

If there is an update available, you will be prompted to download it. Just follow the instructions given before you install a brand new Android OS version on your device.
9. Factory reset your device
Factory Reset is must be done after due deliberation. Remember to take a back-up of all your data and contents on the cloud or an external memory device, such as a pen drive before adopting this method because once you perform a factory reset on your device, all media, contents, data and other files are wiped out, including your device settings.
Follow the steps given below to factory reset your device:
• Visit “Settings” by clicking the settings icon as shown below.
• Now select “Backup and Reset” and move on.
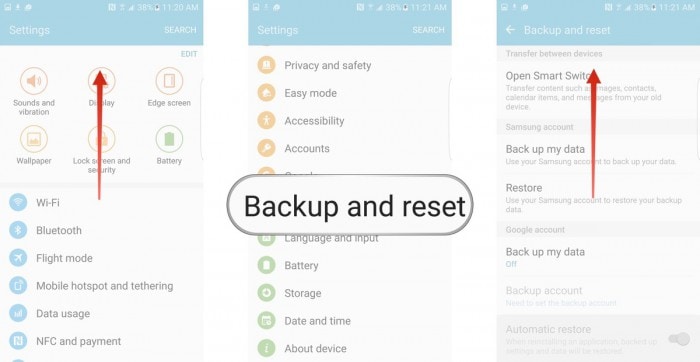
• In this step, select “Factory data reset” and then “Reset Device”.
• Finally, tap on “ERASE EVERYTHING” as shown below to Factory Reset your device.

Note: Once the factory reset process is complete, your device will automatically restart and you will have to set it up once again.
10. Replace your battery
This should be your last resort to fix My Lava Yuva 2 Pro won’t charge problem, and you should only attempt to replace your battery if none of the other techniques work. Also, please consult a technician before purchasing and installing a new battery in your device as different phones and tablets have a different type of battery requirements.

Finally, fixing the phone won’t charge the problem is simple, and therefore there is no need for you to worry as you are not the only one experiencing such an issue. Other Android users have tried, tested, and recommended the methods given above to solve why won’t My Lava Yuva 2 Pro charge or Lava Yuva 2 Pro tablet won’t charge error. So go ahead and try them out now.
Also read:
- [New] Top 10 Best Screen Recorders for Mac for 2024
- [New] Ultimate Gear for YouTube Content Makers
- 9 Solutions to Fix Process System Isnt Responding Error on Tecno Pova 5 Pro | Dr.fone
- A Complete Guide To OEM Unlocking on Tecno Phantom V Flip
- App Wont Open on Your Honor 90? Here Are All Fixes | Dr.fone
- App Wont Open on Your Poco M6 5G? Here Are All Fixes | Dr.fone
- Compreeved Guide Converting WebP to Quality JPG Format
- Fixes for Apps Keep Crashing on Xiaomi Redmi K70E | Dr.fone
- How PGSharp Save You from Ban While Spoofing Pokemon Go On Infinix Hot 40i? | Dr.fone
- Pattern Locks Are Unsafe Secure Your Vivo Phone Now with These Tips
- Quick-Subscribe Does It Really Amplify Watch Time for 2024
- Troubleshooting Missing Pdh.dll Files: Expert Strategies for a Smooth Fix
- What To Do When Vivo V27 Has Black Screen of Death? | Dr.fone
- Title: How To Fix Unresponsive Phone Touchscreen Of Lava Yuva 2 Pro | Dr.fone
- Author: Ariadne
- Created at : 2024-10-21 18:16:08
- Updated at : 2024-10-28 18:51:36
- Link: https://howto.techidaily.com/how-to-fix-unresponsive-phone-touchscreen-of-lava-yuva-2-pro-drfone-by-drfone-fix-android-problems-fix-android-problems/
- License: This work is licensed under CC BY-NC-SA 4.0.