
How To Fix Unresponsive Phone Touchscreen Of Nokia G310 | Dr.fone
How To Fix Unresponsive Phone Touchscreen Of Nokia G310
Smartphones nowadays contribute to our daily workflow, whether you’re a student or a professional. They get more sophisticated and add new features every year, making them more attractive with each new release. However, users sometimes deal with their screen touch not working on Android, raising various concerns.

If you are facing a similar issue, this page has all the solutions to teach you what to do if your phone screen is not working. By exploring the different methods below, you will be able to know how to fix a frozen phone touch screen as an Android user. Read on for more information.
Part 1: Top Causes of an Unresponsive Touchscreen
Android has been the best-selling OS since 2011, with over three billion active users. With the release of Android 13, complaints over touch issues on certain Android phones have popped up over the internet. Meanwhile, software updates over the years can sometimes make their phones stuck on the loading screen, causing worry among Android users.
Here are some of the top causes why your phone screen stopped working, mainly for Android.
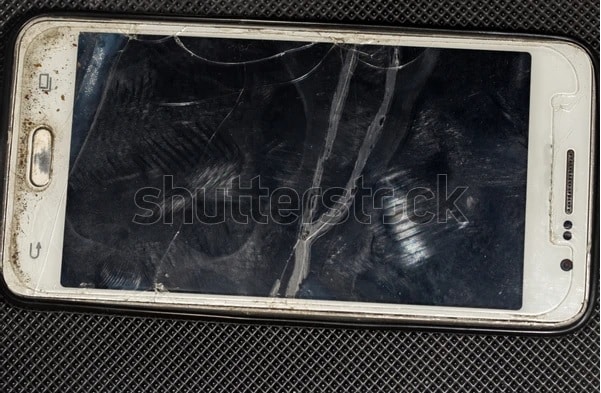
- Physical Damage
If your Android phone is not responding to touch, it can be due to a cracked LCD causing temperature variants or magnetic fields to malfunction on your Nokia G310.

For iOS users, your iPhone will temporarily stop working if it detects extreme temperatures such as a too-hot or too-cold reading. You should turn off your iPhone and let it cool down or warm to a normal temperature.
- Faulty Applications
Certain apps can sometimes make your phone experience touch issues. Your Android screen may work everywhere except a particular app. In this case, the fault is likely on the app, not your smartphone. It’s recommended to download the latest apps with frequent software updates to prevent malicious apps from corrupting or crashing your phone.
- iOS/Android Software Issues
Your phone screen not responding can also be due to software glitches that your smartphone picks up during regular use. Your iOS/Android device will sometimes freeze or hang if you run too many intensive apps simultaneously. The situation can lead to touch issues when using the phone.
- Dirty Screen or Bad Peripherals
It may not respond properly when an Android device is dirty due to water, sweat, or body oils. It will not be able to take inputs, causing your phone to not respond to touch. A poor screen protector and a tightly pressed phone case will also negatively impact your smartphone.
Part 2: What To Do When Your Smartphone Is Not Responding to Touch
Here is a list of things you should do how to fix a frozen phone touch screen, whether you’re using an iPhone or an Android smartphone.
1. Clean Your Smartphone
Your screen touch not working can sometimes get fixed by simply cleaning the screen on your smartphone. Use a soft dry cloth, gently clean your iPhone or Android device, and ensure water, oils, dirt, or other debris are no longer on your display. If you recently dropped your device in water, turn it off and leave it untouched for the next few hours.

2. Remove Extra Peripherals
Unplug any external device connected to your iPhone’s Lightning port or USB-C if your phone screen stops working. For Android users, meanwhile, disconnect any accessories like chargers or wireless headphones. After that, try using the touchscreen. If it works, the outcome proves that the fault appeared due to the external device.
3. Force Restart Your Device
If your phone screen is still unresponsive,maybe it is overloaded. You should force restart your Nokia G310. It doesn’t delete any data. Here’s how.
Example 1: For Nokia G310 Smart Phones
Here’s how to force restart your smartphone to fix your phone screen that’s not responding.
- Press and hold the Powerand Volume Down buttons simultaneously for more than 7 seconds to force a reboot.

E****xample 2: For Nokia G310 Redmi
If your Nokia G310 Redmi phone is stuck on loading screen or “thinking” for a long time without responding, reboot it in just two steps.
Step 1: Press and hold the power button on the right side of the screen, then a screen showing several options appears.
Step 2: Choose Restart, then Accept if a confirmation message spears. Then wait a few seconds or minutes when your device is performing the reboot.

4. Update Your Software
Your smartphone may behave erratically due to software bugs. While these are out of your control, you can quickly fix your phone not responding to touch by simply updating your OS to the latest version. Here’s how.
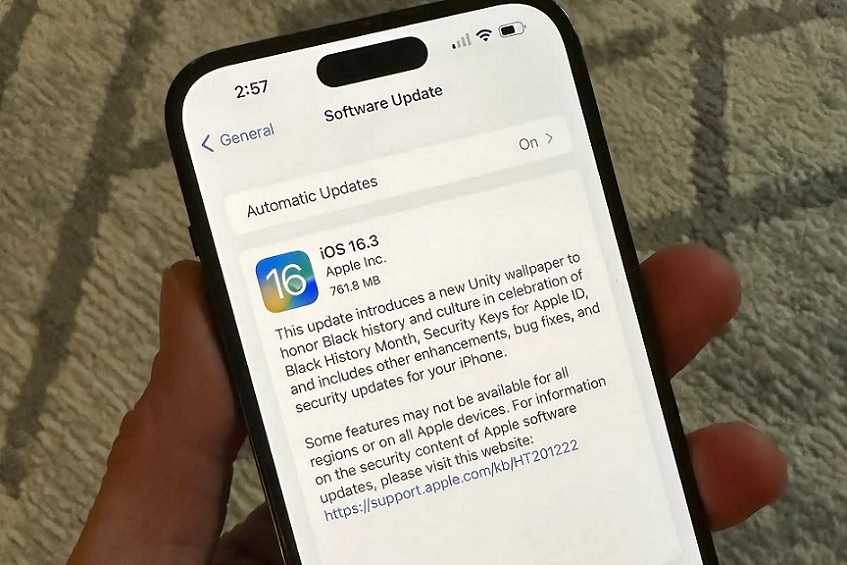
- For iOS users, go to your iPhone Settings> General > Software Update > Download and Install.
- For Android owners, go to Settings > Software Update. Tap the Check for software updatesto see if a new update is available.
5. Perform a Factory Reset
If nothing helps, your remaining option is to try completing a Factory Reset. Doing this will erase all your data, but this is arguably the quickest way to restore your screen-frozen phone to its factory default settings. Factory Reset is available on Android devices with almost similar steps. Here’s how.
For Android, Nokia G310 Series
Step 1: Search and tap the Settings option, and open General management.
S****tep 2: Swipe the options, find and tap Reset > Factory data reset, and check the information below. Then swipe and press the Reset button.
Note:
You might be asked to enter the pin of the security lock on the phone if you’ve set one.
S****tep 3: You may need to enter your Nokia G310 account password if you have bounded an account to your phone after taping Delete all. Then your Nokia G310 phone will reset. You’ll see its initial setup screen when it turns back on.
Part 3: How to Fix Unresponsive Touchscreen With an Alternative
The methods outlined above usually solve issues on your smartphone not responding to touch. If all else fails, Wondershare Dr.Fone for iOS and Android can fix various smartphone issues within less than 10 minutes. The program enables you to fix common scenarios such as black screen, boot loop, bricked iOS or Android, and much more without any required skills.


Key Features
The key features of Wondershare Dr.Fone for iOS and Android are listed below.
- Fix all iOS and Android Problems in Minutes
Wondershare Dr.Fone for Android and iOS allows you to fix your smartphone within less than 10 minutes. For iPhone owners, common issues such as a black screen, white screen of death, iPhone frozen, stuck on a restart loop, or recovery mode can easily be repaired with Dr.Fone. For Android users, meanwhile, problems, including unresponsive screen, black screen of death, boot loop, and more, are done within minutes.
- Supports up to 1000+ Android Models and iOS 16
The program supports all iOS versions, including the latest iOS 16 and iOS 16 beta. Compared to the iTunes store or other methods, the app can quickly fix any iPhone issues without data loss. For Android users, meanwhile, Dr.Fone supports up to 1000+ Android smartphones making it highly versatile even if you’re using an older Android device or the latest models.
Tech Specs
Here are the minimum system requirements of Wondershare Dr.Fone (iOS) for your computer.
| Computer OS | iOS |
|---|---|
| Windows: 7, 8, 8.1, 10, 11 | Support all iOS versions, including the latest iOS 16 & iOS 16 beta |
| macOS: 12, 11, 10.15, 10.14, 10.13, 10.12, 10.11, 10.10, 10.9, or 10.8 |
Meanwhile, here are the tech specs for Wondershare Dr.Fone (Android)’s minimum system requirements.
| Computer OS | Android |
|---|---|
| Windows 7, 8, 8.1, 10, 11 | Android 2.1 and up |
Pros and Cons
Here are the pros and cons of using Wondershare Dr.Fone (Android)
Pros
- Fone – System Repair’s UI for iOS and Android is clutter free and beginner-friendly. You can start repairing your phone right away after installation.
- Repairing your iOS or Android smartphone within less than 10 minutes saves you precious time.
Cons
- The iOS and Android versions of Wondershare Dr.Fone are sold separately. You’ll have to get each version of the program if you own a smartphone for both iOS and Android.
Pricing
The iOS and Android versions of Wondershare Dr.Fone has different price plans. See them below.
Wondershare Dr.Fone (iOS) offers a quarterly, 1-year, and perpetual license, depending on your budget. Here’s the pricing below.
- Quarterly License (1-5 Mobile Devices) - $6.65/Month – With Auto Renew
- 1 Quarter License (1-5 Mobile Devices) - $7.32/Month – No Auto Renew
- 1-Year License (1-5 Mobile Devices) - $4.99/Month – No Auto Renew
- Perpetual License (1-5 Mobile Devices) - $79.95
Wondershare Dr.Fone (Android) price plans are available for a 1-Year or Perpetual License, depending on your budget.
- 1-Year License (1-5 Mobile Devices) - $39.95
- Perpetual License (1-5 Mobile Devices) - $49.95
- 1-Year Business License (Unlimited Devices) - $399.00
How To Fix Unresponsive Touchscreen With Wondershare Dr.Fone
In this step-by-step guide below, you can fix your unresponsive phone screen using Wondershare Dr.Fone on iOS and Android.
Step 1: Download and install Wondershare Dr.Fone for iOS or Android on your computer. Launch the app afterward and connect your smartphone.

Step 2A (For iOS): Choose the correct model of your iPhone to download the appropriate firmware package.
Step 2B (For Android): Choose the correct Brand, Name, Model, Country, as well as Carrier, then click Next.

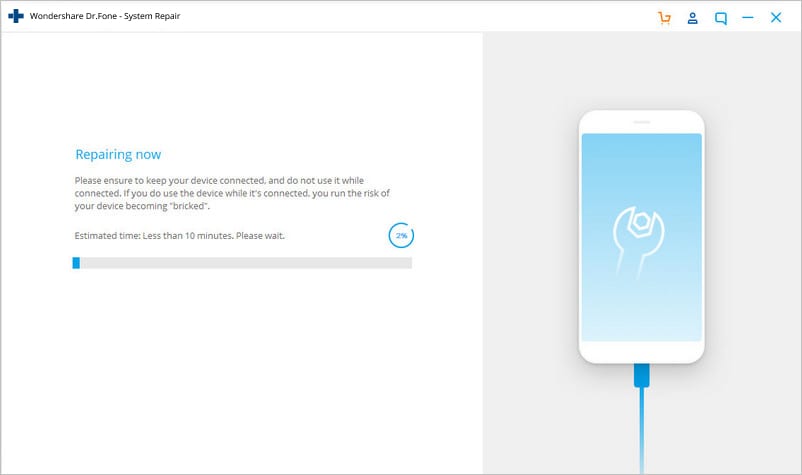
Step 3: Follow the on-screen instructions provided on the main program window and wait for the repair process to complete.
Part 4: People Also Ask
Some common questions you should know when taking care of an unresponsive phone touchscreen are listed below.
1. Why Did My iPhone Screen Go Black After Not Responding to Touch?
Your iPhone screen with a touch issue will sometimes go black after not responding to touch due to several issues. It could be hardware, software, issues with a particular app, software crash, or you have a low battery. If it’s a drained battery, you’re in luck; all you have to do is charge it. Otherwise, you’ll have to perform a force restart on your iPhone to try to reboot it.
2. How Do I Keep My Android From Crashing?
Keeping your apps updated should help you solve app crashing issues that can impact your Android OS. These apps build up large caches throughout your normal usage. Clearing cached data from time to time can drastically improve your smartphone’s performance and prevent touch issues. To remove your app cache, go to Settings > Storage and tap Cached Data.
3. Can I Use Dr.Fone for Free?
Wondershare Dr.Fone for iOS and Android is free to download and install. You can also test the first few steps and see if the program supports your device. However, when you click the Fix Now button to start the repair process, you will be required to enter a valid license to activate the program.
 safe & secure
Conclusion
Knowing the common causes of an unresponsive phone touchscreen is the first step to preventing it from happening to your smartphone. While there are ways to fix it when it does happen, prevention is better than cure, as most experts say. However, if the methods outlined above don’t work, your best bet is to use a dedicated program such as Wondershare Dr.Fone for Android and iOS.
Wondershare Dr.Fone works on almost all modern smartphones today and can fix a stop-working phone screen within less than 10 minutes. It’s beginner-friendly and doesn’t require advanced technical know-how to use right away.
Guide: How To Unbrick a Bricked Nokia G310 Phone
Nokia G310 phones are super popular thanks to their excellent features and affordable prices. But being so popular means people try to customize them with custom software. If you’re not careful, you might have a “bricked” Nokia G310 phone. It won’t work at all. It will be more like a brick than a smartphone.
Don’t worry, though. This guide is here to help. It will show you how to unbrick your phone step by step. You’ll learn to bring your phone back to life and make it work again. So, get started on fixing your bricked Nokia G310 phone by reading this article.
Part 1. Common Reasons Why Nokia G310 Phones Get Bricked
A bricked phone might sound like a techy term, but it’s pretty simple – when your Nokia G310 phone turns into a lifeless block that won’t do anything. In this section, you’ll learn all about why this happens, so you can avoid these issues and keep your phone alive as long as possible.
- Trying to flash incompatible ROMs. Sometimes, people want their Nokia G310 phones to run different software like a custom version of Android called a ROM. But if you use the correct ROM for your specific phone, it can mess things up nicely. Also, inexperience with ROM flashing can hard brickyour Nokia G310 Be sure to follow guides and ask for community help online.
- Rooting mishaps/failures.“Rooting” means giving your phone superpowers, but if you mess up, it can go wrong. Your phone might not boot up, leaving you with a brick. Like the previous bullet, follow guides carefully, especially if inexperienced.
- Failed Firmware Updates. When your phone asks you to update its software, following the instructions carefully is essential. If you interrupt the process or something goes wrong, your phone could be bricked.
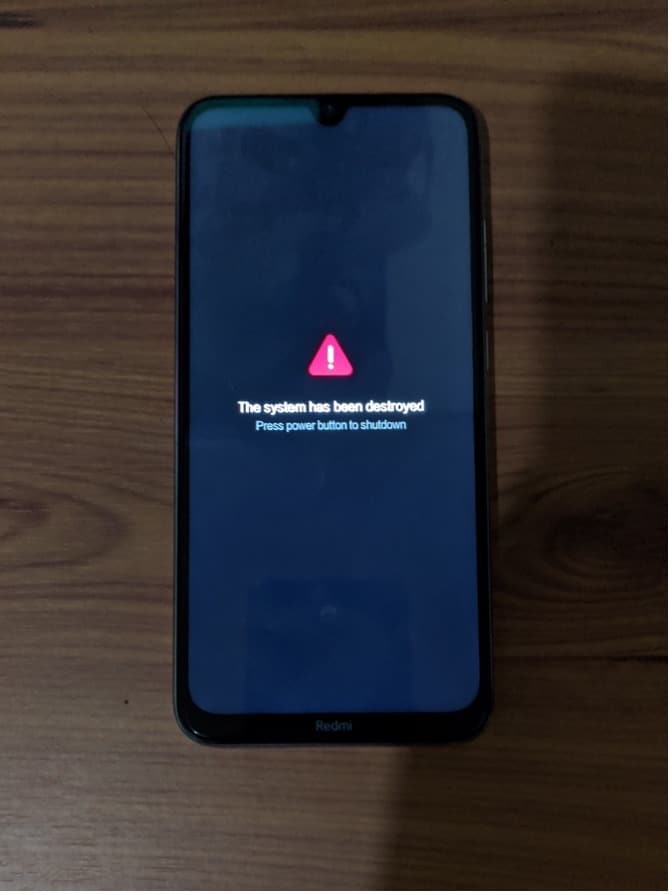
Now, you must know about soft and hard-bricking to learn how to diagnose your phone. Soft bricking is like a phone’s bad day – it might not start up. However, with the right help, you can fix it. Hard bricking is worse. It’s when your phone is a paperweight – it won’t turn on, respond, or do anything useful.
Part 2. Method 1: Use the Nokia G310 Flash Tool To Recover Bricked Nokia G310 Phones
Say you’ve accidentally bricked your Nokia G310 phone due to rooting or ROM flashing. You might feel scared, but imagine having a magic wand that can fix your bricked phone. That’s what the Nokia G310 Flash Tool is –a dedicated Nokia G310 unbricking tool. It lets you install or flash different software onto your phone, giving it a fresh start. Most of the time, a simple firmware flash will unbrick your Nokia G310.
The Nokia G310 Flash Tool is a superhero for various situations. Here are some scenarios where it can save the day:
- **Device Recovery.**If your phone is bricked or acting strange, the Flash Tool can help bring it back to life.
- Firmware Updates. You can use it to install official updates released by Nokia G310, ensuring your phone runs smoothly.
- **Device Customization.**Want a different look for your phone? The Flash Tool can help you install custom ROMs or themes.
- **Bug Fixes.**Got pesky bugs or glitches? The Flash Tool can replace corrupted software to make your phone behave.
- Performance Enhancement. If your phone feels sluggish, the Flash Tool can boost its speed by flashing a new OS.
How To Use the Nokia G310 Flash Tool To Unbrick a Nokia G310 Phone
Now that you know what the Nokia G310 Flash Tool is all about, it’s time to learn how to use it. If you’ve bricked your Nokia G310 phone, follow the steps below:
- Step 1. Download the Nokia G310 Flash Tool and the stock firmware of your device on your computer.
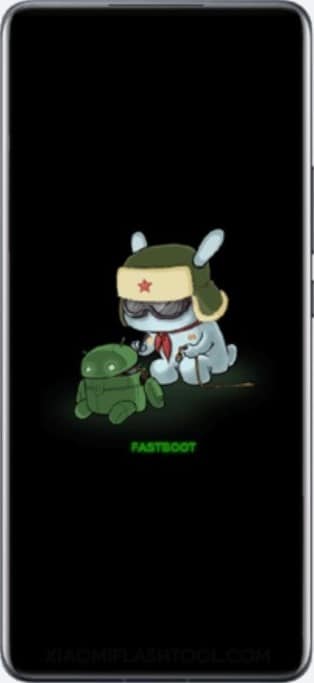
- Step 2. Turn off your phone. Then, press and hold the Volume Down + Power Key simultaneously for 6-8 seconds. This will force your phone to enter the Fastboot mode.

- Step 3. Connect your phone to your computer using a cable when you see this screen flash.
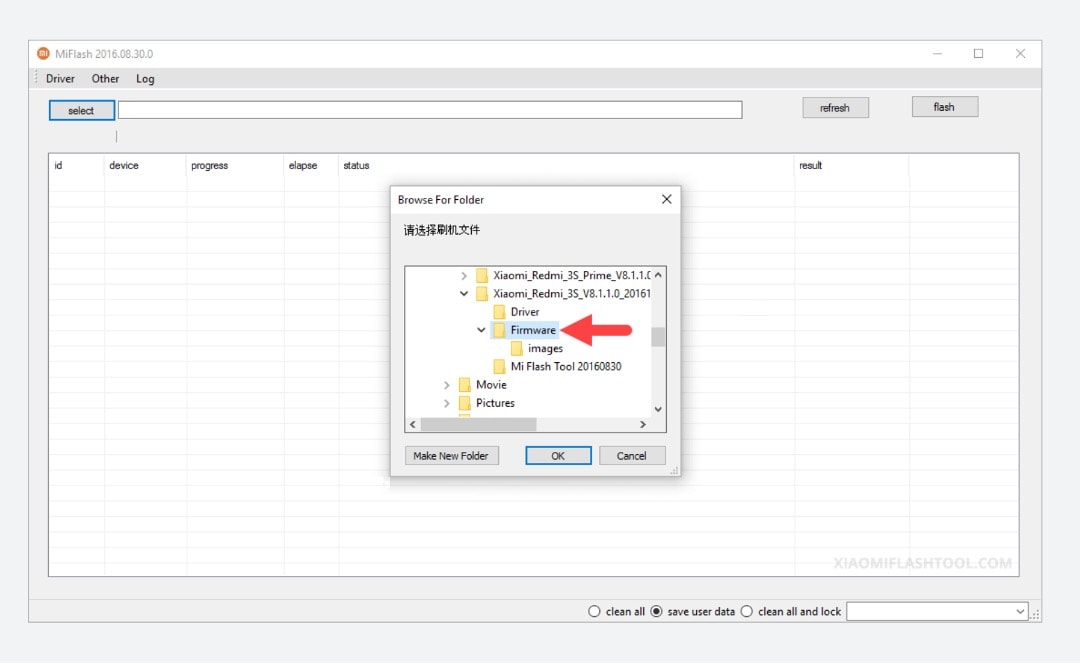
- Step 4. Using the Nokia G310 Flash Tool, click Select. Then, locate the firmware files you downloaded earlier.
- Step 5. Click the refresh button until the flash tool recognizes your device. Then, click flash to replace the firmware. A text saying “success” should appear under the result column.
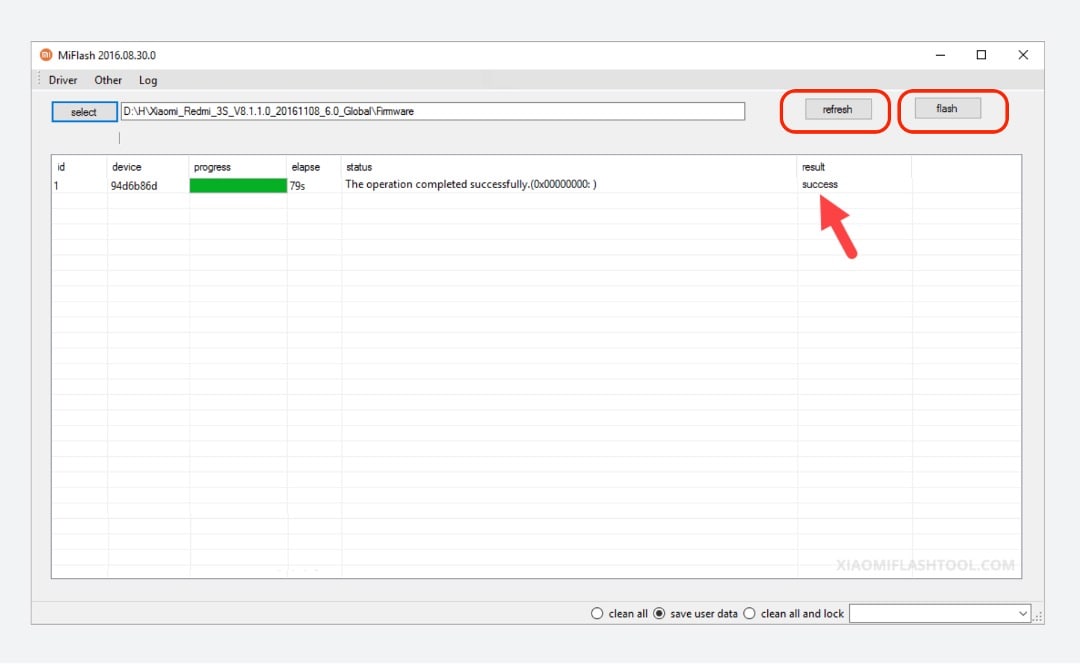
Congratulations! Your phone should be up and working after following these steps.
Part 3. Method 2: Wondershare Dr.Fone System Repair – Your One-Stop Shop for Unbricking Your Nokia G310 Phone
If you gave the Nokia G310 Flash Tool a shot and your phone is still not cooperating, don’t lose hope. Sometimes, the magic touch needs a slight variation. That’s where Dr.Fone comes into play. This dedicated software can work wonders when fixing various phone problems. It can even help in cases of bricked Nokia G310 phones involving software or firmware issues.
![]()
Dr.Fone - System Repair (Android)
Repair Android System Errors without Any Trouble.
- Fix your Android to normal, no skills required.
- Fix various Android system issues, stuck in boot loop , black screen , or won’t turn on , looping on start, etc.
- The high success rate in resolving Android system issues.
- Compatible with a wide range of Android devices and OS versions
- User-friendly interface with easy-to-follow steps.
3981454 people have downloaded it
One of Dr.Fone’s most astonishing powers is its “System Repair” feature. This is where the real magic happens. If your Nokia G310 phone is bricked, it can help repair the underlying software glitches that caused the issue. Moreover, Dr.Fone brings a toolbox of features to the table, making it more than just a one-trick pony. Here are its key features:
- **Data Recovery:**If you’ve lost precious data, Dr.Fone can help recover it, even from a bricked phone.
- **Data Transfer:**You can quickly move data between devices, even if one is unresponsive.
- **System Backup & Restore:**Fone can help you create a backup of your phone’s system and restore it when needed.
- **Unlocking Tools:**If you’re locked out of your phone, Dr.Fone can help you regain access.
How To Use Dr.Fone System Recovery Feature To Unbrick a Nokia G310 Phone
Now that you know about Dr.Fone, it’s time to understand how to use it. Hopefully, it can save your bricked Nokia G310 phone from its problems. Follow the steps below:
- Step 1. DownloadDr.Fone from its official website , and launch it on your computer. After entering the Toolbox menu from the left panel, click System Repair. Make sure that your Nokia G310 phone is connected.
- Step 2. Select Android on the next screen.

- Step 3. Initiate the Android System Repair by clicking Start.
- Step 4. Confirm your device details. You can edit any details that might be wrong.

- Step 5. Put your phone into Download mode. Follow the guidelines for phones with or without home buttons. Your phone will begin downloading the dedicated firmware.

- Step 6. After downloading the firmware, verify and proceed with the installation by clicking Fix Now. Confirm firmware installation by typing “000000” into the text box in the appearing window. Click Confirm afterward.
- Step 7. After the process is finished, your phone should now be okay. Click Done.

Part 4. Best Practices/Tips Before Unbricking Your Phone
Before diving into the unbricking process, you must arm yourself with some tips and precautions to ensure your recovery journey is as smooth as possible. Here’s what you need to know:
- Backing Up Data: An Ounce of Prevention. Remember the golden rule: always back up your data before attempting any phone recovery. Unbricking might save your phone, but being safe is better than sorry.
- **Authentic Tools and Software: Stay on the Safe Side.**Using genuine and trustworthy tools is crucial when unbricking your Nokia G310 This applies especially to Dr.Fone, which you should only download from the official website. Additionally, when recovering your phone’s software, use authentic Nokia G310 ROMs (the operating system’s files).
- **Learning from Online Guides and Communities: Seek Guidance.**Navigating the unbricking process might seem daunting, but you’re not alone. There are many online guides, tutorials, and communities where people share their experiences and solutions.
Conclusion
So, there you have it – your guide to fixing a bricked Nokia G310 phone. Remember, bricking happens when your phone stops working. You won’t be afraid when that happens, as you learned about the Nokia G310 Flash Tool and Dr.Fone. They are your phone-saving superheroes that can unbrick even a hard-bricked Nokia G310 phone.
As a parting reminder, always keep a tool ready for emergencies. For this, choose Dr.Fone. It’s a super tool for all your phone problems. Give it a shot and be confident with your phone wherever you go and whatever you do with it.
safe & secure
3,052,835 people have downloaded it
8 Solutions to Solve YouTube App Crashing on Nokia G310
YouTube can be considered among the apps that are widely used by users. And seeing “Unfortunately YouTube has stopped” error on the Android display screen is a thing that you can’t stand. The reasons can be multiple for why YouTube is not working or it keeps crashing. For instance, an outdated app, not updated OS, low storage, or corrupted cache. No matter what has triggered the problem on your device, we have solutions for it. Please read and follow this article to get the problem sorted.
Restart the app
The issues like YouTube keeps crashing are often get disappeared by just quitting and restarting the app. This is helpful to give a fresh start to the app and restarting will bring your device back to normal. Hence, the first resolution we would like to recommend is to restart your app. Follow the steps to do this.
- Go to “Settings” and tap “Apps & Notifications” or “Application”.
- Choose “YouTube” from the list of apps and open it.
- Tap on “Force Close” or “Force Stop”.
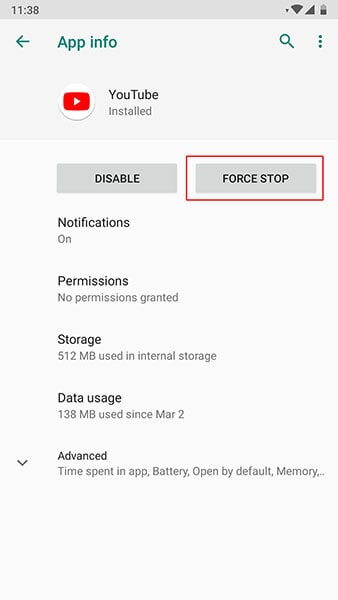
- You can now restart your device and then launch the app again. Check if this works or not.
Restart the Android
Similar to the app, if you restart the Nokia G310 device, it will start operating properly making the YouTube app work better than before. So, as the next tip, please restart your device.
- Long press the “Power” key.
- Press “Restart” and confirm.

Use a VPN
There is a possibility that YouTube is prohibited in your region. Banning some apps is done for some safety reasons. And therefore, you need to check if this is done in your area or not. If yes, then we shouldn’t mention the reason why YouTube is not working on Android. In such a case, use a VPN to access YouTube.
Clear the Cache of YouTube
When the stored cache files start getting crash, the “Unfortunately YouTube has stopped” sort of errors are likely to appear. And therefore, if the above method didn’t work, try this one to get the problem resolved. We are going to clear the cache of YouTube to make it run smoothly.
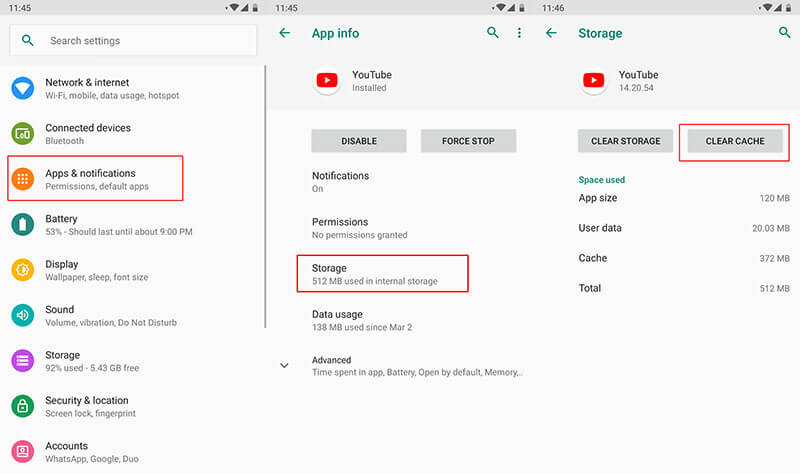
- Go to “Settings” and tap “Apps & Notifications”/”Applications”.
- Now, choose “YouTube” from the list of apps.
- Open “Storage” and click on “Clear Cache”.
Reinstall YouTube from Play Store
If YouTube keeps crashing, make sure to uninstall and reinstall it from Play Store. Doing this will make the app gets refreshed, remove the glitches, and make it normal as a result. Here are the steps for it.
- Firstly, uninstall it by “Settings” > “Apps” > “YouTube” > “Uninstall”.
- Now, go to the “Play Store” and search “YouTube”. Tap on “Install”.
Reset Network Settings
The apps that run on the internet might start crashing due to connectivity issues. Therefore, resetting the network settings once can work as a great remedy to follow when YouTube has stopped on your Nokia G310. This will remove all your network settings like Wi-Fi passwords etc.
- Tap on “Settings” followed by “Backup and reset”.
- Look for “Reset Network Settings”.
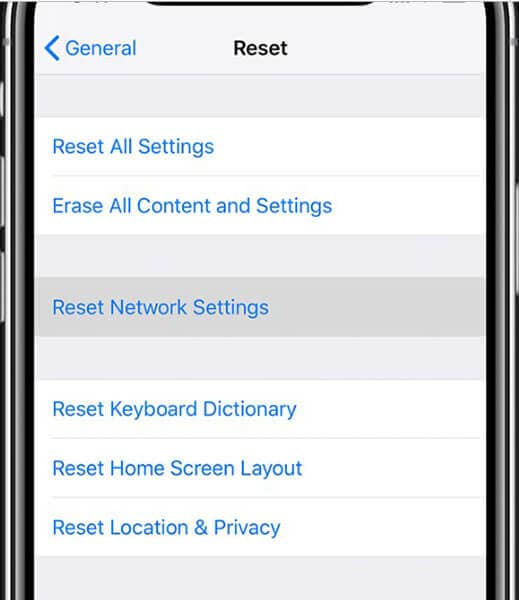
Note: In some phones, you may find the option in “System” > “Advanced” > “Reset”.
Re-flash the stock ROM of Android in one click
There are times when a corrupted system gives you such errors. And therefore, you should try re-flashing the stock ROM on your Nokia G310. Before you wonder how we would like to introduce a highly recommended tool for this. It is Dr.Fone - System Repair (Android). It holds the proficiency to flash the stock ROM in just a click. So, when your YouTube is not responding due to a corrupted system, make use of this tool to get it solved. The benefits associated with this tool are as follows.
Dr.Fone - System Repair (Android)
Android repair tool to flash the stock ROM of Android
- Easy to use and quickly fixes the issues
- Has the capability to repair any Android system issue
- 1000+ Android models are supported
- Takes no special technical knowledge to use
- Higher success rate with promising results
3981454 people have downloaded it
Step 1: Launch the Tool
Start with visiting the website on your PC and downloading the Dr.Fone toolkit. Install and open the tool. Now, from the main screen, choose “System Repair”.
Step 2: Connect Device
With the help of the USB cord, connect your Nokia G310 to the computer. Click on “Android Repair” now from the left panel.
Step 3: Enter Information
Now, as the next step, you need to make sure of the details of your device. Please enter the name and brand of the phone. The country, region, and career are also to be added. Hit on “Next” once done.
Step 4: Download Firmware
Now, follow the instructions given on the screen according to your device. Click on “Next” and the program will start downloading the firmware.

Step 5: Repair the Issue
Lastly, when the firmware is downloaded, the system will start getting repaired on its own. You need to wait until you are informed about the completion of the process.
Reset Factory Settings of this Device
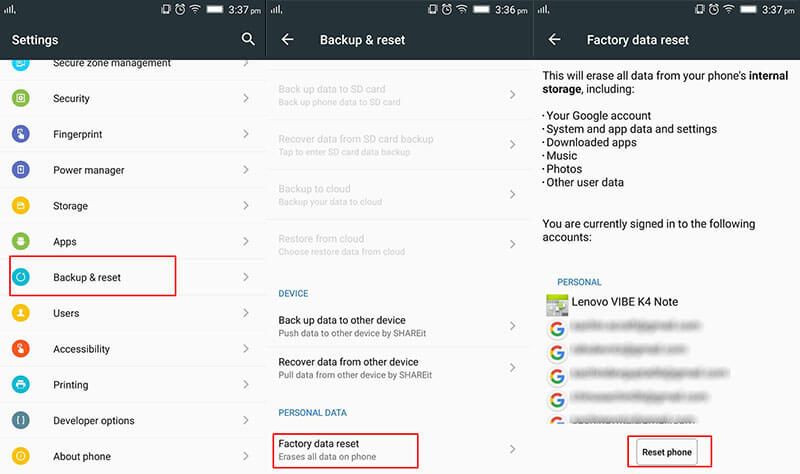
When nothing works, the last resort you can go with is resetting the Nokia G310 device to factory state. Doing this will remove any sort of conflicting bugs and other stuff. However, this will remove the data from your device. So make sure to backup everything before going with this method. The steps are:
- Open “Settings” and tap “Backup & reset”.
- Go to “Factory data reset” and tap “Reset phone”
Also read:
- [New] 2024 Approved Top 10 Editors Elevate Your Webcam Recordings
- [New] Download and Conversion Mastery Vimeo to MP4 Guide for 2024
- [Updated] Bridging the Gap Between YouTube & Instagram Stories Effectively for 2024
- [Updated] Directly Infuse YouTube Music Into Any iMovie Project
- 7 Fixes for Unfortunately, Phone Has Stopped on Tecno Pop 7 Pro | Dr.fone
- Efficiently Capturing Your Screen in Windows 11: Best Practices and Tricks
- From Footage to Feature Making YouTube Thumbnails (Mobile) for 2024
- From Setting Up to Broadcasting A DiscoGuide
- Gmail Not Working on Motorola Razr 40 7 Common Problems & Fixes | Dr.fone
- Gmail Not Working on Tecno Spark 20C 7 Common Problems & Fixes | Dr.fone
- Synology NAS上でWindows 10の安全な保存:AOMEI Backupper利用ガイド
- Unlock Styling Secrets with a DIY Video Editing Guide for 2024
- Why Does My Infinix Hot 30 5G Keep Turning Off By Itself? 6 Fixes Are Here | Dr.fone
- Title: How To Fix Unresponsive Phone Touchscreen Of Nokia G310 | Dr.fone
- Author: Ariadne
- Created at : 2024-10-27 16:20:00
- Updated at : 2024-10-28 18:47:34
- Link: https://howto.techidaily.com/how-to-fix-unresponsive-phone-touchscreen-of-nokia-g310-drfone-by-drfone-fix-android-problems-fix-android-problems/
- License: This work is licensed under CC BY-NC-SA 4.0.