
How To Fix Unresponsive Touch Screen on Nubia Z50 Ultra | Dr.fone
How To Fix Unresponsive Touch Screen on Nubia Z50 Ultra
With the increase in our reliance on smartphones, having touchscreen problems on your device can be annoying. Sometimes, it’s even more frustrating than a physically broken screen because you don’t know where the issue is coming from.
If your touchscreen is malfunctioning or doesn’t work correctly, you cannot interact with your device. On this page, you’ll learn general phone touch problems on Android and how to get rid of them. Now explore the article to learn more.

Part 1: Why Is My Android Experiencing Touch Screen Problems
Below are some of the most common reasons you’re experiencing touch problems on your Android smartphone.
- The touchscreen problemfreezes your phone, lags, or hangs.
- Some parts of the screen work fine, but some don’t.
- Your screen responds inaccurately (typing “a” gets you “q” or “z”).
- The touchscreen is automatically operating itself, resulting in ghost touch.
- It doesn’t respond to any taps, and the phone’s screen has stopped working.
- The device is physically damaged, or the screen is cracked or broken.
- Outdated devices are prone to the black/white/blue screen of death.
Part 2: Tips, Fixes, and Workarounds To Fix Your Nubia Z50 Ultra Touch Problems
If any of the outlined reasons above are the cause of your touch screen malfunctioning, here are some solutions to fix it.
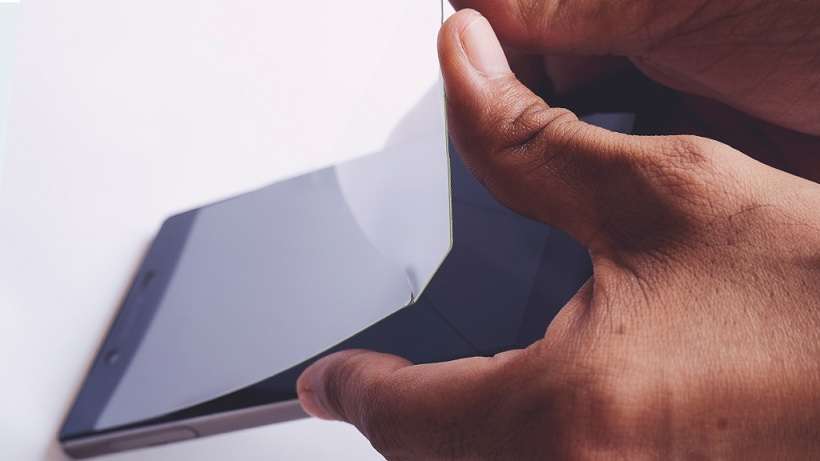
Method 1: Remove the Screen Protector and Phone Case
Some phone cases and screen protectors cause touch problems on your Android screen. This issue is prevalent if you recently changed your phone case or screen protector. It may be due to incompatibility, but you should remove them to see if your phone starts responding again.
Method 2: Clean Your Android Smartphone
A touchscreen malfunctioning can also be a sign of a dirty display. Since the screen relies on contact between your fingers and the touchpad to perform actions, this also applies to foreign particles such as dirt, debris, smudges, oil, and more. Clean your touchscreen with wipes or a soft cloth by gently wiping over the screen.
Method 3: Stop Using Your Android Device for a While
Touch problems also arise due to abnormal temperature changes. Your phone might experience ghost touch if it’s too cold or hot. For your screen to function correctly, it needs to be in a temperate environment. Remember to take breaks between phone usage, especially when the phone gets too hot. Avoid using your device under hot conditions, direct sunlight, or anything affecting your phone’s normal temperature.
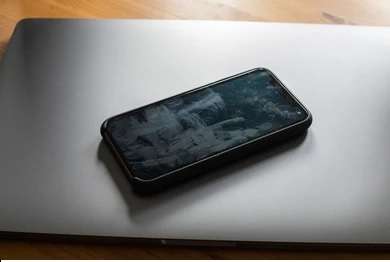
Method 4: Restart Your Android
Performing a reboot sounds trivial with such a complicated issue. But sometimes, it’s often the most successful way to fix a touchscreen problem on an Android device. Restarting your Android shuts down and resets all background services, which may have led to your issue.
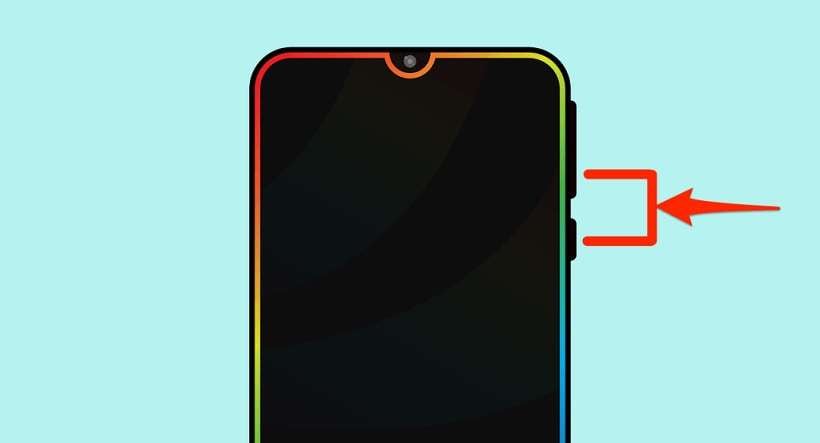
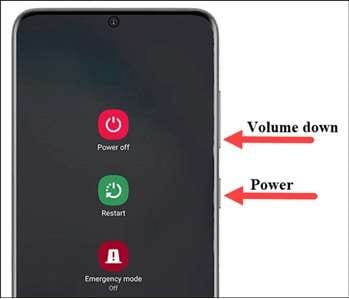
To restart your Android, press and hold the Power button for several seconds to switch off your phone. In other smartphones, you may need to hold down the Power button as well as the Volume Down button at the same time.
Method 5: Factory Data Reset Your Android
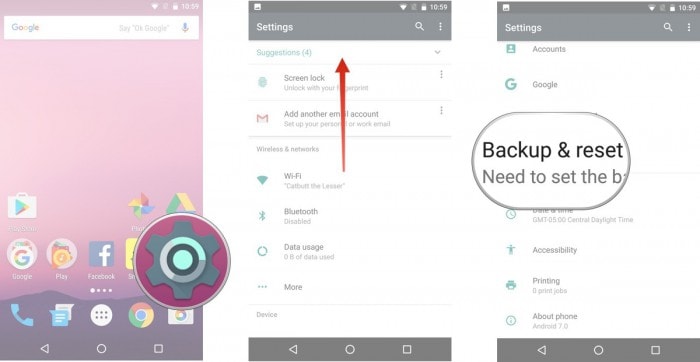
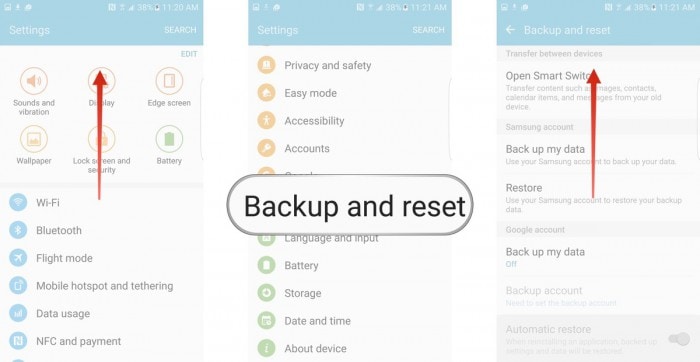
Before attempting to have your device checked for any hardware defects, you should try completing a Factory Reset. To do this, go to Settings > Backup and Reset. Next, tap on Factory data reset > Delete all.
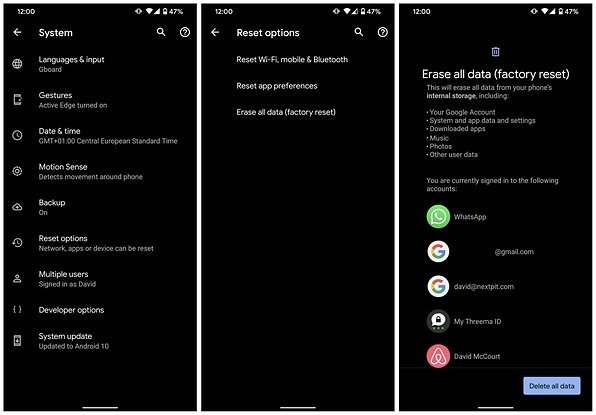

Performing a Factory Data Reset will erase all your data and restore your device to its factory default settings. Creating a backup before doing this step is recommended, as you will lose all your personal data once the process starts.
Method 6: Put Your Android into Recovery Mode
If all else fails, placing your Android into Recovery Mode should be a last resort. Doing this method works similarly to the method above. You should perform this method if the screen is unresponsive and only the buttons on your Android are functional. Here’s how.
Note
Placing your Android into Recovery Mode is different depending on your Android smartphone. Refer to your owner’s manual to see which method is right for your Nubia Z50 Ultra.
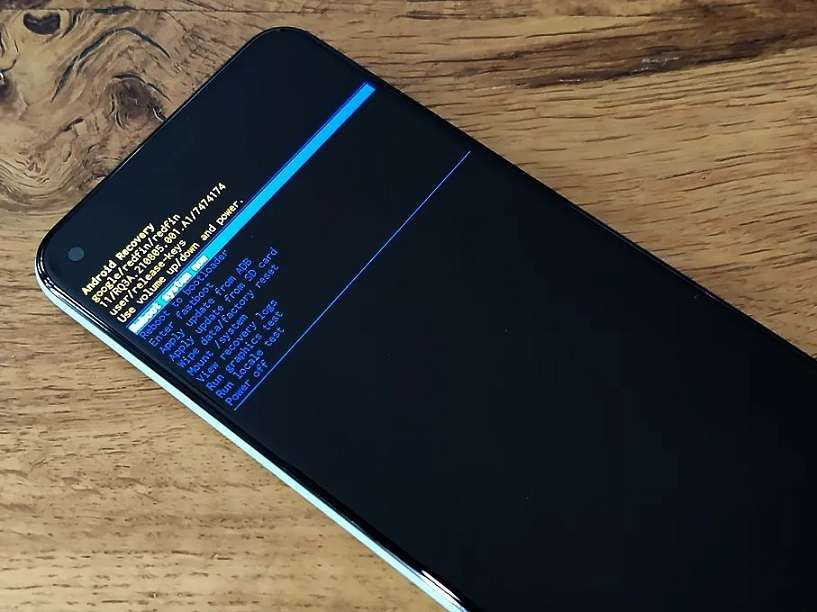
Step 1A: Press and hold the Power button and Volume Down buttons at the same time. Continue holding both buttons until the screen starts.
Step 1B: If your Nubia Z50 Ultra still has a Home button, press and hold the Home button and the Power button at the same time. Continue holding them until the screen starts.
Step 1C: If step 1A did not put your Android into Recovery Mode, press and hold the Power and Volume Up and Down buttons simultaneously. Continue pressing all three until the screen starts.
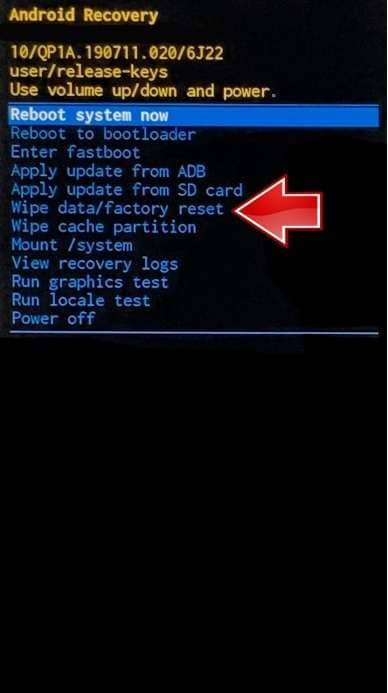
Step 2: Use the Volume buttons to navigate the choices, select Wipe data/factory reset, and confirm your choice with the Power button.
Step 3: Wait for the process to complete and for your Nubia Z50 Ultra to restart automatically.
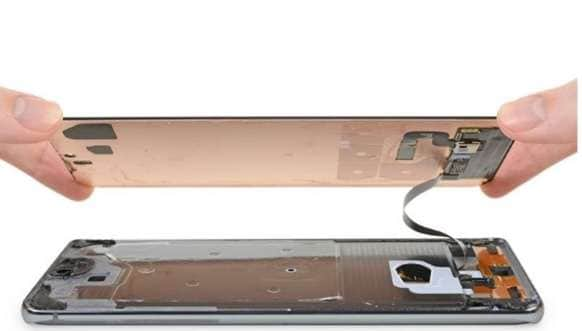
Method 7: Replace Your Android Touchscreen
If doing all the earlier workarounds and fixes couldn’t resolve the touchscreen problem, it could be the screen itself. While replacing the touchscreen yourself is possible if you have the technical know-how, it’s still best to bring it to a professional to prevent further damage. You should have your Nubia Z50 Ultra checked by a technician if the screen is getting weak, has water damage, or has failing screen components.
 “
“
Method 8: Bring it to an Authorized Service Center
Your phone touch problem might not be caused by the screen, even when you had it replaced. If your Android is still unresponsive, it’s best to bring your smartphone to an authorized service center or directly to the phone manufacturer, especially when all efforts are exhausted.
Part 3: How To Fix Android Touch Problem With an Alternative
If all the general phone touch problems on your Nubia Z50 Ultra persist, you should strongly consider Wondershare Dr.Fone to do the job. The program can fix all Android system issues without any required skills. Problems caused by the operating system or software, such as the black screen of death, boot loop, ghost touch, and more, are done within less than 10 minutes with the program.

Key Features
Dr.Fone – System Repair (Android) has many features you can immediately take advantage of. Here are some of them below.
- Fix All Android Problems In Minutes
Wondershare Dr.Fone allows you to fix all touchscreen problems on your smartphone within less than 10 minutes. Moreover, it has a high success rate making it one of the most reliable tools available today.
- Supports up to 1000+ Android Models
The program supports almost all Nubia Z50 Ultra models and other Android devices, whether unlocked or from a carrier. Dr.Fone is equipped with all the proper firmware to flash your Nubia Z50 Ultra with just a few clicks. In addition, it has handy on-screen instructions to help you complete the whole process with ease.
Pros and Cons
Here are the pros and cons of using Dr.Fone – System Repair (Android) to know if you’re still undecided.
Pros
- The user interface is clutter-free, making it highly beginner-friendly.
- The fast processing time to fix your Nubia Z50 Ultra means you can do more in less time.
Cons
- The free version only works until you see if your Nubia Z50 Ultra is compatible with the app. You will be required to enter a valid license once you initiate the repair process.
- If you own an iOS device, you’ll have to get the iOS version.
How To Fix Black Phone Screen With Wondershare Dr.Fone
Follow the step-by-step guide below to start fixing general phone screen problems on Android using Wondershare Dr.Fone.
Step 1: Download and install Wondershare Dr.Fone on your computer. Next, launch the program and connect your Nubia Z50 Ultra to your computer.

Step 2: Click Start to initiate the setup on a new window. From there, select the Brand, Name, Model, Country, and Carrier of your Nubia Z50 Ultra and click Next.

Step 3: Follow the on-screen instructions on the main program window to initiate the repair process. After that, wait for your Android smartphone to return to its original state.

Part 4: FAQs
Here are some FAQs you should remember when experiencing phone touch problems.
1. Does a Cracked Screen Affect Touch on an Android?
If you continue using a smartphone with a cracked screen, there are several implications. Your device will be vulnerable to further damage and might develop touchscreen problems,and your sensors will gradually begin to malfunction. The capabilities of your device are also compromised the longer you delay repairing it. Moreover, a cracked screen can put your fingers at risk of injury due to potential glass splinters.
2. How Do I Temporarily Fix a Cracked Screen?
If you can’t take your cracked screen to a repair shop, apply a small amount of vegetable oil or petroleum jelly to the screen. Doing this will not fix the issue but will make the cracks less noticeable. On the other hand, you can also apply a screen protector to safeguard your phone against further damage. The screen protector slows down or prevents the cracks from getting worse.
3. Can I Use Dr.Fone for Free?
You can download and install Dr.Fone – System Repair (iOS) or (Android) for free to evaluate the program’s offerings. You can do the first few steps to see if the app supports your device. However, you need to get the full version and enter a valid license code to repair your smartphone.
 safe & secure
4,471,551 people have downloaded it
Conclusion
If the touchscreen is malfunctioning on your smartphone, one of the fixes above should help solve the problem. If it did not solve the issue, consider using Dr. Fone – System Repair for iOS or Android when you need an all-in-one solution to all your phone screen problems.
However, if your screen is broken or cracked, going to an authorized service center is still your best bet, especially when your screen urgently needs a replacement. Delaying it further may hurt your wallet in the long run, so it’s best to fix it as soon as possible.
11 Ways to Fix it When My Nubia Z50 Ultra Won’t Charge
What would you do if your phone or other device’s battery is draining? You will plug it into a power source. Right? What if you realize that your phone won’t charge? My phone won’t charge, and the Nubia Z50 Ultra tablet won’t charge is a common problem.
Android devices are very prone to this problem, and hence Android device owners complain frequently that My Nubia Z50 Ultra won’t charge even when it is plugged into a power source properly. The reason behind the phone won’t charge, or Nubia Z50 Ultra tablet won’t charge are not very complicated and, therefore, can be dealt with by you sitting at home.
A charging problem can occur due to a temporary software crash. It is also possible that a corrupted device cache may be causing such a glitch. Another reason for phones not to charge normally or charge slowly is an inappropriate power source or defective charging cable and adapter. All these and many more problems will be cured in the 10 solutions to fix My Nubia Z50 Ultra won’t charge error.
So if you’re still thinking about why won’t My Nubia Z50 Ultra charge, read on to find out solutions to fix My Nubia Z50 Ultra won’t charge problem.
Part 1. One-click solution to fix Android phone won’t charge
While you are upset over ‘why My Nubia Z50 Ultra won’t charge?’, would you mind us helping you around?
Well, we have got Dr.Fone - System Repair (Android) at your fingertips to get rid of this annoying phone won’t charge issues (caused by system corruption). Whether the Nubia Z50 Ultra device froze or became unresponsive, bricked, or got stuck on the Nubia Z50 Ultra logo/blue screen of death or apps started crashing. It can fix every Android system problem.
Dr.Fone - System Repair (Android)
Easy-to-operate program to fix Android phone won’t charge
- As it supports all the latest Nubia Z50 Ultra devices, it can even easily fix the Nubia Z50 Ultra tablet won’t charge issue.
- With a single click, you can fix your entire Android system issues.
- The very first tool is available in the market for Android system repair.
- Without any technical knowledge, one can use this software.
- This tool is intuitive with a high success rate.
3981454 people have downloaded it
Note: When you are stressed over ‘why won’t My Nubia Z50 Ultra charge’, we are ready to eliminate the tension and make things easier for you. But, before you start fixing the phone won’t charge the problem, make sure to back up the Android device . This fixing process might wipe out all the Nubia Z50 Ultra device data.
Phase 1: Preparing and connecting the Android device
Step 1: Install and then run Dr.Fone - System Repair (Android), the ultimate Android repair software on your PC. Hit the ‘System Repair’ tab, followed by connecting your Nubia Z50 Ultra.
Step 2: Tap on the ‘Android Repair’ option and then click ‘Start’ for moving ahead.
Step 3: Mention the detailed information about your Nubia Z50 Ultra under the Nubia Z50 Ultra device information section. Press ‘Next’ then on.

Phase 2: Get to ‘Download’ mode for repairing the Nubia Z50 Ultra device
Step 1: It’s essential that you put the Android device under ‘Download’ mode to resolve the phone won’t charge the issue. Here comes how to do –
- With a ‘Home’ button device, switch off it before holding down the set of keys, including ‘Power’, ‘Volume Down’, and ‘Home’ key for 5-10 seconds. Let them go and hit the ‘Volume Up’ key for entering the ‘Download’ mode.

- If the ‘Home’ button is not there, you got to turn down the Nubia Z50 Ultra device and altogether hold down the ‘Volume Down’, ‘Bixby’, and ‘Power’ keys between 5-10 seconds. Soon after you release the keys, tap the ‘Volume Up’ button for entering the ‘Download’ mode.

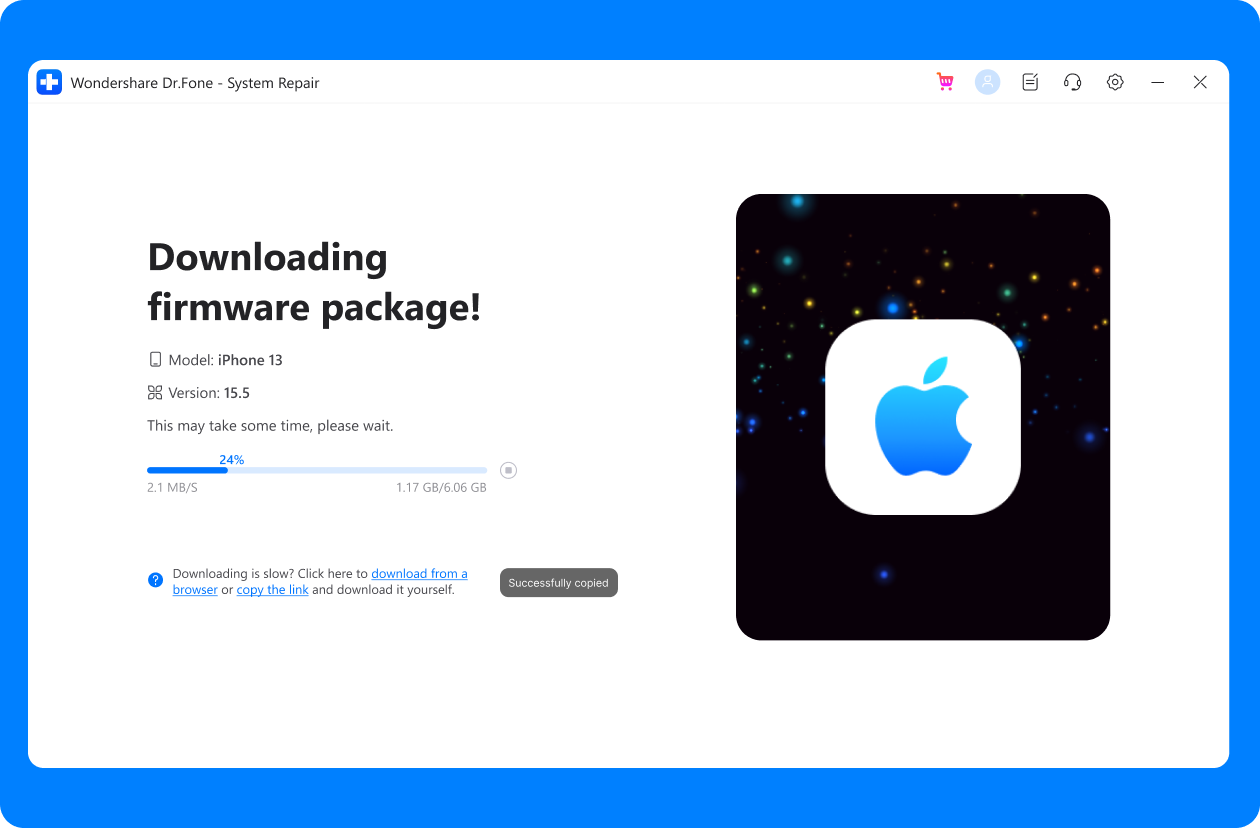
Step 2: Click ‘Next’ to start downloading the Android firmware.

Step 3: Now, Dr.Fone - System Repair (Android) would verify the firmware and then start repairing the Android system on its own. It will ultimately fix your ‘why won’t My Nubia Z50 Ultra charge’ trouble.
Part 2. 10 common ways to fix Android won’t charge
1. Check/replace charging cable
Charging cables fray or become defunct after prolonged usage. Therefore, it is advised to always use the Nubia Z50 Ultra device’s original charging cable or purchase a good quality charging cord, which doesn’t damage your device or your adapter.
It is also very commonly observed that the charging end of the cable which gets connected to the charging port of the Nubia Z50 Ultra device gets damaged and prevents the current from flowing to the phone/tablet.

2. Check/clean charging port
The charging port in your device is a small opening where the charging end of the cabbie is inserted for the current to flow to the phone/tablet. Very often, we notice that the charging port gets blocked with tiny particles of dirt. The charging port might also get clogged if dirt and dust get accumulated in it, preventing the sensors from receiving and forwarding the current to the Nubia Z50 Ultra device.

The best way to take this problem is to clean the port with a blunt pin or a soft bristle unused toothbrush. Make sure you clean the port gently and do not damage it or its sensors.

3. Check/replace charging adapter
This method is fairly simple, and all you need to do is check whether or not the charging adapter is working properly as sometimes, the adapter itself is to be blamed for the charge. To make sure that you are not using a defective adapter, connect your charging cable/USB to another adapter. If your device charges normally, it means there is a problem is with your adapter, and you must replace it at the earliest to solve My Nubia Z50 Ultra won’t charge the issue.

4. Try another power source
This technique is more like a quick trick. It means to switch from one power source to another or use a more efficient and suitable power source. Laptops and PCs charge slower than a direct power source, i.e., a wall socket. Sometimes, the charging speed is slower, and the battery is draining. In such a scenario, choose to charge your device by directly plugging it into a socket on the wall to never experience My Nubia Z50 Ultra won’t charge problem.
5. Clear device Cache
Clearing Cache is a great technique as it cleans your device and all its partitions. By clearing the cache, all the unwanted data and files stored in your device get deleted, which may be causing glitches in the Nubia Z50 Ultra device’s software, preventing it from recognizing the current.
Follow the steps given below to clear your device’s cache:
• Visit “Settings” and find “Storage”

• Now tap on “Cached Data”.

• Click “OK” to clear all unwanted cache from your device as shown above.
Try charging your phone after clearing the cache. If your phone doesn’t charge even now, do not worry. There are more ways to help you combat My Nubia Z50 Ultra won’t charge problem.
6. Re-start/reboot your phone/tablet
Restarting your device to fix why won’t My Nubia Z50 Ultra charge error is a very effective remedy. This method of rebooting your device not only fixes software glitches but other but also tackles other factors/operations that might be running in the background preventing your device from charging.
Restarting a device is simple and can be done by following the steps given below:
• Long press the power button of your device.
• From the options that appear, click on “Restart”/ “Reboot” as shown in the image below.

To restart your device, you may also press the power button for about 20-25 seconds for the phone/tablet to automatically reboot.
7. Download and install the Ampere App
The Ampere app can be downloaded from the Google Play Store. It is very helpful to fix the why won’t my charge error as it gives you real-time information about your device’s battery consumption, charging status, and other essential data.
If the App gives information in green color, it means all is wetland your device is charging normally, however, if the information before you is in orange, you need to take steps to fix the charging problem.


8. Install software updates
Installing your Android version updates is a good idea as the software is the interface that receives charge from the charging port sensors and gives a command for the phone/tablet to charge. People often continue to use older OS versions, which cause trouble and prevent the Nubia Z50 Ultra device from charging.
To check for and install updates on your device, you must be connected to WiFi or a cellular network. Next, visit “Settings” and select “About device”. Now click on “Software Update”.

If there is an update available, you will be prompted to download it. Just follow the instructions given before you install a brand new Android OS version on your device.
9. Factory reset your device
Factory Reset is must be done after due deliberation. Remember to take a back-up of all your data and contents on the cloud or an external memory device, such as a pen drive before adopting this method because once you perform a factory reset on your device, all media, contents, data and other files are wiped out, including your device settings.
Follow the steps given below to factory reset your device:
• Visit “Settings” by clicking the settings icon as shown below.
• Now select “Backup and Reset” and move on.
• In this step, select “Factory data reset” and then “Reset Device”.
• Finally, tap on “ERASE EVERYTHING” as shown below to Factory Reset your device.

Note: Once the factory reset process is complete, your device will automatically restart and you will have to set it up once again.
10. Replace your battery
This should be your last resort to fix My Nubia Z50 Ultra won’t charge problem, and you should only attempt to replace your battery if none of the other techniques work. Also, please consult a technician before purchasing and installing a new battery in your device as different phones and tablets have a different type of battery requirements.

Finally, fixing the phone won’t charge the problem is simple, and therefore there is no need for you to worry as you are not the only one experiencing such an issue. Other Android users have tried, tested, and recommended the methods given above to solve why won’t My Nubia Z50 Ultra charge or Nubia Z50 Ultra tablet won’t charge error. So go ahead and try them out now.
How To Deal With the Nubia Z50 Ultra Screen Black But Still Works?
With the advance of technology over the years, many of us rely on smartphones to communicate, work, and play. As such, it can be pretty concerning when your device begins to act strange like your phone screen suddenly went blank.

Whether you’re using an iPhone or an Android device, you’ll eventually encounter a problematic symptom like this. Therefore, this article will explore what to do when your phone screen goes black. After exploring below, you’ll learn the common causes of why your phone screen went black and how to fix it. Read on below to learn more.
Part 1: Why Did My Nubia Z50 Ultra Screen Go Black but Still Works? Common Causes
Experiencing a cell phone blank screen is not exclusive to Android or iOS users. A phone screen not turning on happens all the time due to several factors that may or may not be out of your control. While they can be frustrating, here are some common causes you should know as to why your phone screen went black but still works.
A Drained Battery
The first thing that comes to mind when your phone screen suddenly goes black is you have a drained battery. Even though this is obvious, it’s still important to mention, as this is usually what most people encounter. To fix this problem, plug your smartphone into a charger and wait for your device to turn on again. If it works, then you just prevented a rather annoying experience.

App Troubles
If your phone is working, but the screen is black, there’s also a high probability that you are having an isolated issue with a particular application. An app could be loading something, which often happens for streaming apps such as YouTube, Netflix, Prime, and more, especially if you have slow internet connectivity.
Software Issues
A potential reason why your phone screen went black but still works could be because of your smartphone’s software. This problem suggests that your Nubia Z50 Ultra is crashing, potentially freezing your device if not addressed immediately. If this is the cause, then your device is likely experiencing a critical system error, and you should directly try to reboot your phone.
Hardware Problem
If you dropped your phone, there’s a high chance the LCD connectors went loose due to the physical impact. If this happened to you, the phone might be working, but the screen is black due to the LCD cable dislodging. Another issue could be your phone got exposed to extreme temperatures. This can also cause a black screen but your phone is still on.

Part 2: How To Fix Black Screen on Your Phone
Here are four valuable methods you should know on what to do when your phone screen goes black on your iPhone or Android smartphone to get them working again.
Method 1: Force Restart your Android/iOS Smartphone
If your phone screen is black but still works, force restarting it is the easiest way to fix it. The following are the detailed steps for both Android and iOS devices.
How to Force Restart your Android Device
Here is how you force restart an Android device when your phone screen doesn’t turn on.
Step 1: Press and hold the Power and Volume Down buttons simultaneously.
Step 2: Hold the same buttons until your device restarts, and display the phone’s logo.
How to Force Restart your iOS Device
If you own the latest iPhone models, here are the method of restarting it from iPhone 8 up to 14.
Step 1: Press and immediately release Volume Up. Next, press and immediately release Volume Down.

Step 2: Press and hold Sleep/Wake until you see the Apple logo.
Note
If you own an iPhone 7, press and hold the Side button and Volume Down simultaneously until you see the apple logo.
Method 2: Uninstall or Update Outdated Applications
In some cases, your phone screen is black but still works because of installing incompatible apps on your iOS/Android device. If the installed app is frequently crashing, it may be the source of a blank cell phone screen. Uninstall the problem app to see if the black screen disappears or not.
Method 3: Inspect the LCD Connectors
If your phone screen goes black but still works, you should inspect the logic board to the LCD screen to see if it has become disconnected. It is common for smartphones that often get dropped a few times. It’s best to plug the connectors back to regain your screen’s functionality.
However, this requires technical know-how. It’s better to seek help from a professional as you could risk causing more damage to your device if you don’t know what you’re doing.
Method 4: Perform a Factory Reset
If all the methods above did not solve your problem, the last resort you can take is to perform a Factory Reset. This method works on Android and iOS smartphones and erases all your data. It is the quickest way to try to fix why your phone screen went black. Here are the steps.
For Android Users
If you’re on Android, tap Settings > Backup and Reset. Tap on Factory data reset > Delete all to initiate the factory reset.
If you cannot do this, here’s how to perform a factory reset manually using Recovery Mode.
Note
The process of booting into Recovery Mode is not the same across all Android devices and depends on the manufacturer and model of your phone. Refer to your owners manual to see which method is the right one for your Nubia Z50 Ultra.
Step 1A: Press and hold the Power button and Volume Down buttons simultaneously and continue holding until the screen starts.
Step 1B: For Android devices with a Home button, press and hold the Home button and the Power button and continue holding until the screen starts.
Step 1C: Press and hold the Power button as well as the Volume Up and Volume Down buttons simultaneously and continue holding until the screen starts.

Step 2: Use the Volume buttons to navigate the choices and select Wipe data/factory reset and confirm your choice with the Power button.
Step 3: Simply wait for the process to complete and wait for your Nubia Z50 Ultra to restart automatically.
F****or iOS Users
Step 1: For iOS users, meanwhile, tap Settings > General > Transfer or Reset iPhone.
Step 2: Next, choose Erase All Content and Settings. Check the list of items you want to remove.

Step 3: Tap Continue and enter your iPhone passcode. A message warns you that the process will delete all media and data and reset all settings.
Step 4: Tap Erase iPhone to confirm. You’ll be asked to type in your Apple ID and password if Find My is active. Enter your password and tap Erase.
Part 3: How To Fix Black Screen Phone With an Alternative
If your phone screen went black but still works and doing the methods above did not solve the issue, you can use Wondershare Dr.Fone for iOS and Android as a last resort. It’s one of the most popular smartphone repair tools today, enabling you to fix all kinds of annoying scenarios. These include black screen, boot loop, white screen of death, bricked iOS or Android device, and more.
Key Features
Dr.Fone – System Repair for iOS and Android has fantastic features you can immediately take advantage of. Here are its key features below.
- Fix all Android and iOS Problems in Minutes
Dr.Fone – System Repair can fix all kinds of issues on your Android/iOS, such as a black screen, white screen of death, screen freeze, boot loop, or recovery mode. All of this can be done within less than 10 minutes to save you precious time.
- Supports up to 1000+ Android Smartphones and the latest iOS
All iOS versions, including the latest iOS 16 and iOS 16 beta, are fully supported by Dr.Fone – System Repair. The app handles all your smartphone issues without data loss to secure your info. On the other hand, if you own an Android, the app supports up to 1000+ Android smartphones, making it highly versatile for Android owners.
Tech Specs
Dr.Fone – System Repair (Android)’s minimum system requirements for your computer are listed below.
| Computer OS | Android |
|---|---|
| Windows 11, 10, 8.1, 8, 7 | Android 2.1 and up to the latest |
Meanwhile, here are the system requirements for Dr.Fone – System Repair (iOS).
| Computer OS | iOS |
|---|---|
| Windows 11, 10, 8.1, 8, 7 | Supports all iOS versions, including the latest iOS 16 and iOS 16 beta |
| macOS 12, 11, 10.15, 10.14, 10.13, 10.12, 10.11, 10.10, 10.9, 10.8 |
Pros and Cons
If you’re still undecided about Dr.Fone – System Repair, here are its pros and cons.
Pros
- Fone – System Repair for iOS and Android has a clutter-free and beginner-friendly user interface. It’s easy to understand and use, so you can start immediately.
- Both the iOS and Android versions finish the repair tasks within less than 10 minutes to save you time.
Cons
- Each version for each OS is sold separately.
- The free version works up to your device’s compatibility. Once you start the repair process, the app will ask you for a valid license key.
How to Fix Black Phone Screen With Dr.Fone – System Repair
Here’s how to fix your phone screen with Dr.Fone – System Repair on iOS/Android.
Step 1: Download and install Dr.Fone – System Repair for iOS or Android. Next, open the program and connect your smartphone.
Step 2A (For iOS): Choose the correct model of your iPhone for the program to be able to download the appropriate firmware package.
Step 2B (For Android): Click Start. On the next window, choose the Brand, Name, Model, Country, and Carrier of your smartphone, then click Next.
Step 3: Follow the on-screen instructions provided on the main program window and wait for the repair process to complete.
safe & secure
4,262,204 people have downloaded it
Conclusion
Our increasing reliance on smartphones has led to amazing advancements in new technologies. However, lingering issues such as your phone screen not turning on or your phone screen being black but still working are ongoing problems to many. That’s why learning how to prevent these events is essential to take care of your smartphone.
Doing all the recommended methods above usually solves the case. If the different fixes don’t work for you, Dr.Fone – System Repair for iOS and Android can help resolve all your problems within less than 10 minutes. You can download it for free on Windows and Mac to test it yourself.
Also read:
- [New] Sharp as Day The #Top10 Clearer Photo Editors List
- [Updated] The Art of Building Engaging Facebook Moment Slides for 2024
- 2024 Approved How to Curve Images in Photoshop
- 7 Fixes for Unfortunately, Phone Has Stopped on Huawei P60 | Dr.fone
- 8 Ultimate Fixes for Google Play Your Oppo Find N3 Flip Isnt Compatible | Dr.fone
- Asus ROG Phone 7 Ultimate Stuck on Screen – Finding Solutions For Stuck on Boot | Dr.fone
- Fix Unfortunately Settings Has Stopped on Google Pixel 8 Quickly | Dr.fone
- Frustrated with Sluggish Mobile Data? Quickly Improve Speed Using These 10 Tips
- Google Play Services Wont Update? 12 Fixes are Here on Samsung Galaxy M14 5G | Dr.fone
- In 2024, How to Cast Oppo Find X7 to Computer for iPhone and Android? | Dr.fone
- No-Cost YouTube Audio Tools for Seamless MP3 Downloads for 2024
- Secrets of OpenAI's Program: Find and Fix Computing Blunders
- Step-by-Step Instructions for Refreshing Your Residential Sound System's Speakers
- Title: How To Fix Unresponsive Touch Screen on Nubia Z50 Ultra | Dr.fone
- Author: Ariadne
- Created at : 2024-10-23 18:29:24
- Updated at : 2024-10-28 18:51:11
- Link: https://howto.techidaily.com/how-to-fix-unresponsive-touch-screen-on-nubia-z50-ultra-drfone-by-drfone-fix-android-problems-fix-android-problems/
- License: This work is licensed under CC BY-NC-SA 4.0.