
How To Fix Unresponsive Touch Screen on Samsung Galaxy Z Flip 5 | Dr.fone
How To Fix Unresponsive Touch Screen on Samsung Galaxy Z Flip 5
With the increase in our reliance on smartphones, having touchscreen problems on your device can be annoying. Sometimes, it’s even more frustrating than a physically broken screen because you don’t know where the issue is coming from.
If your touchscreen is malfunctioning or doesn’t work correctly, you cannot interact with your device. On this page, you’ll learn general phone touch problems on Android and how to get rid of them. Now explore the article to learn more.

Part 1: Why Is My Android Experiencing Touch Screen Problems
Below are some of the most common reasons you’re experiencing touch problems on your Android smartphone.
- The touchscreen problemfreezes your phone, lags, or hangs.
- Some parts of the screen work fine, but some don’t.
- Your screen responds inaccurately (typing “a” gets you “q” or “z”).
- The touchscreen is automatically operating itself, resulting in ghost touch.
- It doesn’t respond to any taps, and the phone’s screen has stopped working.
- The device is physically damaged, or the screen is cracked or broken.
- Outdated devices are prone to the black/white/blue screen of death.
Part 2: Tips, Fixes, and Workarounds To Fix Your Samsung Galaxy Z Flip 5 Touch Problems
If any of the outlined reasons above are the cause of your touch screen malfunctioning, here are some solutions to fix it.
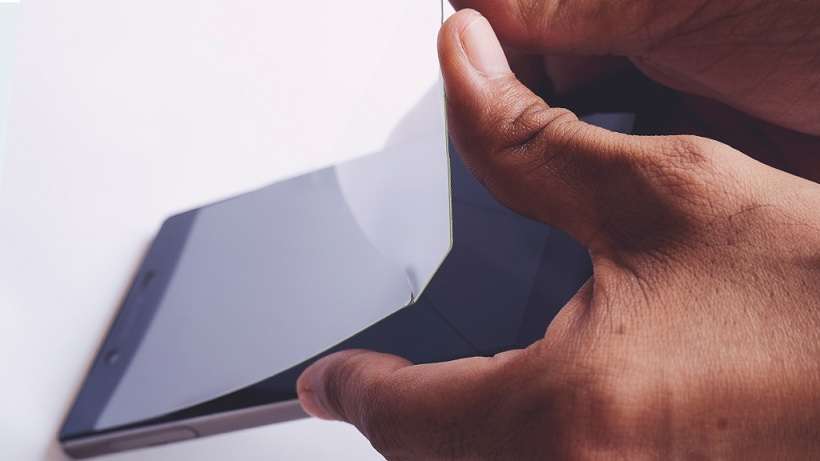
Method 1: Remove the Screen Protector and Phone Case
Some phone cases and screen protectors cause touch problems on your Android screen. This issue is prevalent if you recently changed your phone case or screen protector. It may be due to incompatibility, but you should remove them to see if your phone starts responding again.
Method 2: Clean Your Android Smartphone
A touchscreen malfunctioning can also be a sign of a dirty display. Since the screen relies on contact between your fingers and the touchpad to perform actions, this also applies to foreign particles such as dirt, debris, smudges, oil, and more. Clean your touchscreen with wipes or a soft cloth by gently wiping over the screen.
Method 3: Stop Using Your Android Device for a While
Touch problems also arise due to abnormal temperature changes. Your phone might experience ghost touch if it’s too cold or hot. For your screen to function correctly, it needs to be in a temperate environment. Remember to take breaks between phone usage, especially when the phone gets too hot. Avoid using your device under hot conditions, direct sunlight, or anything affecting your phone’s normal temperature.
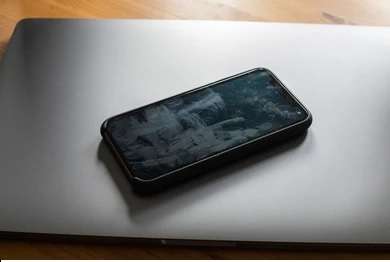
Method 4: Restart Your Android
Performing a reboot sounds trivial with such a complicated issue. But sometimes, it’s often the most successful way to fix a touchscreen problem on an Android device. Restarting your Android shuts down and resets all background services, which may have led to your issue.
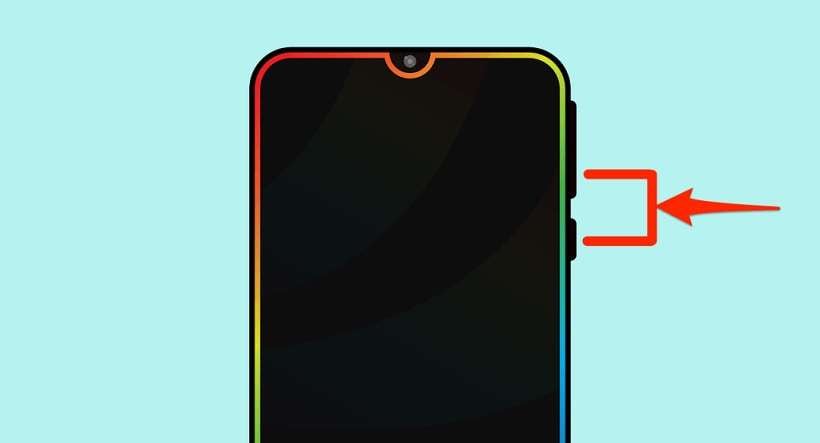
To restart your Android, press and hold the Power button for several seconds to switch off your phone. In other smartphones, you may need to hold down the Power button as well as the Volume Down button at the same time.
Method 5: Factory Data Reset Your Android
Before attempting to have your device checked for any hardware defects, you should try completing a Factory Reset. To do this, go to Settings > Backup and Reset. Next, tap on Factory data reset > Delete all.
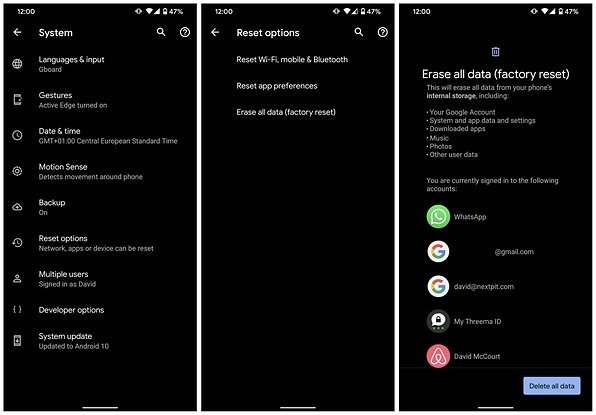
Performing a Factory Data Reset will erase all your data and restore your device to its factory default settings. Creating a backup before doing this step is recommended, as you will lose all your personal data once the process starts.
Method 6: Put Your Android into Recovery Mode
If all else fails, placing your Android into Recovery Mode should be a last resort. Doing this method works similarly to the method above. You should perform this method if the screen is unresponsive and only the buttons on your Android are functional. Here’s how.
Note
Placing your Android into Recovery Mode is different depending on your Android smartphone. Refer to your owner’s manual to see which method is right for your Samsung Galaxy Z Flip 5.
Step 1A: Press and hold the Power button and Volume Down buttons at the same time. Continue holding both buttons until the screen starts.
Step 1B: If your Samsung Galaxy Z Flip 5 still has a Home button, press and hold the Home button and the Power button at the same time. Continue holding them until the screen starts.
Step 1C: If step 1A did not put your Android into Recovery Mode, press and hold the Power and Volume Up and Down buttons simultaneously. Continue pressing all three until the screen starts.
Step 2: Use the Volume buttons to navigate the choices, select Wipe data/factory reset, and confirm your choice with the Power button.
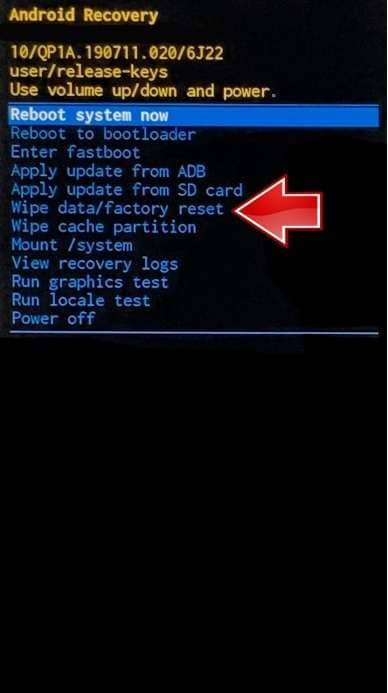
Step 3: Wait for the process to complete and for your Samsung Galaxy Z Flip 5 to restart automatically.
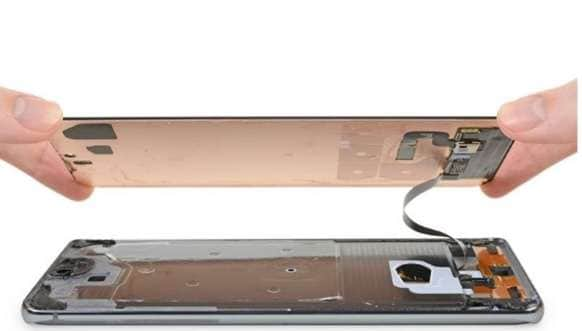
Method 7: Replace Your Android Touchscreen
If doing all the earlier workarounds and fixes couldn’t resolve the touchscreen problem, it could be the screen itself. While replacing the touchscreen yourself is possible if you have the technical know-how, it’s still best to bring it to a professional to prevent further damage. You should have your Samsung Galaxy Z Flip 5 checked by a technician if the screen is getting weak, has water damage, or has failing screen components.
 “
“
Method 8: Bring it to an Authorized Service Center
Your phone touch problem might not be caused by the screen, even when you had it replaced. If your Android is still unresponsive, it’s best to bring your smartphone to an authorized service center or directly to the phone manufacturer, especially when all efforts are exhausted.
Part 3: How To Fix Android Touch Problem With an Alternative
If all the general phone touch problems on your Samsung Galaxy Z Flip 5 persist, you should strongly consider Wondershare Dr.Fone to do the job. The program can fix all Android system issues without any required skills. Problems caused by the operating system or software, such as the black screen of death, boot loop, ghost touch, and more, are done within less than 10 minutes with the program.

Key Features
Dr.Fone – System Repair (Android) has many features you can immediately take advantage of. Here are some of them below.
- Fix All Android Problems In Minutes
Wondershare Dr.Fone allows you to fix all touchscreen problems on your smartphone within less than 10 minutes. Moreover, it has a high success rate making it one of the most reliable tools available today.
- Supports up to 1000+ Android Models
The program supports almost all Samsung Galaxy Z Flip 5 models and other Android devices, whether unlocked or from a carrier. Dr.Fone is equipped with all the proper firmware to flash your Samsung Galaxy Z Flip 5 with just a few clicks. In addition, it has handy on-screen instructions to help you complete the whole process with ease.
Pros and Cons
Here are the pros and cons of using Dr.Fone – System Repair (Android) to know if you’re still undecided.
Pros
- The user interface is clutter-free, making it highly beginner-friendly.
- The fast processing time to fix your Samsung Galaxy Z Flip 5 means you can do more in less time.
Cons
- The free version only works until you see if your Samsung Galaxy Z Flip 5 is compatible with the app. You will be required to enter a valid license once you initiate the repair process.
- If you own an iOS device, you’ll have to get the iOS version.
How To Fix Black Phone Screen With Wondershare Dr.Fone
Follow the step-by-step guide below to start fixing general phone screen problems on Android using Wondershare Dr.Fone.
Step 1: Download and install Wondershare Dr.Fone on your computer. Next, launch the program and connect your Samsung Galaxy Z Flip 5 to your computer.

Step 2: Click Start to initiate the setup on a new window. From there, select the Brand, Name, Model, Country, and Carrier of your Samsung Galaxy Z Flip 5 and click Next.

Step 3: Follow the on-screen instructions on the main program window to initiate the repair process. After that, wait for your Android smartphone to return to its original state.

Part 4: FAQs
Here are some FAQs you should remember when experiencing phone touch problems.
1. Does a Cracked Screen Affect Touch on an Android?
If you continue using a smartphone with a cracked screen, there are several implications. Your device will be vulnerable to further damage and might develop touchscreen problems,and your sensors will gradually begin to malfunction. The capabilities of your device are also compromised the longer you delay repairing it. Moreover, a cracked screen can put your fingers at risk of injury due to potential glass splinters.

2. How Do I Temporarily Fix a Cracked Screen?
If you can’t take your cracked screen to a repair shop, apply a small amount of vegetable oil or petroleum jelly to the screen. Doing this will not fix the issue but will make the cracks less noticeable. On the other hand, you can also apply a screen protector to safeguard your phone against further damage. The screen protector slows down or prevents the cracks from getting worse.
3. Can I Use Dr.Fone for Free?
You can download and install Dr.Fone – System Repair (iOS) or (Android) for free to evaluate the program’s offerings. You can do the first few steps to see if the app supports your device. However, you need to get the full version and enter a valid license code to repair your smartphone.
 safe & secure
4,471,551 people have downloaded it
Conclusion
If the touchscreen is malfunctioning on your smartphone, one of the fixes above should help solve the problem. If it did not solve the issue, consider using Dr. Fone – System Repair for iOS or Android when you need an all-in-one solution to all your phone screen problems.
However, if your screen is broken or cracked, going to an authorized service center is still your best bet, especially when your screen urgently needs a replacement. Delaying it further may hurt your wallet in the long run, so it’s best to fix it as soon as possible.
8 Workable Fixes to the SIM not provisioned MM#2 Error on Samsung Galaxy Z Flip 5
SIM cards are small chips that act as a connecting medium between your cell phone and your carrier. It is programmed to help your carrier identify your cell phone account with certain information. And eventually, you are enabled to make calls and to make use of mobile internet. Now, if your device is showing “SIM not provisioned” on Android then it signifies that the connection to carrier network cannot be established or perhaps, your carrier isn’t able to identify your cell phone account.
Part 1. Why does the error “SIM not provisioned MM#2” pop up?
There can be numerous reasons behind the pop up that reads “SIM not provisioned” on Android. But basically, it most probably affects the users who have registered a new SIM card. If you get to experience this issue in other situations or if the SIM is not working in Android, then the problem is with the SIM card and needs to be replaced. Anyways, here is a list of situations when the “SIM not provisioned” error may bother you.
- You got a new SIM card for your new phone.
- You are transferring your contacts into the new SIM card.
- In case, the carrier network provider’s authorization server is unavailable.
- Perhaps, you’re out of the reach of the carrier coverage area and that too, without active roaming agreement.
- Though new SIM cards work flawlessly. But it is often necessary to get your SIM card activated due to security reasons.
Just in case, you haven’t bought any new SIM card and the one you were using was working fine until now, then the most probable reasons behind it could be listed below:
- If your SIM card is too old, possibly it might have gone dead, try replacing it.
- Perhaps, the SIM card was not properly inserted into the slot or there might be some dirt between the SIM and smartphone pins.
A yet another reason could be that your SIM card got deactivated by your carrier provider as it could have been locked to a particular phone. Now, if you insert such a SIM card to another device or a new device even, you may get to witness a message that reads “SIM not valid”.
2.1 One click to fix the “SIM not provisioned MM#2” error on Android
Without talking any further, let’s straightly get to the first and the easiest way to repair SIM not provisioned issue on Android. For this purpose, we’re glad to introduce Dr.Fone - System Repair (Android) , one of its kind of tool that is capable of repairing almost all sort of Android OS issues in just a matter of few clicks. Whether it is SIM not provisioned on Android or SIM not working in Android or your device stuck in a boot loop or black/white screen of death. The most probable reason for these errors is Android OS corruption. And with Dr.Fone – Repair (Android) you can efficiently and effectively repair your Android OS in a hassle freeway.
Dr.Fone - System Repair (Android)
Android repair tool to fix “SIM not provisioned MM#2” error
- Fix any type of Android system issue with ease.
- Even novice users can use it without any hassle.
- Compatible with all major Samsung Galaxy Z Flip 5 smartphone models.
- Highest success rate in the market for fixing Android issues.
- Supports all Android OS versions.
3981454 people have downloaded it
Step by step Tutorial to fix “SIM not provisioned MM#2” error
Step 1. Connect your Samsung Galaxy Z Flip 5
Download and launch the Dr.Fone toolkit on your computer and then opt for the “System Repair” option from the main interface. Meanwhile, get your Samsung Galaxy Z Flip 5 connected with the computer using a genuine cable.
Step 2. Opt for Android Repair and key in important information
Now, hit on the “Android Repair” from the 3 options on the left, followed by hitting the “Start” button. From the upcoming screen, you’ll be asked to key in important device-related information, like brand, model, country, and carrier details. Hit “Next” afterward.

Step 3. Boot your device in Download mode
You must put your device in Download mode for better repairing of your Android OS. Simply follow the onscreen guide to boot your Android in DFU mode and hit “Next” thereafter. Once done, the software will automatically start downloading the most compatible and recent firmware for your device.

Step 4. Initiate Repairing
As soon as the download completes, the software verifies the firmware and automatically initiates repairing your Samsung Galaxy Z Flip 5. Within a short period, you’ll notice that your Samsung Galaxy Z Flip 5 has been successfully repaired.
 safe & secure
2.2 Ensure the SIM card is not dirty or wet
At times, the issue can be as simple as cleaning your SIM card and SIM slot properly. Ensuring that SIM is not wet either and then putting it back into its place. If this works, then the SIM not working in Android was due to the dirt or moisture that was preventing proper contact between SIM card pins and smartphone circuit.
2.3 Insert the SIM card correctly
If your SIM card was working properly until yet, there is a good possibility that the SIM card may have moved a bit from its actual location. Eventually, there is poor contact between the SIM card pins and the circuit. Try inserting your SIM card properly with the following steps.
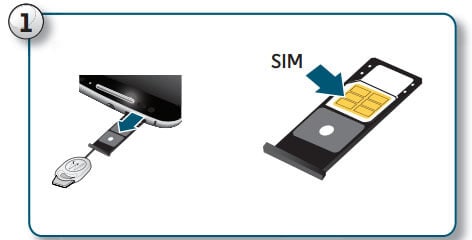
- Power off your Samsung Galaxy Z Flip 5 and with the help of Q pin, eject the SIM card holder from the SIM slot of your device.
- Now, grab a soft rubber pencil eraser and gently rub it in on the gold pins of SIM card to clean them properly. Then, with the help of a soft cloth wipe away the rubber residue from the SIM card.
- Next, push the SIM back into the SIM card holder properly and push it back into the SIM slot now.
- Turn your device back on and look if your SIM not provisioned on the Android issue is resolved or not.
2.4 Activate the SIM card
Usually, when you buy a new SIM card, it gets automatically activated within 24 hours of being plugged into a new device. But if that’s not happening in your case and you’re wondering how to activate SIM card, make use of the three options below to enable activation:
- Call your carrier service provider
- Send an SMS
- Log on to your carrier’s website and look for the activation page over it.
Note: The aforementioned options are straightforward and are quick ways to enable activation. It depends on your carrier network whether they support them.
2.5 Contact your carrier
Even if your SIM isn’t activated, grab another working device to make a phone call to your carrier or network. Ensure, to explain the entire situation and the error message to them. Be patient while they investigate the issue. It may eat up a heck load of time or may get resolved in a few minutes that completely depend upon the complexity of the issue.

2.6 Try the other SIM card slot
A yet another reason why SIM not working in Android can be because of the SIM card slot might have gone corrupted. Thanks to the dual SIM technology, you do not have to rush immediately to get it to check or repair. You can simply rule out this possibility by ejecting the SIM card from its original SIM slot and then replacing it into the other SIM card slot. If this solution did work out for you then it is obvious that the problem was with the SIM card slot that got corrupted. And hence, it was triggering SIM not responding issue.
2.7 Try the SIM card in other phones
Or just in case, you’ve still no joy and the SIM not provisioned on Android message is bothering you. Try making use of another Android device. Eject the SIM card from the Samsung Galaxy Z Flip 5 device which is creating problems and try plugging it into other Samsung Galaxy Z Flip 5] and other smartphones. Perhaps, this will let you know whether the issue is with your device only or with the SIM card itself.
2.8 Try a new SIM card
Still, wondering how to fix SIM not provisioned? Perhaps, nothing worked for you, right? Well, on that note, you must head to your carrier store and request a new SIM card. Also, inform them about the “SIM not provisioned MM2” error, they will be able to execute proper diagnostics over your old SIM card and hopefully get it resolved. Or else, they’ll equip you with a brand new SIM card and swap the new SIM card into your device and get it activated in the meantime. Eventually, restoring the normal functioning of your device.
Conclusion
In wrapping up, SIM not provisioned errors on Android can be troubling, but they’re certainly fixable. There are several methods, from a simple device restart to reaching out to your network provider. But if these don’t work, we suggest trying Dr.Fone - System Repair (Android) . This tool is known for its ability to handle an array of Android issues and could be just what your device needs. Navigate your tech challenges with ease using Dr.Fone.
safe & secure
9 Quick Fixes to Unfortunately TouchWiz has stopped Of Samsung Galaxy Z Flip 5
“Unfortunately TouchWiz home has stopped” is the talk of the town due to annoying TouchWiz UI, a front-end user interface developed by Samsung Galaxy Z Flip 5. Not to mention, the Samsung Galaxy Z Flip 5 has borne a whole lot of heat from its agitated users over the years and the reason is pretty much obvious due to the pre-installed bloatware apps and the theme launch “TouchWiz home”. That not just brutally annoys users and eats up a heck of internal storage space but lags up too often due to low speed and stability. As a result users end up with “Unfortunately TouchWiz home has stopped” and “Unfortunately, TouchWiz has stopped”. Apparently, there are several flaws in the design and functioning of this launcher and hence, Touchwiz keeps stopping or becomes unresponsive.
Part 1: Common scenarios when TouchWiz keeps stopping
Here in this section, we will introduce some scenarios that can be blamed for why TouchWiz is not working. Check out the following points:
- More often than not, the TouchWiz keeps stopping after an Android update. When we update our Samsung Galaxy Z Flip 5 device, the old data and cache usually conflicts with TouchWIz thereby cropping up this mess.
- When you disable some built-in apps, you might get in trouble with TouchWiz. Doing this sometimes can hamper the TouchWiz operation and raise the “**unfortunately TouchWiz home has stopped**” error message.
- Many times installing some third-party apps and widgets can cause this problem. The apps like launchers can be conflicting with TouchWiz home launcher and therefore cease it to work. Also, a glitched widget is responsible for the same i.e. forces stop the TouchWiz.
Part 2: 9 Fixes to “Unfortunately TouchWiz has stopped”
Fix “TouchWiz keeps stopping” by repairing Android system
When your TouchWiz keeps stopping and you aren’t able to proceed further, the best way to handle the situation is to repair the Android system. And the best that can help you to serve the purpose is Dr.Fone - System Repair (Android). It has the ability to fix any sort of Android system issue without any complications. To fix this issue, the tool only takes few minutes of yours and performs smoothly. Moreover, you don’t have to worry if you aren’t tech pro. This tool requires no special technical know-how. Here are the advantages you get with this tool.
Dr.Fone - System Repair (Android)
One click tool to fix “Unfortunately TouchWiz has stopped”
- A very easy tool that fixes problems in just one click
- Provides full support all day all night as well as offers 7 day money back challenge
- Enjoys higher success rate and considered as first tool carrying such amazing functionalities
- Able to fix wide variety of Android issues including app crashing, black/white screen of death
- Fully secured and no harm regarding any virus infection
3,211,972 people have downloaded it
Step 1: Download the Program
The one-click repairing process begins with downloading Dr.Fone from its official website. When it is downloaded, follow the installation steps. Upon successful installation, launch the tool on your PC.
Step 2: Connect your Samsung Galaxy Z Flip 5 Device
After you open the software, hit on the “System Repair” button from the main interface. With the help of a genuine USB cable, get your Samsung Galaxy Z Flip 5 phone and connect it with the computer.
Step 3: Choose the Tab
Now, from the next screen, you are supposed to choose “Android Repair” tab. It is given on the left panel.
Step 4: Enter Right Information
Please keep your mobile details handy as you will need them in the next window. You will need to enter the correct brand, model, and country name etc. for better detection of your device.
Step 5: Confirm Actions
This process may result in removing your data hence we strongly recommend you to keep a backup of your data.
Tip: You can use Dr.Fone – Phone Backup (Android) to backup your Samsung Galaxy Z Flip 5 device in case you’re wondering how.
Step 6: Take your Device in Download mode
You will get some instructions on your screen to keep your device in Download mode. Follow them according to the Samsung Galaxy Z Flip 5 device you own and hit “Next”. When you do this, the program will detect your device and let you download the latest firmware.

Step 7: Repair Device
Now, when the firmware is downloaded, the program will itself begin to repair your device. Wait and keep the Samsung Galaxy Z Flip 5 device connected until you get the notification for process completion.
Clear the cache data the TouchWiz
Maximum Android devices are designed to deleted cache data upon getting updated to the newest Android system. However, Samsung Galaxy Z Flip 5 stands as an exception in such case. And therefore, many times TouchWiz starts stopping right after upgrading. Thus, due to the collection of cache data, TouchWiz can display error. This calls for removing the cache from TouchWiz and run things smoothly. Here is how to do this:
- Tap on “Apps” from the Home screen firstly.
- Launch “Settings” afterwards
- Look for “Applications” and tap on it followed by “Application Manager”.
- When Application Manager gets opened, swipe towards right to get into the “All” screen.
- Now, choose “TouchWiz” and tap “Clear Cache”.
- Now, tap “Clear Data” followed by “OK”.
- Now restart your device.

Please note that this will delete all your Home screens post this method.
Disable Motion & gesture settings
The functions regarding Motions and Gestures can be responsible for why TouchWiz home has stopped in your device. Usually the Samsung Galaxy Z Flip 5 devices running on Android version less than Marshmallow are prone to encountering this issue. Or the Samsung Galaxy Z Flip 5 devices having modest specs often fall prey to the issue. When you disable these settings, you might get out of the problem.
Change the Animation Scale
When you use TouchWiz, it may consume higher memory usage for high amount of graphic maintenance. As a result, the “**unfortunately TouchWiz home has stopped**” error might crop up. Taking this into consideration, you should try reconfiguring the animation scale and get rid of the error. Here’s how:
Clear Cache Partition
In case the above steps didn’t figure out the problem, here is the next tip. This method can be counted as one of the most effective one. Because it is able to fix minor issues in Android devices, we recommend you for “**TouchWiz home has stopped**” issue too. Let us know how you can do it:
- Turn off your Samsung Galaxy Z Flip 5 device.
- Start pressing and holding “Volume Up” and “Power” buttons simultaneously.
- Keep doing this until you see the Android screen. This will take your device into recovery mode.
- You will observe some options on the screen. Take help of Volume buttons, scroll down to choose “Wipe Cache Partition”. Press Power button to confirm and the Samsung Galaxy Z Flip 5 device will be rebooted.

Check now if the error is eliminated. If unfortunately not, please try the following solution.
Enable the easy mode
For some users, enabling Easy Mode has been of great assistance. This feature aims to make the user experience more efficient by simply eliminating complex features. The Easy Mode removes those features that confuse the users by messing up the screen. Hence, we suggest you to switch to this mode in order to remove “**TouchWiz not working**” problem. The steps are:
- Open “Settings” and go to “Personalization”.
- Hit on “Easy Mode” now.

Hope the TouchWiz won’t keep stopping error does not pop up anymore!
Boot your phone to safe mode
Here is the next solution to be followed when TouchWiz keeps stopping. As we already said, third-party apps can cause this issue, booting your device in the Safe mode will disable those apps temporarily. Hence you need to boot your Samsung Galaxy Z Flip 5 device to Safe mode and check if the reason is any third-party app.
- Switch off your device to initiate.
- Press “Power” button and keep doing this until device’s logo appears on the screen.
- When you see logo appearing, instantly release the button and start holding “Volume Down” button.
- Keep holding until rebooting finishes.
- You will now witness “Safe mode” on the bottom screen. You can now release the button.

Reset Factory settings
If the above method went futile and you’re still at the same place, then factory reset is the next logical step to be taken. We suggest this method because it will take your device to its factory state. As a result, TouchWiz will probably get normal and work perfectly.
Along with this, we would also suggest you go take backup of your data so that you won’t lose any of the personal information from your device after performing factory reset. For your convenience, we have stated the backup steps too in the following guide. Have a look:
- Run “Settings’ in your device and go to “Backup & Reset”.
- Notice if “Back up my data” is enabled or not. If not, turn it on and create backup.
- Now, scroll for “Factory Data reset” option and confirm it by clicking “Reset Phone”.

- Wait a few minutes and your device will reboot.
Install a new launcher to replace TouchWiz
We believe that you will find the above methods helpful. However, if still in case your TouchWiz is not working, we advice you that you should install a new theme launcher in your device. It will be a wise option to ditch TouchWiz in such scenario rather than tolerating the problem. Hope this advice will help you.
Also read:
- [New] Top Cricket Ultimate Guide to Live Streaming Selection
- [Updated] 2024 Approved Nikon KM-170 VS Hero Black A Tough Decision
- 2024 Approved Permission to Browse Friends' Media Content on SMS/Chat Services
- 9 Solutions to Fix Google Pixel 7a System Crash Issue | Dr.fone
- Android Safe Mode - How to Turn off Safe Mode on Vivo Y27s? | Dr.fone
- Easy Access to BDSMSTREAK Video Content Through BDSMSTREAK Downloader Tool
- Fix the Error of Unfortunately the Process.com.android.phone Has Stopped on Xiaomi Redmi A2+ | Dr.fone
- Step-by-Step Disabling of Windows 10 Driver Signature Checks
- Stuck at Android System Recovery Of Sony Xperia 1 V ? Fix It Easily | Dr.fone
- Top Apps and Online Tools To Track Nubia Z50S Pro Phone With/Without IMEI Number
- Transcoding Made Easy: Get Free VOB-to-MPG Conversion Using the MovieVillage Platform
- Troubleshooting Guide How to Fix an Unresponsive Xiaomi 14 Ultra Screen | Dr.fone
- Title: How To Fix Unresponsive Touch Screen on Samsung Galaxy Z Flip 5 | Dr.fone
- Author: Ariadne
- Created at : 2024-10-22 19:02:07
- Updated at : 2024-10-28 18:34:05
- Link: https://howto.techidaily.com/how-to-fix-unresponsive-touch-screen-on-samsung-galaxy-z-flip-5-drfone-by-drfone-fix-android-problems-fix-android-problems/
- License: This work is licensed under CC BY-NC-SA 4.0.