
How to Quickly Fix Bluetooth Not Working on Samsung Galaxy S24 | Dr.fone
How to Quickly Fix Bluetooth Not Working on Samsung Galaxy S24
One of the key features of an Android device these days is the Bluetooth technology. This is such an important part of the phone that many of us take for granted, but as soon as the feature stops working, it can cause all kinds of problems.
Fortunately, despite there being many reasons why a problem could occur to your Bluetooth feature, there are also plenty of fixes. Today, we’re going to share with you the complete guide that details everything you need to know to get your Bluetooth up and running once again as quickly as possible.
Let’s get straight into it!
Part 1. About Bluetooth Not Working on Android
Of course, the most common problem to occur with Bluetooth technology in your Samsung Galaxy S24 is when it doesn’t connect to the Samsung Galaxy S24 device you’re trying to link it to. This could be anything from a Bluetooth headset or headphones, to a portable speaker or even an in-car audio system.
However, the problems don’t stop there. You may have problems with turning your Bluetooth settings on through your actual device. Perhaps the software simply isn’t loading, or maybe the Bluetooth feature keeps turning itself off randomly.
Due to the complicated nature of Bluetooth technology, there could be many reasons as to why your Bluetooth feature is playing up in this way, but that doesn’t mean it can’t be fixed. For the rest of this guide, we’re going to explore the nine need-to-know ways you can fix the Bluetooth problems not working on your Samsung Galaxy S24 as quickly as possible.
Part 2. 9 fixes for Bluetooth not working on Android
2.1 One click to fix Android Bluetooth issues due to Android system
Since Bluetooth is an internal technology, this indicates there’s a problem with the software or firmware of your Samsung Galaxy S24. If something’s broken, this means you need to fix it. Fortunately, there’s a quick and easy way to do this using software known as Dr.Fone - System Repair (Android).
Dr.Fone - System Repair (Android) is a powerful Android repair tool which is hailed as many as being on the best software applications in the industry. With all the tools you need to repair your phone not just for Bluetooth errors, but basically any internal firmware problems, this is a one-shot-tool that gets the job done.
Dr.Fone - System Repair (Android)
Android repair tool to fix Bluetooth issues in one click
- Can fix most internal software and firmware issues
- Trusted by over 50+ million people around the world
- Supports over 1,000+ unique Android brands, manufacturers, and devices
- Incredibly user-friendly and easy-to-use
- Compatible with all Windows computers
3981454 people have downloaded it
To ensure you have the best experience while using the Dr.Fone - System Repair (Android) software, here’s a complete step-by-step guide on how it works when fixing your Android’s Bluetooth problems.
Step One Make your way over to the Wondershare website and download the Dr.Fone - System Repair (Android) software to either your Mac or Windows computer. Install the downloaded file by following the on-screen instructions. Once installed, open the software, so you’re on the Main Menu.

Step Two Connect your Samsung Galaxy S24 to your computer using the USB cable, wait a couple of seconds, and then click the System Repair option. On the Menu on the left, click Android Repair, and then press Start.

Step Three Next, use the drop-down menus to make sure all the information about your specific device is correct, including your device, operating system number, and carrier information. Click Next to confirm your selections.

Step Four When prompted, put your phone into Download Mode needed for repairs. You can do this by following the on-screen instructions which will depend on which device you have and the available buttons.

Step Five The software will now begin the repair process. This will happen automatically, and all you’ll need to do is make sure your device doesn’t disconnect during this process, and your computer doesn’t turn off.

When the repair process has been completed, you’ll receive the screen below, which means you can try again if the process didn’t work, or you can disconnect your Samsung Galaxy S24 and start using it and your Bluetooth features.
2.2 Restart Android and turn on Bluetooth again

One of the most common solutions in technology is simply to turn it on and off again, which is the case to happen here. By restarting your device, you can clear out any problems you may be suffering from to help it get up and running again. Here’s how;
- Turn your Samsung Galaxy S24 off by holding down the Power button
- Wait for several minutes and then turn your phone on again
- Wait for your phone to completely power up, so you’re on the Main Menu
- Navigate Settings > Bluetooth and then enable the setting
- Try to connect your Bluetooth device to what you were trying to do before
2.3 Clear the Bluetooth cache


Every service on your Samsung Galaxy S24 using a feature called a cache. This is where information is stored to help the feature run properly and give you the best experience. However, over time this can get messy and can cause problems with your Bluetooth feature.
By clearing the cache, you can restart the service and hopefully clear up any issues or problems you may be experiencing.
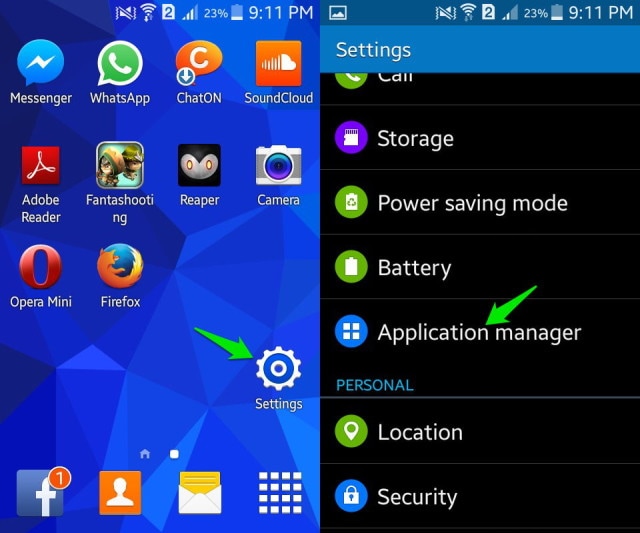
- On your phone, navigate Settings > Application Manager, and you’ll see all the apps and services on your phone. Locate and select the Bluetooth service.
- Select the Storage option
- Tap the Clear Cache option
- Go back of the Menu and restart your phone
- Now turn your Bluetooth feature on and turn connecting it to your preferred device
2.4 Remove paired devices

Sometimes, you may have a problem with the Samsung Galaxy S24 device you’re trying to connect to via Bluetooth, especially if this is a device you’ve updated. To counter and repair this, you’re going to need to remove the paired devices saved with your device and then reconnect them.
Here’s how;
- From the Main Menu of your Samsung Galaxy S24, head to Settings > Bluetooth > Connected Devices.
- Turn Bluetooth on, and you’ll see all the connections your Samsung Galaxy S24 is paired with
- Go through these settings and remove/delete/forget every connection on your device
- Now when you go to connect to a device using Bluetooth, repair the Samsung Galaxy S24 device, enter the passcode, and use a fresh paired connection.
2.5 Use Bluetooth in safe mode

If you’re having problems with your connection and paired devices, sometimes you may have conflicting software faults in your device that are causing the problems. If this is the case, you’ll need to boot your Samsung Galaxy S24 in Safe Mode.
This is an operating state in which your phone will run the bare minimum services it needs to perform. If your Bluetooth works in Safe Mode, you know you have an app or a service that’s causing the problem.
Here’s how to find out;
- Hold the power button down, so the Android power menu turns on
- Long-press the power button again and the restart in Safe Mode option will come up
- The phone will automatically boot into Safe Mode
- Wait a minute on the Main Menu
- Now turn on your Bluetooth and connect it to your preferred device
2.6 Turn on the discoverable feature

To ensure your Bluetooth can connect to other devices, it’s important to make sure you’re making your device discoverable to other Bluetooth devices. If it’s hidden, other devices won’t be able to find it, and sometimes it can bug and prevent connections.
Here’s how to turn on your Bluetooth discoverable feature;
- From the home screen of your Android, navigate to the Menu> Settings > Bluetooth
- Toggle the Bluetooth switch, so it’s on
- Under the available settings, tick the box that allows your Bluetooth device to be discoverable
- Turn your Bluetooth feature on and connect to the Samsung Galaxy S24 device you’re trying to connect too
2.7 Exclude Bluetooth issues of the other device

Sometimes, you might not even have a problem with your Samsung Galaxy S24, but rather the Bluetooth device you’re trying to connect to, whether that’s a Bluetooth speaker, an in-car entertainment system, or any other kind of Bluetooth device.
By testing out another Bluetooth device to see if it will work with your preferred device, you can rule this out from being the issue.
- Disconnect your Samsung Galaxy S24 from the Bluetooth device and turn your Bluetooth off
- Now take another Bluetooth device and connect this to the Samsung Galaxy S24 device you’re trying to connect too. This could be another Android device, or even a computer or iOS device
- If the new device doesn’t connect to your Bluetooth device, you’ll know there’s a problem with your Bluetooth device, not your Samsung Galaxy S24
- If the Samsung Galaxy S24 devices connect, you’ll know there’s a problem with your Samsung Galaxy S24
2.8 Place both devices within close proximity

One of the common misconceptions of Bluetooth is just how far the wireless range is of the service. You need to make sure your devices are well and truly close to each other to make sure a stable connection can be formed.
The further away the Samsung Galaxy S24 devices are from each other, the less likely the connection will remain secure. As a rule of thumb, Bluetooth can work up to 100 meters, but to play it safe, always try and keep your devices under 50m apart.
2.9 Avoid interference of other Bluetooth sources

The final consideration you’ll want to think about is that Bluetooth radio waves, or wireless waves, can interfere with each other. This means they can bounce off each other or get muddled up and make things confusing from your devices.
With this in mind, you’ll want to make sure you’re limiting the amount of Bluetooth activity in the area where you’re trying to use a device. While uncommon, this could be the problem.
To fix this issue, turn off all the Bluetooth connections in the area. This includes computers, laptops, mobile phones, tablets, and any other Bluetooth devices you may have. Then, try connecting your Samsung Galaxy S24 to the Samsung Galaxy S24 device you were trying to use. If it works, you know you were experiencing Bluetooth interference.
9 Solutions to Fix Samsung Galaxy S24 System Crash Issue
Android crash, better known as Android system crash is not a recent issue and has troubled many users in the past as well. It means when your device crashes suddenly and refuses to turn on again or when your device freezes and becomes unresponsive. It may also happen that your Samsung Galaxy S24 crashes abruptly but boots up normally only to crash again after a few minutes or hours. Android Crash sounds like a very serious problem and something that could damage your device or permanently destroy the software, but Android system crash can be dealt with easily. Just in case you suffer from an Android crash and want to know how to fix the Android system crash issue, rest assured that this problem is fixable. There are various ways to tackle the situation, to be discussed further, and you may choose the one that best suits you.
In this article, we will also talk about a unique technique to retrieve the data from your device on which Android system crash issue occurs. So let’s go ahead and read on to know more to fix the Android crash error.
Part 1: How to rescue data the Android system crashes?
When you encounter an Android system crash, before looking for solutions to fix it, make sure you retrieve all your data and information stored on your device. This might sound tedious but a very important step indeed.
Dr.Fone - Data Recovery (Android) is currently one of the most popular tools to retrieve data from not only broken or damaged, locked devices, and unresponsive devices but also from devices that face an Android system crash. You may try the software for free for scanning the data to understand its work. Dr.Fone’s Data Extraction tool not only retrieves and back-up contacts and messages but also your photos, videos, audio files, WhatsApp, docs, call logs, and other file folders. It is also equipped to retrieve data from the Samsung Galaxy S24 device’s internal memory as well as Google drive.
Dr.Fone - Data Recovery (Android)
World’s 1st data retrieval software for broken Android devices.
- Recover data from broken devices or devices that are damaged in any other way such as those stuck in a reboot loop.
- Highest retrieval rate in the industry.
- Recover photos, videos, contacts, messages, call logs, and more.
- Compatible with Samsung Galaxy S24 devices.
3,623,313 people have downloaded it
You may follow the steps given below to rescue your data from crashed Android devices.
1. Download and install the software on your PC. Run the software and then select the Data Recovery feature. Using a USB, connect your Samsung Galaxy S24 to the PC.
2. Select “Android” > “Recover from Broken Phone” in the lower right corner.

3. Choose the “Touch screen not responsive or cannot access the phone” to continue.

4. You will now see device options before you. Select yours and move on to feed in your device name and model details.

5. Now press the volume down, power, and home button on your device together to boot the phone in Download mode.

6. As long as your phone is in Download mode, the software will start to analyze phone data.
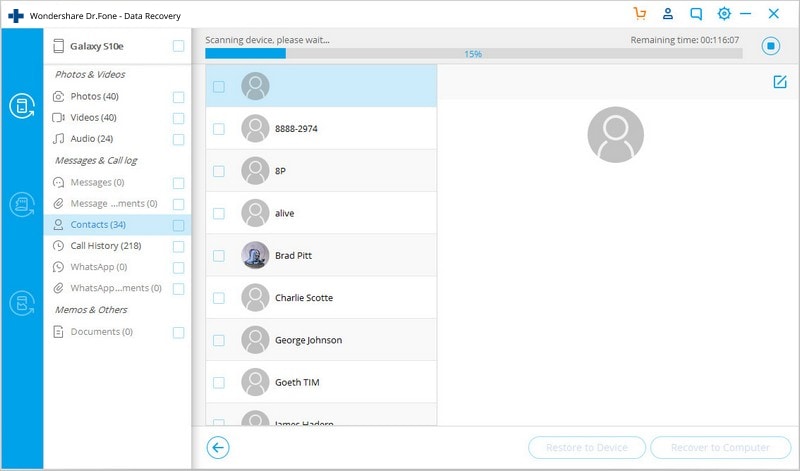
7. Finally, the process will take a few minutes to scan and display your phone data. Select “Recover to Computer” to retrieve all data on your PC as a backup.

Using Dr.Fone Damage Extraction software is intuitive and very safe. It prevents data loss and allows you to adopt various ways to recover your device from the Android system crash issue.
 safe & secure
Part 2: Why does my Android phone system keep crashing?
Encountering a persistent issue like the Android phone system constantly crashing can be highly frustrating and disruptive. This part delves into the underlying causes of this problem. By understanding these reasons, you can take informed steps to troubleshoot and rectify the issue, ensuring a smoother and more enjoyable smartphone experience.
- Software Glitches and Bugs
- Incompatible or Poorly Optimized Apps
- Outdated Operating System
- Corrupted System Files
- Malware and Security Threats
- Hardware Overheating
- Physical or Hardware Issues
A crashing Android phone system can be attributed to a variety of factors, ranging from software glitches and compatibility issues to hardware-related problems. Keep reading to get it solved!
Part 3: Restart your Samsung Galaxy S24
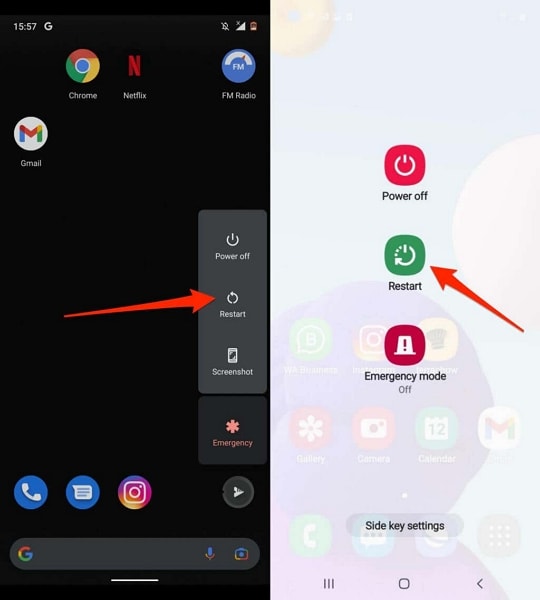
Once you have successfully retrieved your data, consider solving the Android crash issue as soon as possible. Before you redirect to a proper solution for repairing your Samsung Galaxy S24 system, you can try restarting your device as a quick remedy. Restart the Android device to clear temporary system data and potentially resolve any software glitches causing the crash, which can be done as follows:
Instructions: Hold your Samsung Galaxy S24’s “Power” button on the side of the phone. As the following window appears on the screen, select the “Reboot” option to restart the Android device successfully.
Part 4: Shut down unnecessary running apps
Another quick solution to avoid Android devices crashing is to shut down unnecessary apps running in the Samsung Galaxy S24 device’s background. To cater to that, you need to try out the following steps as a remedy to shutting down unwanted applications:
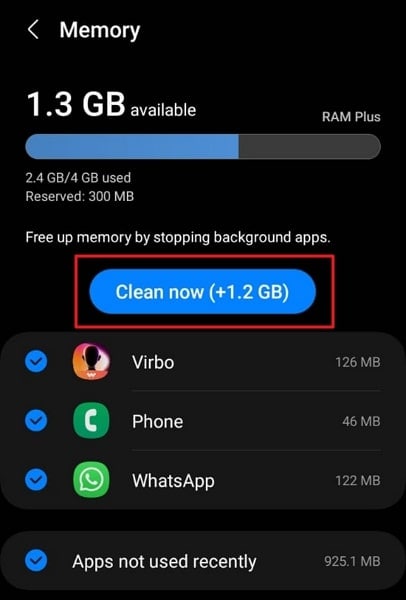
Step 1: Open the “Settings” of your Samsung Galaxy S24 and continue to the “Battery and device care” section from the available options. Continue to the “Memory” section on the next window to lead to the applications taking up space on your Samsung Galaxy S24.
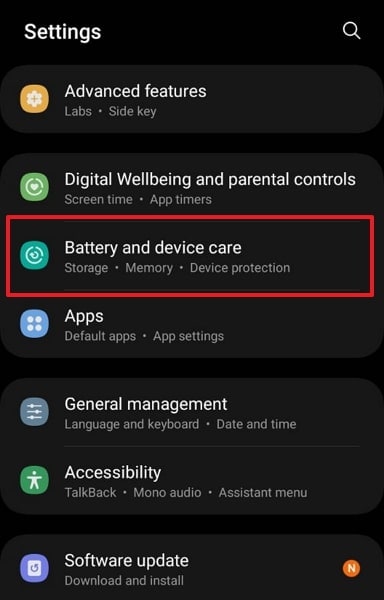
Step 2: As you progress further, you need to select the “Clean now” button to shut down all unnecessary background applications running on the Android.
Part 5: Uninstall incompatible Apps to fix Android crash issue
If your Android system crash takes place frequently but the Samsung Galaxy S24 device turns on normally after that, there is a chance that some Apps may be causing the problem. Unnecessary and large App files burden the Samsung Galaxy S24 device system and force it to crash every now and then. Make sure you download, install and store only those Apps which are fully compatible with your Android system. DO NOT download Apps from other unknown sources and use only Google Play store for the purpose. All other incompatible Apps must be deleted to prevent them from tweaking your software.
To uninstall unwanted and incompatible Apps, please follow the steps below.
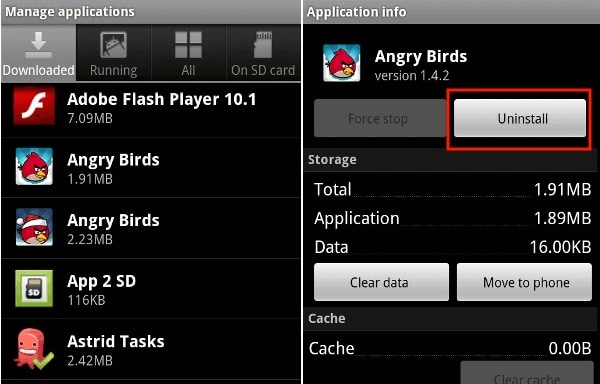
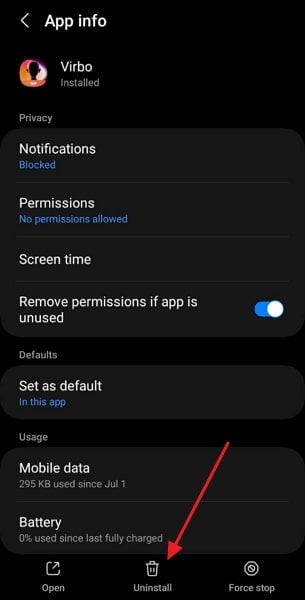
1. Visit “Settings” and search for “Application Manager” or “Apps”.
Select the App you wish to uninstall. From the options that appear before you, click on “Uninstall” to delete the App from your device.
You may also uninstall an App directly from the Home Screen (only possible in certain devices) or from the Google Play Store.
Part 6: Check Android storage and free up space
If you are constantly facing issues of your Samsung Galaxy S24 crashing, there is a possibility that your device’s storage is full. The need to free up space arouses the need to know about the potential steps for checking storage and cleaning up space, which is discussed as follows:
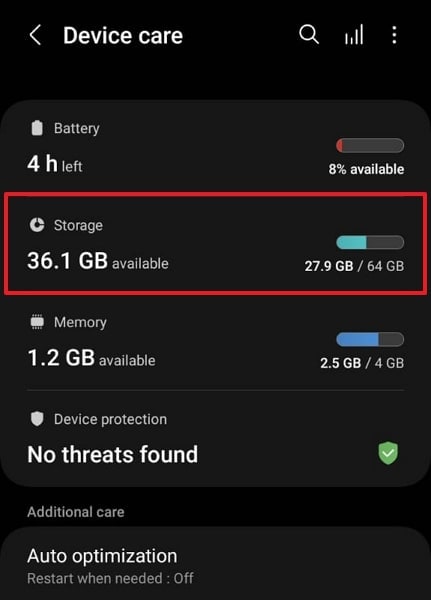
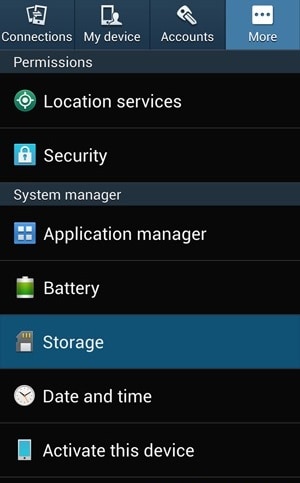
Step 1: You need to navigate into “Settings” and look for the “Battery and device care” section. As you lead next, select the “Storage” option to check the Android storage and see how it is segregated.
Step 2: As you navigate to the next screen, you can free up space by removing the applications from your Android. For that, tap on “Apps” to open a section containing the list of applications installed on the Android.
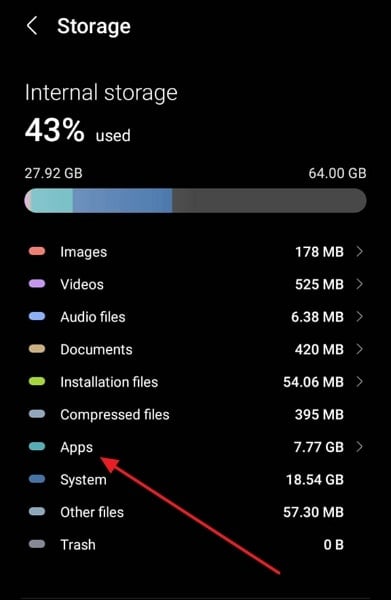
Step 3: Go through the list of applications and select any app you want to remove. As you navigate next, select “Uninstall” to lead to removing the app from the Android device.
Part 7: Clear cache partition to fix Android crash issue
Clearing cache is a good idea because it cleans your device and reduces the burden on the Android software and gives it enough space to function normally and carry out its operations.
In case the Android system crash issue is temporary, follow the steps given below to clear your device’s cache:
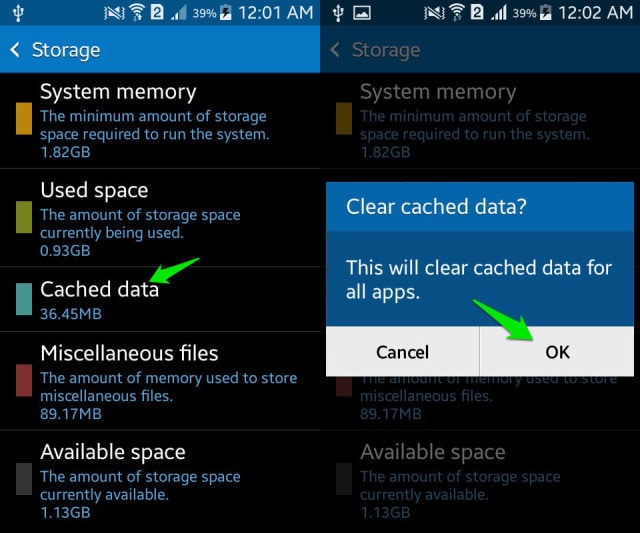
1. On your Samsung Galaxy S24, visit “Settings” and find “Storage”
2. Now tap on “Cached Data”, and then click “OK” to clear all unwanted cache from your device as shown above.
However, if the Android crash problem is such that your phone has frozen, becomes unresponsive, and does not turn on, you must first boot into the Recovery Mode screen.
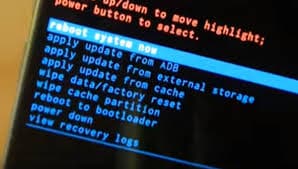
1. Press the volume down button and power button together until you see a screen with multiple options before you.
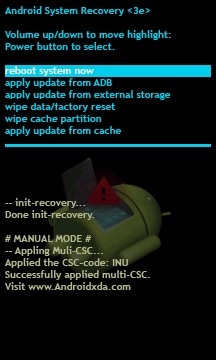
2. Once you are on the Recovery Mode screen, use the volume down key to scroll down and select ”Wipe cache partition” as shown below.

3. After the process is completed, select “Reboot System” which is the first option in the recovery mode screen.
This method will help you erase all the clogged-up and unwanted files and resolve the Android system crash issue. If clearing cache doesn’t help, try formatting your SD Card.
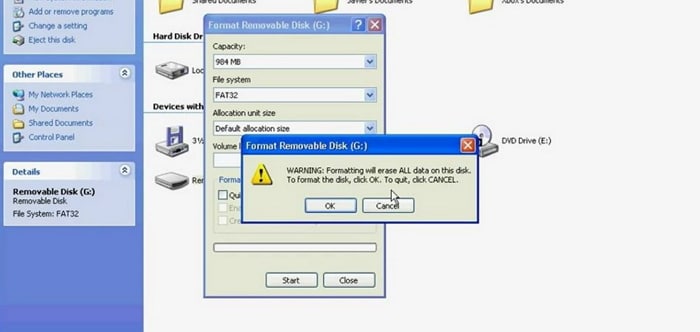
Part 8: Remove the SD card to fix the Android crash issue
Removing and formatting your SD Card to fix the Android System crash issue is helpful when a corrupted SD Card disturbs the Android software forcing it to shut down suddenly.
To format your SD Card, just follow the instructions below.
1. Firstly, eject it from the Samsung Galaxy S24 device.
2. Then using an SD Card reading tool, insert the Card in your PC. Open Computer and then right-click on the SD card to format it.
Part 9: Update to the latest software version
Updating the Android device will cast out all glitches that prevent it from operating properly. For that, let’s look into the steps explaining how to update your Android software version to the latest option:
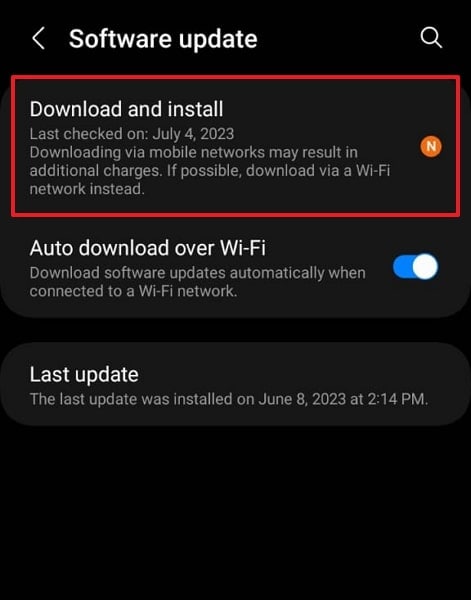
Step 1: As you lead into the “Settings” of your Android, scroll down and look for the “Software Update” option.
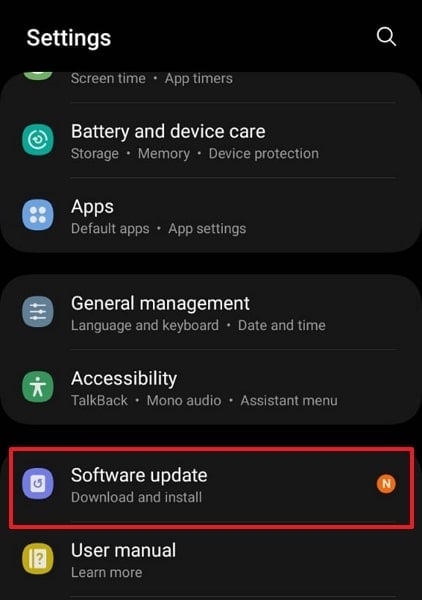
Step 2: On leading to the next screen, select the “Download and Install” option to continue updating your Android to the latest version.
Part 10: Use Wondershare Dr.Fone – System Repair To Fix Android System Crash
If you are not getting any specific solution to the problem, you can try fixing the Android system crash problems using specific tools. These third-party tools can be an excellent option for resolving system errors in Android devices. Wondershare Dr.Fone – System Repair (Android) is a great tool designed to resolve all system issues in Samsung Galaxy S24] and other smartphones.
It features a great system providing a one-click Android repair option for fixing all kinds of problems. Along with fixing all basic and advanced Android system issues, it features support for multiple Android devices.
Key Features of Wondershare Dr.Fone – System Repair (Android)
![]()
Dr.Fone - System Repair (Android)
Repair Android System Errors without Any Trouble.
- Fix your Android to normal, no skills required.
- Fix various Android system issues, stuck in boot loop , black screen , or won’t turn on , looping on start, etc.
- The high success rate in resolving Android system issues.
- Compatible with a wide range of Android devices and OS versions
- User-friendly interface with easy-to-follow steps.
3981454 people have downloaded it
As we redirect to resolving Android system errors using Wondershare Dr.Fone – System Repair, let’s look into some essential features that make up the entire tool:
- Features support for all the latest Android devices up to Samsung Galaxy S24 S22.
- It can help you resolve issues like Android’s black screen of death, being stuck in the boot loop, and many more.
- Provides an easy interface to execute procedures, making it a simple tool with no learning curve.
Steps To Repair Android System Crash Issue Using Dr.Fone – System Repair (Android)
Let’s redirect to the steps that can be used to repair Android system crash issues using Wondershare Dr.Fone – System Repair (Android):
Step 1: Launch and Open System Repair Tool
You need to download and install the latest version of Wondershare Dr.Fone on your computer. Proceed to launch and navigate into the “Toolbox” section. Look for the “System Repair” option and initiate the process while ensuring the Android device is connected to the computer through a USB cable.
Step 2: Start Repairing the Android
After selecting the nature of the Samsung Galaxy S24 device you want to repair, navigate to a new window where you need to click “Start” to initiate the system repair process.
Step 3: Define the Parameters of Device
You will be redirected to a new window where you need to define and verify some parameters before repairing the Android. Select the “Brand,” provide a “Name,” select a “Model,” and provide a country where it has been bought. Define the “Carrier” and click “Next” after confirming.
Step 4: Put Android in Download Mode
Whatsoever Android you own, you need to put it in Download Mode, depending on the buttons that the Samsung Galaxy S24 device has. The repairing process initiates as you enter the Download Mode, and new firmware is downloaded on the platform.

Step 5: Fix the Firmware of Android
Once it downloads and is verified, click the “Fix Now” button to repair the Android successfully. You may need to provide a PIN to confirm the process. Once provided, the next screen shows the progress of the repair process. As it completes, click the “Done” button to conclude fixing the Android system crash issue.

safe & secure
Part 11: Factory reset the Samsung Galaxy S24 device to fix the Android crash issue
Factory Resetting is advisable only when nothing else works. Also, there are two ways of doing it depending on whether the Android crash is permanent or temporary.
Follow the steps given below to factory reset your device while it is switched on:
1. Visit “Settings”.
Now select “Backup and Reset”.
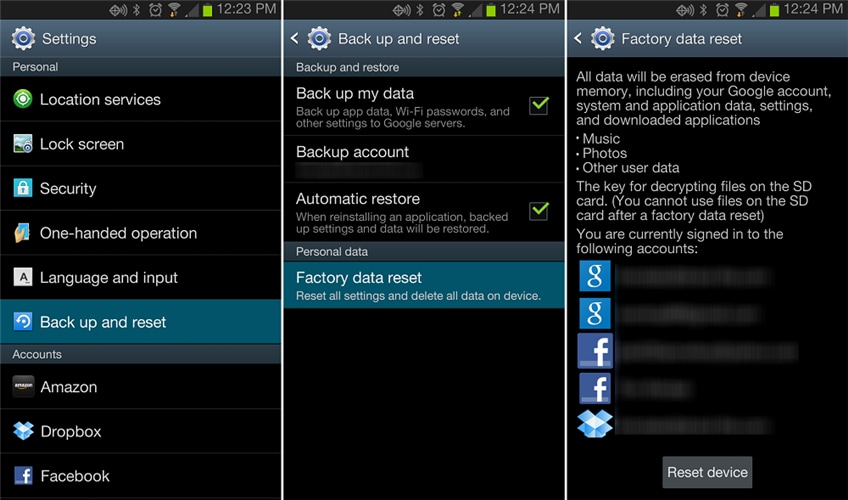
In this step, select “Factory data reset” and then “Reset Device” to confirm Factory Reset.
The process of factory resetting your Samsung Galaxy S24 is risky and cumbersome, as it deleted all data, but it helps to fix the Android System crash error.
You may also follow the instructions given below to Master set your device in Recovery Mode if it won’t turn on after an Android system crash has taken place:
When you are at the Recovery Mode screen, scroll down using volume down key, and from the options given, select “Factory Reset” using the power key.
Wait for your device to perform the task and then:
Reboot the phone in Recovery Mode by selecting the first option.
Bottomline, the tips given above have helped many to solve the Android system crash issue. So do not hesitate to try them, but don’t forget to extract your data with Dr.Fone’s Data Recovery tool.
safe & secure
Calls on Samsung Galaxy S24 Go Straight to Voicemail? 12 Fixes
Have you ever experienced incoming calls to your phone go straight to voicemail without ringing? It can be frustrating, especially if you’re expecting an important call. It could be due to simple things like turning down the volume or forgetting to turn off the Do Not Disturb mode. In other cases, it might be because you accidentally blocked the caller’s number.
In most cases, incoming calls going to voicemail without ringing are common. However, if it’s happening frequently or for all calls, your phone may have a problem.
This article will discuss why incoming phone calls go straight to voicemail and how to fix the problem. We’ll also show you how to use Wondershare Dr.Fone, a powerful Android System Repair tool, to solve such issues. So, if you’re uncertain why that last call went straight to voicemail, keep reading, and we’ll cover everything you need to know.

Part 1: Not Ringing? Here’s Why Calls on Your Phone Go Straight to Voicemail
If an incoming call to your cell phone goes straight to voicemail without ringing, there could be a few reasons. Here’s what to look for and what you should do to fix it:
- Turn Off Do Not Disturb (DND) Mode
DND mode is a feature that silences all incoming calls, notifications, and alerts. If DND mode is enabled, your cell phone goes straight to voicemail when someone calls. To turn off DND mode, swipe down from the top of the screen to open the notification settings panel, then tap the Do not disturb icon.

Here’s an alternative way:
- Step 1: Open the Settings app and go to Notifications.
- Step 2: Tap Do not disturb.

- Step 3: Toggle Do Not Disturb offto disable the mode.
- Turn Off Call Forwarding
One reason calls go straight to voicemail without ringing is if you enabled call forwarding. Call forwarding is a feature that redirects incoming calls to another number. To turn off call forwarding:
- Step 1: Open the Phone Dialer app on your device, then tap the menu icon and select Settings.

- Step 2: Navigate to Supplementary services > Call forwarding.

- Disable Call Barring
If a phone call went straight to voicemail, another possible explanation is the call barring. It is a feature that restricts calls from being made or received on your phone. If activated, it can cause incoming calls to a phone to go straight to voicemail. To turn off call barring on Samsung Galaxy S24 devices:
- Step 1: Open the Phone Dialer app, then tap the menu icon in the top right corner.
- Step 2: Go to Settings > Supplementary services > Call barring, then tap OK.
- Step 3: Select Voice call, then turn off your preferred outgoing and incoming calls. When prompted, enter 0000 as a password.

- Update Your Phone’s Software
Sometimes, software bugs can cause problems with incoming calls, which may be why your last incoming call went straight to voicemail. If your phone runs outdated software, try updating it to the latest version.
To check for updates, open the Settings app and go to Software update or System update. For a seamless update experience, follow the step-by-step instructions on your mobile screen.

- Reset Network Settings
If the incoming calls on your phone go straight to voicemail, consider resetting your phone’s network settings. Network settings control how your phone connects to the cellular network. If these settings are not set up correctly, incoming calls may not be able to reach your device.
Note: Resetting your network settings will erase any saved Wi-Fi networks and Bluetooth pairings, requiring you to re-enter them after the reset is complete.
To reset your network settings on most Android devices:
- Step 1: Open the Settings app on your smartphone, then tap System or General Management.
- Step 2: Go to Reset > Reset Network Settings and confirm the action.

- Turn Off Bluetooth
When Bluetooth is on, it can interfere with your device’s ability to receive calls, causing them to go straight to voicemail without ringing. To turn off Bluetooth on an Android device, you can do one of the following:
- Swipe down from the top of the screen to open the Quick Settingspanel, then tap the Bluetooth icon to turn it off.

- Go to Settings> Connections > Bluetooth and toggle the switch off.

It should help ensure that calls come through to your phone instead of going to voicemail.
- Check Airplane Mode
If turning off Bluetooth didn’t solve the issue, another possible cause could be that your phone is in Airplane Mode. Airplane Mode turns off all wireless connections on your phone, including cellular service, which can cause calls to dial straight to voicemail. There are two ways to turn off Airplane mode on Android:
Using the Settings app:
- Step 1: Open the Settings app.
- Step 2: Tap Network & internet.
- Step 3: Toggle off Airplane mode or Flight mode.
Using the Quick Settings panel:
- Step 1: Swipe down from the top of the phone screen to access the Quick Settings panel.
- Step 2: Look for the Airplane mode or Flight mode icon, then tap it to turn it off.

- Check Blocked Numbers
“My boyfriend’s phone goes straight to voicemail when someone is calling. Any idea why that might be?”
Do you also find yourself asking what does it mean? It could be that he has blocked that phone number. To check this:
- Step 1: Open the Phone dialer app.
- Step 2: Tap the menu icon in the top right corner and select Settings.
- Step 3: Tap Block numbers. If you find the number in the blocked list, remove it to ensure that their calls come through to the phone.

If you still have trouble reaching your boyfriend, try calling him from a different number. If your call didn’t go through, you know that he hasn’t blocked your number and that there may be another issue with his phone.
- Turn Off Google One VPN
If you’re using Google One VPN, try turning it off to see if that fixes the problem. Some users have reported that Google One VPN can cause incoming calls to a phone to go straight to voicemail. To turn off Google One VPN:
- Step 1: Open the Google One app on your Samsung Galaxy S24.
- Step 2: At the bottom, go to the Benefits tab, then tap View Details below the Online protection with a VPN section.

- Step 3: Toggle off Enable VPN.

- Contact Your Carrier
If your phone calls go straight to voicemail after trying all the above, contact your carrier for help. They may be able to troubleshoot the problem or determine if there is a service outage in your area.
And if your carrier confirms that there is no service outage or billing-related block, the problem may be with your phone itself. You may need to try resetting your phone to factory settings or taking it to a repair shop.
- The Caller Used Ringless Voicemail
Ringless voicemail is a service that allows businesses to bypass your phone’s ringtone and send you pre-recorded messages directly to voicemail. Ringless voicemail is often used for marketing purposes. If you think you’re receiving ringless voicemail calls, you can contact the company calling you and ask them to remove you from their list.
Part 2: Not Clear About the Root Cause? Troubleshoot Directly by Wondershare Dr.Fone
If you’re unsure what’s causing your calls to go straight to voicemail, you can try using the Dr.Fone System Repair tool. This software can scan and repair your phone for any underlying problems, which may fix the issue and get your calls ringing again.
Dr.Fone supports over 1000 Android models, including unlocked Samsung Galaxy S24 models and models from carriers like AT&T and Vodafone. It has an intuitive interface and is easy to use, even for beginners. Learn below the steps on how to use Dr.Fone System Repair to fix incoming calls that dial straight to voicemail:
- Step 1: Download Dr.Fone on your computer, then launch it once installed.
safe & secure
4,118,635 people have downloaded it
- Step 2: Connect your smartphone to your desktop or computer using a USB cable. Next, from the Toolbox homepage, select System Repair.
- Step 3: Select Android as the Samsung Galaxy S24 device type.

- Step 4: Click Start to begin repairing your smartphone.
- Step 5: Select the Samsung Galaxy S24 device details on the Name, Model, Country, and Carrier drop-down lists. Next, select the agreement checkbox, then click Next to proceed.
- Step 6: Follow the in-app instructions to enter Download mode on your Samsung Galaxy S24, then click Next.

- Step 7: Wait while the app downloads the firmware; once done, click Fix Now.

- Step 8: Enter the code in the input box to verify the Samsung Galaxy S24 device information in the dialogue box, then click Confirm.

- Step 9: The app will start repairing the system issue on your Samsung Galaxy S24. Once completed, your app should restart, then click Done to close the app.
You May Also Like:
Top 5 Best Android System Repair Apps
How to Fix It: Android Stuck on Boot Screen?
How to Flash Dead Android Phone Safely
Conclusion
When your phone calls go straight to voicemail without ringing, it can be a frustrating and disruptive experience. Not only do you miss important calls from work, friends, or family, but it also leaves you feeling disconnected and out of the loop. As a temporary measure to avoid missing important calls, check your voicemail regularly.
For a prompt solution, consider using Dr.Fone if incoming calls on your phone go straight to voicemail. It is a powerful mobile solution that can also address other system problems, including stuck boot loops, app crashes, black screens, and bricked devices. If you consistently experience this issue, it’s advisable to reach out to a professional for assistance.
safe & secure
4,215,287 people have downloaded it
Also read:
- [New] In 2024, Top 10 MOBA Games for Android Gamers Unveiled
- 2024 Approved Video Transformation Pics and Tunes Fusion
- 9 Quick Fixes to Unfortunately TouchWiz has stopped Of OnePlus 12 | Dr.fone
- 9 Solutions to Fix Infinix Smart 7 HD System Crash Issue | Dr.fone
- Enterprise Victory: Stellar Masterminds Data Revival From HDDs
- Fix Cant Take Screenshot Due to Security Policy on Realme 11 5G | Dr.fone
- Fixing Persistent Pandora Crashes on OnePlus Ace 2V | Dr.fone
- How to Unlock Apple iPhone 11? | Dr.fone
- In 2024, Crafting Fast Fortnite Icons in Minutes
- Want to Uninstall Google Play Service from Vivo Y36? Here is How | Dr.fone
- YouTube Shorts Revenue Sharing Explained How Much Will I Make, In 2024
- Title: How to Quickly Fix Bluetooth Not Working on Samsung Galaxy S24 | Dr.fone
- Author: Ariadne
- Created at : 2024-10-21 17:50:47
- Updated at : 2024-10-28 17:23:05
- Link: https://howto.techidaily.com/how-to-quickly-fix-bluetooth-not-working-on-samsung-galaxy-s24-drfone-by-drfone-fix-android-problems-fix-android-problems/
- License: This work is licensed under CC BY-NC-SA 4.0.