
How to Resolve Realme 11 5G Screen Not Working | Dr.fone
How to Resolve Realme 11 5G Screen Not Working

Nothing is more frustrating than your phone’s touch screen becoming unresponsive. Given the importance of smartphones in daily work, a phone with a touch screen not working can badly affect your routine. It is an issue found in most smartphone brands, even among Realme 11 5G phones, known for their efficient performance. If your Realme 11 5G screen is not working, it can be an exhausting experience.
Luckily for your, multiple ways are available to resolve this issue. This article will list six fixes for resolving the Realme 11 5G not working issue. It will also discuss the reasons behind this issue in detail and provide a list of tips to avoid it in the future.
Part 1: What Causes Realme 11 5G Screen Unresponsive?
Answering what causes Realme 11 5G screen unresponsiveness is difficult. Many reasons, ranging from minor bugs to serious hardware issues, can cause it. To find out the exact or near exact reason, you will have to review your device’s activity before this issue occurs. You can use the following common reasons behind the Realme 11 5G 6T touch screen not working as the basis of your investigation:
1. Touchscreen Calibration
Excessive smartphone use can cause the touchscreen to go out of the required settings. It means until the touch screen is not recalibrated properly, the touch not working issues will continue to pop up.
2. Battery Issue
If your device’s battery is damaged or is at the end of its lifespan, it can cause the touch screen not responding issues. Moreover, the low battery and issue with the charging port can also lead to this problem.
3. Corrupted System Files
The presence of corrupted system files is also a significant cause of such issues. These corrupted files can also lead to serious performance issues on your phone.
4. Conflicting Settings
It is also possible that the conflicting settings in your device are causing this issue. These settings can range from touch sensitivity to screen refresh rate. Unless these conflicts are removed, the touchscreen performance will continue to degrade.
Part 2: The Common Solutions to Solve a Realme 11 5G Screen Unresponsive
Fixing the Realme 11 5Gscreen not working is easy as long as it is not a serious hardware issue. While there are multiple ways to solve this problem, we have chosen the 6 most common and easy solutions. Listed below are the 6 common solutions to solve a Realme 11 5G screen unresponsive:
Solution 1. Restart the Realme 11 5G Phone
As with any other issue or device, the first fix you should always try first is to restart your device. It is the best solution to fix the Realme 11 5G not working issue if temporary bugs and glitches are the reason behind it. When you restart your device, it flushes out all temporary bugs and glitches while resetting your device’s processes. Use this guide to restart your Realme 11 5G device:
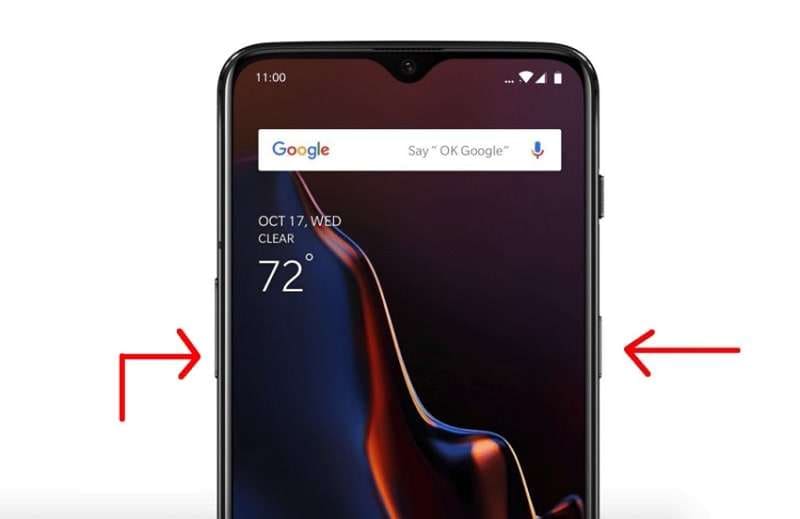
Instruction: Press and hold the “Power” button for a couple of seconds until it turns off. Wait a few moments and then use the “Power” button to turn on the Realme 11 5G device. In some of the Realme 11 5G devices, you also have to use the “Volume Down” button along with the “Power” button to restart the Realme 11 5G device.
Solution 2. Check the Charging Port and Battery
The issues with the battery of your Realme 11 5G 5 can also lead to Realme 11 5G not working. It can be due to your device’s low or near-empty battery. While in some cases, serious issues with the battery can also be behind this problem. Similarly, the reason behind your phone’s touch not working can be charging port issues.
Thus, you should check and clean your device’s charging port and see if it resolves the problem. Moreover, turn off your device, charge it, and then restart it to check if the touch screen not working issue is gone.
Solution 3. Contact the Realme 11 5G Customer Support
Contacting Realme 11 5G customer support can also help resolve the Realme 11 5G screen not working problem. It is especially helpful if you are unable to find the cause and want to seek an expert opinion. The Realme 11 5G customer support will help you find the issue and recommend a solution.
It is an excellent option if your Realme 11 5G device’s touch is not working due to hardware issues. They can help guide you to a suitable service center to fix your phone and resolve this issue.

Solution 4. Wipe the Cache of Your Realme 11 5G Device
A common reason for Realme 11 5G Nord being stuck on the loading screen is the filled cache partition. If you do not clean out the cache partition of your Realme 11 5G device, its performance will degrade. As a result, your device will experience issues like the touch screen not working or getting stuck at the loading screen. Here is how you can clear the cache of your Realme 11 5G device:
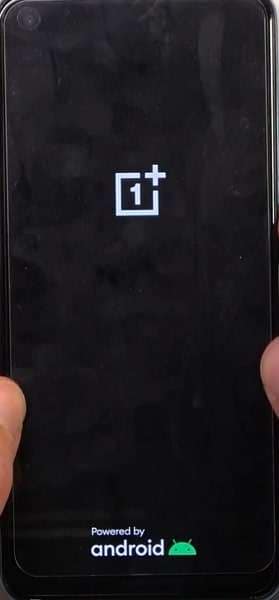
Step 1: Turn off your device by pressing and holding the “Power” button. Once it is turned off, press and hold the “Power” and “Volume Down” buttons until you see the Realme 11 5G logo.
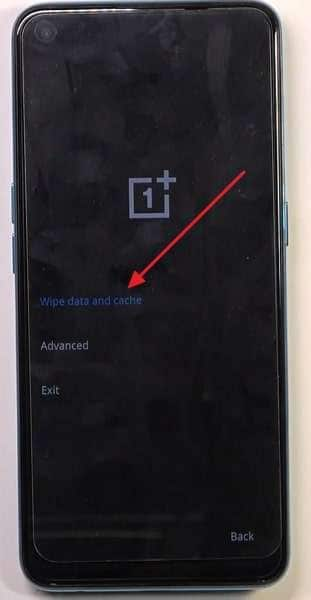
Step 2: Now, enter your phone’s PIN or pattern and choose a language. After selecting the language, choose “Wipe data and cache.”
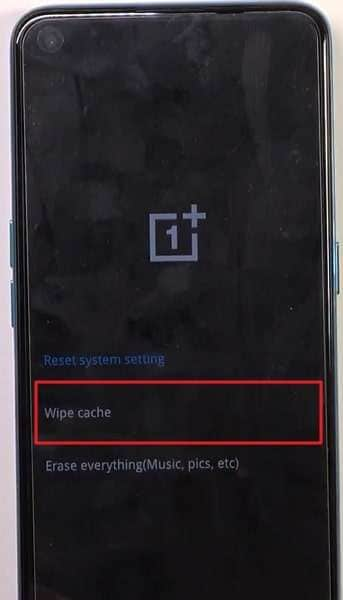
Step 3: Select “Wipe cache” on the next screen and confirm the action through “Yes” in the ensuing window. Once the process is complete, choose “Reboot” to restart your device.
Solution 5. Reset to Factory Settings
Sometimes, clearing the cache partition doesn’t help resolve the touchscreen issue. In that case, You have to factory reset your Realme 11 5G device. It is the best and last solution if other fixes haven’t worked and you can’t pinpoint the reason. Factory resetting your Realme 11 5G will delete all phone data. Thus, you should create a proper backup before trying this fix. Follow these steps to factory reset your Realme 11 5G in no time:
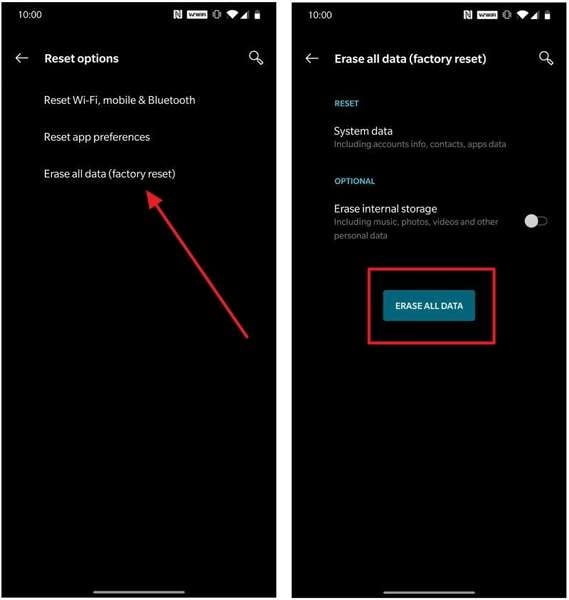
Step 1: Launch Settings on your Realme 11 5G device and tap “System” to select “Reset Options.”
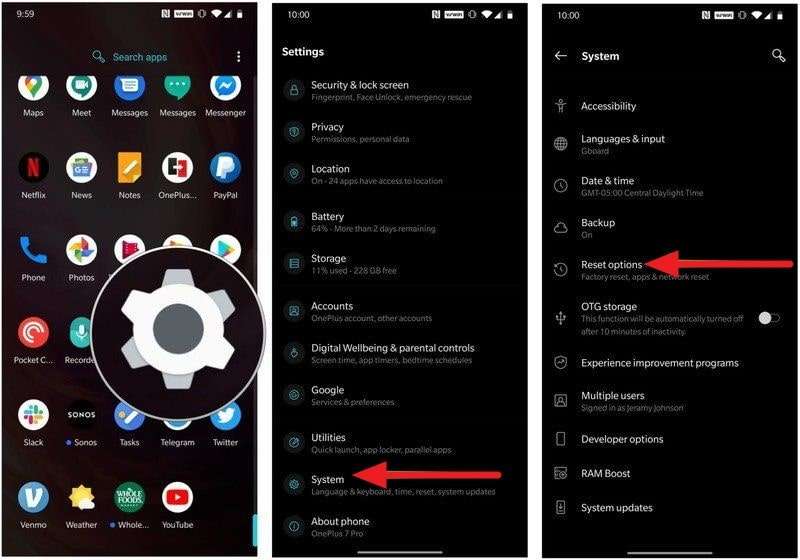
Step 2: In the “Reset Options,” select “Erase all data (factory reset)” and confirm the action by again pressing “Erase All Data.” It will start the factory reset process.
Solution 6. Replace the Old Screen with A New Screen
If none of the above-mentioned fixes have worked so far, you should replace the touch screen. Replacing the touch screen is recommended in case of hardware and severe software issues. However, it can be quite an expensive fix as new touch screens aren’t cheap. The prices for new touchscreens differ depending on the model. These prices start from $20 and go up to hundreds of dollars.

Part 3: How to Avoid Realme 11 5G Screen being Unresponsive?
Protecting your Realme 11 5G device against system issues like touch not working is not difficult. While it is true that you can’t 100% avoid such problems, the risks can still be reduced to a great extent. To prevent your Realme 11 5G screen from being unresponsive, here are some tips you can follow:
- ****Regular Updates:****You should always ensure that your Realme 11 5G device runs on the latest software version available. It can help prevent bugs or glitches that might cause the screen to become unresponsive.
- ****Device Protection:****It is also essential that you use a good quality phone case and screen protector. These will protect your Realme 11 5G device from physical damage. Drops, bumps, or scratches can damage the screen and make it unresponsive.
- ****Delete Unnecessary Apps:****If you have too many apps on your Realme 11 5G devices, it can cause screen unresponsiveness issues. Thus, you should only install the apps you need and delete the apps that are no longer needed.
- ****Use Dr.Fone 13:****Having a professional tool like Fone in your arsenal helps a lot in protecting against system issues. If a system issue is able to pass through, Dr.Fone has the ability to resolve the issue in a matter of seconds. Moreover, it is a complete smartphone tool with data transfer, location changer, and system repair features.
A new version of Dr.Fone is expected to release in the latter half of this month. The new version will include many improvements, advanced features, and increased device support. Furthermore, it will also have a better and more user-friendly interface.

Conclusion
To sum up this article, it can be said that issues like Realme 11 5G not working are part of life. These issues can occur anytime and are hard to completely protect against. Thus, having a problem solver like Wondershare Dr.Fone is the best choice. It will not only help you safeguard against system issues but also resolve them if they occur.
8 Solutions to Solve YouTube App Crashing on Realme 11 5G
YouTube can be considered among the apps that are widely used by users. And seeing “Unfortunately YouTube has stopped” error on the Android display screen is a thing that you can’t stand. The reasons can be multiple for why YouTube is not working or it keeps crashing. For instance, an outdated app, not updated OS, low storage, or corrupted cache. No matter what has triggered the problem on your device, we have solutions for it. Please read and follow this article to get the problem sorted.
Restart the app
The issues like YouTube keeps crashing are often get disappeared by just quitting and restarting the app. This is helpful to give a fresh start to the app and restarting will bring your device back to normal. Hence, the first resolution we would like to recommend is to restart your app. Follow the steps to do this.
- Go to “Settings” and tap “Apps & Notifications” or “Application”.
- Choose “YouTube” from the list of apps and open it.
- Tap on “Force Close” or “Force Stop”.
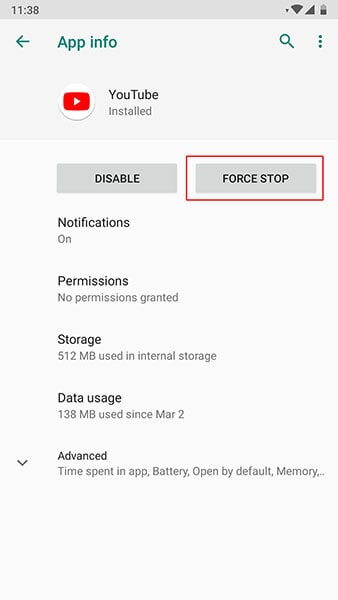
- You can now restart your device and then launch the app again. Check if this works or not.
Restart the Android
Similar to the app, if you restart the Realme 11 5G device, it will start operating properly making the YouTube app work better than before. So, as the next tip, please restart your device.
- Long press the “Power” key.
- Press “Restart” and confirm.

Use a VPN
There is a possibility that YouTube is prohibited in your region. Banning some apps is done for some safety reasons. And therefore, you need to check if this is done in your area or not. If yes, then we shouldn’t mention the reason why YouTube is not working on Android. In such a case, use a VPN to access YouTube.
Clear the Cache of YouTube
When the stored cache files start getting crash, the “Unfortunately YouTube has stopped” sort of errors are likely to appear. And therefore, if the above method didn’t work, try this one to get the problem resolved. We are going to clear the cache of YouTube to make it run smoothly.
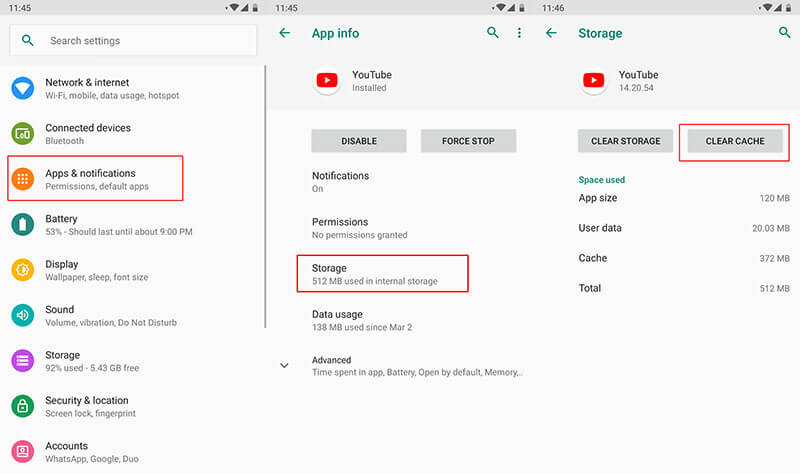
- Go to “Settings” and tap “Apps & Notifications”/”Applications”.
- Now, choose “YouTube” from the list of apps.
- Open “Storage” and click on “Clear Cache”.
Reinstall YouTube from Play Store
If YouTube keeps crashing, make sure to uninstall and reinstall it from Play Store. Doing this will make the app gets refreshed, remove the glitches, and make it normal as a result. Here are the steps for it.
- Firstly, uninstall it by “Settings” > “Apps” > “YouTube” > “Uninstall”.
- Now, go to the “Play Store” and search “YouTube”. Tap on “Install”.
Reset Network Settings
The apps that run on the internet might start crashing due to connectivity issues. Therefore, resetting the network settings once can work as a great remedy to follow when YouTube has stopped on your Realme 11 5G. This will remove all your network settings like Wi-Fi passwords etc.
- Tap on “Settings” followed by “Backup and reset”.
- Look for “Reset Network Settings”.
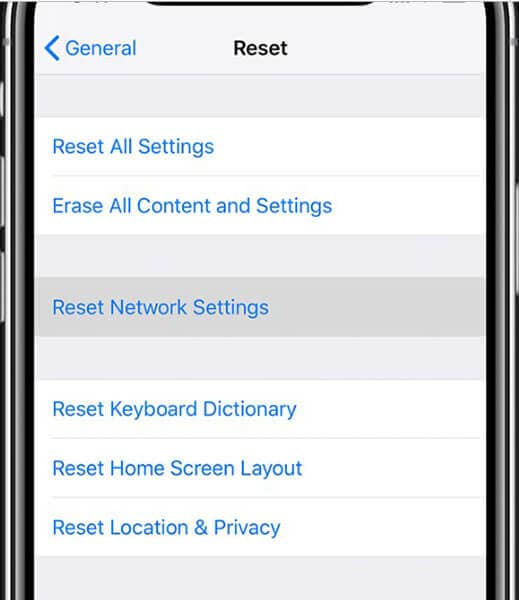
Note: In some phones, you may find the option in “System” > “Advanced” > “Reset”.
Re-flash the stock ROM of Android in one click
There are times when a corrupted system gives you such errors. And therefore, you should try re-flashing the stock ROM on your Realme 11 5G. Before you wonder how we would like to introduce a highly recommended tool for this. It is Dr.Fone - System Repair (Android). It holds the proficiency to flash the stock ROM in just a click. So, when your YouTube is not responding due to a corrupted system, make use of this tool to get it solved. The benefits associated with this tool are as follows.
Dr.Fone - System Repair (Android)
Android repair tool to flash the stock ROM of Android
- Easy to use and quickly fixes the issues
- Has the capability to repair any Android system issue
- 1000+ Android models are supported
- Takes no special technical knowledge to use
- Higher success rate with promising results
3981454 people have downloaded it
Step 1: Launch the Tool
Start with visiting the website on your PC and downloading the Dr.Fone toolkit. Install and open the tool. Now, from the main screen, choose “System Repair”.

Step 2: Connect Device
With the help of the USB cord, connect your Realme 11 5G to the computer. Click on “Android Repair” now from the left panel.

Step 3: Enter Information
Now, as the next step, you need to make sure of the details of your device. Please enter the name and brand of the phone. The country, region, and career are also to be added. Hit on “Next” once done.

Step 4: Download Firmware
Now, follow the instructions given on the screen according to your device. Click on “Next” and the program will start downloading the firmware.

Step 5: Repair the Issue
Lastly, when the firmware is downloaded, the system will start getting repaired on its own. You need to wait until you are informed about the completion of the process.

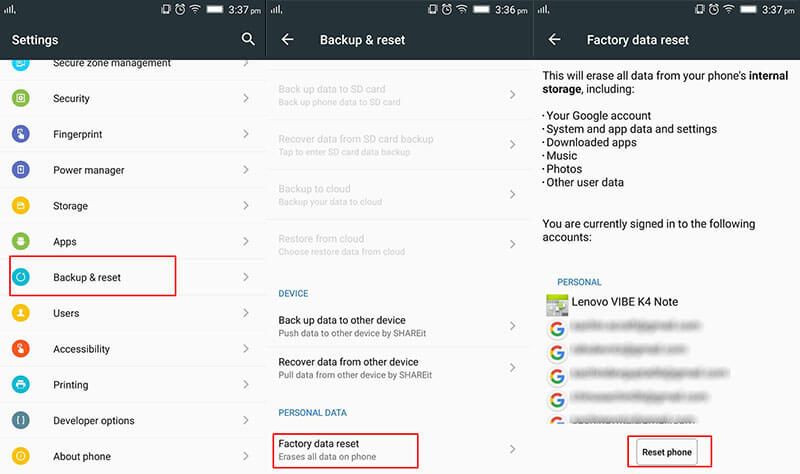
Reset Factory Settings of this Device
When nothing works, the last resort you can go with is resetting the Realme 11 5G device to factory state. Doing this will remove any sort of conflicting bugs and other stuff. However, this will remove the data from your device. So make sure to backup everything before going with this method. The steps are:
- Open “Settings” and tap “Backup & reset”.
- Go to “Factory data reset” and tap “Reset phone”
Spotify Keeps Crashing: A Complete List of Fixes You Can Use on Realme 11 5G

Does your Spotify keep crashing? You’re not alone. This problem is widespread and can happen to anyone. Fortunately, there are ways to rectify it quickly and easily. We’ve prepared a guide to fixing your Spotify crashing problem.
In our guide, you’ll find out why your Spotify keeps crashing. Moreover, you’ll get a list of fixes for your Spotify closing problem and detailed instructions. Once you’ve read our guide, you’ll successfully solve the problem of Spotify crashing on Android.
Part 1. Why Spotify Keeps Crashing

Some people have encountered a problem with their Spotify accounts. Spotify can sometimes keep crashing and closing due to several reasons. For example, it can happen due to your phone not being compatible with the app. This can happen if your operating system isn’t updated to the newest version.
Another reason the Spotify app keeps crashing could be an antivirus or a VPN blocking Spotify from working. Moreover, your device might be out of storage space, causing your phone to slow down and crash apps.
Several other reasons for this problem include network issues, a weak Wi-Fi signal, or the battery saving mode. Furthermore, your apps and files might be corrupted, or an app on your phone might block Spotify from working correctly.
Part 2. Spotify Keeps Crashing: Best Fixes
As you can see, there are numerous reasons for your Spotify crashing. Fortunately, all of them are easy fixes, and there’s no need to worry. We’ve prepared a list of 11 ways to fix your Spotify. With these fixes and detailed instructions, you’ll be able to eliminate your Spotify problem with ease.
1. Fix the Spotify Closing Issue by Repairing Your System
The reason for your Spotify crashing may be more significant than just a bug. Your device system might be behind it. If that’s the case, you might need to repair your system before trying to fix Spotify.
If you want to repair your mobile device’s system quickly and efficiently, try Wondershare Dr.Fone.
Wondershare Dr.Fone is an app that gives you complete control over your phone. You can manage it, back it up, recover files, and repair your system. The system repair option will fix your Android in just a few clicks and allow you to use Spotify freely. The steps go as follows:
- Step 1: Install and open Wondershare Dr.Fone on your computer and connect your Android.
- Step 2: Go to the Toolbox section and select System Repair.
- Step 3: Choose the Android

- Step 4: See which Android errors Wondershare Dr.Fone can fix and click Start.
- Step 5: Select the **Brand,**Name, Model, Country, and Carrier In the Carrier section, choose OPEN if your device is unlocked.
- Step 6: Tick the “I agree with the warning, and I am ready to proceed”checkbox and click Next.
- Step 7: Put your Android in Download Mode. You can find the steps below these instructions.
- Step 8: The program will automatically download once you put the phone in Download Mode.
- Step 9: Once the firmware downloads, click Fix Nowto install it on your Android.

- Step 10: Type “000000” in the dialog box and click Confirm.

- Step 11: That will start the system reparation, which you can follow on the screen.

- Step 12: Once it finishes, click Doneto complete the system repair.
There are two ways to enter Download Mode: one for Android devices with the Home button and another for those without it.
The steps for entering Download Mode on an Android phone with the Home button are as follows:

- Step 1: Turn off your phone.
- Step 2: Press and hold the Volume Down,Home, and Power buttons simultaneously.
- Step 3: Press the Volume Upbutton to enter Download Mode.
The steps for entering Download Mode on Android devices without the Home button are as follows:

- Step 1: Turn off your phone.
- Step 2: Press and hold the Volume Down, Bixby, andPower buttons simultaneously.
- Step 3: Press the Volume Upbutton to enter Download Mode.
2. Force-Close the App
You can force-close Spotify and open it again to make it work properly. That is an easy fix if your Spotify has developed a bug. If that is the case, follow the next steps:
- Step 1: Try opening Spotify.
- Step 2: If it’s not working, open App Switcher or Recent Apps. Different Android devices open it differently. Thus, you can swipe up from your Home screen, or if you have three buttons at the bottom, press Recent Apps.

- Step 3: Find Spotify in Recent Appsand click X or swipe up over it to force-close it.
- Step 4: Try opening Spotify again.
3. Re-Login to Your Spotify
The Spotify app may be working fine. Maybe you’re having problems with your Spotify account. If so, you can try logging out and logging in again to see if that works. That isn’t a big problem; sometimes Spotify accounts start bugging. You can re-login to your Spotify account by following these steps:
- Step 1: Open Spotify.
- Step 2: Tap Settingsin the upper right corner.

- Step 3: Scroll to the bottom of the settings and tap Log Out.

- Step 4: Tap Log In.

- Step 5: Enter your login credentials.
- Step 6: Tap Loginagain, and you’re in.

4. Restart Your Device
Another way to stop Spotify from crashing can be restarting your Android. The steps may vary slightly depending on the Realme 11 5G device, but they’re mostly the same. Follow these steps to restart your device:
- Step 1: Press and hold the Power button(you must press and hold both the Power and Volume Up buttons on a newer Android device).
- Step 2: Tap Restart. That will restart your Android, and you can try opening Spotify again.

5. Set Up Your Time and Date
Another possible reason for your Spotify closing problem could be the incorrect time and date on your Android. That is also an easy fix; you must set it correctly and try opening the app again. Set up your time and date with these steps:
- Step 1: Open Settingson your Android.
- Step 2: Go to Systemor General Management (depending on your Android model).
- Step 3: Go to Date and Time.
- Step 4: Tap Set Dateand set the correct date.

- Step 5: Go to Set Timeand set the right time.

6. Update Your System Software
Your Spotify app might keep crashing because your system is outdated. Try updating it to the latest version to try and fix the crashing problem. The steps for the Android system update are as follows:
- Step 1: Open Settings.

- Step 2: Go to System or About Phone.

- Step 3: Select System Update.
- Step 4: If there’s an available update, tap

7. Update Your App
If your system is updated, then Spotify might need an update. The app might malfunction if you’re using an older version. Thus, updating the app might solve the Spotify crashing problem. You can update Spotify by following these steps:
- Step 1: Go to the Play Store.

- Step 2: Search and open Spotify in the Play Store.
- Step 3: Tap Update

8. Free up Storage
Spotify can start crashing if your Android’s storage space is at capacity. That can also cause other apps to crash, not only Spotify. Therefore, check the storage space and free up as much as possible. Follow these steps:
- Step 1: Open
- Step 2: Go to Device Maintenance > Storageor go directly to Storage.

- Step 3: Here, you can see how much of your storage space is available and what’s taking up the most space.

- Step 4: Then, you can go ahead and clear as much space as you can.
9. Reinstall Spotify
There’s another solution if the Spotify app keeps crashing. You can try uninstalling and reinstalling it again on your Android. That will reset the app and might solve your problem. Follow the next steps to reinstall Spotify:
- Step 1: Find the Spotify app on your Android.
- Step 2: Hold the app icon.
- Step 3: Then, press Uninstall.

- Step 4: Press OK.
- Step 5: Then, open the PlayStore and find Spotify.
- Step 6: Tap Installto reinstall the app again.

- Step 7: Once it installs, log in to test if it’s working.
10. Check if Spotify Is Down
If your Spotify keeps crashing and closing, it might not be your device’s problem. Sometimes, Spotify’s server can be down, and many people face the same issue. If that’s the case, you can check with your friends if their Spotify is working or check online if Spotify is down. To do that, follow these steps:
- Step 1: Open your web browser.
- Step 2: Type “Is Spotify down” in the search bar.

- Step 3: You’ll see several websites that check real-time app servers and if they’re down.

- Step 4: Go to one or two and see what they say. If Spotify is down, you’ll need to wait for them to fix the problem.
11. Clear the Cache
When using different apps and websites, your device caches data from those sources. Since there’s no need to pile up your Spotify cache, you can clear it. Follow these steps:
- Step 1: Open Settings.

- Step 2: Go to Apps.
- Step 3: Find Spotify and tap it.

- Step 4: Tap Storageor Storage usage.

- Step 5: Tap Clear Cache.

 safe & secure
Conclusion
If your Spotify app keeps crashing, several reasons might be behind it. For instance, your storage space might be at capacity, your system might need an update, your phone might have a software bug, or the Spotify server might be down.
We’ve given you 11 solutions to fix the Spotify crashing problem. However, if your system needs repairing, you can try Wondershare Dr.Fone for quick and easy repair. This solution and all others will surely help you fix the crashing problem.
Also read:
- [New] 2024 Approved Effortless Fusion of YouTube Videos with FlV Format
- [Updated] Effortless Capture Win/Mac Tools to Record Desktop Screens
- 4 Ways to Fix Android Blue Screen of Death On Samsung Galaxy A15 4G | Dr.fone
- 7 Fixes for Unfortunately, Phone Has Stopped on Infinix Smart 8 | Dr.fone
- 7 Solutions to Fix Chrome Crashes or Wont Open on OnePlus Nord N30 SE | Dr.fone
- 8 Quick Fixes Unfortunately, Snapchat has Stopped on Huawei Nova Y91 | Dr.fone
- Authentication Error Occurred on Vivo V27? Here Are 10 Proven Fixes | Dr.fone
- Fixes for Apps Keep Crashing on Nubia Red Magic 9 Pro+ | Dr.fone
- Full Guide to Hard Reset Your Vivo Y27s | Dr.fone
- In 2024, 2023 | Fix Facebook Videos Not Playing on Android/iPhone/Chrome
- In 2024, Earnings Expansion on Glamour Channels
- In 2024, How to Reset Apple ID and Apple Password From Apple iPhone 12 Pro Max
- Instagram The Reason Behind Video Upside-Down
- The Ultimate How-To: Adding Perfect Horizontal and Vertical Lines to Microsoft Word
- Troubleshooting Guide How to Fix an Unresponsive Samsung Galaxy A05 Screen | Dr.fone
- Troubleshooting Guide How to Fix an Unresponsive Vivo Y100i Screen | Dr.fone
- Universal Guide: Viewing Your iCloud Photos on iOS, PCs, and Android
- Title: How to Resolve Realme 11 5G Screen Not Working | Dr.fone
- Author: Ariadne
- Created at : 2024-10-18 21:12:31
- Updated at : 2024-10-22 20:19:15
- Link: https://howto.techidaily.com/how-to-resolve-realme-11-5g-screen-not-working-drfone-by-drfone-fix-android-problems-fix-android-problems/
- License: This work is licensed under CC BY-NC-SA 4.0.