
How to Resolve Vivo Y100 Screen Not Working | Dr.fone
How to Resolve Vivo Y100 Screen Not Working

Nothing is more frustrating than your phone’s touch screen becoming unresponsive. Given the importance of smartphones in daily work, a phone with a touch screen not working can badly affect your routine. It is an issue found in most smartphone brands, even among Vivo Y100 phones, known for their efficient performance. If your Vivo Y100 screen is not working, it can be an exhausting experience.
Luckily for your, multiple ways are available to resolve this issue. This article will list six fixes for resolving the Vivo Y100 not working issue. It will also discuss the reasons behind this issue in detail and provide a list of tips to avoid it in the future.
Part 1: What Causes Vivo Y100 Screen Unresponsive?
Answering what causes Vivo Y100 screen unresponsiveness is difficult. Many reasons, ranging from minor bugs to serious hardware issues, can cause it. To find out the exact or near exact reason, you will have to review your device’s activity before this issue occurs. You can use the following common reasons behind the Vivo Y100 6T touch screen not working as the basis of your investigation:
1. Touchscreen Calibration
Excessive smartphone use can cause the touchscreen to go out of the required settings. It means until the touch screen is not recalibrated properly, the touch not working issues will continue to pop up.
2. Battery Issue
If your device’s battery is damaged or is at the end of its lifespan, it can cause the touch screen not responding issues. Moreover, the low battery and issue with the charging port can also lead to this problem.
3. Corrupted System Files
The presence of corrupted system files is also a significant cause of such issues. These corrupted files can also lead to serious performance issues on your phone.
4. Conflicting Settings
It is also possible that the conflicting settings in your device are causing this issue. These settings can range from touch sensitivity to screen refresh rate. Unless these conflicts are removed, the touchscreen performance will continue to degrade.
Part 2: The Common Solutions to Solve a Vivo Y100 Screen Unresponsive
Fixing the Vivo Y100screen not working is easy as long as it is not a serious hardware issue. While there are multiple ways to solve this problem, we have chosen the 6 most common and easy solutions. Listed below are the 6 common solutions to solve a Vivo Y100 screen unresponsive:
Solution 1. Restart the Vivo Y100 Phone
As with any other issue or device, the first fix you should always try first is to restart your device. It is the best solution to fix the Vivo Y100 not working issue if temporary bugs and glitches are the reason behind it. When you restart your device, it flushes out all temporary bugs and glitches while resetting your device’s processes. Use this guide to restart your Vivo Y100 device:
Instruction: Press and hold the “Power” button for a couple of seconds until it turns off. Wait a few moments and then use the “Power” button to turn on the Vivo Y100 device. In some of the Vivo Y100 devices, you also have to use the “Volume Down” button along with the “Power” button to restart the Vivo Y100 device.
Solution 2. Check the Charging Port and Battery
The issues with the battery of your Vivo Y100 5 can also lead to Vivo Y100 not working. It can be due to your device’s low or near-empty battery. While in some cases, serious issues with the battery can also be behind this problem. Similarly, the reason behind your phone’s touch not working can be charging port issues.
Thus, you should check and clean your device’s charging port and see if it resolves the problem. Moreover, turn off your device, charge it, and then restart it to check if the touch screen not working issue is gone.
Solution 3. Contact the Vivo Y100 Customer Support
Contacting Vivo Y100 customer support can also help resolve the Vivo Y100 screen not working problem. It is especially helpful if you are unable to find the cause and want to seek an expert opinion. The Vivo Y100 customer support will help you find the issue and recommend a solution.
It is an excellent option if your Vivo Y100 device’s touch is not working due to hardware issues. They can help guide you to a suitable service center to fix your phone and resolve this issue.

Solution 4. Wipe the Cache of Your Vivo Y100 Device
A common reason for Vivo Y100 Nord being stuck on the loading screen is the filled cache partition. If you do not clean out the cache partition of your Vivo Y100 device, its performance will degrade. As a result, your device will experience issues like the touch screen not working or getting stuck at the loading screen. Here is how you can clear the cache of your Vivo Y100 device:
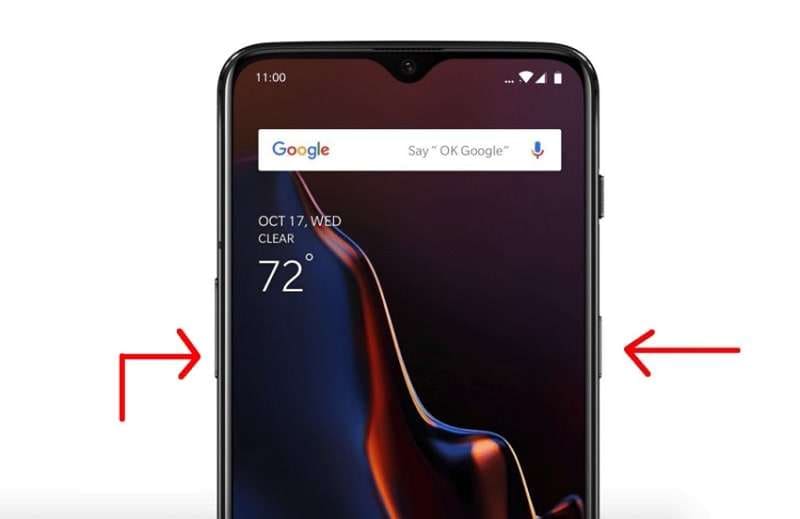
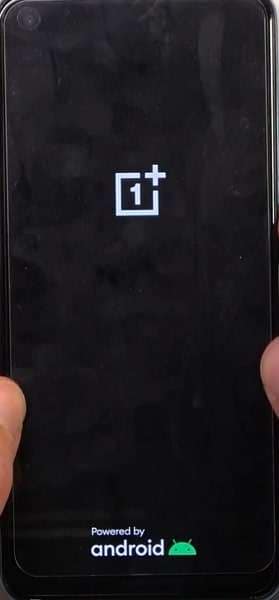
Step 1: Turn off your device by pressing and holding the “Power” button. Once it is turned off, press and hold the “Power” and “Volume Down” buttons until you see the Vivo Y100 logo.
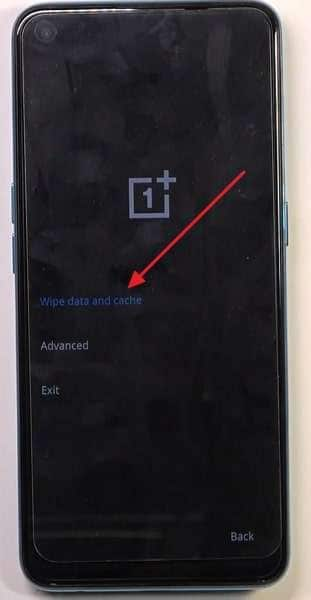
Step 2: Now, enter your phone’s PIN or pattern and choose a language. After selecting the language, choose “Wipe data and cache.”
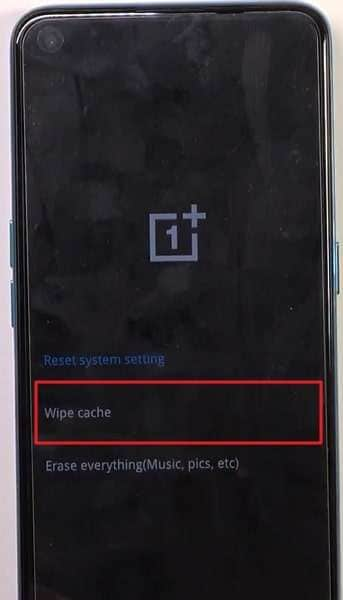
Step 3: Select “Wipe cache” on the next screen and confirm the action through “Yes” in the ensuing window. Once the process is complete, choose “Reboot” to restart your device.
Solution 5. Reset to Factory Settings
Sometimes, clearing the cache partition doesn’t help resolve the touchscreen issue. In that case, You have to factory reset your Vivo Y100 device. It is the best and last solution if other fixes haven’t worked and you can’t pinpoint the reason. Factory resetting your Vivo Y100 will delete all phone data. Thus, you should create a proper backup before trying this fix. Follow these steps to factory reset your Vivo Y100 in no time:
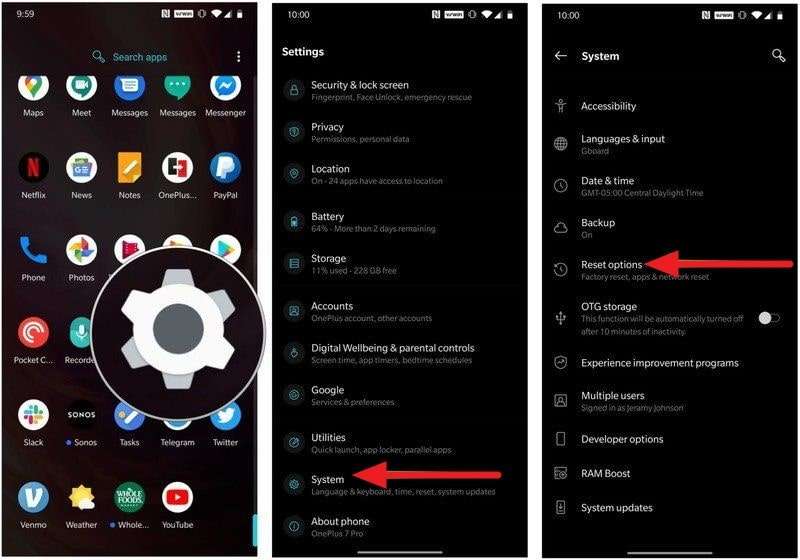
Step 1: Launch Settings on your Vivo Y100 device and tap “System” to select “Reset Options.”
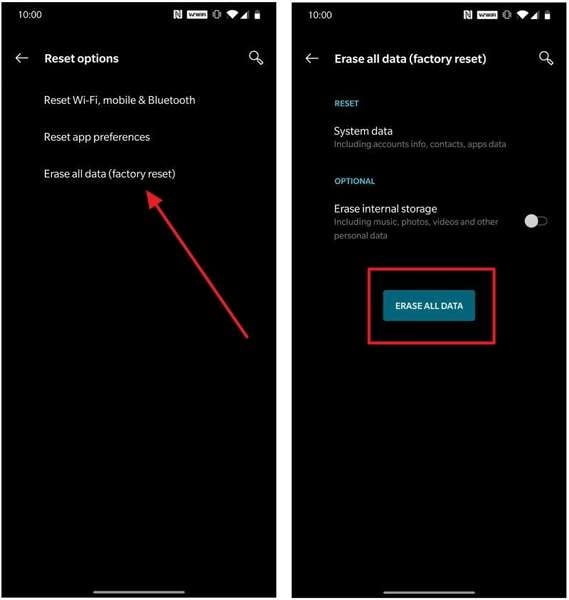
Step 2: In the “Reset Options,” select “Erase all data (factory reset)” and confirm the action by again pressing “Erase All Data.” It will start the factory reset process.
Solution 6. Replace the Old Screen with A New Screen
If none of the above-mentioned fixes have worked so far, you should replace the touch screen. Replacing the touch screen is recommended in case of hardware and severe software issues. However, it can be quite an expensive fix as new touch screens aren’t cheap. The prices for new touchscreens differ depending on the model. These prices start from $20 and go up to hundreds of dollars.
Part 3: How to Avoid Vivo Y100 Screen being Unresponsive?
Protecting your Vivo Y100 device against system issues like touch not working is not difficult. While it is true that you can’t 100% avoid such problems, the risks can still be reduced to a great extent. To prevent your Vivo Y100 screen from being unresponsive, here are some tips you can follow:
- ****Regular Updates:****You should always ensure that your Vivo Y100 device runs on the latest software version available. It can help prevent bugs or glitches that might cause the screen to become unresponsive.
- ****Device Protection:****It is also essential that you use a good quality phone case and screen protector. These will protect your Vivo Y100 device from physical damage. Drops, bumps, or scratches can damage the screen and make it unresponsive.
- ****Delete Unnecessary Apps:****If you have too many apps on your Vivo Y100 devices, it can cause screen unresponsiveness issues. Thus, you should only install the apps you need and delete the apps that are no longer needed.
- ****Use Dr.Fone 13:****Having a professional tool like Fone in your arsenal helps a lot in protecting against system issues. If a system issue is able to pass through, Dr.Fone has the ability to resolve the issue in a matter of seconds. Moreover, it is a complete smartphone tool with data transfer, location changer, and system repair features.
A new version of Dr.Fone is expected to release in the latter half of this month. The new version will include many improvements, advanced features, and increased device support. Furthermore, it will also have a better and more user-friendly interface.

Conclusion
To sum up this article, it can be said that issues like Vivo Y100 not working are part of life. These issues can occur anytime and are hard to completely protect against. Thus, having a problem solver like Wondershare Dr.Fone is the best choice. It will not only help you safeguard against system issues but also resolve them if they occur.
Android Safe Mode - How to Turn off Safe Mode on Vivo Y100?
Safe mode on Android is very useful to get rid of dangerous apps and malware. This allows the user to perform a uninstall of the crashed or malicious apps by putting safe mode on Android. Now the question is how to remove safe mode? In this article, we have discussed in detail how to get out of safe mode and also discussed some frequently asked questions. Keep reading this article.

Part 1: How to turn off safe mode on Android?
This is very important to turn off the safe mode after you put the safe mode on Android. Your mobile performance is limited in this mode. So you have to turn off safe mode. For doing this, there are some methods. Try to apply them one by one. If you succeed, stop there. Else go to the next method.
Method 1: Restarting the Vivo Y100 device
This is the easiest method to turn off the safe mode in Android. To use this method, follow the steps below.
Step 1 – Tap and hold the power button of your Vivo Y100.
Step 2 – You could find the option “Restart”. Tap on it. (If you have only one option, move to the step no 2)
Step 3 – Now, your phone will boot up in some time and you can see the Vivo Y100 device is no more on safe mode.

This method, if goes well, will turn off safe mode in Android from your device. IF not, move to the next method instead.
Method 2: Do a soft reset:
The soft reset is very easy to perform. It won’t delete any of your personal files etc. Besides, it clears all the temp files and unnecessary data and recent apps so that you get a healthy device. This method is very good for turning off Safe mode on Android.
Step 1 – Tap and hold the power button.
Step 2 – Now, select “Power off” from the given option. This will make your device off.
Step 3 – Wait a few seconds and then turn it on again.
This time you can see your phone is no more in safe mode. Also, your junk files have been also removed. If you still find the Vivo Y100 device is the safe mode, follow the next method.
Method 3: Break all power
This method is sometimes very helpful to turn off safe mode on android by disconnecting all the power as well as resetting the SIM card.
Step 1 – Take the back cover off from the Vivo Y100 device and remove the battery. (Not all devices will give you this facility)
Step 2 – Take out the SIM card.
Step 3 – Reinsert the SIM card and insert the battery again.
Step 4 – Turn the Vivo Y100 device on by tapping and holding the power button.
Now, you can see your device is out of safe mode. If you still find your device in Safe mode, see the next method.
Method 4: Wipe the cache of the Vivo Y100 device.
The cache of the Vivo Y100 device sometimes creates an obstacle in overcoming the safe mode on Android. To solve this issue, follow the steps below.
Step 1 – Turn on your device in safe mode. It can generally be done by tapping the home, power, and volume up button on Android device. If this combination is not working for you, search the internet with your device model number.

Step 2 – Now you can find the recovery mode screen. Navigate to the “Wipe cache” option with the volume up and down button and select the option by tapping the power button.

Step 3 – Now follow on-screen instruction and your device will be rebooted.
After successful completion of this method, your device should no longer be in safe mode. If the problem still persists, the only solution is to do a factory reset. This will erase all the data from your device. So take backup of your internal storage.
Method 5: Factory data reset
To factory data reset, you have to follow the below steps.
Step 1 – Enter in the recovery mode by following the steps mentioned earlier.
Step 2 – Now select “Factory data reset” from the given options.

Step 3 – Now, follow the on-screen instructions and your device will be factory reset.
After this method, you can successfully get rid of the safe mode on Android. Restore your data from the backup you created.
Watch the video below to turn off safe mode on your phone:
Part 2: How to put the phone in safe mode?
If some apps or programs create a problem on your device, the solution is safe mode. Safe mode allows you to uninstall the app or the program out of your device safely. So, safe mode on Android is quite useful sometimes. Let’s have a look at how to turn on safe mode in Android.
Before this, remember to take a backup of your Vivo Y100. We recommend you to use the Dr.Fone - Phone Backup (Android). This tool is the best in its class to provide users with a very easy-to-use user interface yet powerful solution.
Dr.Fone - Phone Backup (Android)_
Flexibly Backup and Restore Android Data
- Selectively backup Android data to the computer with one click.
- Preview and restore the backup to any Android devices.
- Supports 8000+ Android devices.
- There is no data lost during backup, export, or restore.
Always remember to use this tool before you enter in the safe mode as you never know what will happen next and you might end up with factory resetting. This, as the result, will erase all your valuable data. So always perform backup data before you proceed.
To enter the safe mode, follow the instructions below.
Step 1 – First of all, long press the power button and let the Power options appear.

Step 2 – Now, long press on the “Power off” option. This will instantly ask you if you want to reboot into safe mode. Select the option and your device will reboot in safe mode.

If you are using Android version 4.2 or earlier, turn off the Vivo Y100 device and turn it on the back by tapping the power button. When the logo appears, tap and hold the volume down button. This will allow the Vivo Y100 device to boot in safe mode.
Follow these steps carefully and now you can see a “Safe Mode” written at the corner of your device. This will confirm that you have successfully entered in Safe mode on Android.
Part 3: Safe mode on Android FAQs
In this section, we’ll discuss some frequently asked questions about the safe mode. Some users have many questions regarding the safe mode. Here we’ll try to cover some of them.
1. Why is My Vivo Y100 on safe mode?
This is a very common question around the world. For many Android device users, it’s quite common to see your phone in safe mode suddenly. Android is a secure platform and if your device sees any threat from your recently installed apps or any programs that want to harm your device; it would go into safe mode automatically. Sometimes, you might accidentally perform the steps discussed in part 2 and boot your device in safe mode.
2. Safe mode won’t turn off on My Vivo Y100
For the solution to remove safe mode from your device you must follow the step-by-step methods as mentioned in part 1. This will surely take your device out of the safe mode.
The safe mode is a very useful program for any Android device. But it limits the programs of Android and you must remove safe mode after uninstalling the harmful app. This article showed you how to turn off safe mode easily.
8 Ultimate Fixes for Google Play Your Vivo Y100 Isn’t Compatible
Nowadays, keeping yourself informed about the newest apps and features is essential. Have you encountered the error message “Google Play your device isn’t compatible with this version?” When attempting to download or update an application, this problem can pose a significant obstacle. The good news is that you can now alleviate those concerns.
In this article, we delve into how to resolve the “your device isn’t compatible with this version Google Play” error. It will discuss the top 8 ultimate fixes for this vexing issue that many Android users face. From practical tips to advanced solutions, this article aims to empower you with the knowledge to overcome this challenge.
Part 1: Reasons Behind Your Device Isn’t Compatible With This Version Play Store
Encountering the frustrating “your device isn’t compatible with this version Google Play“ error can be disruptive. That’s why it is essential to go through the underlying reasons causing this compatibility issue:
1. Outdated Operating System Firmware
One of the primary culprits behind the compatibility error is outdated OS firmware. App developers release updates to keep up with the latest features and security patches. That’s why an obsolete OS version on your device may render it incompatible with the newer app versions available on the Google Play Store.
2. Insufficient Hardware Requirements
Each application has specific hardware prerequisites that your device needs to fulfill. In case your smartphone does not meet the required specifications, you won’t be able to utilize the app. Thus, Google Play Store may restrict access to certain applications, citing compatibility issues.
3. Corrupted Cache Files
Cache files are designed to enhance the speed and efficiency of app loading. Yet, they can sometimes become corrupt. When this occurs, it disrupts the app’s normal operation. Clearing these corrupted cache files is often a crucial step.
4. Geographic Restrictions
In certain cases, app developers or Google Play itself may impose geographic restrictions. This could lead to compatibility issues if your device is located in an area where the app is restricted. Understanding the geographical availability of an app is vital in finding the root cause.
4. Beta Versions and Unstable Releases
Engaging with beta versions or unstable releases of an app can result in compatibility issues. These versions are typically in the testing phase. That’s why their compatibility with a wide range of devices may not be guaranteed. If you find yourself facing compatibility errors, it’s worth checking if you are in a beta program.
Part 2: 8 Reliable Fixes for Google Play Your Device Isn’t Compatible With This Version
Facing the “Play Store your device isn’t compatible with this version” error is an all-too-familiar setback. However, fear not, as this article will be your guide in resolving this issue. Summarized below are the top 8 solutions to fix this error with ease:
Fix 1: Force Quit Google Play Store
Force quitting the Google Play Store is a simple yet effective first step in resolving compatibility issues. Occasionally, the app may encounter glitches or background errors. These can hinder its proper functioning. Force quitting the Google Play Store and restarting it can often rectify these issues. You can use the following steps to force quit Google Play Store:
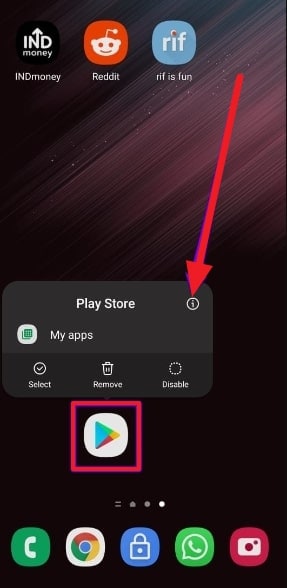
- Step 1. On your Vivo Y100, find the Google Play Store and long-press its icon. Press “App info” from the pop-up menu to access the app information screen.
- Step 2. Here, tap the “Force Stop” option to force close the Google Play Store. After a while, relaunch the app to see if the issue is resolved.

Fix 2: Clear Google Play Store Cache
Clearing the cache of the Google Play Store is a targeted solution. It addresses potential compatibility issues arising from corrupted or outdated temporary files. The cache stores data that helps the app load faster. Yet, when these files become corrupted, it can lead to performance issues. Follow these steps to clear the Google Play Store cache and the “device not compatible Google Play” issue:
- Step 1. After finding the Google Play Store on your device, press and hold the icon until a pop-up menu appears. Here, touch the “App info” option to reach the screen displaying information about the app.

- Step 2. Here, press “Storage and Cache,” and on the following screen, tap “Clear cache.” Confirm your action to wipe the cache data. Afterward, access the targeted app again to check if the issue is resolved.

Fix 3: Remove the Google Services Framework’s Cache and Data
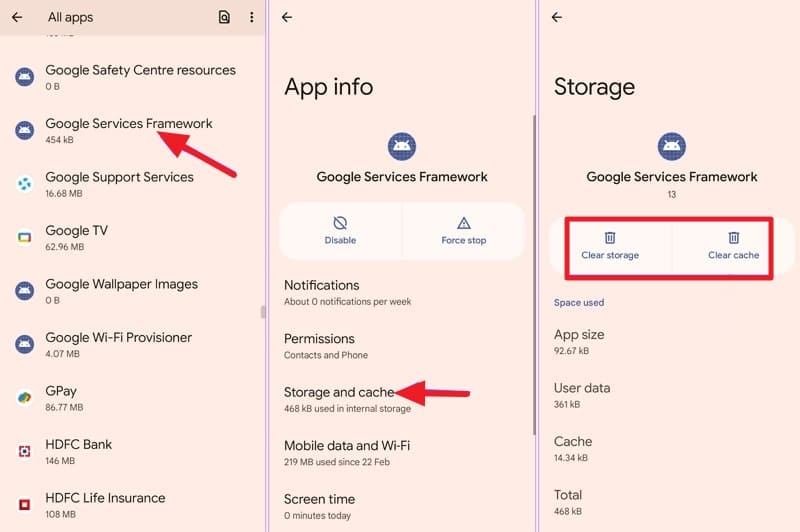
The Google Services Framework plays a crucial role in your Vivo Y100. It is essential in the functioning of various Google services, including the Google Play Store. Clearing its cache and data can be an effective method to tackle compatibility issues. Here’s a step-by-step guide on how to remove the Google Services Framework’s cache and data:
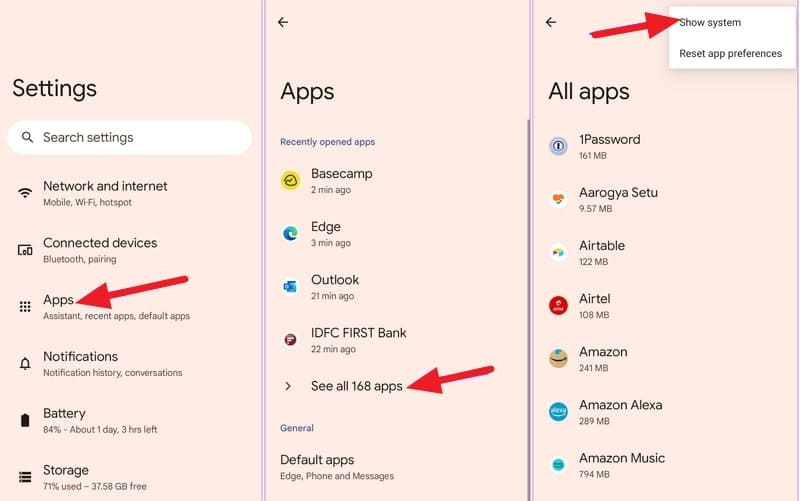
- Step 1. Open your device’s Settings and scroll down to tap “Apps.” There, press the “All Apps” options, and on the following screen, choose “Show System” from the top right corner.
- Step 2. Now, find and tap the “Google Services Framework” app and go on to press “Storage and Cache.” Here, use “Clear Cache” and “Clear Storage” to clear its cache and data.
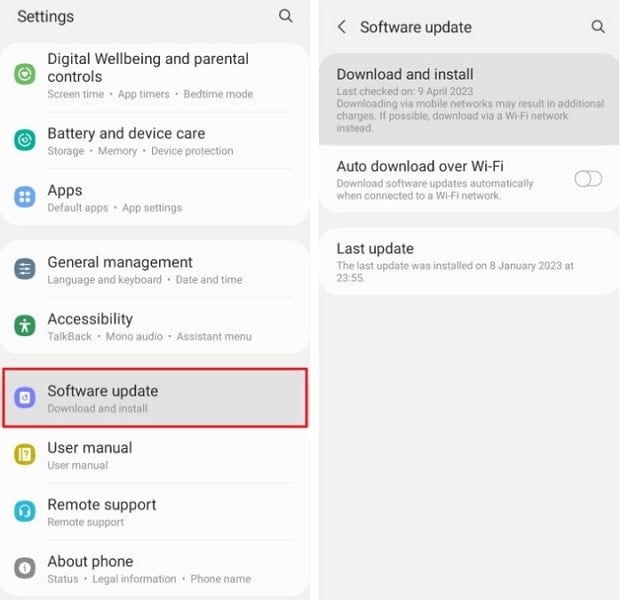
Fix 4: Update the Android OS Version
An outdated operating system is a common factor behind compatibility issues. This case is often used with Google Play Store and other important apps. Maintaining your Vivo Y100’s compatibility with the latest app releases is essential. To ensure your Android operating system is up-to-date, please proceed with the following steps:
Instructions. You will need to start by accessing the Vivo Y100 device’s “Settings.” Scroll down to find and press the “System” option. On the following screen, tap “Software Update” to check if an update is available. If there is one, follow the on-screen prompts to update your device’s OS.
Fix 5: Uninstall the Google Play Store Updates
In certain cases, issues with the Google Play Store itself may be contributing to compatibility errors. Uninstalling recent updates can revert the app to its default state. It can potentially resolve the problem. Follow these steps to uninstall updates for the Google Play Store and resolve “device not compatible Play Store” issues:
- Step 1. Using your Vivo Y100’s Settings, access the Google Play Store app in the “Apps” tab. Once on its info page, tap the three dots icon from the top right corner.

- Step 2. From the available options, choose “Uninstall updates.” Then confirm your decision when prompted to delete the Google Play Store updates.

Fix 6: Sideload the Incompatible Android App
If all else fails and the compatibility issue persists, sideloading the app can be a workaround. It means installing the app manually without using the Google Play Store. This approach proves especially valuable for users with a strong determination to access a specific application. Below is a comprehensive, step-by-step tutorial on how to sideload an app:
- Step 1. Long-press the Google Chrome icon to open the app info menu. Navigate to the “Install unknown apps” section. Here, toggle the switch to enable “Allow from this source.”

- Step 2. Afterward, access a reliable, trusted website where the APK for the targeted app is available. Download and install the app to resolve the compatibility issues.

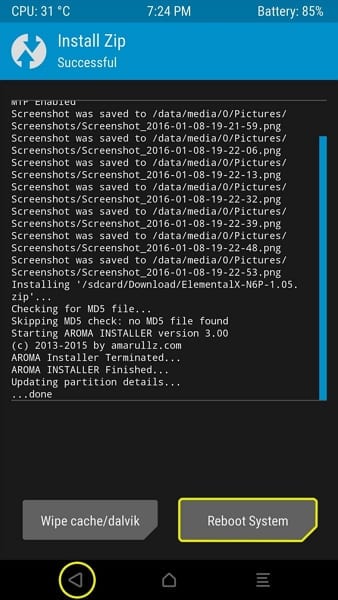
Fix 7: Install a Custom ROM
Have you exhausted other options and are still grappling with compatibility issues? Installing a custom ROM could be a more advanced but effective solution. Custom ROMs are modified versions of Android operating systems developed by the Android community. Engaging in this procedure entails large modifications to your device’s software. It is crucial to comprehend the potential consequences and proceed with caution.
Installing a custom ROM may void your device’s warranty. Moreover, it’s crucial to choose a ROM compatible with your device model. Installing a custom ROM is an advanced solution that should be approached with caution. It has the capability to address compatibility issues. Nevertheless, it demands a certain level of technical expertise and may not be suitable for all users.
Fix 8: Try Using a Third-Party App Store
The final solution to avoid compatibility issues on the Google Play Store is to use a different app store. Exploring alternative app stores can be a pragmatic workaround. Several third-party app stores offer a diverse range of applications. They might provide the desired app without encountering compatibility errors and help avoid the “device not compatible Google Play” error.
You can explore reputable third-party app stores such as Aptoide, Amazon Appstore, GetJar, or SlideME. Ensure the chosen app store is reputable and widely used, minimizing potential security risks. Exercise caution and ensure the legitimacy of the app store to avoid security risks.

Part 3: Is Your Play Store Not Working Properly? Fix It Now With Wondershare Dr.Fone
If you are unable to download any application on your Vivo Y100, it might be because of your Play Store issue. Play Store is the crucial element in your device, providing your facility with many features and functions. Get it fixed by trying Wondershare Dr.Fone – System Repair (Android) tool within a few clicks.
The System Repair tool in Dr.Fone helps you to resolve this issue in your Android Phone with powerful mechanisms and efficient working. It provides a user-friendly interface to fix Play Store Not Working with much ease.
Key Features of Wondershare Dr.Fone
- Fone – System Repair (Android) allows you to repair your Vivo Y100 easily in just a few clicks.
- This tool is also used to resolve the Black Screen of Death issue and Bricked Android devices problem.
- Users can fix their Android devices of any model or brand within minutes.
- With its easy-to-follow guide and steps, no technical expertise is required to use Dr.Fone’s software.
![]()
Dr.Fone - System Repair (Android)
Repair Android System Errors without Any Trouble.
- Fix your Android to normal, no skills required.
- Fix various Android system issues, stuck in boot loop , black screen , or won’t turn on , looping on start, etc.
- The high success rate in resolving Android system issues.
- Compatible with a wide range of Android devices and OS versions
- User-friendly interface with easy-to-follow steps.
3981454 people have downloaded it
Steps Involved To Fix Play Store Not Working Properly via Wondershare Dr.Fone
Now, we will be discussing the guide to resolve your “Google Play your device isn’t compatible with this version” errors. Here is how to fix the Play Store not working properly with Wondershare Dr.Fone – System Repair (Android):
- Step 1: Access Wondershare Dr.Fone on Computer
The first thing you need to do is to launch Wondershare Dr.Fone on your PC and access the “Toolbox” panel, followed by the “System Repair” section. Then, select the “Android” device and hit the “Start” button to proceed with the repair process.

- Step 2: Put Device Details and Download the Firmware
After that, you need to enter the Vivo Y100 device details like the “Name, Model, Brand, etc.” and put your phone on a Download Mode. Following this step, the firmware will download on its own, and you need to click the “Fix Now” button to install it on your Vivo Y100.

- Step 3: Confirm the Installation and End the Process
In the last step, you will have to put in the code and proceed with the “Confirm” button to initiate the repair process. This may delete all your data in the Vivo Y100 device, and once it has ended, select the “Done” button to conclude the process.

 safe & secure
3,120,524 people have downloaded it
Conclusion
To conclude, encountering compatibility issues like “Google Play your device isn’t compatible with this version,” can be a frustrating roadblock. However, this article has armed you with the knowledge through exploring various fixes. You now possess a toolkit of solutions to overcome the notorious issue. From forced quitting the Google Play Store to exploring the realm of custom ROMs, each fix has been crafted to cater to different user preferences.
For users seeking a comprehensive solution, Wondershare Dr.Fone emerges as a versatile and powerful tool. It goes beyond conventional troubleshooting methods. Its “Android Repair” feature is tailored to address various Android system issues, including those affecting the Google Play Store.
Also read:
- [New] 2024 Approved Explore Android' Written By Dr. Jane Smith, a Renowned Psychologist Specializing in Cognitive Development and Learning Styles.
- [New] 2024 Approved Frosty Olympics Highlights in Figure Skating
- [Updated] 2024 Approved 10 Easy YouTube Video Ideas Everyone Can Make It
- 11 Ways to Fix it When My Oppo A2 Wont Charge | Dr.fone
- 2024 Approved Enhance Videos Seamlessly Using YouTube Studio Editor
- 4 Solutions to Fix Unfortunately Your App Has Stopped Error on Oppo A2 | Dr.fone
- 9 Solutions to Fix Process System Isnt Responding Error on Nokia C12 Plus | Dr.fone
- 9 Solutions to Fix Process System Isnt Responding Error on Samsung Galaxy Z Flip 5 | Dr.fone
- Calls on Asus ROG Phone 8 Go Straight to Voicemail? 12 Fixes | Dr.fone
- Cellular Network Not Available for Voice Calls On Vivo V30 Lite 5G | Dr.fone
- Effortless iOS Podcast Acquisition The Ultimate Guidebook for 2024
- Gmail Not Working on Samsung Galaxy M54 5G 7 Common Problems & Fixes | Dr.fone
- How To Bypass iCloud Activation Lock on Mac For Apple iPhone 8 Plus?
- In 2024, Smartphone Image Editing - The Best Free Layers & Tools Guide (Top 10)
- Optimal Hard Drive Recovery Protocols
- Super Easy Ways To Deal with Realme 10T 5G Unresponsive Screen | Dr.fone
- The Best of Both Worlds ScreenFlow for Mac Creatives Reviewed for 2024
- Unlocking the Secrets of Impressive HDR Portraits
- Why Your Honor V Purse Screen Might be Unresponsive and How to Fix It | Dr.fone
- Title: How to Resolve Vivo Y100 Screen Not Working | Dr.fone
- Author: Ariadne
- Created at : 2024-10-20 18:10:20
- Updated at : 2024-10-22 18:16:36
- Link: https://howto.techidaily.com/how-to-resolve-vivo-y100-screen-not-working-drfone-by-drfone-fix-android-problems-fix-android-problems/
- License: This work is licensed under CC BY-NC-SA 4.0.