
How To Revive Your Bricked Lenovo ThinkPhone in Minutes | Dr.fone
How To Revive Your Bricked Lenovo ThinkPhone in Minutes
Lenovo ThinkPhone has established a notable presence within the custom development arena. This trait holds for Lenovo ThinkPhone. Today, it’s still one of the most popular budget smartphones available. The popular smartphone offers the freedom to flash custom ROMs, attain administrative privileges, access countless customization options, and much more.
Yet, delving into these capabilities comes with its share of risks. The potential for your Lenovo ThinkPhone to brick is high if you don’t know what you’re doing. This page teaches you how to unbrick your Lenovo ThinkPhone if it happens.
Part 1. Potential Causes of a Lenovo ThinkPhone Becoming Bricked
The factors that lead to your Lenovo ThinkPhone to brick vary. The possible solutions also depend upon the underlying causes. At times, the manufacturer’s intervention remains the only viable remedy. Below are the most frequent causes of bricking.
- The presence of malicious malware can harm your Lenovo ThinkPhone. This can result in a ‘bricked’ state devoid of functionality.
- Altering the bootloader, system partition, or other critical software components risks triggering a bricking event.
- Bricking can also occur due to errors during the update process. Whether through automatic or manual downloads, any interruption during software updates can cause your Lenovo ThinkPhone to brick.
- Using inappropriate methods when performing root access can also result in bricking. Performing root access is dangerous as it grants entry to the Lenovo ThinkPhone device’s root directory housing the operating system.
Every Android device is susceptible to experiencing a system failure that leads to a bricked state. The risk remains consistent whether your device is from Lenovo ThinkPhone, Lenovo ThinkPhone, Lenovo ThinkPhone, or any other brand. That’s why it’s strongly advised against modifying their smartphones, especially when you don’t know what you’re doing.
Part 2. Techniques To Unbrick a Lenovo ThinkPhone
When faced with a bricked Lenovo ThinkPhone, below are various techniques to revive it. Whether through software resets or hardware interventions, these methods can help breathe life back into your device.
Discharge the Battery
A particular suggestion involves allowing the Lenovo ThinkPhone device’s battery to discharge fully, enabling proper functionality of the Flash Tool software. This process typically spans a few days and is recommended by some specialists.

Perform a Factory Reset
Accessing the Lenovo ThinkPhone device settings is impossible if your Lenovo ThinkPhone bricks. For this reason, it is recommended to enter Recovery Mode. Here’s how.
- Step 1: Press and hold the Power button and select the Restart option. During the reboot, press the Volume Up and Power keys simultaneously.
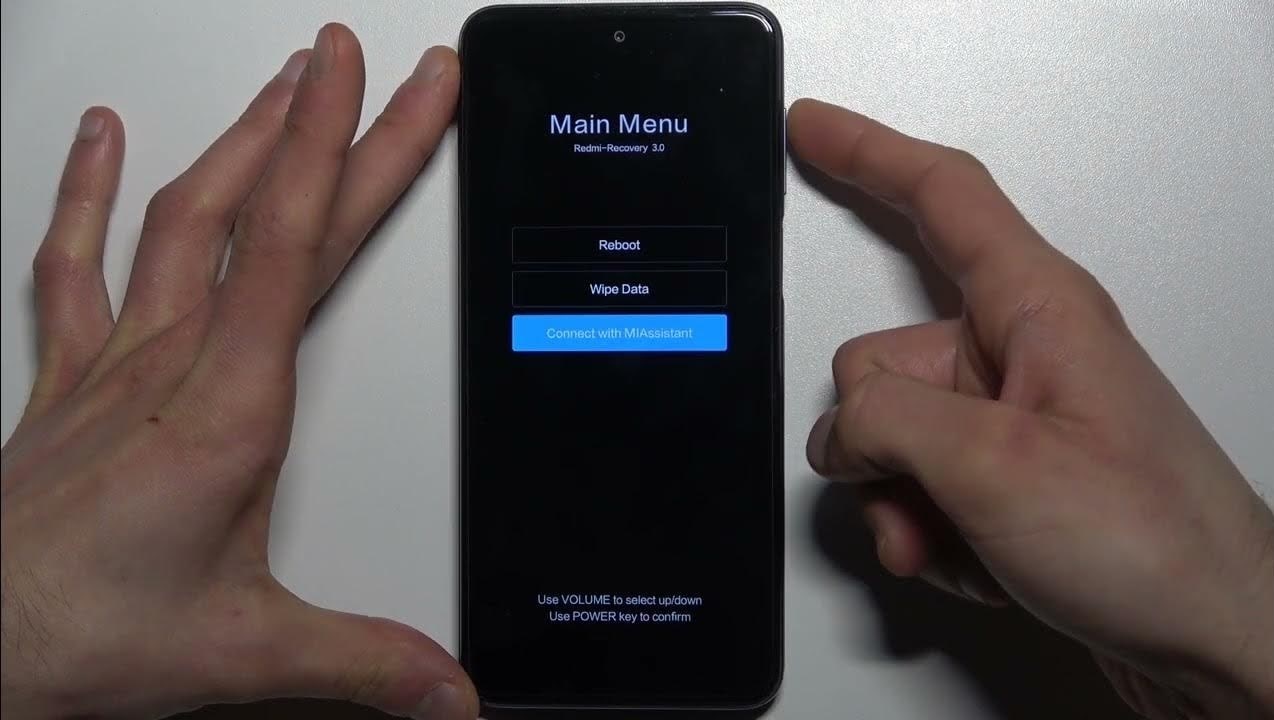
- Step 2: The main menu will show three options: Reboot, Wipe Data, and Connect with MIAssistant. Choose Reboot.
Explore Dedicated Software Tools To Fix Bricked Phones
Lenovo ThinkPhone offers its official software tools, such as the Lenovo ThinkPhoneFlash Tool. It’s designed for advanced users familiar with flashing firmware onto their devices. Here’s how.
- Step 1: Download and install the Lenovo ThinkPhoneFlash Tool .
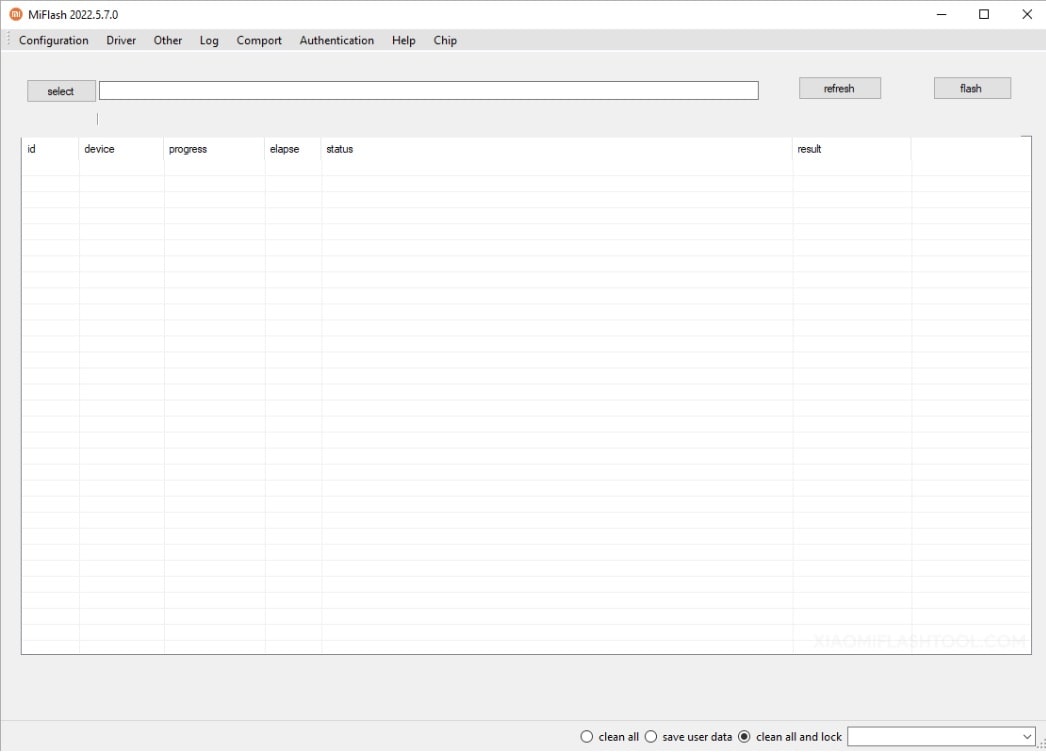
- Step 2: Download the Stock Firmware of Lenovo ThinkPhone and extract it on your computer. Press and Hold the Power and Volume Down buttons for at least 5-10 seconds to enter Fastboot Mode.

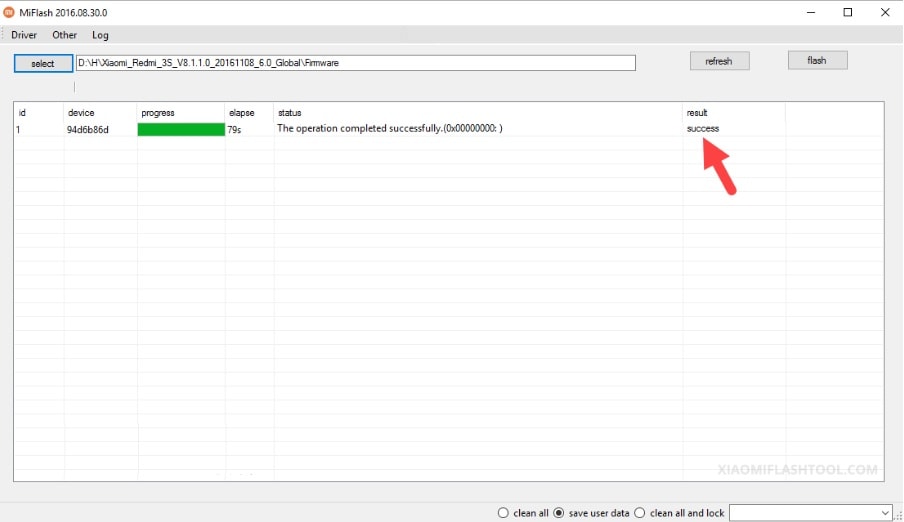
- Step 3: Connect your Lenovo ThinkPhone to the computer using a USB cable. Launch Lenovo ThinkPhoneFlash Tool and locate the Firmware you have downloaded on the computer. Click the refresh > flash to begin the flashing process.
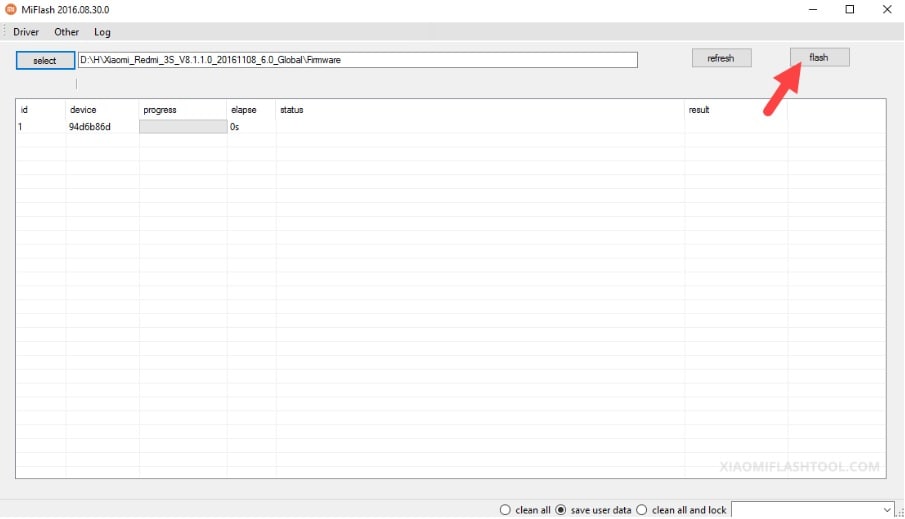
- Step 4: The SUCCESS result should appear in the Lenovo ThinkPhoneFlash Tool once the flashing process is done.
However, if the Lenovo ThinkPhoneFlash Tool did not unbrick your Lenovo ThinkPhone, consider using Wondershare Dr.Fone - System Repair (Android). The platform allows you to unbrick your Lenovo ThinkPhone with a few clicks.
Part 3. Reviving Your Lenovo ThinkPhone Using Wondershare Dr.Fone - System Repair (Android)
Dr.Fone - System Repair (Android) equips Lenovo ThinkPhone users with the ability to tackle soft brick and hard brick issues. This specialized Android repair tool enables you to restore your Lenovo ThinkPhone through a streamlined process, requiring just a few simple clicks.

 safe & secure
3,227,773 people have downloaded it
Key Features
Dr.Fone - System Repair (Android) offers several benefits to unbrick your Lenovo ThinkPhone easily. Below are its key features.
- Fix Common Lenovo ThinkPhone Problems in Minutes. This tool provides comprehensive solutions for common issues like black screen, Play Store not working, boot loops, or even bricked Android devices .
- Compatibility with Over 1000 Android Models. This app fixes glitches across modern Android devices. The software is compatible with an extensive range of models. Whether your Lenovo ThinkPhone is unlocked or carrier-bound, restoration is not a problem.
- Unparalleled Software Flexibility. Dr.Fone - System Repair (Android) also boasts an added capacity to mend iOS devices. This versatile tool is your all-inclusive solution for mobile devices, ensuring convenience whether you own an iOS or Android device.
Advantage of Dr.Fone - System Repair (Android) for Unbricking Lenovo ThinkPhone
Here are three benefits to choosing Dr.Fone - System Repair (Android) for unbricking a Lenovo ThinkPhone. You’ll further believe Dr.Fone is a reliable assistant when reviving your bricked Lenovo ThinkPhone.
Simplified Firmware Management
Dr.Fone eliminates the tedious search for appropriate firmware when unbricking your Lenovo ThinkPhone. The platform automatically downloads the correct firmware for your device. The hassle of identifying and manually procuring firmware is removed, saving time and ensuring a smoother unbricking process.
User-Friendly Approach
One of Dr.Fone’s key strengths is its user-friendly design. It caters to users with varying levels of technical expertise by employing a step-by-step process. This approach guides users through the repair process with clarity. It reduces the requirement for advanced technical knowledge.
Free Version for Evaluation
Dr.Fone - System Repair (Android) offers a free version for everyone. It allows users to test its capabilities before committing to a purchase. This trial version grants users the opportunity to assess the tool’s effectiveness and suitability for unbricking their Lenovo ThinkPhone. This instills confidence before investing in a full license.
How To Unbrick Lenovo ThinkPhone Using Dr.Fone - System Repair (Android)
Dr. Fone’s features are perfect for unbricking Lenovo ThinkPhone devices. Below are the procedures to restore your Lenovo ThinkPhone from its bricked state.
![]()
Dr.Fone - System Repair (Android)
Repair Android System Errors without Any Trouble.
- Fix your Android to normal, no skills required.
- Fix various Android system issues, stuck in boot loop , black screen , or won’t turn on , looping on start, etc.
- The high success rate in resolving Android system issues.
- Compatible with a wide range of Android devices and OS versions
- User-friendly interface with easy-to-follow steps.
3981454 people have downloaded it
- Step 1: Download and install Dr.Fone - System Repair (Android) on your computer. After launching the application, click System Repair. Then, click Android as the Lenovo ThinkPhone device type. Connect your Lenovo ThinkPhone. Indicate Phone Brick as the Android issue and initiate the process by clicking Start.

- Step 2: Select the appropriate device information corresponding to your Lenovo ThinkPhone. Choose Brand, Name, Model, Country, and Carrier. Confirm by checking the I agree button, then proceed to the next step by clicking Next.

- Step 3: Given that the Lenovo ThinkPhone lacks a Home button, click the Phone without Home button option. Follow the prompts displayed on-screen and proceed by clicking Next to initiate the process of restoring your bricked phone.

- Step 4: As your Lenovo ThinkPhone enters Download Mode, the firmware download will start automatically. Follow the on-screen instructions. Wait for the system to initiate the repair procedure automatically. Upon completion, a message will pop up on the main window. Click Done to exit the tool. You can click Try again to repeat the process if needed.

You May Also like:
How To Fix iPhone Bricked After iOS 17/iOS 16/iOS 15 Update
How to Fix It If Your Lenovo ThinkPhone Phone Got Bricked?
Conclusion
Don’t let a bricked Lenovo ThinkPhone stand in your way. Use the array of techniques from basic troubleshooting to advanced software tools to breathe life back into your device. Unbrick your Lenovo ThinkPhone to its full functionality using the methods provided or Dr.Fone’s adept assistance.
Lastly, you can still refer to Lenovo ThinkPhone for repairs. It remains the primary solution in numerous cases. Utilizing your warranty can alleviate the associated costs. Seeking assistance from a specialized technician is also a viable route to consider for a thorough device assessment.
Lenovo ThinkPhone Stuck on Screen – Finding Solutions For Stuck on Boot
The market has embraced Lenovo ThinkPhone for being the pioneers in the industry. Although the company lacked in providing explicit smartphones, they were still able to catch up with the race. Lenovo ThinkPhone C31, known to provide durability of the next level, is taking up the latest shelves of Lenovo ThinkPhone smartphones. Although the company promises reliability, there are several problems involving such smartphones.
One prominent solution stated by Lenovo ThinkPhone users involves the screen stuck in the boot. If your Lenovo ThinkPhone is stuck on the “Lenovo ThinkPhone” screen for no particular reason, you will have to read this article. As this article tackles all reasons involving the problem, it comes up with the necessary solutions. These solutions will help Lenovo ThinkPhone users find solutions for their stuck screens on the boot.
Part 1: What Causes Lenovo ThinkPhone Screen Stuck on Boot?
Has your Lenovo ThinkPhone recently been stuck on the boot loop screen? If it is happening or has happened to you, there are some reasons that you need to be aware of. Having an overview of the causes of Lenovo ThinkPhone being stuck on the Android One screen can help you redirect yourself toward to right solution. Go through the list of all causes and find more about the issue involving screens stuck on boot in Lenovo ThinkPhone smartphones:
- The Device is Damped in Liquid
It is entirely possible that your Lenovo ThinkPhone smartphone is immersed in water. With a smartphone dipped in liquid, the Lenovo ThinkPhone device can turn useless. If you have tried starting it again, it won’t run and might get stuck on the boot.
- Soft-Bricked Device
There are multiple conditions where your Lenovo ThinkPhone smartphone can get soft-bricked. It majorly happens when a particular function in the Lenovo ThinkPhone device stops working. To counter the problem, it is essential that you can get your device stuck on the boot screen.
- Outdated Device
If the equipment wears out after a certain time, there is a need to have it changed. With such obsolete models of Lenovo ThinkPhone, you will surely face issues like a screen stuck on the boot. Smartphone equipment cannot be revamped, and you will have to go for newer options.
- Software Update Required
A software update on your Lenovo ThinkPhone smartphone might be causing issues with the screen stuck on the boot. The best way to get rid of this problem is to update your system software to the latest version.
Part 2: 5 Solutions To Solve Lenovo ThinkPhone Screen Stuck on Boot
Do you seek to resolve the problem of the Lenovo ThinkPhone Plus stuck on the Android One screen? There are specific techniques that can be tried as a remedy. These solutions are tried and recommended by experts. Go through the details provided below to solve the issues with your stuck Lenovo ThinkPhone screen.
Solution 1: Force Restart Lenovo ThinkPhone
The first and most proclaimed technique to refresh Lenovo ThinkPhone devices under such a problem is to force restart them. If the Lenovo ThinkPhone device is stuck, you will have to perform this process by pressing the “Power” and “Volume Up” keys for 15 seconds. Continue holding the buttons until the Lenovo ThinkPhone device vibrates or restarts by showing the screen again.

Solution 2: Leave the Phone For a While To Drain Its Battery
A conventional way to solve the issue of a stuck screen in Lenovo ThinkPhone is to leave the phone in its position. As you let its battery drain out, the phone will turn off, and you can activate the Lenovo ThinkPhone device again by charging it.
Once you restart it this way, all the procedures will initiate again, and the Lenovo ThinkPhone device will be as good as new. Draining the battery has given you the leverage to regain control over the Lenovo ThinkPhone device again.
Solution 3: Check For Updates on Lenovo ThinkPhone Smartphones
Another quick remedy to try on your Lenovo ThinkPhone smartphones involves updating their software. If there is any prevailing software update to install on the smartphone, you will have to check and update it by following the steps guided below:
Step 1: Open the “Settings” of your Lenovo ThinkPhone smartphone and continue to the “System” section in the list of options. You will have to access the “Advanced” options in the “System” menu.

Step 2: As you lead to the advanced options, look for “System update” in the provided options. Look for the “Check for update” button. This will check if your Lenovo ThinkPhone needs any software updates or not.

Solution 4: Using Wondershare Dr.Fone
One of the finest options available to perform is using a third-party platform that promises smooth operability. Wondershare Dr.Fone is a platform designed to provide such smartphones another life to survive. Its unique functionality repairs all the issues with a smartphone and makes it as good as a new one.
If your Lenovo ThinkPhone Plus is stuck on the Android One screen, this platform is the ultimate solution for you. With the support of the latest devices and software versions, Dr.Fone – System Repair (Android) offers the best results. To know how to repair your Lenovo ThinkPhone smartphone with the help of this tool, look through the steps featured next:
Step 1: Open Dr.Fone and Select System Repair
As you launch Dr.Fone after downloading it on your computer, continue to the “System Repair” option. You will have to start by connecting the Android device to the computer through a USB cable. Select “Android Repair” from the options available and continue to the following options.

Step 2: Define Device Information and Confirm
You will be directed to the Lenovo ThinkPhone device information screen, where you must define the identification parameters of the Lenovo ThinkPhone device. Select the brand, name, model, country, and carrier details for proper system recovery. On clicking “Next,” you will receive a warning where you will have to type the number “000000” to proceed with the method.
Step 3: Put Your Lenovo ThinkPhone in Download Mode
Following this, you will have to put your Lenovo ThinkPhone in Download Mode. For that, you need to follow the steps according to the condition of the Lenovo ThinkPhone device:
- For Devices with Home Button:
Power off your Android and continue to press and hold the “Volume Down,” “Home,” and “Power” buttons for a few seconds. After holding them for almost 10 seconds, release and press the “Volume Up” button to enter the mode.
- For Devices without Home Button:
Turn off the Android device and hold the “Volume Down,” “Bixby,” and “Power” buttons simultaneously for a few seconds. On releasing the buttons, press the “Volume Up” button to enter Download Mode.

Step 4: Start Downloading and Verify Firmware
To proceed, tap the “Next” button to download the firmware. As you verify the firmware, the repairing process starts on your Lenovo ThinkPhone device.

Solution 5: Contact the Customer Service Center of Lenovo ThinkPhone
If the issue of the Lenovo ThinkPhone stuck on the “Lenovo ThinkPhone” screen continues, you will have to contact the Lenovo ThinkPhone device’s customer support. With no proper method left for the Lenovo ThinkPhone device, the only effective technique is to visit the authorized store for Lenovo ThinkPhone smartphones and claim the issue with the Lenovo ThinkPhone device. In this way, you might receive or get a fully repaired device with no additional charges if the Lenovo ThinkPhone smartphone is under warranty.
Part 3: How to Avoid Lenovo ThinkPhone Screen Stuck on Boot?
What if you come to know that you can avoid the Lenovo ThinkPhone screen stuck-on boot problem? There are a set of tips and tricks that you can follow to explain how to prevent such an issue in the first place. Follow these tips to learn more about saving your Lenovo ThinkPhone from such miserable conditions:
1. Protect from Malware
The first thing to protect your Lenovo ThinkPhone smartphone from getting stuck on the boot is to keep it safe from unauthorized and malicious data. The best thing to keep a device secure is to follow all security protocols and avoid bypassing them. If you try downloading something not authorized by the Play Store itself, for instance, an APK, it can make your device vulnerable to malware.
2. Keep Your Device Updated
If you feel frustrated by issues like Lenovo ThinkPhone being stuck on the Android One screen, the best thing to avoid such a problem is to keep your device updated at all costs. Whenever there is an update on your Lenovo ThinkPhone smartphone, make sure to install it on time and properly. Do not leave updates uninstalled for no reason, as they can hinder the Lenovo ThinkPhone device’s speed and performance.
3. Do Not Fool Around with System Files
Changing or modifying system files can be fatal for smartphones. Thus, to keep your Lenovo ThinkPhone safe, you need to keep your hands away from such important files. Modifying a single file can make your device useless or put you in situations like a Lenovo ThinkPhone smartphone stuck on the boot. For that, the best tip is to keep yourself out of engagement.
4. Use Wondershare Dr.Fone To Manage All Data With Ease
As you have observed, the power of Dr.Fone can be a perfect phone manager for you at all times. While providing system repair services, it can also help you manage your device’s data and other statuses. Thus, consider keeping Dr.Fone close to your device and its operations. In this way, you will be able to have complete control over all types of data present in the Lenovo ThinkPhone smartphone.
safe & secure
4,675,795 people have downloaded it
Conclusion
With that, this brings the article on Lenovo ThinkPhone smartphones to a conclusion. If you are still facing issues with your Lenovo ThinkPhone stuck on the “Lenovo ThinkPhone” screen, this article is the perfect solution for your problem.
With all the provided methods, we do hope that you will be able to restore the status of your Lenovo ThinkPhone smartphone and make it functional. For the finest results, you have also discovered Dr.Fone – System Repair (Android) as the best solution for repairing such devices.
Calls on Lenovo ThinkPhone Go Straight to Voicemail? 12 Fixes
Have you ever experienced incoming calls to your phone go straight to voicemail without ringing? It can be frustrating, especially if you’re expecting an important call. It could be due to simple things like turning down the volume or forgetting to turn off the Do Not Disturb mode. In other cases, it might be because you accidentally blocked the caller’s number.
In most cases, incoming calls going to voicemail without ringing are common. However, if it’s happening frequently or for all calls, your phone may have a problem.
This article will discuss why incoming phone calls go straight to voicemail and how to fix the problem. We’ll also show you how to use Wondershare Dr.Fone, a powerful Android System Repair tool, to solve such issues. So, if you’re uncertain why that last call went straight to voicemail, keep reading, and we’ll cover everything you need to know.

Part 1: Not Ringing? Here’s Why Calls on Your Phone Go Straight to Voicemail
If an incoming call to your cell phone goes straight to voicemail without ringing, there could be a few reasons. Here’s what to look for and what you should do to fix it:
- Turn Off Do Not Disturb (DND) Mode
DND mode is a feature that silences all incoming calls, notifications, and alerts. If DND mode is enabled, your cell phone goes straight to voicemail when someone calls. To turn off DND mode, swipe down from the top of the screen to open the notification settings panel, then tap the Do not disturb icon.

Here’s an alternative way:
- Step 1: Open the Settings app and go to Notifications.
- Step 2: Tap Do not disturb.

- Step 3: Toggle Do Not Disturb offto disable the mode.
- Turn Off Call Forwarding
One reason calls go straight to voicemail without ringing is if you enabled call forwarding. Call forwarding is a feature that redirects incoming calls to another number. To turn off call forwarding:
- Step 1: Open the Phone Dialer app on your device, then tap the menu icon and select Settings.

- Step 2: Navigate to Supplementary services > Call forwarding.

- Disable Call Barring
If a phone call went straight to voicemail, another possible explanation is the call barring. It is a feature that restricts calls from being made or received on your phone. If activated, it can cause incoming calls to a phone to go straight to voicemail. To turn off call barring on Lenovo ThinkPhone devices:
- Step 1: Open the Phone Dialer app, then tap the menu icon in the top right corner.
- Step 2: Go to Settings > Supplementary services > Call barring, then tap OK.
- Step 3: Select Voice call, then turn off your preferred outgoing and incoming calls. When prompted, enter 0000 as a password.

- Update Your Phone’s Software
Sometimes, software bugs can cause problems with incoming calls, which may be why your last incoming call went straight to voicemail. If your phone runs outdated software, try updating it to the latest version.
To check for updates, open the Settings app and go to Software update or System update. For a seamless update experience, follow the step-by-step instructions on your mobile screen.

- Reset Network Settings
If the incoming calls on your phone go straight to voicemail, consider resetting your phone’s network settings. Network settings control how your phone connects to the cellular network. If these settings are not set up correctly, incoming calls may not be able to reach your device.
Note: Resetting your network settings will erase any saved Wi-Fi networks and Bluetooth pairings, requiring you to re-enter them after the reset is complete.
To reset your network settings on most Android devices:
- Step 1: Open the Settings app on your smartphone, then tap System or General Management.
- Step 2: Go to Reset > Reset Network Settings and confirm the action.

- Turn Off Bluetooth
When Bluetooth is on, it can interfere with your device’s ability to receive calls, causing them to go straight to voicemail without ringing. To turn off Bluetooth on an Android device, you can do one of the following:
- Swipe down from the top of the screen to open the Quick Settingspanel, then tap the Bluetooth icon to turn it off.

- Go to Settings> Connections > Bluetooth and toggle the switch off.

It should help ensure that calls come through to your phone instead of going to voicemail.
- Check Airplane Mode
If turning off Bluetooth didn’t solve the issue, another possible cause could be that your phone is in Airplane Mode. Airplane Mode turns off all wireless connections on your phone, including cellular service, which can cause calls to dial straight to voicemail. There are two ways to turn off Airplane mode on Android:
Using the Settings app:
- Step 1: Open the Settings app.
- Step 2: Tap Network & internet.
- Step 3: Toggle off Airplane mode or Flight mode.
Using the Quick Settings panel:
- Step 1: Swipe down from the top of the phone screen to access the Quick Settings panel.
- Step 2: Look for the Airplane mode or Flight mode icon, then tap it to turn it off.

- Check Blocked Numbers
“My boyfriend’s phone goes straight to voicemail when someone is calling. Any idea why that might be?”
Do you also find yourself asking what does it mean? It could be that he has blocked that phone number. To check this:
- Step 1: Open the Phone dialer app.
- Step 2: Tap the menu icon in the top right corner and select Settings.
- Step 3: Tap Block numbers. If you find the number in the blocked list, remove it to ensure that their calls come through to the phone.

If you still have trouble reaching your boyfriend, try calling him from a different number. If your call didn’t go through, you know that he hasn’t blocked your number and that there may be another issue with his phone.
- Turn Off Google One VPN
If you’re using Google One VPN, try turning it off to see if that fixes the problem. Some users have reported that Google One VPN can cause incoming calls to a phone to go straight to voicemail. To turn off Google One VPN:
- Step 1: Open the Google One app on your Lenovo ThinkPhone.
- Step 2: At the bottom, go to the Benefits tab, then tap View Details below the Online protection with a VPN section.

- Step 3: Toggle off Enable VPN.

- Contact Your Carrier
If your phone calls go straight to voicemail after trying all the above, contact your carrier for help. They may be able to troubleshoot the problem or determine if there is a service outage in your area.
And if your carrier confirms that there is no service outage or billing-related block, the problem may be with your phone itself. You may need to try resetting your phone to factory settings or taking it to a repair shop.
- The Caller Used Ringless Voicemail
Ringless voicemail is a service that allows businesses to bypass your phone’s ringtone and send you pre-recorded messages directly to voicemail. Ringless voicemail is often used for marketing purposes. If you think you’re receiving ringless voicemail calls, you can contact the company calling you and ask them to remove you from their list.
Part 2: Not Clear About the Root Cause? Troubleshoot Directly by Wondershare Dr.Fone
If you’re unsure what’s causing your calls to go straight to voicemail, you can try using the Dr.Fone System Repair tool. This software can scan and repair your phone for any underlying problems, which may fix the issue and get your calls ringing again.
Dr.Fone supports over 1000 Android models, including unlocked Lenovo ThinkPhone models and models from carriers like AT&T and Vodafone. It has an intuitive interface and is easy to use, even for beginners. Learn below the steps on how to use Dr.Fone System Repair to fix incoming calls that dial straight to voicemail:
- Step 1: Download Dr.Fone on your computer, then launch it once installed.
safe & secure
4,118,635 people have downloaded it
- Step 2: Connect your smartphone to your desktop or computer using a USB cable. Next, from the Toolbox homepage, select System Repair.
- Step 3: Select Android as the Lenovo ThinkPhone device type.
- Step 4: Click Start to begin repairing your smartphone.
- Step 5: Select the Lenovo ThinkPhone device details on the Name, Model, Country, and Carrier drop-down lists. Next, select the agreement checkbox, then click Next to proceed.
- Step 6: Follow the in-app instructions to enter Download mode on your Lenovo ThinkPhone, then click Next.
- Step 7: Wait while the app downloads the firmware; once done, click Fix Now.

- Step 8: Enter the code in the input box to verify the Lenovo ThinkPhone device information in the dialogue box, then click Confirm.

- Step 9: The app will start repairing the system issue on your Lenovo ThinkPhone. Once completed, your app should restart, then click Done to close the app.
You May Also Like:
Top 5 Best Android System Repair Apps
How to Fix It: Android Stuck on Boot Screen?
How to Flash Dead Android Phone Safely
Conclusion
When your phone calls go straight to voicemail without ringing, it can be a frustrating and disruptive experience. Not only do you miss important calls from work, friends, or family, but it also leaves you feeling disconnected and out of the loop. As a temporary measure to avoid missing important calls, check your voicemail regularly.
For a prompt solution, consider using Dr.Fone if incoming calls on your phone go straight to voicemail. It is a powerful mobile solution that can also address other system problems, including stuck boot loops, app crashes, black screens, and bricked devices. If you consistently experience this issue, it’s advisable to reach out to a professional for assistance.
safe & secure
4,215,287 people have downloaded it
Also read:
- [New] In 2024, Expertly Select The Fastest 5 Chrome Plugins for FB Video Downloads
- [New] In 2024, The Professional's Playbook Refined GoPro Video Production Techniques
- [Updated] 2024 Approved Best Practices for Designing an Engaging YouTube Teaser
- [Updated] Elevate Views Premium Hashtags to Spark Virality in Video Snippets for 2024
- Expert Insights From Tom’s Technology Resource
- How To Leave a Life360 Group On Nokia 130 Music Without Anyone Knowing? | Dr.fone
- How to Share/Fake Location on WhatsApp for Honor 90 | Dr.fone
- How to Transfer Contacts from Motorola Razr 40 to Outlook | Dr.fone
- In 2024, From Stills to Songs The Art of Audio-Visual Fusion
- Professional Tech Resume Design Ideas and Resources - Curated Selections From ZDNet
- Samsung Galaxy F14 5G Stuck on Screen – Finding Solutions For Stuck on Boot | Dr.fone
- Simple Solutions to Fix Android SystemUI Has Stopped Error For Oppo A78 5G | Dr.fone
- Solved Warning Camera Failed on Vivo T2x 5G | Dr.fone
- Strategies for Apps That Wont Download From Play Store On Infinix GT 10 Pro | Dr.fone
- Strategies for Apps That Wont Download From Play Store On Oppo A56s 5G | Dr.fone
- Strategies for Apps That Wont Download From Play Store On Oppo Find X7 Ultra | Dr.fone
- Strategies for Apps That Wont Download From Play Store On Samsung Galaxy S23+ | Dr.fone
- Strategies for Apps That Wont Download From Play Store On Vivo V30 | Dr.fone
- Strategies for Apps That Wont Download From Play Store On Vivo Y78 5G | Dr.fone
- Title: How To Revive Your Bricked Lenovo ThinkPhone in Minutes | Dr.fone
- Author: Ariadne
- Created at : 2024-10-21 21:17:13
- Updated at : 2024-10-22 19:28:30
- Link: https://howto.techidaily.com/how-to-revive-your-bricked-lenovo-thinkphone-in-minutes-drfone-by-drfone-fix-android-problems-fix-android-problems/
- License: This work is licensed under CC BY-NC-SA 4.0.