
How To Revive Your Bricked Oppo A2 in Minutes | Dr.fone
How To Revive Your Bricked Oppo A2 in Minutes
Oppo A2 has established a notable presence within the custom development arena. This trait holds for Oppo A2. Today, it’s still one of the most popular budget smartphones available. The popular smartphone offers the freedom to flash custom ROMs, attain administrative privileges, access countless customization options, and much more.
Yet, delving into these capabilities comes with its share of risks. The potential for your Oppo A2 to brick is high if you don’t know what you’re doing. This page teaches you how to unbrick your Oppo A2 if it happens.
Part 1. Potential Causes of a Oppo A2 Becoming Bricked
The factors that lead to your Oppo A2 to brick vary. The possible solutions also depend upon the underlying causes. At times, the manufacturer’s intervention remains the only viable remedy. Below are the most frequent causes of bricking.
- The presence of malicious malware can harm your Oppo A2. This can result in a ‘bricked’ state devoid of functionality.
- Altering the bootloader, system partition, or other critical software components risks triggering a bricking event.
- Bricking can also occur due to errors during the update process. Whether through automatic or manual downloads, any interruption during software updates can cause your Oppo A2 to brick.
- Using inappropriate methods when performing root access can also result in bricking. Performing root access is dangerous as it grants entry to the Oppo A2 device’s root directory housing the operating system.
Every Android device is susceptible to experiencing a system failure that leads to a bricked state. The risk remains consistent whether your device is from Oppo A2, Oppo A2, Oppo A2, or any other brand. That’s why it’s strongly advised against modifying their smartphones, especially when you don’t know what you’re doing.

Part 2. Techniques To Unbrick a Oppo A2
When faced with a bricked Oppo A2, below are various techniques to revive it. Whether through software resets or hardware interventions, these methods can help breathe life back into your device.

Discharge the Battery
A particular suggestion involves allowing the Oppo A2 device’s battery to discharge fully, enabling proper functionality of the Flash Tool software. This process typically spans a few days and is recommended by some specialists.
Perform a Factory Reset
Accessing the Oppo A2 device settings is impossible if your Oppo A2 bricks. For this reason, it is recommended to enter Recovery Mode. Here’s how.
- Step 1: Press and hold the Power button and select the Restart option. During the reboot, press the Volume Up and Power keys simultaneously.
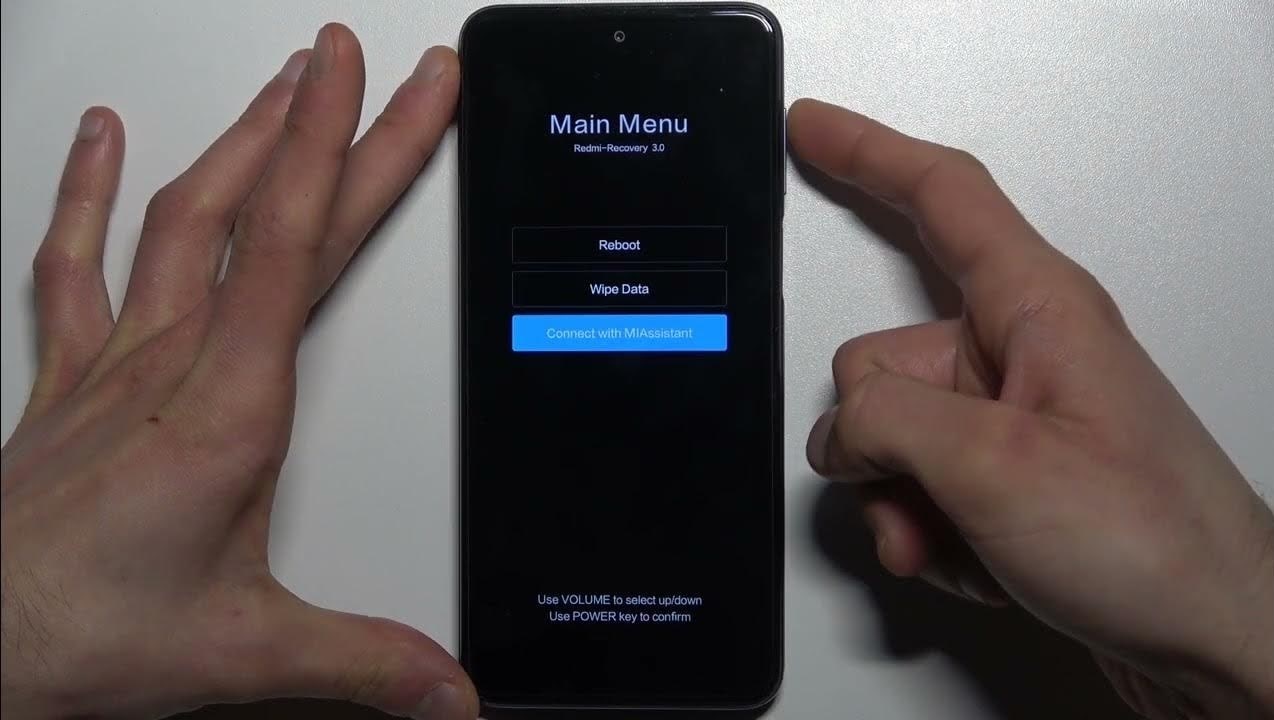
- Step 2: The main menu will show three options: Reboot, Wipe Data, and Connect with MIAssistant. Choose Reboot.
Explore Dedicated Software Tools To Fix Bricked Phones
Oppo A2 offers its official software tools, such as the Oppo A2Flash Tool. It’s designed for advanced users familiar with flashing firmware onto their devices. Here’s how.
- Step 1: Download and install the Oppo A2Flash Tool .
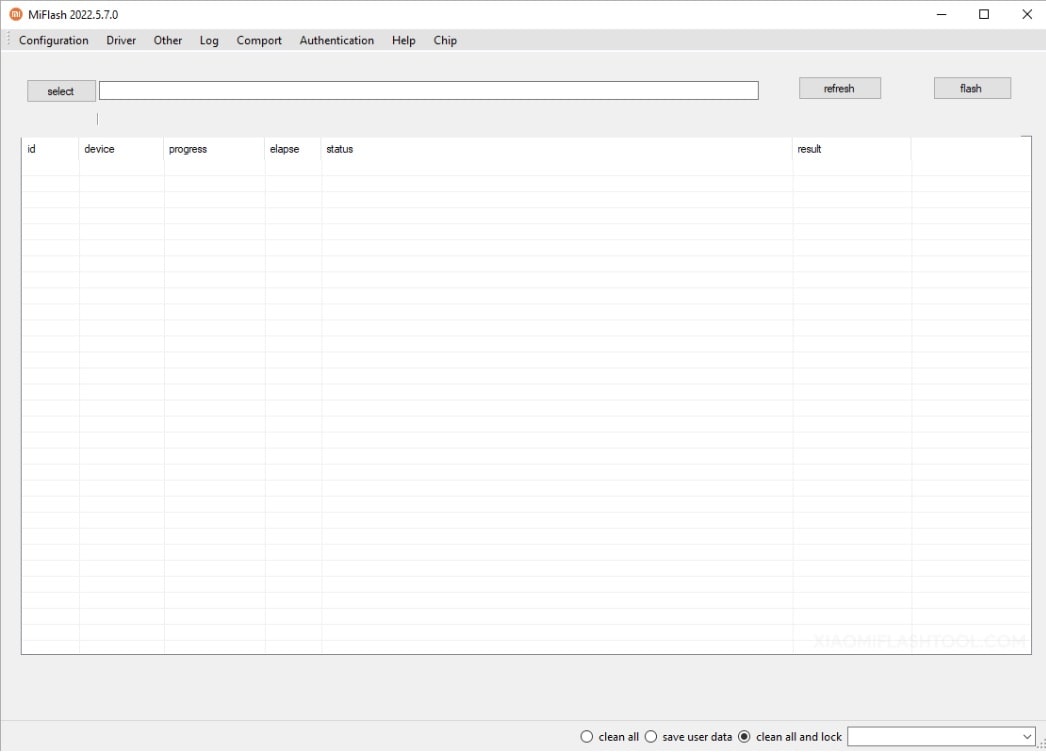
- Step 2: Download the Stock Firmware of Oppo A2 and extract it on your computer. Press and Hold the Power and Volume Down buttons for at least 5-10 seconds to enter Fastboot Mode.

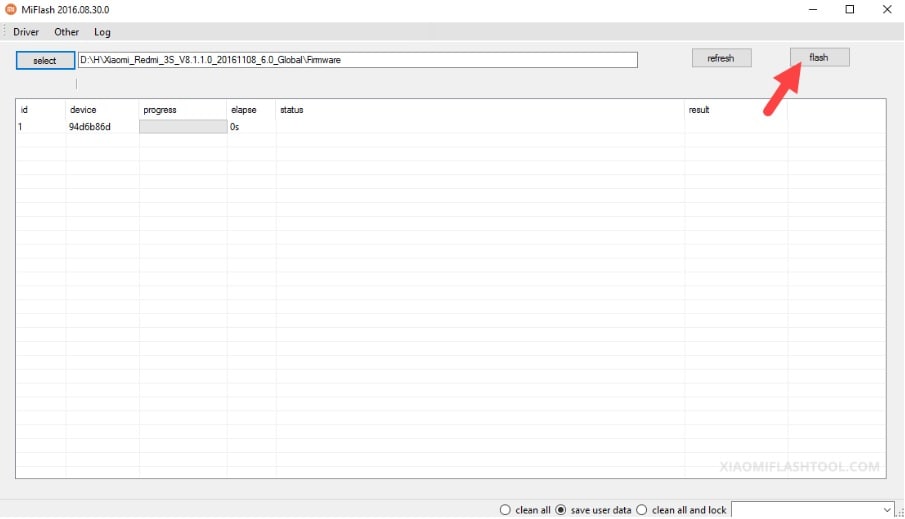
- Step 3: Connect your Oppo A2 to the computer using a USB cable. Launch Oppo A2Flash Tool and locate the Firmware you have downloaded on the computer. Click the refresh > flash to begin the flashing process.
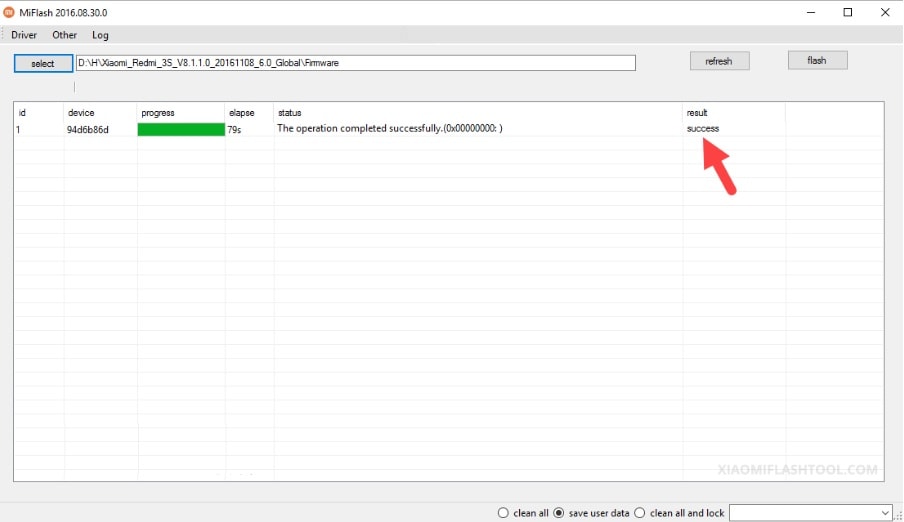
- Step 4: The SUCCESS result should appear in the Oppo A2Flash Tool once the flashing process is done.
However, if the Oppo A2Flash Tool did not unbrick your Oppo A2, consider using Wondershare Dr.Fone - System Repair (Android). The platform allows you to unbrick your Oppo A2 with a few clicks.
Part 3. Reviving Your Oppo A2 Using Wondershare Dr.Fone - System Repair (Android)
Dr.Fone - System Repair (Android) equips Oppo A2 users with the ability to tackle soft brick and hard brick issues. This specialized Android repair tool enables you to restore your Oppo A2 through a streamlined process, requiring just a few simple clicks.

 safe & secure
3,227,773 people have downloaded it
Key Features
Dr.Fone - System Repair (Android) offers several benefits to unbrick your Oppo A2 easily. Below are its key features.
- Fix Common Oppo A2 Problems in Minutes. This tool provides comprehensive solutions for common issues like black screen, Play Store not working, boot loops, or even bricked Android devices .
- Compatibility with Over 1000 Android Models. This app fixes glitches across modern Android devices. The software is compatible with an extensive range of models. Whether your Oppo A2 is unlocked or carrier-bound, restoration is not a problem.
- Unparalleled Software Flexibility. Dr.Fone - System Repair (Android) also boasts an added capacity to mend iOS devices. This versatile tool is your all-inclusive solution for mobile devices, ensuring convenience whether you own an iOS or Android device.
Advantage of Dr.Fone - System Repair (Android) for Unbricking Oppo A2
Here are three benefits to choosing Dr.Fone - System Repair (Android) for unbricking a Oppo A2. You’ll further believe Dr.Fone is a reliable assistant when reviving your bricked Oppo A2.
Simplified Firmware Management
Dr.Fone eliminates the tedious search for appropriate firmware when unbricking your Oppo A2. The platform automatically downloads the correct firmware for your device. The hassle of identifying and manually procuring firmware is removed, saving time and ensuring a smoother unbricking process.
User-Friendly Approach
One of Dr.Fone’s key strengths is its user-friendly design. It caters to users with varying levels of technical expertise by employing a step-by-step process. This approach guides users through the repair process with clarity. It reduces the requirement for advanced technical knowledge.
Free Version for Evaluation
Dr.Fone - System Repair (Android) offers a free version for everyone. It allows users to test its capabilities before committing to a purchase. This trial version grants users the opportunity to assess the tool’s effectiveness and suitability for unbricking their Oppo A2. This instills confidence before investing in a full license.
How To Unbrick Oppo A2 Using Dr.Fone - System Repair (Android)
Dr. Fone’s features are perfect for unbricking Oppo A2 devices. Below are the procedures to restore your Oppo A2 from its bricked state.
![]()
Dr.Fone - System Repair (Android)
Repair Android System Errors without Any Trouble.
- Fix your Android to normal, no skills required.
- Fix various Android system issues, stuck in boot loop , black screen , or won’t turn on , looping on start, etc.
- The high success rate in resolving Android system issues.
- Compatible with a wide range of Android devices and OS versions
- User-friendly interface with easy-to-follow steps.
3981454 people have downloaded it
- Step 1: Download and install Dr.Fone - System Repair (Android) on your computer. After launching the application, click System Repair. Then, click Android as the Oppo A2 device type. Connect your Oppo A2. Indicate Phone Brick as the Android issue and initiate the process by clicking Start.

- Step 2: Select the appropriate device information corresponding to your Oppo A2. Choose Brand, Name, Model, Country, and Carrier. Confirm by checking the I agree button, then proceed to the next step by clicking Next.

- Step 3: Given that the Oppo A2 lacks a Home button, click the Phone without Home button option. Follow the prompts displayed on-screen and proceed by clicking Next to initiate the process of restoring your bricked phone.

- Step 4: As your Oppo A2 enters Download Mode, the firmware download will start automatically. Follow the on-screen instructions. Wait for the system to initiate the repair procedure automatically. Upon completion, a message will pop up on the main window. Click Done to exit the tool. You can click Try again to repeat the process if needed.

You May Also like:
How To Fix iPhone Bricked After iOS 17/iOS 16/iOS 15 Update
How to Fix It If Your Oppo A2 Phone Got Bricked?
Conclusion
Don’t let a bricked Oppo A2 stand in your way. Use the array of techniques from basic troubleshooting to advanced software tools to breathe life back into your device. Unbrick your Oppo A2 to its full functionality using the methods provided or Dr.Fone’s adept assistance.
Lastly, you can still refer to Oppo A2 for repairs. It remains the primary solution in numerous cases. Utilizing your warranty can alleviate the associated costs. Seeking assistance from a specialized technician is also a viable route to consider for a thorough device assessment.
How to Flash Dead Oppo A2 Safely
- Fix malfunctioning Android to normal in one click.
- Highest success rate to fix all Android issues.
- Step-by-step guidance through the fixing process.
- No skills required to operate this program.
A phone is considered to be dead when it becomes completely unresponsive and refuses to switch on. Similarly, an Android phone is said to be dead when it does not boot up. You may try to switch it on several times by pressing the power button but in vain. You will see no sign of the phone’s logo or anything like a welcome screen. The Android phone’s screen remains black and does not illuminate when you try to turn it on. Interestingly, even when you charge this dead device, it does not show that it is getting charged.
Many people regard this as a battery issue, and many think of it as a temporary software crash. Some users also seem to believe that this is because of a virus attack. However, if you are looking for ways that tell how to fix a dead Android phone, you must understand that a dead phone or device can be cured by flashing custom firmware safely. If you are keen to know how to flash a dead Android phone or how to flash dead Android phones using PC, here are ways to help you.
Given below are eight techniques to flash your Oppo A2 safely, depending upon which phone you are using. It may seem time-consuming and tedious, but we can assure you that it works. So, move ahead and read on to learn about flashing new firmware, your Oppo A2, MTK Android, and Oppo A2 safely.
safe & secure
Part 1: Can a Dead Phone Be Flashed?
Flashing a dead Android phone might be skeptical for many users who have been in such a situation. Although it is possible to flash a dead Android phone, it is essential to be aware of the reasons that lead you into such a situation. Before a remedy, diagnosing the problem is a necessity for retaining the Oppo A2 device.
From battery issues to physical damage to the Oppo A2 device, there can be many reasons your Oppo A2 died. The reasons for a dead Android phone are not restricted to these points. There can be software-related issues or firmware issues that might cause such havoc on your Android.
Part 2: How to flash Oppo A2 in one click
While you are worried about how to flash Oppo A2 instantly with a single click, Dr.Fone - System Repair (Android) swiftly makes its way with a galore of options for you. This amazing tool from Wondershare can fix a plethora of Android system issues such as crashing of apps, black screen of death, failed system update, etc. Moreover, it can also get your device out of boot loop, unresponsive bricked Android mobiles as well as stuck at the Oppo A2 logo.
Dr.Fone - System Repair (Android)
One-click solution to flash Oppo A2
- The high success rate in fixing Oppo A2 Android devices.
- All the latest Oppo A2 devices are supported by this software.
- One-click operation of this tool helps you how to flash Oppo A2 easily.
- Being very intuitive, it doesn’t need you to be tech-savvy to use this software.
- It is one of its kind and the first one-click Android repair software on the market.
3981454 people have downloaded it
Step-by-step Tutorial
We are going to explain how to flash a dead Android phone using a PC using Dr.Fone - System Repair (Android)
Note: Before you understand how to flash Dead Android phone, take a backup of your data and then proceed to avoid any data loss.
Phase 1: Prepare your Oppo A2
Step 1: Once you have downloaded and installed Dr.Fone, launch it. From the main menu, tap on ‘System Repair’ and get your Oppo A2 connected to it.

Step 2: Click ‘Android Repair’ from the available options, and then press the ‘Start’ button to fix the Dead Android phone by flashing it.
Step 3: On the Oppo A2 device information screen, pick the appropriate device brand, name, model, and other details followed by tapping the ‘Next’ button.
Phase 2: Put the Android device in Download mode to start repair.
Step 1: It is essential to boot your Oppo A2 in Download mode before repairing.
- If the Oppo A2 device has a ‘Home’ button: Turn it off and then hold down the ‘Volume Down’, ‘Home’, and ‘Power’ buttons altogether for 5-10 seconds. Un-hold all of them and hit the ‘Volume Up’ button for entering ‘Download’ mode.

- In the absence of a ‘Home’ button: Switch off the Android device and hold the ‘Volume Down’, ‘Bixby’, and ‘Power’ buttons for 5 to 10 seconds, then release them. Hit the ‘Volume Up’ button for entering the ‘Download’ mode.
Step 2: Press the ‘Next’ button for initiating firmware download.

Step 3: Once the firmware gets downloaded and verified Dr.Fone - System Repair (Android) starts to flash your Dead Android phone. All the Android system issues will be fixed soon after.
safe & secure
Part 3: How to flash Oppo A2 dead phone with Odin?
In this segment, we will learn how to fix the dead Android phone, i.e., Oppo A2 phones using Odin software. Odin is software used internally by Oppo A2 to generally unblock devices and perform a more utility-based job, namely, flashing new firmware in place of the old one. There are different variants available, so choose the one which is supported by your Galaxy phone. Here is a step-by-step explanation of how to flash dead Android phone (Oppo A2) using Odin software.
Step 1: Install the driver software on the computer. You can find the best driver software for your device and PC on the official Oppo A2 website. You may also download Oppo A2 Kies on your PC. Once you have downloaded and installed the driver software, restart the PC.
Step 2: Now download suitable firmware for your device in the form of a zip folder that you can open and store on your desktop.

Make sure the file is .bin, .tar, or .tar.md5 only as these are the only file types recognized by Odin.


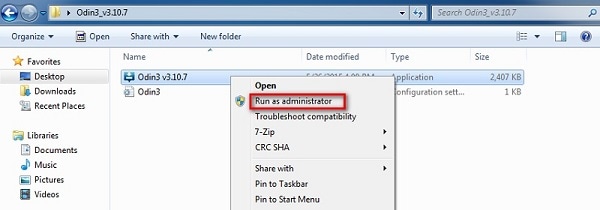
Step 3: In this step, download the latest version of Odin on your PC and move it to the desktop, and then right-click on the downloaded Odin file to select “Run as Administrator”.

Step 4: Now, boot your dead device to Download Mode by pressing the power, volume down, and home button together. When the phone vibrates, release the power button only.

Step 5: Gently press the volume up button, and you will see the Download Mode Screen.

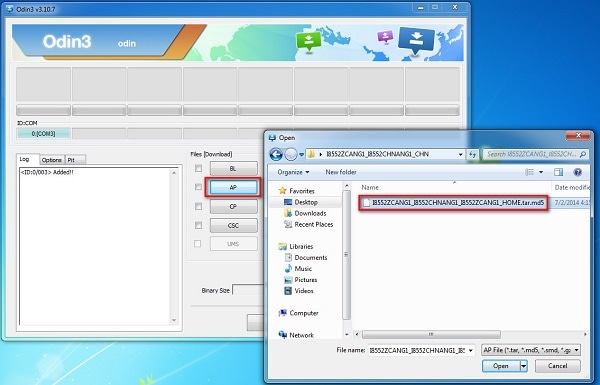
Step 6: Now, you may use a USB to connect your Oppo A2 to the PC. Odin will recognize your device, and in the Odin window, you will see a message saying “Added”.

Step 7: In this step, find the tar.md5 file you downloaded by clicking on “PDA” or “AP” on the Odin window and then click “Start”.
Finally, once the flashing process is complete, your Oppo A2 phone will reboot and start normally, and you may see a “Pass” or “Reset” message on the Odin window on the PC.
Part 4: How to flash MTK Android dead phone with SP Flash tool?
SP Flash tool, also known as SmartPhone Flash tool is a popular freeware tool used to flash custom ROM or firmware in MTK Android phones. It is a very successful tool and is extremely easy to use.
Let us look at the steps given below to learn how to flash dead Android phones using PC with the help of the SP Flash tool.
Step 1: To start with, download and install the MTK driver on your PC and then download the ROM/firmware you wish to use for flashing purposes.
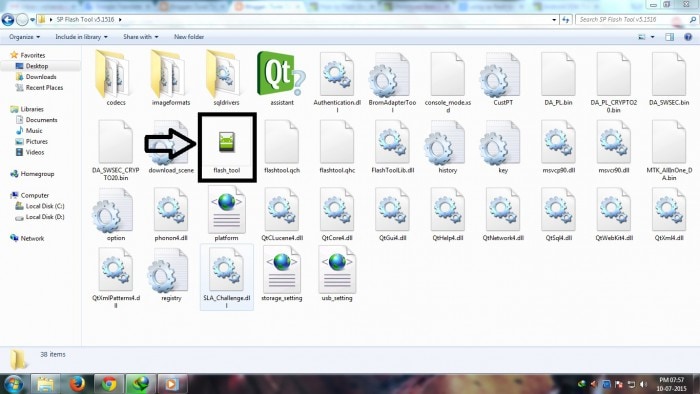
Step 2: Once done, you should download the SP Flash tool and extract it on your PC and move on to launch the Flash_tool.exe file to open the SP Flash tool window.
Step 3: Now, on the SP Flash tool window, click on “Download” and select “Scatter-loading”.

Step 4: The last step would be to locate the file downloaded by you and click “Open” and then finally, select “Download” on the SP Flash tool window.
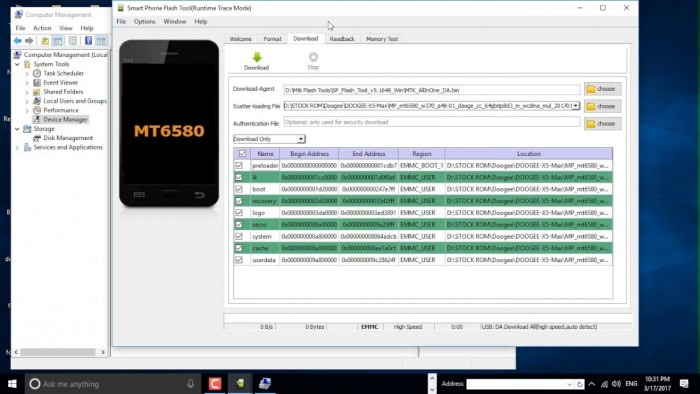
After completing the above steps, connect your dead device to the PC with a USB cable and wait for it to get recognized. The flashing process will take a few minutes to finish and then you will see a green circle indicating “OK Download”.
That’s it! Now simply disconnect your phone and wait for it to reboot.
Part 5: How to flash Oppo A2 dead phone with the Phoenix tool?
Phoenix tool, better known as PhoenixSuit, is a tool similar to the SP False tool and Odin. It works very well with Oppo A2 and is the best answer to “How to fix dead Android phone?”, “How to flash dead Android phone using PC?”, etc.
Let’s look at the steps of flashing the Oppo A2 dead phone with the Phoenix tool.
First, download and install the Oppo A2 PC Suite driver on your PC. Then you will need to download the PhoenixSuit tool and then launch it.

Now, on the toolbar, click “Tools” and select “Data Package Download” from the drop-down list.

Then move to download the firmware for your dead Oppo A2 and save it in a new Folder. Once done, go back to the Phoenix tool window and click on “File” and select “Open Product”.

Simply, feed in the details and then click “OK”.

After this, click on “Flashing” and select “Firmware update” and then browse to select the appropriate product code and then click “OK” again.
Then move on to select “Dead Phone USB Flashing” from the Firmware Update Box.

Lastly, just click on “Refurbish” and connect your phone to the PC using a USB cable.
That was it, the flashing process may take up to a few minutes after which your dead Oppo A2 will restart automatically.
Part 6: How to flash a dead phone that won’t turn on via factory reset?
Using tools for flashing Android devices can be a solution; however, it is heavily restricted to the Oppo A2 device models. For a generalized solution, there can be other options that you can go with. Factory resetting an Android device by putting it in Recovery Mode is one way. To know how to flash a dead Android phone using factory reset, go through the steps featured below:
Step 1: To initiate the process, you will have to put your Oppo A2 in Recovery Mode. Generally, Android phones are put in Recovery Mode by holding the “Power” and “Volume Up” keys for a few seconds after turning them off. The key combinations can vary according to your Oppo A2.
Step 2: As the Android boot menu opens on your screen, use the “Volume Down” and “Volume Up” keys to scroll up and down the menu. On accessing the “Wipe Data/Factory Reset” option, use the “Power” key to select the particular option.
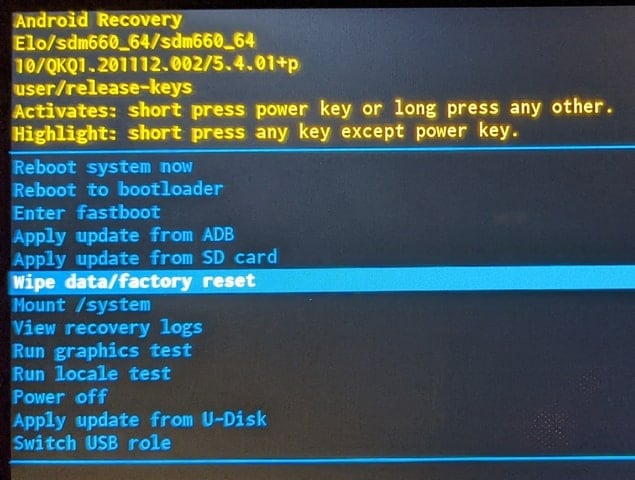
Step 3: Continue to select the “Yes” option for confirming the factory reset of the Android device. The phone will automatically reboot after successfully factory resetting.
Part 7: How to flash a dead Android phone by checking screen faulty
The screen of your Oppo A2 may be faulty, due to which it is not launching. While seeking the right way of how to fix a dead Android phone, you can force restart your phone using the Volume buttons according to your device model.
If the Android vibrates on restarting and the screen does not lighten up, the problem can be directed to a hardware fault. The screen is broken and needs physical assistance to resolve the issue.

Part 8: How to fix a dead Android phone by changing the battery
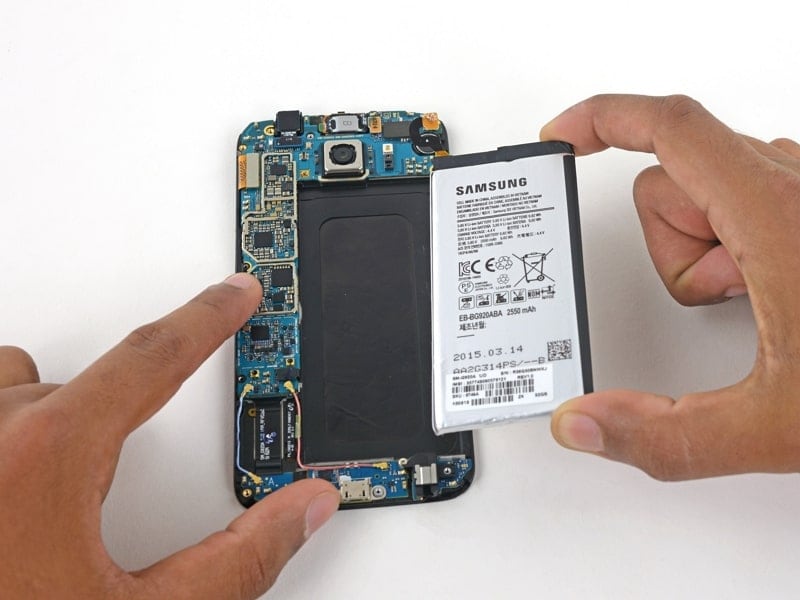
Another solution that can help you fix the dead Android phone is changing its battery. The battery of an Android device can last up to 3 years. When its capacity drops to a bare minimum, it is best to change the battery of your Android. Upon trying to restart your Oppo A2, if it does not, you might need to replace your battery. All Android phone batteries are removable, which should be regulated with proper supervision.
Part 9: How to repair dead Android phone by contacting official support
If you are unable to discover any proper solution for how to flash dead Android phones, you might have to consult the respective customer support of the Android phone manufacturers. Consult customer support to discover why the phone is dead and how it can be flashed. The respective personnel will assist you in resolving the issue, which might require monetary input from your side.
Conclusion
A dead Android phone might be the cause of worry, but the techniques given above to flash your dead Android device safely are very helpful. These methods have been tried and tested by users all over the world and thus, we recommend them to you. If your phone is dead or has become unresponsive, do not panic. Depending on your phone’s brand, here are ways to guide you on how to fix the dead Android phone and how to flash dead Android phone using PC.
It has been observed that Wondershare Dr.Fone – System Repair (Android) assists in the best way. Resolve all your concerns involving your dead Android phone and flash it to make it operable again.
Carefully follow the instructions given, and you will be able to reboot your dead Android phone successfully.
7 Fixes for “Unfortunately, Phone Has Stopped” on Oppo A2
Encountering issues with the Phone app is never welcoming. Being one of the useful apps, seeing it crashing and unresponsive gives sheer despondency. If talked about the triggering points, they are numerous. But the central point is what to do when the Phone app keeps crashing. In this article, we have discussed this issue in detail. To know this and more about why the “Unfortunately, Phone has stopped” error crops up, read this article and get the problem sorted on your own.
Part 1: When can the “Unfortunately, Phone has stopped” error come?
First things first! You need to stay updated on why the Phone app keeps stopping or crashing before jumping to any solution. Following are the points when this error comes up to annoy you.
- When you install a custom ROM, the issue might occur.
- The upgrading of the software or incomplete updates can lead to crashing the Phone app.
- Data crashes can be another reason why this error shows up.
- Infection through malware and virus on your phone is also included when the Phone app might crash.
Part 2: 7 Fixes for the “Unfortunately, Phone Has Stopped” error
2.1 Open the Phone app in Safe Mode
First and foremost, the thing that can let you get rid of this trouble is Safe Mode. It is a feature that will end any excessive background functioning of the Oppo A2 device. For instance, your device will be able to run sans any third-party apps when in Safe mode. Since the important functions and the naïve apps will be running on the Oppo A2 device, you will get to know if it’s really a software glitch or not by running the Phone app in Safe mode. And this is the first solution we would recommend you make use of when the Phone app has stopped. Here is how to enable Safe Mode.
- Switch off the Oppo A2 phone first.
- Now keep pressing the “Power” button until you see the Oppo A2 logo on the screen.
- Release the button and immediately press and hold the “Volume Down” key.
- Leave the key once the Oppo A2 device is in Safe mode. Now, the third-party apps will be disabled and you can check if the Phone app is still not responding or everything is fine.
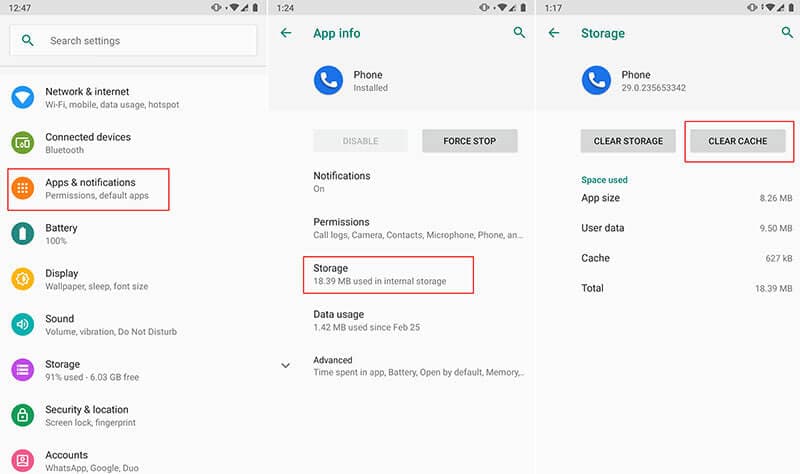
2.2 Clear the cache of the Phone app
The cache should be cleaned timely if you want any app to work properly. Due to the constant usage, the temporary files get collected and may corrupt if not cleared. Hence, the next solution you should try when the Phone app keeps stopping is to clear the cache. Here are the steps to be performed.
- Open “Settings” on your device and go to “Application” or “Apps”.
- Now from the list of all applications, go to “Phone” and tap on it.
- Now, click on “Storage” and choose “Clear Cache”.
2.3 Update Google Play services
Since Android is created by Google, there must be some Google Play services that are crucial to run several system functions. And if attempting the previous methods isn’t of any use, try updating Google Play services when you find the Phone app stopped. For doing this, you need to make sure that automatic updates are turned on in Google settings. If not, enable it and get the apps including Google Play services updated for smoother functions.
2.4 Update the Oppo A2 firmware
When the firmware is not updated, it may conflict with some apps and maybe that’s why your Phone app falls prey. Therefore, updating Oppo A2 firmware will be a sane step that should be taken when the Phone app has stopped. Follow the below-mentioned steps and then check if the Phone app is opening or not.
- Open “Settings” and go to “About Device”.
- Now tap on “Software Updates” and check for the availability of the new update.
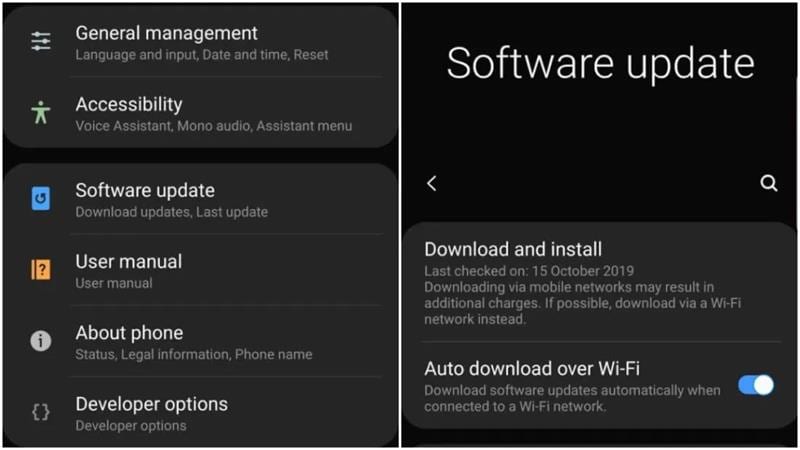
- Download and install it and then try to use the Phone app.
2.5 Clear partition cache
Here is another resolution for the “Unfortunately Phone has stopped” error. Clearing the partition cache will remove the whole cache of the Oppo A2 device and make it work like before.
- Switch off your device to begin with and enter the recovery mode by pressing the “Home”, “Power” and “Volume Up” buttons.
- The recovery mode screen will appear now.
- From the menu, you need to choose “Wipe Cache Partition”. For this, you can use the Volume keys to scroll up and down.
- To select, press the “Power” button.
- The process will begin and the Oppo A2 device will restart post it. Check if the problem still persists or it is finished. If unfortunately not, get to the next and the most productive solution.

2.6 Get the Oppo A2 system repaired in one click
If still, the Phone app keeps stopping after trying everything, here is the most effective method that can surely help you. Dr.Fone - System Repair (Android) is a one-click tool that promises to repair Android devices hassle-free. Be it apps crashing, the black screen, or any other issue, the tool has no problem fixing any sort of issue. Here are the benefits of Dr.Fone - System Repair (Android).

Dr.Fone - System Repair (Android)
Android repair tool to fix “Unfortunately, Phone Has Stopped” on Oppo A2 devices.
- It takes no special skills to operate it and fairly works to bring the Android system to normalcy.
- It shows great compatibility with all Oppo A2 devices and other Android phones supporting over 1000 Android brands.
- Fixes any kind of Android issue without any complication.
- Easy to use and trusted by millions of users and therefore has a higher success rate.
- Can be downloaded freely and friendly user interface.
3,106,444 people have downloaded it
How to fix crashing Phone app using Dr.Fone - System Repair (Android)
Step 1: Get the Software Installed
Click the “Start Download” button to download the tool on your computer, and then open the program to begin the repair, click on “System Repair”.
Step 2: Plug the Phone with PC
Take your original USB cord and then connect your Oppo A2 to the computer. When the Oppo A2 device is connected, click on “Android” from the two tabs > click “Start”
Step 3: Enter the Details
As the next step, enter some important details on the next screen. Be sure to enter the right name, brand, and model of the Oppo A2 device. When done everything, verify once and click on “Next”.
Step 4: Downloading Firmware
Downloading firmware will be the next step. Prior to this, you have to go through the instructions given onscreen to enter the DFU mode. Please click on “Next” and the program will bring the suitable firmware version and start downloading it.
Step 5: Get the Oppo A2 device Repaired
When you see the firmware has been downloaded, the issue will begin to get resolved. Hang on and wait until you get notified for the repair of the Oppo A2 device.
safe & secure
2.7 Factory reset
If none of the above methods worked for you, the last resort you are left with is a factory reset. This method will wipe everything from your device and make it function like normal. We also suggest you make a backup of your data if it is important so as to prevent the loss. Here is how to do this to fix the crashing Phone app.
- Open “Settings” and go to the “Backup and Reset” option.
- Look for “Factory data reset” and then tap on “Reset phone”.
- Within a while, your device will go through resetting and boot up to normalcy.

safe & secure
Also read:
- [New] In 2024, The PS3 Game Viewer's Guide Filming Your Playtime
- [Updated] 2024 Approved Assembling an Original Identification Alphanumeric
- 10 Quick DIY Moviemaking Secrets Unveiled
- 6 Solutions to Fix Error 505 in Google Play Store on Samsung Galaxy F15 5G | Dr.fone
- Full Solutions to Fix Error Code 920 In Google Play on Oppo F23 5G | Dr.fone
- Google Pixel 8 Camera Not Working Unexpected Error? Fix It Now | Dr.fone
- How To Fix Unresponsive Touch Screen on Nokia C300 | Dr.fone
- Immediate Fixes: Resetting a Sony PS5 Controller
- In 2024, Everything You Need to Know about Lock Screen Settings on your Infinix Smart 8 Plus
- In 2024, Step Into New Realms with VR Technology
- In-Depth Analysis of Cutting-Edge Computing by Tom's Hardware Experts
- Reasons for Motorola G54 5G Stuck on Startup Screen and Ways To Fix Them | Dr.fone
- Unleash Your Potential with These 12 Best Flip-Screen Cameras
- Vivo V30 Lite 5G Stuck on Screen – Finding Solutions For Stuck on Boot | Dr.fone
- WebM ファイルから MP4 への最適なコンバーターとその使い方をご紹介します
- What To Do if Your Google Pixel 8 Pro Auto Does Not Work | Dr.fone
- What To Do if Your Nokia C300 Auto Does Not Work | Dr.fone
- Title: How To Revive Your Bricked Oppo A2 in Minutes | Dr.fone
- Author: Ariadne
- Created at : 2024-10-16 18:20:01
- Updated at : 2024-10-22 19:41:39
- Link: https://howto.techidaily.com/how-to-revive-your-bricked-oppo-a2-in-minutes-drfone-by-drfone-fix-android-problems-fix-android-problems/
- License: This work is licensed under CC BY-NC-SA 4.0.