
My Videos Arent Playing on Oppo Find X7 Ultra – What Can I Do? | Dr.fone
My Videos Aren’t Playing on Oppo Find X7 Ultra – What Can I Do?
There’s a reason Android holds over two-thirds of the mobile operating system market share. It’s a powerful OS that gives you the utmost freedom and flexibility, allowing you to customize your phone to suit your needs.
However, regardless of the capabilities of Android phones and the features that come with their OS, just like any other smartphone, they’re prone to glitches and annoying issues – especially with their video files.
You may encounter videos not playing on your Oppo Find X7 Ultra more frequently than you like. Whether it’s video files you’ve recorded using your phone or files you’ve downloaded, this glitch can get pretty annoying pretty fast. Fortunately, there are several solutions you could try to fix it.
See what you can do if videos won’t play on your Android.
Why Are My Videos Not Playing On Android?
Considering how most smartphone manufacturers tend to emphasize the unbelievable quality of their cameras, perfect night modes, seamless slow-motion recordings, superb resolution, and more, you’d expect all images and videos to function flawlessly on your Android. Unfortunately, that’s not always the case.
Occasionally, you could find that the videos you access from your gallery won’t play, sending you the message that “video cannot be played” or “can’t play video.” Other times, you might find that YouTube videos won’t load correctly or your downloaded videos won’t open in your media player.
There could be a wide variety of reasons that is happening, including:
- Corrupted video
- Corrupted SD card
- Outdated media player
- Outdated OS
- Incomplete download from the source
- Low storage
- Video downloaded from a suspicious source
An array of hardware and software issues could lead to you being unable to play videos on your Android. However, that doesn’t mean you should immediately send your device for repairs or delete the videos that won’t play. There might be a few better solutions you could try.
What You Can Do if Your Videos Aren’t Playing On Android Phone
Since there are many reasons for having problems with videos not playing on your Android, you could also try many solutions.
1. Do a Factory Reset
While a factory reset shouldn’t always be the first solution you go to, it can usually prove to be the most effective one.
A factory reset, aka a master reset or a hard reset, returns all your software configurations to the original state when the phone was first manufactured. In the process, all your data is lost – any photos and videos you have on your phone and the apps you’ve installed will be deleted. You’ll be logged out of all your accounts and won’t have access to your message history, contacts, and more.
While it seems like an extreme step, it can help fix any video issues you might encounter due to software bugs.
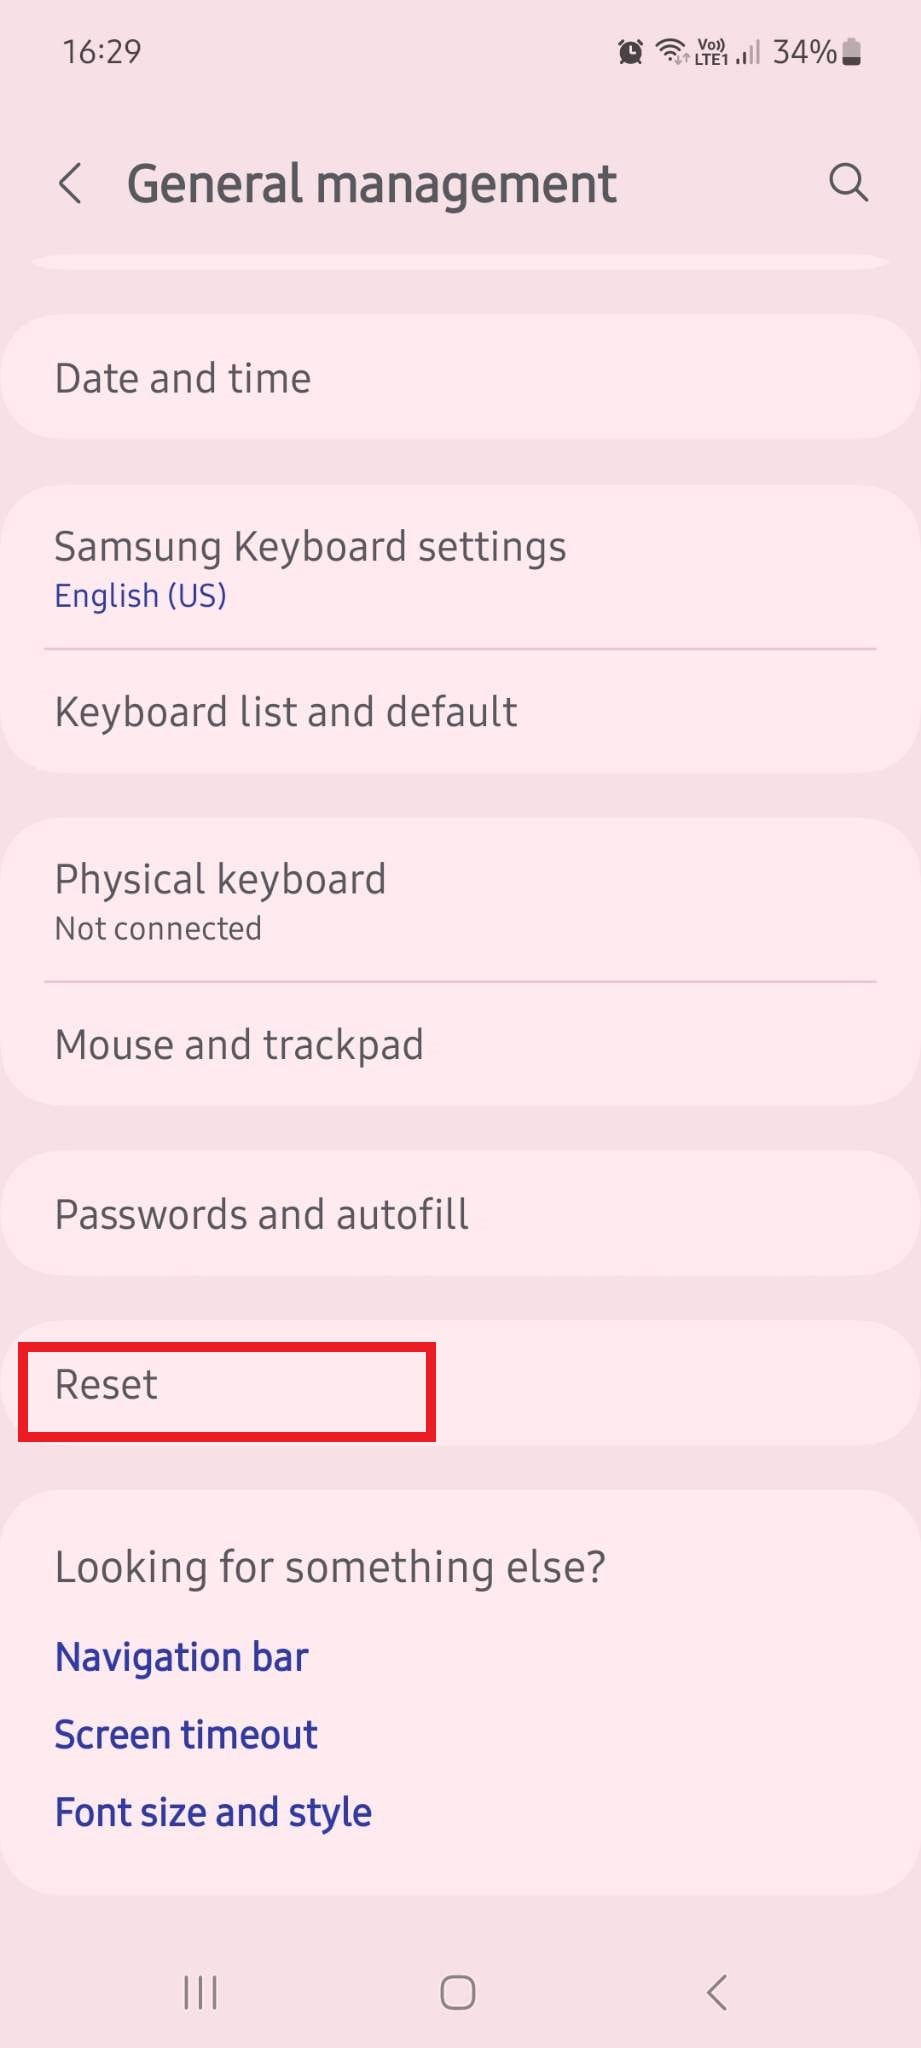
Though there could be slight variations between different phones, you can usually perform a factory reset by going to Settings > General Management > Reset > Factory data reset > Reset.
2. Restart Your Oppo Find X7 Ultra
While a factory reset is all but guaranteed to fix the issues you’re encountering with your videos, sometimes a simple restart might do the trick just fine. A restart works by clearing your RAM (Random Access Memory).
In a nutshell, RAM stores short-term data that helps your processor complete tasks quickly. This data is always easily accessible, and it’s what helps your phone quickly open webpages and apps you’ve recently used.
Over time, however, your RAM can get filled with unnecessary data and data fragments, which, in turn, can confuse your processor.
Restarting your phone will clear your RAM and potentially eliminate any data fragments causing your videos to be unplayable.
3. Check the Video Format
As a general rule of thumb, the videos you capture should be in a format your device supports. However, the videos you’ve downloaded might not be. That’s why checking the files’ video format before trying other possible fixes is in your best interest.
If the format isn’t supported, installing the right video player with the necessary compatibility is the most straightforward fix. Some of the most popular video players for Android include VLC for Android, GOM Player, MX Player, Bsplayer, and RealPlayer. You can easily find all of them in the Google Play Store.

4. Check the Internet Connection
If you’re having problems playing downloaded or online videos, check your internet connection to see if there’s an issue there. If your internet’s down, any downloaded videos might not have downloaded correctly, and any online videos that haven’t been loaded will not play.
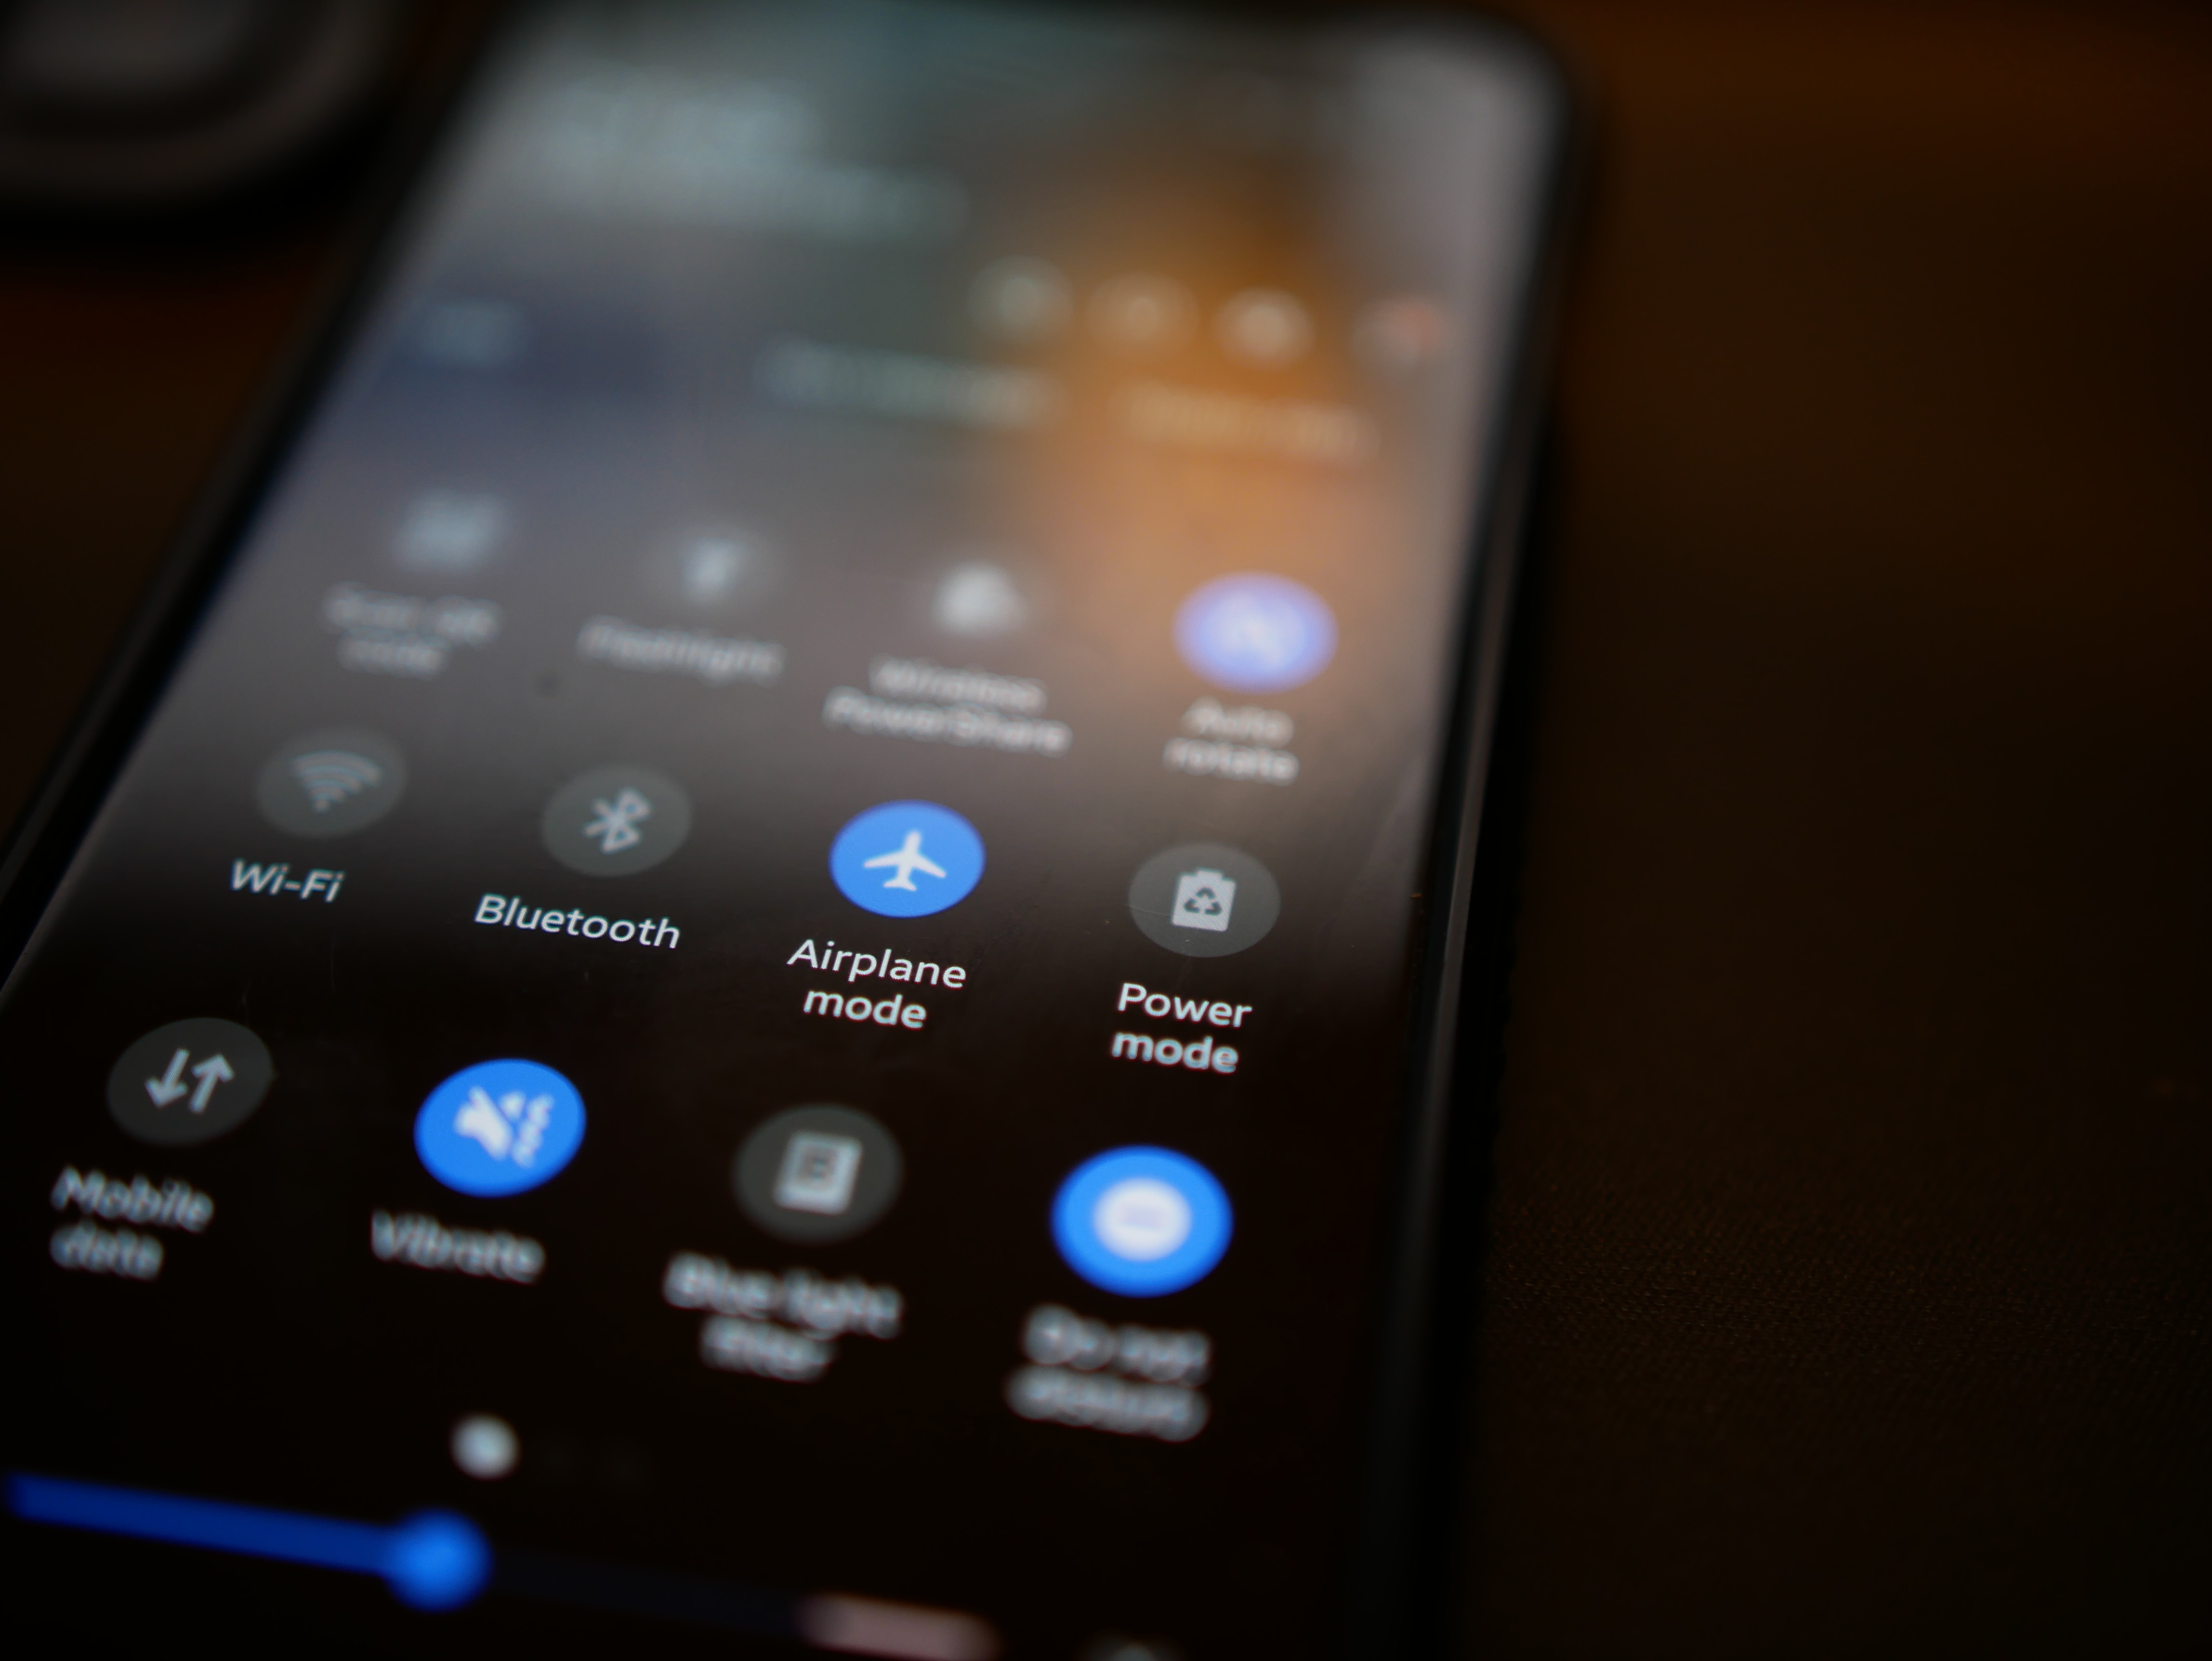
Make sure that you turn the Airplane mode off and your Wi-Fi on. Check the connection and test your internet speed to see if everything works properly.
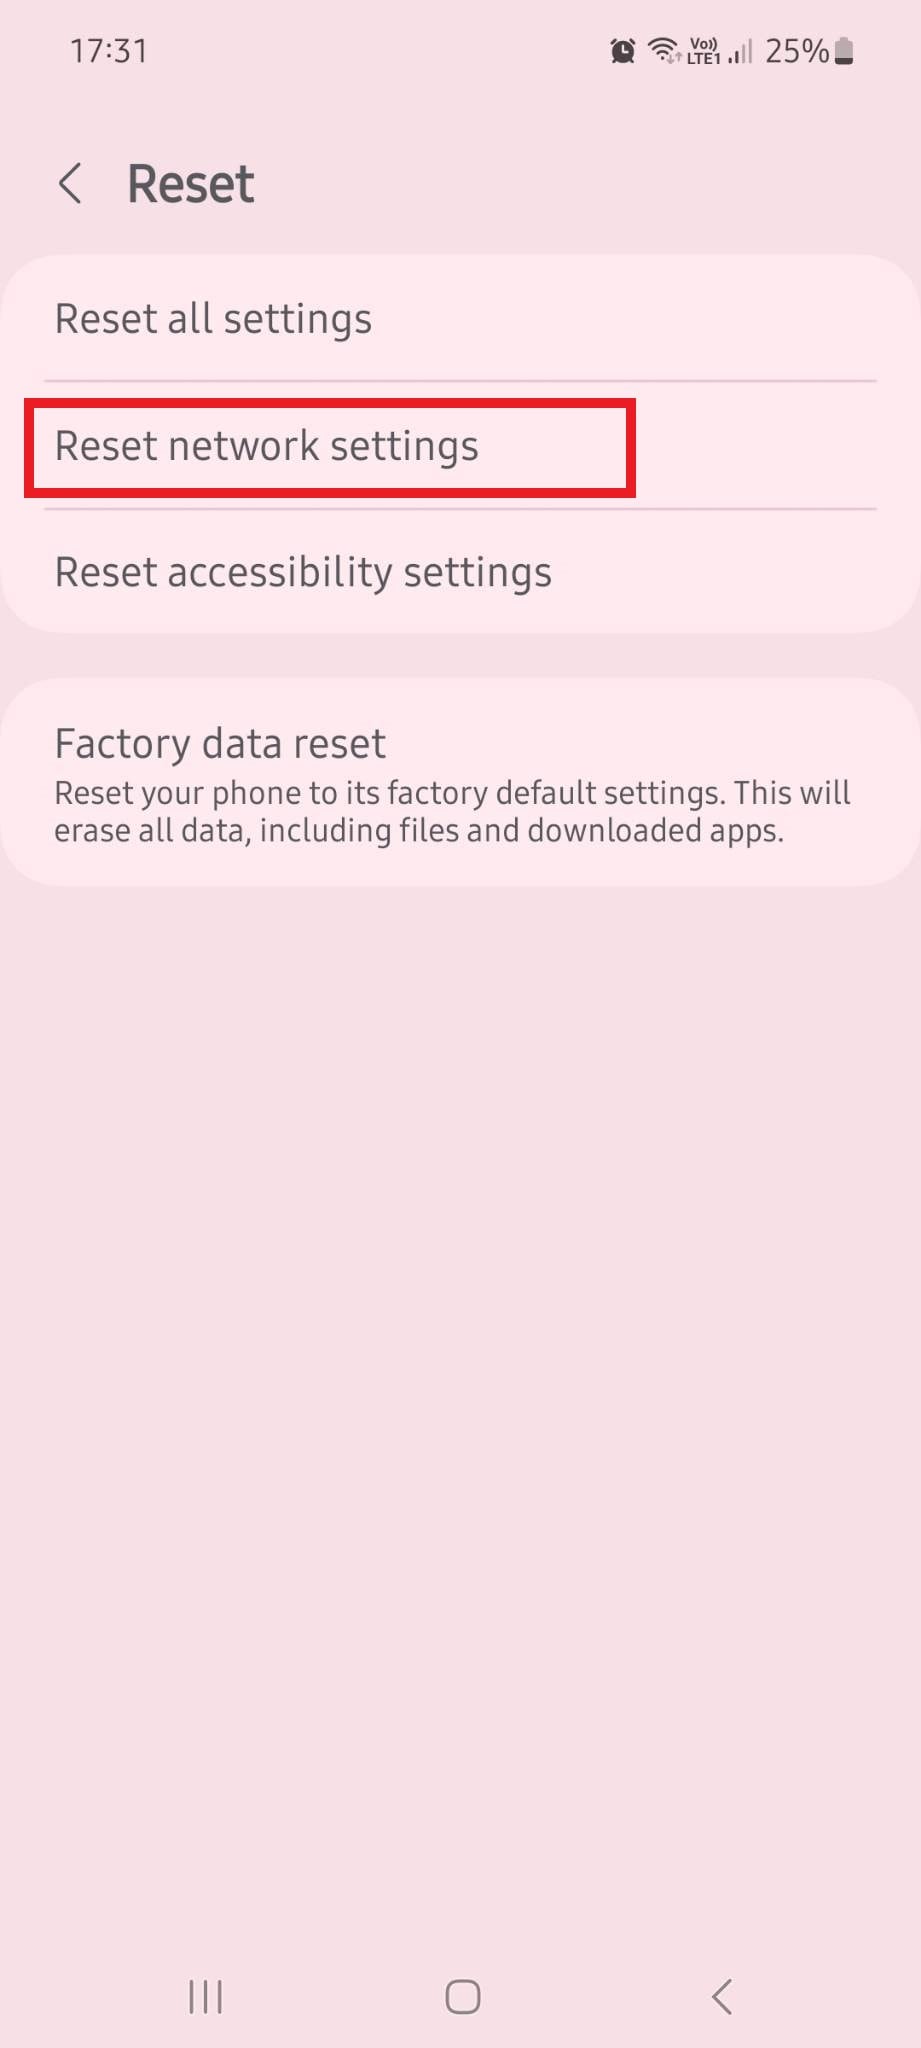
You might need a network reset if your phone can’t connect to a Wi-Fi network. The path might differ between Android devices, but you should be able to find the option for a network reset at the exact location of your factory reset. Go to Settings > General Management > Reset > Reset Network settings > Reset settings.
5. Clear the Cache
The cache stores a copy of your most commonly used data, helping decrease loading time and improve your phone’s performance. However, too much cache data can take up too much space and cause data corruption, preventing you from accessing some of your apps.
On average, you should clear your phone’s cache every few months to ensure that everything runs smoothly. If you encounter issues with your videos not playing on Android, clearing the cache could be just the fix you need.
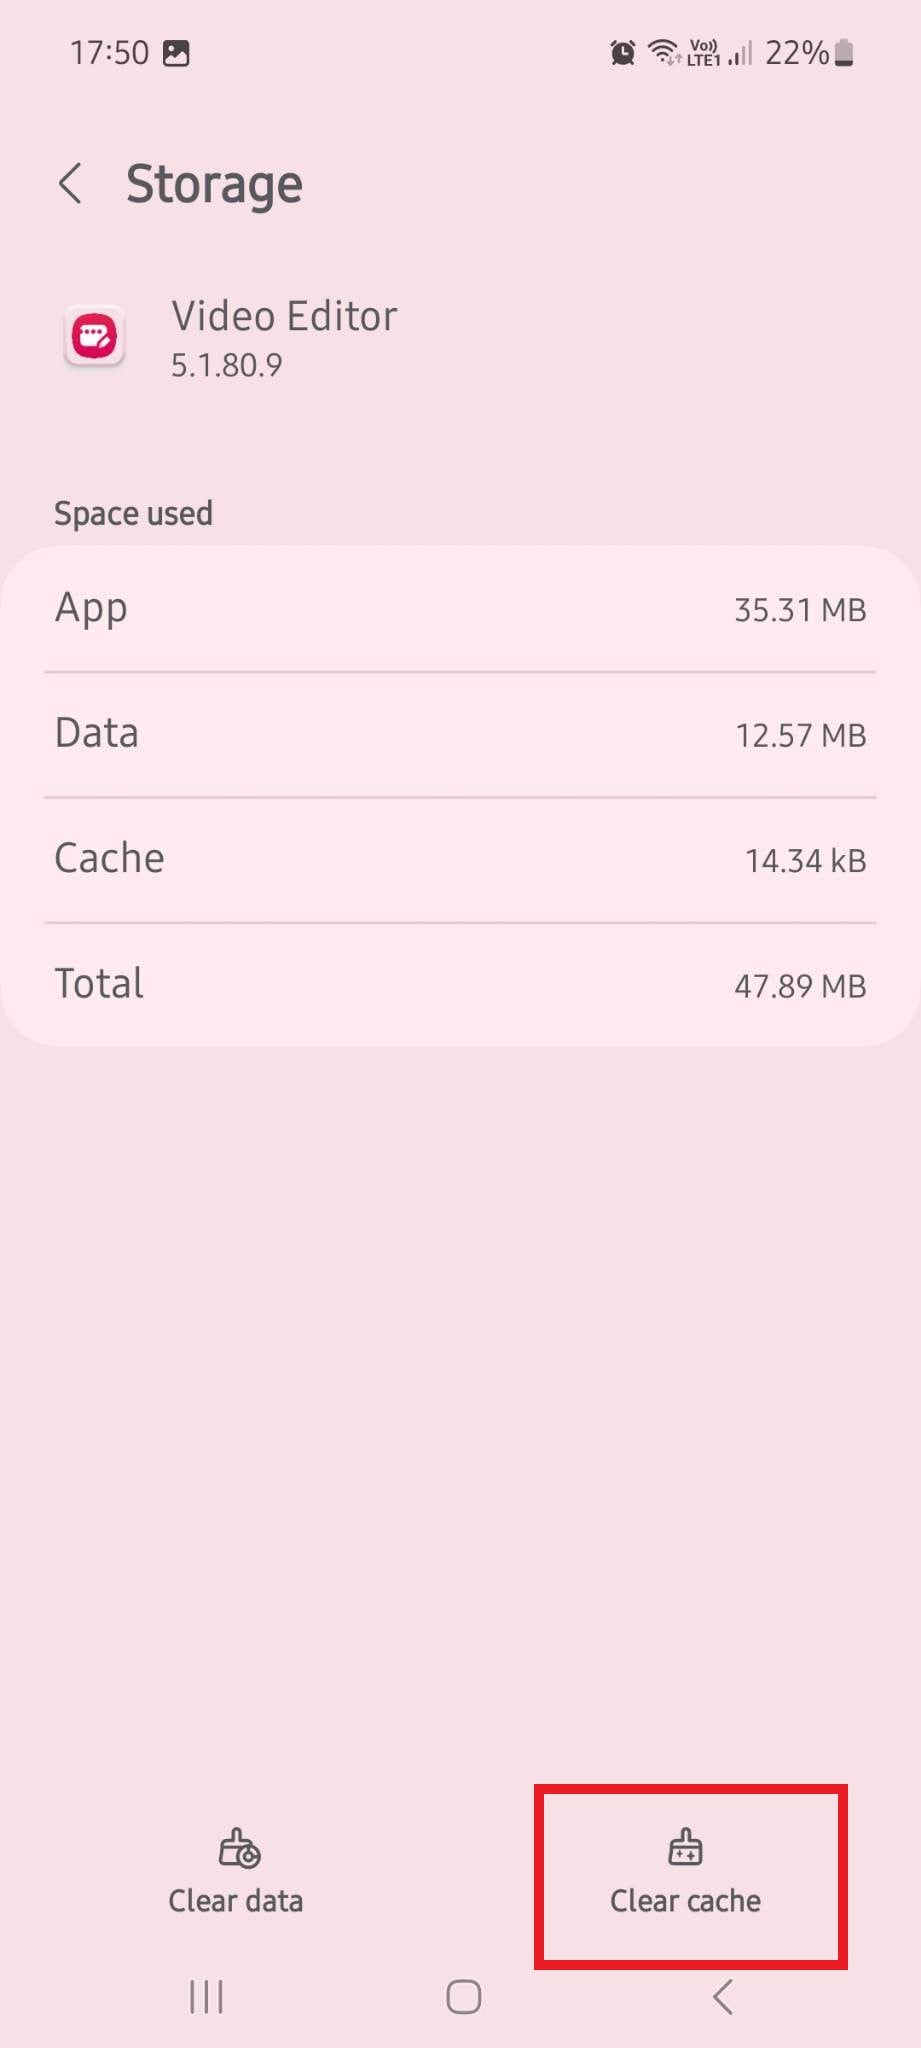
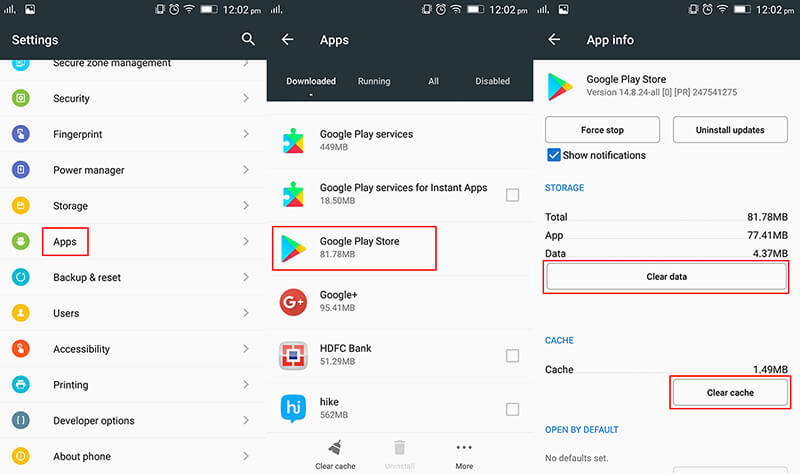
To clear the cache from your apps, you’ll want to go to Settings > Apps. From there, select the app you want to remove the cache from, scroll down to Storage, then choose Clear Cache.
6. Update Android OS
An outdated Android OS is usually the culprit behind many bugs and glitches you may encounter on your phone. It can prevent you from playing video files, accessing apps, taking photos, and more. It can lead to data corruption and loss, expose you to malware and cyberattacks, and compromise phone performance.
Regularly updating your OS to its latest version is always in your best interest. It can solve the problem of your videos not playing and protect you and your sensitive data.
7. Repair Your Android OS

You might already have the latest version of Android OS, but that still doesn’t mean your OS is functioning as it should. Maybe your phone was interrupted while downloading or installing the new OS version. Maybe your phone had underlying OS issues, or you accidentally downloaded files you shouldn’t have. Whatever the case is, if your videos don’t play due to an OS problem, you’ll need to repair your OS.
The best way to do it is with a reliable Android OS repair solution like Wondershare Dr.Fone.
Fast, efficient, and powerful, Wondershare Dr.Fone can repair your Oppo Find X7 Ultra in several simple steps:
- Step 1: Download and launch Wondershare Dr.Fone on your PC.
- Step 2: Go to Toolbox, then use a cable to connect your Oppo Find X7 Ultra to your PC.

- Step 3: Select System Repair > Android.
- Step 4: In the new window, select Start.

- Step 5: Fill in information about your phone’s Brand, Name, Model, Country, and Carrier.
- Step 6: Agree with the warning and select Next.

- Step 7: Follow the on-screen instructions to put your device in Download Mode.
- Step 8: Wondershare Dr.Fone will automatically start downloading the necessary firmware, so wait for the process to finish.

- Step 9: When the download is complete, select Fix Now to install it.
- Step 10: Type 000000, then select Confirmto continue fixing your device.

- Step 11: Wait for the Repairing Nowprocess to finish.
- Step 12: Once the process is complete, click Done.
If the reason your videos wouldn’t play on your Oppo Find X7 Ultra was a fault in the OS, everything should be functioning well after repairing your phone with Wondershare Dr.Fone.
Remember that repairing your device with Wondershare Dr.Fone might result in data loss. Back up all your essential data before fixing your OS using this software to stay safe.
8. Update the Video App
Sometimes, it’s not the outdated OS version causing issues but rather the out-of-date video app. Like OS updates, app and other software updates often contain fixes for common problems and security patches. Not every update is there simply to introduce new features.
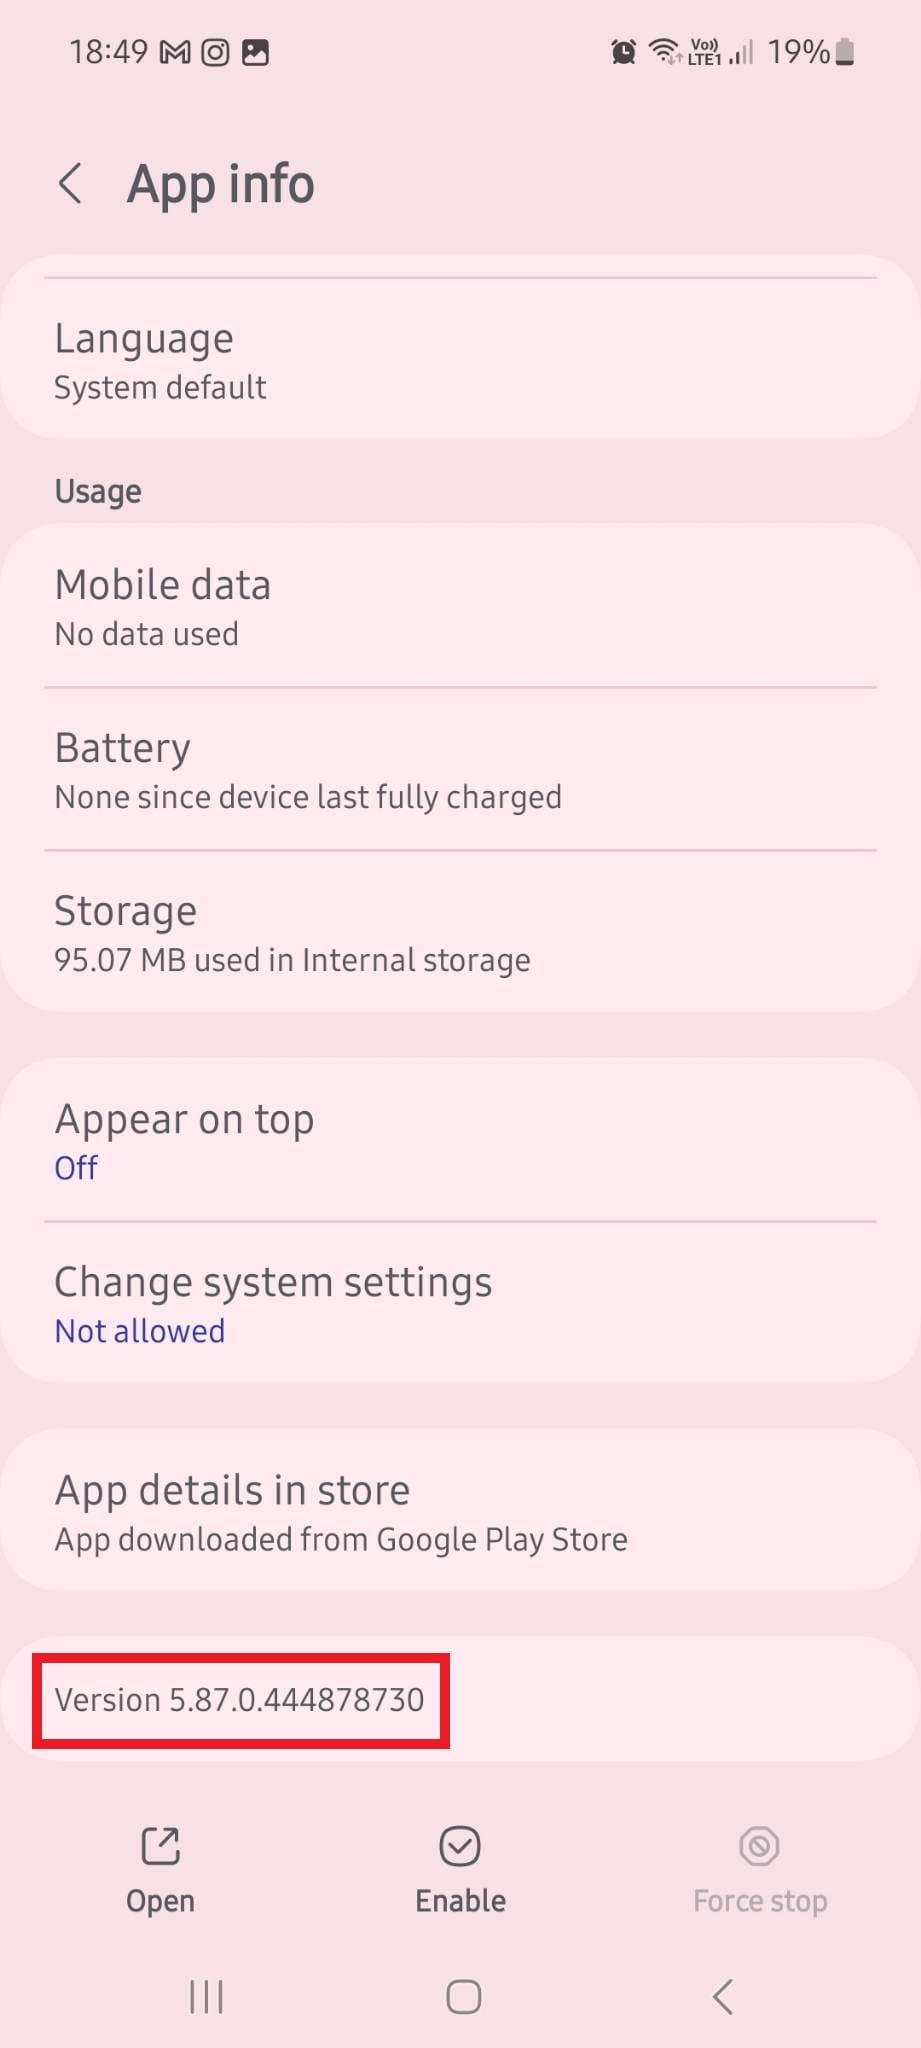
To check whether you’re using the latest version of your video player, go to Settings > Apps. Find your video player app, tap it, and scroll down to the bottom of the page to see the version installed on your phone.
9. Clear Cookies and Browsing Data
If online videos are causing problems, not your recorded or downloaded ones, you might be due for a quick cookie and browsing data clearing.
Cookies are usually there to improve the user experience, allowing you to load websites faster and enjoy improved performance. However, if your cookies and browsing data occupy too much space, they could pose problems.
You’ll first need to launch your mobile browser to clear cookies and browsing data. If you’re using Google Chrome, the process is simple and streamlined. Tap the three dots in the upper right corner and go to Settings. From there, go to Privacy and security > Clear browsing data > Clear data.
10. Reinstall Video Apps
If you still have issues with videos not playing on your Oppo Find X7 Ultra, you could try deleting and reinstalling your video apps. Sometimes, simply updating the video app might still retain the glitch causing problems. However, if you delete it in its entirety and then install it again, the issue should be gone.
To uninstall the video app on your Android, go to Settings > Apps. Locate the app you want to delete, then tap Uninstall at the bottom of your screen.
To reinstall it again, go to the Google Play Store, search for the video app you want to have, then click Install.
 safe & secure
4,974,400 people have downloaded it
Conclusion
Like other smartphones, Android devices occasionally encounter glitches when playing video files. In most instances, the solution can be as simple as restarting your device. In others, you might have to perform a full factory reset or use software like Wondershare Dr.Fone to repair your Android OS.
Whatever the case is, don’t despair. There’s usually a solution that can fix the problem and ensure your device works as expected.
Play Store Stuck on Downloading Of Oppo Find X7 Ultra? 7 Ways to Resolve
Part 1: Symptoms when “Play Store Stuck on Downloading”
Just as any problem gives some indication of anything wrong is going to befall. Similarly, a user does feel some unexpected turns of events resulting in Play Store to stick at downloading. If one happens to see that the progress bar has suddenly frozen to a certain scope and taking ages to march any further, it is treated as the first signs for Play store not working properly. Another, such scenario is where your apps are not able to download easily. Rather, the Play store reflects a message downloads are yet in the pending queue. If one happens to witness such problems, these can be in fact be giving you the warning signal of the Play store problem
Part 2: Causes of why “Play Store Stuck on Downloading”
With technology, uncertainties are bound to happen. It becomes quite tricky to analyze the real problem and craft a solution. As, there can be several causes that might be disturbing the smooth functionality of Play store. Here are some collated issues that we’ve gathered that are indicative of the cause.
- The time is not rightly setup: Sometimes, the unexpected root cause of play store failing to work is due to the date and time not set up rightly. If the system time is not according to the standard timing, then the application can misbehave.
- Fluctuations in internet connection: If internet speed is running too low or has weaker connection, Play Store download stuck at 99 problem may arise out. Always, use a good speed of internet.
- Get rid of Cache: Extras of cache can pose to be problematic in the working of applications. Users must timely clean their devices so as to brush away any kind of cache memory.
- Outdated version of Play store app: Users generally do not feel the urge for updating the play store app. It is important to use only the updated version so as the functioning of Google Play app is not affected.
Part 3: 7 fixes for Play Store stuck on downloading
3.1 Check SD card and phone storage space
All the applications, data of one’s device is generally loads directly in phone’s storage or the SD card (if plugged). Hence, it is crucial to check whether your phone storage or SD is not fully occupied. As it can indirectly be the reason why the issue of “**Play Store download stuck at 99%**” might occur. Ensure to get rid of any application that you are no longer using. Or, consider deleting any picture, videos or documents that aren’t required by you.
3.2 Check Wi-Fi or cellular data connection
Sometimes, it’s not your phone that is going all faulty, the root cause might be the internet connection. If the internet is running low or does not seem to be stable, then the play store download problem may occur. Users must ensure that the Oppo Find X7 Ultra device they are working should have a stable network connection so as to combat the problem. Then, they can try downloading the application and check if the problem is prevalent or not.
3.3 One click to fix corrupted Play Store components
The world of internet and its intricacies are beyond a novice’s realm. Chances of malfunctioning of Google Play Store may be due to the components relating to Play Store may have gone corrupted. To resolve such issue, the need of a good software that is courageous enough to tackle all kinds of issues is need. For that, the only perfect solution is Dr.Fone - System Repair (Android), an impeccable software useful in providing speedy recovery of your phone. With it you can ward away the issues like boot problem, black screen of death, phone stuck etc.
Dr.Fone - System Repair (Android)
Android repair tool to fix Play Store stuck on downloading
- Can easily deal with all kinds of problems disrupting the activities of Android phone including app crashes, system crash, black screen of death, Play Store stuck on downloading。
- 1-click technology helpful in repairing rare kinds of issues like phone stuck in boot loop, recovery mode, Oppo Find X7 Ultra logo or Android devices getting bricked.
- Supports compatibility with several kinds of Android phones, including the all Oppo Find X7 Ultra models even the Oppo Find X7 Ultra S9.
- The easy to use interface is crafted with underlying features and functionalities in a right manner.
- Provides 24 hours customer assistance to users for resolving queries or problems.
3,224,929 people have downloaded it
Step by Step Tutorial
Here is the complete guide which will help users in understanding how Dr.Fone - System Repair (Android) can vanish Play store download problem completely.
Step 1: Launch Dr.Fone - System Repair (Android) and connect device
First of all, load the program on PC. In the interim, draw connection of device with phone using a genuine cable. Over the interface, tap on “System Repair” mode.
Step 2: Select Android Repair mode
Over the following screen, select “Android Repair” placed at the left panel to resolve play store stuck issue and press “Start” button too!
Step 3: Fill in the information
It is important to add in all the necessary information for successful execution of program. Make sure to give details of “Brand”, “Name”, “Country”, “Model” and all other fields.
Step 4: Ensure to Download Firmware
Now, follow the on the on-screen prompts to boot Android phone into the download mode. Once done, you’re ready to download the suitable firmware package by hitting the “Next”.
Fret not, the program will automatically detect the most suitable firmware for your device.
Step 5: Repair Android phone
After the package downloads, program will repair all kinds of problems surfacing over your phone automatically. This way, the Play store stuck on downloading will get resolved fully.

3.4 Clear data and cache of Play Store and download again
Did you know the piling up of cache memory can certainly pull off a great deal for Play Store getting stuck? Cache data may generally stash the data so that you can access it even in future course. But, this do east up a good chunk of space and result in the misbehavior of Play Store app. You can opt to brush away Play store stuck on downloading by using the following steps.
- Get your Oppo Find X7 Ultra and visit “Settings”.
- Then, surf for “Application manager” option and launch “Google Play store” option.
- From there, click on “Cached Data” and select the “Clear Cache” option.
- Optionally, make use of “Force Stop” feature to halt the functioning of the app.
- At last, reboot/restart your smartphone.
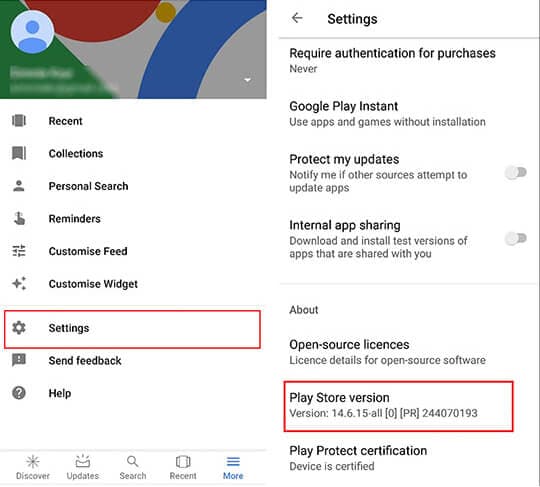
3.5 Update Play Store to the latest version
When was the last time you cared to update your Play store app? Generally, users overlook the need of updating the application. As, they think that it may not be of any greater importance. But, in reality working in an outdated version can directly impact Play Store and cause download problem. Follow the below steps to update Play Store to latest version.
- From phone, just launch Google Play Store app from app drawer.
- Press the 3 horizontal lines icon over the top and locate “Settings” from the left menu.
- In Settings, browse for “Play Store Version” located under “About” section.
- Tap on it, if it shows that Play Store app is not updated then proceed with the on-screen prompts to update it to the latest version.
3.6 Try another Google account
If you’re unable to see a streak of hope and wondering why my Play Store is still showing download pending. Well, some unexpected issue might be there with your Google account. As, there are times where your existing Google account can be the hurdle. Therefore, trying your hand in some other Google account might assist to work things out.
3.7 Avoid downloading large apps
Last but certainly not the least, users must avoid downloading large applications. Especially those games that eats a whopping number of 300+MB of your space. You must always watch out on size of the application is and only then craft the decision to load it on your device. This may help out in keeping the Play store stuck on downloading problem at bay.
9 Quick Fixes to Unfortunately TouchWiz has stopped Of Oppo Find X7 Ultra
“Unfortunately TouchWiz home has stopped” is the talk of the town due to annoying TouchWiz UI, a front-end user interface developed by Oppo Find X7 Ultra. Not to mention, the Oppo Find X7 Ultra has borne a whole lot of heat from its agitated users over the years and the reason is pretty much obvious due to the pre-installed bloatware apps and the theme launch “TouchWiz home”. That not just brutally annoys users and eats up a heck of internal storage space but lags up too often due to low speed and stability. As a result users end up with “Unfortunately TouchWiz home has stopped” and “Unfortunately, TouchWiz has stopped”. Apparently, there are several flaws in the design and functioning of this launcher and hence, Touchwiz keeps stopping or becomes unresponsive.
Part 1: Common scenarios when TouchWiz keeps stopping
Here in this section, we will introduce some scenarios that can be blamed for why TouchWiz is not working. Check out the following points:
- More often than not, the TouchWiz keeps stopping after an Android update. When we update our Oppo Find X7 Ultra device, the old data and cache usually conflicts with TouchWIz thereby cropping up this mess.
- When you disable some built-in apps, you might get in trouble with TouchWiz. Doing this sometimes can hamper the TouchWiz operation and raise the “**unfortunately TouchWiz home has stopped**” error message.
- Many times installing some third-party apps and widgets can cause this problem. The apps like launchers can be conflicting with TouchWiz home launcher and therefore cease it to work. Also, a glitched widget is responsible for the same i.e. forces stop the TouchWiz.
Part 2: 9 Fixes to “Unfortunately TouchWiz has stopped”
Fix “TouchWiz keeps stopping” by repairing Android system
When your TouchWiz keeps stopping and you aren’t able to proceed further, the best way to handle the situation is to repair the Android system. And the best that can help you to serve the purpose is Dr.Fone - System Repair (Android). It has the ability to fix any sort of Android system issue without any complications. To fix this issue, the tool only takes few minutes of yours and performs smoothly. Moreover, you don’t have to worry if you aren’t tech pro. This tool requires no special technical know-how. Here are the advantages you get with this tool.
Dr.Fone - System Repair (Android)
One click tool to fix “Unfortunately TouchWiz has stopped”
- A very easy tool that fixes problems in just one click
- Provides full support all day all night as well as offers 7 day money back challenge
- Enjoys higher success rate and considered as first tool carrying such amazing functionalities
- Able to fix wide variety of Android issues including app crashing, black/white screen of death
- Fully secured and no harm regarding any virus infection
3,211,972 people have downloaded it
Step 1: Download the Program
The one-click repairing process begins with downloading Dr.Fone from its official website. When it is downloaded, follow the installation steps. Upon successful installation, launch the tool on your PC.
Step 2: Connect your Oppo Find X7 Ultra Device
After you open the software, hit on the “System Repair” button from the main interface. With the help of a genuine USB cable, get your Oppo Find X7 Ultra phone and connect it with the computer.
Step 3: Choose the Tab
Now, from the next screen, you are supposed to choose “Android Repair” tab. It is given on the left panel.
Step 4: Enter Right Information
Please keep your mobile details handy as you will need them in the next window. You will need to enter the correct brand, model, and country name etc. for better detection of your device.
Step 5: Confirm Actions
This process may result in removing your data hence we strongly recommend you to keep a backup of your data.
Tip: You can use Dr.Fone – Phone Backup (Android) to backup your Oppo Find X7 Ultra device in case you’re wondering how.
Step 6: Take your Device in Download mode
You will get some instructions on your screen to keep your device in Download mode. Follow them according to the Oppo Find X7 Ultra device you own and hit “Next”. When you do this, the program will detect your device and let you download the latest firmware.

Step 7: Repair Device
Now, when the firmware is downloaded, the program will itself begin to repair your device. Wait and keep the Oppo Find X7 Ultra device connected until you get the notification for process completion.
Clear the cache data the TouchWiz
Maximum Android devices are designed to deleted cache data upon getting updated to the newest Android system. However, Oppo Find X7 Ultra stands as an exception in such case. And therefore, many times TouchWiz starts stopping right after upgrading. Thus, due to the collection of cache data, TouchWiz can display error. This calls for removing the cache from TouchWiz and run things smoothly. Here is how to do this:
- Tap on “Apps” from the Home screen firstly.
- Launch “Settings” afterwards
- Look for “Applications” and tap on it followed by “Application Manager”.
- When Application Manager gets opened, swipe towards right to get into the “All” screen.
- Now, choose “TouchWiz” and tap “Clear Cache”.
- Now, tap “Clear Data” followed by “OK”.
- Now restart your device.

Please note that this will delete all your Home screens post this method.
Disable Motion & gesture settings
The functions regarding Motions and Gestures can be responsible for why TouchWiz home has stopped in your device. Usually the Oppo Find X7 Ultra devices running on Android version less than Marshmallow are prone to encountering this issue. Or the Oppo Find X7 Ultra devices having modest specs often fall prey to the issue. When you disable these settings, you might get out of the problem.
Change the Animation Scale
When you use TouchWiz, it may consume higher memory usage for high amount of graphic maintenance. As a result, the “**unfortunately TouchWiz home has stopped**” error might crop up. Taking this into consideration, you should try reconfiguring the animation scale and get rid of the error. Here’s how:
Clear Cache Partition
In case the above steps didn’t figure out the problem, here is the next tip. This method can be counted as one of the most effective one. Because it is able to fix minor issues in Android devices, we recommend you for “**TouchWiz home has stopped**” issue too. Let us know how you can do it:
- Turn off your Oppo Find X7 Ultra device.
- Start pressing and holding “Volume Up” and “Power” buttons simultaneously.
- Keep doing this until you see the Android screen. This will take your device into recovery mode.
- You will observe some options on the screen. Take help of Volume buttons, scroll down to choose “Wipe Cache Partition”. Press Power button to confirm and the Oppo Find X7 Ultra device will be rebooted.

Check now if the error is eliminated. If unfortunately not, please try the following solution.
Enable the easy mode
For some users, enabling Easy Mode has been of great assistance. This feature aims to make the user experience more efficient by simply eliminating complex features. The Easy Mode removes those features that confuse the users by messing up the screen. Hence, we suggest you to switch to this mode in order to remove “**TouchWiz not working**” problem. The steps are:
- Open “Settings” and go to “Personalization”.
- Hit on “Easy Mode” now.

Hope the TouchWiz won’t keep stopping error does not pop up anymore!
Boot your phone to safe mode
Here is the next solution to be followed when TouchWiz keeps stopping. As we already said, third-party apps can cause this issue, booting your device in the Safe mode will disable those apps temporarily. Hence you need to boot your Oppo Find X7 Ultra device to Safe mode and check if the reason is any third-party app.
- Switch off your device to initiate.
- Press “Power” button and keep doing this until device’s logo appears on the screen.
- When you see logo appearing, instantly release the button and start holding “Volume Down” button.
- Keep holding until rebooting finishes.
- You will now witness “Safe mode” on the bottom screen. You can now release the button.

Reset Factory settings
If the above method went futile and you’re still at the same place, then factory reset is the next logical step to be taken. We suggest this method because it will take your device to its factory state. As a result, TouchWiz will probably get normal and work perfectly.
Along with this, we would also suggest you go take backup of your data so that you won’t lose any of the personal information from your device after performing factory reset. For your convenience, we have stated the backup steps too in the following guide. Have a look:
- Run “Settings’ in your device and go to “Backup & Reset”.
- Notice if “Back up my data” is enabled or not. If not, turn it on and create backup.
- Now, scroll for “Factory Data reset” option and confirm it by clicking “Reset Phone”.

- Wait a few minutes and your device will reboot.
Install a new launcher to replace TouchWiz
We believe that you will find the above methods helpful. However, if still in case your TouchWiz is not working, we advice you that you should install a new theme launcher in your device. It will be a wise option to ditch TouchWiz in such scenario rather than tolerating the problem. Hope this advice will help you.
Also read:
- [New] Expert's Choice Top 8 Proven Video Marketing Actions for 2024
- [Updated] 2024 Approved High-Performance Drones Sold Here
- [Updated] 2024 Approved Unleash Creativity with Canon's Time-Lapse Capabilities
- 6 Fixes to Unfortunately WhatsApp has stopped Error Popups On Tecno Pova 6 Pro 5G | Dr.fone
- Essential Insights: Discover Why Your iPhone's Touchscreen May Not Be Working
- Fix Cant Take Screenshot Due to Security Policy on OnePlus Nord CE 3 5G | Dr.fone
- Fixing Persistent Pandora Crashes on Lenovo ThinkPhone | Dr.fone
- Full Exploration of PicsArt's New Features for 2024
- Infinix Smart 7 Screen Unresponsive? Heres How to Fix It | Dr.fone
- Mastering Awesome Valorant Thumbnails for YouTube Content
- Say Goodbye to Spam: Protect Your iPhone with These Three Essential Text-Blocking Strategies
- What To Do When Xiaomi 13T Pro Has Black Screen of Death? | Dr.fone
- Title: My Videos Arent Playing on Oppo Find X7 Ultra – What Can I Do? | Dr.fone
- Author: Ariadne
- Created at : 2024-10-13 18:33:29
- Updated at : 2024-10-16 21:36:39
- Link: https://howto.techidaily.com/my-videos-arent-playing-on-oppo-find-x7-ultra-what-can-i-do-drfone-by-drfone-fix-android-problems-fix-android-problems/
- License: This work is licensed under CC BY-NC-SA 4.0.