
Oppo A58 4G Not Connecting to Wi-Fi? 12 Quick Ways to Fix | Dr.fone
Oppo A58 4G Not Connecting to Wi-Fi? 12 Quick Ways to Fix
Nowadays, it’s pretty much essential to have your Oppo A58 4G or smartphone connected to the internet. Whether you’re watching videos, looking something up, or using any kind of app, you need the internet for these applications to function correctly.
This is why it can so annoying when it gets to a point where the internet connection isn’t working. However, the problem of a web page not loading correctly is just the tip of the iceberg.
There are plenty of problems you could experience, whether it’s the Wi-Fi network keeps disconnecting on its own without any warning, perhaps a security issue where the passcode or IP address isn’t being registered properly, or even if the connection is just being super slow, even if there’s no reason too.
Luckily, despite there being so many problems out there, there are also many solutions. Today, we’re going to share with you the complete definitive guide to help you get your Oppo A58 4G connected and free from problems and issues.
Part 1: Restart your Oppo A58 4G
Begin by powering off your Oppo A58 4G and unplugging your router. Wait for about a minute before plugging in the router and turning on your device. This simple reset can often restore stable connections and fix Android wifi not working.

Part 2: Turn on Airplane mode and turn off
Turn on Airplane Mode for a few seconds, then turn it off. This maneuver refreshes your device’s network connections and might rectify the Android not connecting to wifi issue.

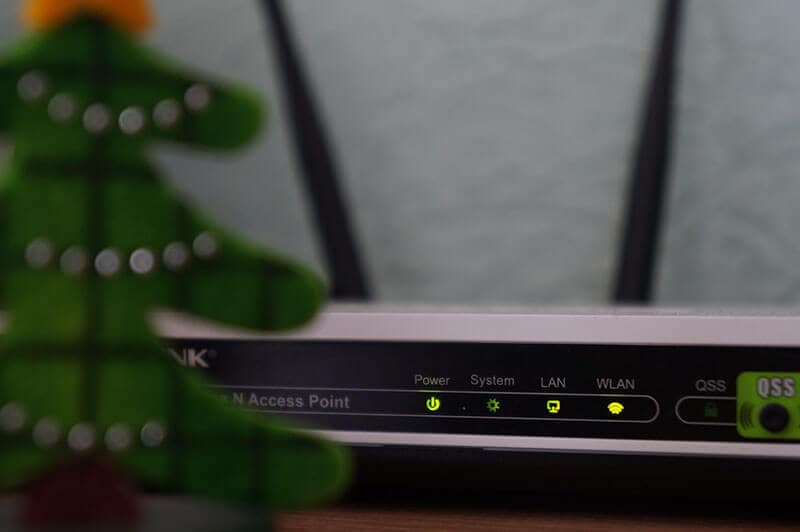
Part 3. Check Wi-Fi Router settings
The third step you’ll want to take is making sure the internet router in your house is working properly and is actually sending internet data to your Oppo A58 4G. Of course, if you have other internet-enabled devices connected to the same router and they’re working fine, you know this isn’t the problem.
However, if you’ve got a problem with Wi-Fi not working on your Android and other devices in your home or office, you know you’ve got a router problem. Here’s how to solve it.
- Go to your internet router and check the indicator lights
- While this depends on your device, a green or blue light will mean the connection is good, whereas a red light indicates a problem
- Press the Restart button on your router and wait ten minutes before reconnecting your device and connecting again
- Call up your internet provider to see if there’s an internet connection issue in your area
- Open your web browser and log into your router settings to ensure your Oppo A58 4G is connected to the Wi-Fi network and is allowed to send and receive data
Part 4. Boot your Android in safe mode
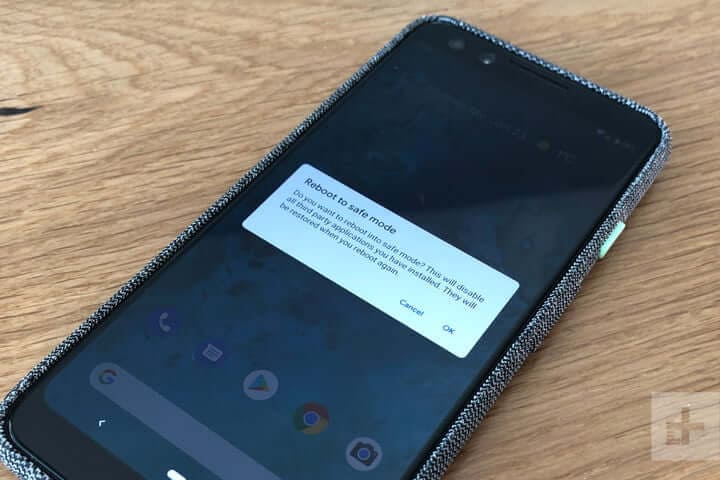
If you’re unable to connect to the internet, but other devices have no issues, you may find the issues is coming from within your Oppo A58 4G itself. Fortunately, there are ways you can see whether this is the problem.
The best way to do this is to boot your device in Safe Mode. The process for doing this will depend on the make and model of your Oppo A58 4G, but the basic process goes as follows;
- Turn off your Oppo A58 4G by holding down the Power button and tapping Power Off. Wait a few minutes to ensure the Oppo A58 4G device is completely off
- Press and hold the Power button to turn your phone on, but the press and hold both the volume up and volume down buttons at the same time
- You will see the words ‘Safe Mode’ appear on your screen as the Oppo A58 4G device loads
- Now you will be booted in Safe Mode. Try connecting to the internet again to see if it works
If your device connects to the internet while in Safe Mode, you’ll know you have a problem with an app or service that’s running on your device. If this is the case, you’ll need to go through your apps and delete them and then reinstall them one at a time until you find the app or service that is causing your internet problems.
Part 5. Check the Android Wi-Fi adapter
If you’re using a Wi-Fi adapter on your device to connect to the internet, you’ll need to make sure this is working. This could be an adapter on your Oppo A58 4G itself, especially if you’re using an older device, or if you’re using an adapter to boost the ranger of your router network.
You need to check both of these to make sure your connection is working properly.
- If using an Android Wi-Fi adapter, make sure all the Oppo A58 4G device drivers are up to date, and if you’re using an app, make sure the app is updated, and all the settings allow an internet connection
- If you’re using a router adapter, make sure it’s set up properly, and your Oppo A58 4G is connected to the adapter using the correct passwords. Try connecting another device to see if the internet connection is working on there
- Whichever method you’re using, try disconnecting your Oppo A58 4G and forgetting the network, and then reconnecting and entering the right password to refresh the connection
Part 6. Check SSID and IP address on Android
To make a Wi-Fi connection work, your Oppo A58 4G needs to match two codes that connect and relate to your router to establish the connection and work correctly. These are known as the SSID and the IP address.
Every wireless device will have its own codes and making sure they’re matched to the network you’re connecting to is crucial to ensuring the internet is working on your Oppo A58 4G. Here’s how to check on your Oppo A58 4G to make sure everything is correct.
- Tap the Settings menu option, followed by Wi-Fi on your Oppo A58 4G
- Turn on your Wi-Fi network and connect it to your router
- Find the router name (SSID) and make sure it’s exactly the same as the SSID written on your router
- Once connected, tap the Wi-Fi network and you will see the IP address. Check both your phone and the router codes to make sure this number matches
When these numbers are matching, if your Android is still not connecting to wifi, you’ll know this wasn’t the problem.
Part 7. Fix Android system issues in one click
If none of the solutions above are working, this could indicate a real problem with the firmware and operating system of your Oppo A58 4G. Fortunately, a fast solution to get everything working again is to completely repair the software of your phone.
You can do this easily using powerful Android recovery software known as Dr.Fone - System Repair (Android) . This is the leading repair tool on the market and is designed to fix and repair any firmware and software problems you may be having.
Dr.Fone - System Repair (Android)
A one-click tool to fix Wi-Fi not working on Android
- Can repair Android from any problem including the black screen of death
- A trusted software application used by 50+ million people around the world
- The most user-friendly mobile repair application available right now
- Supports over 1,000+ Android models and devices
- A world-class customer support team to help you whenever you need them
3,483,527 people have downloaded it
To help you have the best and the most accurate experience when using the Dr.Fone - System Repair (Android) application, here’s a complete step-by-step guide on how to use it.
Step One Make your way over to the Wondershare website and download the Dr.Fone - System Repair (Android) software. Install it onto your computer by following the on-screen instructions.
Once installed, connect your Oppo A58 4G to your computer using a USB cable, and open the software, click “System Repair”.

Step Two Click the “Android” option in the menu and then click “Start” to begin the Repair process.

Step Three On the next screen, go through the options and use the drop-down menus to make sure the information is correct for your individual device. Accept the terms and conditions of the software, and then click the “Next” button.

Step Four Confirm you want the software to carry out the repair process by typing the ‘000000’ code into the pop-up box and pressing Confirm. Make sure you read everything displayed in this box beforehand to know what’s happening.

Step Five Now put your phone into Download Mode by following the on-screen instructions, so your device is ready for the repair process. The method for getting your phone into Download Mode will vary depending on your device, so make sure you’re following the right instructions.

Step Six Once the software has detected your device in Download Mode, it will automatically begin the repair process. You need to make sure your device stays connected throughout this time, and your computer stays on.

The whole process is automatic, so you won’t need to do anything until it’s finished. Once completed, you can disconnect your phone and start connecting it to the internet as normal!

 safe & secure
Part 8. Check the Wi-Fi connectivity on another phone

When experiencing problems with your Wi-Fi network, it’s worth noting the problem might not be with your phone, but rather the Wi-Fi network itself. This is why it’s important to make sure you check the connection on another device.
Of course, if you’re already using another phone on your Wi-Fi network, you know this isn’t the case. However, if you’re not sure, here’s what you need to do;
- Get another Android or iOS phone or tablet
- Open the Settings menu and connect to the Wi-Fi network you’re having problems with
- Enter the password and connect to the network
- Open a web browser on the phone and try loading a web page
- If the page loads, you know the Wi-Fi network isn’t the problem
- If the page doesn’t load, you know you’ve got a problem with your Wi-Fi network
Part 9. Change the password of the Wi-Fi

Each Wi-Fi network router will give the opportunity to choose and change the password you have to let devices connect to your network. It’s important you try changing this because you never know if someone else has accessed your network and could be blocking your device. Here’s how it works;
- Log onto your computer and open your Wi-Fi settings
- Depending on the brand and method of your individual router, navigate to the Wi-Fi password settings menu
- Change the password to something complicated using all available digits and characters
- Save the password and restart the router to disconnect all devices
- Now connect your Oppo A58 4G to the router using the new password
Part 10. Reset network settings on Android
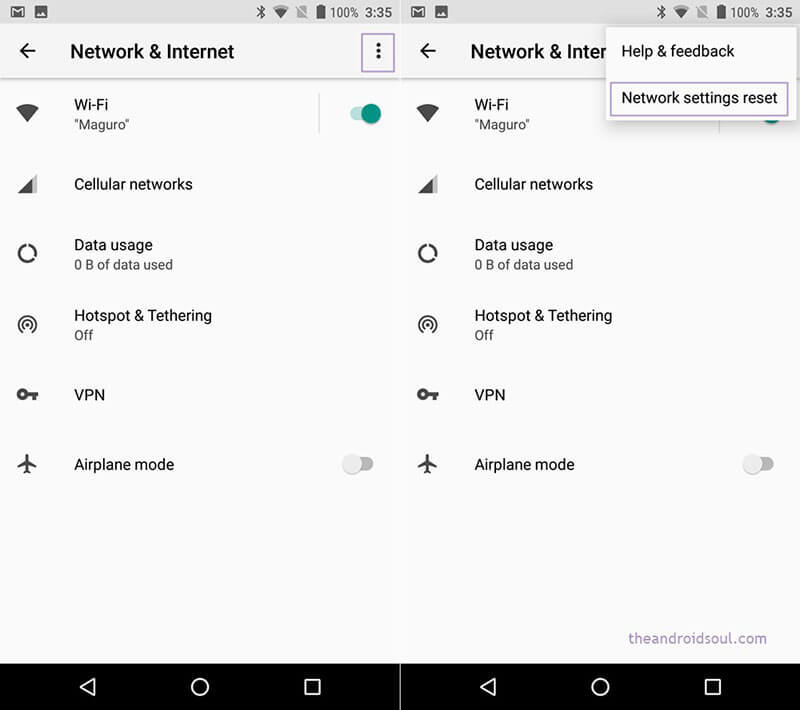
Just like the method above where you’ll be effectively resetting the network settings on your router, if this hasn’t worked, you’ll be able to reset the network settings on your Oppo A58 4G, hopefully removing the bugs and allowing you to connect.
Here’s how you can do this easily on your Oppo A58 4G;
- From the home screen of your Oppo A58 4G, open the Settings menu
- Tap the Backup & Reset option
- Tap the Reset Network Settings option
- Tap the Reset Network option
- If you need to, enter the PIN number or passcode for the Android device, and the Oppo A58 4G device will confirm the reset has taken place
- Reconnect your Oppo A58 4G to your Wi-Fi network for the changes to take effect
Part 11. Clear partition cache in recovery mode
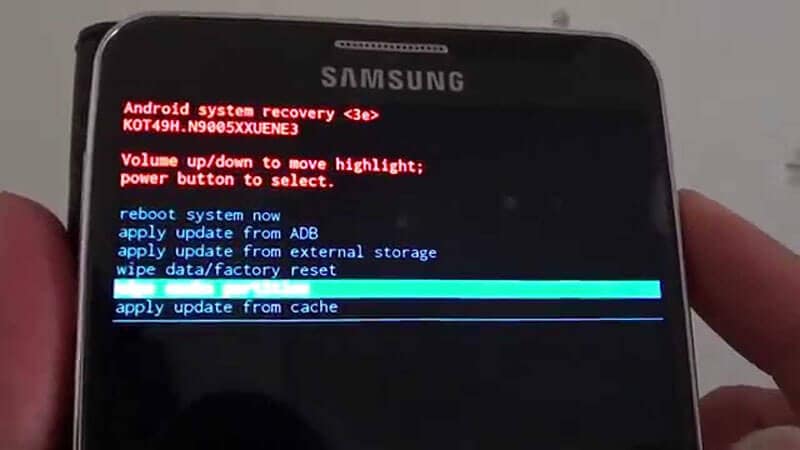
As you continue to use your Oppo A58 4G, the partition cache will fill up with data your device needs and doesn’t need. However, by clearing your device’s partition cache, you can make clear up some space which should help your device have enough memory to connect to the internet.
- Turn off your Oppo A58 4G
- Turn it on by holding down the power button, volume button, and home button
- When your phone vibrates, let go of the Power button, but continue to hold the volume button
- When a menu is displayed, use the volume buttons to navigate the menu
- Select the Android System Recovery option, followed by Wipe Cache Partition
- Restart your device and connect to the internet
Part 12. Reset factory settings

If worse comes to worst, another option you have is to factory reset your Oppo A58 4G. As we’ve spoken about above, while using your phone from the day you started using it, your device will fill up with files and data which can become messy and causes bugs.
However, by factory resetting your device, you can start again from the factory default from which you first received it, ultimately clearing the bugs. Make sure you back up your device before proceeding because it will erase your personal files.
- Open the Settings menu on your Oppo A58 4G
- Navigate to System > Advanced > Reset Options
- Tap the Reset phone option, and enter your PIN code if required
- Tap Erase Everything
- Wait for your phone to complete the process
- Restart your device and connect to the internet
safe & secure
What to Do if Google Play Services Keeps Stopping on Oppo A58 4G

Is the annoying Google Play Services error constantly popping up on your phone? Is it happening while reading, gaming, or browsing social media?
The error constantly plagues thousands of Android users, and it can be incredibly frustrating when you’re using the phone for something important or doing something entirely unrelated to the Google Play app.
Oddly enough, the “Unfortunately, Google Play Services has stopped.” error isn’t severe – you can fix it with a few general and easy-to-do fixes, a factory reset, or a system repair. Below, you’ll find info about why it’s happening and a list of ten possible solutions.
Why Am I Getting the Message “Google Play Services Keeps Stopping?”
Computers and phones often speak in error codes and apps that stop working. Even minor connectivity issues can cause these problems, leaving you wondering what’s wrong with your device or displaying the “Unfortunately, Google Play Services has stopped working.” error message.
Software errors are another set of problems that can also cause this issue. Namely, an average phone user has at least 40 installed apps, and sometimes these apps don’t play well together. They generate problems or steal resources from each other, such as RAM, causing crashes and errors.
There’s also the issue of wrong app versions. Although each Android phone uses the Android operating system, these systems can be vastly different, and the apps built for them can be made to be phone-specific and only run on a specific phone model.
That’s also the case with Google Play Store and Google Play Services.
Why Google Play Services Keeps Stopping
The Google Play Services keeps stopping error is an infamous one, and it can appear for various reasons and even on brand new phones. However, these causes can be categorized into three groups, which are:
- Network Issues
- Software Errors
- Wrong Play Services Version
Regardless of what’s causing the issue on your phone, we’ve compiled a list of ten possible solutions, and you can find those below.
Solutions to Try When Google Play Services Keeps Stopping
There are many solutions for the issue of Google Play Services that keeps stopping. We’ve listed the most famous and effective ones, and you’ll find them below in no particular order. Try them out and see whether they fix the issue.
1. Do a Factory Reset
A factory reset on any smartphone removes all your data on the phone’s internal storage and can even wipe your SD card clean if you select the option. Before you reset your phone to factory settings, ensure you’ve backed up all your essential apps and files. When you’re ready, you can do a factory reset by following these steps:
Step 1: Go into Settingsand search for “reset.”
Step 2: Choose Factory reset.
Step 3: Tap the Erase all dataor Reset device at the bottom, whichever button is there.

Step 4: Input your password and confirm the action.

Your phone will now restart and start the reset process. Once the factory reset completes, your phone will look brand new, and you’ll need to install all your apps again. Moreover, your Google Play Services app will likely get fixed by this, too.
2. Update Your System
As keeping your phone’s system and apps updated to the latest possible version is essential and recommended for the best performance and highest efficiency, you can try updating it to see whether it fixes your Google Play Services error. Here’s how:
- Step 1: Open the Settings
- Step 2: Head into System> System update.
- Step 3: If there’s an update available, click it and go through the process of updating your phone’s system.
Restarting your phone after an update, even if it doesn’t restart itself, is highly advisable, ensuring that the new updates apply without issues.
3. Revert to the Previous Version
As we’ve discussed the wrong Play Services versions above, it’s worth noting that sometimes even the developers can make mistakes and roll out the wrong version for your phone. So, if you notice that the phone is getting the error after you’ve updated Google Services or the Play Store, you can quickly revert to the previous version, and here’s how:
- Step 1: Head into Settings> Apps > Google Play Services.
- Step 2: Press the Disablebutton at the bottom of the screen.
- Step 3: Restart the phone, repeat the process by clicking Enablethis time, and restart the phone again.
As these are system apps, you can’t remove them from the phone, and disabling them will only remove the updates, leaving you with a base version that came with your phone out of the box.
4. Uninstall the App’s Updates and Reinstall
Like reverting to the previous version, you can also try reinstalling updates to fix the Google Play Services has stopped working error. The process is similar to the one above, but we’ve still included the steps. Here’s how you can do that:
Step 1: Go into Settings> Apps and find Google Play Services.
Step 2: Tap it and press Uninstall Updatesat the bottom.
Step 3: Exit the Settingsapp and restart the phone.
Step 4: Open the Play Storeapp and head into the app’s settings by clicking your profile icon. Then scroll to the bottom, and tap Settings.
Step 5: Find and tap the Play Store versionto update your Google Play Services.

As you’re already there, you might as well update all other apps after you tap Manage apps & device. That will ensure that older and not-up-to-date apps aren’t causing the issue.
5. Check Storage
Believe it or not, one of the leading causes of the Google Play Services issue is a phone overfilled with apps. Namely, if you have insufficient storage, the Google Play Store app will likely crash and display errors such as “Unfortunately, Google Play Services has stopped working.”
Head into your phone’s Settings and select Storage to see how your phone’s doing storage-wise. Deleting a few apps you don’t use and transferring your photo and video library to a PC is highly advisable if your phone’s storage space lacks gigabytes.
6. Do a System Repair
Although the other solutions here are general fixes that might help, a system repair might take a bit longer but will undoubtedly fix your issue. You can use the Wondershare Dr.Fone app to repair the system and eliminate the annoying “Unfortunately, Google Play Services has stopped working” error.
Moreover, Dr. Fone works on Android and iOS devices and can fix various phone issues, including boot loops, a white screen of death, a stuck phone, etc. That’s why we’ve included a guide on using it for an Android phone issue. Here’s how:
Step 1: Launch the Wondershare Dr.Fone app on your PC and head into Toolkit> System Repair > Android.
Step 2: Select the type of issue you want to fix > Start.
Step 3: Select the make and model of your phone so that Dr.Fone can find the appropriate Android software.
Step 4: Connect the phone to the PC via a USB cable and follow the on-screen instructions to put the phone into Download Mode. The instructions are available for both phones with and without the home button.
Step 5: Select the appropriate Android firmware, download it, and hit Fix Nowafter it downloads.
Step 6: Enter the code and hit Confirmto continue the system repair process. When it’s done, click the Done
That’s all it takes to do a system repair with Wondershare Dr.Fone. Give the software a few minutes to complete, during which your phone might restart a few times. Once it’s done, your Google Play Services app will undoubtedly work.
7. Clear Cache
The easiest and the most obvious fix for many Android apps is clearing the app’s cache. Here’s how you can do that for Google Play Services and Google Play Store:
Step 1: Go into Settings> Apps and find the Google Play Store
Step 2: Tap Storageand hit the Clear cache
Step 3: Repeat the process for the Google Play Services

If this doesn’t work, move on to another possible fix.
8. Check Date and Time Settings
Oddly enough, the Google Play Services app is prone to failure because of an incorrectly set time or date. That’s because Google’s servers constantly check these settings before issuing updates to the Oppo A58 4G devices, so you’ll need to ensure they’re correct beforehand. Here’s how:
Step 1: Head into Settings> System > Date & Time.
Step 2: Ensure that both “**Use network–provided time” and “Use network-provided time zone**” are toggled on.
Step 3: If this doesn’t work, you can try repeating the process and manually setting the time and the time zone.

Once you check or change these settings, try using the Google Play Store app and check whether the issue is fixed. Restarting the phone after changing the settings is also highly advisable.
9. Troubleshoot Your Internet Connection
Another regularly overlooked troublemaker is a poor internet connection. That’s because most apps nowadays are meant to work in online mode only, and losing connection or using a bad one interferes with the app’s functionality.
To test the internet connection on your Oppo A58 4G, you should open a browser and head to a random internet page to see if it’s opening and whether there are any delays. If it’s working fine, your internet connection isn’t the problem.
10. Adjust Google Play Services Permissions
Although permissions rarely change, they can cause issues if you change them accidentally. These settings can be found in the same place where you would uninstall updates or clear the app’s cache, so you can use some of the steps mentioned above to check them.
Once inside Permission Settings, check whether the Google Play Services and Play Store apps have sufficient permission to do their jobs and whether any required permissions were recently removed. If so, grant these two apps their permissions back.
safe & secure
4,953,228 people have downloaded it
Conclusion
Although it’s an incredibly frustrating error, the “Unfortunately, Google Play Services has stopped” message is more annoying than serious. We’ve explained why it happens, but we’ve also given you a list of solutions to fix it.
Our list includes various fixes, from simple ones, like deleting the app’s cache and ensuring your network works fine, to more serious ones, like doing a factory reset. Alternatively, you can do a system repair with the help of Wondershare Dr.Fone, which will certainly fix the problem, but it might be a bit more complicated than cache deletion.
How to Fix It: Oppo A58 4G Won’t Turn On
Did your Oppo A58 4G decide to go on vacation and refuses to turn on? If your Oppo A58 4G won’t turn on for no apparent reason, finding why it failed to power on and the solution for it is not a fun process.
Here, we hope we are able to give you a checklist of reasons behind this issue and the possible steps you can take to rectify it.
Part 1: Common Reasons That Your Oppo A58 4G Won’t Turn On
If you cannot find any reason why your Oppo A58 4G will not switch on, here are some possible reasons:
- Your Android phone is simply frozen in power-off or sleep mode. In which case, it fails to switch itself on or wake itself up when you initiate it.
- Your phone’s battery may be out of charge.
- The operating system or installed software is corrupted. The tell-tale sign if this is that if you manage to switch on your Oppo A58 4G, it freezes or crash soon after.
- Your device is clogged up with dust and lint causing the hardware to not work properly.
- Your power button is broken , which caused it to not be able to trigger the necessary action needed to power up the Android phone. Check to also see if your connectors have no carbon build-up which will cause your phone to not be charged properly.
Part 2: Rescue Data on Android Phone That Will Not Turn On
If you need some help rescuing data from an Android phone that will not turn on, the Dr.Fone - Data Recovery (Android) will be your best friend in your data recovery attempt. With the help of this data recovery solution, you will be able to intuitively recover lost, deleted or corrupted data on any Android devices. Its flexibility and efficiency in rescuing data make it one of the best software out there.
Note: For now, the tool can rescue data from broken Android only if your phone is earlier than Android 8.0, or rooted.
Dr.Fone - Data Recovery (Android)
World’s 1st data retrieval software for broken Android devices.
- It can also be used to recover data from broken devices or devices that are damaged in any other way such as those stuck in a reboot loop.
- Highest retrieval rate in the industry.
- Recover photos, videos, contacts, messages, call logs, and more.
- Compatible with Oppo A58 4G devices.
3981454 people have downloaded it
If your Oppo A58 4G won’t turn on, here is how you can use the software to recover data:
Step 1: Launch Wondershare Dr.Fone
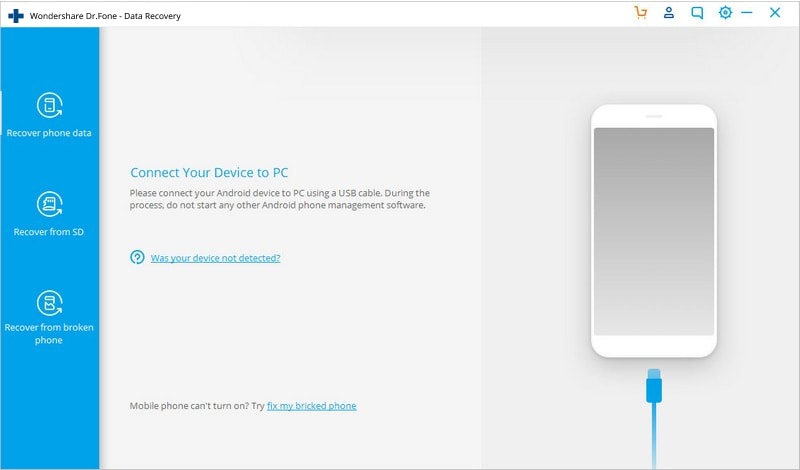
On your desktop computer or laptop, open Wondershare Dr.Fone. Click on Data Recovery on the left column. Connect your Oppo A58 4G to the computer using a USB cable.
Step 2: Decide which file types to recover
On the next window, you will need to check the boxes corresponding to the type of files you can recover from a list. You can get back Contacts, Messages, Call History, WhatsApp messages & attachments, Photos, Audio and more.

Step 3: Select the problem with your phone
Opt for “Touch screen not responsive or cannot access the phone” or “Black/broken screen”. Click Next to continue.

Look up for your device – pick the Oppo A58 4G device Name and Device Model. Advance by clicking on the Next button.

Step 4: Go into your Oppo A58 4G’s Download Mode.
The data recovery tool will guide you on how you can go into your Oppo A58 4G’s Download Mode. You should be getting a step-by-step guide on your computer.

Step 5: Scan the Android Phone.
Using the provided USB cable, attach your Oppo A58 4G to your computer – the data recovery tool should be able to discover your device automatically and scan it for recoverable data.

Step 6: Review and Retrieve the Data from Broken Android Phone.
Wait for the program to finish scanning the phone – once completed, you will be able to get a list of recoverable files. You can have a preview of the file by highlighting them. Tick the box next to the file name and click on Recover to start retrieving the files and save them in the destination of your choosing.

Part 3: Android Phone Won’t Turn On: One Click Fix
After repeated attempts, when your Android mobile/tablet stops buzzing, what options do you have to revive it?
Well, we would recommend picking Dr.Fone - System Repair (Android) to fix an Android phone will not switch problem. This one-click Android system repair tool resolves every Android system issue without any fuss including Android Phone won’t turn on issue.
Dr.Fone - System Repair (Android)
The real fix to issues like “Android phone will not switch on”
- This tool is aptly effective for all the latest Oppo A58 4G devices.
- With a high success rate for fixing Android devices, Dr.Fone - System Repair (Android) ranks at the top.
- This is a single click application to fix all Android system issues effortlessly.
- It is the first tool to repair all Android system issues in the industry.
- It is intuitive and requires no tech expertise to work with.
3981454 people have downloaded it
Prior to fixing the Android phone will not switch and getting things back in action. You need to make sure that you have backed up the Android device . It is recommended that rescuing data from an Android phone by backing up is better than recovering it post the process.
Phase 1: Get the Oppo A58 4G device ready and connect it
Step 1: Run Dr.Fone on your computer once the installation is complete and tap the ‘Repair’ option form the interface. Now, connect your Android mobile with the computer.
Step 2: You will find a range of options, tap on the ‘Android Repair’ one. Hit the ‘Start’ button so that you can proceed to fix Android Phone won’t turn on hassle.
Step 3: Now, over the Oppo A58 4G device information window, ensure to feed your exact device details. Press the ‘Next’ button then on.
Phase 2: Enter ‘Download’ mode for fixing your Oppo A58 4G
Step 1: You need to put your Oppo A58 4G in Download mode for resolving the Android phone will not switch on.
- For the Oppo A58 4G device having ‘Home’ button, you got to switch it off and press ‘Volume Down’, ‘Home’, and ‘Power’ keys for 5-10 seconds at once. Let them go and click on the ‘Volume Up’ button to put your phone in ‘Download’ mode.
- For ‘Home’ button-less device, turn the phone/tablet down first. For 5 – 10 seconds, hold down the ‘Volume Down’, ‘Bixby’, and ‘Power’ buttons. Tap on the ‘Volume Up’ button to get into the ‘Download’ mode, after releasing the 3 buttons.

Step 2: Hitting the ‘Next’ key will allow you to download firmware and proceed with the next step.

Step 3: Dr.Fone - System Repair (Android) would verify your firmware download and then take a while to rectify and resolve Android Phone won’t turn on issue.
Part 4: Android Phone Won’t Turn On: Common Fix
To try fixing an Android Phone that won’t turn on, follow these steps:
- For any Android devices, remove the battery (considering the battery of your Oppo A58 4G can be removed) and leave it out for at least 30 minutes. Put back the battery in and try to turn it on.
- Press and hold down the Power and Volume Down buttons at the same time for 15-30 minutes to reboot the Oppo A58 4G device.
- Should the first two steps do not work, charge your Oppo A58 4G to get it out of the start-up loop. You can also opt to use a different battery, just in case your current battery is the source of the problem.
- If there are any connected hardware e.g. SD card, remove them from the Oppo A58 4G device.
- Start your Oppo A58 4G in Safe Mode by pressing and holding down the Menu or Volume Down button on your device.
- Should the first five steps do not work for you, perform a hard reset. Do take note that each device will have a different way to do so and that data that is stored locally on the phone will be deleted.
- Send your Oppo A58 4G to the repair shop should none of these steps work.
Part 5: Useful Tips to Protect Your Oppo A58 4G
There are several reasons as to why your Oppo A58 4G won’t turn on. The problem could be a hardware or software issue which could be prevented. Here are some useful tips to protect your Oppo A58 4G.
I. Hardware
- Remember that the components that make your Oppo A58 4G is sensitive. To protect these components from being damaged, use a good guard casing.
- Take apart your Oppo A58 4G and clean it routinely to avoid dust and lint from clogging the phone and overheating it.
II. Software
- It is recommended to download apps from Google Play Store. This way, you can be sure that your app comes from a trusted source.
- Read the app’s permission to see which part of the operating system and your personal information that you are giving access to.
- Install reliable anti-virus and anti-malware software to safeguard your Oppo A58 4G from malicious attacks.
- Make sure you update your operating system, software and apps to make sure you have the latest version – the developer may have fixed the bugs that have caused problems on Android phones.
It is important to note that your phone contains some important data. Therefore, when your Oppo A58 4G won’t turn on do not just give up - there are plenty of tools at your disposal to recover back your files and phone.
Also read:
- [New] Best Mac Video Trims Top 6 Picks Post-Snow Leopard for 2024
- [New] From Clicks to Cash The Systematic Triple Pathway for YouTube Revenue Tracking for 2024
- [New] In 2024, The Ultimate iPhone/iPad Video & Image Archive
- [Updated] StreamlinedProcess for YouCamWebRecord
- 8 Solutions to Solve YouTube App Crashing on Vivo Y200e 5G | Dr.fone
- 8 Ultimate Fixes for Google Play Your OnePlus Nord N30 5G Isnt Compatible | Dr.fone
- Cellular Network Not Available for Voice Calls On Tecno Pova 6 Pro 5G | Dr.fone
- Find Your Favorite Tunes Android's Top 6 Music Vids
- How to Fix the Soft Bricked Vivo X100? | Dr.fone
- How to Quickly Fix Bluetooth Not Working on Realme Narzo N55 | Dr.fone
- How To Unbrick a Dead Realme Narzo 60 5G | Dr.fone
- In 2024, Edit and Send Fake Location on Telegram For your Xiaomi Redmi K70 Pro in 3 Ways | Dr.fone
- MPG to VOB Conversion Tutorial: A Comprehensive How-To Approach
- My Videos Arent Playing on Xiaomi Redmi K70 – What Can I Do? | Dr.fone
- Reasons for Samsung Galaxy M34 5G Stuck on Startup Screen and Ways To Fix Them | Dr.fone
- Strategies to Enhance Phone Sound in Windows PCs
- Top 5 from Xiaomi Redmi Note 12 Pro+ 5G to iPhone Contacts Transfer Apps and Software | Dr.fone
- Title: Oppo A58 4G Not Connecting to Wi-Fi? 12 Quick Ways to Fix | Dr.fone
- Author: Ariadne
- Created at : 2024-10-12 04:14:14
- Updated at : 2024-10-16 23:41:54
- Link: https://howto.techidaily.com/oppo-a58-4g-not-connecting-to-wi-fi-12-quick-ways-to-fix-drfone-by-drfone-fix-android-problems-fix-android-problems/
- License: This work is licensed under CC BY-NC-SA 4.0.