
Play Store Stuck on Downloading Of Motorola Moto G14? 7 Ways to Resolve | Dr.fone
Play Store Stuck on Downloading Of Motorola Moto G14? 7 Ways to Resolve
Part 1: Symptoms when “Play Store Stuck on Downloading”
Just as any problem gives some indication of anything wrong is going to befall. Similarly, a user does feel some unexpected turns of events resulting in Play Store to stick at downloading. If one happens to see that the progress bar has suddenly frozen to a certain scope and taking ages to march any further, it is treated as the first signs for Play store not working properly. Another, such scenario is where your apps are not able to download easily. Rather, the Play store reflects a message downloads are yet in the pending queue. If one happens to witness such problems, these can be in fact be giving you the warning signal of the Play store problem
Part 2: Causes of why “Play Store Stuck on Downloading”
With technology, uncertainties are bound to happen. It becomes quite tricky to analyze the real problem and craft a solution. As, there can be several causes that might be disturbing the smooth functionality of Play store. Here are some collated issues that we’ve gathered that are indicative of the cause.
- The time is not rightly setup: Sometimes, the unexpected root cause of play store failing to work is due to the date and time not set up rightly. If the system time is not according to the standard timing, then the application can misbehave.
- Fluctuations in internet connection: If internet speed is running too low or has weaker connection, Play Store download stuck at 99 problem may arise out. Always, use a good speed of internet.
- Get rid of Cache: Extras of cache can pose to be problematic in the working of applications. Users must timely clean their devices so as to brush away any kind of cache memory.
- Outdated version of Play store app: Users generally do not feel the urge for updating the play store app. It is important to use only the updated version so as the functioning of Google Play app is not affected.
Part 3: 7 fixes for Play Store stuck on downloading
3.1 Check SD card and phone storage space
All the applications, data of one’s device is generally loads directly in phone’s storage or the SD card (if plugged). Hence, it is crucial to check whether your phone storage or SD is not fully occupied. As it can indirectly be the reason why the issue of “**Play Store download stuck at 99%**” might occur. Ensure to get rid of any application that you are no longer using. Or, consider deleting any picture, videos or documents that aren’t required by you.
3.2 Check Wi-Fi or cellular data connection
Sometimes, it’s not your phone that is going all faulty, the root cause might be the internet connection. If the internet is running low or does not seem to be stable, then the play store download problem may occur. Users must ensure that the Motorola Moto G14 device they are working should have a stable network connection so as to combat the problem. Then, they can try downloading the application and check if the problem is prevalent or not.
3.3 One click to fix corrupted Play Store components
The world of internet and its intricacies are beyond a novice’s realm. Chances of malfunctioning of Google Play Store may be due to the components relating to Play Store may have gone corrupted. To resolve such issue, the need of a good software that is courageous enough to tackle all kinds of issues is need. For that, the only perfect solution is Dr.Fone - System Repair (Android), an impeccable software useful in providing speedy recovery of your phone. With it you can ward away the issues like boot problem, black screen of death, phone stuck etc.
Dr.Fone - System Repair (Android)
Android repair tool to fix Play Store stuck on downloading
- Can easily deal with all kinds of problems disrupting the activities of Android phone including app crashes, system crash, black screen of death, Play Store stuck on downloading。
- 1-click technology helpful in repairing rare kinds of issues like phone stuck in boot loop, recovery mode, Motorola Moto G14 logo or Android devices getting bricked.
- Supports compatibility with several kinds of Android phones, including the all Motorola Moto G14 models even the Motorola Moto G14 S9.
- The easy to use interface is crafted with underlying features and functionalities in a right manner.
- Provides 24 hours customer assistance to users for resolving queries or problems.
3,224,929 people have downloaded it
Step by Step Tutorial
Here is the complete guide which will help users in understanding how Dr.Fone - System Repair (Android) can vanish Play store download problem completely.
Step 1: Launch Dr.Fone - System Repair (Android) and connect device
First of all, load the program on PC. In the interim, draw connection of device with phone using a genuine cable. Over the interface, tap on “System Repair” mode.

Step 2: Select Android Repair mode
Over the following screen, select “Android Repair” placed at the left panel to resolve play store stuck issue and press “Start” button too!

Step 3: Fill in the information
It is important to add in all the necessary information for successful execution of program. Make sure to give details of “Brand”, “Name”, “Country”, “Model” and all other fields.

Step 4: Ensure to Download Firmware
Now, follow the on the on-screen prompts to boot Android phone into the download mode. Once done, you’re ready to download the suitable firmware package by hitting the “Next”.
Fret not, the program will automatically detect the most suitable firmware for your device.

Step 5: Repair Android phone
After the package downloads, program will repair all kinds of problems surfacing over your phone automatically. This way, the Play store stuck on downloading will get resolved fully.

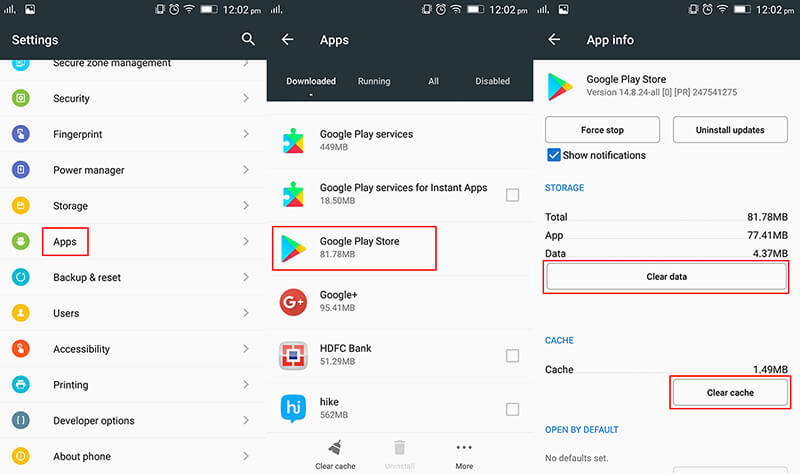
3.4 Clear data and cache of Play Store and download again
Did you know the piling up of cache memory can certainly pull off a great deal for Play Store getting stuck? Cache data may generally stash the data so that you can access it even in future course. But, this do east up a good chunk of space and result in the misbehavior of Play Store app. You can opt to brush away Play store stuck on downloading by using the following steps.
- Get your Motorola Moto G14 and visit “Settings”.
- Then, surf for “Application manager” option and launch “Google Play store” option.
- From there, click on “Cached Data” and select the “Clear Cache” option.
- Optionally, make use of “Force Stop” feature to halt the functioning of the app.
- At last, reboot/restart your smartphone.
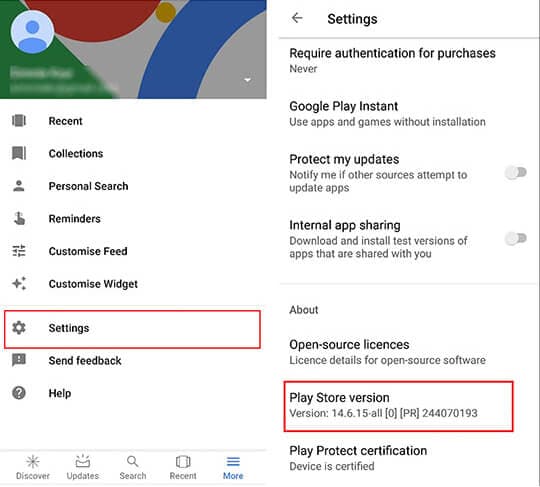
3.5 Update Play Store to the latest version
When was the last time you cared to update your Play store app? Generally, users overlook the need of updating the application. As, they think that it may not be of any greater importance. But, in reality working in an outdated version can directly impact Play Store and cause download problem. Follow the below steps to update Play Store to latest version.
- From phone, just launch Google Play Store app from app drawer.
- Press the 3 horizontal lines icon over the top and locate “Settings” from the left menu.
- In Settings, browse for “Play Store Version” located under “About” section.
- Tap on it, if it shows that Play Store app is not updated then proceed with the on-screen prompts to update it to the latest version.
3.6 Try another Google account
If you’re unable to see a streak of hope and wondering why my Play Store is still showing download pending. Well, some unexpected issue might be there with your Google account. As, there are times where your existing Google account can be the hurdle. Therefore, trying your hand in some other Google account might assist to work things out.
3.7 Avoid downloading large apps
Last but certainly not the least, users must avoid downloading large applications. Especially those games that eats a whopping number of 300+MB of your space. You must always watch out on size of the application is and only then craft the decision to load it on your device. This may help out in keeping the Play store stuck on downloading problem at bay.
Authentication Error Occurred on Motorola Moto G14? Here Are 10 Proven Fixes
There are times when users get an authentication error while they connect to a Wifi network. The problem is mostly found in Android whenever a device tries to establish a connection to Wifi. If your device is also experiencing an authentication problem Wifi, then don’t worry. It can easily be resolved. In this post, we will make you familiar with the root cause for the Motorola Moto G14 Wifi problem and how you can resolve whenever authentication error occurred on your device.
Part 1: Any idea about the Wi-Fi authentication problem?
Wi-Fi authentication has to be done every time you wish to connect to a Wi-Fi network over your smartphone or laptop. To authenticate yourself and connect to the protected Wi-Fi network, you need to have the password of it. But if after you’re putting in the correct password and still experiencing the wifi authentication problem. Here’s what you need to know.
Authentication error occurs when the “deal” between the Wi-Fi router and device fails due to certain reasons. First, the Motorola Moto G14 device sends the password of the network and the “connect” request in an encrypted format to the Wi-Fi router. Then, the router decrypts the password and compares the password saved on it. Now, if the password matches, it sends affirmation for the “connect” request, and then the Motorola Moto G14 device is allowed to connect to the network.

Part 2: Why Authentication Error Occurred when Connecting to Wifi?
There could be plenty of reasons for facing an authentication error on your device. Most of the time, it occurs whenever a Wifi router seems to malfunction. Furthermore, if your phone has been recently updated, then chances are that there could be an issue with its drivers. A security attack can also make your device malfunction as well. An unstable connection or a router blockage can also be a reason for this issue.
In this scenario, whenever you try to connect to a Wifi network (even after supplying the correct password and username), it doesn’t connect to it. Instead, it displays an authentication error occurred promptly. Thankfully, there are plenty of ways to overcome the authentication problem Wifi. In the next section, we have provided three different solutions to fix the Motorola Moto G14 Wifi problem (as it mostly happens on Android devices).
Part 3: 10 Solutions to Fix Wifi Authentication Error
Before we make you familiar with different fixes for the Wifi authentication error, it is important to check your router beforehand. Chances are that you could be getting the authentication error because your router is not functioning properly. You can restart it and try to connect any other device to it as well to check it. After making sure that there is no problem with your network or router, follow these suggestions to overcome the authentication error occurred issue.
Check if extra characters added in Wi-Fi password
Ensure that no other extra characters are being added in the Wi-Fi password while you’re entering it. Key in the password carefully while viewing the characters, and then check if the authentication error occurs or not.
One-Click to Fix Wifi Authentication Error by Android System Repair
Android system repair is considered the most effective way to fix Wifi Authentication Error. As the bottom-layer Android system files may be corrupted unconsciously with days of phone use, the Wifi Authentication Error may be one of the symptoms.
So Android repair requires programming knowledge to do it?
No! With Dr.Fone - System Repair (Android), you can do Android repair in just a few steps and get all issues like Wifi Authentication error fixed easily.
Dr.Fone - System Repair (Android)
An easy-to-operate tool to fix Android system issues like a Wifi authentication error
- Fixes all Android system issues like a black screen of death, Wifi authentication error, etc.
- One-click to fix the Wifi authentication error. No technical skills required.
- Supports all the new Motorola Moto G14 devices like Galaxy S8, S9, etc.
- Easy-to-follow instructions provided on each of the screens.
3981454 people have downloaded it
Here are the steps to fix Wifi Authentication Error by Android system repair:
Note: Android repair is effective to permanently fix Wifi Authentication Error, but may wipe out the existing phone data. Backup all the important Android data to PC before you go on.
- After the Dr.Fone tool is downloaded, install, and launch it. You can see the following screen.
- Connect your Motorola Moto G14 to the computer, and select “Android Repair” in the middle.
- Select all the details that match your device, and click “Next”.
- Next up, you should boot your Motorola Moto G14 in download mode by following the on-screen instructions.

- Allow the program to download the corresponding firmware. After that, the Android repair will start and get the Wifi Authentication Error fixed in minutes.

Use static IP address instead of DHCP
DHCP, or Dynamic Host Configuration Protocol is the default IP address assignment for the Wi-Fi settings on many devices. Whereas DHCP can cause IP address conflict during the dynamic IP address assignment. So, you’d better change “DHCP” to “Static” to see if the authentication error persists.
Step 1: Head to the “Settings” of your Motorola Moto G14 and then opt for “Wireless and Networks” followed by “WLAN/WiFi”.
Step 2: Now, hit on the WiFi network that is showing “authentication error occurred”.
Step 3: Depending on your Motorola Moto G14 model, look for “IP Settings” and tap on it. Now, switch the “DHCP” to “Static”.
Step 4: Note down the static IP address fields and wipe off all the fields. Punch it in again and then save it.

Check carefully for duplicate Wi-Fi names before you connect
Perhaps, you might connect to a WiFi with a similar name. There are good chances that some users do not modify their WiFi network name and possibly, your neighbor may have the same WiFi network, service provider. Therefore, ensure you connect to the correct WiFi network.
Reset the Wifi network
One of the easiest ways to fix the authentication problem of Wifi is to reset the network. To do this, you would be required to forget the respective network first and then connect to it again. This can be done by simply following these steps.
1. Firstly, you need to forget a Wifi network. To do it, go to your phone’s Settings > WiFi and network. From here, you can see a list of all the Wifi hotspots that your phone connects to. Select the network you wish to forget.

2. When you would select a network, it will provide the basic information related to it. Just tap on the “Forget” button and agree to the pop-up message. This will erase the network’s information from your device.

3. Afterward, turn on your Wifi again and tap to the network you wish to connect to. Simply provide the credentials and tap on the “Connect” button to reestablish the connection. This way, you can reset the network successfully.

Modify network connection
If the above solution won’t work, then you would be required to walk the extra mile to fix the Motorola Moto G14 Wifi problem. After you reset a network connection, if still getting issues regarding the authentication of the network, you need to modify the connection. In this technique, you will be changing the IP settings on your phone to alter the way it establishes a secure connection. You can do it by following these steps.
1. To start with, visit your phone’s Settings and open the Wifi page.

2. This will display a list of all the Wifi networks that are associated with your device. Just long-tap on the Wifi network that you wish to modify. It will open another pop-up window. From here, tap on the option of “Manage network settings”. Sometimes, users also get an option of “Modify network settings” here as well. Simply select it to proceed.

3. It will display basic information related to your Wifi network. Just tap on the “Show advanced options” button to access more options related to the network setting.

4. From the IP Settings menu, change the field from DHCP to Static. This will let you establish a static connection between your device and the router.

5. As soon as you will change it to static, you will get different fields related to your network’s IP address, gateway, DNS, and more. Simply fill these fields and tap on the “Save” button once you are done.

Now, try to connect to the Wifi hotspot again. You would be able to overcome the authentication problem of Wifi.
Change Network Security Type
It has been observed that, when we connect to Wifi, our device chooses a wrong security type. This clashes with the default security protocol of the router and authentication error occurred due to this. If your device is facing the same issue, then it can be fixed by simply changing its security type. To do this, follow these instructions:
1. To change the security type of a network, you need to “Add the network”. If you already have the Wifi network saved, then simply forget the network by following the above-mentioned tutorial.
2. Now, turn on your device’s Wifi and tap on the option of “Add network”. Here, you would be asked to give a network name and select the security type. To manually select it, tap on the “Security” option.

3. From here, you will get a list of various security protocols that you can pick. Select “WPA/WPA2-PSK” and save your selection.

Now, try to connect to the network again. Most likely, it will let you fix the authentication error on your device.
Update Android firmware to the latest
There are instances where an outdated OS version of your Motorola Moto G14 may create a hindrance in establishing a connection between your device and the WiFi network. You need to update your Android firmware to the latest version and then check if the problem persists or not.
Step 1: Launch “Settings” of your Motorola Moto G14 and then get into the “About Phone” option.
Step 2: Now, opt for the “System Update” option. If the update is available, get your device updated to the latest OS version.
Restart the router and reset Android network settings
Sometimes, the WiFi router may hang up while establishing a connection and therefore, the wifi authentication problem occurs. Try restarting your Wi-Fi router and then check if your device connects successfully. If this doesn’t work, try to reset your Android Network Settings .
Bonus tip: Turn Airplane mode on/off
By simply turning on the Airplane mode (and later turning it off), you can easily fix the authentication problem Wifi most of the time. You can find a toggle button for Airplane mode on the notification bar of your phone. If you can’t find it there, then go to your phone’s Settings > Connection > More Networks and turn on the feature of “Airplane Mode”.

Let it do for a while. Afterward, turn it off and try to connect to the Wifi network again.
After following these quick and easy suggestions, you would be able to fix the Motorola Moto G14 Wifi problem for sure. Even if you use any other Android device, then its authentication error can easily be resolved after these effective solutions. Go ahead and give these expert solutions a try and let us know about your experience as well. If you have any other solution to fix the authentication problem Wifi, then share it with us as well in the comments.
Calls on Motorola Moto G14 Go Straight to Voicemail? 12 Fixes
Have you ever experienced incoming calls to your phone go straight to voicemail without ringing? It can be frustrating, especially if you’re expecting an important call. It could be due to simple things like turning down the volume or forgetting to turn off the Do Not Disturb mode. In other cases, it might be because you accidentally blocked the caller’s number.
In most cases, incoming calls going to voicemail without ringing are common. However, if it’s happening frequently or for all calls, your phone may have a problem.
This article will discuss why incoming phone calls go straight to voicemail and how to fix the problem. We’ll also show you how to use Wondershare Dr.Fone, a powerful Android System Repair tool, to solve such issues. So, if you’re uncertain why that last call went straight to voicemail, keep reading, and we’ll cover everything you need to know.

Part 1: Not Ringing? Here’s Why Calls on Your Phone Go Straight to Voicemail
If an incoming call to your cell phone goes straight to voicemail without ringing, there could be a few reasons. Here’s what to look for and what you should do to fix it:
- Turn Off Do Not Disturb (DND) Mode
DND mode is a feature that silences all incoming calls, notifications, and alerts. If DND mode is enabled, your cell phone goes straight to voicemail when someone calls. To turn off DND mode, swipe down from the top of the screen to open the notification settings panel, then tap the Do not disturb icon.

Here’s an alternative way:
- Step 1: Open the Settings app and go to Notifications.
- Step 2: Tap Do not disturb.

- Step 3: Toggle Do Not Disturb offto disable the mode.
- Turn Off Call Forwarding
One reason calls go straight to voicemail without ringing is if you enabled call forwarding. Call forwarding is a feature that redirects incoming calls to another number. To turn off call forwarding:
- Step 1: Open the Phone Dialer app on your device, then tap the menu icon and select Settings.

- Step 2: Navigate to Supplementary services > Call forwarding.

- Disable Call Barring
If a phone call went straight to voicemail, another possible explanation is the call barring. It is a feature that restricts calls from being made or received on your phone. If activated, it can cause incoming calls to a phone to go straight to voicemail. To turn off call barring on Motorola Moto G14 devices:
- Step 1: Open the Phone Dialer app, then tap the menu icon in the top right corner.
- Step 2: Go to Settings > Supplementary services > Call barring, then tap OK.
- Step 3: Select Voice call, then turn off your preferred outgoing and incoming calls. When prompted, enter 0000 as a password.

- Update Your Phone’s Software
Sometimes, software bugs can cause problems with incoming calls, which may be why your last incoming call went straight to voicemail. If your phone runs outdated software, try updating it to the latest version.
To check for updates, open the Settings app and go to Software update or System update. For a seamless update experience, follow the step-by-step instructions on your mobile screen.

- Reset Network Settings
If the incoming calls on your phone go straight to voicemail, consider resetting your phone’s network settings. Network settings control how your phone connects to the cellular network. If these settings are not set up correctly, incoming calls may not be able to reach your device.
Note: Resetting your network settings will erase any saved Wi-Fi networks and Bluetooth pairings, requiring you to re-enter them after the reset is complete.
To reset your network settings on most Android devices:
- Step 1: Open the Settings app on your smartphone, then tap System or General Management.
- Step 2: Go to Reset > Reset Network Settings and confirm the action.

- Turn Off Bluetooth
When Bluetooth is on, it can interfere with your device’s ability to receive calls, causing them to go straight to voicemail without ringing. To turn off Bluetooth on an Android device, you can do one of the following:
- Swipe down from the top of the screen to open the Quick Settingspanel, then tap the Bluetooth icon to turn it off.

- Go to Settings> Connections > Bluetooth and toggle the switch off.

It should help ensure that calls come through to your phone instead of going to voicemail.
- Check Airplane Mode
If turning off Bluetooth didn’t solve the issue, another possible cause could be that your phone is in Airplane Mode. Airplane Mode turns off all wireless connections on your phone, including cellular service, which can cause calls to dial straight to voicemail. There are two ways to turn off Airplane mode on Android:
Using the Settings app:
- Step 1: Open the Settings app.
- Step 2: Tap Network & internet.
- Step 3: Toggle off Airplane mode or Flight mode.
Using the Quick Settings panel:
- Step 1: Swipe down from the top of the phone screen to access the Quick Settings panel.
- Step 2: Look for the Airplane mode or Flight mode icon, then tap it to turn it off.

- Check Blocked Numbers
“My boyfriend’s phone goes straight to voicemail when someone is calling. Any idea why that might be?”
Do you also find yourself asking what does it mean? It could be that he has blocked that phone number. To check this:
- Step 1: Open the Phone dialer app.
- Step 2: Tap the menu icon in the top right corner and select Settings.
- Step 3: Tap Block numbers. If you find the number in the blocked list, remove it to ensure that their calls come through to the phone.

If you still have trouble reaching your boyfriend, try calling him from a different number. If your call didn’t go through, you know that he hasn’t blocked your number and that there may be another issue with his phone.
- Turn Off Google One VPN
If you’re using Google One VPN, try turning it off to see if that fixes the problem. Some users have reported that Google One VPN can cause incoming calls to a phone to go straight to voicemail. To turn off Google One VPN:
- Step 1: Open the Google One app on your Motorola Moto G14.
- Step 2: At the bottom, go to the Benefits tab, then tap View Details below the Online protection with a VPN section.

- Step 3: Toggle off Enable VPN.

- Contact Your Carrier
If your phone calls go straight to voicemail after trying all the above, contact your carrier for help. They may be able to troubleshoot the problem or determine if there is a service outage in your area.
And if your carrier confirms that there is no service outage or billing-related block, the problem may be with your phone itself. You may need to try resetting your phone to factory settings or taking it to a repair shop.
- The Caller Used Ringless Voicemail
Ringless voicemail is a service that allows businesses to bypass your phone’s ringtone and send you pre-recorded messages directly to voicemail. Ringless voicemail is often used for marketing purposes. If you think you’re receiving ringless voicemail calls, you can contact the company calling you and ask them to remove you from their list.
Part 2: Not Clear About the Root Cause? Troubleshoot Directly by Wondershare Dr.Fone
If you’re unsure what’s causing your calls to go straight to voicemail, you can try using the Dr.Fone System Repair tool. This software can scan and repair your phone for any underlying problems, which may fix the issue and get your calls ringing again.
Dr.Fone supports over 1000 Android models, including unlocked Motorola Moto G14 models and models from carriers like AT&T and Vodafone. It has an intuitive interface and is easy to use, even for beginners. Learn below the steps on how to use Dr.Fone System Repair to fix incoming calls that dial straight to voicemail:
- Step 1: Download Dr.Fone on your computer, then launch it once installed.
 safe & secure
4,118,635 people have downloaded it
- Step 2: Connect your smartphone to your desktop or computer using a USB cable. Next, from the Toolbox homepage, select System Repair.
- Step 3: Select Android as the Motorola Moto G14 device type.

- Step 4: Click Start to begin repairing your smartphone.
- Step 5: Select the Motorola Moto G14 device details on the Name, Model, Country, and Carrier drop-down lists. Next, select the agreement checkbox, then click Next to proceed.
- Step 6: Follow the in-app instructions to enter Download mode on your Motorola Moto G14, then click Next.

- Step 7: Wait while the app downloads the firmware; once done, click Fix Now.

- Step 8: Enter the code in the input box to verify the Motorola Moto G14 device information in the dialogue box, then click Confirm.

- Step 9: The app will start repairing the system issue on your Motorola Moto G14. Once completed, your app should restart, then click Done to close the app.
You May Also Like:
Top 5 Best Android System Repair Apps
How to Fix It: Android Stuck on Boot Screen?
How to Flash Dead Android Phone Safely
Conclusion
When your phone calls go straight to voicemail without ringing, it can be a frustrating and disruptive experience. Not only do you miss important calls from work, friends, or family, but it also leaves you feeling disconnected and out of the loop. As a temporary measure to avoid missing important calls, check your voicemail regularly.
For a prompt solution, consider using Dr.Fone if incoming calls on your phone go straight to voicemail. It is a powerful mobile solution that can also address other system problems, including stuck boot loops, app crashes, black screens, and bricked devices. If you consistently experience this issue, it’s advisable to reach out to a professional for assistance.
safe & secure
4,215,287 people have downloaded it
Also read:
- [New] Integrating External Websites Into Instagram's Ecosystem
- [New] Videos That Vibe A Novice's Roadmap on a Mac and YouTube
- 11 Proven Solutions to Fix Google Play Store Not Working Issue on Realme 11 5G | Dr.fone
- 2024 Approved Unveiling the Ultimate IPhone Selfie Sticks (#8)
- 8 Solutions to Solve YouTube App Crashing on Samsung Galaxy S23 Ultra | Dr.fone
- 9 Quick Fixes to Unfortunately TouchWiz has stopped Of Itel P40 | Dr.fone
- Boosting Views A Guide to Effective Facebook Video Advertising Techniques for 2024
- Budget Mobile, Ransomware Breakthrough - The Encryption Expedition
- Fix App Not Available in Your Country Play Store Problem on Honor Magic 6 Lite | Dr.fone
- How to Fix Unfortunately, Contacts Has Stopped Error on Xiaomi Redmi K70 Pro | Dr.fone
- In 2024, Fake Android Location without Rooting For Your Samsung Galaxy Z Fold 5 | Dr.fone
- Oppo Reno 9A Bootloop Problem, How to Fix it Without Data Loss | Dr.fone
- The Easy Way Adding External YT Videos to Your PowerPoint Sessions
- Things You Dont Know About Infinix Note 30 Pro Reset Code | Dr.fone
- Title: Play Store Stuck on Downloading Of Motorola Moto G14? 7 Ways to Resolve | Dr.fone
- Author: Ariadne
- Created at : 2024-10-11 03:39:05
- Updated at : 2024-10-17 05:37:11
- Link: https://howto.techidaily.com/play-store-stuck-on-downloading-of-motorola-moto-g14-7-ways-to-resolve-drfone-by-drfone-fix-android-problems-fix-android-problems/
- License: This work is licensed under CC BY-NC-SA 4.0.