
Reasons for Oppo A2 Stuck on Startup Screen and Ways To Fix Them | Dr.fone
Reasons for Oppo A2 Stuck on Startup Screen and Ways To Fix Them
There are many reasons why phones get stuck on the boot screen. It could be something as simple as physical damage or more complicated related to software problems. Having your phone stuck on the logo screen, or boot screen is annoying, and it is no surprise that people will find ways to fix this issue when encountered.

This article will share the possible reasons why your phone is stuck on the boot screen. This article will share three possible reasons for this problem and three valuable tips to help fix this issue. If all else fails, there is an application that is recommended and is sure to solve your issue in no time. Keep on reading to find out more!
It is not uncommon for phones to be stuck on the startup screen, but finding out why this happens is tricky. This section identified some of the top reasons your cellphone could have gotten stuck on the startup screen.
Physical Damage to the Phone
If you accidentally dropped your phone or knocked it on a hard surface, you could have damaged the internal hardware of your phone. This could affect your phone’s ability to reboot and result in your phone being stuck on the boot screen.
If you are 100% certain that your phone has gone through physical damage, you should seek professional help to have your phone repaired or checked. It is advised not to fix this problem yourself as your phone’s internal parts are complicated and delicate. Look for an official phone repair store and get your phone fixed for issues like your phone getting stuck on the logo.
Liquid Damage
It is not common for your phone to expose to water. Rain or water splashes are unavoidable; sometimes, your phone gets wet. Little exposure to water on the surfaces of your phone is fine. However, if you fall into a pool with your phone or drop it in a puddle of water, your phone will likely suffer from liquid damage.
Even the tiniest water droplet that seeped into your phone could damage the internal hardware of your device, often leaving you with your phone stuck on the boot screen. The first thing to do when you accidentally submerge your phone in the water is to check if the water has damaged your phone.
For iPhone users, look for the water damage indicator. If you see that it has turned from white to red, it has suffered from water damage. You have two options if your phone has suffered liquid damage. One is dismantling your phone and letting it dry for at least 48 hours. Two is bringing your phone to a repair shop to fix it.

Software Issues
Software issues are probably the most common reason your phone is stuck on the logo screen. Eight times out of ten, software issues are either caused by a failed software update, using an older version of the operating system, or having a jailbroken phone. When the software does not successfully update, the phone will have no operating system, as the old system was erased before the new software was installed.
The older operating system is also not desired as your phone typically will send periodic updates to make sure your phone is up-to-date and free from bugs. Running applications on an older operating system might lead to issues like the phone being stuck on the boot screen or the logo. Hence, updating your phone to the latest software version would be better.

Part 2. 3 Helpful Ways To Fix Phones Stuck on Boot Screen
After understanding the common problems on why your phone is stuck on the startup screen page, here are three easy solutions to try solving yourself at home.
Hard reboot your phone
To quickly fix any of your phone issues, especially when stuck on the startup screen, perform a hard reboot. The term hard reboot means turning your device off and on again. You might think this is a simple option, but this is a tried and tested method that might work on a minor glitch that results in your smartphone getting stuck on the startup screen page.
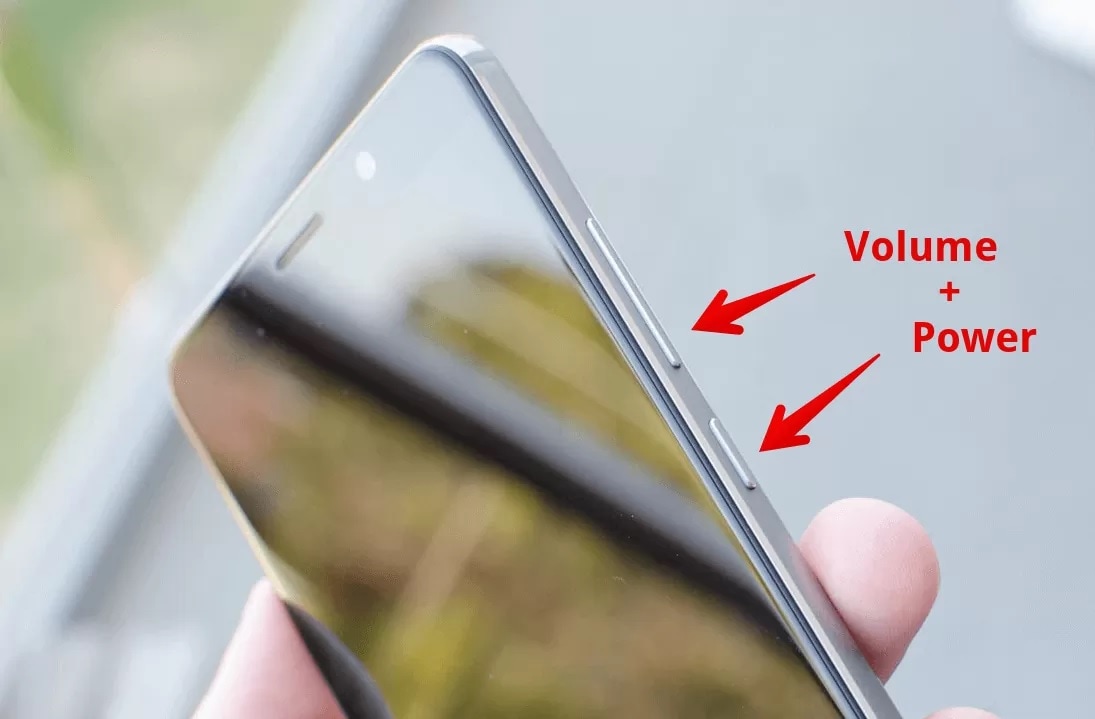
Here is an example of performing a hard reboot for an Android phone such as Oppo A2. Preess and hold the Power and Volume Down buttons simultaneously for more than 7 seconds to perform the hard reboot.

Put your phone in recovery mode
If a hard reboot does not work, a natural next step is to try going into recovery mode. The recovery mode is specially designed to solve any software-related issues. It is important to note that entering recovery mode will delete all your corrupted files and replace them with a functional operating system. Hence, back up all your files to ensure you retain all your information.
Here is a step-by-step process for putting your Oppo A2 or Redmi smartphone in recovery mode.
Step 1: Tap and press the Power button to switch off your Oppo A2/Redmi phone
Step 2:Hold the Volume Up and the Power buttons at the same time, then release the keys when the Main menu of Recovery mode appears on the screen.

Step 3: You can use the volumes buttons to navigate up and down and press the Power key to confirm the selection.
Factory Reset
If you do not want to attempt recovery mode, you can try resolving the issue of your phone being stuck on the startup screen through Factory Reset. Factory Reset, also called Hard Reset, erases all information and data on your device. As a result, it will return to the settings and recover the data it used to have when leaving the factory.
Here is an example of putting your Samsang smartphone into the Factory Reset DFU mode.
Step 1: Open the Settings application on your phone and tap General Management.
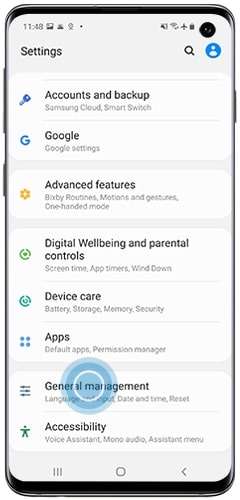
Step 2: Go to Reset > Factory data reset.
Step 3: Swipe to and tap Reset.
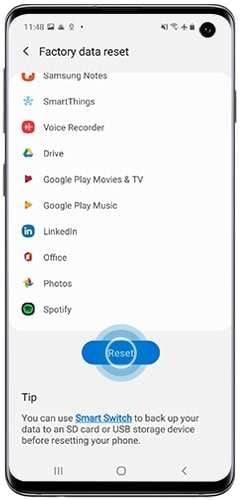
Note: Before carrying out a factory reset, you need to input the password of your Oppo A2 Account.
Bonus Tip: Best App To Solve Phone Stuck on Boot Screen
If all the solutions above do not work and you do not want to perform a factory reset on your phone, one option is to use an application called Wondershare Dr.Fone. It is one of the most effective phone recovery solutions and can help to bring your phone back to a state like it was brand new. Being stuck on the startup screen page will be a problem of the past.

The following steps will show you how to use Dr.Fone to perform system repair on your phone.
Step 1: To the Dr.Fone application using the link above and click on System Repair.
Step 2: Depending on the Oppo A2 device you are using, choose either Android or iPhone.
Step 3: In the next window, select the issue you are facing and click Start.
Step 4: Choose the corresponding Brand, Name, Model, Country, and Carrier from each drop-down menu and click Next.
Tip: Make sure the information you input is accurate, as it will affect the system repair if the information is inaccurate.

Step 5: Connect your device to your computer and follow the instructions on the screen to enter Download mode. Click on Next to proceed to the next step.
Step 6: Wait for the process to complete, and a new firmware will be updated on your device. Power on your phone and check if the issue still exists.
Frequently Asked Questions
The following are interesting and frequently asked questions about how to solve boot loops.
- What is a boot loop?
A boot loop describes a process when Your Oppo A2 stays stuck in a circle of rebooting. When your phone is stuck on the startup screen, one of the strategies you will try is to restart your device. However, when your phone gets stuck in a boot loop, it is your device’s way of trying to turn it off and on again to fix the issue.
Since there is an issue with the booting process, it will keep running into the same error repeatedly, calling the boot loop. When trapped in a boot loop, your device will keep turning off and on. Most boot loop issues are software-related, such as a wrong system update.
- How do you fix a boot loop?
When stuck in a boot loop, there are different troubleshooting methods for other devices. For Android phones, force your phone into its Recovery mode; from there, you can restore a previous backup. This backup could be from when the boot loop did not exist, so recovery to that backup could quickly solve the problem.
For iPhones, it is the same concept as the Android, restore your phone to the previous backup. You can use iTunes to restore a previously stored backup on your computer.
- How to prevent a boot loop?
A boot loop typically starts when there is a change to your system before a reboot cycle. Most issues are software-related, such as having to do a system upgrade gone wrong or a problem that doesn’t mesh. One way to prevent this is to perform a software or system upgrade constantly. Make your phone juiced to prevent it from turning off mid-way when updating.
 safe & secure
3,405,439 people have downloaded it
Conclusion
This article summarizes some of the possible reasons why your phone is stuck on the boot screen. It demonstrated three useful strategies to overcome your phone stuck in the boot with ease. However, if all the above methods do not work, why not try Dr.Fone-System Repair?
Dr.Fone-System Repair repairs the operating system issues and fixes the issue with your phone. Once you power on your phone again, you can rest assured that it will be like new.
How To Restore a Bricked Oppo A2 Back to Operation
In moments of lag or freezing on your Android, you might brick Your Oppo A2, which can be unsettling. This is more than just the loss of a device. A bricked cell phone also involves potential data erasure. Yet, it’s crucial to understand the true implications of a bricked phone. This page tackles how to address the issue of a bricked Android phone.
This comprehensive guide aims to the reasons behind Android phones becoming bricked. By reading below, you’ll learn effective methods to unbrick a mobile phone without the risk of data loss.

Part 1. What are Brick Phones: At a Glance
The term “bricked phone“ is used when a device becomes non-functional. This is typically due to a critical software or firmware error. There are two distinct scenarios for encountering a bricked phone: a soft brick and a hard brick.
- Soft Brick. A soft brick entails a phone that’s not operational due to software glitches or conflicts but is not irreparable.
- Hard Brick.A hard brick signifies a more dire situation. This is where the phone becomes inoperable, resembling an actual brick in terms of functionality.
The Common Causes of a Cell Phone Bricking
Below are the common causes why a cell phone bricks.
Failed Updates
When a firmware or system update fails, it can lead to a bricked phone. Updates involve intricate changes to the phone’s software. If interrupted or incompatible, the Oppo A2 device may get stuck in a state of partial functionality. This can result in a soft brick.
Failed Flashing
Flashing involves installing custom firmware or software onto a device. If the flashing process is interrupted or if the firmware used is not compatible with the Oppo A2 device’s hardware, it can cause a hard brick. The device’s essential software components may become corrupted, rendering the phone unusable.
Rooting
Rooting, which grants users superuser access to their device’s OS, can lead to bricking if not done right. Rooting often involves making deep system changes, and errors can disrupt the phone’s core functionality.
Installing Bad Apps
Installing malicious, incompatible, or poorly coded apps can lead to a soft brick situation. In severe cases, they can trigger a boot loop or render the phone unresponsive.
Others
Several less common factors can also contribute to bricking. Overclocking, attempting to modify the bootloader, or tampering with system files can lead to disastrous consequences. Hardware issues, such as faulty memory or battery problems, might also manifest as bricked devices.
Part 2. Unbricking Methods and Tools
Below are solutions that you can employ to fix various brick phone scenarios.
Reverting Android Device to Factory Defaults (Soft Brick)
A universal approach to trying to recover a brick phone exists for all Android phones. This is, consider restoring your device to its factory settings. You can find instructions specific to your phone model online. Although this procedure erases all your data, it’s possible to regain the use of your brick phone.
Get in Touch With the Manufacturer (Hard Brick and Soft Brick)
Normally, smartphone warranties span from 1 to 2 years. If your phone remains unrooted and falls within that coverage period, consider reaching out to the manufacturer. This direct approach could lead to your phone being repaired or replaced with a new one at no cost to you.
Seek Professional Assistance (Hard Brick and Soft Brick)
When your phone falls outside the warranty coverage, consider seeking help from a reputable repair shop. However, be aware that any lost data cannot be attributed to their efforts. Fortunately, you can recover lost data using reliable data recovery software once your phone is operational again.
Use a Dedicated App To Fix Bricked Mobile Phones (Hard Brick and Soft Brick)
Among the array of tools designed for unbricking and recovery, one standout is Wondershare Dr.Fone - System Repair (Android). With an exceptional recovery rate, it stands out as one of the top contenders for data retrieval. Its performance is notable when applied to modern brick phones, making it a highly effective choice for these devices.
Part 3. Unbricking Mobile Phones With Dr.Fone - System Repair (Android)
Dr.Fone - System Repair (Android) empowers you to resolve a range of prevalent Android problems. This Android repair tool eliminates the need to hunt for suitable firmware to flash your phone. By utilizing Dr.Fone – System Repair (Android), you can recover data on Your Oppo A2 with a few clicks.

safe & secure
4,039,461 people have downloaded it
Key Features
Below are some of the standout features of Dr.Fone - System Repair (Android)
Address Android Challenges Like a Professional
From common scenarios like black screens and boot loops to even bricked Android devices, this tool has you covered. Dr.Fone has simplified the process so that anyone can fix Android problems.
Support for Over 1000 Android Models
This software is designed to fix glitches including most modern Android devices. Whether your Oppo A2 is an unlocked variant or tied to carriers, you can restore it back to normal in just a matter of minutes.
Trial Access at No Cost
Dr.Fone - System Repair (Android) offers free access for you to test the initial steps and verify device compatibility. This cost-effective feature ensures value for money every step of the way.
Main Advantages of Using Dr.Fone – System Repair (Android)
Dr. Fone – System Repair (Android) is a great solution with numerous tools to help you manage your Oppo A2 in various ways. Here are some of the advantages of using the app for fixing bricked phones.
- Fone – System Repair (Android) comes with a clean UI making navigation and usage easy. The user-friendly design offers a seamless experience for beginners and professionals alike.
- Utilizing the app for system repair is an effortless and speedy process. It doesn’t take up much time to revive your bricked phoneso you can use it right away.
- The System Repair toolkit only needs you to click on a few buttons. Combined with its clean UI and speedy process, using the app is a breeze.
Part 4. How To Revive a Bricked Phone Using Dr.Fone – System Repair (Android)
Below are the steps to recover data on a bricked mobile phone.
- Step 1: Download and install Dr.Fone – System Repair (Android) on your computer. Launch the app and select System Repair. Next, choose Select Android as the Oppo A2 device type. Then, connect to your Oppo A2. Choose Phone Brick as the Android problem and click Start.

- Step 2: Select the correct device information. Choose the Brand, Name, Model, Country, and Carrier. Tick the box next to I agree button and click Next to proceed to the next step.

- Step 3: Click on the Phone with Home button or Phone without Home button depending on your device. Follow the on-screen instructions and click Next to proceed with reviving your brick phone.

- Step 4: Once the Oppo A2 device enters Download Mode, the firmware will automatically start downloading. Follow the on-screen prompts and wait for the system to initiate the repair process. Once it concludes, the completion message will appear on the main window. Click Done to close the tool or click Try again to repeat the process.

safe & secure
4,311,328 people have downloaded it
Conclusion
Fixing a bricked phone may seem daunting, but solutions are within reach. This page explained the distinctions between soft and hard brick scenarios. It also identified common causes and revealed effective methods for unbricking.
Among these, Dr.Fone – System Repair (Android) emerges as a dependable ally. The tool offers a comprehensive toolkit for recovery and data rescue. The power to reclaim lost data lies in your hands. Act, follow the methods outlined, and recover your brick phone.
How to Fix Error 495 While Download/Updating Android Apps On Oppo A2
Error 495 is a common error that occurs while downloading or updating apps from Google Play Store. This error is usually caused by a problem with the Google Play Store, and it can be fixed by clearing the cache and data of the Google Play Store app. If you are experiencing this error, follow the steps below to fix it.
In this article, you will learn why the Android error 495 pops up, possible solutions to bypass, as well as a dedicated repair tool to radically fix error 495.
We always like to explore every new feature or the features that already exist on our devices. We have a tendency to be the master of our device and want to know every bit of the handset. Unexpected errors ruin that experience and it is just frustrating to experience these errors. And the worst part is that we have no idea where we are wrong or what we did that led to the error. Same is the case with the error 495 which occurs due to downloading or updating of Android Apps. You may have spent countless hours on the internet to find the right solution for error code 495 but even after following many of the most guaranteed steps sometimes the error still doesn’t go away.
However, this article will provide you various methods to get rid of the Error 495 play store problem that you face and you will not have to depend on any other sources for your solution.
Reasons for Google play error 495
Android Apps are most commonly downloaded from the Google Play Store with the help of Wi-Fi or Cellular Data. One may come across many types of errors. Mostly the errors come in during the download or update or installing time. Error 495 occurs when the user isn’t being able to download or install an app over Wi-Fi, but the user is able to do the same thing over cellular data.
Technically speaking, the issue is caused when the connection to the Google Play servers, where the app is hosted, times out. Which is unable to resolve by itself.
Also, there could be another reason that it cannot sync with the servers.
Now that we know the possible reasons for the error 495, let us also know how to get rid of it in the sections below.
Solution 1: One Click to Fix error 495 by Android Repair
Tried several methods to make the error 495 disappear, but nothing works? Well, many people have experienced the same frustration. The root cause is that something is wrong with the Android system. You need to have your Android system repaired to fix error 495 in this situation.
Note: Having your Android system repaired may lose existing data on your Android. Backup the data on your Android before the Android repair.
Dr.Fone - System Repair (Android)
Best tool for fundamental Android repair in one click
- Fixes all Android system issues like error 495, system UI not working, etc.
- One click for Android repair. No special technics needed.
- Supports all the new Oppo A2 devices like Galaxy Note 8, S8, S9, etc.
- Step-by-step on-screen instructions provided to fix error 495 without any hassle.
3,390,486 people have downloaded it
With Dr.Fone - System Repair (Android) , you can easily fix error 495 in few steps. Here is how:
- Download, install, and launch Dr.Fone - System Repair (Android). Connect your Android to your computer with a USB cable.
- Select the option “Repair” > “Android Repair”, and click “Start”.
- Select the Oppo A2 device information like brand, name, model, etc., and confirm your selection by typing in “000000”.
- Press the stated keys to boot your Android in download mode to download the firmware as instructed.
- After the firmware is downloaded, the program will automatically start to repair your Android.

Solution 2: Clear the Google Service Framework cache to Fix error 495
Step 1:
Go to the “settings” of your device. Once the series of sections comes up, tap on the “APPS” section.
Step 2:
Click on ‘All Apps’ or ‘Swipe to All’ and the open the section named “Google Services Framework App”
 .
.
STEP 3:
Open “App Details” and the screen shown in the image should come up on your device. As shown in the image, follow the three steps. First, tap on “Force Stop” and then second, tap on the “Clear Data” option and finally go ahead and tap on the “Clear Cache” option.
Following the above steps should solve your problem of Google Play Error 495. And you can enjoy back to using the apps which you couldn’t download or update due to the Error 495.
Solution 3: Reset App Preference in Google play Store to Fix error 495
STEP 1:
Go to the settings section in your device. It will be differently placed for different devices and different users.

STEP 2:
Once the Settings section is open. A lot of further sections will pop up. No find the section named “Application Manager” or “Apps”. After locating it, tap on that section.

STEP 3:
Now go ahead and tap or slide to a section named “ALL”.
STEP 4:
After reaching the “ALL” section tap the touch button to open menu/properties and choose an option named “Reset Apps” or “Reset App Preferences”.
There’s no need to be alarmed because on clicking the reset option, the apps won’t be deleted but it is only going to re-set them. And hence solving the Error 495 created in the Google Play.

Solution 4: Fix Error Code 495 by installing a VPN app
The Error code 495 can be easily removed in another interesting way too. On downloading a Virtual Private Network (VPN) and then operating the play store automatically solves the error 495.
STEP 1:
Install Hideman VPN (using any other VPN will also make it work) from Google Play store. (If the error persists for this app too then download it from a different app store or by using a third-party store).
STEP 2:
Now open the app and select the United States as the country of connection and press the option named Connect.
STEP 3:
Open Google Play Store and Download any app without the Error Code 495 coming in and bothering.
This fix will work for most of the Google Play Errors and not just only The Error Code 495.
Solution 5: Remove your Google Account & Reconfigure it to fix error 495
Removing the Google account and re-configuring it is a very common method adopted to get rid of the Error 495. Adopt the following steps to complete this method.
STEP 1:
Go to the “Settings” section of your device. Like it was mentioned before, different devices and different users will have the placement of the settings section in a different place.

STEP 2:
Go to the accounts section in the settings tab.

STEP 3:
In the accounts section tap on the Google Account part
STEP 4:
Inside The Google section, there’ll be an option called “Remove Account”. Tap on that section, to remove your google account.

STEP 5:
Now go ahead and re-enter/ re-register your Google account and check if the Error 495 still persists.
Now you have completed all the steps and your problem should be solved.
Solution 6: Fix error code 495 by Removing your Google Play Store Data & Cache
One of the best and most accurate methods in the series of various steps in eradicating the Error Code 495 in Google Play Store is by removing the Google play Store Data and Cache. In order to do so follow the steps mentioned below. After following the steps it is guaranteed that the Error code 495 will be done with and you won’t experience any such problems in the future.
STEP 1:
Go to the “Settings” section into your mobile device. The settings can be accessed by scrolling down and pulling down the drop-down menu and most likely the settings app will be on the top-right corner. Otherwise, it will be found after opening the app drawer.

STEP 2:
Once after opening the settings section, select the “Installed apps” or the “Apps” section.

STEP 3:
Find the “Google Play Store” section and select that too.
STEP 4:
Tap on the “Clear data” & “Clear Cache”.

Doing the above steps will clear your caches of the Google Play Store. Now you have a new google Play store.
Hence in this article, we got to know about the error 495 and the possible solutions to it as well. Also, this article explains how Error code 495 can be removed by 5 different ways. These are the best ways by which you can remove or get rid of the Error Code 495. In case one of the method fails, use the other one to rectify this recurring error 495 on your Oppo A2.
Also read:
- [New] 2024 Approved The Ultimate Tutorial on Making an Impact with Instagram Live
- [New] Host Smart and Cheap Your Guide to Youtube Seminars for 2024
- [New] In 2024, Boosting Profile Videos A Guide to Allure
- 8 Solutions to Solve YouTube App Crashing on Itel P55T | Dr.fone
- 8 Ultimate Fixes for Google Play Your Huawei Nova Y91 Isnt Compatible | Dr.fone
- Android Screen Stuck General Poco C65 Partly Screen Unresponsive | Dr.fone
- Best Methods for Samsung Galaxy S24 Wont Turn On | Dr.fone
- Fix the Error of Unfortunately the Process.com.android.phone Has Stopped on Itel A05s | Dr.fone
- Fix the Error of Unfortunately the Process.com.android.phone Has Stopped on Samsung Galaxy A14 4G | Dr.fone
- Fixing Persistent Pandora Crashes on Samsung Galaxy A25 5G | Dr.fone
- Full Guide to Catch 100 IV Pokémon Using a Map On OnePlus Ace 2V | Dr.fone
- In 2024, 3 Effective Methods to Fake GPS location on Android For your OnePlus 11R | Dr.fone
- In 2024, Direct From Google Meet Securely Live Stream on YouTube
- Snag the Apple M2 MacBook Air for Just $800 Before Prime Day Arrives – Exclusive Deal Alert!
- Unbeatable Ways to Archive LOL Encounters for 2024
- Vivo Y100 Not Connecting to Wi-Fi? 12 Quick Ways to Fix | Dr.fone
- Waterproof Wonder: The Nikon W100 Reviewed
- Title: Reasons for Oppo A2 Stuck on Startup Screen and Ways To Fix Them | Dr.fone
- Author: Ariadne
- Created at : 2024-10-01 16:22:00
- Updated at : 2024-10-05 16:09:32
- Link: https://howto.techidaily.com/reasons-for-oppo-a2-stuck-on-startup-screen-and-ways-to-fix-them-drfone-by-drfone-fix-android-problems-fix-android-problems/
- License: This work is licensed under CC BY-NC-SA 4.0.