
Reasons for Samsung Galaxy S24 Ultra Stuck on Startup Screen and Ways To Fix Them | Dr.fone
Reasons for Samsung Galaxy S24 Ultra Stuck on Startup Screen and Ways To Fix Them
There are many reasons why phones get stuck on the boot screen. It could be something as simple as physical damage or more complicated related to software problems. Having your phone stuck on the logo screen, or boot screen is annoying, and it is no surprise that people will find ways to fix this issue when encountered.
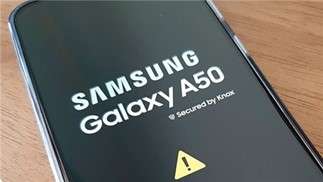
This article will share the possible reasons why your phone is stuck on the boot screen. This article will share three possible reasons for this problem and three valuable tips to help fix this issue. If all else fails, there is an application that is recommended and is sure to solve your issue in no time. Keep on reading to find out more!
It is not uncommon for phones to be stuck on the startup screen, but finding out why this happens is tricky. This section identified some of the top reasons your cellphone could have gotten stuck on the startup screen.
Physical Damage to the Phone
If you accidentally dropped your phone or knocked it on a hard surface, you could have damaged the internal hardware of your phone. This could affect your phone’s ability to reboot and result in your phone being stuck on the boot screen.
If you are 100% certain that your phone has gone through physical damage, you should seek professional help to have your phone repaired or checked. It is advised not to fix this problem yourself as your phone’s internal parts are complicated and delicate. Look for an official phone repair store and get your phone fixed for issues like your phone getting stuck on the logo.
Liquid Damage
It is not common for your phone to expose to water. Rain or water splashes are unavoidable; sometimes, your phone gets wet. Little exposure to water on the surfaces of your phone is fine. However, if you fall into a pool with your phone or drop it in a puddle of water, your phone will likely suffer from liquid damage.
Even the tiniest water droplet that seeped into your phone could damage the internal hardware of your device, often leaving you with your phone stuck on the boot screen. The first thing to do when you accidentally submerge your phone in the water is to check if the water has damaged your phone.
For iPhone users, look for the water damage indicator. If you see that it has turned from white to red, it has suffered from water damage. You have two options if your phone has suffered liquid damage. One is dismantling your phone and letting it dry for at least 48 hours. Two is bringing your phone to a repair shop to fix it.

Software Issues
Software issues are probably the most common reason your phone is stuck on the logo screen. Eight times out of ten, software issues are either caused by a failed software update, using an older version of the operating system, or having a jailbroken phone. When the software does not successfully update, the phone will have no operating system, as the old system was erased before the new software was installed.
The older operating system is also not desired as your phone typically will send periodic updates to make sure your phone is up-to-date and free from bugs. Running applications on an older operating system might lead to issues like the phone being stuck on the boot screen or the logo. Hence, updating your phone to the latest software version would be better.
Part 2. 3 Helpful Ways To Fix Phones Stuck on Boot Screen
After understanding the common problems on why your phone is stuck on the startup screen page, here are three easy solutions to try solving yourself at home.
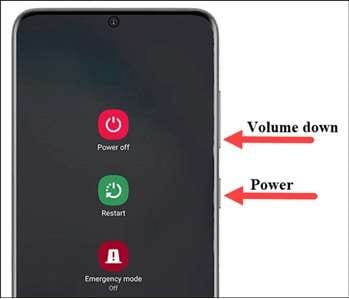
Hard reboot your phone
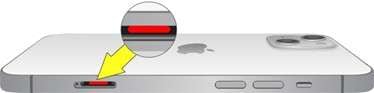
To quickly fix any of your phone issues, especially when stuck on the startup screen, perform a hard reboot. The term hard reboot means turning your device off and on again. You might think this is a simple option, but this is a tried and tested method that might work on a minor glitch that results in your smartphone getting stuck on the startup screen page.
Here is an example of performing a hard reboot for an Android phone such as Samsung Galaxy S24 Ultra. Preess and hold the Power and Volume Down buttons simultaneously for more than 7 seconds to perform the hard reboot.

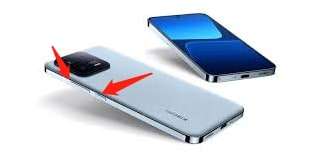
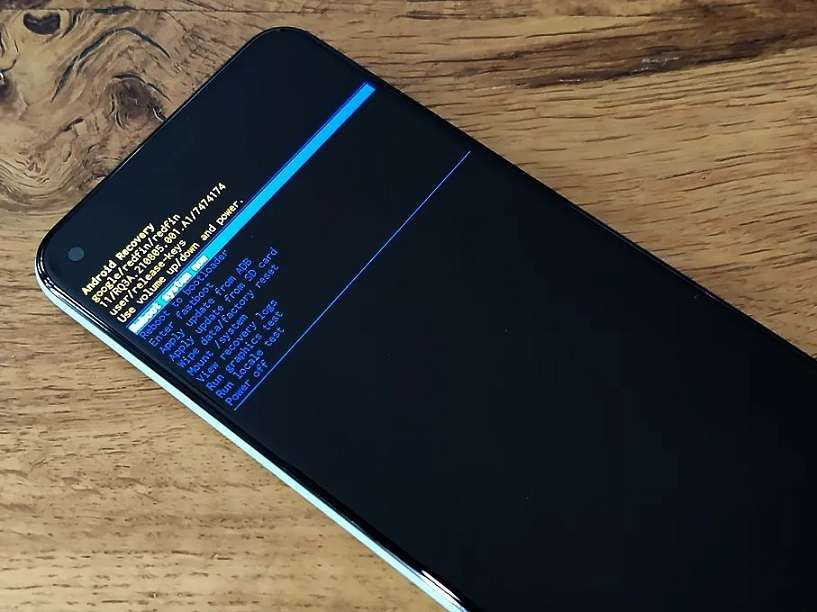
Put your phone in recovery mode
If a hard reboot does not work, a natural next step is to try going into recovery mode. The recovery mode is specially designed to solve any software-related issues. It is important to note that entering recovery mode will delete all your corrupted files and replace them with a functional operating system. Hence, back up all your files to ensure you retain all your information.
Here is a step-by-step process for putting your Samsung Galaxy S24 Ultra or Redmi smartphone in recovery mode.
Step 1: Tap and press the Power button to switch off your Samsung Galaxy S24 Ultra/Redmi phone
Step 2:Hold the Volume Up and the Power buttons at the same time, then release the keys when the Main menu of Recovery mode appears on the screen.
Step 3: You can use the volumes buttons to navigate up and down and press the Power key to confirm the selection.
Factory Reset
If you do not want to attempt recovery mode, you can try resolving the issue of your phone being stuck on the startup screen through Factory Reset. Factory Reset, also called Hard Reset, erases all information and data on your device. As a result, it will return to the settings and recover the data it used to have when leaving the factory.
Here is an example of putting your Samsang smartphone into the Factory Reset DFU mode.
Step 1: Open the Settings application on your phone and tap General Management.
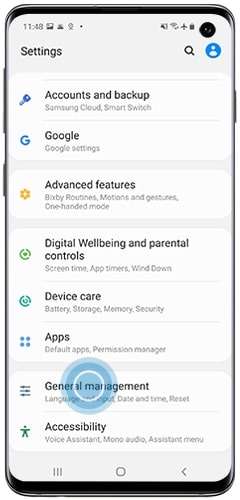
Step 2: Go to Reset > Factory data reset.
Step 3: Swipe to and tap Reset.
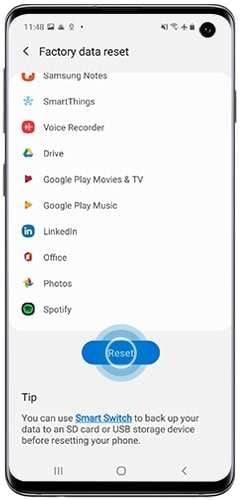
Note: Before carrying out a factory reset, you need to input the password of your Samsung Galaxy S24 Ultra Account.
Bonus Tip: Best App To Solve Phone Stuck on Boot Screen
If all the solutions above do not work and you do not want to perform a factory reset on your phone, one option is to use an application called Wondershare Dr.Fone. It is one of the most effective phone recovery solutions and can help to bring your phone back to a state like it was brand new. Being stuck on the startup screen page will be a problem of the past.

The following steps will show you how to use Dr.Fone to perform system repair on your phone.
Step 1: To the Dr.Fone application using the link above and click on System Repair.
Step 2: Depending on the Samsung Galaxy S24 Ultra device you are using, choose either Android or iPhone.
Step 3: In the next window, select the issue you are facing and click Start.
Step 4: Choose the corresponding Brand, Name, Model, Country, and Carrier from each drop-down menu and click Next.
Tip: Make sure the information you input is accurate, as it will affect the system repair if the information is inaccurate.

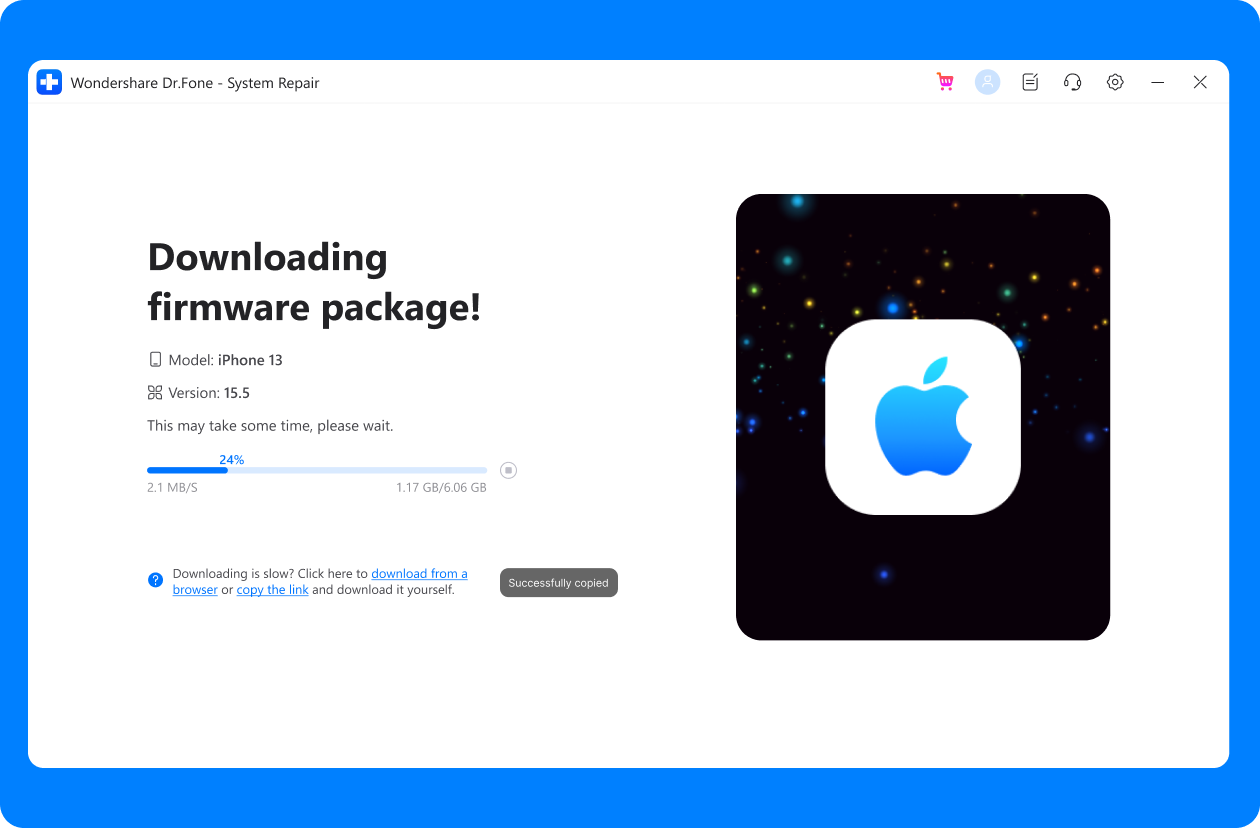
Step 5: Connect your device to your computer and follow the instructions on the screen to enter Download mode. Click on Next to proceed to the next step.
Step 6: Wait for the process to complete, and a new firmware will be updated on your device. Power on your phone and check if the issue still exists.
Frequently Asked Questions
The following are interesting and frequently asked questions about how to solve boot loops.
- What is a boot loop?
A boot loop describes a process when Your Samsung Galaxy S24 Ultra stays stuck in a circle of rebooting. When your phone is stuck on the startup screen, one of the strategies you will try is to restart your device. However, when your phone gets stuck in a boot loop, it is your device’s way of trying to turn it off and on again to fix the issue.
Since there is an issue with the booting process, it will keep running into the same error repeatedly, calling the boot loop. When trapped in a boot loop, your device will keep turning off and on. Most boot loop issues are software-related, such as a wrong system update.
- How do you fix a boot loop?
When stuck in a boot loop, there are different troubleshooting methods for other devices. For Android phones, force your phone into its Recovery mode; from there, you can restore a previous backup. This backup could be from when the boot loop did not exist, so recovery to that backup could quickly solve the problem.
For iPhones, it is the same concept as the Android, restore your phone to the previous backup. You can use iTunes to restore a previously stored backup on your computer.
- How to prevent a boot loop?
A boot loop typically starts when there is a change to your system before a reboot cycle. Most issues are software-related, such as having to do a system upgrade gone wrong or a problem that doesn’t mesh. One way to prevent this is to perform a software or system upgrade constantly. Make your phone juiced to prevent it from turning off mid-way when updating.
 safe & secure
3,405,439 people have downloaded it
Conclusion
This article summarizes some of the possible reasons why your phone is stuck on the boot screen. It demonstrated three useful strategies to overcome your phone stuck in the boot with ease. However, if all the above methods do not work, why not try Dr.Fone-System Repair?
Dr.Fone-System Repair repairs the operating system issues and fixes the issue with your phone. Once you power on your phone again, you can rest assured that it will be like new.
Fix Unfortunately Settings Has Stopped on Samsung Galaxy S24 Ultra Quickly
All of you, sooner or later, must have found the “Unfortunately Settings has stopped” error on your Samsung Galaxy S24 Ultra. The problem can occur if the Settings keeps stopping or crashing. Many times, you may try to open the Settings but it doesn’t even open. Or possibly, it may freeze after getting opened thereby hampering the Samsung Galaxy S24 Ultra device’s performance.

Well! There can be a number of reasons why this thing happens. For instance, custom ROM installations, not enough space in the Samsung Galaxy S24 Ultra device or perhaps an outdated version of Android. If you are struggling with the same issue and want to know what to do when Android Settings is not responding, this post will help you. We have explained everything in detail along with the solutions. So, scroll down and get things sorted.
- Part 1: Clear the cache of Settings and Google Play Service
- Part 2: Clear the Android phone’s RAM and retry
- Part 3: Uninstall the Google update
- Part 4: Uninstall the custom ROM or re-flash the stock ROM
- Part 5: Wipe cache partition to restore Settings
- Part 6: Factory reset your Android
- Part 7: Check and update Android OS
Part 1: Clear the cache of Settings and Google Play Service
It is possible that the corrupted cache files are responsible for this error. Hence, as the first tip, we would like you to clear the Settings cache if that is what triggers the “Unfortunately Settings has stopped” issue. Clearing it would definitely make Settings run appropriately. And The steps to clear the cache of the Google Play Services app are similar. Here is how to clear the cache of Settings:
- Open “Settings” on your Samsung Galaxy S24 Ultra and choose “Apps & Notifications”/”Apps”/”Application Manager” (the option may differ on different devices).
- In the list of applications, look for “Settings” and open it.
- Now, select “Storage” followed by “Clear Cache”.

Note: In some phones, the “Clear Cache” option may come after tapping on “Force Stop”. Therefore, go accordingly without getting confused.
Part 2: Clear the Android phone’s RAM and retry
As the next tip, we would like to suggest you clear your device’s RAM by ceasing the running apps in the background. RAM, if at the increased level, is responsible for the Samsung Galaxy S24 Ultra device’s freezing, poor performance, and most probably is the reason behind crashing Settings. Also, if the apps in the background keep running, they might conflict with the Settings and stop it to perform properly. Therefore clearing RAM is important when Android Settings is not responding. Here is how to do it.
- Firstly, you need to go to the Recent apps screen. For this, long-press the Home key.
Note: Please note that different devices have different ways to go to the Recent apps screen. Do it according to the Samsung Galaxy S24 Ultra device you own. - Now, swipe the apps and tap on the clear option. You will be able to notice the amount of RAM cleared

Part 3: Uninstall the Google update
Uninstalling Google Play Store updates has also responded well to many users. It has worked in the case of the “Unfortunately Settings has stopped” error. So, we would also like to suggest you use this tip if the others don’t work. Here are the steps to be followed for this.
- Open “Settings” on your Android and tap on “Application manager” or “Apps” or “Application.
- Now, head to all the apps and select “Google Play Store” from there.
- Tap on “Uninstall Updates” and restart your device to check if the crashing Settings issue has been resolved.

Part 4: Uninstall the custom ROM or re-flash the stock ROM
Using a custom ROM on your device brings up this problem due to incompatibility or improper installation. Therefore, you should either uninstall the custom ROM or re-flash the stock ROM. in order to re-flash the stock ROM of your Samsung Galaxy S24 Ultra, the best way would be Dr.Fone - System Repair (Android). It offers one-click functionality to flash stock ROM and that too with full security. Supporting all Samsung Galaxy S24 Ultra devices, it ranks among its counterparts when it comes to fixing crashing Phone app issues or any other Android system issue. It is loaded with the beneficial features which are discussed below.
Dr.Fone - System Repair (Android)
Android repair tool to fix “Unfortunately, Settings Has Stopped”
- You needn’t be a tech-savvy to use this
- Supports a wide range of Android devices easily, 1000+ being more precise
- One-click tool and supports any sort of Android system issue
- Higher success rate along with millions of trusted users
- Trustworthy and offers an extremely easy interface
4,635,310 people have downloaded it
How to fix crashing Settings using Dr.Fone - System Repair (Android)
Step 1: Download Tool
Visit the official website of Dr.Fone and download the toolbox from there. Go for the installation process and wait until the installation gets over. Launch it now and choose the “System Repair” tab from the main window.
Step 2: Get the Phone Connected
With the help of a USB cable, plug your Samsung Galaxy S24 Ultra into the PC. Upon proper connection, hit on the “Android Repair” option from the left panel.

Step 3: Feed Correct Information
In the next window, you need to fill in some necessary information like the name and model of the mobile device. Enter details like country and career. Check once and hit on “Next”.

Step 4: Enter Download Mode
Now, you need to take your device into Download mode. For this, you need to follow the onscreen instruction according to your device. Click “Next” and you will notice the firmware downloading progress on your screen.

Step 5: Repair the Issue
Once the firmware is completely downloaded, your Samsung Galaxy S24 Ultra will automatically start getting repaired. Stay there and you will receive a notification that the repair is done.

Part 5: Wipe cache partition to restore Settings
Like RAM, wiping cache is also vital so as to make the Samsung Galaxy S24 Ultra device’s operation smoother. And when you are getting the “Unfortunately Settings has stopped” error, it might be due to the collected cache. To remove it, you will need to enter the recovery mode. And the steps for recovery mode range from device to device. For instance, Samsung Galaxy S24 Ultra users have to press the “Home”, “Power” and “Volume Up” buttons. Similarly, HTC and LG device users are supposed to press the “Volume Down” and “Power” buttons. For Nexus, it is “Volume Up, Down” and Power key combinations. Therefore, before going further, make sure what device you own and enter the recovery mode according to it. Now, follow the detailed guide below to wipe the cache partition in order to fix crashing Settings.
- Primarily, turn off the Samsung Galaxy S24 Ultra device and enter the recovery mode by pressing the respective key combinations.
- You will notice a Recovery screen on your device.
- On showing up the recovery screen, look for the “Wipe Cache partition” option and use the “Volume Down” and “Volume Up” buttons to scroll down and up respectively.
- On reaching the required option, press the “Power” button to start wiping.
- Once finished, click the reboot option and the Samsung Galaxy S24 Ultra device will be rebooted, fixing the issue hopefully.

Part 6: Factory reset your Android
You can also opt for Factory resetting your device to fix the issue of Settings keeps stopping. By removing everything from the Samsung Galaxy S24 Ultra device, it will make your device run properly. If you have important data on your device, please make sure to create a backup before taking action if you don’t want to lose it. The steps are as follows.
- In the “Settings, go to “Backup and Reset”.
- Tap on “Factory data reset” followed by “Reset device”.
- Wait for the completion of the process and check if Settings is stopping or not after it gets rebooted.

Part 7: Check and update Android OS
A lot of times minor issues crop up due to the operating systems that get outdated. It is because the Samsung Galaxy S24 Ultra device needs to get updated from time-to-time for proper functioning otherwise it will not be able to match up with the fading technologies thereby coming up with issues like “Unfortunately Settings has stopped”. We recommend here you check for the available update and update your device. For this follow the guide below.
- Go to “Settings” and tap “About Phone” on your device.
- Now, hit on “System Update” and the Samsung Galaxy S24 Ultra device will look for any available update.
- If there is any, go along with the prompts to install it and make your phone even smarter.

Conclusion
If your Samsung Galaxy S24 Ultra shows the “Unfortunately Settings has stopped” error, don’t worry. This problem can come from many things like old software or cache issues. You can try easy fixes like clearing cache or updating your system. Sometimes, removing custom ROMs might be needed.
For iOS users facing similar problems, we recommend using Dr.Fone-System Repair (iOS) . It’s known for fixing many iOS problems without losing any data. Remember, a well-working device is just a few steps away!
 safe & secure
How To Deal With the Samsung Galaxy S24 Ultra Screen Black But Still Works?
With the advance of technology over the years, many of us rely on smartphones to communicate, work, and play. As such, it can be pretty concerning when your device begins to act strange like your phone screen suddenly went blank.

Whether you’re using an iPhone or an Android device, you’ll eventually encounter a problematic symptom like this. Therefore, this article will explore what to do when your phone screen goes black. After exploring below, you’ll learn the common causes of why your phone screen went black and how to fix it. Read on below to learn more.
Part 1: Why Did My Samsung Galaxy S24 Ultra Screen Go Black but Still Works? Common Causes
Experiencing a cell phone blank screen is not exclusive to Android or iOS users. A phone screen not turning on happens all the time due to several factors that may or may not be out of your control. While they can be frustrating, here are some common causes you should know as to why your phone screen went black but still works.
A Drained Battery
The first thing that comes to mind when your phone screen suddenly goes black is you have a drained battery. Even though this is obvious, it’s still important to mention, as this is usually what most people encounter. To fix this problem, plug your smartphone into a charger and wait for your device to turn on again. If it works, then you just prevented a rather annoying experience.

App Troubles
If your phone is working, but the screen is black, there’s also a high probability that you are having an isolated issue with a particular application. An app could be loading something, which often happens for streaming apps such as YouTube, Netflix, Prime, and more, especially if you have slow internet connectivity.
Software Issues
A potential reason why your phone screen went black but still works could be because of your smartphone’s software. This problem suggests that your Samsung Galaxy S24 Ultra is crashing, potentially freezing your device if not addressed immediately. If this is the cause, then your device is likely experiencing a critical system error, and you should directly try to reboot your phone.
Hardware Problem
If you dropped your phone, there’s a high chance the LCD connectors went loose due to the physical impact. If this happened to you, the phone might be working, but the screen is black due to the LCD cable dislodging. Another issue could be your phone got exposed to extreme temperatures. This can also cause a black screen but your phone is still on.

Part 2: How To Fix Black Screen on Your Phone
Here are four valuable methods you should know on what to do when your phone screen goes black on your iPhone or Android smartphone to get them working again.
Method 1: Force Restart your Android/iOS Smartphone
If your phone screen is black but still works, force restarting it is the easiest way to fix it. The following are the detailed steps for both Android and iOS devices.
How to Force Restart your Android Device
Here is how you force restart an Android device when your phone screen doesn’t turn on.
Step 1: Press and hold the Power and Volume Down buttons simultaneously.
Step 2: Hold the same buttons until your device restarts, and display the phone’s logo.
How to Force Restart your iOS Device
If you own the latest iPhone models, here are the method of restarting it from iPhone 8 up to 14.
Step 1: Press and immediately release Volume Up. Next, press and immediately release Volume Down.

Step 2: Press and hold Sleep/Wake until you see the Apple logo.
Note
If you own an iPhone 7, press and hold the Side button and Volume Down simultaneously until you see the apple logo.
Method 2: Uninstall or Update Outdated Applications
In some cases, your phone screen is black but still works because of installing incompatible apps on your iOS/Android device. If the installed app is frequently crashing, it may be the source of a blank cell phone screen. Uninstall the problem app to see if the black screen disappears or not.
Method 3: Inspect the LCD Connectors
If your phone screen goes black but still works, you should inspect the logic board to the LCD screen to see if it has become disconnected. It is common for smartphones that often get dropped a few times. It’s best to plug the connectors back to regain your screen’s functionality.
However, this requires technical know-how. It’s better to seek help from a professional as you could risk causing more damage to your device if you don’t know what you’re doing.
Method 4: Perform a Factory Reset
If all the methods above did not solve your problem, the last resort you can take is to perform a Factory Reset. This method works on Android and iOS smartphones and erases all your data. It is the quickest way to try to fix why your phone screen went black. Here are the steps.
For Android Users
If you’re on Android, tap Settings > Backup and Reset. Tap on Factory data reset > Delete all to initiate the factory reset.
If you cannot do this, here’s how to perform a factory reset manually using Recovery Mode.
Note
The process of booting into Recovery Mode is not the same across all Android devices and depends on the manufacturer and model of your phone. Refer to your owners manual to see which method is the right one for your Samsung Galaxy S24 Ultra.
Step 1A: Press and hold the Power button and Volume Down buttons simultaneously and continue holding until the screen starts.
Step 1B: For Android devices with a Home button, press and hold the Home button and the Power button and continue holding until the screen starts.
Step 1C: Press and hold the Power button as well as the Volume Up and Volume Down buttons simultaneously and continue holding until the screen starts.

Step 2: Use the Volume buttons to navigate the choices and select Wipe data/factory reset and confirm your choice with the Power button.
Step 3: Simply wait for the process to complete and wait for your Samsung Galaxy S24 Ultra to restart automatically.
F****or iOS Users
Step 1: For iOS users, meanwhile, tap Settings > General > Transfer or Reset iPhone.
Step 2: Next, choose Erase All Content and Settings. Check the list of items you want to remove.

Step 3: Tap Continue and enter your iPhone passcode. A message warns you that the process will delete all media and data and reset all settings.
Step 4: Tap Erase iPhone to confirm. You’ll be asked to type in your Apple ID and password if Find My is active. Enter your password and tap Erase.
Part 3: How To Fix Black Screen Phone With an Alternative
If your phone screen went black but still works and doing the methods above did not solve the issue, you can use Wondershare Dr.Fone for iOS and Android as a last resort. It’s one of the most popular smartphone repair tools today, enabling you to fix all kinds of annoying scenarios. These include black screen, boot loop, white screen of death, bricked iOS or Android device, and more.
Key Features
Dr.Fone – System Repair for iOS and Android has fantastic features you can immediately take advantage of. Here are its key features below.
- Fix all Android and iOS Problems in Minutes
Dr.Fone – System Repair can fix all kinds of issues on your Android/iOS, such as a black screen, white screen of death, screen freeze, boot loop, or recovery mode. All of this can be done within less than 10 minutes to save you precious time.
- Supports up to 1000+ Android Smartphones and the latest iOS
All iOS versions, including the latest iOS 16 and iOS 16 beta, are fully supported by Dr.Fone – System Repair. The app handles all your smartphone issues without data loss to secure your info. On the other hand, if you own an Android, the app supports up to 1000+ Android smartphones, making it highly versatile for Android owners.
Tech Specs
Dr.Fone – System Repair (Android)’s minimum system requirements for your computer are listed below.
| Computer OS | Android |
|---|---|
| Windows 11, 10, 8.1, 8, 7 | Android 2.1 and up to the latest |
Meanwhile, here are the system requirements for Dr.Fone – System Repair (iOS).
| Computer OS | iOS |
|---|---|
| Windows 11, 10, 8.1, 8, 7 | Supports all iOS versions, including the latest iOS 16 and iOS 16 beta |
| macOS 12, 11, 10.15, 10.14, 10.13, 10.12, 10.11, 10.10, 10.9, 10.8 |
Pros and Cons
If you’re still undecided about Dr.Fone – System Repair, here are its pros and cons.
Pros
- Fone – System Repair for iOS and Android has a clutter-free and beginner-friendly user interface. It’s easy to understand and use, so you can start immediately.
- Both the iOS and Android versions finish the repair tasks within less than 10 minutes to save you time.
Cons
- Each version for each OS is sold separately.
- The free version works up to your device’s compatibility. Once you start the repair process, the app will ask you for a valid license key.
How to Fix Black Phone Screen With Dr.Fone – System Repair
Here’s how to fix your phone screen with Dr.Fone – System Repair on iOS/Android.
Step 1: Download and install Dr.Fone – System Repair for iOS or Android. Next, open the program and connect your smartphone.
Step 2A (For iOS): Choose the correct model of your iPhone for the program to be able to download the appropriate firmware package.
Step 2B (For Android): Click Start. On the next window, choose the Brand, Name, Model, Country, and Carrier of your smartphone, then click Next.
Step 3: Follow the on-screen instructions provided on the main program window and wait for the repair process to complete.
safe & secure
4,262,204 people have downloaded it
Conclusion
Our increasing reliance on smartphones has led to amazing advancements in new technologies. However, lingering issues such as your phone screen not turning on or your phone screen being black but still working are ongoing problems to many. That’s why learning how to prevent these events is essential to take care of your smartphone.
Doing all the recommended methods above usually solves the case. If the different fixes don’t work for you, Dr.Fone – System Repair for iOS and Android can help resolve all your problems within less than 10 minutes. You can download it for free on Windows and Mac to test it yourself.
Also read:
- [New] In 2024, Breathtaking Bounds of 2022 Skaters
- [Updated] In 2024, Game Changers Gear Essentials Every Business Needs to Stay Ahead of the Curve
- [Updated] In 2024, The Essential How-To for YouTube Comment Control
- 3 Smart and Simple Ways to Change Home Address on Apple iPhone 15 Pro Max | Dr.fone
- 6 Fixes to Unfortunately WhatsApp has stopped Error Popups On Vivo Y200e 5G | Dr.fone
- 7 Fixes for Unfortunately, Phone Has Stopped on Motorola Edge 40 Pro | Dr.fone
- Android Screen Stuck General Meizu 21 Pro Partly Screen Unresponsive | Dr.fone
- Fixing Persistent Pandora Crashes on Samsung Galaxy S23 FE | Dr.fone
- Full Guide How To Fix Connection Is Not Private on Motorola Moto G84 5G | Dr.fone
- Google Play Services Wont Update? 12 Fixes are Here on Honor Magic 6 | Dr.fone
- In 2024, Dose Life360 Notify Me When Someone Checks My Location On Samsung Galaxy A54 5G? | Dr.fone
- Live Streaming Made Easy: The Ultimate Guide to ManyCam, Virtual Cameras, and Online Broadcasts
- Revolutionizing AI Conversation: The Impact of PaLM 2 on Google's Bard
- Secure Visual Studio Code Against Windows 11 Glitches
- Title: Reasons for Samsung Galaxy S24 Ultra Stuck on Startup Screen and Ways To Fix Them | Dr.fone
- Author: Ariadne
- Created at : 2024-10-03 16:23:39
- Updated at : 2024-10-05 16:17:28
- Link: https://howto.techidaily.com/reasons-for-samsung-galaxy-s24-ultra-stuck-on-startup-screen-and-ways-to-fix-them-drfone-by-drfone-fix-android-problems-fix-android-problems/
- License: This work is licensed under CC BY-NC-SA 4.0.