
Stuck at Android System Recovery Of Samsung Galaxy F14 5G ? Fix It Easily | Dr.fone
Stuck at Android System Recovery Of Samsung Galaxy F14 5G ? Fix It Easily
In this article, you will learn what is Android system recovery, and how to fix Android stuck at system recovery step by step. To get out of Android system recovery more easily, you need this Android repair tool.
You know your Samsung Galaxy F14 5G is stuck in recovery mode when you cannot turn on the Samsung Galaxy F14 5G device. If you try to turn it on, it shows a message that says, “Android System Recover.” This situation can be quite debilitating for most Android users. Most of the time, you don’t know whether you have lost all of your important Android data. It is even more worrying because of the fact that you cannot turn on your device at all, especially when you don’t know how to fix it.
Part 1. What is Android System Recovery?
Despite all the worry that surrounds an unwanted Android system recovery screen, it is actually a feature that can be quite helpful to your Samsung Galaxy F14 5G when it’s needed. It can be useful when you want to hard reset the Android device without having to access the settings. This can be very useful if your device is not working very well or if your touch screen is experiencing problems. It can also be very helpful when you are having a problem accessing the settings on your device.
For these reasons, it is actually a good thing, although when it does happen unexpectedly, you may want to know how to fix it.
Part 2. How to get to Android System recovery
Now that you know how useful the Android System can be, you may want to know how to utilize this feature to get out of some of the problems we mentioned above. Here’s how you can safely get to the Android recovery system on your Samsung Galaxy F14 5G.
Step 1: Hold down the power key and then select “Power Off” from the options on the screen. If, however, your screen is unresponsive, keep holding the power key for several seconds until the Samsung Galaxy F14 5G device is completely turned off.

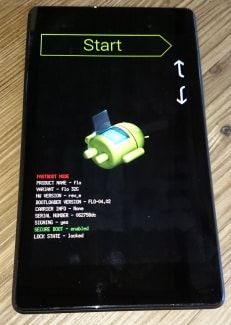
Step 2: Next, you need to hold down the Power and the Volume Key. You should able to see the Android image and a bunch of information about your device. There should also be a “Start” at the top right corner of the screen.
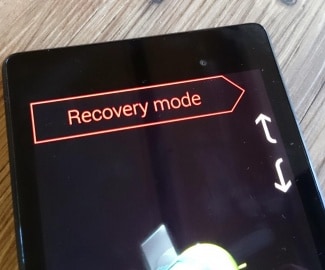
Step 3: Press the Volume up and Volume down keys and use the Power key to select menu options. Press the Volume down key twice to see “Recovery Mode” in red at the top of the screen. Press the Power key to select it.
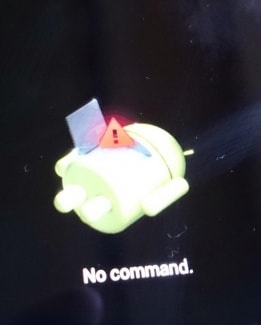
Step 4: The white Google logo will appear immediately followed by the Android logo again as well as the words “No Command” at the bottom of the screen.
Step 5: Finally, press and hold both the Power and the Volume up Key for around 3 seconds and then let go of the Volume up Key but keep holding the Power Key. You should see the Android system recovery options at the top of the screen. Use the Volume keys to highlight and the Power key to select the one you want.


Part 3. Android Stuck at System Recovery? How to fix in one click?
Sometimes during the System Recovery process, the process can glitch, and you’ll lose data on your device, rendering it unusable. However, another solution to fix this is to repair your device using the Dr.Fone - System Repair tool.
Dr.Fone - System Repair (Android)
One-stop solution to fix Android stuck at System recovery
- It’s the #1 software for PC-based Android repair
- It’s easy to use with no technical experience required
- Supports all latest Samsung Galaxy F14 5G devices
- Easy, one-click fix Android stuck at system recovery
3981454 people have downloaded it
Here’s a step by step guide on how to use it yourself;
Note: Be aware that this process can erase all your personal files on your device, so ensure you’ve backed up your Samsung Galaxy F14 5G before continuing.
Step #1 Head over to the Dr.Fone website and download the software for your Windows computer.
Once installed on your computer, open onto the main menu and connect your Samsung Galaxy F14 5G using the official USB cable. Select the System Repair option.

Step #2 Select the ‘Android Repair’ option from the next screen.

Insert your device information, including the brand, carrier details, model and country and region you’re in to ensure you’re downloading the correct firmware.
 Easy and Safe Partition Software & Hard Disk Manager

Step #3 Follow the onscreen instructions on how to put your device in Download Mode.
Your device should already be in this mode but follow the instructions to make sure. There are methods available for devices, both with and without home buttons.

company, user or members of the same household. Action! - screen and game recorder</a>

Step #4 The firmware will now start downloading. You’ll be able to track this process in the window.
Ensure your device, and your computer stays connected the entire time, and make sure your internet connection remains stable.

After downloading, the software will automatically start to repair your device by installing the firmware. Again, you can track the progress of this on the screen, and you’ll need to ensure your device remains connected throughout.


You’ll be notified when the operation is complete and when you’re able to disconnect your phone and use it as normal, free from it being stuck on the Android system recovery screen!
 PaperScan Professional: PaperScan Scanner Software is a powerful TWAIN & WIA scanning application centered on one idea: making document acquisition an unparalleled easy task for anyone.

Part 4. Android Stuck at System Recovery? How to fix in a common way?
If, however, your device is stuck on system recovery mode, here’s how you can easily get it out of system recovery. The process is slightly different for different Android devices, so you should check your device’s manual before attempting this process.
Step 1: Power off the Samsung Galaxy F14 5G device, and just to be sure, take out the battery to ensure that the Samsung Galaxy F14 5G device is fully turned off. Then reinsert the battery.
Step 2: Press and hold down the Home button, Power Button, and the Volume up Key simultaneously until the Samsung Galaxy F14 5G device vibrates.
Step 3: Once you feel the vibration, release the power button but continue to hold down the Home and Volume up Key. The Android recovery screen will display. Release the Volume up and Home buttons.
Step 4: Press the Volume down key to select the “Wipe Data/ Factory Reset option and then press the Power button to select it.
Step 5: Next, you need to press the Volume down button to highlight “Delete All User Data” and then press the Power button to select it. The device will reset and present the “Reboot System Now” option.
Step 6: Finally, press the Power button to reboot the phone in normal mode.
Part 5. Backup and Restore Android System
Losing data on your Samsung Galaxy F14 5G is a common occurrence, and since Android devices don’t really have an automatic full backup solution, it is important to know how to backup and restore your device system. Here’s how to easily do that.
Step 1: Enter the recovery mode on your Samsung Galaxy F14 5G, as described in Part 2 above. Use the Volume and Power keys to select the “Backup & Restore” option on the screen.
Step 2: Tap on the backup option or use the Volume and Power keys if your screen is unresponsive. This will begin backing up your system to the SD card.
Step 3: After the process is complete, choose “Reboot” to restart the Samsung Galaxy F14 5G device.
Step 4: You can then simply check Recovery > backup directory on your SD card. You can rename it to easily find it later during the restore process.
To restore the system from the backup created, follow these simple steps.
Step 1: Once again, enter recovery mode as described in part 2 above and then choose Backup & Restore from the menu list.
Step 2: Press “Restore” to begin the recovery process from the Backup file we created
Step 3: You will be notified when the system restore is complete.
Android system recovery mode can be quite useful, especially when your system is unresponsive. As we have also seen, it is important to know how to get into and out of System Recovery mode if you are going to backup and restore your Android system. It is also quite easy to do both of these things.
Top 10 Fixes for Phone Keep Disconnecting from Wi-Fi On Samsung Galaxy F14 5G
The revolutionized world is about the internet, online life, and social media. You can get all the information you need from the internet. You are a click away from booking tickets, buying groceries, calling your loved ones, or even you can handle office meetings with the internet.

Since everything revolves around the internet, it’s annoying if your WI-FI disconnects. You might question yourself why does my Wi-Fi keep disconnecting from the phone? To know the answer, read the article below.
Part 1: Why Does Your Phone Keep Disconnecting from WiFi?
Is your phone frequently getting disconnected from Wi-Fi? Or the internet service is lagging? We have a few options from which you can inspect your problem. Not all internet issues arise from the service provider, as some issues are because of the Samsung Galaxy F14 5G devices that are using the internet. Some of these issues are discussed below for your assistance:
- Router Problems
If the internet provider is doing their job right, the router might not deliver you the right thing. Like other electronic devices, they can also misbehave. This can happen because the router is faulty, or it can happen because the firmware is outdated.
- Out of Wi-Fi Range
Why does My Samsung Galaxy F14 5G keep disconnecting from Wi-Fi? It is because you might be out of range! The router’s placement is very important. The router transmits frequencies that have a limited range. If you are moving out of the range, the internet automatically disconnects.
- Wi-Fi Signals Getting Blocked
The signals from the router can dissipate from any other electronic device nearby. Signals like radio and microwaves can interfere with signal strength.
- Devices Connected with Router
Commonly, a house has around a dozen devices connected to the internet router. People do not think that the router has limited connection slots. It is unable to entertain a specific number of requests for service facilitation. The router has limitations; the service quality will drop if the limitations are exceeded. This drop in quality can also cause internet disconnection from devices.
- Unstable Internet
If your Samsung Galaxy F14 5G gets disconnected frequently, then this disconnection is due to unstable internet, but apart from the above-mentioned problems, there is another reason for internet disconnection.
Sometimes, the internet is stable, but it still disconnects. This is because the internet service provider might not send the best quality internet you have acquired it for. If your internet is stable and the phone still keeps disconnecting, then head onto the next part that will share the top 10 fixes to sort out this issue.
.png) Kanto Player Professional
Kanto Player ProfessionalPart 2: 10 Ways to Fix Wi-Fi Keep Disconnecting on Phone
As we have mentioned earlier if your Wi-Fi is stable, but it keeps disconnecting from Samsung Galaxy F14 5G S22 or other Android phones, the coming section of this article is for you. We will provide you with 10 solutions with complete assistance to fix the “Wi-fi keeps disconnecting Android“ issue.
 Nero Burning ROM:
The ultimate burning program for all your needs!
Fix 1: Restart Your Phone
If the Wi-Fi keeps disconnecting from your Samsung Galaxy F14 5G, but the internet is stable, then you should try to fix the issue by restarting your phone. Sometimes, it’s the phone that’s causing a problem, so to resolve it, you can follow the steps given below:
Step 1: Firstly, unlock your phone. Now, press the Power button and hold it for a few seconds.
Step 2: Now, select the ‘Reboot’ option to resolve the issue from the options on the screen.


Fix 2: Check Router Settings
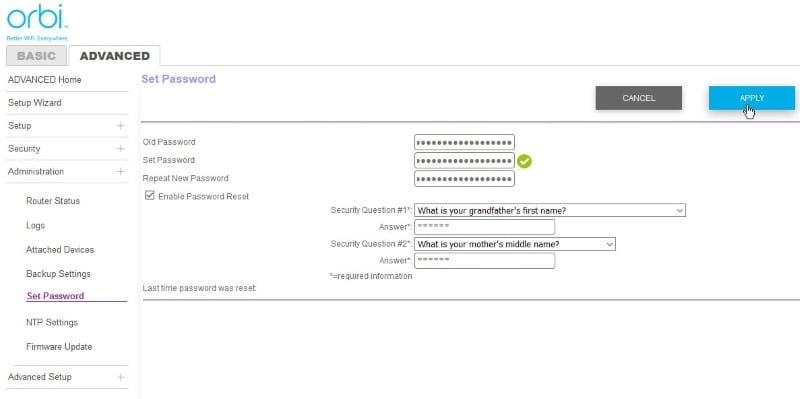
If your Android keeps disconnecting from Wi-Fi, you can also fix the problem by checking the router settings. This is because your phone might be blocked from connecting to the network, and if this is the scenario, your phone will never maintain the connection. You should check the Router’s admin panel or app to remove your phone from the blocklist.
Fix 3: Reconnect to Network
To fix the annoying problem that your Wi-Fi keeps disconnecting, you should try forgetting the network and then reconnecting to it. This could be done easily by following the steps below:
Step 1: First, you need to open the Wi-Fi settings menu. This could be done by pressing and holding the Wi-Fi option from the drop-down menu of your phone until the settings open up.

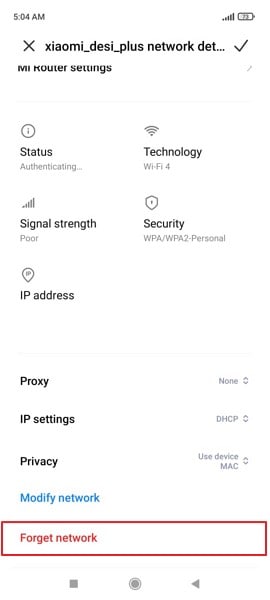
Step 2: A list of all the Wi-Fi networks will appear on the screen. Select the network that is causing trouble from that list and hit the ‘Forget Network’ option.
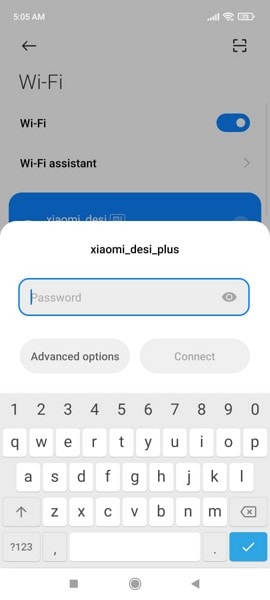
Step 3: After that, you should reconnect to this Wi-Fi network by selecting it from the Wi-Fi list and entering its password.
Fix 4: Restart Your Router
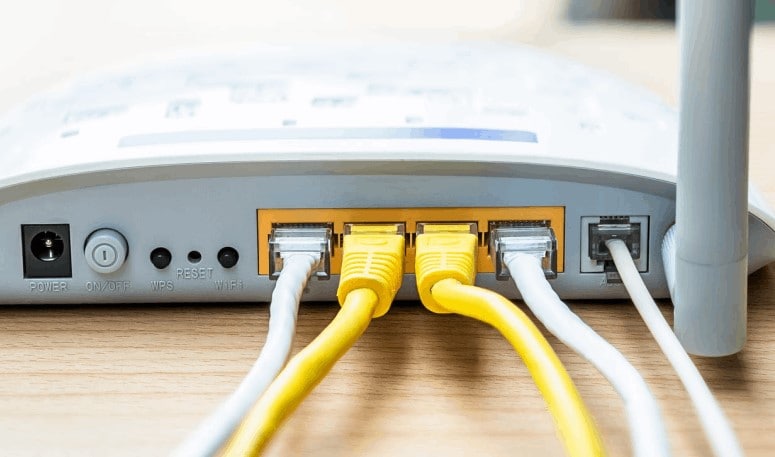
As we discussed, to restart your phone, you can also restart the router to get rid of the problem. For this, hit the restart button on the router to get a fresh start. If the Samsung Galaxy F14 5G device has no button, disconnect the power supply and plug it back in to connect again. Most internet issues are resolved by restarting the router.
Fix 5: Forget Old Networks
The problem that your Wi-Fi keeps disconnecting can also occur because of the list of networks you have connected to. Having yourselves connected to different set of networks could turn out to be quite problematic in the process. In the process of finding and switching to the best network, your device’s Wi-Fi will continually disconnect and reconnect with the nearby networks. To finish this irritating issue, you should remove and forget all the extra networks that you connected previously.
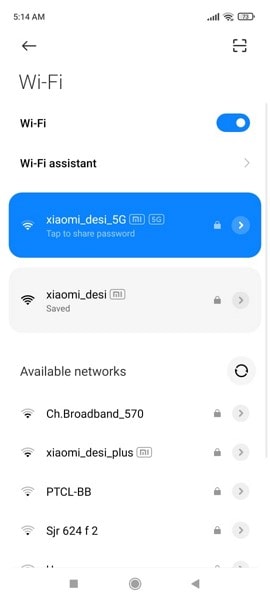
Step 1: You should start by pressing and holding the Wi-Fi option from the drop-down menu on your phone until the Wi-Fi settings screen appears.

Step 2: You will see a list of all the Wi-Fi networks you have connected to previously. One by one, select each network and hit the ‘Forget Network’ button to remove it.

Fix 6. Check Recently Installed Applications
Sometimes, different installed applications can also cause trouble. If your Wi-Fi was fine, but suddenly it started disconnecting, then don’t forget to check the recently installed apps. This is because with not knowing the damage it can cause, you might have installed some VPNs, connections boosters, or firewalls. You can try and disable them but if that doesn’t resolve the problem, then uninstall the app.
Step 1: For uninstalling the problematic application, you have to select it and hold it. You will see a pop-up menu of multiple options; choose the option of ‘Uninstall’ to remove the app from the phone.
 vMix Basic HD - Software based live production. vMix Basic HD includes 4 inputs, 3 cameras, streaming, recording, playlist.
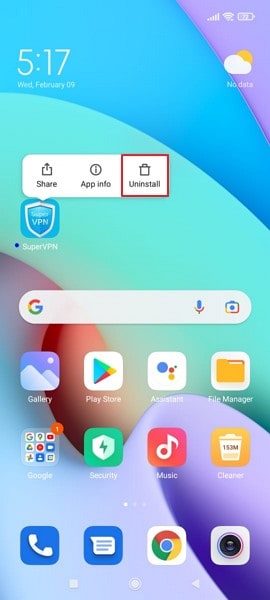

Fix 7: Reset Network Settings on your Phone
It’s annoying that your Wi-Fi keeps disconnecting while you are working or studying. Android users can easily get over this problem by resetting the network settings. The steps for this fix are as follows:
Step 1: For resetting the network, start by opening the ‘Settings’ menu on your phone. Then, scroll down, look for the ‘Connection & Sharing’ option, and select it.
Step 2: As you progress onto a new screen, you will find the option of “Reset Wi-Fi, Mobile Networks, and Bluetooth” in the menu. Select the option to lead to the next window.
 Any DRM Removal for Mac: Remove DRM from Adobe, Kindle, Sony eReader, Kobo, etc, read your ebooks anywhere.
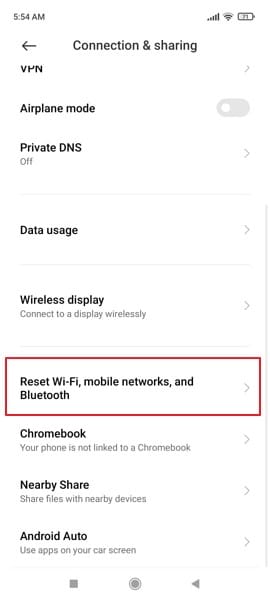
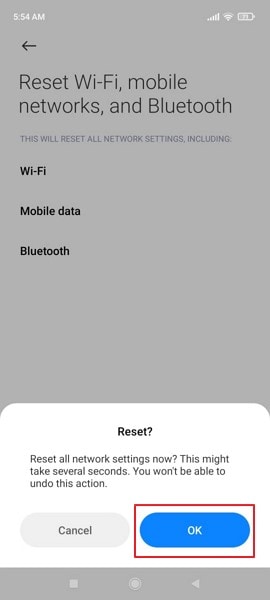
Step 3: Click on the option of “Reset Settings” present on the bottom of the next screen that shows up. Provide confirmation of resetting these settings by inserting your device’s PIN, if any.


Step 4: After providing the appropriate clearances, you will be asked for another confirmation of resetting the Samsung Galaxy F14 5G device’s networks to default. Click “OK” to execute.
Fix 8: Check Routers Range
If your Wi-Fi automatically disconnects and connects again while you are roaming in the house, then it is because of the router’s range; you should check it. For this, you can consider changing and modifying your AP (Access Point) band on your router.
Although the 5GHz frequency band is recognized for providing better network speeds, this band has a shorter range as compared to the 2.4GHz band, which has a better coverage of area. You can easily shift your router’s range through its configuration page. It is considered optimal to utilize the 2.4GHz frequency band for better ranges.

Fix 9: Stay Connected while Asleep
Most Android phones have a battery-saving feature. This feature disables the network connections to save the battery of the phone. If this is why the Wi-Fi keeps disconnecting, follow the steps shared below to fix it:
Step 1: Start by opening the ‘Settings’ menu on your phone. Then scroll down until you find the ‘Battery’ option and open it.

Step 2: Then, from the battery screen, hit the ‘More Battery Settings’ options. Then, you will see the ‘Stay Connected while Asleep’ option; turn it on.

Fix 10: Upgrade Router Firmware
If none of the above-shared fixes work, the last fix to resolve the problem is upgrading your router firmware. For this, you should contact any professional who knows network operations as upgrading router firmware takes time and requires knowledge.
Wi-Fi Stay Connected
The article above has discussed 10 solutions that offer a comprehensive toolkit to tackle the persistent issue of Wi-Fi keeps turning off Android. By toggling Airplane Mode, restarting your device, adjusting settings, and updating firmware, among other steps, you can effectively address and resolve this connectivity problem. With these solutions at your disposal, you can regain a stable and uninterrupted Wi-Fi experience on your Samsung Galaxy F14 5G.
4 Ways to Fix Android Blue Screen of Death On Samsung Galaxy F14 5G
Android is undoubtedly amongst the best smartphone platforms but comes with its own share of glitches. The Android screen of death is observed by many users all over the world who complain of their device screen turning blue rendering their phone/tablet unresponsive. This is called the Android blue screen of death and it usually occurs when you turn on your device by pressing the Power On button but your device does not boot up normally and remains stuck at a plain blue screen without any error message.
Such an Android screen of death is caused by a temporary software crash but can also occur due to certain hardware issues. We understand the inconvenience caused to you when you see the Android blue screen of death. Here are ways to fix the error and great software to extract all your data to keep it unaltered and safe.
Read on to learn more about the Android screen of death and ways to combat it.

Part 1: How to rescue data on Samsung Galaxy F14 5G with blue screen of death?
The Android blue screen of death issue is not a difficult problem to deal with and can be fixed by you by following the easy steps given in this article. We suggest that all readers rescue the data stored on their Android devices to prevent data loss and keep it stored in your PC from where it can be accessed and recovered by you anytime, anywhere. This task might sound tedious, but, we have for you Dr.Fone - Data Recovery (Android) , a software specially designed to retrieve data from broken and damaged Samsung Galaxy F14 5G phones and tabs, especially Samsung Galaxy F14 5G devices, and keep it safe in your PC without tampering with it or altering its format. It efficiently extracts data from broken or unresponsive Samsung Galaxy F14 5G devices, phones/tabs stuck at black/blue screen, or whose system crashed due to a virus attack.

Dr.Fone - Data Recovery (Android)
World’s 1st data retrieval software for broken Android devices.
- It can also be used to recover data from broken devices or devices that are damaged in any other way such as those stuck in a reboot loop.
- Highest retrieval rate in the industry.
- Recover photos, videos, contacts, messages, call logs, and more.
- Compatible with Samsung Galaxy F14 5G devices.
3,145,271 people have downloaded it
Follow the steps given below to extract data when you experience an Android screen of death:
1. Download, install, and run the Dr.Fone - Data Recovery (Android) tool on your PC. Connect your device using a USB cable and move on to the main screen of the software.
2. Once you launch the software, you will see many tabs before you. Click on “Data Recovery” > “Android”.
 SwifDoo PDF 2-Year Plan
3. And then choose “Recover from Broken Phone” from the program’s screen.

4. In this step, choose from the two options before you the true nature of your device as shown in the screenshot below.

5. You will now be asked to feed in your phone’s model type and name as shown in the screenshot below. Give correct details for the software to identify your device smoothly and hit “Next”.

6. In this step, refer to the instructions in your device manual to enter into Download Mode on your Samsung Galaxy F14 5G and hit “Next”. An example of what to do to reach Download Mode is shown below.

7. Finally, let the software recognize your Samsung Galaxy F14 5G, and start to download the recovery package for your device.

8. Once it does, you will be able to preview all the files on the screen in front of you before you hit “Recover to Computer”.

The process may take up to a few minutes and once it’s done all your files will be extracted and stored on your PC. You can now move on to troubleshooting the problem without the fear of losing all your important data.
 safe & secure
Part 2: One click to fix the Android blue screen of death
We understand how annoying it is to see the Android blue screen of death and fail to access your device data. But, with Dr.Fone - System Repair (Android) , your troubles would burst away.
This software effectively fixes Android screen of death issue along with app crashing, bricked or unresponsive device, stuck on Samsung Galaxy F14 5G logo, etc. All Android issues are well taken care of by Dr.Fone - System Repair (Android) with one click.
 dotConnect for Oracle is an ADO.NET data provider for Oracle with Entity Framework Support.
Dr.Fone - System Repair (Android)
Easy and effective solution to fix the Android blue screen of death!
- Every kind of Android system error and problem is resolved.
- It is the premier Android repair software in the market.
- All the latest Samsung Galaxy F14 5G devices are supported by this program.
- Android blue screen of death can be fixed with a single click.
- Easy to use and no technical skills are needed to operate it.
4,750,154 people have downloaded it
Note: Backing up your device is significant before you carry out the Android repair process. The process of fixing the Android blue screen of death issue may erase data from your Samsung Galaxy F14 5G. So backing up your Android seems a viable option.
Phase 1: Connecting your Android after preparing it
Step 1: Installation and running Dr.Fone - System Repair (Android) on your system takes you to the main screen. Choose the ‘System Repair’ option followed by connecting the Android device.
Step 2: Press the ‘Android Repair’ option before tapping the ‘Start’ button.
Step 3: Over the Samsung Galaxy F14 5G device information window, select all relevant data about your device followed by the ‘Next’ button.
Phase 2: Initiate repairing after entering ‘Download’ mode
Step 1: Get the Samsung Galaxy F14 5G device in ‘Download’ mode to fix the Android blue screen of death issue. Here is how –
- On a ‘Home’ button-less device – you need to switch off the Samsung Galaxy F14 5G device. Now, hold the ‘Volume Down’, ‘Power’, and ‘Bixby’ keys together for about 10 seconds and release. Hit the ‘Volume Up’ key to get into ‘Download’ mode.

- On a ‘Home’ button device – shut down the Android phone/tablet, and then push the ‘Power’, ‘Volume Down’, and ‘Home’ keys for 10 seconds. Let go of the keys and press the ‘Volume Up’ key to enter ‘Download’ mode.
Step 2: Tap the ‘Next’ button to download firmware.
Step 3: Dr.Fone - System Repair (Android) would verify the firmware post-download. It will start repairing the Android system automatically.
safe & secure
Part 3: Force Restart Your Samsung Galaxy F14 5G
A force restart is a basic step that can clear minor software glitches. It has the potential to resolve the Android blue screen of death issue. Force restarting your device can clear temporary bugs and reset all processes. It is a simple yet often overlooked way to fix the Android blue screen of death issue. Use the following steps to force restart your Samsung Galaxy F14 5G:
Step: On your Samsung Galaxy F14 5G, press and hold the “Power” and “Volume Down” keys for around 10 seconds. Release the keys when your device reboots and wait for it to complete rebooting.

Part 4: Remove phone battery to fix blue screen of death
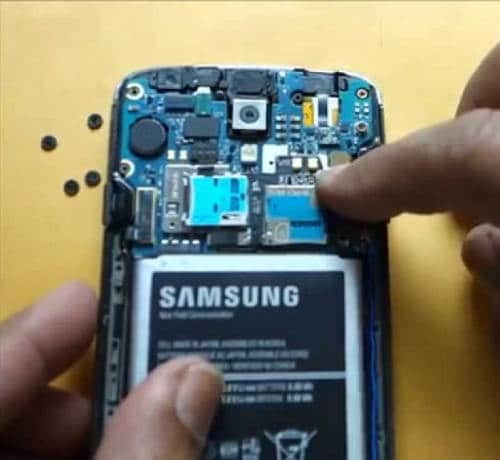
The best home remedy to fix any kind of Android screen of death remove the Samsung Galaxy F14 5G device’s battery. This technique might sound too simple, but it has solved the Android blue screen of death issue for many users whose devices started normally after reinserting the battery. Here is what you should do.
1. Open the back cover of your Samsung Galaxy F14 5G and carefully remove its battery.

2. Let the battery be out for 5-7 minutes. Meanwhile, long press the power button to drain out any residual charge from your device.
3. Now reinsert the battery and attach the back cover.
4. Turn on your device and see that it boots normally all the way to the Home/Locked Screen without getting stuck at Android blue screen of death.
Note: Not all Android devices allow you to remove their battery. If you own such a device, try the next step as it is your only option to fix the Android blue screen of death problem.
Part 5: Put out your SIM Card/SD card and reinsert
In some cases, issues related to the Android blue screen of death can be caused by problems with the SIM card or SD card. Removing and reinserting these cards can help resolve potential conflicts or glitches. Remember that this method can help resolve issues related to SIM card or SD card conflicts. However, it may not address more complex software or hardware problems causing the blue screen issue.
 TubeDigger - online video downloader from mostly any site
Part 6: Clean or change the LCD connector
If you’re facing the Android blue screen of death issue, the issue might be related to a hardware problem. The problem can be a loose or damaged LCD connector. In this scenario, you can try cleaning or changing the connector. This method is more advanced and involves disassembling your device. That’s why you need to proceed with caution and only if you’re comfortable with hardware tasks.
Part 7: Update to the latest Android version
Software problems can manifest the Android equivalent of a blue screen of death. It is usually triggered by errors or anomalies within the operating system. To address these concerns, upgrading to the most recent version of the Android OS proves effective. However, updating your device’s software could introduce fresh glitches or compatibility conflicts. These steps outline the process of updating your device to the latest OS:
Step: Open the Settings app on your Samsung Galaxy F14 5G by locating and launching it. Proceed by scrolling through the options and selecting “Software Update.” In the ensuing screen, choose “Download and Install” to start a search for any available updates.

 ZoneAlarm Extreme Security NextGen
Part 8: How to fix the Android blue screen of death by factory reset?
The Android screen of death is a very confusing issue as it freezes your device at a blue screen with no options to navigate further. In such a situation you may consider performing a Factory Reset, better known as Hard Reset as you will need to enter Recovery Mode to implement this technique. Although resting your device will wipe off all its data but you don’t need to worry as Dr.Fone toolkit Android Data Extraction software can retrieve all your files and keep them safe.
Accessing Recovery Mode differs for different Android devices. Thus, we suggest that you consult your device manual to understand how to boot into Recovery Mode on your particular Android device and then follow the steps given below:
Once you are on the Recovery Screen, you will see a list of options before you, similar to the screenshot below.

Use the Volume Down button to scroll downwards and reach the “Wipe data/Factory reset” option.

Now use the power button to select it and wait for the Samsung Galaxy F14 5G device to reboot automatically.
You will notice that the Android device will turn back on without getting stuck at the Android blue screen of death. Now you can set up your device from scratch.
 PDF application, powered by AI-based OCR, for unified workflows with both digital and scanned documents.
 Part 9: What Should You Do if Android Still Stuck on Blue Screen?
Have you tried all the methods, and your Samsung Galaxy F14 5G is still stuck on the blue screen of death? In this case, it’s important to consider the possibility of a hardware issue. Remember that hardware issues can be complex. Trying to fix things without the right expertise can result in additional harm. If you’re uncertain about the next steps, it’s wisest to ask for assistance from a trained professional.
The Android screen of death, especially the Android blue screen of death, is not a very pleasant sight and could worry you. The good news is that this problem can be fixed by you sitting at home without any technical assistance. Follow the simple and easy tips given above to reboot your device and use the Dr.Fone - Data Recovery (Damaged Device) tool to rescue your data in the most efficient and effective way, then use Dr.Fone - System Repair (Android) to repair your Samsung Galaxy F14 5G.
safe & secure
- Title: Stuck at Android System Recovery Of Samsung Galaxy F14 5G ? Fix It Easily | Dr.fone
- Author: Ariadne
- Created at : 2024-07-30 11:28:01
- Updated at : 2024-07-31 11:28:01
- Link: https://howto.techidaily.com/stuck-at-android-system-recovery-of-samsung-galaxy-f14-5g-fix-it-easily-drfone-by-drfone-fix-android-problems-fix-android-problems/
- License: This work is licensed under CC BY-NC-SA 4.0.