
Tecno Pova 5 Pro Bootloop Problem, How to Fix it Without Data Loss | Dr.fone
Tecno Pova 5 Pro Bootloop Problem, How to Fix it Without Data Loss
Have you, like many other users, faced the bootloop Android problem and wondered what exactly is Android boot loop. Well, Android boot loop is nothing but an error that makes your phone switch on itself every time you manually turn it off. To be precise, when your Tecno Pova 5 Pro does not remain switched off or powered off and starts to boot up automatically after a few seconds, it might be stuck in the boot loop Android.
An Android boot loop is a very common problem and is one of the first symptoms of a soft-bricked device. Also, when your device is experiencing Android boot loop issue, it does not start normally to reach the Home or Locked Screen and remains frozen at the Tecno Pova 5 Pro device’s logo, Recovery Mode or a lit-up screen. Many people fear losing their data and other files due to this error and thus, it is a very confusing situation to be in.
We understand the inconvenience caused, therefore, here are ways to tell you how to fix the bootloop problem in Android devices without losing any important data.
However, before moving on, let us learn a little about the causes for the Android boot loop error.
Part 1: What might cause the bootloop issue on Android?
Android boot loop error might seem weird and unexplainable but it occurs because of some specific reasons.
Firstly, please understand that it is a misnomer that boot loop error occurs only in a rooted device. Boot loop Android error can also occur in a stock device with the original software, ROM, and firmware.
In a rooted device, changes made, such as flashing a new ROM or customized firmware which are not compatible with the Tecno Pova 5 Pro device’s hardware or existing software, can be blamed for the boot loop problem.
Moving on, when your device’s software is unable to communicate with the system files during the start-up process, Android boot loop problem may arise. Such a glitch is caused if you have recently updated the Android version.
Also, corrupt App update files may also cause the bootloop Android issue. Apps and programs downloaded from unknown sources bring in a particular type of virus that prevents you from using your device smoothly.
All-in-all, Android boot loop error is a direct outcome of when you try to tamper with your device’s internal settings.
Hence, if you are looking for ways to guide you about how to fix boot loop issue, you will have to revamp the Tecno Pova 5 Pro device internally by either resetting it or adopting a recovery method.
Read on to know more about how to fix the bootloop error without any data loss when your device suffers from the bootloop Android problem.
Part 2: One click to Fix Android Bootloop without factory reset
If you are trying to figure out how to fix boot loop, the first option you have is the one-click fix to Android Bootloop which involves using the Dr.Fone - System Repair software.
This is designed to repair any data corruption on your device and restores your firmware to its usual working condition.
Dr.Fone - System Repair (Android)
One click to fix boot loop of Android
- #1 Android repair solution from your PC, can fix a wide range of Android system issues, such as boot loop, black screen, etc.
- The software requires no technical expertise, and anybody can use it
- A one-click solution when learning how to fix Android boot loop
- Not require root Android phones.
- Works with most Tecno Pova 5 Pro devices, including the latest Tecno Pova 5 Pro phones like S22
- Simple and easy-to-use user interface
4,689,059 people have downloaded it
To help you get started, here’s a step-by-step guide on how to use Dr.Fone - System Repair.
Note: This method can erase data on your device, including your personal files, so make sure you’ve backed up your device before proceeding.
Step #1 Download the Dr.Fone - System Repair software from the website and install it onto your computer.
Open the software and select the System Repair option from the main menu to fix the Android bootloop error.

Step #2 Connect your Tecno Pova 5 Pro to your computer using the official cable and select the “Android” option from the three menu items. Click “Start” to confirm.

You’ll then need to input the Tecno Pova 5 Pro device information, such as your carrier info, device name, model, and country/region in order to ensure you’re downloading and repairing the correct firmware to your phone.

Step #3 Now you’ll need to put your phone into Download Mode to remove the Android bootloop.
For this, you can simply follow the onscreen instructions for both phones with and without home buttons.

Click “Next”, and the software will begin downloading the firmware repair files.

Step #4 Now you can sit back and watch the magic happen!
Make sure your computer stays connected to the internet, and your device stays connected to your computer throughout the entire process. Once the firmware has been downloaded, it will be automatically installed onto your mobile device, removing the boot loop Android error.

You’ll be notified when the process is done and when you can remove your device and start using free from the boot loop Android error!
 safe & secure
Part 3: Soft reset to fix Android bootloop issue
When your device is stuck in Android boot loop, it does not necessarily mean that it is bricked. Boot loop might be occurring due to a simpler problem which can be fixed by turning off your device. This sounds like a home remedy for a serious problem but it works and resolves the problem most of the time.
Follow the steps given below to soft reset your device:
Turn the Tecno Pova 5 Pro device off and take out its battery.

If you cannot take the battery out, let the phone be off for about 3 to 5 minutes, and then turn it back on.
Simply performing a soft reset on your device can help you if you are looking for solutions for how to fix the bootloop issue. This a very useful method as it does not result in any kind of loss in data and protects all your media files, documents, settings, etc.
In case the Tecno Pova 5 Pro device does not turn on normally and is still stuck in the bootloop Android problem, be prepared to use the troubleshooting techniques given and explained below.
Part 4: Boot into Safe Mode to fix Android boot loop

Booting your Tecno Pova 5 Pro into Safe Mode is a useful troubleshooting step to fix boot loop issues caused by third-party apps. When in Safe Mode, the Tecno Pova 5 Pro device will start up with only essential system apps, and any downloaded apps that might be causing conflicts won’t run. Here’s how you can boot your Tecno Pova 5 Pro into Safe Mode to address the boot loop problem:
Step 1: Power Off Your Device
Hold down the power button until it turns off completely.
Step 2: Access Safe Mode
To enter Safe Mode, follow these steps based on your device model:
- For most Android devices: Press and hold the power button to turn on your device. As soon as the manufacturer’s logo appears, press and hold the Volume Down button until the Tecno Pova 5 Pro device finishes booting. You should see “Safe Mode” displayed in the bottom left or right corner of the screen.
- Some devices might require slightly different key combinations. Refer to your device’s user manual or perform an online search for the specific method to enter Safe Mode for your model.
Step 3: Observe the Tecno Pova 5 Pro device
Once your device has booted into Safe Mode, use it for a while to see if the boot loop issue persists. If the boot loop doesn’t occur in Safe Mode, it indicates that the problem is likely caused by a third-party app.
Step 4: Identify and Uninstall Problematic Apps
Now that you’re in Safe Mode, it’s time to identify the troublesome app. Start by uninstalling recently installed apps one by one until the boot loop problem is resolved. After each uninstallation, restart your device normally to check if the boot loop still occurs. Continue this process until you find the problematic app.
Step 5: Restart Normally
Once you’ve identified and uninstalled the problematic app, restart your device normally to exit Safe Mode. Your Android device should now start up without getting stuck in a boot loop.
By following these steps and using Safe Mode to isolate problematic apps, you can effectively troubleshoot and resolve boot loop issues on your Tecno Pova 5 Pro.
Part 4: Factory reset to fix Android bootloop issue
Factory reset, also known as Hard Reset, is a one-stop solution for all your software resulting in issues. Android boot loop being such problem, can be easily overcome by performing a factory reset.
Please note that all your device’s data and settings will be deleted by adopting this method. However, if you have a Google account signed in on your Tecno Pova 5 Pro, you will be able to retrieve most of your data once the Tecno Pova 5 Pro device turns on.
To factory reset your Android boot loop device, you must first boot into the Recovery Mode screen.
To do this:
Press the volume down button and power button together until you see a screen with multiple options before you.

When you are at the Recovery Mode screen, scroll down using the volume down key, and from the options given, select “Factory Reset” using the power key.

Wait for your device to perform the task and then:
Reboot the phone in Recovery Mode by selecting the first option.

This solution is known to fix the boot loop error 9 out of 10 times, but if you still can’t start your Tecno Pova 5 Pro normally, consider using a CWM Recovery to resolve the Android boot loop issue.
Part 5: Use CWM Recovery to fix bootloop on rooted Android
CWM stands for ClockworkMod and it is a very popular custom recovery system. To use this system to solve the boot loop Android error, your Tecno Pova 5 Pro must be rooted with CWM Recovery System which basically means CWM must be downloaded and installed on your device.
Furthermore, to use CWM Recovery to fix boot loop on rooted Android devices, follow the steps given below:
Press the home, power, and volume up buttons to launch the CWM Recovery screen.
Note: you might have to use a different combination of keys to enter into Recovery Mode, depending on your device’s model.

Scroll down using” the volume key to select “Advanced”.

Now select “Wipe” and choose to wipe “Dalvik Cache”.

In this step, select “Mounts and Storage” to click on “Wipe” or “Cache”.
Once this is done, make sure to reboot your Tecno Pova 5 Pro.
This process with successfully fix the Android boot loop error and not cause any loss of data stored on your device stuck in boot loop.
So the bottom line is that boot loop Android issue may seem like an irreparable error but it can be resolved by carefully following the techniques explained above. These methods not only tell you how to fix the bootloop problem but also prevent it from occurring in the future.
An Android boot loop is a common phenomenon with all Android devices because we tend to tamper with our device’s internal settings. Once the ROM, firmware, kernel, etc are damaged or rendered incompatible with the Tecno Pova 5 Pro device’s software, you cannot expect it to function smoothly, hence, the boot loop error occurs. Since you are not the only one suffering from the Android boot loop problem, be rest assured that the ways, given above, to combat it are recommended by users facing similar troubles. So, don’t hesitate and go ahead to try them on.
safe & secure
Tecno Pova 5 Pro Camera Not Working Unexpected Error? Fix It Now
For all its glory and goodness, the Android OS often has its users pulling their hair in frustration at just how buggy the OS can be at times. So, if you’re having one of those days today, we are here to help. Camera app is one of the most used apps on smartphones today. People only launch the app when they want to take a photo, for everything else there’s a dedicated photo gallery app. What happens when you launch the camera app only to realize it threw an error and you missed your photo moment? Don’t throw the phone, not yet. Let us help you out.

Part I: Why Is Android Camera Not Working?
There are a few reasons why the camera app is not working on your Tecno Pova 5 Pro.
Low Memory
Camera app does rely heavily on system resources, so in case you have too many apps open and for some reason the OS is not able to manage the resources appropriately for the camera app to function as it should, you will get a camera error.
Low Storage
The camera app needs storage space to save the photos it takes. So, in case your phone is running low on storage space, the camera app would likely malfunction as it would have no way to store the photos it would be taking.
General Bugs And Glitches
OS bugs and general glitches within the OS and the camera app can cause camera not working issue anytime during everyday operation. This is part and parcel of any technology.
Hardware Issues
In the rarest cases, there might have developed an actual hardware issue with the camera system on your Tecno Pova 5 Pro. The likely culprit is misuse and abuse, such as a dropped phone or maybe the phone was too hot for extended periods of time, causing hardware issues.
Part II: How To Fix Android Camera Not Working Issue?
So, how to get the Android camera not working problem solved? There are a few ways you can try fixing the camera not working issue on your Tecno Pova 5 Pro right where you are, without needing to take the Tecno Pova 5 Pro device to the manufacturer’s service center.
II.I: Restart The Handset
One of the first things to do any time an app or your phone or tablet does not work like it should, restarting the Tecno Pova 5 Pro device refreshes everything just enough to resolve most commonly occurring issues.

Use the power button on your smartphone to restart your Android handset and see if this resolves the issue.
II.II: Close And Relaunch The Camera App
If the camera app (or any app for that matter) has been in the background for a while and then it is brought to the foreground, there are always chances of it crashing for any reason, or not working as expected. So, closing the app completely and relaunching it is recommended.
Step 1: Launch the app switcher on your specific Android device the way your device manufacturer suggests you to. Usually, it is a swipe up and hold gesture to get into the app switcher.

Step 2: Next, you can choose to close just the camera app or, better yet, close all apps by tapping the Close All button. Flicking any app upwards (quick upward swipe) is how you close an app. If there is no Close All button anywhere, repeat the gesture for all open apps.
II.III: Check App Permissions
These days, thanks to strides in the privacy initiatives, apps need permissions before they can function the way they do. Most of the times, apps such as camera do have the necessary permissions, but sometimes it is possible that the permissions are set incorrectly. To check if the camera app has the requisite permissions, do the following:
Step 1: Go to Settings > Apps > Camera > Permissions.

Step 2: Tap Camera.

Step 3: See if the selected option is Allow Only While Using This App. If not, select it.
II.IV: Clear The Camera App Cache
Clearing the camera app cache is sometimes helpful. To do that:
Step 1: Go to Settings > Apps > Camera and tap Storage Usage.

Step 2: Tap Clear Cache.

II.V: Clear The Photo Gallery App Cache
The camera app is closely tied to the photo gallery app that comes baked in into Android OS. That is because photos that the camera app takes are stored in the photo gallery app. Consequently, if there were any issues in the photo gallery app, that could lead to the camera app not working on Android problem. Here’s how to clear the photo gallery app cache:
Step 1: Go to Settings > Apps > Photos > Storage Usage.

Step 2: Tap Clear Cache.
II.VI: Check For App Updates
This does not happen always, but sometimes, with known bugs and issues, there may be an update released that fixes those bugs and issues that prevent some users from using a given app reliably. Checking for updates is a good step to make sure that your camera app is updated to the latest version possible.
Step 1: Go to Play Store and tap your profile picture on the right.

Step 2: Tap Manage Apps and Device.

Step 3: If there are updates available, Tap Update All to update all apps.
II.VII: Cool The Phone Down
We do not realize the immense power that is packed into the thin smartphone form factor these days. If you have been using the phone to video chat for a while now, you might not realize that the phone has become hot, especially if you are using a desk stand. Same for shooting high-resolution videos; the phone does get quite hot shooting high-resolution videos.
If this is the case, close all apps and let the phone cool down. You might even want to shut the phone off to help cool it faster.
II.VIII: Nudge The Camera System
You may want to tap your camera system (the lenses and surrounding area) gently to see if that gets the camera working. In case it did, this is indicative of a hardware issue, and you should get it checked at the service center at your earliest convenience.
II.IX: Fix Android Camera Not Working Issue In One Click (With Dr.Fone)
Now, if the above fixes have not worked, you might want to repair your Android OS once before you make that appointment with the service centre. And, we have just the app to help you fix your camera not working on Android problem quickly.
Wondershare Dr.Fone is a multi-module app that works on both Windows and macOS and is the only app you will ever need to resolve nearly all of your smartphone and tablet issues that you are likely to encounter. Need to take backups? Dr.Fone Phone Backup has you covered with the ability to take and restore even selective backups, and to any location such as your computer or an external disk as well. Want to transfer WhatsApp chats to a new phone? Use WhatsApp Transfer to do just that! Bought a new phone? Use Phone Transfer to transfer contents from old phone to new, and then use Dr.Fone Data Eraser to securely wipe your old phone before giving it away!
Today, we will use Dr.Fone’s System Repair (Android) module to fix Android camera not working issue quickly.
Download Dr.Fone here.
safe & secure
Step 1: Launch Dr.Fone app on your PC or Mac.
Step 2: Click System Repair module and then Android.

Step 3: For now, don’t bother with the scenarios given and click Start to go to the next screen.
Step 4: Your Android device will be detected by Dr.Fone. If anything seems incorrect, use the dropdown options to change it, and click Next.
Step 5: Your phone needs to be put into Download mode before it can be repaired. Follow the instructions shown onscreen and click Next.

Step 6: Dr.Fone automatically downloads the most recent firmware for your device and when it is ready, waits for your input. Click Fix Now to start the repair process.

Step 7: You will need to enter a 6-digit code (digit zero, six times – 000000) to confirm and begin the repair process.

When the repair is complete, Dr.Fone shows the final screen as below:

safe & secure
Conclusion
The camera app on your smartphone is one of the most important apps you use. This is not a game; this is an app that makes previous memories possible for you. So, when you get any of those incorrigible errors that are impossible to make sense of, what do you do? This guide gives you 9 fixes to fix Android camera not working error quickly and easily.
Play Store Stuck on Downloading Of Tecno Pova 5 Pro? 7 Ways to Resolve
Part 1: Symptoms when “Play Store Stuck on Downloading”
Just as any problem gives some indication of anything wrong is going to befall. Similarly, a user does feel some unexpected turns of events resulting in Play Store to stick at downloading. If one happens to see that the progress bar has suddenly frozen to a certain scope and taking ages to march any further, it is treated as the first signs for Play store not working properly. Another, such scenario is where your apps are not able to download easily. Rather, the Play store reflects a message downloads are yet in the pending queue. If one happens to witness such problems, these can be in fact be giving you the warning signal of the Play store problem
Part 2: Causes of why “Play Store Stuck on Downloading”
With technology, uncertainties are bound to happen. It becomes quite tricky to analyze the real problem and craft a solution. As, there can be several causes that might be disturbing the smooth functionality of Play store. Here are some collated issues that we’ve gathered that are indicative of the cause.
- The time is not rightly setup: Sometimes, the unexpected root cause of play store failing to work is due to the date and time not set up rightly. If the system time is not according to the standard timing, then the application can misbehave.
- Fluctuations in internet connection: If internet speed is running too low or has weaker connection, Play Store download stuck at 99 problem may arise out. Always, use a good speed of internet.
- Get rid of Cache: Extras of cache can pose to be problematic in the working of applications. Users must timely clean their devices so as to brush away any kind of cache memory.
- Outdated version of Play store app: Users generally do not feel the urge for updating the play store app. It is important to use only the updated version so as the functioning of Google Play app is not affected.
Part 3: 7 fixes for Play Store stuck on downloading
3.1 Check SD card and phone storage space
All the applications, data of one’s device is generally loads directly in phone’s storage or the SD card (if plugged). Hence, it is crucial to check whether your phone storage or SD is not fully occupied. As it can indirectly be the reason why the issue of “**Play Store download stuck at 99%**” might occur. Ensure to get rid of any application that you are no longer using. Or, consider deleting any picture, videos or documents that aren’t required by you.
3.2 Check Wi-Fi or cellular data connection
Sometimes, it’s not your phone that is going all faulty, the root cause might be the internet connection. If the internet is running low or does not seem to be stable, then the play store download problem may occur. Users must ensure that the Tecno Pova 5 Pro device they are working should have a stable network connection so as to combat the problem. Then, they can try downloading the application and check if the problem is prevalent or not.
3.3 One click to fix corrupted Play Store components
The world of internet and its intricacies are beyond a novice’s realm. Chances of malfunctioning of Google Play Store may be due to the components relating to Play Store may have gone corrupted. To resolve such issue, the need of a good software that is courageous enough to tackle all kinds of issues is need. For that, the only perfect solution is Dr.Fone - System Repair (Android), an impeccable software useful in providing speedy recovery of your phone. With it you can ward away the issues like boot problem, black screen of death, phone stuck etc.
Dr.Fone - System Repair (Android)
Android repair tool to fix Play Store stuck on downloading
- Can easily deal with all kinds of problems disrupting the activities of Android phone including app crashes, system crash, black screen of death, Play Store stuck on downloading。
- 1-click technology helpful in repairing rare kinds of issues like phone stuck in boot loop, recovery mode, Tecno Pova 5 Pro logo or Android devices getting bricked.
- Supports compatibility with several kinds of Android phones, including the all Tecno Pova 5 Pro models even the Tecno Pova 5 Pro S9.
- The easy to use interface is crafted with underlying features and functionalities in a right manner.
- Provides 24 hours customer assistance to users for resolving queries or problems.
3,224,929 people have downloaded it
Step by Step Tutorial
Here is the complete guide which will help users in understanding how Dr.Fone - System Repair (Android) can vanish Play store download problem completely.
Step 1: Launch Dr.Fone - System Repair (Android) and connect device
First of all, load the program on PC. In the interim, draw connection of device with phone using a genuine cable. Over the interface, tap on “System Repair” mode.
Step 2: Select Android Repair mode
Over the following screen, select “Android Repair” placed at the left panel to resolve play store stuck issue and press “Start” button too!
Step 3: Fill in the information
It is important to add in all the necessary information for successful execution of program. Make sure to give details of “Brand”, “Name”, “Country”, “Model” and all other fields.
Step 4: Ensure to Download Firmware
Now, follow the on the on-screen prompts to boot Android phone into the download mode. Once done, you’re ready to download the suitable firmware package by hitting the “Next”.
Fret not, the program will automatically detect the most suitable firmware for your device.
Step 5: Repair Android phone
After the package downloads, program will repair all kinds of problems surfacing over your phone automatically. This way, the Play store stuck on downloading will get resolved fully.
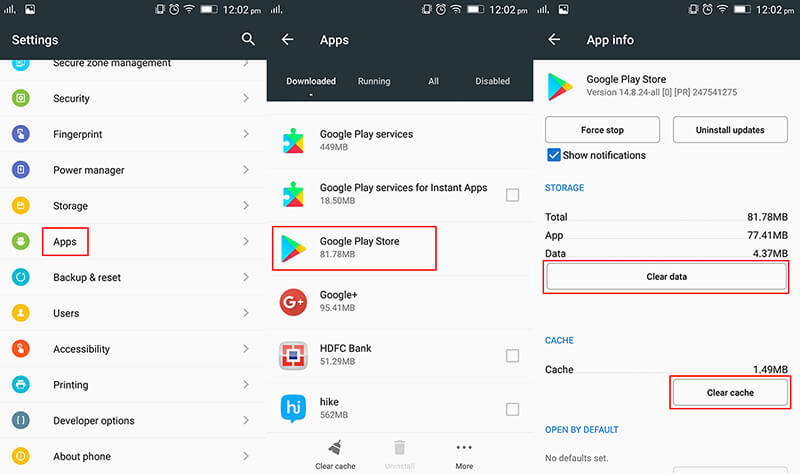
3.4 Clear data and cache of Play Store and download again
Did you know the piling up of cache memory can certainly pull off a great deal for Play Store getting stuck? Cache data may generally stash the data so that you can access it even in future course. But, this do east up a good chunk of space and result in the misbehavior of Play Store app. You can opt to brush away Play store stuck on downloading by using the following steps.
- Get your Tecno Pova 5 Pro and visit “Settings”.
- Then, surf for “Application manager” option and launch “Google Play store” option.
- From there, click on “Cached Data” and select the “Clear Cache” option.
- Optionally, make use of “Force Stop” feature to halt the functioning of the app.
- At last, reboot/restart your smartphone.
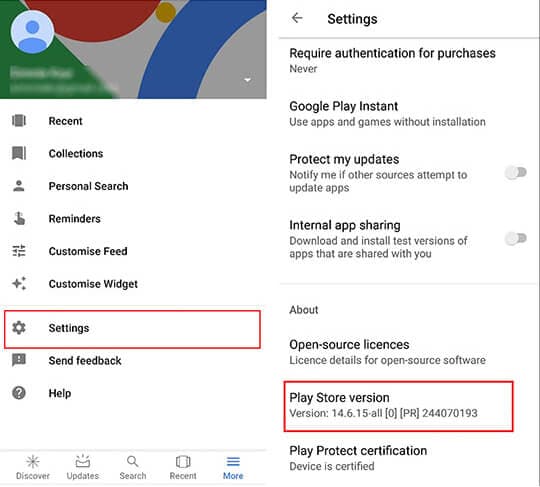
3.5 Update Play Store to the latest version
When was the last time you cared to update your Play store app? Generally, users overlook the need of updating the application. As, they think that it may not be of any greater importance. But, in reality working in an outdated version can directly impact Play Store and cause download problem. Follow the below steps to update Play Store to latest version.
- From phone, just launch Google Play Store app from app drawer.
- Press the 3 horizontal lines icon over the top and locate “Settings” from the left menu.
- In Settings, browse for “Play Store Version” located under “About” section.
- Tap on it, if it shows that Play Store app is not updated then proceed with the on-screen prompts to update it to the latest version.
3.6 Try another Google account
If you’re unable to see a streak of hope and wondering why my Play Store is still showing download pending. Well, some unexpected issue might be there with your Google account. As, there are times where your existing Google account can be the hurdle. Therefore, trying your hand in some other Google account might assist to work things out.
3.7 Avoid downloading large apps
Last but certainly not the least, users must avoid downloading large applications. Especially those games that eats a whopping number of 300+MB of your space. You must always watch out on size of the application is and only then craft the decision to load it on your device. This may help out in keeping the Play store stuck on downloading problem at bay.
Also read:
- [New] 2024 Approved Bring Your GSlides to Life with YouTube Media
- [New] In 2024, From Black and White to Richness Embracing HDR's Power
- 11 Ways to Fix it When My Motorola Razr 40 Wont Charge | Dr.fone
- 6 Fixes to Unfortunately WhatsApp has stopped Error Popups On Tecno Spark 20C | Dr.fone
- 7 Solutions to Fix Error Code 963 on Google Play Of Xiaomi Redmi Note 13 Pro+ 5G | Dr.fone
- 8 Workable Fixes to the SIM not provisioned MM#2 Error on Vivo V29 Pro | Dr.fone
- Android Safe Mode - How to Turn off Safe Mode on Samsung Galaxy S23? | Dr.fone
- Beyond Expectations The New Samsung UBD-K8500 Edition
- Drone Frontier - Deconstructing DJI's Mavic Pro Masterpiece
- How to Change Vivo V27 Pro Location on Skout | Dr.fone
- How to Unlock a Network Locked Sony Xperia 1 V Phone?
- In 2024, The Ultimate Cheat Sheet Pro Instagram Photo Enhancements
- Seamless Viewing of Time-Honored Facebook Stories for 2024
- The Efficient Way to Grab All Episodes on Your iDevice
- Troubleshooting Guide How to Fix an Unresponsive Samsung Galaxy M34 5G Screen | Dr.fone
- Title: Tecno Pova 5 Pro Bootloop Problem, How to Fix it Without Data Loss | Dr.fone
- Author: Ariadne
- Created at : 2025-02-12 22:00:00
- Updated at : 2025-02-17 19:51:52
- Link: https://howto.techidaily.com/tecno-pova-5-pro-bootloop-problem-how-to-fix-it-without-data-loss-drfone-by-drfone-fix-android-problems-fix-android-problems/
- License: This work is licensed under CC BY-NC-SA 4.0.