
Top 10 Fixes for Phone Keep Disconnecting from Wi-Fi On Oppo Reno 8T 5G | Dr.fone
Top 10 Fixes for Phone Keep Disconnecting from Wi-Fi On Oppo Reno 8T 5G
The revolutionized world is about the internet, online life, and social media. You can get all the information you need from the internet. You are a click away from booking tickets, buying groceries, calling your loved ones, or even you can handle office meetings with the internet.

Since everything revolves around the internet, it’s annoying if your WI-FI disconnects. You might question yourself why does my Wi-Fi keep disconnecting from the phone? To know the answer, read the article below.
Part 1: Why Does Your Phone Keep Disconnecting from WiFi?
Is your phone frequently getting disconnected from Wi-Fi? Or the internet service is lagging? We have a few options from which you can inspect your problem. Not all internet issues arise from the service provider, as some issues are because of the Oppo Reno 8T 5G devices that are using the internet. Some of these issues are discussed below for your assistance:
- Router Problems
If the internet provider is doing their job right, the router might not deliver you the right thing. Like other electronic devices, they can also misbehave. This can happen because the router is faulty, or it can happen because the firmware is outdated.
- Out of Wi-Fi Range
Why does My Oppo Reno 8T 5G keep disconnecting from Wi-Fi? It is because you might be out of range! The router’s placement is very important. The router transmits frequencies that have a limited range. If you are moving out of the range, the internet automatically disconnects.
- Wi-Fi Signals Getting Blocked
The signals from the router can dissipate from any other electronic device nearby. Signals like radio and microwaves can interfere with signal strength.
- Devices Connected with Router
Commonly, a house has around a dozen devices connected to the internet router. People do not think that the router has limited connection slots. It is unable to entertain a specific number of requests for service facilitation. The router has limitations; the service quality will drop if the limitations are exceeded. This drop in quality can also cause internet disconnection from devices.
- Unstable Internet
If your Oppo Reno 8T 5G gets disconnected frequently, then this disconnection is due to unstable internet, but apart from the above-mentioned problems, there is another reason for internet disconnection.
Sometimes, the internet is stable, but it still disconnects. This is because the internet service provider might not send the best quality internet you have acquired it for. If your internet is stable and the phone still keeps disconnecting, then head onto the next part that will share the top 10 fixes to sort out this issue.
Part 2: 10 Ways to Fix Wi-Fi Keep Disconnecting on Phone
As we have mentioned earlier if your Wi-Fi is stable, but it keeps disconnecting from Oppo Reno 8T 5G S22 or other Android phones, the coming section of this article is for you. We will provide you with 10 solutions with complete assistance to fix the “Wi-fi keeps disconnecting Android“ issue.
Fix 1: Restart Your Phone
If the Wi-Fi keeps disconnecting from your Oppo Reno 8T 5G, but the internet is stable, then you should try to fix the issue by restarting your phone. Sometimes, it’s the phone that’s causing a problem, so to resolve it, you can follow the steps given below:
Step 1: Firstly, unlock your phone. Now, press the Power button and hold it for a few seconds.
Step 2: Now, select the ‘Reboot’ option to resolve the issue from the options on the screen.

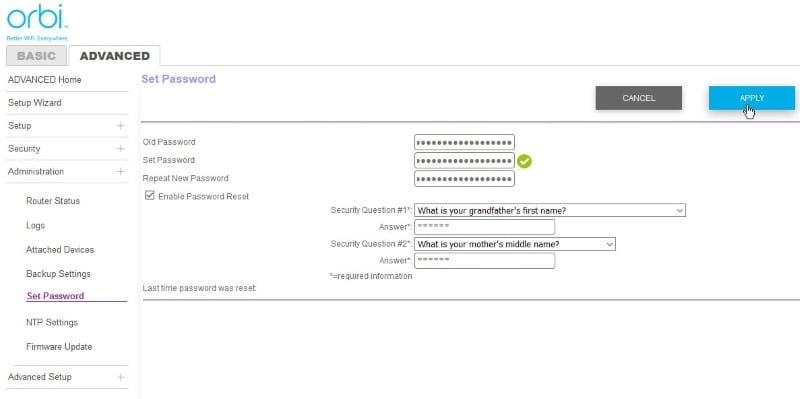
Fix 2: Check Router Settings
If your Android keeps disconnecting from Wi-Fi, you can also fix the problem by checking the router settings. This is because your phone might be blocked from connecting to the network, and if this is the scenario, your phone will never maintain the connection. You should check the Router’s admin panel or app to remove your phone from the blocklist.
Fix 3: Reconnect to Network
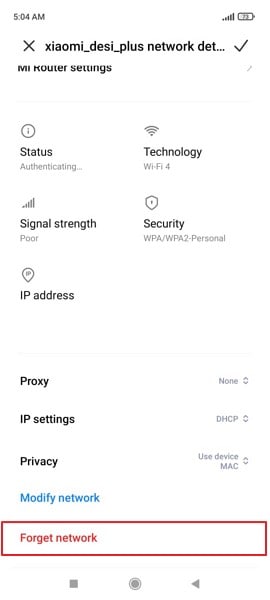
To fix the annoying problem that your Wi-Fi keeps disconnecting, you should try forgetting the network and then reconnecting to it. This could be done easily by following the steps below:
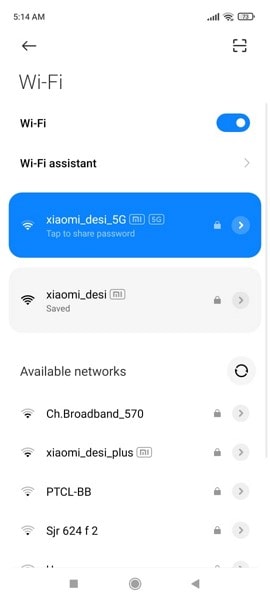
Step 1: First, you need to open the Wi-Fi settings menu. This could be done by pressing and holding the Wi-Fi option from the drop-down menu of your phone until the settings open up.

Step 2: A list of all the Wi-Fi networks will appear on the screen. Select the network that is causing trouble from that list and hit the ‘Forget Network’ option.
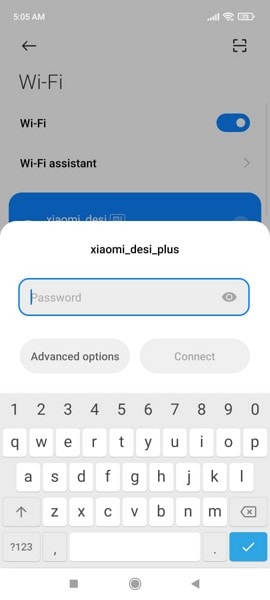
Step 3: After that, you should reconnect to this Wi-Fi network by selecting it from the Wi-Fi list and entering its password.
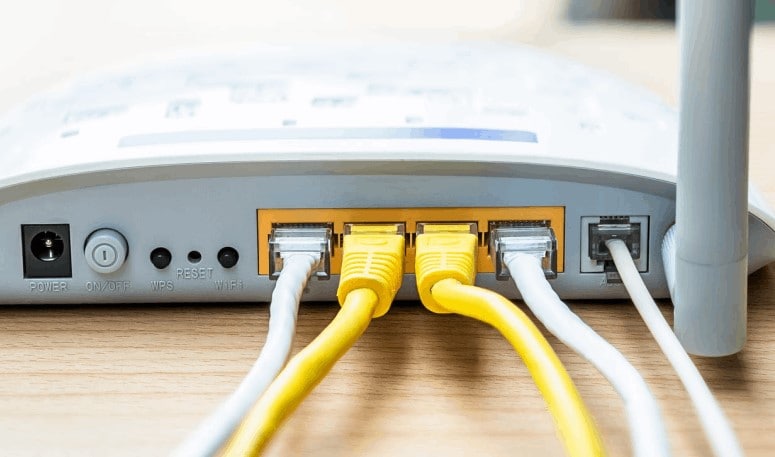
Fix 4: Restart Your Router
As we discussed, to restart your phone, you can also restart the router to get rid of the problem. For this, hit the restart button on the router to get a fresh start. If the Oppo Reno 8T 5G device has no button, disconnect the power supply and plug it back in to connect again. Most internet issues are resolved by restarting the router.
Fix 5: Forget Old Networks
The problem that your Wi-Fi keeps disconnecting can also occur because of the list of networks you have connected to. Having yourselves connected to different set of networks could turn out to be quite problematic in the process. In the process of finding and switching to the best network, your device’s Wi-Fi will continually disconnect and reconnect with the nearby networks. To finish this irritating issue, you should remove and forget all the extra networks that you connected previously.
Step 1: You should start by pressing and holding the Wi-Fi option from the drop-down menu on your phone until the Wi-Fi settings screen appears.

Step 2: You will see a list of all the Wi-Fi networks you have connected to previously. One by one, select each network and hit the ‘Forget Network’ button to remove it.
Fix 6. Check Recently Installed Applications
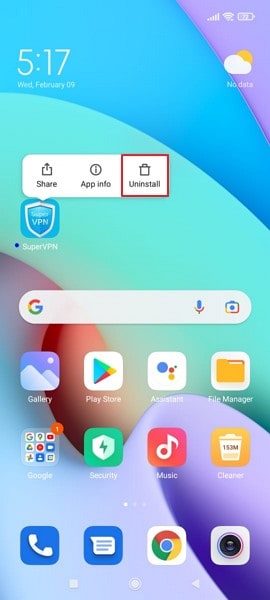
Sometimes, different installed applications can also cause trouble. If your Wi-Fi was fine, but suddenly it started disconnecting, then don’t forget to check the recently installed apps. This is because with not knowing the damage it can cause, you might have installed some VPNs, connections boosters, or firewalls. You can try and disable them but if that doesn’t resolve the problem, then uninstall the app.
Step 1: For uninstalling the problematic application, you have to select it and hold it. You will see a pop-up menu of multiple options; choose the option of ‘Uninstall’ to remove the app from the phone.
Fix 7: Reset Network Settings on your Phone
It’s annoying that your Wi-Fi keeps disconnecting while you are working or studying. Android users can easily get over this problem by resetting the network settings. The steps for this fix are as follows:
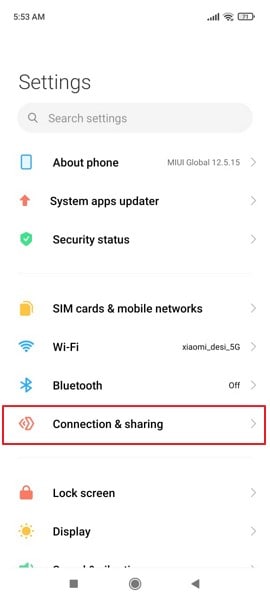
Step 1: For resetting the network, start by opening the ‘Settings’ menu on your phone. Then, scroll down, look for the ‘Connection & Sharing’ option, and select it.
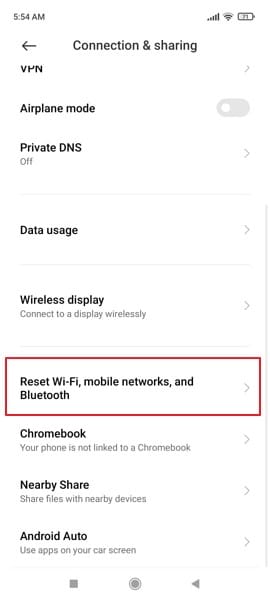
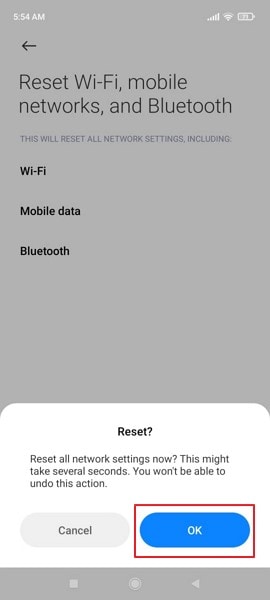
Step 2: As you progress onto a new screen, you will find the option of “Reset Wi-Fi, Mobile Networks, and Bluetooth” in the menu. Select the option to lead to the next window.
Step 3: Click on the option of “Reset Settings” present on the bottom of the next screen that shows up. Provide confirmation of resetting these settings by inserting your device’s PIN, if any.

Step 4: After providing the appropriate clearances, you will be asked for another confirmation of resetting the Oppo Reno 8T 5G device’s networks to default. Click “OK” to execute.
Fix 8: Check Routers Range
If your Wi-Fi automatically disconnects and connects again while you are roaming in the house, then it is because of the router’s range; you should check it. For this, you can consider changing and modifying your AP (Access Point) band on your router.
Although the 5GHz frequency band is recognized for providing better network speeds, this band has a shorter range as compared to the 2.4GHz band, which has a better coverage of area. You can easily shift your router’s range through its configuration page. It is considered optimal to utilize the 2.4GHz frequency band for better ranges.

Fix 9: Stay Connected while Asleep
Most Android phones have a battery-saving feature. This feature disables the network connections to save the battery of the phone. If this is why the Wi-Fi keeps disconnecting, follow the steps shared below to fix it:
Step 1: Start by opening the ‘Settings’ menu on your phone. Then scroll down until you find the ‘Battery’ option and open it.

Step 2: Then, from the battery screen, hit the ‘More Battery Settings’ options. Then, you will see the ‘Stay Connected while Asleep’ option; turn it on.

Fix 10: Upgrade Router Firmware
If none of the above-shared fixes work, the last fix to resolve the problem is upgrading your router firmware. For this, you should contact any professional who knows network operations as upgrading router firmware takes time and requires knowledge.
Wi-Fi Stay Connected
The article above has discussed 10 solutions that offer a comprehensive toolkit to tackle the persistent issue of Wi-Fi keeps turning off Android. By toggling Airplane Mode, restarting your device, adjusting settings, and updating firmware, among other steps, you can effectively address and resolve this connectivity problem. With these solutions at your disposal, you can regain a stable and uninterrupted Wi-Fi experience on your Oppo Reno 8T 5G.
How to Fix Android App Not Installed Error on Oppo Reno 8T 5G Quickly?
App not installed on Android is no more an unknown Error Code during Application installation as many people experience it on a day-to-day basis. An “Application not installed” error message usually pops up when you are trying to download and install an App with a .apk file extension from somewhere other than the Google Play Store. The error is very confusing at first but makes sense when you realize that this unknown Error Code during Application installation is neither a software issue nor a hardware problem. It is a direct outcome of what you do with your device. Yes, you heard that right. Your faulty actions can cause Android App not installed error.
What to do when trying to install the Android APK it says “app not installed”? It is terrible that you can’t install App on your device. But in this article, you will know more about the causes behind this error and the best ways to fix it, read on, here is all you need to know.
Part 1: Common reasons for the “Android App not installed” error
You may ask: Why can’t I download apps on my Oppo Reno 8T 5G? Understanding the underlying causes of the “Android App Not Installed” error is crucial for resolving the issue effectively. So, what are the reasons for Android App not installed error? Given below are a few reasons:
1. Insufficient storage
Android software and if data such as photos, videos, music, messages, apps, contacts, emails, etc are stored in the internal memory there is not adequate storage left for another App, leading to Android App not installed error.
2. Corrupted/Contaminated App file
When you do not download Apps from the Play Store and choose another platform to do so, App files are usually corrupted and hence cannot be installed on your device smoothly. You should be doubly sure of the source from where you download an App, check its extension name, and make an effort not to install contained files.
3. SD Card not mounted in the Oppo Reno 8T 5G device
At times your phone could be connected to your PC or another electronic device that can access the SD Card from your device. In such situations when you install an App and choose to save it to your SD Card, you will see Android App not installed error because the App cannot find the SD card as it is not mounted in your device.
4. Storage location
You must be aware that certain Apps work their best when stored in the Oppo Reno 8T 5G device’s internal memory, whereas others need to be located on an SD Card. If you do not save the App in an appropriate location, you will find that the App isn’t installed because of an unknown Error Code.
5. Corrupt storage
Corrupted storage, especially a corrupted SD Card, is known to cause the Android App isn’t installed error. Even the internal storage can get clogged due to unnecessary and unwanted data, some of which might contain an element that disturbs the storage location. Take this issue seriously as a corrupted SD Card and even clogged up internal memory can put your device in danger.
6. Application Permission
Software operations running in the background and App Permission are not new concepts. Such errors can also cause the Unknown Error Code during App installation.
7. Incorrect file
If you already have an App installed but download another variant of it having a distinct signed or unsigned certificate can also make the Android App not installed error pop-up. This sounds technical, but this and all the other reasons listed above can be tackled by you.
The Unknown Error Code during Application installation can occur due to any one or more of the reasons stated above. So read them carefully and understand them well to avoid such glitches in the future.

Part 2: One-click to fix App not installed on Android error
So App not installed on your Oppo Reno 8T 5G or tablet? The most horrible part is that this issue may come out of the corruption in the system files. In this situation, Android apps won’t be installed no matter what measures you take. Android system repair is the only effective solution to deal with this issue.
Android system repair used to require high technical skills. But most of the users know little about technical things. Well, worry not! Dr.Fone - System Repair (Android) allows you to repair Android easily, that is, complete the fix with just one click.
Dr.Fone - System Repair (Android)
A powerful tool to fix the “Android App not installed” error in one click
- Fix all Android system issues like Android App not being installed, the system UI not working, etc.
- One-click to fix Android App not installed. No technical skills are required.
- Support all the new Oppo Reno 8T 5G devices, etc.
- On-screen instructions are provided to prevent any misoperation.
3981454 people have downloaded it
Note: Getting your Android system repaired may erase the existing device data. It is recommended that you should back up your Android data before starting the Android repair.
The following steps illustrate how to fix the “Android App not installed” error in one click:
- Install Dr.Fone on your Windows. After that, launch it, and click “System Repair”. Connect your Android to the computer.

- Select the “Android” option and click “Start”.

- Select device information, such as brand, name, model, country, etc., from each field, and type “Next”.

- Follow the on-screen instructions to boot your Android in download mode, and allow the tool to download the firmware to your device.

- After the firmware is downloaded, the tool will start to repair your Android, hereby fixing the “Android App not installed” error.

 safe & secure
Part 3: How to fix App not installed error on Android
We understand that it can be a tricky situation to be in when Android App not installed error pops up, but what if we tell you can get rid of it in easy and simple steps? Yes, there is!
#1. Delete unnecessary files/Apps
Insufficient storage can prevent the app from being installed. Make some storage space on your device by cleaning unwanted data and deleting extra media and other files. You can also get rid of heavy Apps by:
Visiting “Settings” on your device. Then select “Manage apps”, “Application Manager” or “Apps” (varies based on device model or version) from the list of options before you.

Now select the App you wish to uninstall and wait for the App Info screen to open, then click on “Uninstall” as shown in the screenshot.

You can also uninstall the unnecessary application on the home screen, just long-press the app you want to uninstall until you see the “uninstall” icon. Click “Uninstall”, then, you need to click “OK” to confirm the uninstall process.

#2. Use only Google Play Store
As you are all aware, the Play Store is specially designed for Android software and contains only trusted and safe Apps. It is often known as the “Android Market” because it is loaded with different types of Apps to stiffly all your needs so that you don’t have to rely on other third-party sources to purchase/install Apps.

#3. Mount your SD Card
Another remedy for Android App not installed error is to make sure that the SD card inserted in your device is not inaccessible.

To check the same:
First, disconnect your Oppo Reno 8T 5G from your PC and then visit “Settings” on your Android and select “Storage” from the options that appear. Finally, click on “Mount SD Card” at the Storage Info screen.
You can now restart your device and try to install the app now, it should work!
#4. Choose App location wisely
It is advisable to not tamper with the App’s location and let the software decide where it needs to be placed. As far as possible, let the Apps be in your device’s internal memory.
#5. Format SD Card
The chances of your SD Card being corrupted are very high. You can format it either while it is in your device or externally.
Now to Clean up your SD Card, simply visit “Settings” and select “Storage” and tap on “Format SD Card” and mount it once again to use it smoothly.

#6. App Permissions
You can reset App permissions to combat the Android App not installed error by Visiting “Settings” and then selecting “Apps”. Now access the Apps menu and hit “Reset App Preferences” or “Reset application permissions”. This will allow third-party apps to get installed on your device.
#7. Choose the correct App file
Make sure to always download an App file only from a trusted and safe source to avoid any errors during installation.
#8. Reboot your device
Finally, if nothing else works, restart your device to end all operations which could be causing the said error. To reboot, just press the power button till you see a pop-up. Select “Restart” and wait for your device to reboot.

Conclusion
Encountering the “App Not Installed” error on Android can be frustrating, but by understanding the causes and implementing the appropriate solutions, you can overcome this issue. We saw that Android App not installed error can be fixed quickly if you keep in mind the tips given in this article. However, please ensure that you follow each instruction carefully to avoid any further goof up.
safe & secure
Play Store Not Working On Oppo Reno 8T 5G? 8 Solutions Inside
A functional Google Play Store is crucial for Android users to access, update, and install apps. Unfortunately, common issues like your Google Play Store not working can disrupt this experience. If you find your Play Store misbehaving more often than not, don’t fret.
In this guide, discover reliable solutions when your Google Play Store is not responding. The article will teach you how to tackle these problems and ensure a seamless app experience. Don’t let technical glitches hinder your digital journey—follow these troubleshooting steps for a swift resolution. Explore the page below to learn more.

Part I. 7 Common Google Play Store Issues Users Encounter
The Google Play Store serves as the epicenter for Android users. It facilitates seamless access to a vast array of apps. However, encountering issues with the platform can impact the functionality of your device. Below are 7 common issues on why your Google Play Store is not responding.
Inability To Open the Play Store
The inability to open the Play Store leaves you without access to new apps or updates. The issue is often accompanied by error messages, which can leave you scratching your head.
Crashing Issues
Frequent crashes undermine the stability of the Play Store. Users attempting to browse or download apps may find themselves abruptly kicked out of the application. It can disrupt your intended tasks and cause annoyance in the long run.
Not Responding Errors
The dreaded “Not Responding” message can bring usability to a standstill. Users navigating the Play Store may experience delays or complete unresponsiveness. It can lead to a frustrating and unproductive experience.
Download and Installation Failures
When downloads and installations fail, you will be unable to enjoy new apps or updates. This issue can be annoying when trying to access crucial software improvements or security updates.
Authentication and Account Issues
Problems with authentication and account access can lock users out of their Google accounts on the Play Store. It prevents users from purchasing or downloading apps. The issue not only hampers functionality but also raises security concerns.
Update Problems
Difficulties in updating apps can leave users with outdated software. It can potentially compromise security and miss out on new features. The issue diminishes the user experience by depriving you of the latest enhancements.
Connection and Network Errors
Persistent connection and network errors impede the Play Store’s ability to fetch data. It hinders users from browsing and downloading apps. The issue is frustrating in areas with unstable internet connectivity.
Part II. Why Does the Google Play Store Keep Stopping?
If you’re wondering why does Google Play Store keeps stopping on your phone, there can be several factors. Here are some of them below.

- **Network issues.**Unstable or poor internet connections can disrupt the communication between the Oppo Reno 8T 5G device and the Play Store. It can lead to frequent crashes.
- **Outdated Play Store version.**Running an outdated version of the Play Store may result in compatibility issues. The lack of essential updates can cause the application to stop unexpectedly.
- Cache and data accumulation. Over time, cached data and accumulated data in the Play Store can become corrupted. It can hinder the smooth operation of your phone and contribute to sudden stops.
- Google account problems. Authentication issues, incorrect credentials, or other problems with the linked Google account can disrupt the Play Store’s functionality. This can also lead to repeated crashes.
- **System glitches and bugs.**Inherent glitches and bugs within the Android operating system may affect the Play Store’s performance. They can cause your device to stop unexpectedly.
Part III.7 Quick Solutions To Resolve Play Store Not Working Issues
Encountering issues with the Google Play Store can be frustrating. It disrupts your ability to download, update, or access essential apps. Here are seven quick solutions when your Google Play Store unfortunately has stopped.
Clear Cache and Data
Revitalize your Google Play Store by addressing performance issues. Clearing cache and data can be a crucial step when troubleshooting malfunctions or glitches in the app. Here’s how.
- Step 1: Head to your device’s Settings and navigate to Apps or Application Manager.
- Step 2: Locate and select Google Play Store. Within Storage, choose Clear Cache and Clear Data. Confirm your action and restart the Play Store.

Update Play Store
Enhance your Play Store’s functionality by ensuring it’s up-to-date. This method suits those who haven’t updated their Google Play Store for a long time. Follow the steps below.
- Step 1: Open the Play Store app and tap the three horizontal lines in the top-left corner to access the menu.
- Step 2: Select Settings and scroll down to find the Play Store version. Install any available updates.

Check Internet Connection
Ensure a stable internet connection on your device. Switch between Wi-Fi and mobile data to identify connectivity issues. Restart your router or modem if problems persist.
Reset App Preferences
Restore your device’s app settings to default for improved functionality. Below are the steps.
- Step 1: Go to your device’s Settings and select Apps or Application Manager.
- Step 2: Tap the three dots in the top-right corner and choose Reset app preferences.

Re-add Google Account
Resolve Play Store issues by re-adding your Google account. Follow these steps in Settings to remove and re-add your Google account, ensuring a seamless and error-free experience.
- Step 1: Navigate to Settings and choose Accounts or Users & Accounts.
- Step 2: Select Google and remove the account. Re-add the Google account and verify if the Play Store functions properly.

Uninstall Play Store Updates
This method troubleshoots Play Store problems by uninstalling updates. Here’s how.
- Step 1: Access Settings and go to Apps or Application Manager.
- Step 2: Find Google Play Store and tap on Uninstall Updates. Confirm the action and restart the Play Store.

Perform a System Update
Ensure your device’s overall stability by performing a system update to ensure the stable operation of the Play Store. Follow the steps below.
- Step 1: Access Settings, scroll down, and select System or Software Update.
- Step 2: Next, choose System update or Check for Updates and install any available system updates**.**

If you’re still asking yourself why my Google Play Store is not opening after conventional methods prove ineffective, it may lead you to explore third-party tools. As a final recourse, considering reputable tools like Wondershare Dr.Fone - System Repair introduces a fresh approach to troubleshooting your device.
Part IV. How To Repair Play Store Not Working With an Alternative
Repairing your Google Play Store can be swift and effective with Dr.Fone - System Repair. This tool offers advanced features to diagnose and fix various system issues without the advanced skills required. It provides a quick and efficient resolution for a malfunctioning Google Play Store. Follow these three simple steps to get started:
- Step 1: Begin by downloading and installing Dr.Fone - System Repair (Android) on your computer.
 safe & secure
4,207,329 people have downloaded it
- Step 2: Launch the program and connect your Oppo Reno 8T 5G to the computer using a USB cable. Choose the Oppo Reno 8T 5G device type and click Start to initiate the repair process.
- Step 3: Dr.Foneshould automatically detect the brand of your device. Next, choose the Name, Model, Country, and Carrier. Tick the checkmark and click Next to continue. Follow the on-screen instructions and wait for the repair process to complete.
- Step 4: Simply click Done on the prompt window displaying a confirmation message to exit the tool if your Oppo Reno 8T 5G starts successfully. In the event that the Oppo Reno 8T 5G device fails to start, select Try Again to initiate the process once more.

Bonus: What Else Can Dr.Fone - System Repair Do?
Beyond its utility in fixing Google Play Store malfunctions, Dr.Fone is known for its user-friendly interface and high success rate. Its ability to address a wide range of Android issues offers a comprehensive solution to various system-related problems. Below are the platform’s key highlights.
Key Features
- Fixes diverse Android issues. Dr.Fone - System Repair excels in resolving a multitude of Android problems. This includes a black screen, a boot loop, and bricked Android devices. Its comprehensive approach ensures you can rely on a single tool to tackle a wide range of system-related issues.
- Support for over 1000 Android models. Dr.Fone supports over 1000 Android models. The broad coverage ensures diverse devices can use the software to troubleshoot and repair their Android systems.
- User-Friendly interface. Dr.Fone is designed with simplicity in mind. It offers an easy-to-use interface that caters to both novice and experienced users.
- High success rate. The software boasts a high success rate in resolving Android issues. Its effectiveness in tackling various problems has garnered trust among users. It’s one of the go-to solutions for those seeking reliable and efficient system repairs.
safe & secure
4,131,376 people have downloaded it
Conclusion
Addressing issues when your Google Play Store does not work is crucial for an uninterrupted Android experience. Follow the outlined steps to regain control and enjoy a seamless app experience. Don’t let frustrations linger; take immediate action for a hassle-free Google Play Store.
Lastly, having Dr.Fone - System Repair at your side offers a reliable solution for a wide range of Android concerns. Don’t worry if your Google Play store is not responding, and Dr.Fone can fix it in minutes.
Also read:
- [New] 2024 Approved Pre-Production Meets Post-Production Premiere and YouTube
- [New] Ideal 10 Virtual Photo Backdrop Modifiers
- [New] In 2024, Discovering Costless Software for Streaming Sessions
- 2024 Approved Instagram Edge Enhancement - 3 Essential Methods
- Cellular Network Not Available for Voice Calls On Motorola Moto G23 | Dr.fone
- Fix the Error of Unfortunately the Process.com.android.phone Has Stopped on Samsung Galaxy A05 | Dr.fone
- Fixing Persistent Pandora Crashes on Poco C55 | Dr.fone
- Full Guide How To Fix Connection Is Not Private on Nubia Red Magic 8S Pro | Dr.fone
- In 2024, Effortless Multimedia Collaboration StreamWork
- Is Investing in a 4K Television Worth It for Regular Cable Viewers?
- What to Do if Google Play Services Keeps Stopping on Nubia Red Magic 9 Pro+ | Dr.fone
- Title: Top 10 Fixes for Phone Keep Disconnecting from Wi-Fi On Oppo Reno 8T 5G | Dr.fone
- Author: Ariadne
- Created at : 2025-02-12 17:15:37
- Updated at : 2025-02-17 23:36:41
- Link: https://howto.techidaily.com/top-10-fixes-for-phone-keep-disconnecting-from-wi-fi-on-oppo-reno-8t-5g-drfone-by-drfone-fix-android-problems-fix-android-problems/
- License: This work is licensed under CC BY-NC-SA 4.0.