
Top 4 Android System Repair Software for Motorola Moto G73 5G Bricked Devices | Dr.fone
Top 4 Android System Repair Software for Motorola Moto G73 5G Bricked Devices
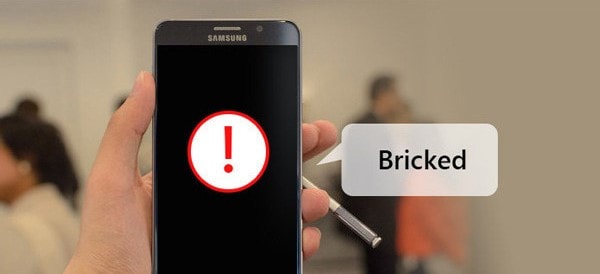
Is your Motorola Moto G73 5G device showing signs of being “bricked” or “soft-bricked”? When a Motorola Moto G73 5G is bricked, it becomes unresponsive and unusable. But fear not, as this article will guide you through reviving your device’s functionality. It will delve into the significance of unbricking and how it restores usability.
Moreover, this article will introduce you to the world of Motorola Moto G73 5G unbrick tools and software, ensuring you can get your device back on track. So read on and explore the top Android system repair software that can bring life back to your bricked Motorola Moto G73 5G device.
Part 1: Understanding Bricked Motorola Moto G73 5G
Have you ever heard the term “bricked” concerning your Motorola Moto G73 5G device? This section explains it to you in simple terms. Imagine your device becoming like a brick, unresponsive and seemingly lifeless. That’s what happens when a Motorola Moto G73 5G gets bricked. There are two main types of brick: soft brick and hard brick.
Soft Brick
Soft brick is like a temporary setback for your device. To see if your Motorola Moto G73 5G is soft - bricked, check out the details below:
- It happens when the software encounters issues, but the hardware is usually fine.
- Your device might not start properly, freeze, or get stuck on the logo screen.
Hard Brick
Now, this is a more severe situation. In this case, your bricked Motorola Moto G73 5G might fall under the following conditions:
- Thesoftware and hardware have significant problems, making the Motorola Moto G73 5G device unresponsive.
- Your device won’t turn on and might not show any signs of life.
Common Causes of a Brick Motorola Moto G73 5G
Now, let’s discuss why devices end up in this bricked state. It can happen due to a few common reasons:
- Failed Updates
Something might go wrong during the process when you’re trying to update your Motorola Moto G73 5G device. This is properly because of a poor internet connection or other interruptions. As a result, your device might get confused and end up bricked.
- Custom ROM Installations
A custom ROM is like a customized version of your device’s software. While it can bring cool new features, it can also cause issues if not installed correctly. Incompatible or poorly made custom ROMs can sometimes lead to a bricked device.
- Unauthorized Modifications
If you’re trying to tweak your device’s software without proper knowledge, you might make changes that the Motorola Moto G73 5G device can’t handle. This can lead to instability and, you guessed it, a bricked device.
So, why is it important to know all this? Well, a bricked device isn’t just frustrating; it can disrupt your daily life. You won’t be able to use your device, access your apps, or even make calls. That’s why unbricking is crucial.
Part 2: Top Android System Repair Software
Now that you’ve grasped the concept, let’s dive into how to unbrick a Motorola Moto G73 5G. That’s where Android system repair software comes in. These clever programs are like doctors for your device’s software. They diagnose and fix issues to keep your appliance running smoothly. Let’s explore the cream of the crop when it comes to these software solutions:
Wondershare Dr.Fone – System Repair (Android)
Dr.Fone - System Repair (Android) is like a magic wand for your Motorola Moto G73 5G device. It’s designed to rescue your device from troubles and make it run smoothly again. Dr.Fone - System Repair (Android) is built to fix various issues, including a bricked device. It can resolve problems like black screens, frozen devices, boot loops, and even devices stuck in recovery mode.
![]()
Dr.Fone - System Repair (Android)
Repair Android System Errors without Any Trouble.
- Fix your Android to normal, no skills required.
- Fix various Android system issues, stuck in boot loop , black screen , or won’t turn on , looping on start, etc.
- The high success rate in resolving Android system issues.
- Compatible with a wide range of Android devices and OS versions
- User-friendly interface with easy-to-follow steps.
3981454 people have downloaded it

Key Features
Here’s what Dr.Fone offers as a powerful Android system repair software:
- Repair a wide variety of Android system issues.
- User-friendly interface that’s easy to navigate.
- No technical expertise required – it guides you step by step.
- Compatibility with a wide range of Motorola Moto G73 5G devices.
Pros
Check out Dr. Fone’s benefits you can take advantage of:
- Easy and intuitive to use.
- Can fix a range of software-related problems.
- Doesn’t require deep technical knowledge.
- Can help you avoid expensive repair services
Cons
As for its drawback, refer below:
- Some complex issues might still require professional help.
How To Unbrick Motorola Moto G73 5G Using Dr.Fone
This tutorial will show you how Dr.Fone can remove the brick from a Motorola Moto G73 5G smartphone.
- Step 1: Launch Dr.Fone and head to the program’s left-hand panel, where you’ll find the Toolbox. You may fix your broken Android device by connecting it to your computer and selecting System Repair from the menu.

 safe & secure
4,001,177 people have downloaded it
- Step 2: Select Android on the following screen to troubleshoot an Android device. After that, you’ll be brought to a new screen where you can initiate the fix by clicking Start.

- Step 3: When you click through to the next window, the service will automatically recognize the manufacturer of the Android device. Choose the appropriate Brand, Name, Model, Country, and Carrier from the drop-down menus. Select OPEN in the Carrier area if the phone is unlocked. The next step is to tick the box labeled I accept the risk and am ready to continue. Click Next to proceed with the rest of the Motorola Moto G73 5G device repair.

Step 4: Put your Motorola Moto G73 5G into Download Mode when prompted.
If your phone has a home button, follow the on-screen prompts to power it down. Keep pressing and holding the Volume Down, Home, and Power Then, press the Volume Upbutton to activate the Download Mode.

- If your Android doesn’t have a Home button, you may still use it byturning it off and pressing the Volume Down, Bixby, and Power buttons simultaneously. Repeatedly pressing the Volume Up button will activate Download Mode.

- Step 5: The firmware download starts on the platform immediately after the Motorola Moto G73 5G device enters Download Mode. You can click Stop to abort it at any stage during the process. The platform then verifies and presents the information as it downloads. By selecting Fix Now, you can install the firmware.

- Step 6: The Android repair procedure may delete all of your data. To proceed, please type “000000” in the box provided. The system repair process will begin, and its status can be viewed in the next screen’s progress bar.
Take Note: Backing up your Android is necessary before doing any Android repair.

- Step 7: The prompt window will show the completion message. If the Android device boots normally, you can close the tool by clicking the Done button. Press the Try Again button to try powering on the Motorola Moto G73 5G device again if it does not turn on automatically.
Repair System & Phone Master
This software is a real game-changer in resolving Android system problems. It specializes in repairing system issues, enhancing device performance, and cleaning up unnecessary files.
Key Features
Check out the key features of this software below:
- Repair a range of system issues, including bricking.
- Boost device speed and performance.
- Clean up junk files to free up space.
- The easy-to-use interface is suitable for all users.
Pros
Repair System & Phone Master’s advantages include the following:
- Straightforward operation.
- Focus on improving overall device performance.
- Can potentially extend your device’s lifespan.
Cons
Below is the disadvantage of this software:
- Repair capabilities might be limited for complex issues.
System Repair for Android
True to its name, System Repair for Android is designed to repair and rejuvenate your device’s Android system. It’s a reliable tool to tackle various software issues, including bricked devices.
Key Features
The key features of System Repair for Android app include:
- Repair various Android system problems.
- User-friendly interface for hassle-free operation.
Pros
As for its advantages, see the list below:
- Straightforward solution for commonsystem issues.
- Can save you from device replacement costs.
Cons
Check below to learn about this app’s drawback:
- Advanced issues might require professional intervention.
Phone Doctor Plus
Phone Doctor Plus is like a health check-up app for your device. It’s designed to repair system issues and diagnose hardware problems that might contribute to a bricked device.
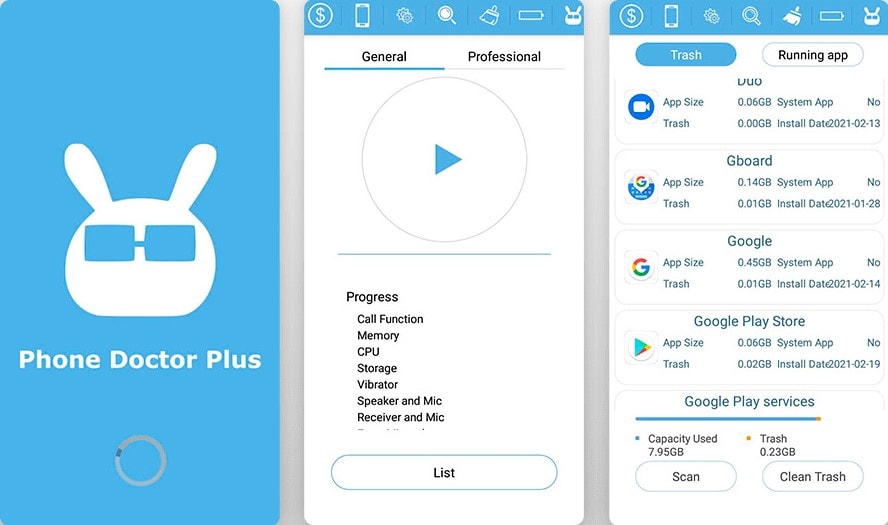
Key Features
See Phone Doctor Plus’s essential features below:
- Diagnose and repair both software and hardware issues.
- Identify potential problems that could lead to bricking.
Pros
This app’s advantages include the following:
- Comprehensive diagnosis for both software and hardware.
- Can help you identify issues before they become serious.
Cons
Check out this app’s disadvantages below:
- Not solely focused on software repair, might not cover all scenarios.
Part 3: Tips on Preventing Future Bricking Incidents
Now that you know how to fix a bricked Motorola Moto G73 5G smartphone, let’s focus on preventing it in the first place. Here are some simple steps you can take to keep your Motorola Moto G73 5G device safe and sound:
- Regularly Check for Updates
Always keep your device’s software up to date. Updates often contain bug fixes and improvements that can prevent software-related issues.
- Use Reliable Tools and Software
When using any tools or software on your device, ensure they’re trusted and well-reviewed. Unreliable tools can lead to unexpected problems.
- Avoid Unauthorized Modifications
Avoid messing with your device’s software beyond basic settings unless you’re a tech expert. Unauthorized modifications can lead to bricking.
- Keep Your Battery Charged
Ensure your device has enough battery power before initiating software updates or installations. Low battery during critical processes can lead to issues.
- Backup Regularly
Regularly back up your device’s data to avoid losing important information during a bricking incident.
- Use Official Firmware
If you’re ever reinstalling or updating your device’s software, always use official firmware provided by the manufacturer.
- Utilize Safe Mode for Troubleshooting
If your device starts acting strange, try booting it into safe mode. This helps you identify if a third-party app is causing issues.
- Seek Professional Help
If you’re unsure about a particular action, seek help from experts. Trying to fix complex issues yourself can worsen the situation.
By following these easy tips, you can keep your Motorola Moto G73 5G device running smoothly and avoid the hassle of dealing with a bricked device. Always remember, prevention is better than cure!
safe & secure
Conclusion
Encountering a bricked Motorola Moto G73 5G device can be a frustrating roadblock. However, there’s a silver lining – the power of an Android system repair software like Dr.Fone – System Repair (Android). This user-friendly tool acts as your device’s superhero, rescuing it from the clutches of bricking incidents.
So, whether your device is experiencing a soft brick or a hard brick, you now have the best tools and knowledge to overcome it. Dive into the Android system repair software world, explore your options, and bid farewell to brick. Welcome a revived, functioning Motorola Moto G73 5G device into your daily life.
Authentication Error Occurred on Motorola Moto G73 5G? Here Are 10 Proven Fixes
There are times when users get an authentication error while they connect to a Wifi network. The problem is mostly found in Android whenever a device tries to establish a connection to Wifi. If your device is also experiencing an authentication problem Wifi, then don’t worry. It can easily be resolved. In this post, we will make you familiar with the root cause for the Motorola Moto G73 5G Wifi problem and how you can resolve whenever authentication error occurred on your device.
Part 1: Any idea about the Wi-Fi authentication problem?
Wi-Fi authentication has to be done every time you wish to connect to a Wi-Fi network over your smartphone or laptop. To authenticate yourself and connect to the protected Wi-Fi network, you need to have the password of it. But if after you’re putting in the correct password and still experiencing the wifi authentication problem. Here’s what you need to know.
Authentication error occurs when the “deal” between the Wi-Fi router and device fails due to certain reasons. First, the Motorola Moto G73 5G device sends the password of the network and the “connect” request in an encrypted format to the Wi-Fi router. Then, the router decrypts the password and compares the password saved on it. Now, if the password matches, it sends affirmation for the “connect” request, and then the Motorola Moto G73 5G device is allowed to connect to the network.
Part 2: Why Authentication Error Occurred when Connecting to Wifi?
There could be plenty of reasons for facing an authentication error on your device. Most of the time, it occurs whenever a Wifi router seems to malfunction. Furthermore, if your phone has been recently updated, then chances are that there could be an issue with its drivers. A security attack can also make your device malfunction as well. An unstable connection or a router blockage can also be a reason for this issue.
In this scenario, whenever you try to connect to a Wifi network (even after supplying the correct password and username), it doesn’t connect to it. Instead, it displays an authentication error occurred promptly. Thankfully, there are plenty of ways to overcome the authentication problem Wifi. In the next section, we have provided three different solutions to fix the Motorola Moto G73 5G Wifi problem (as it mostly happens on Android devices).
Part 3: 10 Solutions to Fix Wifi Authentication Error
Before we make you familiar with different fixes for the Wifi authentication error, it is important to check your router beforehand. Chances are that you could be getting the authentication error because your router is not functioning properly. You can restart it and try to connect any other device to it as well to check it. After making sure that there is no problem with your network or router, follow these suggestions to overcome the authentication error occurred issue.
Check if extra characters added in Wi-Fi password
Ensure that no other extra characters are being added in the Wi-Fi password while you’re entering it. Key in the password carefully while viewing the characters, and then check if the authentication error occurs or not.
One-Click to Fix Wifi Authentication Error by Android System Repair
Android system repair is considered the most effective way to fix Wifi Authentication Error. As the bottom-layer Android system files may be corrupted unconsciously with days of phone use, the Wifi Authentication Error may be one of the symptoms.
So Android repair requires programming knowledge to do it?
No! With Dr.Fone - System Repair (Android), you can do Android repair in just a few steps and get all issues like Wifi Authentication error fixed easily.
Dr.Fone - System Repair (Android)
An easy-to-operate tool to fix Android system issues like a Wifi authentication error
- Fixes all Android system issues like a black screen of death, Wifi authentication error, etc.
- One-click to fix the Wifi authentication error. No technical skills required.
- Supports all the new Motorola Moto G73 5G devices like Galaxy S8, S9, etc.
- Easy-to-follow instructions provided on each of the screens.
3981454 people have downloaded it
Here are the steps to fix Wifi Authentication Error by Android system repair:
Note: Android repair is effective to permanently fix Wifi Authentication Error, but may wipe out the existing phone data. Backup all the important Android data to PC before you go on.
- After the Dr.Fone tool is downloaded, install, and launch it. You can see the following screen.
- Connect your Motorola Moto G73 5G to the computer, and select “Android Repair” in the middle.
- Select all the details that match your device, and click “Next”.
- Next up, you should boot your Motorola Moto G73 5G in download mode by following the on-screen instructions.
- Allow the program to download the corresponding firmware. After that, the Android repair will start and get the Wifi Authentication Error fixed in minutes.

Use static IP address instead of DHCP
DHCP, or Dynamic Host Configuration Protocol is the default IP address assignment for the Wi-Fi settings on many devices. Whereas DHCP can cause IP address conflict during the dynamic IP address assignment. So, you’d better change “DHCP” to “Static” to see if the authentication error persists.
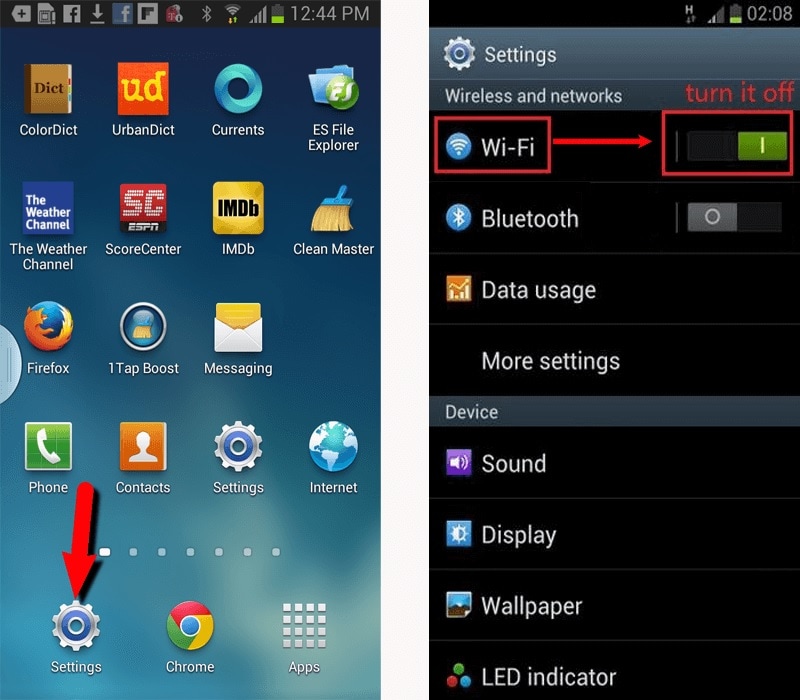
Step 1: Head to the “Settings” of your Motorola Moto G73 5G and then opt for “Wireless and Networks” followed by “WLAN/WiFi”.
Step 2: Now, hit on the WiFi network that is showing “authentication error occurred”.
Step 3: Depending on your Motorola Moto G73 5G model, look for “IP Settings” and tap on it. Now, switch the “DHCP” to “Static”.
Step 4: Note down the static IP address fields and wipe off all the fields. Punch it in again and then save it.

Check carefully for duplicate Wi-Fi names before you connect
Perhaps, you might connect to a WiFi with a similar name. There are good chances that some users do not modify their WiFi network name and possibly, your neighbor may have the same WiFi network, service provider. Therefore, ensure you connect to the correct WiFi network.
Reset the Wifi network
One of the easiest ways to fix the authentication problem of Wifi is to reset the network. To do this, you would be required to forget the respective network first and then connect to it again. This can be done by simply following these steps.
1. Firstly, you need to forget a Wifi network. To do it, go to your phone’s Settings > WiFi and network. From here, you can see a list of all the Wifi hotspots that your phone connects to. Select the network you wish to forget.

2. When you would select a network, it will provide the basic information related to it. Just tap on the “Forget” button and agree to the pop-up message. This will erase the network’s information from your device.

3. Afterward, turn on your Wifi again and tap to the network you wish to connect to. Simply provide the credentials and tap on the “Connect” button to reestablish the connection. This way, you can reset the network successfully.

Modify network connection
If the above solution won’t work, then you would be required to walk the extra mile to fix the Motorola Moto G73 5G Wifi problem. After you reset a network connection, if still getting issues regarding the authentication of the network, you need to modify the connection. In this technique, you will be changing the IP settings on your phone to alter the way it establishes a secure connection. You can do it by following these steps.
1. To start with, visit your phone’s Settings and open the Wifi page.

2. This will display a list of all the Wifi networks that are associated with your device. Just long-tap on the Wifi network that you wish to modify. It will open another pop-up window. From here, tap on the option of “Manage network settings”. Sometimes, users also get an option of “Modify network settings” here as well. Simply select it to proceed.

3. It will display basic information related to your Wifi network. Just tap on the “Show advanced options” button to access more options related to the network setting.

4. From the IP Settings menu, change the field from DHCP to Static. This will let you establish a static connection between your device and the router.

5. As soon as you will change it to static, you will get different fields related to your network’s IP address, gateway, DNS, and more. Simply fill these fields and tap on the “Save” button once you are done.

Now, try to connect to the Wifi hotspot again. You would be able to overcome the authentication problem of Wifi.
Change Network Security Type
It has been observed that, when we connect to Wifi, our device chooses a wrong security type. This clashes with the default security protocol of the router and authentication error occurred due to this. If your device is facing the same issue, then it can be fixed by simply changing its security type. To do this, follow these instructions:
1. To change the security type of a network, you need to “Add the network”. If you already have the Wifi network saved, then simply forget the network by following the above-mentioned tutorial.
2. Now, turn on your device’s Wifi and tap on the option of “Add network”. Here, you would be asked to give a network name and select the security type. To manually select it, tap on the “Security” option.

3. From here, you will get a list of various security protocols that you can pick. Select “WPA/WPA2-PSK” and save your selection.

Now, try to connect to the network again. Most likely, it will let you fix the authentication error on your device.
Update Android firmware to the latest
There are instances where an outdated OS version of your Motorola Moto G73 5G may create a hindrance in establishing a connection between your device and the WiFi network. You need to update your Android firmware to the latest version and then check if the problem persists or not.
Step 1: Launch “Settings” of your Motorola Moto G73 5G and then get into the “About Phone” option.
Step 2: Now, opt for the “System Update” option. If the update is available, get your device updated to the latest OS version.
Restart the router and reset Android network settings
Sometimes, the WiFi router may hang up while establishing a connection and therefore, the wifi authentication problem occurs. Try restarting your Wi-Fi router and then check if your device connects successfully. If this doesn’t work, try to reset your Android Network Settings .
Bonus tip: Turn Airplane mode on/off
By simply turning on the Airplane mode (and later turning it off), you can easily fix the authentication problem Wifi most of the time. You can find a toggle button for Airplane mode on the notification bar of your phone. If you can’t find it there, then go to your phone’s Settings > Connection > More Networks and turn on the feature of “Airplane Mode”.

Let it do for a while. Afterward, turn it off and try to connect to the Wifi network again.
After following these quick and easy suggestions, you would be able to fix the Motorola Moto G73 5G Wifi problem for sure. Even if you use any other Android device, then its authentication error can easily be resolved after these effective solutions. Go ahead and give these expert solutions a try and let us know about your experience as well. If you have any other solution to fix the authentication problem Wifi, then share it with us as well in the comments.
Full Solutions to Fix Error Code 920 In Google Play on Motorola Moto G73 5G
If you are using an Android device, you might have encountered the error code 920 in Google Play Store. This error usually occurs when you are trying to download or update an app from the Google Play Store. The error code 920 can be quite frustrating, as it prevents you from downloading or updating your favorite apps. However, there are several ways to fix this error and get your apps back up and running. In this article, we will show you some of the best solutions to fix error code 920 in Google Play Store on Motorola Moto G73 5G.
Trust me, once you face an error it’s frustrating until you find a solution to it. Almost 90 % of the time we search on the internet for an appropriate solution. But finding a legitimate solution can be hard. Most websites just upload only one method to solve an error. And most times that one single method may not be enough for us. And again we are back to Square one trying to figure out what’s wrong and where we screwed up. Most people face an error 920 on play store. It’s frustrating to get the play store error 920.And not everyone knows what the error 920 is. Rest assured, this article will provide you four methods to get rid of the error 920 problems you face and you will not have to depend on any other further sources for finding out what play store error 920 is or find any other method to get rid of the error 920 on play store.
- (i) Re-installing the application
- (ii) Switching off and turning the wifi (cellular data) on
- (iii) Clearing the cache and data of Google Play Store
- (iv) Removing and adding back your Google account
Part 1: What is Error Code 920?
Sometimes people think that they have endangered the fate of humanity because of the error that is being displayed (Just Kidding). Don’t worry you haven’t crashed any server or did any damage to your device but you just gave your device a lot of work. Before you got this error you were downloading a lot of apps right. Well, that’s the exact reason why you came up with this error in the first place. There are various reasons behind this error code 920, however, the prominent ones are –
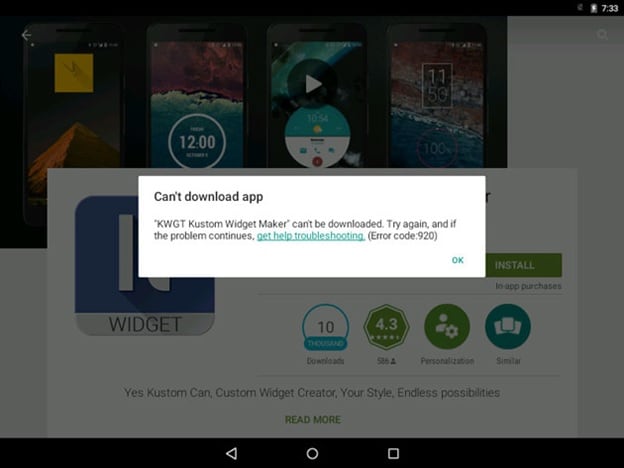
- a. Too much load on your data connection.
- b. The cache is not cleaned. Thus the connection is getting hampered due to overload.
- c. Network connection is not stable.
There are a lot of Android users out there and the error 920 on play store doesn’t have a unique solution. You’ll have to try out a bunch of them and find out what works for your device. So one of the given four methods below is definitely going to work on your device.
Part 2: 5 Solutions to fix error 920
METHOD 1: Fix Error Code 920 By Android Repair
If you’re writing a lot of data to your device in one go, this can sometimes overload your phone which can cause data corruption. This could have happened if you try the method above and then still encounter the play store error 920.
If this is the case, there’s a solution known as Dr.Fone - System Repair that can help. This is an industry-leading package that has everything you need to get your device running as it should be.
Dr.Fone - System Repair (Android)
Easiest Fix to Error Code 920
- Easy operation with no technical knowledge required
- Simple, one-click play store error 920 fix
- Clean and simple to understand user-interface
- Supports various Motorola Moto G73 5G devices, including the latest Motorola Moto G73 5G S9/S8
- The #1 Android repair software in the world
3,545,081 people have downloaded it
If this is the answer you’re looking for to help you fix your error code 920 problems, here’s a step by step guide on how to use it;
Note: please note that this method may erase all personal data on your device, so make sure you’ve backed up your device before continuing.
Step #1 Head over to the Dr.Fone website and download the Repair software for your Windows computer.
Step #2 Once installed, open the software and select the ‘System Repair’ option from the main menu.
Then connect your Motorola Moto G73 5G using the official cable and select the ‘Android Repair’ option.
Step #3 On the next screen, insert your device information to ensure you’re downloading the correct firmware.
Step #4 Put your phone into Download mode by following the onscreen instructions.
Dr.Fone will now download your firmware and automatically install it onto your device. Your phone will then reset, and you’ll be ready to use it without experiencing that annoying error 920 play store code!
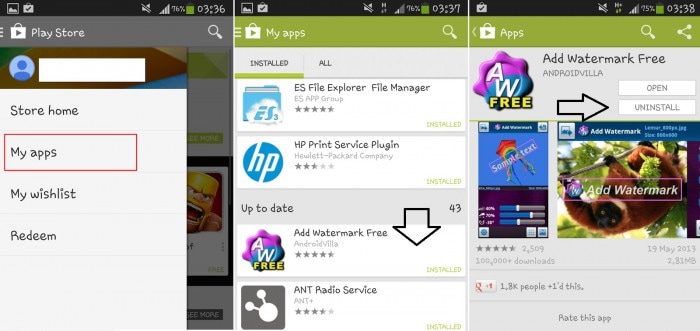
METHOD 2: Re-installing the application
This is the first thing that you want to try before going on to the more advanced one. In fact, this is the first thing I’d recommend you to try if you come up with an Error code 920. Just try this whenever you get any error.
Step 1 - Go to the application that you got the error with.
Step 2 - Open that application download page on the Play store.
Step 3 - Uninstall it or even uninstall all the update (If the error came when you were updating the application).
Step 4 - Now you clear the task manager and try installing it once again. If the play store error 920 doesn’t come then you have solved the problem and now wasn’t that easy. So it’s always best to try this step before doing anything else.
METHOD 3: Switching off and turning the wifi (cellular data) on
This is another basic method in solving the play store error 920. This error comes in when you have given too many tasks to download.
Step 1 - To remove that load Just turn your wifi off and then turn your wifi on (the same goes with your cellular data).
Step 2 - Now after doing this go to your Play Store application and download the application that you were going to download. Now your Play Store Error 920 won’t be bothering you anymore.
METHOD 4: Clearing the cache and data of Google Play Store
This is a little more complicated (complicated as in you will need to do a little more than the previous two methods). What you need to do is clear the cache and clear the data of the play store. This will get rid of the error code 920 the next time you download or update any application from the Google Play store.
Step 1 – Go to settings of your device.
Step 2 – Now find “Applications” option under the settings menu. Here you can find “Google Play Store” option. Open it.
Step 3 – Now, at the bottom, you can find “Clear Cache” option. Tap on it and your all cache will be cleared.
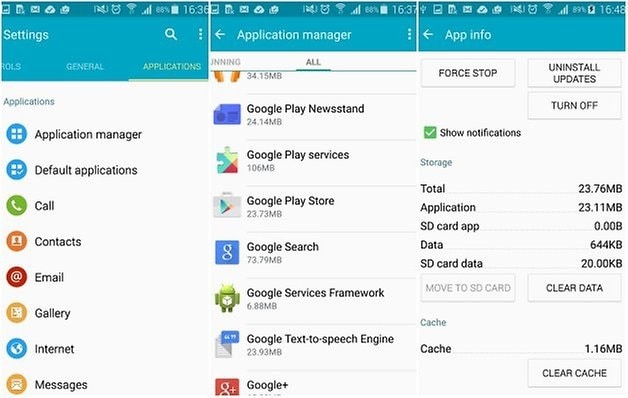
After doing this step clear your task manager (delete all recent applications). Go to play store and resume your download or update.
METHOD 5: Removing and adding back your Google account
It is best if you follow the order of the methods mentioned. Like, try each method in the given order until you get rid of the play store error 920. If you reach here then you truly must be in a desperate position to get rid of this error. The best and guaranteed way is to delete your Google account from your phone. By deleting what is meant here is to temporarily remove your account and the adding it in again. What this does is it kind of resets your play store details and it eradicates the error code 920. To do this you need to
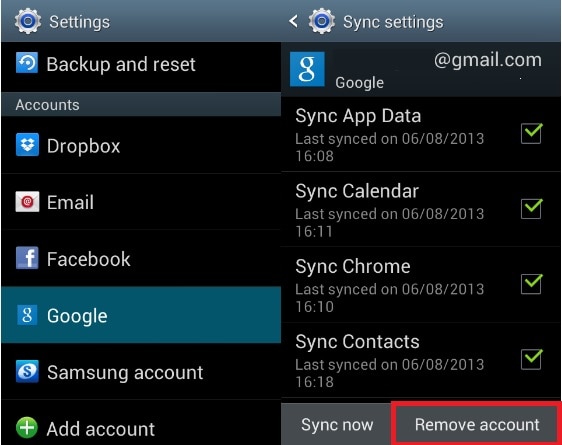
Step 1 - go to Settings of your Mobile.
Step 2- Now, find “Accounts” and then go to “Google Accounts”.
Step 3 - In that section find the account you use for the play store or the account that you were using while the error came in. Once you tap on your specific account you’ll find an option to remove the account. Tap on it.
Step 4 - Now you have successfully removed your account and after that re-add your account. After entering your email id and password and hence adding your account. Go back to the play store and find the application that you were downloading or updating when the error code 920 came in. Now re-install it or update it back again. This time you won’t be faced with the play store error 920.
Again it is best if you follow the methods as illustrated above for removing error code 920 and this might have solved your problem by now. If now, you go for a complete factory reset, do it only at the extreme stage as this will delete all your personal data.
Play Store error 920 is a pretty common error and its solutions are also very easy. Please do ensure that you follow each and every step in sync so that you can get the best result out of these methods and get over with the error code 920 on Google play store.
Also read:
- [New] 2024 Approved Greening the Grid Paving the Way for Sustainable Metropolises
- [New] In 2024, Winning the Race Elite Video Apps for Windows Phones
- [Updated] In 2024, Real-Time Chromebook Display Logger
- [Updated] In 2024, The Art of Captioning Text Techniques for Images in OSes
- 8 Solutions to Solve YouTube App Crashing on Samsung Galaxy M54 5G | Dr.fone
- 9 Solutions to Fix Honor Play 7T System Crash Issue | Dr.fone
- ABBYY-Umfragen Entdecken Frühwarnzeichen Von Burnout Bei Jungen Führungskräften Durch Schlechte Prozesse Und Veraltete Technologien Im Vergleich Zu Erfahrenen Kollegen
- App Wont Open on Your Samsung Galaxy A34 5G? Here Are All Fixes | Dr.fone
- Fix App Not Available in Your Country Play Store Problem on Oppo F25 Pro 5G | Dr.fone
- Fix Cant Take Screenshot Due to Security Policy on ZTE Nubia Flip 5G | Dr.fone
- How to Unlock iPhone SE with a Mask On
- In 2024, Unlocking Made Easy The Best 10 Apps for Unlocking Your Oppo Reno 10 Pro 5G Device
- Step Into Pro Audio Recording on Your Mac Using Audacity
- Why Your Oppo F23 5G Screen Might be Unresponsive and How to Fix It | Dr.fone
- Title: Top 4 Android System Repair Software for Motorola Moto G73 5G Bricked Devices | Dr.fone
- Author: Ariadne
- Created at : 2025-02-05 16:34:21
- Updated at : 2025-02-08 16:31:52
- Link: https://howto.techidaily.com/top-4-android-system-repair-software-for-motorola-moto-g73-5g-bricked-devices-drfone-by-drfone-fix-android-problems-fix-android-problems/
- License: This work is licensed under CC BY-NC-SA 4.0.