
Top 4 Android System Repair Software for Nokia C110 Bricked Devices | Dr.fone
Top 4 Android System Repair Software for Nokia C110 Bricked Devices
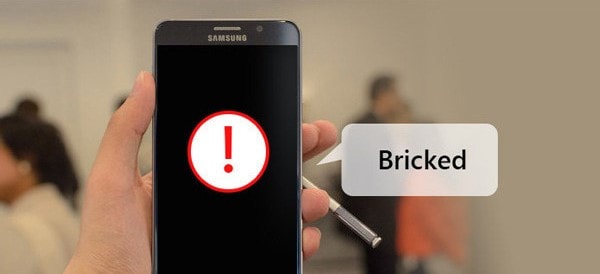
Is your Nokia C110 device showing signs of being “bricked” or “soft-bricked”? When a Nokia C110 is bricked, it becomes unresponsive and unusable. But fear not, as this article will guide you through reviving your device’s functionality. It will delve into the significance of unbricking and how it restores usability.
Moreover, this article will introduce you to the world of Nokia C110 unbrick tools and software, ensuring you can get your device back on track. So read on and explore the top Android system repair software that can bring life back to your bricked Nokia C110 device.
Part 1: Understanding Bricked Nokia C110
Have you ever heard the term “bricked” concerning your Nokia C110 device? This section explains it to you in simple terms. Imagine your device becoming like a brick, unresponsive and seemingly lifeless. That’s what happens when a Nokia C110 gets bricked. There are two main types of brick: soft brick and hard brick.
Soft Brick
Soft brick is like a temporary setback for your device. To see if your Nokia C110 is soft - bricked, check out the details below:
- It happens when the software encounters issues, but the hardware is usually fine.
- Your device might not start properly, freeze, or get stuck on the logo screen.
Hard Brick
Now, this is a more severe situation. In this case, your bricked Nokia C110 might fall under the following conditions:
- Thesoftware and hardware have significant problems, making the Nokia C110 device unresponsive.
- Your device won’t turn on and might not show any signs of life.
Common Causes of a Brick Nokia C110
Now, let’s discuss why devices end up in this bricked state. It can happen due to a few common reasons:
- Failed Updates
Something might go wrong during the process when you’re trying to update your Nokia C110 device. This is properly because of a poor internet connection or other interruptions. As a result, your device might get confused and end up bricked.
- Custom ROM Installations
A custom ROM is like a customized version of your device’s software. While it can bring cool new features, it can also cause issues if not installed correctly. Incompatible or poorly made custom ROMs can sometimes lead to a bricked device.
- Unauthorized Modifications
If you’re trying to tweak your device’s software without proper knowledge, you might make changes that the Nokia C110 device can’t handle. This can lead to instability and, you guessed it, a bricked device.
So, why is it important to know all this? Well, a bricked device isn’t just frustrating; it can disrupt your daily life. You won’t be able to use your device, access your apps, or even make calls. That’s why unbricking is crucial.
Part 2: Top Android System Repair Software
Now that you’ve grasped the concept, let’s dive into how to unbrick a Nokia C110. That’s where Android system repair software comes in. These clever programs are like doctors for your device’s software. They diagnose and fix issues to keep your appliance running smoothly. Let’s explore the cream of the crop when it comes to these software solutions:
Wondershare Dr.Fone – System Repair (Android)
Dr.Fone - System Repair (Android) is like a magic wand for your Nokia C110 device. It’s designed to rescue your device from troubles and make it run smoothly again. Dr.Fone - System Repair (Android) is built to fix various issues, including a bricked device. It can resolve problems like black screens, frozen devices, boot loops, and even devices stuck in recovery mode.
![]()
Dr.Fone - System Repair (Android)
Repair Android System Errors without Any Trouble.
- Fix your Android to normal, no skills required.
- Fix various Android system issues, stuck in boot loop , black screen , or won’t turn on , looping on start, etc.
- The high success rate in resolving Android system issues.
- Compatible with a wide range of Android devices and OS versions
- User-friendly interface with easy-to-follow steps.
3981454 people have downloaded it

Key Features
Here’s what Dr.Fone offers as a powerful Android system repair software:
- Repair a wide variety of Android system issues.
- User-friendly interface that’s easy to navigate.
- No technical expertise required – it guides you step by step.
- Compatibility with a wide range of Nokia C110 devices.
Pros
Check out Dr. Fone’s benefits you can take advantage of:
- Easy and intuitive to use.
- Can fix a range of software-related problems.
- Doesn’t require deep technical knowledge.
- Can help you avoid expensive repair services
Cons
As for its drawback, refer below:
- Some complex issues might still require professional help.
How To Unbrick Nokia C110 Using Dr.Fone
This tutorial will show you how Dr.Fone can remove the brick from a Nokia C110 smartphone.
- Step 1: Launch Dr.Fone and head to the program’s left-hand panel, where you’ll find the Toolbox. You may fix your broken Android device by connecting it to your computer and selecting System Repair from the menu.

 safe & secure
4,001,177 people have downloaded it
- Step 2: Select Android on the following screen to troubleshoot an Android device. After that, you’ll be brought to a new screen where you can initiate the fix by clicking Start.

- Step 3: When you click through to the next window, the service will automatically recognize the manufacturer of the Android device. Choose the appropriate Brand, Name, Model, Country, and Carrier from the drop-down menus. Select OPEN in the Carrier area if the phone is unlocked. The next step is to tick the box labeled I accept the risk and am ready to continue. Click Next to proceed with the rest of the Nokia C110 device repair.

Step 4: Put your Nokia C110 into Download Mode when prompted.
If your phone has a home button, follow the on-screen prompts to power it down. Keep pressing and holding the Volume Down, Home, and Power Then, press the Volume Upbutton to activate the Download Mode.

- If your Android doesn’t have a Home button, you may still use it byturning it off and pressing the Volume Down, Bixby, and Power buttons simultaneously. Repeatedly pressing the Volume Up button will activate Download Mode.

- Step 5: The firmware download starts on the platform immediately after the Nokia C110 device enters Download Mode. You can click Stop to abort it at any stage during the process. The platform then verifies and presents the information as it downloads. By selecting Fix Now, you can install the firmware.

- Step 6: The Android repair procedure may delete all of your data. To proceed, please type “000000” in the box provided. The system repair process will begin, and its status can be viewed in the next screen’s progress bar.
Take Note: Backing up your Android is necessary before doing any Android repair.

- Step 7: The prompt window will show the completion message. If the Android device boots normally, you can close the tool by clicking the Done button. Press the Try Again button to try powering on the Nokia C110 device again if it does not turn on automatically.
Repair System & Phone Master
This software is a real game-changer in resolving Android system problems. It specializes in repairing system issues, enhancing device performance, and cleaning up unnecessary files.
Key Features
Check out the key features of this software below:
- Repair a range of system issues, including bricking.
- Boost device speed and performance.
- Clean up junk files to free up space.
- The easy-to-use interface is suitable for all users.
Pros
Repair System & Phone Master’s advantages include the following:
- Straightforward operation.
- Focus on improving overall device performance.
- Can potentially extend your device’s lifespan.
Cons
Below is the disadvantage of this software:
- Repair capabilities might be limited for complex issues.
System Repair for Android
True to its name, System Repair for Android is designed to repair and rejuvenate your device’s Android system. It’s a reliable tool to tackle various software issues, including bricked devices.
Key Features
The key features of System Repair for Android app include:
- Repair various Android system problems.
- User-friendly interface for hassle-free operation.
Pros
As for its advantages, see the list below:
- Straightforward solution for commonsystem issues.
- Can save you from device replacement costs.
Cons
Check below to learn about this app’s drawback:
- Advanced issues might require professional intervention.
Phone Doctor Plus
Phone Doctor Plus is like a health check-up app for your device. It’s designed to repair system issues and diagnose hardware problems that might contribute to a bricked device.
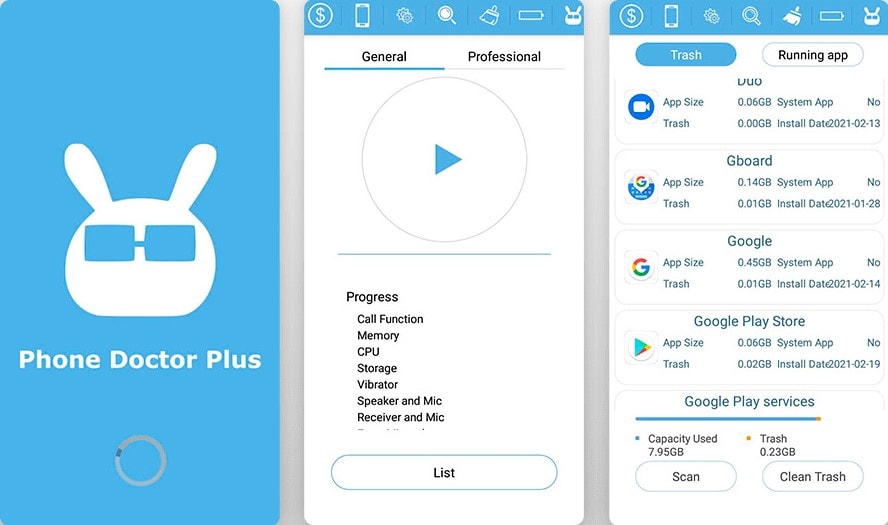
Key Features
See Phone Doctor Plus’s essential features below:
- Diagnose and repair both software and hardware issues.
- Identify potential problems that could lead to bricking.
Pros
This app’s advantages include the following:
- Comprehensive diagnosis for both software and hardware.
- Can help you identify issues before they become serious.
Cons
Check out this app’s disadvantages below:
- Not solely focused on software repair, might not cover all scenarios.
Part 3: Tips on Preventing Future Bricking Incidents
Now that you know how to fix a bricked Nokia C110 smartphone, let’s focus on preventing it in the first place. Here are some simple steps you can take to keep your Nokia C110 device safe and sound:
- Regularly Check for Updates
Always keep your device’s software up to date. Updates often contain bug fixes and improvements that can prevent software-related issues.
- Use Reliable Tools and Software
When using any tools or software on your device, ensure they’re trusted and well-reviewed. Unreliable tools can lead to unexpected problems.
- Avoid Unauthorized Modifications
Avoid messing with your device’s software beyond basic settings unless you’re a tech expert. Unauthorized modifications can lead to bricking.
- Keep Your Battery Charged
Ensure your device has enough battery power before initiating software updates or installations. Low battery during critical processes can lead to issues.
- Backup Regularly
Regularly back up your device’s data to avoid losing important information during a bricking incident.
- Use Official Firmware
If you’re ever reinstalling or updating your device’s software, always use official firmware provided by the manufacturer.
- Utilize Safe Mode for Troubleshooting
If your device starts acting strange, try booting it into safe mode. This helps you identify if a third-party app is causing issues.
- Seek Professional Help
If you’re unsure about a particular action, seek help from experts. Trying to fix complex issues yourself can worsen the situation.
By following these easy tips, you can keep your Nokia C110 device running smoothly and avoid the hassle of dealing with a bricked device. Always remember, prevention is better than cure!
safe & secure
Conclusion
Encountering a bricked Nokia C110 device can be a frustrating roadblock. However, there’s a silver lining – the power of an Android system repair software like Dr.Fone – System Repair (Android). This user-friendly tool acts as your device’s superhero, rescuing it from the clutches of bricking incidents.
So, whether your device is experiencing a soft brick or a hard brick, you now have the best tools and knowledge to overcome it. Dive into the Android system repair software world, explore your options, and bid farewell to brick. Welcome a revived, functioning Nokia C110 device into your daily life.
Why Is My Nokia C110 Offline? Troubleshooting Guide
Ever had your Nokia C110 claim it’s offline, leaving you scratching your head about where it went wrong? We get it; it’s confusing. That’s why this article is here to untangle the mystery.
In the following sections, we’re diving into the “why is My Nokia C110 offline” dilemma that many Android users face. We’ll break down the possible reasons behind this common issue and guide you through simple steps on how to fix it. By the end of the article, you’ll be able to get back to smooth internet surfing on your Nokia C110. Let’s get started.
Part 1: Why Does My Nokia C110 Say Offline?
When you encounter the “offline” error message, it can disrupt your usual smartphone activities. Suddenly, you find yourself unable to browse the internet, send or receive emails, or stay connected through instant messages.
It’s a frustrating scenario, but let’s break down the potential reasons why your phone might be displaying this offline status:
- Enabling Airplane mode
Why is My Nokia C110 showing offline? Well, one common culprit behind the “offline” message is the accidental activation of Airplane Mode on your Nokia C110. When Airplane Mode is enabled, it disconnects your phone from all wireless networks, rendering it unable to connect to the internet or cellular networks.
- Internet connection issues
Fluctuations in your signal strength or unexpected data loss can also be the culprit behind the “Why is My Nokia C110 offline?” problem. Android devices rely on stable internet connections, and disruptions, whether temporary or prolonged, can lead to this error.
- Glitches or bugs
Sometimes, glitches or bugs in Google apps installed on your Nokia C110 can mislead it into thinking it’s offline. Google Play Services or other related applications may encounter issues, causing the phone to display an “offline” message.
- Firewall restrictions
In some cases, a firewall on your Nokia C110 might be overly restrictive, preventing the Nokia C110 device from establishing a connection to the internet. This security measure, intended to protect your device, can sometimes go overboard and disrupt normal online functionality.
Now, you have understood the potential causes as the first step toward resolving the issue. Next, we’ll guide you through the process of troubleshooting and getting your Nokia C110 back online.

Part 2: How To Fix “Phone Offline” With Internet Connection Problem
Now that we’ve figured out why your phone says it’s offline, let’s tackle the issue head-on. If you’re facing problems like downloads that won’t start, Google Play stuck on “Loading…,” or web pages refusing to load, chances are it’s an internet connection issue causing the problem.
Here are some easy solutions to get your connection back.
Solution 1: Change connection to mobile data
Switching to mobile data can be a quick fix if your Wi-Fi is acting up. It ensures a change in your connection source and might resolve the “Phone offline” issue. Follow these easy steps to change your connection to mobile data:
- Step 1: Swipe down from the top of your screen to access the Quick Settings menu.
- Step 2: Tap the Wi-Fi icon to turn off the Wi-Fi connection.
- Step 3: Tap Mobile Data to turn it on.

Solution 2: On and off Airplane mode
Airplane Mode can sometimes cause connectivity confusion. Turning it off and on essentially resets your phone’s wireless connections, which might resolve the offline issue.
How to on and off Airplane mode on Android:
- Step 1: Swipe down from the top of your screen to access the Quick Settings menu.
- Step 2: Look for the Airplane Mode icon and tap the icon to turn on Airplane Mode.
- Step 3: Wait a few seconds, then tap it again to turn off the Airplane Mode. Now, check if your phone is now online.

Solution 3: Reset network settings
Resetting network settings can help eliminate any configuration glitches that might be causing the phone offline problem. It’s like giving your phone’s connection settings a fresh start.
To reset your network settings, the steps may differ depending on the phone model you are using. However, you can generally do so by looking for the “Network” settings.
- Step 1: Open your phone’s Settings > Connection & sharing.
- Step 2: Find and select “Reset Wi-Fi, mobile networks, and Bluetooth.”
- Step 3: Tap “Reset Settings” and confirm the action and allow your phone to reset.
- Step 4: Reconnect to your Wi-Fi and check if the issue persists.

Solution 4: Restart your Wi-Fi router
Sometimes, the problem might not be with your phone but rather with the Wi-Fi router. Restarting it can refresh the connection and potentially resolve the connectivity problem.
How to restart your Wi-Fi router:
- Step 1: Locate your Wi-Fi router.
- Step 2: Turn off the router using the power button or unplug it.
- Step 3: Wait for about 10–15 seconds before plugging the router back in or turning it on.
- Step 4: Allow the router to restart and establish a connection. Then, check if your phone still shows the “Phone Offline” message.
These solutions should cover the most common connectivity issues. If the problem persists, we’ll explore further steps in the following sections.
Part 3: How To Fix “Phone Offline” Despite Having an Internet Connection
Ever found it odd to receive the frustrating offline error message when you’re sure your internet connection is up and running? If you’ve double-checked your internet connection and your phone still says it’s offline, the issue may lie within your browser, apps, or device settings.
In this part, we’ll answer the question “**Why does My Nokia C110 say offline android?**” despite a seemingly functional internet connection. Then, let’s see other solutions on how to get your device back to its online, fully functional self.
Solution 1: Clear Google Chrome’s cache and data
Sometimes, the answer to “Why is my Android phone offline” can be attributed to a buildup of corrupted or outdated data in your browser’s cache. Clearing the cache and data for Google Chrome can resolve this issue, allowing for a fresh start and potentially eliminating the offline status.
How to clear your browser’s cache and data on Android:
- Step 1: Open the Settings > Apps > Manage Apps.
- Step 2: Locate and tap “Google Chrome” or your preferred browser in the list of installed apps.
- Step 3: Tap “Storage” and select “Clear Cache” to remove temporary files.
- Step 4: Choose “Clear Data” to delete app data. Confirm the action if prompted.
Now, restart Google Chrome and check if the offline error persists.

Solution 2: Re-install Google Chrome
If clearing the cache and data didn’t solve the offline issue, reinstalling Google Chrome can be the next step. A fresh installation can eliminate any underlying glitches or corrupted files that might be causing the persistent offline status.
How to re-install Google Chrome:
- Step 1: Visit the Google Play Store and search for Google Chrome.
- Step 2: Tap “Uninstall” to remove the app from your device.
- Step 3: Wait until it has finished uninstalling your app. Then, tap “Install” to start reinstalling the app.
- Step 4: Once the installation is complete, open Google Chrome and check if the offline error persists while browsing.

Solution 3: Repair the system to fix the phone showing offline
When persistent offline issues seem deeply rooted in your device’s system, a comprehensive system repair may be the solution. Wondershare Dr. Fone’s system repair tool is designed to address a range of system problems, providing a reliable way to fix any problem you have with your phone.
With Dr. Fone’s system repair tool, you can diagnose and resolve “Why is My Nokia C110 offline on Android,” ensuring a smooth and functional Android experience.
Key Features:
- Comprehensive system repair for any devices
- User-friendly interface
- Efficient problem diagnosis
How to use Dr. Fone’s system repair tool:
- Step 1: Open Dr.Fone’s system repair tool
Start by launching Wondershare Dr.Fone on your computer. Go to the Toolbox section and connect your Nokia C110. Choose System Repair and pick Android as your device type.
safe & secure
3,189,324 people have downloaded it
- Step 2: Start the repair
Click Start on the new screen to kick off the repair. Since you’re dealing with an offline connection issue on Android, select System Damage.
- Step 3: Confirm your device details
The platform will detect your Nokia C110’s brand. Confirm the Name, Model, Country, and Carrier. If your device is unlocked, choose OPEN in the Carrier section. Agree to the warning, click Next, and proceed with the repair.
- Step 4: Download firmware.
Follow the instructions to put your Nokia C110 into Download Mode. Once in Download Mode, you will start downloading the firmware.

- Step 5: Confirm Installation
Remember, the repair may erase data. It’s advisable to back up your data first before starting the repair. Enter “000000” to confirm the repair process, shown by a progress bar. Click Done once it is completed and see if your Android is back online.
Conclusion
Dealing with the “Phone Offline” hiccup on your Nokia C110 can be a real headache. But fear not – we’ve covered a range of solutions to get you back online smoothly. From troubleshooting internet connection problems to addressing browser and app-related glitches, the solutions provided in this guide are designed to cater to a variety of scenarios. If you find it troublesome to try solutions one by one, then we recommend using Dr.Fone directly which is a full toolkit for your phone and can help resolve most device glitches one-off.
Remember, technology can sometimes be tricky. But with patience and the right guidance, you can overcome these challenges.
Full Guide: How To Fix Connection Is Not Private on Nokia C110
Are you encountering the “your connection is not private” issue on your phone? We found many Android users have increasingly expressed their frustrations with this recurring problem while browsing on the internet.
Usually, you can just reload the page to fix the error. But in case it doesn’t help, you may need to look for more advanced solutions. In the following discussion, we will delve into why this “your connection is not private” on Android happens and explore solutions that work for you.
Part 1: Addressing Your Connection Is Not Private on Android
First of all, what does “your connection is not private” on Android mean? To answer this question, it’s essential to understand that this error is often associated with Secure Socket Layer (SSL) protocol issues.
SSL is a cryptographic protocol created to establish a secure communication channel over the internet. Its primary purpose is to ensure the confidentiality and integrity of data exchanged between a user’s device and a website’s server.
The error message appears when there’s a problem with the SSL/TLS (Transport Layer Security) certificate of the website you are trying to access. This certificate is a digital document that authenticates the website and encrypts the data transmitted between the user’s device and the server.

Some common factors that could trigger the “your connection is not private” on Chrome Android error:
- Expired or invalid SSL certificate of the website;
Certificates are issued for a specific period, and if the website owner fails to renew it in time, your browser will detect it as not secure.
- There is a mismatch between the domain on the certificate and the actual domain you are trying to visit;
This discrepancy might occur due to a misconfiguration on the website or, in some cases, due to a man-in-the-middle attack where a third party intercepts the communication between your device and the server.
- No HTTPS enforcement;
Another reason for the issue is if the installed SSL certificate doesn’t turn on the “force HTTPS” option. This means visitors might be using the non-secure HTTP version of the site instead of the safe URL.
So, the error serves as a warning to users, indicating that the connection may not be secure and sensitive information could be at risk.
Browsers, including those on Android devices, prioritize user safety and privacy. They will block access to potentially compromised websites to prevent data theft or unauthorized access. That’s why when you get the “your connection is not private” message on Android, you can’t access the website.
Part 2: What The Error Codes in “Your Connection Is Not Private” Mean
When “your connection is not private” on Chrome Android error shows up, it often comes along with specific error codes that can indicate the root cause of the issue. Understanding these error codes is crucial for troubleshooting and resolving the problem effectively.
- ERR_CERT_SYMANTEC_LEGACY: Unsupported Symantec-issued certificate
This error code indicates that the website you are attempting to access is equipped with an unsupported Symantec-issued certificate. Symantec, a prominent Certificate Authority, had faced concerns about the security of its certificate issuance processes.
As a result, major browsers, including Google Chrome, no longer support certificates issued by Symantec. If you encounter this error, it implies that the website’s SSL certificate is outdated and needs to be updated with a certificate from a trusted Certificate Authority.
- NET::ERR_CERT_AUTHORITY_INVALID: Unauthenticated SSL certificate
The presence of this error code suggests that the SSL certificate of the website cannot be authenticated by your browser. This could occur if the certificate is self-signed or issued by an unrecognized Certificate Authority.
- NET::ERR_CERT_DATE_INVALID: Date and time mismatch
This error code points to a discrepancy between your Nokia C110’s date and time settings and the information on the website’s SSL certificate, as they have expiration dates. If the date and time settings on your device are incorrect, it may prevent the certificate from being validated. Correcting your device’s date and time settings should resolve this issue.
- SSL certificate error: Generic or unspecified problem
This is a more generic error message that indicates a problem with the website’s SSL certificate without specifying the exact nature of the issue. It could indicate various issues, such as an expired certificate, a misconfiguration in the certificate chain, or other SSL-related problems.
Part 3: How To Fix Your Connection Is Not Private on Android
Encountering the “your connection is not private” error on Android can be a frustrating experience. Fortunately, there are various methods to address and fix this issue, depending on its underlying cause.
In this section, we will explore some effective solutions to help you regain a secure and private connection.
Method 1: Clear your cache
When you use the internet, web browsers store information about your online activities in cached data and cookies to speed things up. However, having too much of this data can cause problems instead. It might even stop your browser from connecting securely.
So, clearing your browser cache and data can be a quick and simple “your connection is not private” Android fix. Follow the steps here:
- Step 1: Open and launch Chrome.
- Step 2: Access the Menu (the three dots button) to open the Settings. Select Privacy and Security > Clear Browsing Data.
- Step 3: Opt for the “All Time” option and click “Clear Data” to erase your cache.

After successfully clearing your browser cache and data, revisit the website to check if the problem persists.
Method 2: Repair the Android system
Addressing the “your connection is not private” to fix on Android involves examining both the Nokia C110 device and the website. If clearing browser data doesn’t help, there might be an issue with your Android system. One solution is to use the Wondershare Dr.Fone system repair tool to fix the issues safely.
How to perform system repair with Dr.Fone:
- Step 1. Open the Repair Tool
Start by launching Wondershare Dr.Fone on your computer. Go to the Toolbox section and connect your Nokia C110. Choose System Repair and pick Android as your device type.
safe & secure
4,322,863 people have downloaded it
- Step 2. Begin Repair
Click Start on the new screen to kick off the repair. Since you’re dealing with a connection private issue on Android, select System Damage.
- Step 3. Fill in the Nokia C110 device Details
The platform will detect your Nokia C110’s brand. Confirm the Name, Model, Country, and Carrier. If your device is unlocked, choose OPEN in the Carrier section. Agree to the warning, click Next, and proceed with the repair.
- Step 4. Activate Download Mode
Follow the instructions to put your Nokia C110 into Download Mode. Once in Download Mode, you will start downloading the firmware.
- Step 5. Confirm Installation
Remember, the repair may erase data. It’s advisable to back up your data first before starting the repair. Enter “000000” to confirm the repair process, shown by a progress bar.
When done, click Done if your Android starts properly. If not, click Try Again to repeat the process.
Method 3: Check and fix the date and time on your Android
Since the error code “NET::ERR_CERT_DATE_INVALID” indicates a mismatch between the date and time on your device and your browser, you need to adjust the date and time settings on your Android to fix it.
The specific steps can vary based on your Android model, but the general approach involves locating the “date and time” settings on your phone. How to fix the date and time on Android to bypass “your connection is not private” on Chrome Android:
- Step 1: Go to your Nokia C110’s Settings > Date & Time.
- Step 2: Switch on the “Automatic Date & Time” to sync with the network-provided time.

Method 4: Perform factory reset
If nothing else works, there might be malware on your phone causing trouble. It’s crucial to eliminate this threat before further damage occurs. The recommended action is to perform a factory reset on your phone.
However, keep in mind that this process can result in data loss, so it’s essential to back up your data beforehand. Follow the steps to perform a factory reset on Android:
- Step 1: Go to your Android Settings.
- Step 2: Select Backup and Reset > Factory data reset. Then, opt to erase all data.

Most of the time, you won’t need to go to the extreme of a factory reset. The simpler solutions mentioned earlier should take care of the Security Certificate Error on your Android.
Conclusion
By now, you should have a good grasp of the “Your Connection Is Not Private” problem on Android. This issue typically arises from complications with the SSL certificate of the website, designed to ensure a secure connection.
When you see the error message, it often comes with specific codes that indicate the underlying problem. Several methods can be employed to fix the “Your Connection Is Not Private” on Android. Clearing the browser cache, repairing the Android system using tools like Dr.Fone, checking and fixing date and time settings, and performing a factory reset as a last resort are among the solutions.
By prioritizing user safety and following the step-by-step approach in this guide, you can navigate and resolve this common internet browsing challenge on your Nokia C110s.
Also read:
- [New] Liberty of YouTube Download Customizable Video Themes
- [Updated] 2024 Approved FFmpeg and Its Role in Preserving Natural Auditory Formats
- [Updated] Fine-Tuning Your Videos for Viral Instagram Moments
- [Updated] In 2024, Spectacular Selects Ideal Laptops Mastering 4K Editing
- 4 Ways to Fix Android Blue Screen of Death On Xiaomi Redmi 13C | Dr.fone
- 6 Fixes to Unfortunately WhatsApp has stopped Error Popups On Tecno Spark 10 5G | Dr.fone
- 7 Fixes for Unfortunately, Phone Has Stopped on Realme V30T | Dr.fone
- 7 Fixes for Unfortunately, Phone Has Stopped on Xiaomi Civi 3 | Dr.fone
- A Quick Guide to Realme Narzo 60x 5G FRP Bypass Instantly
- Fix App Not Available in Your Country Play Store Problem on Vivo Y100t | Dr.fone
- Kobo Nia E-Reader Assessment: An Impressive Alternative to the Amazon Kindle
- Mastery in FREE Graphics Top Online Resource Directory
- Nine Perfect Petals | Free Book
- Premier Virtual Marketplaces The 10 Cutest Wrapped Delights for 2024
- Super Easy Ways To Deal with Infinix Hot 40i Unresponsive Screen | Dr.fone
- Top 4 Android System Repair Software for Poco M6 Pro 5G Bricked Devices | Dr.fone
- Why Is My Xiaomi Redmi Note 13 Pro+ 5G Offline? Troubleshooting Guide | Dr.fone
- Title: Top 4 Android System Repair Software for Nokia C110 Bricked Devices | Dr.fone
- Author: Ariadne
- Created at : 2025-02-03 16:38:31
- Updated at : 2025-02-08 16:51:35
- Link: https://howto.techidaily.com/top-4-android-system-repair-software-for-nokia-c110-bricked-devices-drfone-by-drfone-fix-android-problems-fix-android-problems/
- License: This work is licensed under CC BY-NC-SA 4.0.