
Troubleshooting Guide How to Fix an Unresponsive Infinix Smart 7 Screen | Dr.fone
Troubleshooting Guide: How to Fix an Unresponsive Infinix Smart 7 Screen

Smart devices have become an integral part of our lives, and Infinix Smart 7 phones are increasingly popular due to their advanced features and affordable prices. These phones offer numerous benefits, including high-quality cameras, fast processors, long-lasting batteries, and sleek designs.
However, like any other electronic device, Infinix Smart 7 phones can sometimes encounter issues that may impede their functionality. One common problem that users face is an unresponsive screen, which can be frustrating and disruptive to daily activities.
This article will discuss some valuable solutions for dealing with Infinix Smart 7 phone screen unresponsiveness. We will provide step-by-step instructions for troubleshooting and getting your phone back in working order. Whether you’re a novice or an experienced user, these tips and tricks will help you navigate this problem and get back to using your phone without any issues. So, let’s dive in and explore how to fix a Infinix Smart 7 phone with an unresponsive screen.
What causes the Infinix Smart 7 Screen unresponsive?
The Infinix Smart 7 screen may become unresponsive due to various reasons. Here are some common situations and their possible causes:
During Use/Gaming: The screen may become unresponsive due to overheating when using or gaming on a Infinix Smart 7 phone. This can be caused by running too many apps simultaneously or playing games for an extended period, especially on models such as the Infinix Smart 7 9 Pro, which generates much heat during gaming.
**No Response When Touching the Screen:**Sometimes, the Infinix Smart 7 screen may not respond when touched due to a faulty touch screen or display. This can happen due to physical damage or a manufacturing defect. Some Infinix Smart 7 Nord 2 users have reported this issue.
After Dropping the Phone: If a Infinix Smart 7 phone has been dropped, the screen may become unresponsive due to physical damage or a loose connection. This can happen to any model, including the Infinix Smart 7.
Overheating, physical damage, and manufacturing defects are some common causes of Infinix Smart 7 screen unresponsiveness, which may occur during use/gaming, no response when touching the screen, or after dropping the phone.
The common solutions to solve a Infinix Smart 7 Screen unresponsive
Here are the three most common solutions to deal with phone screens being unresponsive, regardless of the brand:
Restart the Infinix Smart 7 device

Restarting the Infinix Smart 7 device is a simple and quick solution to an unresponsive phone screen. To restart the phone, press and hold the power button until the screen turns off, then press and hold the power button again to turn the phone back on.
Check the Charging Port and Battery
Sometimes, an unresponsive screen can be caused by a dead battery or a faulty charging port. To check for these issues:
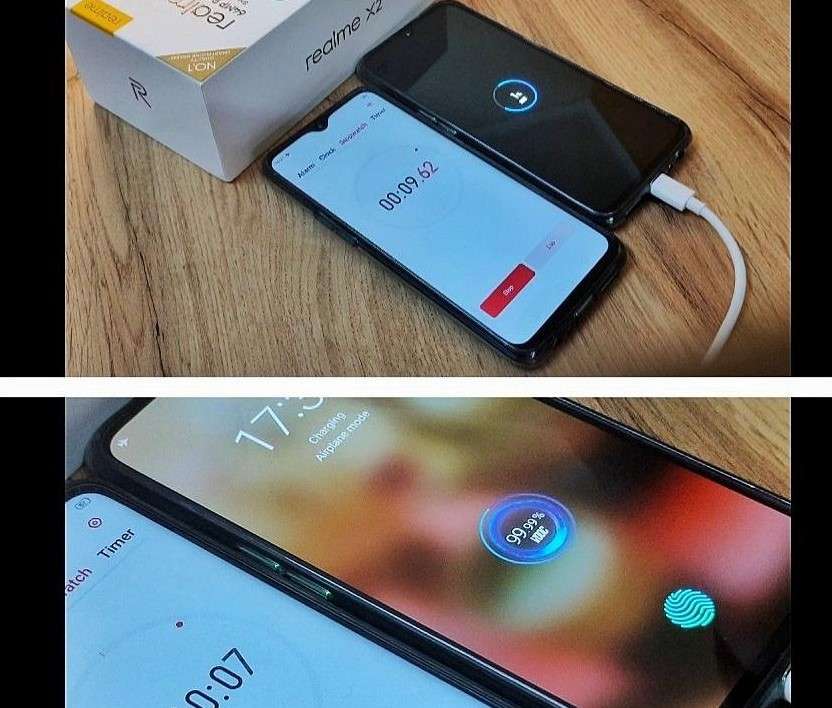
Step 1: Plug the phone into a charger and wait for at least 30 minutes to see if the battery charges.
Step 2: Try a different charger or cable to see if the issue is with the charging accessories.
Contact the Pros

If the above solutions don’t work, contacting a professional is best. A trained technician can diagnose and fix the problem. Contact the phone manufacturer or an authorized repair center to get help with your phone.
For different Infinix Smart 7 models, there may be additional solutions to consider:
Check the Phone’s Temperature

Sometimes, a Infinix Smart 7 phone’s screen, specifically Infinix Smart 7 8 Pro, may become unresponsive due to overheating. To check the phone’s temperature:
Step 1: Go to Settings > Battery > Battery Temperature.
Step 2: If the phone is overheating, let it cool down before using it again.
Reset to Factory Settings
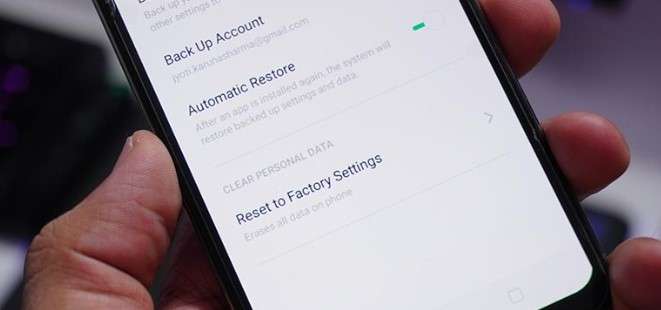
A factory reset may help fix the problem if none of the above solutions work. Note that this will erase all data and settings on the phone, so be sure to back up your data before resetting. To reset the phone:
Step 1: Go to Settings > Additional Settings > Backup and Reset > Erase All Data.
Step 2: Follow the on-screen instructions to reset the phone.
Replace a New Screen

If the phone’s screen is physically damaged or cracked, it may need to be replaced. To replace the screen:
- Contact a professional repair center or the manufacturer for replacement parts and installation.
How to avoid Infinix Smart 7 Screen being unresponsive?
To avoid Infinix Smart 7 screen being unresponsive, here are some suggestions based on the possible causes:
Check Software Updates on Time
Make sure to regularly check for and install software updates on your Infinix Smart 7 phone. These updates often include bug fixes and security patches that can help prevent issues like overheating and screen unresponsiveness.
Check Hardware from Time to Time
Regularly inspect your phone’s hardware components such as charging ports, battery, and screen for any signs of damage or wear and tear. If you notice any issues, get them fixed promptly to prevent them from causing further damage.
Avoid extreme temperatures
Keep your Infinix Smart 7 device in a temperature-controlled environment. High temperatures can cause the screen to become unresponsive, and low temperatures can cause it to freeze.
Keep the screen clean
Dirt and debris on the screen can cause it to become unresponsive. Use a microfiber cloth to clean the screen regularly.
Reduce the number of running apps
Running too many apps at once can overload the system and cause the screen to become unresponsive. Close any apps you’re not using to free up system resources.
Use Wondershare Dr.Fone to Repair or Manage Your Data
Wondershare Dr.Fone is a helpful tool that can help manage and repair your phone’s data. It can be used to back up your data, transfer files between devices, and even fix issues like an unresponsive screen. Dr.Fone has the DF13 version to be launched, which includes more features to help manage your phone’s data effectively.
By following these suggestions, you can help prevent screen unresponsiveness on your Infinix Smart 7 phone. Download Dr.Fone at https://drfone.wondershare.com/ to manage your phone’s data effectively and fix any issues that may arise.
 safe & secure
Conclusion
Infinix Smart 7 phones offer numerous benefits, including high-quality cameras, fast processors, long-lasting batteries, and sleek designs. However, like any other electronic device, Infinix Smart 7 phones can sometimes encounter issues, such as an unresponsive screen. The causes of an unresponsive screen may include overheating, physical damage, and manufacturing defects.
To deal with an unresponsive screen, users can try restarting the Infinix Smart 7 device, checking the charging port and battery, or contacting a professional. Additional solutions for specific Infinix Smart 7 models include checking the phone’s temperature, resetting to factory settings, or replacing a new screen. To avoid an unresponsive screen, users can check software updates on time, inspect the phone’s hardware, avoid extreme temperatures, keep the screen clean, and reduce the number of running apps. Dr.Fone is a helpful tool that can help manage and repair your phone’s data.
What To Do if Your Infinix Smart 7 Auto Does Not Work
Embracing the convenience of Android Auto enhances your driving experience. It seamlessly connects your smartphone with your vehicle. However, in the realm of technology, glitches and malfunctions are commonplace. Android Auto, too, may encounter software or hardware issues that disrupt its functionality.
In this guide, you’ll delve into the common problems users face when Android Auto does not work and provide practical solutions to get you back on the road smoothly. From troubleshooting software glitches to addressing hardware concerns, this article aims to equip you with the knowledge to tackle Android Auto problems effectively.

Part 1. A Briefer on Android Auto
Android Auto is a revolutionary application designed to enhance the in-car experience by seamlessly connecting Android smartphones to compatible vehicles. It serves as a co-pilot, offering hands-free navigation, communication, and entertainment options, minimizing distractions while driving.
How Android Auto Works
Understanding the mechanics of this technology is essential for effective Android Auto troubleshooting. It mirrors your Android smartphone’s interface onto your car’s infotainment system. It provides a simplified and optimized version of your device’s features on the road.
Android Auto connects your smartphone to your car’s infotainment system via USB cable or wirelessly, depending on your device and car compatibility. Once clicked, it displays a user-friendly interface on your car’s screen, allowing you to access navigation through Google Maps, make calls, send messages, and control multimedia apps with voice commands or touchscreen gestures.
By integrating familiar smartphone functionalities into your car, Android Auto aims to provide a safer and more enjoyable driving experience, reducing the need for manual phone interactions while on the road. Understanding this foundation will empower you to effectively troubleshoot when issues arise.

Part 2. Common Issues Android Auto Faces + Troubleshooting/Repair
Even if it is such a great technology, sometimes Android Auto won’t connect. It also deals with common issues that can affect its performance. In this section, you’ll delve into these challenges and equip you with practical troubleshooting solutions to fix your Android Auto experience.
Connection Issues
Connection glitches through Bluetooth or USB can cause Android Auto issues. USB connection problems often come from subpar cables.
The solution here is straightforward – invest in a high-quality USB cable. This ensures a stable link between your smartphone and the car’s infotainment system. Meanwhile, Bluetooth pairing problems may require a bit of digital maneuvering. Try restarting your phone, rebooting the car’s infotainment system, or resetting Bluetooth settings to establish a smooth connection.
App-Specific Problems (Certain Apps Not Working)
Android Auto relies heavily on various navigation, communication, and entertainment applications.
If specific apps refuse to cooperate, a quick remedy is to restart the head unit. If the issue persists, consider uninstalling and reinstalling the problematic applications. This step ensures a clean slate for the apps, potentially resolving any underlying compatibility or performance issues.

Screen and Display Problems (Head Unit)
Issues with the screen or display on your car’s head unit can be disconcerting. To troubleshoot, commence with a simple restart of the head unit.
If the problem lingers, escalate the solution by restarting the entire car. Should these steps prove ineffective, seeking professional assistance at a maintenance center is advisable. This ensures a thorough examination and potential resolution of hardware-related problems, providing a comprehensive fix for persistent screen and display issues.
Voice Commands Not Working
Voice commands serve as a cornerstone of the Android Auto hands-free experience. When they falter, it can disrupt the seamless interaction with the system.
Begin by scrutinizing your internet connection, as voice commands rely on a stable link to function effectively. If the issue persists, a basic restart of the head unit might recalibrate the system, restoring the functionality of voice commands.
Understanding that these issues are inherent to any technology, Android Auto users can confidently navigate and troubleshoot these problems with the provided solutions. By addressing these commonplace concerns, users empower themselves to swiftly overcome hurdles, ensuring a seamless and gratifying driving experience with Android Auto.
Part 3. A Quicker Solution: Wondershare Dr.Fone – System Repair
If navigating through various troubleshooting steps seems complicated, especially if the issue resides within your Infinix Smart 7, a swift and efficient solution comes in the form of Wondershare Dr.Fone - System Repair.

While the methods presented earlier primarily address software glitches, Dr.Fone can tackle more profound issues, offering a quick fix to revitalize your Android Auto experience. It is a comprehensive toolkit that caters to various Android needs, ensuring a seamless and optimized experience. Among its array of features, the System Repair feature in Dr.Fone acts as a reset button for your Infinix Smart 7.
It addresses issues that go beyond the scope of regular troubleshooting. It gives your phone a fresh start by repairing the Android system and resolving glitches, crashes, and other persistent software-related problems. This revitalizes your telephone and can significantly impact Android Auto’s performance.
Note: If the problem persists and is related to the car’s head unit, a visit to the maintenance center might be necessary after exhausting these software-based solutions.
How To Use Wondershare Dr. Fone’s System Repair
To use Dr. Fone’s System Repair feature, follow the steps below. These steps will work with any Android phone.
- Step 1: Begin by launching Dr.Fone on your computer. From the left panel, access the Toolbox menu and click System Repair. Ensure your Infinix Smart 7 is connected.
safe & secure
4,014,082 people have downloaded it
- Step 2: On the subsequent screen, select Android as your device.

- Step 3: Initiate the Android System Repair by clicking Start.

- Step 4: Confirm the accuracy of your device details. If needed, edit any information that may be incorrect.

- Step 5: Place your phone into Download mode following the guidelines tailored for phones with or without home buttons. Your phone will commence downloading the dedicated firmware.

- Step 6: Once the firmware is downloaded, verify and proceed with the installation by clicking Fix Now. Confirm the firmware installation by inputting “000000” into the text box in the appearing window. Click Confirm afterward.

- Step 7: Upon completion of the process, your phone should now be restored. Click Done to conclude.

safe & secure
4,276,578 people have downloaded it
Conclusion
In wrapping up this guide, you’ve explored common reasons Android Auto does not work. You’ve also been provided practical solutions to keep your driving experience seamless. Remember, regular maintenance of your car’s head unit and periodic checks on your Infinix Smart 7 can preemptively address potential issues.
By staying proactive, you ensure a consistently smooth ride with Android Auto. For comprehensive system repair and addressing broader Android-related needs, consider trying out Dr.Fone. It’s a versatile tool that can enhance your Android experience and keep your digital journey hassle-free. Take control of your drive and explore the full potential of your Infinix Smart 7s with Dr.Fone today.
Ways to Unbrick Your Android Device: Various Ways for Recovery
When your Infinix Smart 7 becomes unresponsive or frozen after mistakenly flashing a ROM or rooting, you are informed that the phone has been bricked. The most terrifying aspect will not just be gadget loss, but also data erasure. However, what exactly is a bricked phone, and, more importantly, how do you fix a bricked Android phone?
This article will explain what a bricked android phone is, why an Android phone becomes bricked, how to unbrick an Android phone without losing data and a third-party application you can use.
Part 1. Causes of Bricked Phones
In everyday settings, our mobile devices have become our greatest friends, therefore breaking your phone is the last thing you want to do. There are different reasons why devices brick, and we must be familiar with them in order to comprehend the various techniques to repair bricked devices.
Here are some common reasons why your Infinix Smart 7 is bricked:
- **Flashing Stock/Custom ROM:**It is possible that you installed an incompatible ROM in the Android phone, that the phone shuts off during the process, or that you have performed other errors that cause your phone to restart indefinitely or to become stuck at the starting screen.
- **Rooting an Android device:**You are unable to effectively root the Infinix Smart 7 device.
- **Android firmware is being updated:**If the phone is interrupted when updating the Android firmware, it will be bricked.
- **Installing harmful applications:**You installed harmful programs on your Infinix Smart 7, or the phone was infected with a virus.
Part 2. How to Fix a Bricked Phone
The first step is to establish how badly your device is bricked. In most cases, you will be working with soft bricks that are pretty simple to repair. If your phone is stuck in a boot loop or enters recovery mode every time you turn it on, you may have a soft brick.
To repair bricked Android phones and tablets, you must first thoroughly examine the Infinix Smart 7 device’s state. Before you begin troubleshooting, determine the sort of bricking that your phone is experiencing. However, there is no specific software to unbrick your Infinix Smart 7; you may need to learn the complexities of this issue or hire a professional to do it for you.
 safe & secure
Here are some simple methods for repairing bricked Android devices:
Method 1. Reboot the Phone in Safe Mode
Trying to reboot your android device in safe mode is the first and easiest thing you should try if your phone is bricked. Here’s how to do it:
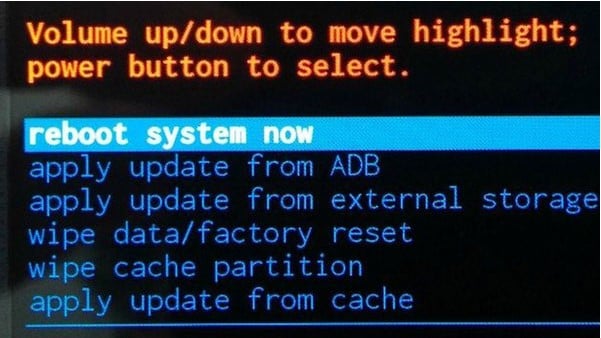
- Step 1: Turn off your smartphone and press the Volume Up + Power button to enter recovery mode. Then, using the volume controls, navigate the menu and select Reboot system now.
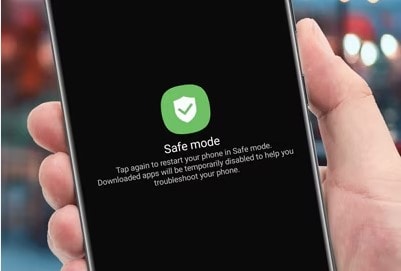
- Step 2: Select the highlighted option by pressing the Power button. After that, wait for your device to reset normally.
- Note: The steps for booting into recovery mode may change based on the manufacturer of your device. For further information, go to the user manual for your phone or tablet.
Method 2. Wipe the Cache Partition
This is the first indication that a user’s phone has gone bricked. The phone turned on automatically, however it became stuck or frozen on the logo screen. The issue might be caused by the undeleting of data and cache, which prevents the phone from displaying the home screen.
This issue, however, may be resolved by wiping the data and cache partitions in recovery mode. You must do the following to do this:
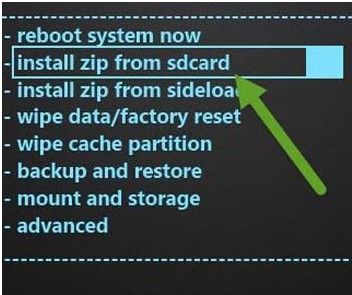
- Step 1: Turn off your smartphone and enter recovery mode by pressing the Power and Volume Down buttons simultaneously. Different devices have various approaches for entering recovery mode, so you may perform better.
- Step 2: After entering recovery mode, you should see the screen below. Remember to pick Advanced and then “Wipe Dalvik Cache” if your device is under Clockwork Mod recovery. Return to the main screen and select “Wipe Cache Partition” once more.
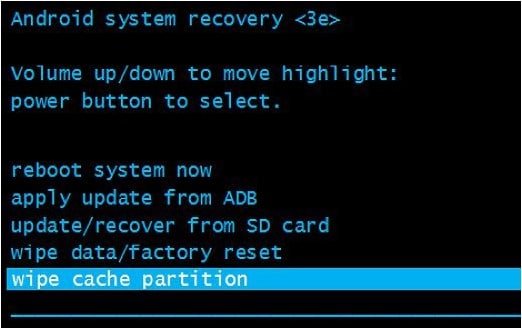
- Step 3: Finally, on your smartphone, choose the Reboot system immediately.
Method 3. Perform a Factory Reset
A factory reset can undo the alterations made to your device that resulted in the brick phone, but you will lose everything you have downloaded and installed in the process. Here’s how to restore a bricked Android phone to factory settings:
- Step 1: Boot your device into recovery mode (turn off your device, then press power button + volume up button).
- Step 2: Select “Wipe Data/“Factory Reset” then confirm the action. When the process is done, you’ll be returned to the recovery mode menu.
- Step 3: Select “Reboot System Now” to restart your device.
Method 4. Flash a Custom ROM
If you boot your phone directly into recovery mode, there’s a problem with the ROM you loaded. Then simply flash the following custom ROM on your phone:
- Step 1: Save the required ROM (in ZIP format) to an SD card. The SD card should then be inserted into your Infinix Smart 7.
- Step 2: Click the “Install zip from sdcard” button. Then, select the ZIP file that contains the ROM. Finally, click the “reboot system now” button.
Method 5. Using Wondershare Dr.Fone to Fix bricked Android Devices
Wondershare Dr.Fone - Data Recovery is the first data recovery solution for any damaged Android smartphone in the globe. It offers one of the greatest recovery rates and can recover a variety of information like images, videos, contacts, messages, and call logs. The program is most effective with Infinix Smart 7 smartphones.
While it is not an Android unbrick tool, it is a useful tool for retrieving data when your Infinix Smart 7 becomes bricked. It is quite easy to use:
- Step 1: Launch Wondershare Dr.Fone and select “Data Recovery” > “Recover Android Data” from the menu. Then, select “****Recover from Broken Phone”.

- Step 2: Choose the file types you wish to recover. Click “Next” and then select the type of damage your phone is experiencing. Select “Touch screen not responsive, or cannot access the phone” or “Black/broken screen”.

- Step 3: Use the recovery wizard to enter your Android smartphone into Download Mode. Connect your Android handset to the computer after following the instructions to begin automatically analyzing your device.

- Step 4: The program will provide a list of all recoverable files, organized by file type. To preview the file, highlight it. Choose the files you wish to recover and then click “Recover” to save all the data you want to restore.

 safe & secure
Part 3. How to Prevent Bricking Your Phone
How to prevent a device from “bricking” itself and how to repair it if it does The delay is set by the MCU, but it should be long enough to allow the debug adapter to connect to the Infinix Smart 7 device and halt it before the Infinix Smart 7 device disables itself.
Here are some things to remember to prevent your device from bricking:
- Avoiding unofficial firmware updates: Installing unapproved OS firmware on your phone will most certainly violate any manufacturer’s warranty you have on it. Read the installation instructions for your unique phone model thoroughly and then carefully follow them, taking time and patience.
- **Being cautious when rooting or jail breaking:**Rooting and Jail breaking disables parts of the operating system’s built-in security mechanisms, which are part of what makes the operating system safe, and your data protected from exposure or damage.
- **Install an antivirus application on your device:**Mobile devices increase the danger of data leaks and breaches. As a result, antiviral software is beneficial on mobile phones. Mobile Device Management is an excellent choice for virus protection on your mobile device.
- Backup your phone data regularly: Backing up your phone safeguards your data in the event that you lose it, it is stolen, or it no longer works. When it comes time to replace your phone, having a backup makes it simple to restore your data to the new device. Furthermore, backing up your phone allows you to organize your data so that it is easier to access.
- Avoid installing apps from untrusted sources: Apps installed from unauthorized sources make your device and personal data more exposed to dangers such as Ransomware. So you should be wary of where you download applications.
Conclusion
It is certainly upsetting when your gadget bricks, but you may attempt the solutions listed above to resolve the issue. Meanwhile, if you want to solve the problem quickly and easily, you can try Wondershare Dr.Fone. It can not only help you repair your Android smartphone, but it can also help you extract data from a bricked device, recover data, and many more Android device solutions!
safe & secure
Also read:
- [New] Crafting Perfect Ringtones From Popular TikTok Audio Tracks
- [New] The Best ASMR Microphones You Should Try for 2024
- [Updated] 2024 Approved Essential Tips for Overwatch Game Sound Logging
- [Updated] Recover Missing Audio From Tweeted Videos for 2024
- 2024 Approved Masterclass in WebP to JPEG Conversion
- 4 Solutions to Fix Unfortunately Your App Has Stopped Error on Motorola Moto E13 | Dr.fone
- Delete Gmail Account With/Without Password On Vivo X Fold 2
- Fix the Error of Unfortunately the Process.com.android.phone Has Stopped on Lenovo ThinkPhone | Dr.fone
- Fix the Error of Unfortunately the Process.com.android.phone Has Stopped on Samsung Galaxy S23+ | Dr.fone
- Fixing Persistent Pandora Crashes on Oppo Find X7 Ultra | Dr.fone
- Full Solutions to Fix Error Code 920 In Google Play on Vivo Y100 | Dr.fone
- How to Fix Unfortunately, Contacts Has Stopped Error on Honor Magic 5 | Dr.fone
- How to Fix Unfortunately, Contacts Has Stopped Error on Itel A05s | Dr.fone
- How to Update Drivers in Windows 11, 8.1, 7. Quickly & Easily!
- In 2024, Experience NBA Like a Pro - Master These Top 15 Livestream Methods
- In 2024, Learning Legends Esteemed Ed Streams Online
- In 2024, Why Your WhatsApp Location is Not Updating and How to Fix On Realme 11 5G | Dr.fone
- Infinix Hot 40 Stuck on Screen – Finding Solutions For Stuck on Boot | Dr.fone
- Why Your Itel P40+ Screen Might be Unresponsive and How to Fix It | Dr.fone
- Title: Troubleshooting Guide How to Fix an Unresponsive Infinix Smart 7 Screen | Dr.fone
- Author: Ariadne
- Created at : 2025-01-21 18:19:12
- Updated at : 2025-01-26 20:07:55
- Link: https://howto.techidaily.com/troubleshooting-guide-how-to-fix-an-unresponsive-infinix-smart-7-screen-drfone-by-drfone-fix-android-problems-fix-android-problems/
- License: This work is licensed under CC BY-NC-SA 4.0.