
Vivo Y77t Camera Not Working Unexpected Error? Fix It Now | Dr.fone
Vivo Y77t Camera Not Working Unexpected Error? Fix It Now
For all its glory and goodness, the Android OS often has its users pulling their hair in frustration at just how buggy the OS can be at times. So, if you’re having one of those days today, we are here to help. Camera app is one of the most used apps on smartphones today. People only launch the app when they want to take a photo, for everything else there’s a dedicated photo gallery app. What happens when you launch the camera app only to realize it threw an error and you missed your photo moment? Don’t throw the phone, not yet. Let us help you out.

Part I: Why Is Android Camera Not Working?
There are a few reasons why the camera app is not working on your Vivo Y77t.
Low Memory
Camera app does rely heavily on system resources, so in case you have too many apps open and for some reason the OS is not able to manage the resources appropriately for the camera app to function as it should, you will get a camera error.
Low Storage
The camera app needs storage space to save the photos it takes. So, in case your phone is running low on storage space, the camera app would likely malfunction as it would have no way to store the photos it would be taking.
General Bugs And Glitches
OS bugs and general glitches within the OS and the camera app can cause camera not working issue anytime during everyday operation. This is part and parcel of any technology.
Hardware Issues
In the rarest cases, there might have developed an actual hardware issue with the camera system on your Vivo Y77t. The likely culprit is misuse and abuse, such as a dropped phone or maybe the phone was too hot for extended periods of time, causing hardware issues.
Part II: How To Fix Android Camera Not Working Issue?
So, how to get the Android camera not working problem solved? There are a few ways you can try fixing the camera not working issue on your Vivo Y77t right where you are, without needing to take the Vivo Y77t device to the manufacturer’s service center.
II.I: Restart The Handset
One of the first things to do any time an app or your phone or tablet does not work like it should, restarting the Vivo Y77t device refreshes everything just enough to resolve most commonly occurring issues.

Use the power button on your smartphone to restart your Android handset and see if this resolves the issue.
II.II: Close And Relaunch The Camera App
If the camera app (or any app for that matter) has been in the background for a while and then it is brought to the foreground, there are always chances of it crashing for any reason, or not working as expected. So, closing the app completely and relaunching it is recommended.
Step 1: Launch the app switcher on your specific Android device the way your device manufacturer suggests you to. Usually, it is a swipe up and hold gesture to get into the app switcher.

Step 2: Next, you can choose to close just the camera app or, better yet, close all apps by tapping the Close All button. Flicking any app upwards (quick upward swipe) is how you close an app. If there is no Close All button anywhere, repeat the gesture for all open apps.
II.III: Check App Permissions
These days, thanks to strides in the privacy initiatives, apps need permissions before they can function the way they do. Most of the times, apps such as camera do have the necessary permissions, but sometimes it is possible that the permissions are set incorrectly. To check if the camera app has the requisite permissions, do the following:
Step 1: Go to Settings > Apps > Camera > Permissions.

Step 2: Tap Camera.

Step 3: See if the selected option is Allow Only While Using This App. If not, select it.
II.IV: Clear The Camera App Cache
Clearing the camera app cache is sometimes helpful. To do that:
Step 1: Go to Settings > Apps > Camera and tap Storage Usage.

Step 2: Tap Clear Cache.

II.V: Clear The Photo Gallery App Cache
The camera app is closely tied to the photo gallery app that comes baked in into Android OS. That is because photos that the camera app takes are stored in the photo gallery app. Consequently, if there were any issues in the photo gallery app, that could lead to the camera app not working on Android problem. Here’s how to clear the photo gallery app cache:
Step 1: Go to Settings > Apps > Photos > Storage Usage.

Step 2: Tap Clear Cache.
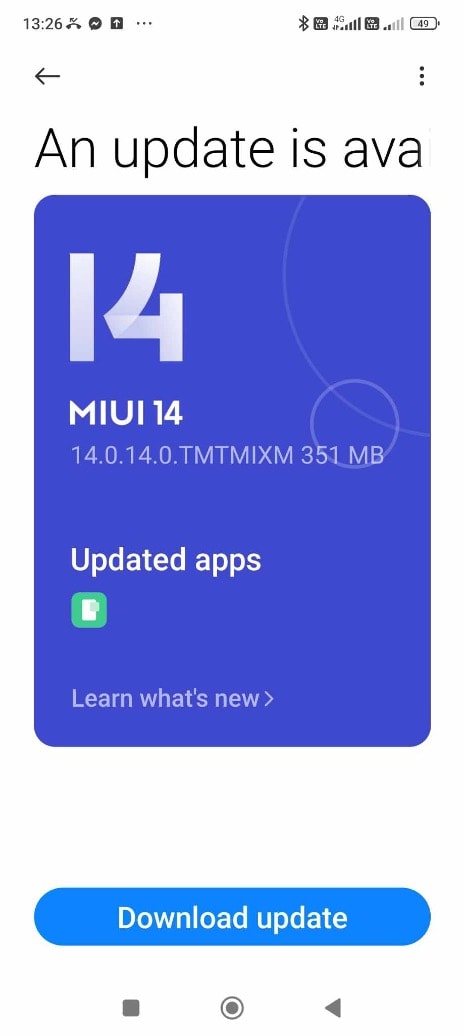
II.VI: Check For App Updates
This does not happen always, but sometimes, with known bugs and issues, there may be an update released that fixes those bugs and issues that prevent some users from using a given app reliably. Checking for updates is a good step to make sure that your camera app is updated to the latest version possible.
Step 1: Go to Play Store and tap your profile picture on the right.

Step 2: Tap Manage Apps and Device.

Step 3: If there are updates available, Tap Update All to update all apps.
II.VII: Cool The Phone Down
We do not realize the immense power that is packed into the thin smartphone form factor these days. If you have been using the phone to video chat for a while now, you might not realize that the phone has become hot, especially if you are using a desk stand. Same for shooting high-resolution videos; the phone does get quite hot shooting high-resolution videos.
If this is the case, close all apps and let the phone cool down. You might even want to shut the phone off to help cool it faster.
II.VIII: Nudge The Camera System
You may want to tap your camera system (the lenses and surrounding area) gently to see if that gets the camera working. In case it did, this is indicative of a hardware issue, and you should get it checked at the service center at your earliest convenience.
II.IX: Fix Android Camera Not Working Issue In One Click (With Dr.Fone)
Now, if the above fixes have not worked, you might want to repair your Android OS once before you make that appointment with the service centre. And, we have just the app to help you fix your camera not working on Android problem quickly.
Wondershare Dr.Fone is a multi-module app that works on both Windows and macOS and is the only app you will ever need to resolve nearly all of your smartphone and tablet issues that you are likely to encounter. Need to take backups? Dr.Fone Phone Backup has you covered with the ability to take and restore even selective backups, and to any location such as your computer or an external disk as well. Want to transfer WhatsApp chats to a new phone? Use WhatsApp Transfer to do just that! Bought a new phone? Use Phone Transfer to transfer contents from old phone to new, and then use Dr.Fone Data Eraser to securely wipe your old phone before giving it away!
Today, we will use Dr.Fone’s System Repair (Android) module to fix Android camera not working issue quickly.
Download Dr.Fone here.
 safe & secure
Step 1: Launch Dr.Fone app on your PC or Mac.

Step 2: Click System Repair module and then Android.

Step 3: For now, don’t bother with the scenarios given and click Start to go to the next screen.

Step 4: Your Android device will be detected by Dr.Fone. If anything seems incorrect, use the dropdown options to change it, and click Next.

Step 5: Your phone needs to be put into Download mode before it can be repaired. Follow the instructions shown onscreen and click Next.

Step 6: Dr.Fone automatically downloads the most recent firmware for your device and when it is ready, waits for your input. Click Fix Now to start the repair process.

Step 7: You will need to enter a 6-digit code (digit zero, six times – 000000) to confirm and begin the repair process.

When the repair is complete, Dr.Fone shows the final screen as below:

safe & secure
Conclusion
The camera app on your smartphone is one of the most important apps you use. This is not a game; this is an app that makes previous memories possible for you. So, when you get any of those incorrigible errors that are impossible to make sense of, what do you do? This guide gives you 9 fixes to fix Android camera not working error quickly and easily.
Why Does My Vivo Y77t Keep Turning Off By Itself? 6 Fixes Are Here
Android users are usually very happy with their smartphones; however, sometimes they do complain about their phones switching off abruptly. This is a weird situation to be in because one moment you are using your phone, and the next moment it suddenly turns itself off, and when you happen to turn it back on, it functions smoothly, but only for a while.
Phones shutting off problem not only disrupts your work but also tests your patience if you are in the middle of executing an important task, playing your favorite game, typing an e-mail/message, or attending a business call, etc.
We often hear Android users ask for solutions for this problem at different forums. If you are one of them and clueless about why My Vivo Y77t keeps shutting off, here are ways that can help you.
So the next time you ask, “Why does My Vivo Y77t keep shutting off?”, refer to this article and follow the techniques given hereunder.
Part 1: Possible reasons for phone turning off by itself
We understand your trouble when you ask, “Why does My Vivo Y77t keep turning off?” thus, here we have four of the possible reasons that might be causing the glitch and help you understand the problem better.
The first one is related to updating the phone’s software or any of the Apps if the download process is interrupted and not duly completed, the phone can act abnormally causing it to switch off at frequent intervals.
Then there are certain Applications that are not supported by the Android software. While using such Apps, the phone may turn off abruptly. This usually happens when you install Apps from unknown sources which are not compatible with Android.
Also, if your battery is low or has become too old, your phone may shut off and not work as smoothly.
Lastly, you can also check if you use a protective cover for your phone. Sometimes, the cover is so tight that it presses the power button continuously turning the phone off.
Now, once you have analyzed the problem, it is easier to move on to the solutions.
Part 2: Check the battery status on Android
If your phone turns off now and then while you are using it and even refuses to start when you press the power button, we suspect that there is a problem with your phone’s battery. Well, Luckily for Android users, there is a test that can be run on the phone to check the battery’s operations and health. Not many users are aware of it, and thus, we have compiled what you need to do the next time you wonder why does My Vivo Y77t keeps shutting off itself.
First, open the dialer on your Vivo Y77t shown in the screenshot below.
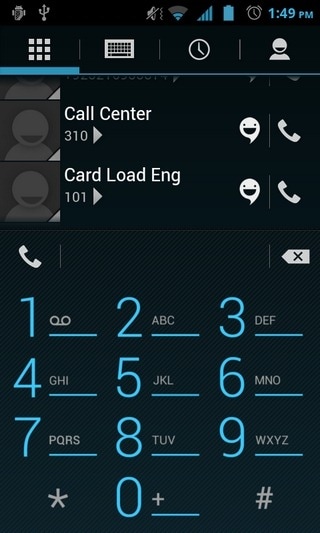
Now dial *#*#4636#*#* just like dialing a usual phone number and wait for the “Battery Info” screen to pop up.
Note: Sometimes, the above-mentioned code may not work. In such cases, try dialing *#*#INFO#*#*. The following screen will appear now.
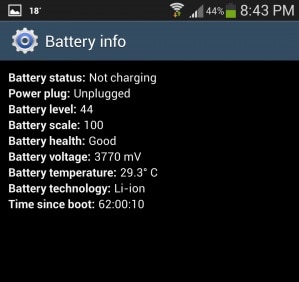
If the battery looks good as you can see in the screenshot above and everything else seems normal, it means that your battery is healthy and need not be replaced. You may now move on to the next step to cure your device.
Part 3: One-click to fix Android phone keeps turning off
We understand how annoying it is to find your Vivo Y77t turning off randomly on its own. So, when the age-old remedies to fix the phone keeps turning off turns futile, you need to go for a reliable tool like Dr.Fone - System Repair (Android) .
Apart from tackling the Android phone keeps turning off the issue, it can also resolve all Android problems. The issues include system update fail, device stuck on logo, unresponsive, or bricked device with a blue screen of death.
Your trouble with ‘why does My Vivo Y77t keep shutting off?’ can be resolved easily using Dr.Fone - System Repair (Android). But, before that, you need to ensure that the Android device has been backed up properly to eliminate the risk of data erasing.
![]()
Dr.Fone - System Repair (Android)
Repair Android System Errors without Any Trouble.
- Fix your Android to normal, no skills required.
- Fix various Android system issues, stuck in boot loop , black screen , or won’t turn on , looping on start, etc.
- The high success rate in resolving Android system issues.
- Compatible with a wide range of Android devices and OS versions
- User-friendly interface with easy-to-follow steps.
3981454 people have downloaded it
Below are the steps that help easily fix Android device keeps turning off on its own:
Phase 1: Preparing your Vivo Y77t and connecting it
Step 1: On your computer, install and launch Dr.Fone. Now, click the ‘System Repair’ button over Dr.Fone window and connect the Android device to your computer.
Step 2: Here, you need to press the ‘Start’ button right after hitting the ‘Android’.
Step 3: Pick your Vivo Y77t details over the Vivo Y77t device information interface. Click the ‘Next’ button afterward.
Phase 2: Enter ‘Download’ mode to repair and resolve ‘why does My Vivo Y77t keep turning off’
Step 1: On your Vivo Y77t, go to ‘Download’ mode following the instructions.
For a device with the ‘Home’ button – Turn off the mobile and then hold down the ‘Home’, ’Volume Down’, and ’Power’ buttons together nearly for 10 seconds. Leave them all and then click the ‘Volume Up’ button to get into the ‘Download’ mode.

For a device lacking ‘Home’ button – After switching off the Android mobile, hold down ‘Bixby’, ‘Power’, ‘Volume Down’ key still 10 seconds. Now, un-hold them and tap the ‘Volume Up’ button to enter the ‘Download’ mode.
Step 2: Hitting the ‘Next’ button will start the Android firmware download.

Step 3: Now, Dr.Fone - System Repair (Android) will verify the firmware once downloaded. Within some time the Android system gets repaired.
safe & secure
Part 4: Update software to the latest version to fix Android phone keeps turning off
Software glitches or outdated operating systems can trigger automatic shutdowns on Android phones. Updating your Vivo Y77t’s software version can be an effective solution to fix the issue of the phone repeatedly turning off. Regular software updates provided by the phone manufacturer often include bug fixes, performance improvements, and security patches. These updates can address underlying problems that may be causing the random shutdowns, ensuring a more stable and reliable phone performance.
To update the software on your Vivo Y77t, follow these steps:
Go to “Settings” on your Vivo Y77t and navigate to the “System” or “Software Update” section (the exact wording may vary depending on your device model and Android version). Look for the option to “Check for updates” to see if any new software updates are available.

Part 5: Cool down your phone to avoid your phone keeps turning off
When a phone overheats, it can trigger an automatic shutdown as a protective mechanism to prevent damage to the Vivo Y77t device’s internal components. Overheating occurs when the phone’s internal temperature rises significantly, typically due to excessive heat generated by the processor and other hardware components during intensive tasks or prolonged usage.
To prevent the phone from turning off due to overheating, you can take various measures, such as limiting intensive usage, avoiding direct sunlight and hot environments, and using the phone on hard surfaces to aid heat dissipation.

Part 6: Narrow down the randomly turning off issue in Safe Mode
Starting your phone in Safe Mode is a good way to narrow down whether or not the problem is occurring because of some heavy and incompatible Apps as Safe Mode allows only built-in Apps to function. If you can use your phone in Safe Mode, consider deleting the unnecessary Apps which may be burdening the phone’s processor.
To boot into Safe Mode:
Long press the power button to see the following options on the screen.
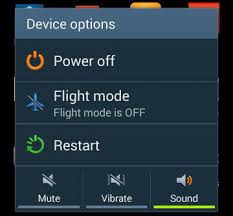
Now tap on “Power Off” for about 10 seconds and click “OK” on the message that pops-up as shown below.
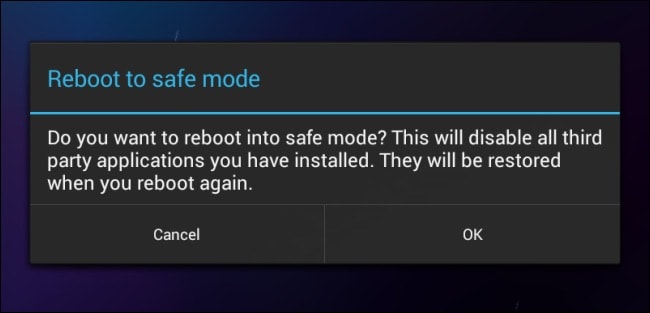
Once done, the phone will reboot and you will see “Safe Mode” on the main screen.
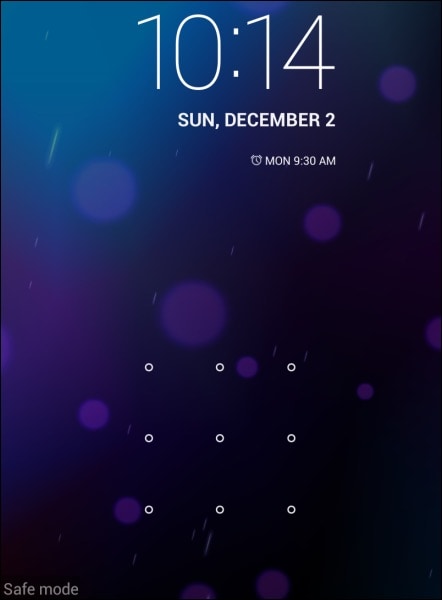
That’s all. Well, booting to Safe Mode is easy and it also helps you to identify the real problem.
Part 7: Back up your data and perform a factory reset
Note: You must take a back-up of all your data because once you perform a factory reset on your device, all media, contents, data, and other files are wiped out, including your device settings.
Wondershare Dr.Fone is a great way to back up all your data to prevent it from getting lost after resetting the phone. It works brilliantly as it backs up all data and allows users to retrieve it fully or selectively. You can backup all files from your Android to PC in just a click and restore them later. Try this software for free before purchasing it to understand it’s working better. It does not tamper with your data and only requires you to follow the simple steps given below to backup your Android data:
Wondershare Dr.Fone
Flexibly Back up and Restore Android Data
- Back up Android data to the computer with one click.
- Preview and selectively restore the backup to any Android device.
- Supports 8000+ Android devices.
- There is no data lost during backup, export, or restoration.
3,981,454 people have downloaded it
To start with, download and run the backup software on the PC.
Once you have the main screen of the software with multiple options that will appear before you, choose the “My Backup” option.
Now connect the Android phone to the PC and make sure that USB debugging is turned on. Then hit “Back Up Now” and wait for the next screen to open.

You will see the file types that will be backed up. Wait for the backup process to complete.

There you go, you have successfully backed up data.

safe & secure
Now moving on to factory reset your phone:
Simply visit “Settings” on your Vivo Y77t by clicking the settings icon as shown below.
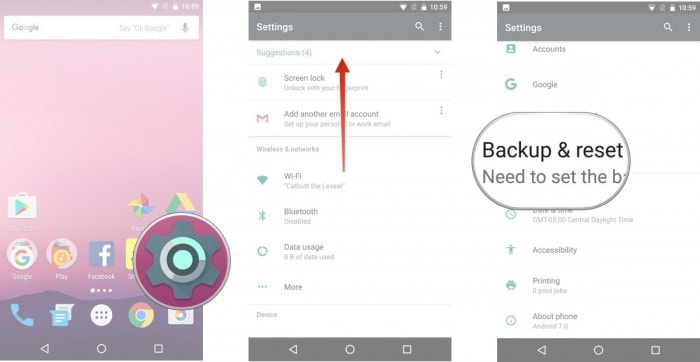
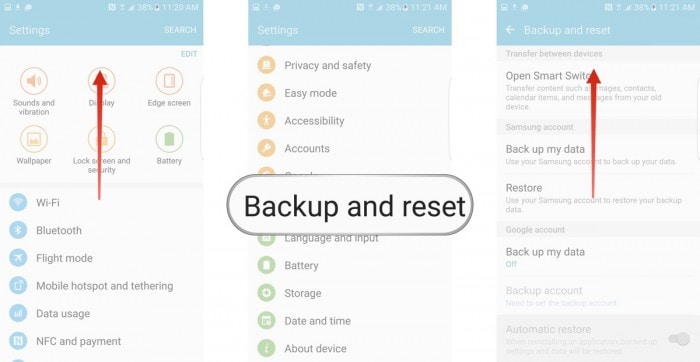
And then select the “Backup and Reset” option.
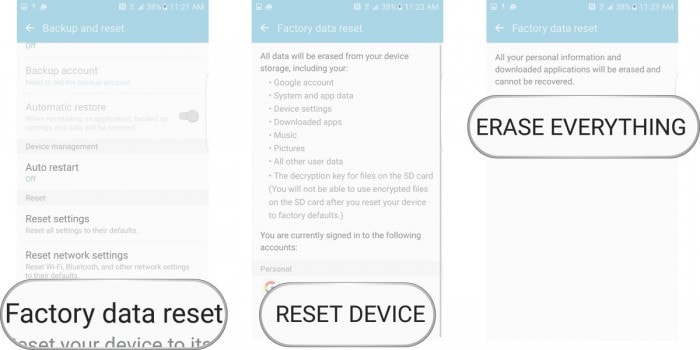
Once selected, tap on “Factory data reset” and then “reset device” as shown in the picture below.
Finally, tap on “ERASE EVERYTHING” as shown below to Factory Reset your device.
Note: Once the factory reset process is complete, your device will automatically restart and you will have to set it up once again. You can restore the backup data on your Vivo Y77t once you factory reset it, again using the Dr.Fone toolkit.
Now for all those of you who are wondering why does My Vivo Y77t keeps turning off by itself, please understand that the reasons behind the problem are simple, and so are its fixes. All you need to do is examine the problem carefully and move on to the fixes given in this article. Dr.Fone toolkit Android Data Backup & Restore feature provides an excellent platform for you to store all your data safely on your PC and retrieve it whenever you like so that you can go ahead to solve the error yourself without stressing about data loss.“Why does My Vivo Y77t keep shutting off?” might be common questions but can be dealt with ease if you follow the methods explained above.
So, do not hold back, go ahead, and try these tricks. They have helped many and will be useful for you too.
safe & secure
Fixing Persistent Pandora Crashes on Vivo Y77t
Pandora, an app bringing music to our fingertips, is a beloved platform for streaming tunes on Android devices. Despite its popularity, users might encounter occasional hurdles with the app, such as unexpected hanging, lagging, or even crashing. These interruptions can disrupt our musical journey.
In this article, you’ll explore practical solutions to the problem of “why does Pandora keep stopping.” Following the steps and tips, you can regain smooth and uninterrupted access to your favorite tunes. Have a hassle-free and enjoyable music streaming experience with Pandora on your Vivo Y77t.

Part 1: Basic Troubleshooting and Fixes
Pandora, the music streaming app cherished by Android users, accompanies you on your musical journey. It offers an array of melodies at our fingertips. However, occasional crashes can disrupt this harmonious experience. This results in an annoying experience where Pandora keeps stopping on Android phones.
Crashes often result from glitches or bugs within the app’s code. These unexpected errors can cause Pandora to freeze, lag, or abruptly shut down, hindering its smooth operation. When faced with intermittent crashes, several basic fixes can help restore Pandora’s functionality:
- Closing the app. Simply closing and reopening Pandora might resolve transient issues.
- Restarting the phone. A reboot of your Vivo Y77t can clear temporary glitches affecting Pandora.
- Updating the app. Ensure you have the latest version of Pandora installed. Updating the app can rectify bugs from older versions.
- **Reinstalling the app.**If the problem persists, uninstall Pandora and reinstall it from the Google Play Store. This process can refresh the app’s data and settings, potentially resolving persistent issues.
If these basic fixes fail to address the continuous crashing of the Pandora app, or if the crashes persist over an extended period, the next section will provide advanced solutions. These initial troubleshooting steps aim to tackle common and temporary issues that could impede Pandora’s performance. If the problem persists, it might necessitate more intricate resolutions or further investigation into the app’s underlying technicalities.
Part 2: Causes Behind Constant Pandora App Crashes and Solutions
Several underlying factors might be at play when persistent crashes plague your Pandora app. This section explores these.
Poor Internet Connection
A stable internet connection is pivotal for seamless app functionality. Crashes in Pandora can stem from poor connectivity. Check your internet connection . Ensure you’re connected to a reliable network. Restart your router or switch between Wi-Fi and mobile data to troubleshoot connectivity issues.

Corrupted/Broken Devices
If you notice that all other apps are crashing , your device’s system may also have a problem. In this case, simple app reinstalls/restarts can fix the problem.
Thankfully, Wondershare Dr.Fone solves device corruption leading to app crashes. This powerful toolkit addresses deep-seated issues causing app crashes, such as corruption within the Vivo Y77t device that impacts Pandora’s performance. The Dr.Fone’s System Repair feature acts as a reset button for your Vivo Y77t, resolving underlying system-level problems that cause app crashes.
Here’s how you can use it to resolve the issue of why the Pandora app keeps crashing on Android. First, of course, ensure that your device is connected.
- Step 1: Launch Dr.Fone on your computer. Access System Repair.
safe & secure
4,851,928 people have downloaded it
- Step 2: Choose Android on the next page.
- Step 3: Click Start to initiate Android System Repair.
- Step 4: Check if the Vivo Y77t device details presented onscreen are correct. You may edit them accordingly for any mistakes.
- Step 5: Follow the onscreen instructions to place your phone into Download mode. Then, Dr.Fone will download the firmware.
- Step 6: After downloading, click Fix Now. Then, type in “000000” on the appearing window text box. Click Confirm.
- Step 7: Once finished, click Done. Your Pandora app should not crash once you reinstall it again by now.
Cache Buildup
Accumulated cache data can hamper app performance, leading to frequent crashes. Clear the cache of the Pandora app. Usually, you can see this option under Settings > Apps > Clear Data. Additionally, you can optimize your device’s RAM and storage space by deleting unnecessary files or closing unused apps.

Device Compatibility Issues
Outdated system software can create compatibility issues, causing app instability. Ensure your device’s system software is up-to-date. Check for and install any pending system updates in your device’s settings. Updated software often includes bug fixes and improvements that can rectify compatibility-related crashes.
You can systematically troubleshoot and resolve the issues by addressing the potential culprits behind constant Pandora app crashes, ensuring a smoother and uninterrupted music streaming experience. If the problems persist, contacting Pandora support or seeking professional assistance might be advisable to delve deeper into the technical aspects of the app’s performance issues.
Part 3: What To Do if None of the Fixes Work
If the suggested fixes don’t work, and you still wonder “why does Pandora keeps stopping on Android,” then it might be time to take a look at these alternatives:
- **Consider trying other music streaming apps.**Explore alternative music streaming applications available on the Google Play Store. Several reliable options offer similar services to Pandora, providing an opportunity to continue enjoying music while bypassing the persistent app issues.
- **Contact customer support.**Reach out to Pandora’s customer support for tailored assistance. They may offer specific troubleshooting steps or insights into the app’s technical glitches.
- Consider a new phone. Upgrade to a new phone if the crashes persist despite troubleshooting, and your device is outdated or incompatible. This might help resolve the issue by providing a more stable environment for app usage.
Conclusion
In conclusion, navigating Pandora app crashes on your Vivo Y77t demands a systematic approach. Keeping regular maintenance, such as clearing cache, optimizing RAM, and ensuring timely device updates, can mitigate app crashes and uphold smooth performance. This way, you can resolve the issue of why Pandora keeps stopping.
When persistent issues arise, especially if other apps are affected similarly, Wondershare Dr.Fone emerges as a reliable solution. Its comprehensive toolkit, including System Repair, can effectively address deep-seated issues. By embracing proactive measures and leveraging Dr. Fone’s prowess, users can enhance their device’s performance and ensure an uninterrupted music streaming experience on Pandora and other apps.
safe & secure
3,362,023 people have downloaded it
Also read:
- [New] From Novice to Vlogger Your Guide to Creating a YouTube Chanel
- [Updated] In 2024, Elevate Your Cinematography Mastering Transitions in Kinemaster
- 2024 Approved Top-Ranked Mac GIF Converter
- 3 Easy Solutions to Hard Reset Vivo Y78+ | Dr.fone
- 7 Solutions to Fix Chrome Crashes or Wont Open on Honor X9a | Dr.fone
- Cellular Network Not Available for Voice Calls On Asus ROG Phone 7 Ultimate | Dr.fone
- Easy Guide How To Bypass Realme GT 5 (240W) FRP Android 10/11/12/13
- Fix the Error of Unfortunately the Process.com.android.phone Has Stopped on Infinix Note 30 VIP Racing Edition | Dr.fone
- Full Guide How To Fix Connection Is Not Private on Vivo Y55s 5G (2023) | Dr.fone
- In 2024, Best 3 Software to Transfer Files to/from Your Realme C67 5G via a USB Cable | Dr.fone
- The Ultimate Checklist of Five Essential Game Mouse Features
- Top 7 Emerging Cybersecurity Developments & Forecasts
- Title: Vivo Y77t Camera Not Working Unexpected Error? Fix It Now | Dr.fone
- Author: Ariadne
- Created at : 2025-01-16 19:58:14
- Updated at : 2025-01-20 17:00:43
- Link: https://howto.techidaily.com/vivo-y77t-camera-not-working-unexpected-error-fix-it-now-drfone-by-drfone-fix-android-problems-fix-android-problems/
- License: This work is licensed under CC BY-NC-SA 4.0.