
Vivo Y78t Bootloop Problem, How to Fix it Without Data Loss | Dr.fone
Vivo Y78t Bootloop Problem, How to Fix it Without Data Loss
Have you, like many other users, faced the bootloop Android problem and wondered what exactly is Android boot loop. Well, Android boot loop is nothing but an error that makes your phone switch on itself every time you manually turn it off. To be precise, when your Vivo Y78t does not remain switched off or powered off and starts to boot up automatically after a few seconds, it might be stuck in the boot loop Android.
An Android boot loop is a very common problem and is one of the first symptoms of a soft-bricked device. Also, when your device is experiencing Android boot loop issue, it does not start normally to reach the Home or Locked Screen and remains frozen at the Vivo Y78t device’s logo, Recovery Mode or a lit-up screen. Many people fear losing their data and other files due to this error and thus, it is a very confusing situation to be in.
We understand the inconvenience caused, therefore, here are ways to tell you how to fix the bootloop problem in Android devices without losing any important data.
However, before moving on, let us learn a little about the causes for the Android boot loop error.
Part 1: What might cause the bootloop issue on Android?
Android boot loop error might seem weird and unexplainable but it occurs because of some specific reasons.
Firstly, please understand that it is a misnomer that boot loop error occurs only in a rooted device. Boot loop Android error can also occur in a stock device with the original software, ROM, and firmware.
In a rooted device, changes made, such as flashing a new ROM or customized firmware which are not compatible with the Vivo Y78t device’s hardware or existing software, can be blamed for the boot loop problem.
Moving on, when your device’s software is unable to communicate with the system files during the start-up process, Android boot loop problem may arise. Such a glitch is caused if you have recently updated the Android version.
Also, corrupt App update files may also cause the bootloop Android issue. Apps and programs downloaded from unknown sources bring in a particular type of virus that prevents you from using your device smoothly.
All-in-all, Android boot loop error is a direct outcome of when you try to tamper with your device’s internal settings.
Hence, if you are looking for ways to guide you about how to fix boot loop issue, you will have to revamp the Vivo Y78t device internally by either resetting it or adopting a recovery method.
Read on to know more about how to fix the bootloop error without any data loss when your device suffers from the bootloop Android problem.
Part 2: One click to Fix Android Bootloop without factory reset
If you are trying to figure out how to fix boot loop, the first option you have is the one-click fix to Android Bootloop which involves using the Dr.Fone - System Repair software.
This is designed to repair any data corruption on your device and restores your firmware to its usual working condition.
Dr.Fone - System Repair (Android)
One click to fix boot loop of Android
- #1 Android repair solution from your PC, can fix a wide range of Android system issues, such as boot loop, black screen, etc.
- The software requires no technical expertise, and anybody can use it
- A one-click solution when learning how to fix Android boot loop
- Not require root Android phones.
- Works with most Vivo Y78t devices, including the latest Vivo Y78t phones like S22
- Simple and easy-to-use user interface
4,689,059 people have downloaded it
To help you get started, here’s a step-by-step guide on how to use Dr.Fone - System Repair.
Note: This method can erase data on your device, including your personal files, so make sure you’ve backed up your device before proceeding.
Step #1 Download the Dr.Fone - System Repair software from the website and install it onto your computer.
Open the software and select the System Repair option from the main menu to fix the Android bootloop error.

Step #2 Connect your Vivo Y78t to your computer using the official cable and select the “Android” option from the three menu items. Click “Start” to confirm.

You’ll then need to input the Vivo Y78t device information, such as your carrier info, device name, model, and country/region in order to ensure you’re downloading and repairing the correct firmware to your phone.

Step #3 Now you’ll need to put your phone into Download Mode to remove the Android bootloop.
For this, you can simply follow the onscreen instructions for both phones with and without home buttons.

Click “Next”, and the software will begin downloading the firmware repair files.

Step #4 Now you can sit back and watch the magic happen!
Make sure your computer stays connected to the internet, and your device stays connected to your computer throughout the entire process. Once the firmware has been downloaded, it will be automatically installed onto your mobile device, removing the boot loop Android error.

You’ll be notified when the process is done and when you can remove your device and start using free from the boot loop Android error!
 safe & secure
Part 3: Soft reset to fix Android bootloop issue
When your device is stuck in Android boot loop, it does not necessarily mean that it is bricked. Boot loop might be occurring due to a simpler problem which can be fixed by turning off your device. This sounds like a home remedy for a serious problem but it works and resolves the problem most of the time.
Follow the steps given below to soft reset your device:
Turn the Vivo Y78t device off and take out its battery.

If you cannot take the battery out, let the phone be off for about 3 to 5 minutes, and then turn it back on.
Simply performing a soft reset on your device can help you if you are looking for solutions for how to fix the bootloop issue. This a very useful method as it does not result in any kind of loss in data and protects all your media files, documents, settings, etc.
In case the Vivo Y78t device does not turn on normally and is still stuck in the bootloop Android problem, be prepared to use the troubleshooting techniques given and explained below.
Part 4: Boot into Safe Mode to fix Android boot loop

Booting your Vivo Y78t into Safe Mode is a useful troubleshooting step to fix boot loop issues caused by third-party apps. When in Safe Mode, the Vivo Y78t device will start up with only essential system apps, and any downloaded apps that might be causing conflicts won’t run. Here’s how you can boot your Vivo Y78t into Safe Mode to address the boot loop problem:
Step 1: Power Off Your Device
Hold down the power button until it turns off completely.
Step 2: Access Safe Mode
To enter Safe Mode, follow these steps based on your device model:
- For most Android devices: Press and hold the power button to turn on your device. As soon as the manufacturer’s logo appears, press and hold the Volume Down button until the Vivo Y78t device finishes booting. You should see “Safe Mode” displayed in the bottom left or right corner of the screen.
- Some devices might require slightly different key combinations. Refer to your device’s user manual or perform an online search for the specific method to enter Safe Mode for your model.
Step 3: Observe the Vivo Y78t device
Once your device has booted into Safe Mode, use it for a while to see if the boot loop issue persists. If the boot loop doesn’t occur in Safe Mode, it indicates that the problem is likely caused by a third-party app.
Step 4: Identify and Uninstall Problematic Apps
Now that you’re in Safe Mode, it’s time to identify the troublesome app. Start by uninstalling recently installed apps one by one until the boot loop problem is resolved. After each uninstallation, restart your device normally to check if the boot loop still occurs. Continue this process until you find the problematic app.
Step 5: Restart Normally
Once you’ve identified and uninstalled the problematic app, restart your device normally to exit Safe Mode. Your Android device should now start up without getting stuck in a boot loop.
By following these steps and using Safe Mode to isolate problematic apps, you can effectively troubleshoot and resolve boot loop issues on your Vivo Y78t.
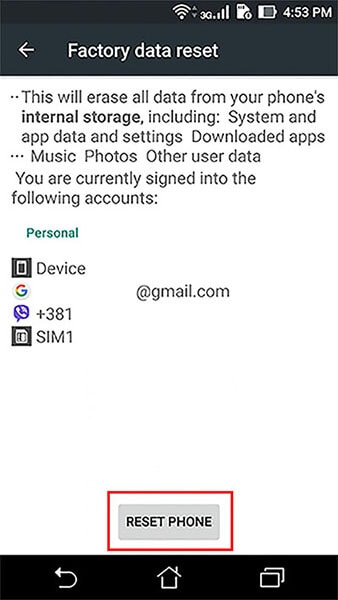
Part 4: Factory reset to fix Android bootloop issue
Factory reset, also known as Hard Reset, is a one-stop solution for all your software resulting in issues. Android boot loop being such problem, can be easily overcome by performing a factory reset.
Please note that all your device’s data and settings will be deleted by adopting this method. However, if you have a Google account signed in on your Vivo Y78t, you will be able to retrieve most of your data once the Vivo Y78t device turns on.
To factory reset your Android boot loop device, you must first boot into the Recovery Mode screen.
To do this:
Press the volume down button and power button together until you see a screen with multiple options before you.

When you are at the Recovery Mode screen, scroll down using the volume down key, and from the options given, select “Factory Reset” using the power key.

Wait for your device to perform the task and then:
Reboot the phone in Recovery Mode by selecting the first option.

This solution is known to fix the boot loop error 9 out of 10 times, but if you still can’t start your Vivo Y78t normally, consider using a CWM Recovery to resolve the Android boot loop issue.
Part 5: Use CWM Recovery to fix bootloop on rooted Android
CWM stands for ClockworkMod and it is a very popular custom recovery system. To use this system to solve the boot loop Android error, your Vivo Y78t must be rooted with CWM Recovery System which basically means CWM must be downloaded and installed on your device.
Furthermore, to use CWM Recovery to fix boot loop on rooted Android devices, follow the steps given below:
Press the home, power, and volume up buttons to launch the CWM Recovery screen.
Note: you might have to use a different combination of keys to enter into Recovery Mode, depending on your device’s model.

Scroll down using” the volume key to select “Advanced”.

Now select “Wipe” and choose to wipe “Dalvik Cache”.

In this step, select “Mounts and Storage” to click on “Wipe” or “Cache”.
Once this is done, make sure to reboot your Vivo Y78t.
This process with successfully fix the Android boot loop error and not cause any loss of data stored on your device stuck in boot loop.
So the bottom line is that boot loop Android issue may seem like an irreparable error but it can be resolved by carefully following the techniques explained above. These methods not only tell you how to fix the bootloop problem but also prevent it from occurring in the future.
An Android boot loop is a common phenomenon with all Android devices because we tend to tamper with our device’s internal settings. Once the ROM, firmware, kernel, etc are damaged or rendered incompatible with the Vivo Y78t device’s software, you cannot expect it to function smoothly, hence, the boot loop error occurs. Since you are not the only one suffering from the Android boot loop problem, be rest assured that the ways, given above, to combat it are recommended by users facing similar troubles. So, don’t hesitate and go ahead to try them on.
safe & secure
6 Fixes to Unfortunately WhatsApp has stopped Error Popups On Vivo Y78t
Ever seen a wheel going on without cog? Similarly, WhatsApp has become the cog of our lives. Be it in the professional era or personal (gossips, oomph) stuffs, it is a crucial engaging kind of application. WhatsApp is the slow poison yet a useful tool used worldwide after call logs or messages. Imagining a day without is enough to put someone off. And if one has recently faced a problem in WhatsApp crashing or not opening, then it is enough to give a heart break. It can be due to Cache memory piled up, storage running out of space, WhatsApp components getting corrupted. In such a case, resolving the problem by using an effective solution is very important! Don’t worry and wander as we will provide impeccable range of fixes to bid bye to WhatsApp stopping problem.
Cause 1: WhatsApp-related Firmware Components went wrong
You should start fixing the WhatsApp crashing issue with fixing the Android firmware. This is because the Android firmware components are many times the hidden culprit behind the problem of why a particular app stops working. And to fix these components in one click, you need Dr.Fone - System Repair (Android). It is one of the safest tools around in the market and works efficiently with Android system issues. It promises to bring your device back to normal and healthy state. Here are the benefits you get with this amazing tool.
Dr.Fone - System Repair (Android)
Android repair tool to fix firmware component issues
- Fixes all kinds of Android system issues with ease
- Supports 1000+ Android device in a hassle-free way
- Really easy to use and free from any virus infection
- One needn’t to be a tech pro to use this tool
- Can be downloaded for free and repairs the Vivo Y78t device in few easy steps
4,388,871 people have downloaded it
Step 1: Download Dr.Fone Tool
To start repairing, go to the official website of Dr.Fone - System Repair (Android) and download it. Install it and then open the tool on your PC. To proceed, look for the “System Repair” tab and click on it.
Step 2: Choose the Right Tab
As the next step, you need to take the help of USB cable and then plug your device to the computer. Once connected appropriately, make sure to click on the “Android Repair” tab from the left panel.
Step 3: Enter Details
Next will be the information screen. Simply enter the model, brand and other details. Check everything once and click on “Next”.
Step 4: Enter Download Mode
Subsequently, you need to go along with the onscreen instructions. This will boot your device in the download mode. The step is necessary to download the firmware. When you follow the steps, you need to click “Next”. The program will then start downloading the firmware.
Step 5: Repair Android
Now, you just have to sit back and relax. The program will begin to repair your device. Wait until you get the notification for completion.
Cause 2: Cache conflict
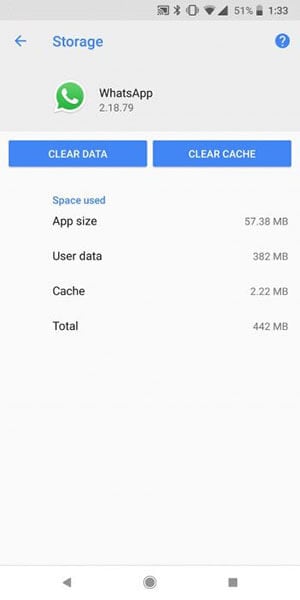
The purpose of Cache in a device is to keep the track of frequently used data and information of an application. And when there are the files or data that are corrupted in the cache, this might raise the “Unfortunately WhatsApp has stopped” error. Therefore, you need to clear the WhatsApp data if the above method went futile. Here are the steps.
- Open “Settings” and go to “App Manager” or “Apps & Notifications” or “Applications”.
- Now, from the list of all applications, choose “WhatsApp”.
- Click on “Storage” and tap “Clear Data”.
Cause 3: WhatsApp components corruption
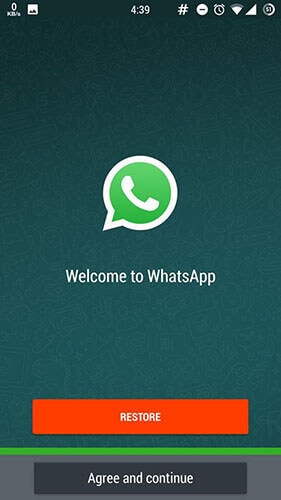
A lot of times, the WhatsApp crashes due to the corrupted components of WhatsApp. In such case, all you need to do is uninstall and install the WhatsApp again. This is how you do it.
- Uninstall the app right away from your Homescreen or from the “Settings” > “Applications” > “All” > “WhatsApp” > “Uninstall” (for some phones).
- Go to “Play Store” and search “WhatsApp” on the search bar.
- Tap on it and start downloading followed by installing it.

Cause 4: Not Enough Storage on your Phone
Insufficient storage could be the other reason why for your WhatsApp has stopped. When your device starts running out of space, some apps may not be able to operate properly for their functions take up space in the Vivo Y78t device. And probably WhatsApp is one of them. If the space is the case with you, we suggest you the following two things to go with.
- Firstly, go to Settings and check the storage. Make sure it is enough i.e. at least 100 to 200MB.
- Secondly, start eliminating the apps that are no longer needed. This will indeed create more space in your device and will let your WhatsApp wok properly.
Cause 5: Gmail Account no longer valid or hacked
It is a well-known fact that Android device and Gmail account go hand in hand. To run the Vivo Y78t device smoothly, it is always asked to enter your Gmail address for further configurations. And when WhatsApp stops on your device, the reason might be your Gmail account. Most probably it is not valid now or maybe hacked. If this is the case, we suggest you to log out and log in with some another Gmail account.
- Log out by opening “Settings” and tap on “Accounts”.
- Choose your Google account and tap on “REMOVE ACCOUNT”.
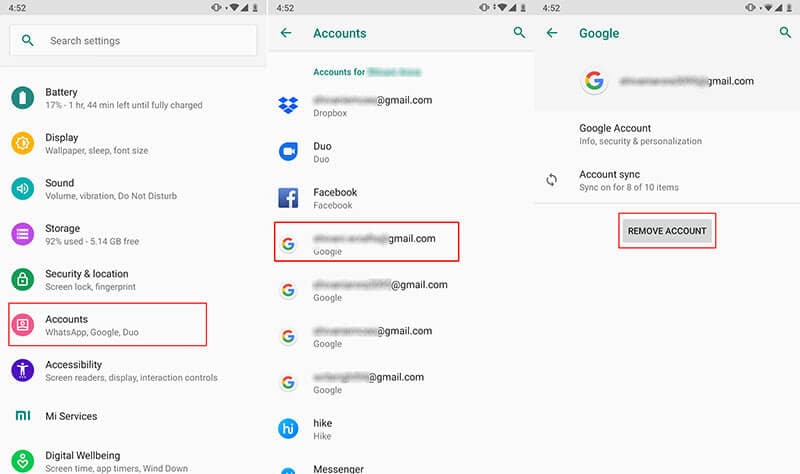
Now, you can login again and check if WhatsApp works or not.
Cause 6: WhatsApp Incompatible with your Android Phone
If still nothing works and your WhatsApp keeps stopping, most likely the reason is the incompatibility of your WhatsApp with your device. In such case, the thing that comes to your rescue is mod WhatsApp version like GBWhatsApp. It is a mod app which is similar to WhatsApp but in a more modified way. With this, a user gets more functionalities and customizable settings when compared to WhatsApp.
If you’re wondering how you can find this app and install, you should keep reading.
To find GBWhatsApp:
Since you can look for this mod app on the Play Store, here are some of the other secure places from where you can download apk file for this GBWhatsApp. Note down these websites to get GBWhatsApp downloaded if WhatsApp has stopped.
- Latest Mod APKs
- UptoDown
- Android APKs Free
- Soft Alien
- OpenTechInfo
To Install GBWhatsApp:
Now that you have decided where to download the apk file, these are the following steps that you should follow to install it on your phone. Please have a look:
- Firstly, open “Settings” on your device and go to “Security”. Turn the “Unknown Sources” option. Doing this will let you install the apps from other locations than Play Store.

- Using the browser on your phone, download the app from any of the aforementioned website.
- Launch the GBWhatsApp apk and follow the onscreen instruction in order to install. You need to go in a similar way as you do in mormal WhatsApp app.
- Simply proceed with entering your name, country and contact number. The app will verify your account. You are now ready to use this app.

How to Fix Unfortunately, Contacts Has Stopped Error on Vivo Y78t
Have you recently noticed a message stating “Contacts has stopped”? This is enough to take away all your peace. As, our native contacts app stashes all our useful contacts which are time and again needed by a user. It’s malfunctioning is enough to give us chills. But, why the Vivo Y78t or any other Android device incurs such problems?
It can occur while you launch the app or while you’re in the app already finding the required contact or when any other application is trying to gain access to it. So, to rage a battle with this issue, you need to seek help of some powerful methods in killing down the issue of contacts app crashes. And, the best part is that you’ve secured yourself by reaching the right place. We will be taking an in-depth discussion on several methods that may prove to be helpful. Let’s read them up here now.
Part 1: Get Android system fixed in one click
We’re always in search of a method that provides handy solution in a quite speedy and hassle-free manner. There are hundreds of tips and tricks for the same. You never know the possibility of firmware being the major drawback. No amount of manual methods can beat the performance of Dr.Fone - System Repair (Android).It is capable of providing 100% solution to any kind of issues, your phone gets troubled with. It is designed with the technology of combating the problem of black screen of death, app crashes and several other issues. In just a single-click, ward off the issue and free your device with errors
Dr.Fone - System Repair (Android)
Fix Contacts app crashing on Android in one click
- Incorporates with 1-click technology to resolve any issues occurring in your Vivo Y78t. Black screen of death, app crash, system crash, faulty issues etc.
- fone – Repair (Android) interface is extremely simple for users and lays functionalities aptly.
- One of its kind software with highest success rate in the market.
- Fully compatible with all kinds of Android phones, models, as well as the popular carrier.
- It provides users with 24 hours customer care service to resolve queries.
3,016,434 people have downloaded it
In this tutorial, we will learn the methodology of addressing the contacts keep stopping problem and gain triumph over it.
Step 1: Load program and draw connection of device
Download Dr.Fone - System Repair (Android) on PC. While program installs, use USB cable to connect device with system. From interface, tap on “System Repair” main window.
Step 2: Opt for Android Repair option
You’ll be directed to the “System Repair” screen where you have to opt for “Android Repair” options appearing over the left panel of the program. After that, do not forget to press “Start”.
Step 3: Key in device information
From following screen, fill the fields of “Brand”, “Name”, “Model”, “Country” and several other parameters. Then, tap on “Next” option to proceed further.
Step 4: Download Firmware package
Just follow the on-screen steps for booting your Vivo Y78t into download mode. Then, hit the “Next” button to proceed with downloading the most suitable firmware package for your Vivo Y78t.
Step 5: Repair Android phone
Once the software downloads, the program will automatically repair any issues irking over your phone. Now, your phone is all free from contacts error.

Part 2: 9 Common ways to fix “Unfortunately, Contacts Has Stopped”
2.1 Restart Android system
Our response to any minuscule issue is straightaway restarting phone. This helps in clearing out any problem that might have disrupt the functioning of phone. So, to fix the problem of “Contacts app won’t open”, you too can try out your hand in this method.
- Get hold of your Android system and long press the power button.
- This will fadeout the main screen and showcase several options from where you’ve to tap on “Reboot/Restart” mode.
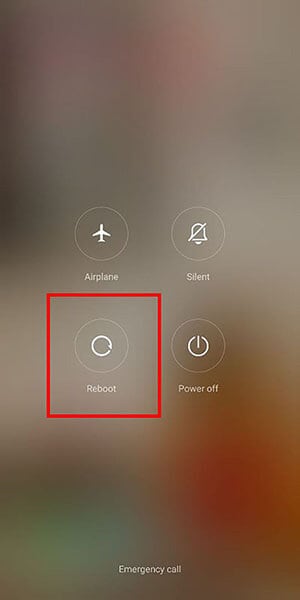
Now, your device will quickly reboot the Vivo Y78t device. Once, the Vivo Y78t device regains its normal state, check whether the issue is coming again or not.
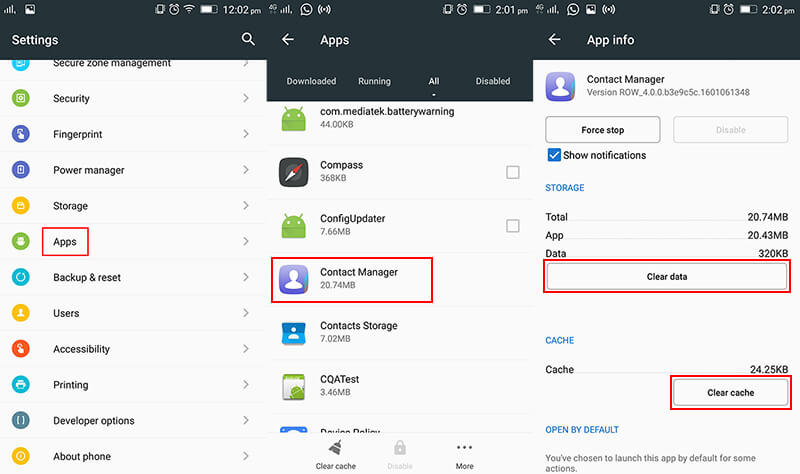
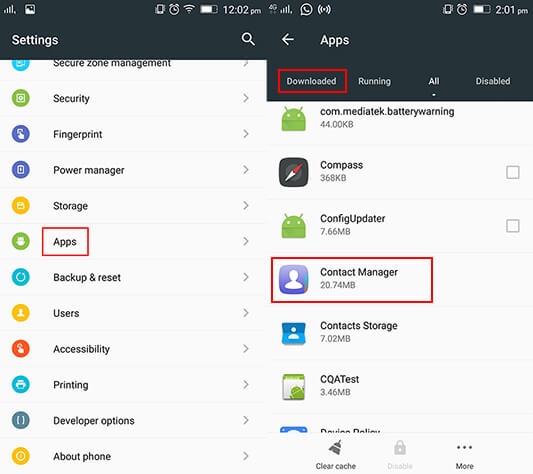
2.2 Clear cache and data of Contacts app
The cache memory basically stashes the copies of the concerned application. It is indeed a streak of copies of the desired app storing information and incurring additional space on the storage. This might be the reason why the contact app crashes rapidly on your Vivo Y78t. Hence, it can prove to be a good remedy for this problem. Just follow down the steps mentioned below-
- First of all, go to “Settings” application from the app drawer or from the notification panel.
- Now, surf and select for “Applications” or “Apps & notifications”.
- Here, you need to browse for “Contacts” app and open it.
- On “Contacts” app, just tap on “CLEAR CACHE” and “CLEAR DATA” button. This will prompt the cache memory to be cleared.
2.3 Wipe cache partition
As we know the cache memories are the temporary files build by the firmware. These are of little importance as they are bound to become a bit more corrupted in nature. And sometimes, may indirectly become a hurdle for the working of contacts app. It is good if the Vivo Y78t device is cleared off from the caches. Instead of manually wiping down the cache memory, we will understand how to clear off the cache partition in the following steps.
- From device, just power off your device. Then, press the “Volume Down + Power” button with “Home” combinations together.
- In a moment’s time, lose fingers from the “Power” button but do not release fingers from “Volume Down” and “Home” buttons.
- Once you view the “Android System Recovery” screen, just lose the “Volume Down” and “Home” buttons.
- Over the options available, just opt for “wipe cache partition” by tapping the “Volume down” button until the desired option is highlighted.
- Finally, push the “Power” key to give consent to the selection.

- After, the process is through there will be an option for “Reboot System Now”. Tap on it and restart the Vivo Y78t device.
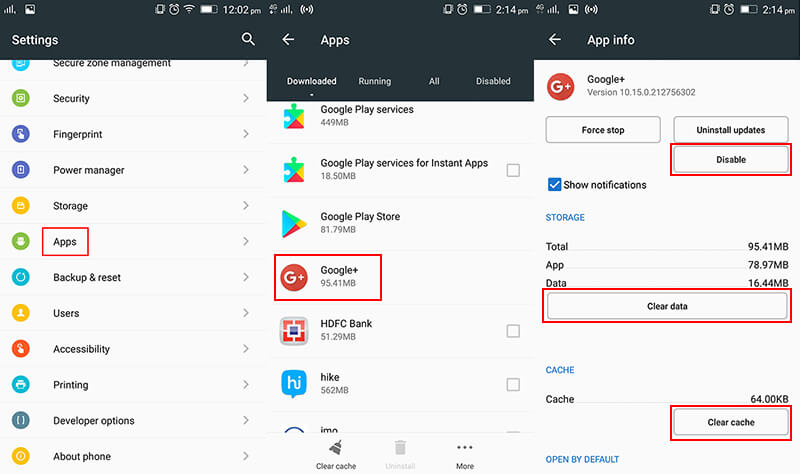
2.4 Disable Google+ app
The root cause for detecting any problem is not very easy. You never know the overloading of Google + application might have directly impacted contacts app crashes. To resolve it, disabling it may prove to be a helpful solution. Here is the quick reference for disabling Google+ application.
- First of all, visit “Settings” from your Vivo Y78t.
- In “Settings”, visit the “Application Manager” or “Applications” menu and browse for “Google +” app.
- From the application main page, you can choose to do either of the methods:
- Either, completely disable the application to work by pressing on “Force stop” or “Disable” feature.
- Or, brush away the unnecessary cache piled up on your storage by using “Clear Cache” functionality.
There will be a prompt stating that the application may misbehave. However, you must disable the feature and check whether it worked out for you or not.
2.5 Update your device software
Many a times, we skip updating our device software thinking it is of less importance. In fact, one must not miss out the updates that occurs in phone. As, without the updates, the scope of some applications are affected to some extent. For its better functioning and avoiding issues like “contacts keep stopping”, here is how you should update device software.
- First and foremost, head on to “Settings” menu. Over there, click on “About Device”.
- There, you need to tap over “Software Update”.
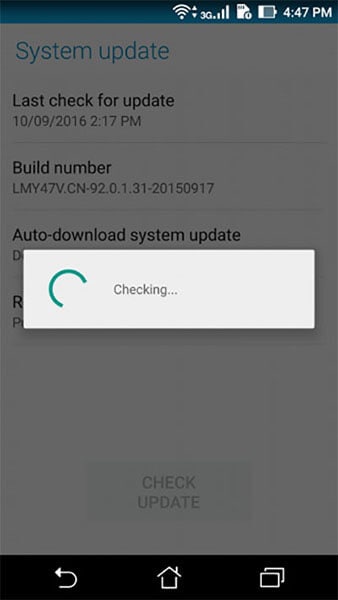
The device will now check whether there are any updates available for your device. If yes, then update application right away.
2.6 Reset App Preferences
As stated, the malfunctioning of contacts can be due to be any unexpected reason. Hence, users can opt for resetting app preferences. This may prove to be helpful in brushing away the issue of “Contacts app won’t open”.
- Launch “Settings” app and surf for “Apps” or “Applications” option on your Vivo Y78t.
- Just, tap over the three dots appearing at the upper right section and then tap on “Reset app preferences”.
- At last, just select “Reset default apps”.

2.7 Delete voicemail
Do you happen to exchange voicemails quite often? It can trigger to be the reason for contact app crashes. If your device happens to have a bulk of voicemails, you must get rid of them sooner or later. As, these might standout to be the prime reason for contacts stopping on Vivo Y78t. If you’re unaware about the procedure of removing all kinds of voicemails, you can proceed to make use of the following steps.
- Start with, launching the “Google Voice” app.
- From there, duly opt for “Voicemail”.
- Just click on the press menu option and at last select “Delete” option.
2.8 Uninstall the downloaded apps
Some applications contain some unwanted advertisements and some elements of malware. This can be enough for disrupting the functionality of the built-in contact app won’t open. It is crucial for your phone to be detoxed from such elements. You need to manually scrap off such applications. Do, ensure to download the application from the genuine source for future use.
- On your Vivo Y78t, just go to “Home” screen and tap on “Apps” icon.
- Then, tap on “Settings” icon followed by going to “Applications” or “Apps & Preferences” menu.
- After that, tap on “Menu icon” which will showcase the apps installed on device.
- Simply, open the app and hit the “Uninstall” button to brush away that app. Repeat the same with other application(s).
Now, check whether you’ve fought the battle with the problem or not.
2.9 Reset to Factory Settings
Last but not least, if all the methods falls flat to resolve the issue of contacts app won’t open. Then, it might be your device has some internal problem. This can be any software crash which might not be fixing with the aforementioned steps. That is where reset to factory settings may prove to be a good option. With this method, your phone will be cleared of all the components, settings and everything present in it. Here are is the comprehensive tutorial for biding bye to the problem of contacts app won’t open.
Note: Do ensure to take a backup of all the data available in your device. As, we don’t want you to regret afterwards.
- Just go to “Settings” and surf and select “Backup & Reset” option.
- You need to toggle on the option for performing the backup on your Google account.
- Then, tap on “Reset” button and then tick mark the option for resetting your phone.
Also read:
- [Updated] Top 10 Innovative AI-Based Podcast Name Generators for 2024
- [Updated] Yuneec's Breakthrough in High-Res Aerial Vision
- 11 Proven Solutions to Fix Google Play Store Not Working Issue on Vivo S17 Pro | Dr.fone
- 2024 Approved In-Depth Analysis Logitech's 4K Professional Cam
- App Wont Open on Your Oppo Reno 11 Pro 5G? Here Are All Fixes | Dr.fone
- Bricked Your Vivo S17e? Heres A Full Solution | Dr.fone
- How To Enable USB Debugging on a Locked Xiaomi Redmi 12 5G Phone
- In 2024, Ultimate Energy Kits for Hero5 - Official & Alternative Products
- Secure Specific Folders in Windows 10: Top Two Techniques
- Stuck at Android System Recovery Of Oppo A18 ? Fix It Easily | Dr.fone
- The Anticipation Surrounding Windows 11’S Moment #22H2
- Want to Uninstall Google Play Service from Oppo A58 4G? Here is How | Dr.fone
- What To Do When Asus ROG Phone 8 Pro Has Black Screen of Death? | Dr.fone
- Title: Vivo Y78t Bootloop Problem, How to Fix it Without Data Loss | Dr.fone
- Author: Ariadne
- Created at : 2025-01-17 18:26:19
- Updated at : 2025-01-20 18:10:25
- Link: https://howto.techidaily.com/vivo-y78t-bootloop-problem-how-to-fix-it-without-data-loss-drfone-by-drfone-fix-android-problems-fix-android-problems/
- License: This work is licensed under CC BY-NC-SA 4.0.