
Want to Uninstall Google Play Service from Nokia C12? Here is How | Dr.fone
Want to Uninstall Google Play Service from Nokia C12? Here is How
In this article, you will learn the pros and cons of uninstalling Google Play services, as well as a free root tool to help you do this.
Acts as a one-stop destination to download various kinds of apps from the Play Store. The Play service also provides a way to manage these apps without much hassle. From uninstalling to updating an app, all of this can be done with Google Play service. Nevertheless, there are times when users wish to uninstall Google Play services. To start with, it takes a lot of storage and makes it pretty tough for users to manage their devices. To help you, we will let you know how to uninstall Google Play Store in this informative post.
Part 1: Reason you might want to get rid of Google Play Service
Before we proceed and discuss different ways on how to update Play Store after uninstalling updates, it is important to cover the basics. We have heard plenty of users who wish to uninstall Google Play services, but are not sure of the repercussions. One of the main reasons is that it consumes a lot of space on phone’s storage. Not just that, it only consumes plenty of battery as well.
If your device is giving the insufficient storage warning, then you need to start by clearing your phone’s data. It is observed that the Google Play Service accumulates most of the data in a device. This leads to users looking for different ways to how to uninstall Google Play Store.
Part 2: What will it affect to uninstall Google Play Service?
If you think that Google Play Service only provides a platform to download new apps, then you are wrong. It provides several other functions that might alter the way you use your smartphone. It is linked with other essential Google services as well, like Google Maps, Gmail, Google Music, etc. After uninstalling the Google Play Service, you might face trouble using various essential apps.
Furthermore, it might tamper with the overall functionality of your device as well. For instance, you could encounter network issues, messaging problems, app crashing, and more. Since the Play Service is closely associated with Android system, it might have a prominent effect on your phone. If you have a rooted device, then you can easily install custom ROM and resolve these issues. Though, for a non-rooted device, overcoming these problems could be a big hurdle.
Part 3: How to disable Google Play Service?
By now, you already know all the repercussions of getting rid of Google Play Services permanently. Before you learn how to update Play Store after uninstalling updates, be sure whether you wish to uninstall Google Play Services or not. You can also choose to simply disable the services as well. If you face any severe issue afterward, then you can always enable the services manually.
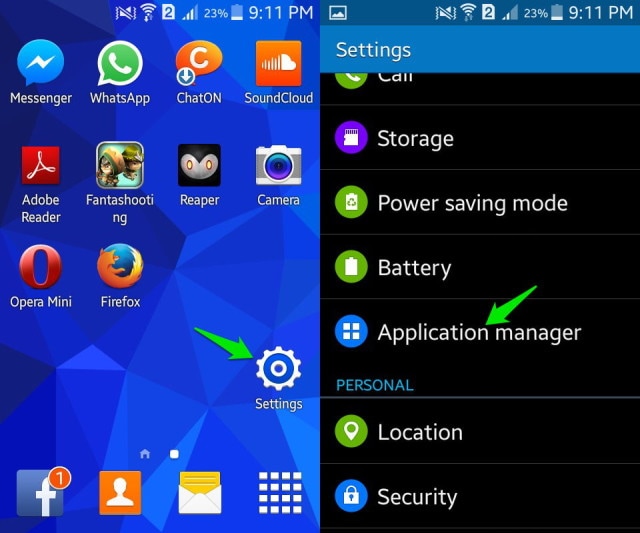
To disable the Google Play Services, just go to your phone’s Settings > Applications > All and open Google Play Services. You will get to know about the app’s detail and a few other options here. Just tap on the “Disable” button. It will generate another pop-up message. Confirm it by tapping on the “Ok” button. This will disable Google Play Services on your device. Later, you can follow the same drill to enable it as well.

Now when you know how to uninstall Google Play Store on your device, you can easily customize it. Get rid of any kind of problem you are facing due to lack of storage or battery issues related to Google Play services after following these instructions. Feel free to drop a comment below if you face any setback while following this tutorial.
How to Fix Android App Not Installed Error on Nokia C12 Quickly?
App not installed on Android is no more an unknown Error Code during Application installation as many people experience it on a day-to-day basis. An “Application not installed” error message usually pops up when you are trying to download and install an App with a .apk file extension from somewhere other than the Google Play Store. The error is very confusing at first but makes sense when you realize that this unknown Error Code during Application installation is neither a software issue nor a hardware problem. It is a direct outcome of what you do with your device. Yes, you heard that right. Your faulty actions can cause Android App not installed error.
What to do when trying to install the Android APK it says “app not installed”? It is terrible that you can’t install App on your device. But in this article, you will know more about the causes behind this error and the best ways to fix it, read on, here is all you need to know.
Part 1: Common reasons for the “Android App not installed” error
You may ask: Why can’t I download apps on my Nokia C12? Understanding the underlying causes of the “Android App Not Installed” error is crucial for resolving the issue effectively. So, what are the reasons for Android App not installed error? Given below are a few reasons:
1. Insufficient storage
Android software and if data such as photos, videos, music, messages, apps, contacts, emails, etc are stored in the internal memory there is not adequate storage left for another App, leading to Android App not installed error.
2. Corrupted/Contaminated App file
When you do not download Apps from the Play Store and choose another platform to do so, App files are usually corrupted and hence cannot be installed on your device smoothly. You should be doubly sure of the source from where you download an App, check its extension name, and make an effort not to install contained files.
3. SD Card not mounted in the Nokia C12 device
At times your phone could be connected to your PC or another electronic device that can access the SD Card from your device. In such situations when you install an App and choose to save it to your SD Card, you will see Android App not installed error because the App cannot find the SD card as it is not mounted in your device.
4. Storage location
You must be aware that certain Apps work their best when stored in the Nokia C12 device’s internal memory, whereas others need to be located on an SD Card. If you do not save the App in an appropriate location, you will find that the App isn’t installed because of an unknown Error Code.
5. Corrupt storage
Corrupted storage, especially a corrupted SD Card, is known to cause the Android App isn’t installed error. Even the internal storage can get clogged due to unnecessary and unwanted data, some of which might contain an element that disturbs the storage location. Take this issue seriously as a corrupted SD Card and even clogged up internal memory can put your device in danger.
6. Application Permission
Software operations running in the background and App Permission are not new concepts. Such errors can also cause the Unknown Error Code during App installation.
7. Incorrect file
If you already have an App installed but download another variant of it having a distinct signed or unsigned certificate can also make the Android App not installed error pop-up. This sounds technical, but this and all the other reasons listed above can be tackled by you.
The Unknown Error Code during Application installation can occur due to any one or more of the reasons stated above. So read them carefully and understand them well to avoid such glitches in the future.

Part 2: One-click to fix App not installed on Android error
So App not installed on your Nokia C12 or tablet? The most horrible part is that this issue may come out of the corruption in the system files. In this situation, Android apps won’t be installed no matter what measures you take. Android system repair is the only effective solution to deal with this issue.
Android system repair used to require high technical skills. But most of the users know little about technical things. Well, worry not! Dr.Fone - System Repair (Android) allows you to repair Android easily, that is, complete the fix with just one click.
Dr.Fone - System Repair (Android)
A powerful tool to fix the “Android App not installed” error in one click
- Fix all Android system issues like Android App not being installed, the system UI not working, etc.
- One-click to fix Android App not installed. No technical skills are required.
- Support all the new Nokia C12 devices, etc.
- On-screen instructions are provided to prevent any misoperation.
3981454 people have downloaded it
Note: Getting your Android system repaired may erase the existing device data. It is recommended that you should back up your Android data before starting the Android repair.
The following steps illustrate how to fix the “Android App not installed” error in one click:
- Install Dr.Fone on your Windows. After that, launch it, and click “System Repair”. Connect your Android to the computer.

- Select the “Android” option and click “Start”.

- Select device information, such as brand, name, model, country, etc., from each field, and type “Next”.

- Follow the on-screen instructions to boot your Android in download mode, and allow the tool to download the firmware to your device.

- After the firmware is downloaded, the tool will start to repair your Android, hereby fixing the “Android App not installed” error.

 safe & secure
Part 3: How to fix App not installed error on Android
We understand that it can be a tricky situation to be in when Android App not installed error pops up, but what if we tell you can get rid of it in easy and simple steps? Yes, there is!
#1. Delete unnecessary files/Apps
Insufficient storage can prevent the app from being installed. Make some storage space on your device by cleaning unwanted data and deleting extra media and other files. You can also get rid of heavy Apps by:
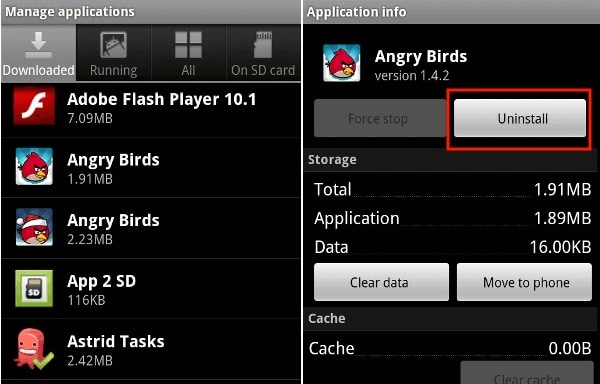
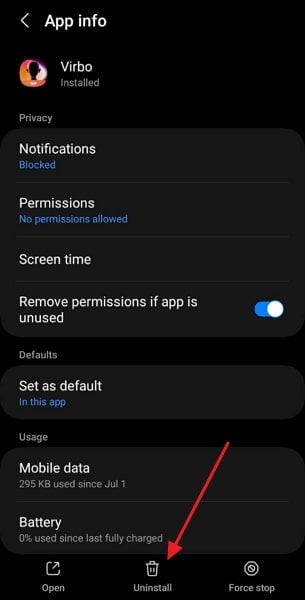
Visiting “Settings” on your device. Then select “Manage apps”, “Application Manager” or “Apps” (varies based on device model or version) from the list of options before you.

Now select the App you wish to uninstall and wait for the App Info screen to open, then click on “Uninstall” as shown in the screenshot.

You can also uninstall the unnecessary application on the home screen, just long-press the app you want to uninstall until you see the “uninstall” icon. Click “Uninstall”, then, you need to click “OK” to confirm the uninstall process.

#2. Use only Google Play Store
As you are all aware, the Play Store is specially designed for Android software and contains only trusted and safe Apps. It is often known as the “Android Market” because it is loaded with different types of Apps to stiffly all your needs so that you don’t have to rely on other third-party sources to purchase/install Apps.

#3. Mount your SD Card
Another remedy for Android App not installed error is to make sure that the SD card inserted in your device is not inaccessible.

To check the same:
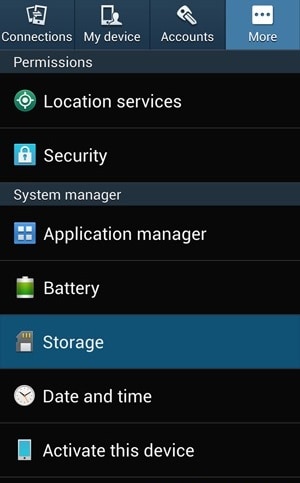
First, disconnect your Nokia C12 from your PC and then visit “Settings” on your Android and select “Storage” from the options that appear. Finally, click on “Mount SD Card” at the Storage Info screen.
You can now restart your device and try to install the app now, it should work!
#4. Choose App location wisely
It is advisable to not tamper with the App’s location and let the software decide where it needs to be placed. As far as possible, let the Apps be in your device’s internal memory.
#5. Format SD Card
The chances of your SD Card being corrupted are very high. You can format it either while it is in your device or externally.
Now to Clean up your SD Card, simply visit “Settings” and select “Storage” and tap on “Format SD Card” and mount it once again to use it smoothly.

#6. App Permissions
You can reset App permissions to combat the Android App not installed error by Visiting “Settings” and then selecting “Apps”. Now access the Apps menu and hit “Reset App Preferences” or “Reset application permissions”. This will allow third-party apps to get installed on your device.
#7. Choose the correct App file
Make sure to always download an App file only from a trusted and safe source to avoid any errors during installation.
#8. Reboot your device
Finally, if nothing else works, restart your device to end all operations which could be causing the said error. To reboot, just press the power button till you see a pop-up. Select “Restart” and wait for your device to reboot.

Conclusion
Encountering the “App Not Installed” error on Android can be frustrating, but by understanding the causes and implementing the appropriate solutions, you can overcome this issue. We saw that Android App not installed error can be fixed quickly if you keep in mind the tips given in this article. However, please ensure that you follow each instruction carefully to avoid any further goof up.
safe & secure
9 Solutions to Fix Nokia C12 System Crash Issue
Android crash, better known as Android system crash is not a recent issue and has troubled many users in the past as well. It means when your device crashes suddenly and refuses to turn on again or when your device freezes and becomes unresponsive. It may also happen that your Nokia C12 crashes abruptly but boots up normally only to crash again after a few minutes or hours. Android Crash sounds like a very serious problem and something that could damage your device or permanently destroy the software, but Android system crash can be dealt with easily. Just in case you suffer from an Android crash and want to know how to fix the Android system crash issue, rest assured that this problem is fixable. There are various ways to tackle the situation, to be discussed further, and you may choose the one that best suits you.
In this article, we will also talk about a unique technique to retrieve the data from your device on which Android system crash issue occurs. So let’s go ahead and read on to know more to fix the Android crash error.
Part 1: How to rescue data the Android system crashes?
When you encounter an Android system crash, before looking for solutions to fix it, make sure you retrieve all your data and information stored on your device. This might sound tedious but a very important step indeed.
Dr.Fone - Data Recovery (Android) is currently one of the most popular tools to retrieve data from not only broken or damaged, locked devices, and unresponsive devices but also from devices that face an Android system crash. You may try the software for free for scanning the data to understand its work. Dr.Fone’s Data Extraction tool not only retrieves and back-up contacts and messages but also your photos, videos, audio files, WhatsApp, docs, call logs, and other file folders. It is also equipped to retrieve data from the Nokia C12 device’s internal memory as well as Google drive.
Dr.Fone - Data Recovery (Android)
World’s 1st data retrieval software for broken Android devices.
- Recover data from broken devices or devices that are damaged in any other way such as those stuck in a reboot loop.
- Highest retrieval rate in the industry.
- Recover photos, videos, contacts, messages, call logs, and more.
- Compatible with Nokia C12 devices.
3,623,313 people have downloaded it
You may follow the steps given below to rescue your data from crashed Android devices.
1. Download and install the software on your PC. Run the software and then select the Data Recovery feature. Using a USB, connect your Nokia C12 to the PC.
2. Select “Android” > “Recover from Broken Phone” in the lower right corner.

3. Choose the “Touch screen not responsive or cannot access the phone” to continue.

4. You will now see device options before you. Select yours and move on to feed in your device name and model details.

5. Now press the volume down, power, and home button on your device together to boot the phone in Download mode.

6. As long as your phone is in Download mode, the software will start to analyze phone data.
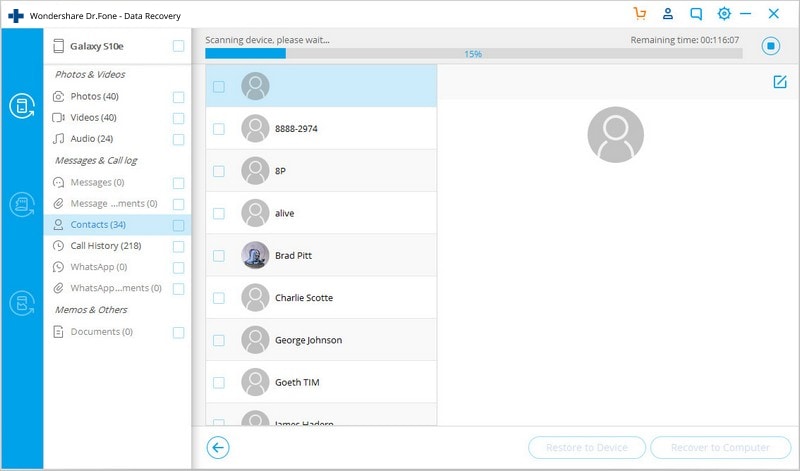
7. Finally, the process will take a few minutes to scan and display your phone data. Select “Recover to Computer” to retrieve all data on your PC as a backup.

Using Dr.Fone Damage Extraction software is intuitive and very safe. It prevents data loss and allows you to adopt various ways to recover your device from the Android system crash issue.
 safe & secure
Part 2: Why does my Android phone system keep crashing?
Encountering a persistent issue like the Android phone system constantly crashing can be highly frustrating and disruptive. This part delves into the underlying causes of this problem. By understanding these reasons, you can take informed steps to troubleshoot and rectify the issue, ensuring a smoother and more enjoyable smartphone experience.
- Software Glitches and Bugs
- Incompatible or Poorly Optimized Apps
- Outdated Operating System
- Corrupted System Files
- Malware and Security Threats
- Hardware Overheating
- Physical or Hardware Issues
A crashing Android phone system can be attributed to a variety of factors, ranging from software glitches and compatibility issues to hardware-related problems. Keep reading to get it solved!
Part 3: Restart your Nokia C12
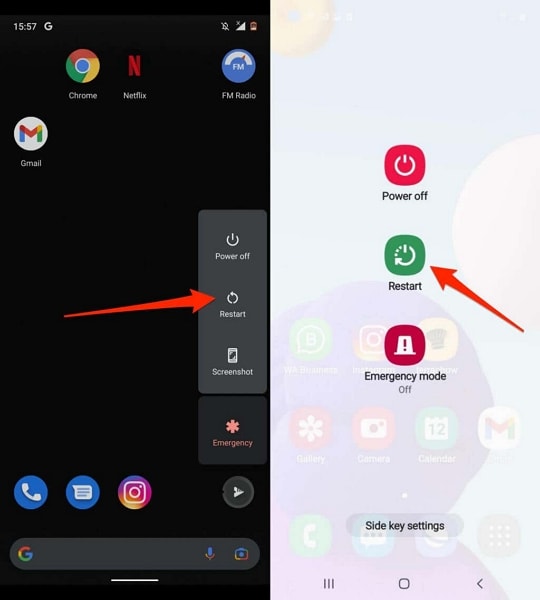
Once you have successfully retrieved your data, consider solving the Android crash issue as soon as possible. Before you redirect to a proper solution for repairing your Nokia C12 system, you can try restarting your device as a quick remedy. Restart the Android device to clear temporary system data and potentially resolve any software glitches causing the crash, which can be done as follows:
Instructions: Hold your Nokia C12’s “Power” button on the side of the phone. As the following window appears on the screen, select the “Reboot” option to restart the Android device successfully.
Part 4: Shut down unnecessary running apps
Another quick solution to avoid Android devices crashing is to shut down unnecessary apps running in the Nokia C12 device’s background. To cater to that, you need to try out the following steps as a remedy to shutting down unwanted applications:
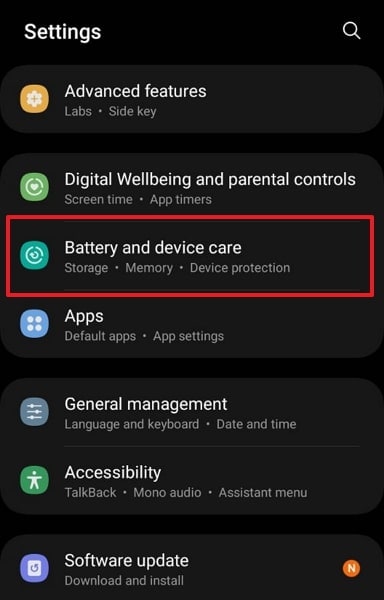
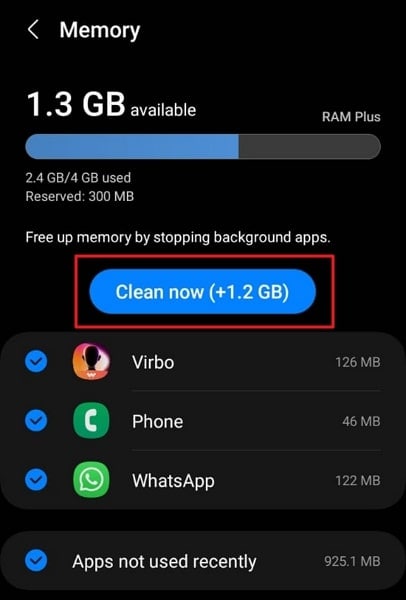
Step 1: Open the “Settings” of your Nokia C12 and continue to the “Battery and device care” section from the available options. Continue to the “Memory” section on the next window to lead to the applications taking up space on your Nokia C12.
Step 2: As you progress further, you need to select the “Clean now” button to shut down all unnecessary background applications running on the Android.
Part 5: Uninstall incompatible Apps to fix Android crash issue
If your Android system crash takes place frequently but the Nokia C12 device turns on normally after that, there is a chance that some Apps may be causing the problem. Unnecessary and large App files burden the Nokia C12 device system and force it to crash every now and then. Make sure you download, install and store only those Apps which are fully compatible with your Android system. DO NOT download Apps from other unknown sources and use only Google Play store for the purpose. All other incompatible Apps must be deleted to prevent them from tweaking your software.
To uninstall unwanted and incompatible Apps, please follow the steps below.
1. Visit “Settings” and search for “Application Manager” or “Apps”.
Select the App you wish to uninstall. From the options that appear before you, click on “Uninstall” to delete the App from your device.
You may also uninstall an App directly from the Home Screen (only possible in certain devices) or from the Google Play Store.
Part 6: Check Android storage and free up space
If you are constantly facing issues of your Nokia C12 crashing, there is a possibility that your device’s storage is full. The need to free up space arouses the need to know about the potential steps for checking storage and cleaning up space, which is discussed as follows:
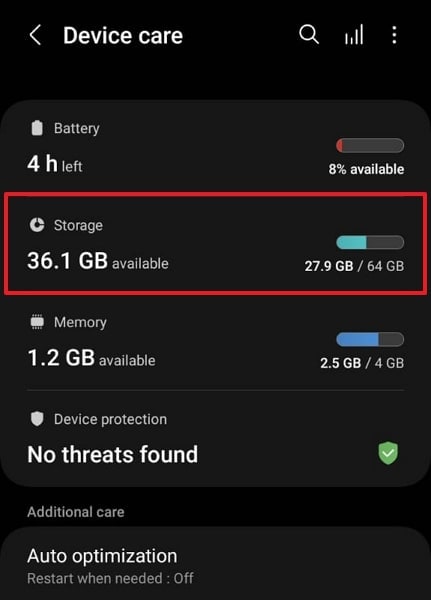
Step 1: You need to navigate into “Settings” and look for the “Battery and device care” section. As you lead next, select the “Storage” option to check the Android storage and see how it is segregated.
Step 2: As you navigate to the next screen, you can free up space by removing the applications from your Android. For that, tap on “Apps” to open a section containing the list of applications installed on the Android.
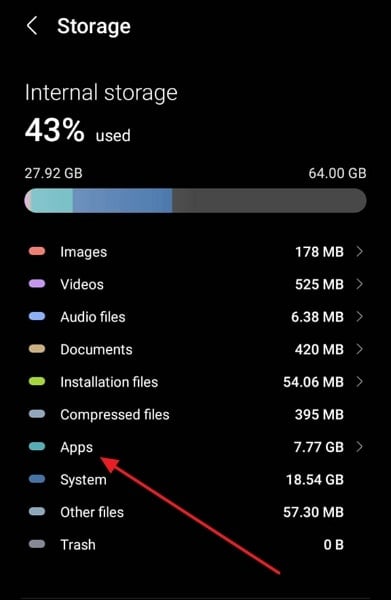
Step 3: Go through the list of applications and select any app you want to remove. As you navigate next, select “Uninstall” to lead to removing the app from the Android device.
Part 7: Clear cache partition to fix Android crash issue
Clearing cache is a good idea because it cleans your device and reduces the burden on the Android software and gives it enough space to function normally and carry out its operations.
In case the Android system crash issue is temporary, follow the steps given below to clear your device’s cache:
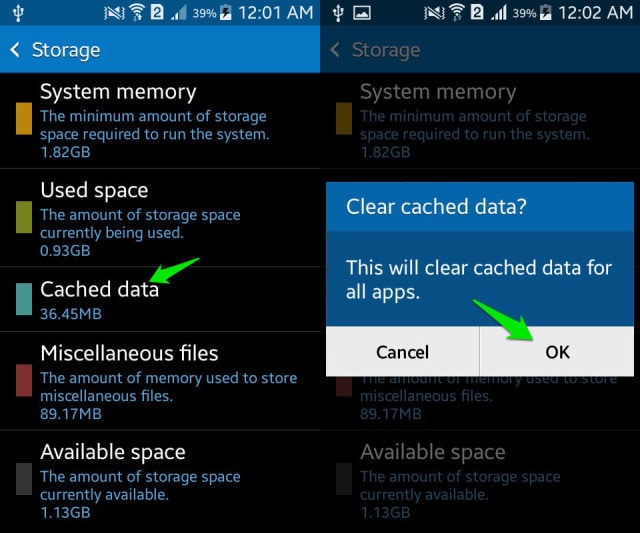
1. On your Nokia C12, visit “Settings” and find “Storage”
2. Now tap on “Cached Data”, and then click “OK” to clear all unwanted cache from your device as shown above.
However, if the Android crash problem is such that your phone has frozen, becomes unresponsive, and does not turn on, you must first boot into the Recovery Mode screen.
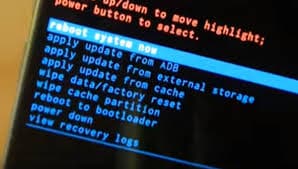
1. Press the volume down button and power button together until you see a screen with multiple options before you.
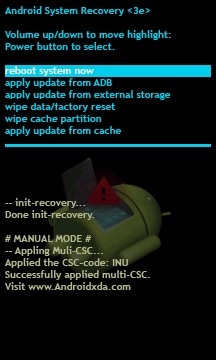
2. Once you are on the Recovery Mode screen, use the volume down key to scroll down and select ”Wipe cache partition” as shown below.
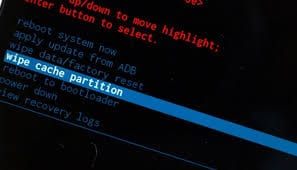
3. After the process is completed, select “Reboot System” which is the first option in the recovery mode screen.
This method will help you erase all the clogged-up and unwanted files and resolve the Android system crash issue. If clearing cache doesn’t help, try formatting your SD Card.
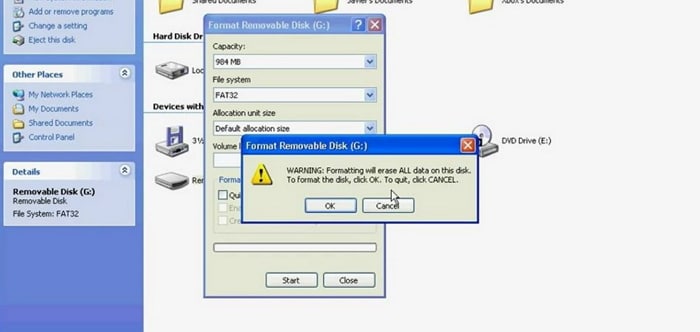
Part 8: Remove the SD card to fix the Android crash issue
Removing and formatting your SD Card to fix the Android System crash issue is helpful when a corrupted SD Card disturbs the Android software forcing it to shut down suddenly.
To format your SD Card, just follow the instructions below.
1. Firstly, eject it from the Nokia C12 device.
2. Then using an SD Card reading tool, insert the Card in your PC. Open Computer and then right-click on the SD card to format it.
Part 9: Update to the latest software version
Updating the Android device will cast out all glitches that prevent it from operating properly. For that, let’s look into the steps explaining how to update your Android software version to the latest option:
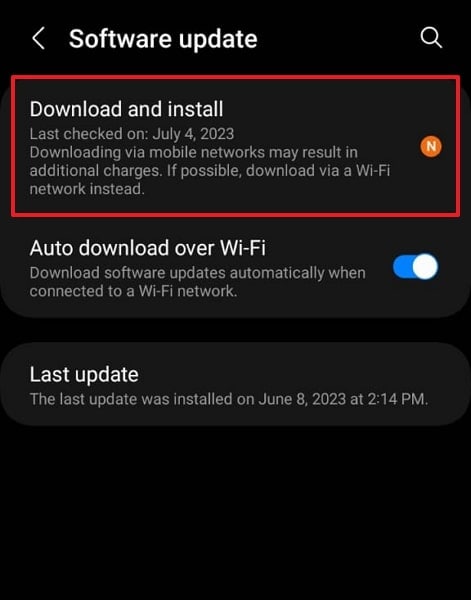
Step 1: As you lead into the “Settings” of your Android, scroll down and look for the “Software Update” option.
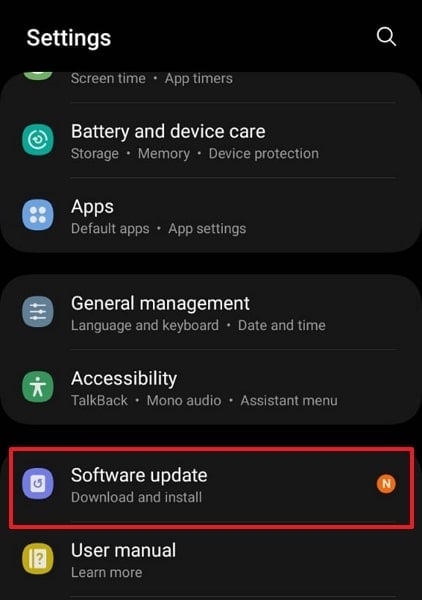
Step 2: On leading to the next screen, select the “Download and Install” option to continue updating your Android to the latest version.
Part 10: Use Wondershare Dr.Fone – System Repair To Fix Android System Crash
If you are not getting any specific solution to the problem, you can try fixing the Android system crash problems using specific tools. These third-party tools can be an excellent option for resolving system errors in Android devices. Wondershare Dr.Fone – System Repair (Android) is a great tool designed to resolve all system issues in Nokia C12] and other smartphones.
It features a great system providing a one-click Android repair option for fixing all kinds of problems. Along with fixing all basic and advanced Android system issues, it features support for multiple Android devices.
Key Features of Wondershare Dr.Fone – System Repair (Android)
![]()
Dr.Fone - System Repair (Android)
Repair Android System Errors without Any Trouble.
- Fix your Android to normal, no skills required.
- Fix various Android system issues, stuck in boot loop , black screen , or won’t turn on , looping on start, etc.
- The high success rate in resolving Android system issues.
- Compatible with a wide range of Android devices and OS versions
- User-friendly interface with easy-to-follow steps.
3981454 people have downloaded it
As we redirect to resolving Android system errors using Wondershare Dr.Fone – System Repair, let’s look into some essential features that make up the entire tool:
- Features support for all the latest Android devices up to Nokia C12 S22.
- It can help you resolve issues like Android’s black screen of death, being stuck in the boot loop, and many more.
- Provides an easy interface to execute procedures, making it a simple tool with no learning curve.
Steps To Repair Android System Crash Issue Using Dr.Fone – System Repair (Android)
Let’s redirect to the steps that can be used to repair Android system crash issues using Wondershare Dr.Fone – System Repair (Android):
Step 1: Launch and Open System Repair Tool
You need to download and install the latest version of Wondershare Dr.Fone on your computer. Proceed to launch and navigate into the “Toolbox” section. Look for the “System Repair” option and initiate the process while ensuring the Android device is connected to the computer through a USB cable.
Step 2: Start Repairing the Android
After selecting the nature of the Nokia C12 device you want to repair, navigate to a new window where you need to click “Start” to initiate the system repair process.
Step 3: Define the Parameters of Device
You will be redirected to a new window where you need to define and verify some parameters before repairing the Android. Select the “Brand,” provide a “Name,” select a “Model,” and provide a country where it has been bought. Define the “Carrier” and click “Next” after confirming.
Step 4: Put Android in Download Mode
Whatsoever Android you own, you need to put it in Download Mode, depending on the buttons that the Nokia C12 device has. The repairing process initiates as you enter the Download Mode, and new firmware is downloaded on the platform.

Step 5: Fix the Firmware of Android
Once it downloads and is verified, click the “Fix Now” button to repair the Android successfully. You may need to provide a PIN to confirm the process. Once provided, the next screen shows the progress of the repair process. As it completes, click the “Done” button to conclude fixing the Android system crash issue.

safe & secure
Part 11: Factory reset the Nokia C12 device to fix the Android crash issue
Factory Resetting is advisable only when nothing else works. Also, there are two ways of doing it depending on whether the Android crash is permanent or temporary.
Follow the steps given below to factory reset your device while it is switched on:
1. Visit “Settings”.
Now select “Backup and Reset”.
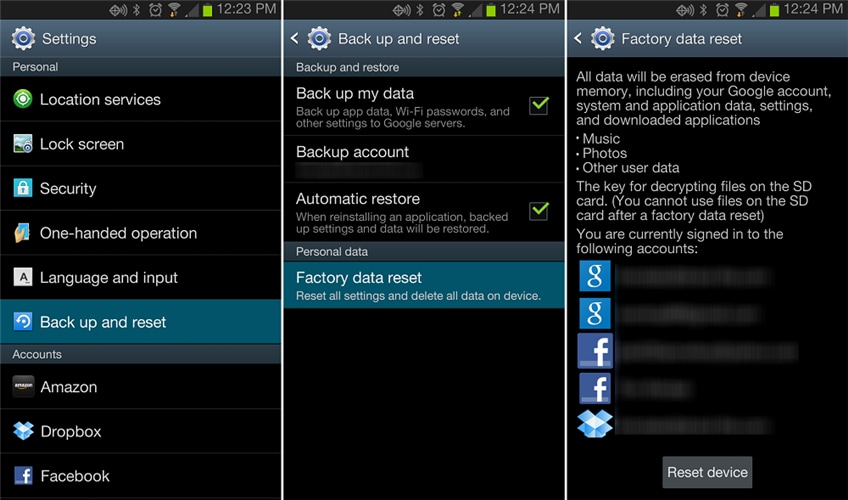
In this step, select “Factory data reset” and then “Reset Device” to confirm Factory Reset.
The process of factory resetting your Nokia C12 is risky and cumbersome, as it deleted all data, but it helps to fix the Android System crash error.
You may also follow the instructions given below to Master set your device in Recovery Mode if it won’t turn on after an Android system crash has taken place:
When you are at the Recovery Mode screen, scroll down using volume down key, and from the options given, select “Factory Reset” using the power key.
Wait for your device to perform the task and then:
Reboot the phone in Recovery Mode by selecting the first option.
Bottomline, the tips given above have helped many to solve the Android system crash issue. So do not hesitate to try them, but don’t forget to extract your data with Dr.Fone’s Data Recovery tool.
safe & secure
Also read:
- [New] 2024 Approved Removing Unwanted Audio From Videos - Essential Steps
- [New] Imgur Meme Generator for 2024
- [Updated] Maximizing Efficiency Video Capturing in Adobe Presenter
- [Updated] The Filmmaker's Pathway to YouTube Success with Professional 360 Video Edits
- 2024 Approved Proven Methods for Youtubers' Rapid Subscriber Expansion
- 4 Solutions to Fix Unfortunately Your App Has Stopped Error on Samsung Galaxy M14 5G | Dr.fone
- 7 Solutions to Fix Chrome Crashes or Wont Open on Realme 11 5G | Dr.fone
- Android Screen Stuck General Vivo X90S Partly Screen Unresponsive | Dr.fone
- Fix Honor X7b Android System Webview Crash 2024 Issue | Dr.fone
- Fix the Error of Unfortunately the Process.com.android.phone Has Stopped on Nokia C32 | Dr.fone
- In 2024, How to Remove Forgotten PIN Of Your Realme C55
- In 2024, Top 12 Prominent Motorola Edge 40 Pro Fingerprint Not Working Solutions
- Tecno Pova 5 Screen Unresponsive? Heres How to Fix It | Dr.fone
- Title: Want to Uninstall Google Play Service from Nokia C12? Here is How | Dr.fone
- Author: Ariadne
- Created at : 2025-01-07 16:04:05
- Updated at : 2025-01-14 16:25:55
- Link: https://howto.techidaily.com/want-to-uninstall-google-play-service-from-nokia-c12-here-is-how-drfone-by-drfone-fix-android-problems-fix-android-problems/
- License: This work is licensed under CC BY-NC-SA 4.0.