
Want to Uninstall Google Play Service from Vivo V30? Here is How | Dr.fone
Want to Uninstall Google Play Service from Vivo V30? Here is How
In this article, you will learn the pros and cons of uninstalling Google Play services, as well as a free root tool to help you do this.
Acts as a one-stop destination to download various kinds of apps from the Play Store. The Play service also provides a way to manage these apps without much hassle. From uninstalling to updating an app, all of this can be done with Google Play service. Nevertheless, there are times when users wish to uninstall Google Play services. To start with, it takes a lot of storage and makes it pretty tough for users to manage their devices. To help you, we will let you know how to uninstall Google Play Store in this informative post.
Part 1: Reason you might want to get rid of Google Play Service
Before we proceed and discuss different ways on how to update Play Store after uninstalling updates, it is important to cover the basics. We have heard plenty of users who wish to uninstall Google Play services, but are not sure of the repercussions. One of the main reasons is that it consumes a lot of space on phone’s storage. Not just that, it only consumes plenty of battery as well.
If your device is giving the insufficient storage warning, then you need to start by clearing your phone’s data. It is observed that the Google Play Service accumulates most of the data in a device. This leads to users looking for different ways to how to uninstall Google Play Store.
Part 2: What will it affect to uninstall Google Play Service?
If you think that Google Play Service only provides a platform to download new apps, then you are wrong. It provides several other functions that might alter the way you use your smartphone. It is linked with other essential Google services as well, like Google Maps, Gmail, Google Music, etc. After uninstalling the Google Play Service, you might face trouble using various essential apps.
Furthermore, it might tamper with the overall functionality of your device as well. For instance, you could encounter network issues, messaging problems, app crashing, and more. Since the Play Service is closely associated with Android system, it might have a prominent effect on your phone. If you have a rooted device, then you can easily install custom ROM and resolve these issues. Though, for a non-rooted device, overcoming these problems could be a big hurdle.
Part 3: How to disable Google Play Service?
By now, you already know all the repercussions of getting rid of Google Play Services permanently. Before you learn how to update Play Store after uninstalling updates, be sure whether you wish to uninstall Google Play Services or not. You can also choose to simply disable the services as well. If you face any severe issue afterward, then you can always enable the services manually.
To disable the Google Play Services, just go to your phone’s Settings > Applications > All and open Google Play Services. You will get to know about the app’s detail and a few other options here. Just tap on the “Disable” button. It will generate another pop-up message. Confirm it by tapping on the “Ok” button. This will disable Google Play Services on your device. Later, you can follow the same drill to enable it as well.

Now when you know how to uninstall Google Play Store on your device, you can easily customize it. Get rid of any kind of problem you are facing due to lack of storage or battery issues related to Google Play services after following these instructions. Feel free to drop a comment below if you face any setback while following this tutorial.
What To Do if Your Vivo V30 Auto Does Not Work
Embracing the convenience of Android Auto enhances your driving experience. It seamlessly connects your smartphone with your vehicle. However, in the realm of technology, glitches and malfunctions are commonplace. Android Auto, too, may encounter software or hardware issues that disrupt its functionality.
In this guide, you’ll delve into the common problems users face when Android Auto does not work and provide practical solutions to get you back on the road smoothly. From troubleshooting software glitches to addressing hardware concerns, this article aims to equip you with the knowledge to tackle Android Auto problems effectively.

Part 1. A Briefer on Android Auto
Android Auto is a revolutionary application designed to enhance the in-car experience by seamlessly connecting Android smartphones to compatible vehicles. It serves as a co-pilot, offering hands-free navigation, communication, and entertainment options, minimizing distractions while driving.
How Android Auto Works
Understanding the mechanics of this technology is essential for effective Android Auto troubleshooting. It mirrors your Android smartphone’s interface onto your car’s infotainment system. It provides a simplified and optimized version of your device’s features on the road.
Android Auto connects your smartphone to your car’s infotainment system via USB cable or wirelessly, depending on your device and car compatibility. Once clicked, it displays a user-friendly interface on your car’s screen, allowing you to access navigation through Google Maps, make calls, send messages, and control multimedia apps with voice commands or touchscreen gestures.
By integrating familiar smartphone functionalities into your car, Android Auto aims to provide a safer and more enjoyable driving experience, reducing the need for manual phone interactions while on the road. Understanding this foundation will empower you to effectively troubleshoot when issues arise.

Part 2. Common Issues Android Auto Faces + Troubleshooting/Repair
Even if it is such a great technology, sometimes Android Auto won’t connect. It also deals with common issues that can affect its performance. In this section, you’ll delve into these challenges and equip you with practical troubleshooting solutions to fix your Android Auto experience.
Connection Issues
Connection glitches through Bluetooth or USB can cause Android Auto issues. USB connection problems often come from subpar cables.
The solution here is straightforward – invest in a high-quality USB cable. This ensures a stable link between your smartphone and the car’s infotainment system. Meanwhile, Bluetooth pairing problems may require a bit of digital maneuvering. Try restarting your phone, rebooting the car’s infotainment system, or resetting Bluetooth settings to establish a smooth connection.
App-Specific Problems (Certain Apps Not Working)
Android Auto relies heavily on various navigation, communication, and entertainment applications.
If specific apps refuse to cooperate, a quick remedy is to restart the head unit. If the issue persists, consider uninstalling and reinstalling the problematic applications. This step ensures a clean slate for the apps, potentially resolving any underlying compatibility or performance issues.

Screen and Display Problems (Head Unit)
Issues with the screen or display on your car’s head unit can be disconcerting. To troubleshoot, commence with a simple restart of the head unit.
If the problem lingers, escalate the solution by restarting the entire car. Should these steps prove ineffective, seeking professional assistance at a maintenance center is advisable. This ensures a thorough examination and potential resolution of hardware-related problems, providing a comprehensive fix for persistent screen and display issues.
Voice Commands Not Working
Voice commands serve as a cornerstone of the Android Auto hands-free experience. When they falter, it can disrupt the seamless interaction with the system.
Begin by scrutinizing your internet connection, as voice commands rely on a stable link to function effectively. If the issue persists, a basic restart of the head unit might recalibrate the system, restoring the functionality of voice commands.
Understanding that these issues are inherent to any technology, Android Auto users can confidently navigate and troubleshoot these problems with the provided solutions. By addressing these commonplace concerns, users empower themselves to swiftly overcome hurdles, ensuring a seamless and gratifying driving experience with Android Auto.
Part 3. A Quicker Solution: Wondershare Dr.Fone – System Repair
If navigating through various troubleshooting steps seems complicated, especially if the issue resides within your Vivo V30, a swift and efficient solution comes in the form of Wondershare Dr.Fone - System Repair.

While the methods presented earlier primarily address software glitches, Dr.Fone can tackle more profound issues, offering a quick fix to revitalize your Android Auto experience. It is a comprehensive toolkit that caters to various Android needs, ensuring a seamless and optimized experience. Among its array of features, the System Repair feature in Dr.Fone acts as a reset button for your Vivo V30.
It addresses issues that go beyond the scope of regular troubleshooting. It gives your phone a fresh start by repairing the Android system and resolving glitches, crashes, and other persistent software-related problems. This revitalizes your telephone and can significantly impact Android Auto’s performance.
Note: If the problem persists and is related to the car’s head unit, a visit to the maintenance center might be necessary after exhausting these software-based solutions.
How To Use Wondershare Dr. Fone’s System Repair
To use Dr. Fone’s System Repair feature, follow the steps below. These steps will work with any Android phone.
- Step 1: Begin by launching Dr.Fone on your computer. From the left panel, access the Toolbox menu and click System Repair. Ensure your Vivo V30 is connected.
 safe & secure
4,014,082 people have downloaded it
- Step 2: On the subsequent screen, select Android as your device.

- Step 3: Initiate the Android System Repair by clicking Start.

- Step 4: Confirm the accuracy of your device details. If needed, edit any information that may be incorrect.

- Step 5: Place your phone into Download mode following the guidelines tailored for phones with or without home buttons. Your phone will commence downloading the dedicated firmware.

- Step 6: Once the firmware is downloaded, verify and proceed with the installation by clicking Fix Now. Confirm the firmware installation by inputting “000000” into the text box in the appearing window. Click Confirm afterward.

- Step 7: Upon completion of the process, your phone should now be restored. Click Done to conclude.

safe & secure
4,276,578 people have downloaded it
Conclusion
In wrapping up this guide, you’ve explored common reasons Android Auto does not work. You’ve also been provided practical solutions to keep your driving experience seamless. Remember, regular maintenance of your car’s head unit and periodic checks on your Vivo V30 can preemptively address potential issues.
By staying proactive, you ensure a consistently smooth ride with Android Auto. For comprehensive system repair and addressing broader Android-related needs, consider trying out Dr.Fone. It’s a versatile tool that can enhance your Android experience and keep your digital journey hassle-free. Take control of your drive and explore the full potential of your Vivo V30s with Dr.Fone today.
Google Play Services Won’t Update? 12 Fixes are Here on Vivo V30
Google Play Services is a crucial component of any Android device, responsible for supporting various Google apps and services. However, at times, users may encounter issues with updating Google Play Services, preventing them from accessing the latest features and security updates.
It’s pretty much annoying when you try to launch Google Play Services but it isn’t able to operate correctly. You get some of the notifications like Google Play Services won’t run unless you update Google Play Services. On the other hand, when you start to update Google Play Services, you stuck again with the error pop-ups, and Google Play Services won’t update. This can create a lot of chaos in one’s life. So, what action should one need to take in such a situation? Well! You needn’t rankle more as we will explore some of the causes and tips to fix the issue. Keep reading!
Part 1: Causes for Google Play Services Won’t Update Issue
Before diving into the solutions, it’s essential to understand the potential causes of the Google Play Services update problem. Let’s talk about the causes without further ado.
- 1. Incompatibility with Custom ROMs: Using a custom ROM on your Vivo V30 can cause compatibility issues and prevent the installation of Google Play Services updates.
- 2. Network connectivity issues: Poor or unstable internet connection can prevent the download and installation of updates.
- 3. Insufficient storage space: When your device doesn’t have enough free space, it can hinder the installation of updates for Google Play Services.
- 4. Excessive Installed Apps: a large number of installed apps on your device can exacerbate the update problem with Google Play Services.
- 5. Cache Conflicts: Accumulated cache can lead to conflicts and cause issues with the updating process of “Google Play Services”.
- 6. Outdated version of Google Play Store: If your device has an outdated version of the Google Play Store app, it may interfere with the update process for Google Play Services.
- 7. Google Play Components: If certain components of Google Play Services are corrupted, it can contribute to update issues.
Part 2: One-Click Fix When Google Play Services Won’t Update
For those seeking a quick and effortless solution, several third-party tools offer one-click fixes for the Google Play Services update problem. These tools automate the update process, ensuring that you have the latest version of Google Play Services installed. However, it is crucial to use reputable and trusted tools to avoid potential security risks.
If you cannot update Google play services by the reason of custom ROM incompatibility or Google Play component corruption, there is a serious need of repairing firmware then. And to repair Android firmware, one of the expert ways is Dr.Fone - System Repair (Android) . This professional tool vows to bring your Vivo V30s back to normal by fixing the issues with ease. Here are the advantages of this tool.
Dr.Fone - System Repair (Android)
Android repair tool to fix Google Play Services not updating
- A completely user-friendly tool where no technical skills are needed.
- All Android models are easily supported.
- Any kind of Android issue like black screen , stuck in boot loop , Google play services won’t update, or app crashing can easily be resolved with these.
- Full security is promised with the tool so there’s no need to worry about harmful activities like viruses or malware.
- Trusted by a lot of users and carries a high success rate.
3,485,019 people have downloaded it
How to Fix Google Play Services can’t be installed using Dr.Fone - System Repair (Android)
- Step 1: Install the Software
Initiate the process of downloading the software on your computer. Now, click on “Install” button and go along with the installation procedure. Click on “System Repair” option from the Toolbox window.
- Step 2: Device Connection
Now, taking the assistance of an original USB cable, connect your Vivo V30 to the PC. Then hit on “Start”.
- Step 3: Check the Information
You will notice the next screen which asks for some information. Please ensure to choose the correct device brand, name, model, career, and other needed details. Click on “Next” after this.
- Step 4: Download Mode
You will now see some instructions on your PC screen. Just follow those according to your device. And then your device will boot in Download mode. Once done, hit on “Next”. The program will now download the firmware.

- Step 5: Repair the Problem
When the firmware is downloaded completely, the program will automatically start getting fixed the issue. Wait for a while until you get the notification of the process completion.

safe & secure
Part 3: 10 Common Fixes When Google Play Services Won’t Update
Method 1. Restart your Android and try to update again
In most cases, restarting the Vivo V30 device can simply do the trick. When you restart the Vivo V30 device, most of the issues get eliminated making the Vivo V30 device perform better than before. Also, it is all about RAM. While you restart your device, the RAM gets cleared. As a result, the apps work properly. So, in the first place, we would like you to restart your Vivo V30 when you cannot update Google Play Services. Once restarted, try to update again and see if the results are positive.
Method 2. Uninstall Google Play Services Updates and Reattempt the Update
Uninstalling previous Google Play Services updates resolves conflicts and errors, often addressing the issue of updates. This process clears potential obstacles, enabling a successful update of Google Play Services. Here’s how you can do it:
- Open your device’s “Settings.”
- Scroll down and select “Apps” or “App Manager.”
- Locate and tap on “Google Play Services.”
- Depending on your device and Android version, you might need to tap on “App info” or “Storage.”
- Look for the option to “Uninstall updates.” This will revert Google Play Services to its original version.
- Confirm the action when prompted.
- Once the updates are uninstalled, go back to the Google Play Store.
- Search for “Google Play Services” using the search bar at the top.
- If an update is available, you’ll see the option to “Update.” Tap on it to start the update process.
- After the update is complete, restart your device to ensure the changes take effect.
Method 3. Update Google Play Store
Ensure that you have the latest version of the Google Play Store app installed on your device. Open the Play Store, go to Settings, and check for updates. Updating the Play Store can often resolve compatibility issues with Google Play Services updates.
Method 4. Google account and re-add it
Go to your device’s Settings, select Accounts or Users, and remove your Google account. Restart your device and add the account again. This process can refresh the connection and resolve update issues.
Method 5. Uninstall unnecessary apps
As we mentioned above, due to a lot of apps being installed at the same time, the issue can crop up. And hence, if the above solution didn’t help, you can try to uninstall the apps that you don’t need currently. We hope this works. But if not, you can go to the next fix.
Method 6. Clear Google Play Services cache
If still you cannot update Google Play Services, clearing cache can solve your problem. We also stated this in the beginning as the reason. If you don’t know, cache holds the app’s data temporarily so that it can remember the information when you next open the app. Many times, old cache files get corrupted. And clearing cache can also help in saving storage space on your device. For these reasons, you need to clear cache of Google Play Services to get rid of the problem.
Here is how to clear Google Play Services cache:

- Launch “Settings” on your phone and go to “Apps & Notifications” or “Application” or “Application Manager”.
- Now, from all the apps’ list, choose “Google Play Services”.
- On opening it, tap “Storage” followed by “Clear Cache”.
Method 7. Boot into download mode to clear cache of whole phone
If unfortunately, things are still the same, we would like to recommend you wipe the cache of the whole device to fix the issue. This is an advanced method to solve issues and is helpful when the Vivo V30 device is facing any flaws or malfunctions. For this, you need to go to the download mode or recovery mode of your device. Every device has its own steps for this. Like in some, you need to simultaneously press the “Power” and “Volume Down” keys. While in some, the “Power” and both “Volume” keys work.
This is how it works when Google Play Services can’t be installed on your device:
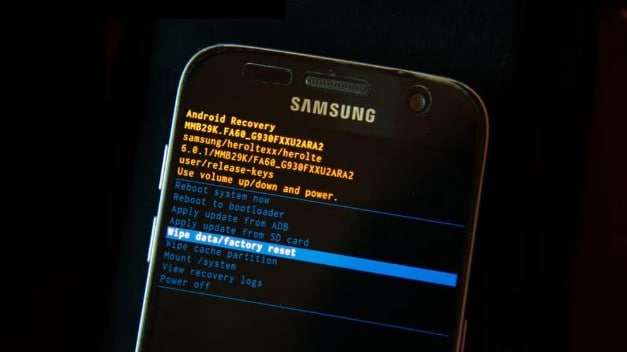
- Turn off the Vivo V30 device to begin with and then follow the steps for recovery mode.
- On the recovery screen, use the “Volume” buttons for scrolling up and down and go to “Wipe cache partition”.
- To confirm, press the “Power” button. Now, the Vivo V30 device will begin to wipe the cache.
- Hit reboot when asked and the Vivo V30 device will now be rebooted finishing the issue.
Method 8. Check your Android storage
Generally speaking, Google Play Services can update automatically in the background. But if there is not enough storage on your Android, the automatic update may fail, so check your android space.
Method 9. battery optimization
Some devices aggressively optimize battery usage, which can interfere with the background processes required for updating Google Play Services. Disable battery optimization for Google Play Services in the Vivo V30 device’s Settings to ensure uninterrupted updates.
Method 10. Check date and time settings
Sometimes, incorrect date and time settings on your device can cause conflicts with Google Play Services updates. Ensure that your device’s date and time are set correctly and set to automatic. Follow the steps below to set the date and time on your android correctly.

- Open “Settings” and go to “General Management”.
- Click “Date & time” and then enable “Automatic date & time”. Or you can disable and re-enable it.
Method 11. Factory Reset your Android
As a final measure, if everything went in vain, you can perform a factory reset on your device. This method will wipe away all your data while performing and make the Vivo V30 device go to factory state. Please ensure to keep backing up your important data if you are going to take the help of this method.
The steps are:
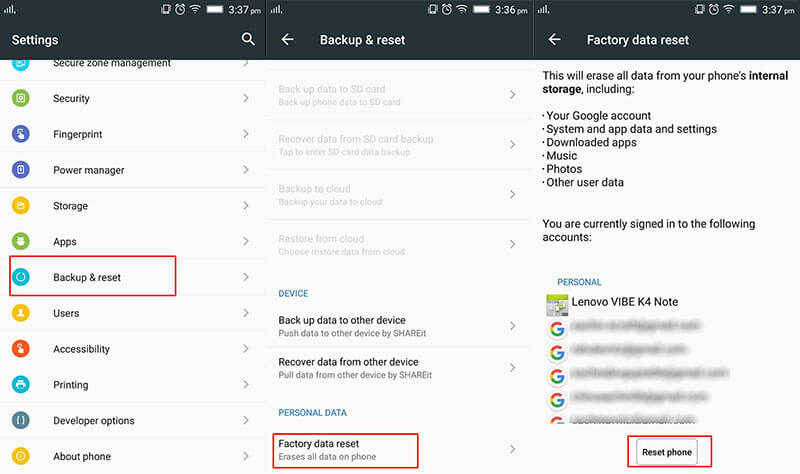
- Open “Settings” and go to “Backup & Reset”.
- Choose “Factory Reset” followed by “Reset Phone”.
FAQs about Google Play Services
To provide further clarity, here are some frequently asked questions about Google Play Services:
1. What is Google Play Services?
Google Play Services is a background service on Android devices that provides essential functionality and support for various Google apps and services. It includes features like authentication, push notifications, location services, and more, enabling seamless integration and enhanced performance for Google apps.
2. Why is it important to keep Google Play Services updated?
Keeping Google Play Services updated is crucial for several reasons. It ensures compatibility with the latest versions of Google apps, improves app performance, and enhances security. Updates often introduce new features, bug fixes, and optimizations, providing a better user experience and access to the latest advancements offered by Google.
3. Can I uninstall Google Play Services?
No, Google Play Services cannot be uninstalled as it is a core system component required for the proper functioning of Google apps and services. Removing or disabling it can lead to malfunctions and render many Google apps non-functional. However, you can disable specific permissions or clear its cache and data if troubleshooting issues related to Google Play Services.
4. How can I check the version of Google Play Services on my device?
To check the version of Google Play Services on your Vivo V30, follow these steps:
- Step 1. Open the Google Play Store app.
- Step 2. Tap on the menu icon (three horizontal lines) in the upper-left corner.
- Step 3. Scroll down and select “Settings.”
- Step 4. Scroll to the bottom and find the “Play Store version” or “Play Services version”. The number displayed indicates the version of Google Play Services installed on your device.
5. Why is my device not compatible with the latest version of Google Play Services?
There can be several reasons why a device is not compatible with the latest version of Google Play Services. It could be due to hardware limitations, an outdated Android operating system version, or the Vivo V30 device no longer receiving official software updates. Compatibility requirements can change with newer versions of Google Play Services, and older devices may not meet the necessary criteria to support the latest updates.
Conclusion
Encountering difficulties when updating Google Play Services can be frustrating, but with the right approach, these issues can be resolved. By understanding the causes and implementing the suggested fixes outlined in this guide, you can overcome the Google Play Services update problem. Remember to prioritize storage space, ensure a stable internet connection, and keep your apps and system components up to date. By doing so, you can enjoy the full functionality of Google Play Services and benefit from the latest features and security enhancements.
Also read:
- [New] Masterclass Uploading Without Complications on Social Media for 2024
- [Updated] Beginning with Adobe Audition The Fading Start
- 8 Workable Fixes to the SIM not provisioned MM#2 Error on Lava Blaze Curve 5G | Dr.fone
- Android Screen Stuck General Tecno Spark 20 Pro+ Partly Screen Unresponsive | Dr.fone
- Fix Unfortunately Settings Has Stopped on Realme 11 Pro Quickly | Dr.fone
- Fixing Code 0X0001 Issue in Nvidia Experience for W10/W11
- Game Masters & YouTube Earning Strategies
- Infinite Visual Fidelity Premium HDMI 2.1 Gaming Displays (PS5)
- Resolving Unidentified Window Second Screen
- Step-by-Step Guide: Protecting an External Storage Device Using Windows 11'S Encryption Features
- What To Do if Your Oppo Find N3 Flip Auto Does Not Work | Dr.fone
- Title: Want to Uninstall Google Play Service from Vivo V30? Here is How | Dr.fone
- Author: Ariadne
- Created at : 2025-01-08 16:38:28
- Updated at : 2025-01-14 17:26:14
- Link: https://howto.techidaily.com/want-to-uninstall-google-play-service-from-vivo-v30-here-is-how-drfone-by-drfone-fix-android-problems-fix-android-problems/
- License: This work is licensed under CC BY-NC-SA 4.0.