
What to Do if Google Play Services Keeps Stopping on Oppo K11x | Dr.fone
What to Do if Google Play Services Keeps Stopping on Oppo K11x

Is the annoying Google Play Services error constantly popping up on your phone? Is it happening while reading, gaming, or browsing social media?
The error constantly plagues thousands of Android users, and it can be incredibly frustrating when you’re using the phone for something important or doing something entirely unrelated to the Google Play app.
Oddly enough, the “Unfortunately, Google Play Services has stopped.” error isn’t severe – you can fix it with a few general and easy-to-do fixes, a factory reset, or a system repair. Below, you’ll find info about why it’s happening and a list of ten possible solutions.
Why Am I Getting the Message “Google Play Services Keeps Stopping?”
Computers and phones often speak in error codes and apps that stop working. Even minor connectivity issues can cause these problems, leaving you wondering what’s wrong with your device or displaying the “Unfortunately, Google Play Services has stopped working.” error message.
Software errors are another set of problems that can also cause this issue. Namely, an average phone user has at least 40 installed apps, and sometimes these apps don’t play well together. They generate problems or steal resources from each other, such as RAM, causing crashes and errors.
There’s also the issue of wrong app versions. Although each Android phone uses the Android operating system, these systems can be vastly different, and the apps built for them can be made to be phone-specific and only run on a specific phone model.
That’s also the case with Google Play Store and Google Play Services.
Why Google Play Services Keeps Stopping
The Google Play Services keeps stopping error is an infamous one, and it can appear for various reasons and even on brand new phones. However, these causes can be categorized into three groups, which are:
- Network Issues
- Software Errors
- Wrong Play Services Version
Regardless of what’s causing the issue on your phone, we’ve compiled a list of ten possible solutions, and you can find those below.
Solutions to Try When Google Play Services Keeps Stopping
There are many solutions for the issue of Google Play Services that keeps stopping. We’ve listed the most famous and effective ones, and you’ll find them below in no particular order. Try them out and see whether they fix the issue.
1. Do a Factory Reset
A factory reset on any smartphone removes all your data on the phone’s internal storage and can even wipe your SD card clean if you select the option. Before you reset your phone to factory settings, ensure you’ve backed up all your essential apps and files. When you’re ready, you can do a factory reset by following these steps:
Step 1: Go into Settingsand search for “reset.”
Step 2: Choose Factory reset.
Step 3: Tap the Erase all dataor Reset device at the bottom, whichever button is there.

Step 4: Input your password and confirm the action.

Your phone will now restart and start the reset process. Once the factory reset completes, your phone will look brand new, and you’ll need to install all your apps again. Moreover, your Google Play Services app will likely get fixed by this, too.
2. Update Your System
As keeping your phone’s system and apps updated to the latest possible version is essential and recommended for the best performance and highest efficiency, you can try updating it to see whether it fixes your Google Play Services error. Here’s how:
- Step 1: Open the Settings
- Step 2: Head into System> System update.
- Step 3: If there’s an update available, click it and go through the process of updating your phone’s system.
Restarting your phone after an update, even if it doesn’t restart itself, is highly advisable, ensuring that the new updates apply without issues.
3. Revert to the Previous Version
As we’ve discussed the wrong Play Services versions above, it’s worth noting that sometimes even the developers can make mistakes and roll out the wrong version for your phone. So, if you notice that the phone is getting the error after you’ve updated Google Services or the Play Store, you can quickly revert to the previous version, and here’s how:
- Step 1: Head into Settings> Apps > Google Play Services.
- Step 2: Press the Disablebutton at the bottom of the screen.
- Step 3: Restart the phone, repeat the process by clicking Enablethis time, and restart the phone again.
As these are system apps, you can’t remove them from the phone, and disabling them will only remove the updates, leaving you with a base version that came with your phone out of the box.
4. Uninstall the App’s Updates and Reinstall
Like reverting to the previous version, you can also try reinstalling updates to fix the Google Play Services has stopped working error. The process is similar to the one above, but we’ve still included the steps. Here’s how you can do that:
Step 1: Go into Settings> Apps and find Google Play Services.
Step 2: Tap it and press Uninstall Updatesat the bottom.
Step 3: Exit the Settingsapp and restart the phone.
Step 4: Open the Play Storeapp and head into the app’s settings by clicking your profile icon. Then scroll to the bottom, and tap Settings.
Step 5: Find and tap the Play Store versionto update your Google Play Services.

As you’re already there, you might as well update all other apps after you tap Manage apps & device. That will ensure that older and not-up-to-date apps aren’t causing the issue.
5. Check Storage
Believe it or not, one of the leading causes of the Google Play Services issue is a phone overfilled with apps. Namely, if you have insufficient storage, the Google Play Store app will likely crash and display errors such as “Unfortunately, Google Play Services has stopped working.”
Head into your phone’s Settings and select Storage to see how your phone’s doing storage-wise. Deleting a few apps you don’t use and transferring your photo and video library to a PC is highly advisable if your phone’s storage space lacks gigabytes.
6. Do a System Repair
Although the other solutions here are general fixes that might help, a system repair might take a bit longer but will undoubtedly fix your issue. You can use the Wondershare Dr.Fone app to repair the system and eliminate the annoying “Unfortunately, Google Play Services has stopped working” error.
Moreover, Dr. Fone works on Android and iOS devices and can fix various phone issues, including boot loops, a white screen of death, a stuck phone, etc. That’s why we’ve included a guide on using it for an Android phone issue. Here’s how:
Step 1: Launch the Wondershare Dr.Fone app on your PC and head into Toolkit> System Repair > Android.
Step 2: Select the type of issue you want to fix > Start.
Step 3: Select the make and model of your phone so that Dr.Fone can find the appropriate Android software.
Step 4: Connect the phone to the PC via a USB cable and follow the on-screen instructions to put the phone into Download Mode. The instructions are available for both phones with and without the home button.
Step 5: Select the appropriate Android firmware, download it, and hit Fix Nowafter it downloads.
Step 6: Enter the code and hit Confirmto continue the system repair process. When it’s done, click the Done

That’s all it takes to do a system repair with Wondershare Dr.Fone. Give the software a few minutes to complete, during which your phone might restart a few times. Once it’s done, your Google Play Services app will undoubtedly work.
7. Clear Cache
The easiest and the most obvious fix for many Android apps is clearing the app’s cache. Here’s how you can do that for Google Play Services and Google Play Store:
Step 1: Go into Settings> Apps and find the Google Play Store
Step 2: Tap Storageand hit the Clear cache
Step 3: Repeat the process for the Google Play Services

If this doesn’t work, move on to another possible fix.
8. Check Date and Time Settings
Oddly enough, the Google Play Services app is prone to failure because of an incorrectly set time or date. That’s because Google’s servers constantly check these settings before issuing updates to the Oppo K11x devices, so you’ll need to ensure they’re correct beforehand. Here’s how:
Step 1: Head into Settings> System > Date & Time.
Step 2: Ensure that both “**Use network–provided time” and “Use network-provided time zone**” are toggled on.
Step 3: If this doesn’t work, you can try repeating the process and manually setting the time and the time zone.

Once you check or change these settings, try using the Google Play Store app and check whether the issue is fixed. Restarting the phone after changing the settings is also highly advisable.
9. Troubleshoot Your Internet Connection
Another regularly overlooked troublemaker is a poor internet connection. That’s because most apps nowadays are meant to work in online mode only, and losing connection or using a bad one interferes with the app’s functionality.
To test the internet connection on your Oppo K11x, you should open a browser and head to a random internet page to see if it’s opening and whether there are any delays. If it’s working fine, your internet connection isn’t the problem.
10. Adjust Google Play Services Permissions
Although permissions rarely change, they can cause issues if you change them accidentally. These settings can be found in the same place where you would uninstall updates or clear the app’s cache, so you can use some of the steps mentioned above to check them.
Once inside Permission Settings, check whether the Google Play Services and Play Store apps have sufficient permission to do their jobs and whether any required permissions were recently removed. If so, grant these two apps their permissions back.
 safe & secure
4,953,228 people have downloaded it
Conclusion
Although it’s an incredibly frustrating error, the “Unfortunately, Google Play Services has stopped” message is more annoying than serious. We’ve explained why it happens, but we’ve also given you a list of solutions to fix it.
Our list includes various fixes, from simple ones, like deleting the app’s cache and ensuring your network works fine, to more serious ones, like doing a factory reset. Alternatively, you can do a system repair with the help of Wondershare Dr.Fone, which will certainly fix the problem, but it might be a bit more complicated than cache deletion.
Calls on Oppo K11x Go Straight to Voicemail? 12 Fixes
Have you ever experienced incoming calls to your phone go straight to voicemail without ringing? It can be frustrating, especially if you’re expecting an important call. It could be due to simple things like turning down the volume or forgetting to turn off the Do Not Disturb mode. In other cases, it might be because you accidentally blocked the caller’s number.
In most cases, incoming calls going to voicemail without ringing are common. However, if it’s happening frequently or for all calls, your phone may have a problem.
This article will discuss why incoming phone calls go straight to voicemail and how to fix the problem. We’ll also show you how to use Wondershare Dr.Fone, a powerful Android System Repair tool, to solve such issues. So, if you’re uncertain why that last call went straight to voicemail, keep reading, and we’ll cover everything you need to know.

Part 1: Not Ringing? Here’s Why Calls on Your Phone Go Straight to Voicemail
If an incoming call to your cell phone goes straight to voicemail without ringing, there could be a few reasons. Here’s what to look for and what you should do to fix it:
- Turn Off Do Not Disturb (DND) Mode
DND mode is a feature that silences all incoming calls, notifications, and alerts. If DND mode is enabled, your cell phone goes straight to voicemail when someone calls. To turn off DND mode, swipe down from the top of the screen to open the notification settings panel, then tap the Do not disturb icon.

Here’s an alternative way:
- Step 1: Open the Settings app and go to Notifications.
- Step 2: Tap Do not disturb.

- Step 3: Toggle Do Not Disturb offto disable the mode.
- Turn Off Call Forwarding
One reason calls go straight to voicemail without ringing is if you enabled call forwarding. Call forwarding is a feature that redirects incoming calls to another number. To turn off call forwarding:
- Step 1: Open the Phone Dialer app on your device, then tap the menu icon and select Settings.

- Step 2: Navigate to Supplementary services > Call forwarding.

- Disable Call Barring
If a phone call went straight to voicemail, another possible explanation is the call barring. It is a feature that restricts calls from being made or received on your phone. If activated, it can cause incoming calls to a phone to go straight to voicemail. To turn off call barring on Oppo K11x devices:
- Step 1: Open the Phone Dialer app, then tap the menu icon in the top right corner.
- Step 2: Go to Settings > Supplementary services > Call barring, then tap OK.
- Step 3: Select Voice call, then turn off your preferred outgoing and incoming calls. When prompted, enter 0000 as a password.

- Update Your Phone’s Software
Sometimes, software bugs can cause problems with incoming calls, which may be why your last incoming call went straight to voicemail. If your phone runs outdated software, try updating it to the latest version.
To check for updates, open the Settings app and go to Software update or System update. For a seamless update experience, follow the step-by-step instructions on your mobile screen.

- Reset Network Settings
If the incoming calls on your phone go straight to voicemail, consider resetting your phone’s network settings. Network settings control how your phone connects to the cellular network. If these settings are not set up correctly, incoming calls may not be able to reach your device.
Note: Resetting your network settings will erase any saved Wi-Fi networks and Bluetooth pairings, requiring you to re-enter them after the reset is complete.
To reset your network settings on most Android devices:
- Step 1: Open the Settings app on your smartphone, then tap System or General Management.
- Step 2: Go to Reset > Reset Network Settings and confirm the action.

- Turn Off Bluetooth
When Bluetooth is on, it can interfere with your device’s ability to receive calls, causing them to go straight to voicemail without ringing. To turn off Bluetooth on an Android device, you can do one of the following:
- Swipe down from the top of the screen to open the Quick Settingspanel, then tap the Bluetooth icon to turn it off.

- Go to Settings> Connections > Bluetooth and toggle the switch off.

It should help ensure that calls come through to your phone instead of going to voicemail.
- Check Airplane Mode
If turning off Bluetooth didn’t solve the issue, another possible cause could be that your phone is in Airplane Mode. Airplane Mode turns off all wireless connections on your phone, including cellular service, which can cause calls to dial straight to voicemail. There are two ways to turn off Airplane mode on Android:
Using the Settings app:
- Step 1: Open the Settings app.
- Step 2: Tap Network & internet.
- Step 3: Toggle off Airplane mode or Flight mode.
Using the Quick Settings panel:
- Step 1: Swipe down from the top of the phone screen to access the Quick Settings panel.
- Step 2: Look for the Airplane mode or Flight mode icon, then tap it to turn it off.

- Check Blocked Numbers
“My boyfriend’s phone goes straight to voicemail when someone is calling. Any idea why that might be?”
Do you also find yourself asking what does it mean? It could be that he has blocked that phone number. To check this:
- Step 1: Open the Phone dialer app.
- Step 2: Tap the menu icon in the top right corner and select Settings.
- Step 3: Tap Block numbers. If you find the number in the blocked list, remove it to ensure that their calls come through to the phone.

If you still have trouble reaching your boyfriend, try calling him from a different number. If your call didn’t go through, you know that he hasn’t blocked your number and that there may be another issue with his phone.
- Turn Off Google One VPN
If you’re using Google One VPN, try turning it off to see if that fixes the problem. Some users have reported that Google One VPN can cause incoming calls to a phone to go straight to voicemail. To turn off Google One VPN:
- Step 1: Open the Google One app on your Oppo K11x.
- Step 2: At the bottom, go to the Benefits tab, then tap View Details below the Online protection with a VPN section.

- Step 3: Toggle off Enable VPN.

- Contact Your Carrier
If your phone calls go straight to voicemail after trying all the above, contact your carrier for help. They may be able to troubleshoot the problem or determine if there is a service outage in your area.
And if your carrier confirms that there is no service outage or billing-related block, the problem may be with your phone itself. You may need to try resetting your phone to factory settings or taking it to a repair shop.
- The Caller Used Ringless Voicemail
Ringless voicemail is a service that allows businesses to bypass your phone’s ringtone and send you pre-recorded messages directly to voicemail. Ringless voicemail is often used for marketing purposes. If you think you’re receiving ringless voicemail calls, you can contact the company calling you and ask them to remove you from their list.
Part 2: Not Clear About the Root Cause? Troubleshoot Directly by Wondershare Dr.Fone
If you’re unsure what’s causing your calls to go straight to voicemail, you can try using the Dr.Fone System Repair tool. This software can scan and repair your phone for any underlying problems, which may fix the issue and get your calls ringing again.
Dr.Fone supports over 1000 Android models, including unlocked Oppo K11x models and models from carriers like AT&T and Vodafone. It has an intuitive interface and is easy to use, even for beginners. Learn below the steps on how to use Dr.Fone System Repair to fix incoming calls that dial straight to voicemail:
- Step 1: Download Dr.Fone on your computer, then launch it once installed.
safe & secure
4,118,635 people have downloaded it
- Step 2: Connect your smartphone to your desktop or computer using a USB cable. Next, from the Toolbox homepage, select System Repair.

- Step 3: Select Android as the Oppo K11x device type.

- Step 4: Click Start to begin repairing your smartphone.

- Step 5: Select the Oppo K11x device details on the Name, Model, Country, and Carrier drop-down lists. Next, select the agreement checkbox, then click Next to proceed.

- Step 6: Follow the in-app instructions to enter Download mode on your Oppo K11x, then click Next.

- Step 7: Wait while the app downloads the firmware; once done, click Fix Now.

- Step 8: Enter the code in the input box to verify the Oppo K11x device information in the dialogue box, then click Confirm.

- Step 9: The app will start repairing the system issue on your Oppo K11x. Once completed, your app should restart, then click Done to close the app.

You May Also Like:
Top 5 Best Android System Repair Apps
How to Fix It: Android Stuck on Boot Screen?
How to Flash Dead Android Phone Safely
Conclusion
When your phone calls go straight to voicemail without ringing, it can be a frustrating and disruptive experience. Not only do you miss important calls from work, friends, or family, but it also leaves you feeling disconnected and out of the loop. As a temporary measure to avoid missing important calls, check your voicemail regularly.
For a prompt solution, consider using Dr.Fone if incoming calls on your phone go straight to voicemail. It is a powerful mobile solution that can also address other system problems, including stuck boot loops, app crashes, black screens, and bricked devices. If you consistently experience this issue, it’s advisable to reach out to a professional for assistance.
safe & secure
4,215,287 people have downloaded it
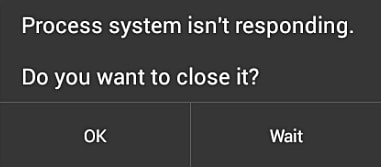
9 Solutions to Fix Process System Isn’t Responding Error on Oppo K11x
The “Process system isn’t responding” is a common error that occurs in almost every kind of Android device. Even though most Android smartphone manufacturers have taken a huge leap in the last few years, the operating system still suffers from a few pitfalls. The process system isn’t responding Android is one of those errors that have been reported plenty of times. I definitely understand encountering the ‘Process System Isn’t Responding’ error on your Oppo K11x can be frustrating.
However, there are several straightforward methods to resolve this issue. This article will provide a step-by-step guide on how to fix the problem and restore your device to normal functionality.
Before solving any Android system issues, try this Android backup software to take a full backup, in case any data loss happens.
Part 1: Reasons for process system isn’t responding error
There could be plenty of reasons for getting the process system is not responding in Android.
- Software Glitch: Android systems may experience temporary glitches due to factors like memory management issues, conflicts between apps or services, or system updates.
- Insufficient System Resources: Low system storage is another reason for getting the error. If you have too many apps on your phone, then it might take a toll on its memory and generate the “process system isn’t responding” prompt.
- Third-Party Apps: Users have also complained that they receive the “Android process system is not responding” error after installing a new app. If you have installed an app from a source other than Google Play Store, then the chances are that you can get this error. Though, even after installing an app from Play Store, there is a bleak probability of facing this issue as well.
- Outdated Software: Using outdated apps, particularly system apps or critical components, may lead to compatibility issues with the latest Android version.
- System Updates: Most of the time, it happens whenever a device is restarted after updating its Android version. Your device could have undergone a bad update or might have had an unsupported driver. This can result in the occurrence of process system not responding issue.
- Corrupt Cache Files: Corrupted cache files can lead to conflicts and result in error.
- Overclocking or Modifications: Rooting or modifying the Android device, or applying overclocking settings, can lead to instability and the process system not responding error.
- Hardware Issues: Rarely, hardware problems like failing components can interfere with the proper functioning of the system.
No matter what the cause is, there are plenty of ways to overcome this issue. We have listed a handful of them in this post.
Part 2: How to Fix Android Process Not Responding? 8 Fixes
When this error occurs, it can disrupt the normal operation of the Oppo K11x device, causing apps to freeze or crash. Fortunately, there are several effective methods to address this problem.
Fix 1: Restart your device
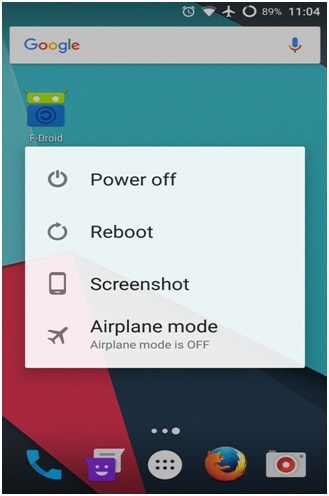
This is one of the easiest ways to resolve the process system not responding error. If you are getting this error on your phone, then try to manually restart your device. The way to restart your phone might differ from one device to another. Mostly, it can be done by long-pressing the power button. This will provide different power options. Tap on the “Reboot” one to restart your phone.
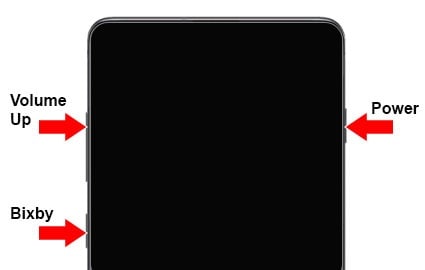
If it won’t work, then long press the Power and Volume up buttons at the same time until the screen goes off. Afterward, use the power button again to turn it on.
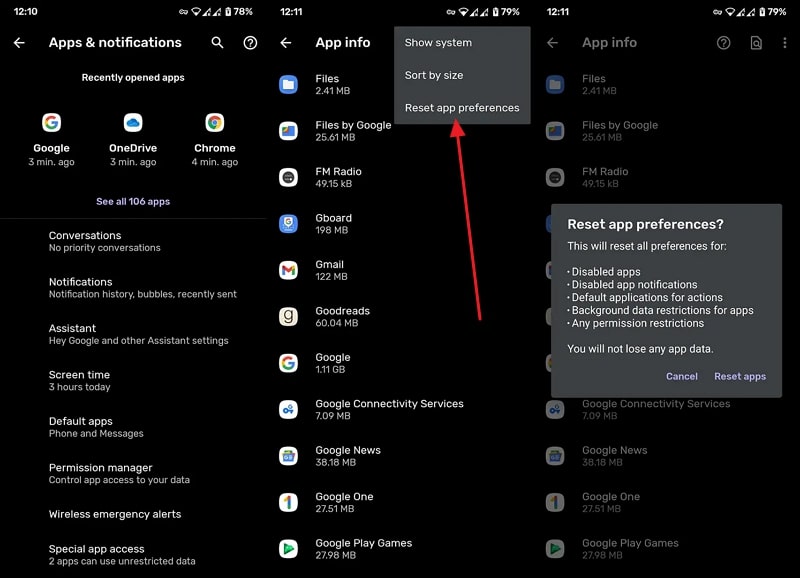
Fix 2: Reset App Preferences
Sometimes the apps interfere with the Oppo K11x device’s settings because they were given permission to access specific functions. It is recommended to allow the asked permission precisely because some suspicious apps can also steal your sensitive data. Here are the straightforward instructions you need to follow to reset the app preferences:
Proceed to the “Apps and Notifications” settings from the Settings app. Next, tap the “See All Apps” option and access the “Three Dots” menu. Here select the “Reset App Preferences” option and confirm the process from the confirmation pop-up.
Fix 3: Free Up Space to Make Sure Android Have Enough Internal Memory
In case the Android internal memory is completely filled, it will slow down the processing speed of the Oppo K11x device. Internal memory is vital for the Oppo K11x device to run all the background apps or the process required by the OS to run the Oppo K11x device efficiently. You can follow these steps to free up some space on your Oppo K11x:
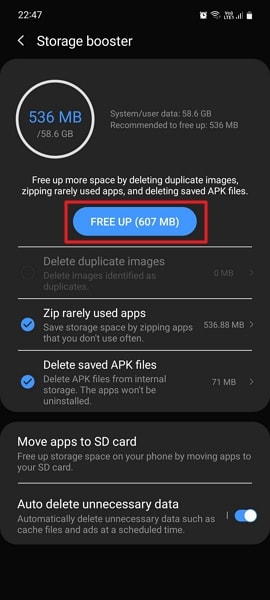
Step 1: Open the Settings app on your Oppo K11x and access the “Battery and Device Care” option by scrolling down. Next, tap on the “Three Dots” from the top right corner and choose the “Storage Booster” feature.

Step 2: Following this, you can select the data you want to remove from the internal memory. Your device will show the space it will free up for you, and you can press the “Free Up” button to free up the storage.
Fix 4: Enter Safe Mode to Uninstall Suspicious Apps
This issue can also occur if you have installed an app from the Google Play Store with a very low rating or an APK. Unlike Apple App Store, anyone can easily upload their mobile apps on Play Store, so it is important to check the app’s credibility before installing it. Following are the simplified instructions to enter the safe mode and delete all suspicious applications:
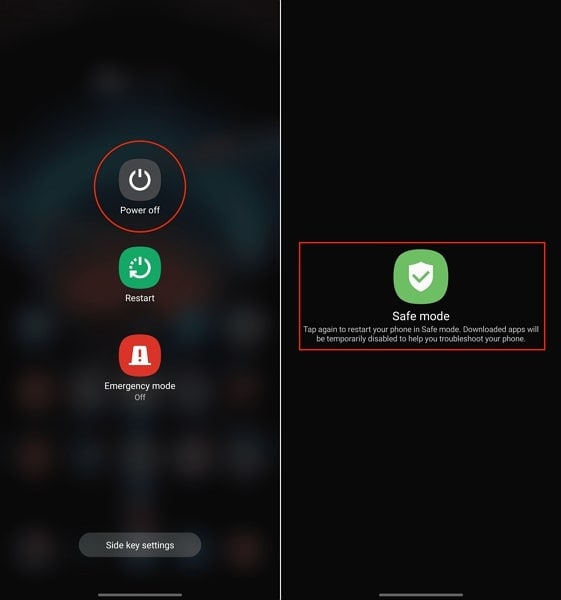
Press and hold the “Power” button of your Android and press and hold the “Power Off” option to access the “Safe Mode” feature. Afterward, confirm to enter the safe mode and remove all the suspicious apps from the Oppo K11x device. You can do this by holding on to the app and selecting the “Uninstall” option from the pop-up options.
Fix 5: Update All Apps on your Device
Updating the apps is crucial for any Android device to work with high efficiency and performance. Apps are developed to make the users’ daily tasks easy to execute. However, there might be some negligence in the development, which can leave some bugs in the app. These bugs are fixed with time by releasing the new version of the app. To update your Android app, proceed with the following step-by-step instructions:
Step 1: Locate the Play Store from the Android home screen and access it. Then, tap the “Profile” icon from the top right corner and proceed to the “Manage apps and devices” option. Afterward, you can check how many app updates are available from the “Updates available” option. To update the apps, you will have to go inside this option.
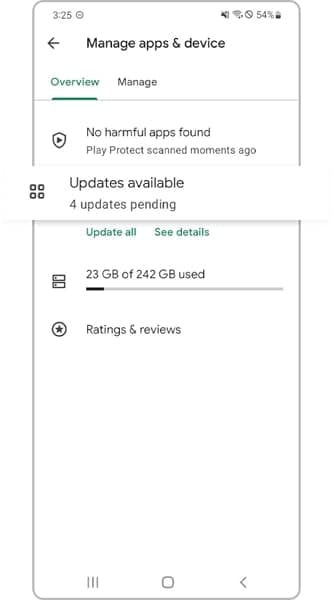
Step 2: You can tap on the “Update All” button if you want to update all the apps one by one. Otherwise, you can press the “Update” option adjacent to each app name to update the frequently used ones.

Fix 6: Check the SD card
If you are still getting the process system isn’t responding to Android error, then chances are that there could be an issue with your SD card. Firstly, check if your SD card is working fine or not. If it is corrupted, then get another memory card for your phone. Also, it should have a prominent amount of free storage. You might be facing this issue if the SD card has limited free space.
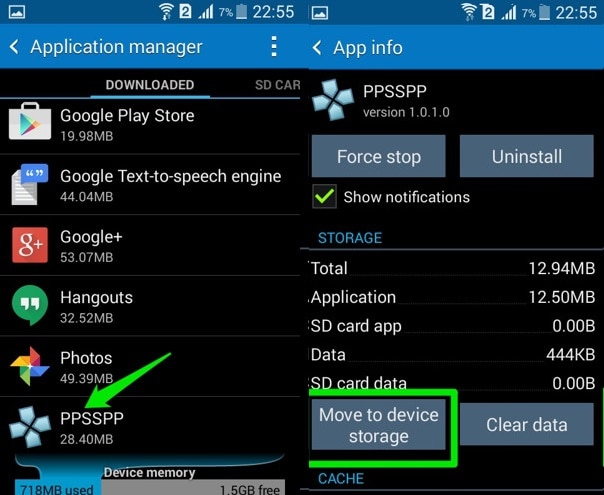
Also, if you are storing apps on the SD card, then your phone might encounter the process isn’t responding issue whenever you run a respective app. Therefore, you should move apps from your SD card to the phone’s internal memory. To do this, go to your phone’s Settings > Application Manager and select any app. If the app is stored on the SD card, then you will get an option of “Move to devise storage”. Just tap on it and manually move every app to your device storage.
Fix 7: One click to fix the process system isn’t responding error
If all the above tricks don’t get your device out of the process system not responding state, then there may be some system issues on your Android. In this case, an Android repair can successfully fix issues like process system isn’t responding.
Note: Android repair may wipe out existing Android data. Back up your Android data before going on.
Dr.Fone - System Repair (Android)
Android repair tool to fix all Android system issues in one click
- Fix all Android system issues like the black screen of death, system UI not working, etc.
- One-click for Android repair. No technical skills are required.
- Supports all the new Oppo K11x devices like Galaxy S8, S9, S22, etc.
- Step-by-step instructions are provided. Friendly UI.
3981454 people have downloaded it
Follow the easy steps below to fix process system isn’t responding error:
- 1. Download and install the Dr.Fone tool. Then select “System Repair” from the main window.
- 2. Connect your Oppo K11x to the PC. After the Oppo K11x device is detected, select the “Android” tab.
- 3. Select and confirm the correct device details of your Android. Then boot your Oppo K11x in download mode and proceed.
- 4. Download the firmware and click “Fix Now”.
- 5. After a while, your Android will be repaired with the “process system isn’t responding” error fixed.
safe & secure
Fix 8: Factory reset Android
It is always considered the most used way to factory reset your phone in order to resolve the process system not responding error. Though, this should be your last resort, as it will wipe off your device’s data entirely. Even if you are performing a factory reset, make sure that you back up your data by using a reliable tool like Wondershare Dr.Fone .
Wondershare Dr.Fone
Flexibly Back up and Restore Android Data
- Back up Android data to the computer with one click.
- Preview and restore selectively the backup to any Android device.
- Supports 8000+ Android devices.
- There is no data lost during backup, export, or restoration.
3,981,454 people have downloaded it
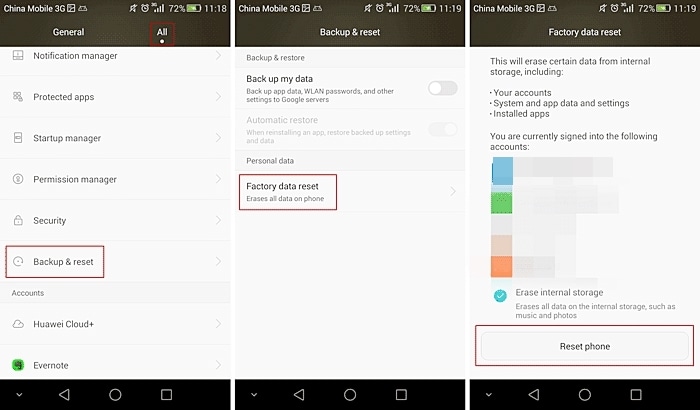
If your phone is functioning, then you can easily factory reset it by visiting Settings > General > Backup & Restore and selecting the option of “Factory Data Reset”. Your device will display a warning regarding all the data files that would be lost or un-synced. Just tap on the “Reset” button to factory reset your device.
If your device is not functioning or locked, then you can perform the factory reset operation by putting your phone into Recovery mode. Most of the time, it can be done by pressing the Power and Volume up button simultaneously for at least 10 seconds. Though, the key combinations might change from one device to another.
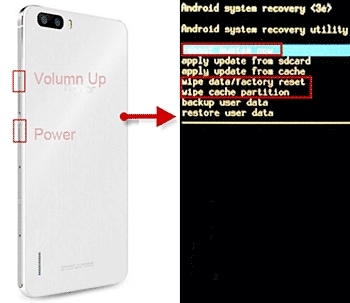
After entering the Recovery mode, go to the “wipe data/factory reset” option using the Volume up and down button. Use the Power button to make a selection. If you get an additional message, then select the “yes – delete all data” option. When it is done, you can simply reboot your device.
Fix 9: Unroot the Oppo K11x device
It has been further discovered that the process system isn’t responding error is more common in rooted devices. Therefore, if you also have a rooted Android device, then you can choose to unroot it in order to fix this issue. There are different ways to unroot an Android device. One of the easiest ways to do it is by using the SuperSU app.
You can always download either SuperSU or SuperSU Pro app from its website here . Simply install it on our device and launch it whenever you wish to unroot it. Visit its “Settings” tab and select the option of “Full unroot”.
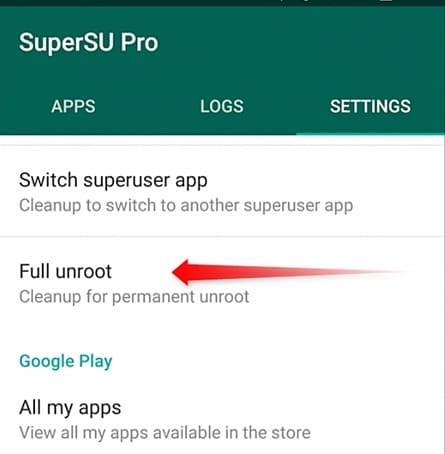
This will generate a warning message regarding all the repercussions of the unrooting process. Just tap on “Continue” to initiate the process.

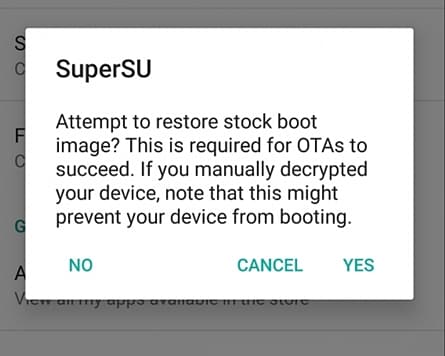
If you are using an older version of Android, then you might get another pop-up to restore boot images. Simply make the desired selection and start the process. After a while, your device would be restarted the usual way, and it would be unrooted. Most probably, this will resolve the process system isn’t responding error as well.
Now that you know different ways to fix the process system not responding error, you can easily overcome this issue and make the most out of your device. Simply start with the easy fixes, and if they don’t work, then take extreme measures like unrooting your device or restoring it to factory setting. Also, make sure to back up your data before taking any extreme measures.
Also read:
- [New] Innovative Approaches to FB Video Sharing PC/Android Platforms
- [New] Instagram Edge Video Cutting Techniques to Boost Engagement for 2024
- 11 Proven Solutions to Fix Google Play Store Not Working Issue on Infinix Note 30i | Dr.fone
- 6 Fixes to Unfortunately WhatsApp has stopped Error Popups On Infinix Zero 30 5G | Dr.fone
- 6 Solutions to Fix Error 505 in Google Play Store on Motorola Moto G34 5G | Dr.fone
- 6 Solutions to Fix Error 505 in Google Play Store on Samsung Galaxy S24+ | Dr.fone
- Android Safe Mode - How to Turn off Safe Mode on Realme 12 5G? | Dr.fone
- Fix the Error of Unfortunately the Process.com.android.phone Has Stopped on Motorola Moto G13 | Dr.fone
- Full Solutions to Fix Error Code 920 In Google Play on Vivo Y78 5G | Dr.fone
- In 2024, Bypassing Google Account With vnROM Bypass For Oppo K11x
- Instagram Voice Customization Made Easy
- Riparazione Immagine Del System Tray Con Errore EFI/BIOS
- The Art of Self-Recording Improving Your YouTube Presence for 2024
- Troubleshoot Like a Pro: Effective Techniques for Force Rebooting Every Kind of iPad
- YouTube Editing Made Easy with The 8 Best No-Cost Software Options for 2024
- Title: What to Do if Google Play Services Keeps Stopping on Oppo K11x | Dr.fone
- Author: Ariadne
- Created at : 2024-12-26 12:50:29
- Updated at : 2024-12-28 19:38:32
- Link: https://howto.techidaily.com/what-to-do-if-google-play-services-keeps-stopping-on-oppo-k11x-drfone-by-drfone-fix-android-problems-fix-android-problems/
- License: This work is licensed under CC BY-NC-SA 4.0.